

How to Group Objects in Word
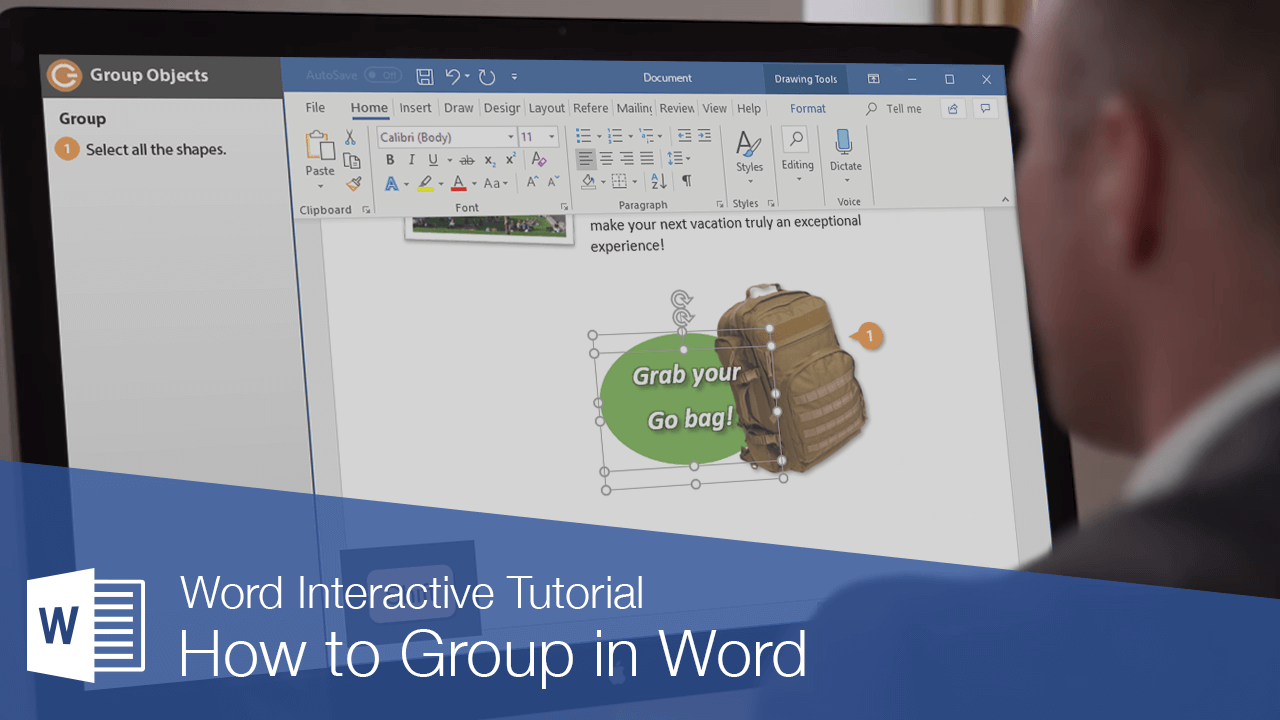
It is often easier to work with a single object than it is to work with several smaller objects that belong together. A group is a collection of objects that Word treats as a single object.
Group
By grouping several objects together, you can format multiple objects at once rather than formatting each object individually.
- Select all the objects you want to group together.
- Click the Layout tab on the ribbon.
- Click the Group button.
- Select Group.
Press and hold down Shift as you select multiple objects.
You can also click the Format tab on the ribbon — the Arrange group on either tab includes the Group button.
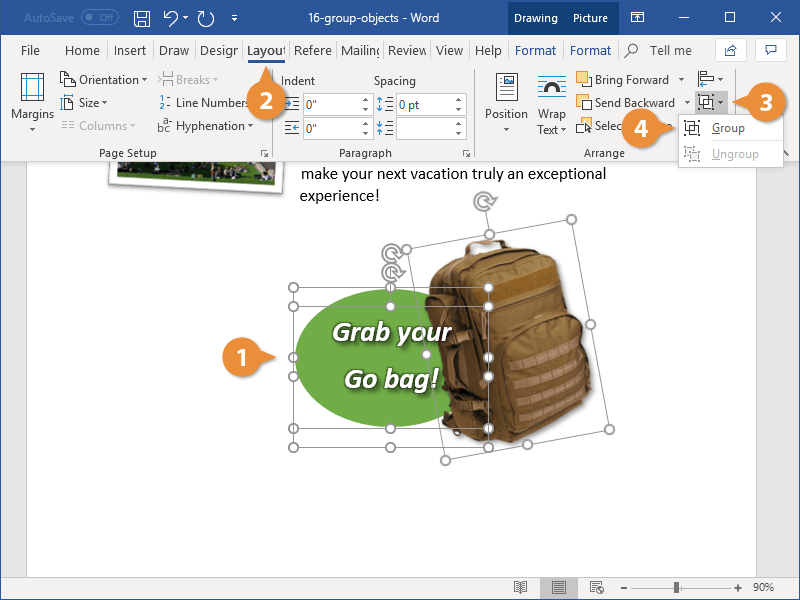
The selected objects are grouped together.
Now that the objects are grouped, you can apply effects to all three objects at once and move the grouped objects around the document together.
You can also right-click selected items and select Group from the contextual menu to group objects.
If you need to apply some formatting to just a single object in the group, or move something around within the group, first select the group, then click the object you want to format within the group. Just that object is selected, but it remains part of the group.
Ungroup
If you no longer need to keep a group of objects together, you can ungroup them so they’re all independent objects again.
- Select the object group.
- Click the Layout tab.
- Click the Group button.
- Select Ungroup.
When a group is selected, the Group command is no longer available, but the Ungroup command is.
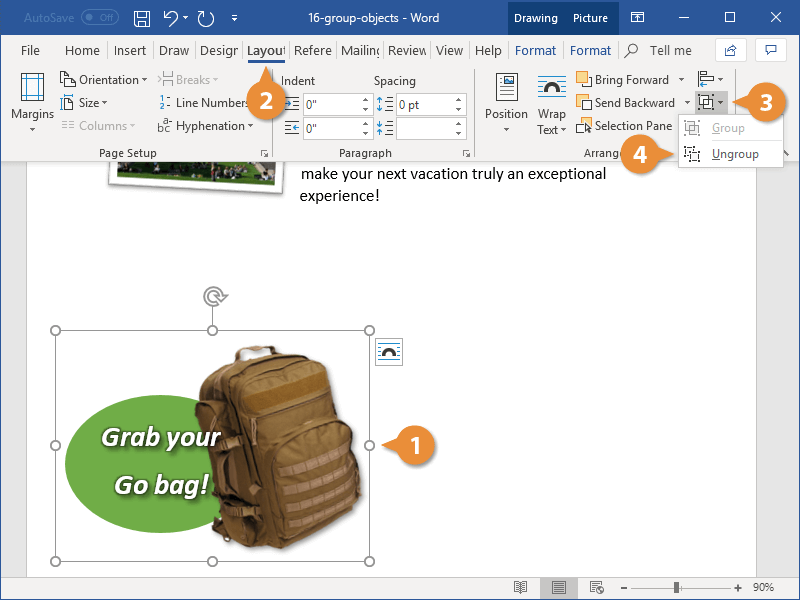
The objects can now be manipulated individually.

FREE Quick Reference
Click to Download
Free to distribute with our compliments; we hope you will consider our paid training.
Word for Microsoft 365 Word for Microsoft 365 for Mac Word 2021 Word 2021 for Mac Word 2019 Word 2019 for Mac Word 2016 Word 2016 for Mac Word 2013 Word 2010 More…Less
You can group shapes, pictures, or other objects. Grouping lets you rotate, flip, move, or resize multiple shapes or objects as though they’re a single shape or object.
Group shapes, pictures, or other objects
-
Press and hold CTRL and select shapes, pictures, or other objects to group.
The Wrap Text option for each object must be other than In line with Text. For more info, see Wrap Text.
-
Do one of the following:
-
Go to Picture Format or Picture Tools Format >
 Group > Group.
 -
Go to Shape Format or Drawing Tools Format > Group > Group.
To still work with an individual item in the group, select the group, and then select the item.
The Group button is enabled for two or more selected objects.
-
 Group > Group.
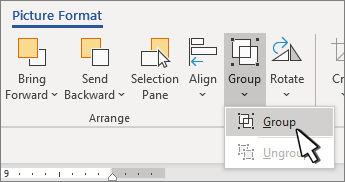
Group shapes, pictures, or objects
-
Press and hold CTRL while you select the shapes, pictures, or objects that you want to group.
The Wrap Text option for each object must be other than In line with Text. For more info, see Wrap Text.
-
Go to Drawing Tools or Picture Tools, on the Format tab, in the Arrange group, select Group
, and then select Group.
To work with an individual item in the group, select the group, and then select the item.
 , and then select Group.
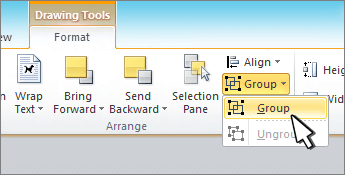
Group shapes, pictures, or other objects
-
Press and hold command while selecting the shapes, pictures, or other objects to group.
The Wrap Text option for each object must be other than In line with Text. For more info, see Wrap Text.
-
Go to Shape Format or Picture Format, and then select Group
> Group.If Group
isn’t visible on the ribbon, select Arrange to display it.
 > Group.
To work with an individual item in the group, select the group, and then select the item.
If the Group button is unavailable, verify that you have more than one object selected.
See also
For more info selecting shapes or pictures, see Select a shape or other object in Word.
SVG icons must converted to shapes before grouping. For more info, see Convert an SVG image to an Office shape.
Need more help?
In the following text, there are 4 effective ways which enable you to quickly select and group multiple objects in your Word document.
It’s not unusual for some of you to create a Word document with plenty of shapes, text boxes, and pictures, etc. And there are also occasions when you have to select them to group so you can move them together instead of operating one by one. Doubtlessly, the question lies at how to select numerous objects. So we will take the example of selecting several flowchart shapes to demonstrate you the 4 methods.
Method 1: Group Objects by Selecting them One by One
Obviously, you can select number of objects one by one.
- Firstly, suppose we have an example as below:


Press either “Ctrl” or “Shift”.
- Then left click shapes to be group one by one.
- Next right click.
- Click “Group” option on the list-menu.
- And again click “Group” on the extend list-menu.


Now you have succeeded in grouping these objects, and you can move them together as a whole.
Method 2: Group Objects by Selecting them on “Selection Pane”
- This time click “Page Layout” tab first.
- Then click “Selection Pane” in “Arrange” group.

- Next on the right side of the document, there will open the “Selection Pane” where you can see all the shapes on a certain page. Press “Ctrl” and hold on.
- And click the shape name on the pane one by one. You can see the shapes on the document page have been selected.

- Then repeat from step 3 to step 5 in method 1.


Method 3: Group Objects by Using “Select Objects” Option in Word 2010
Here is what you need to know that you are unable to use “Select Objects” option in Word 2010 directly but to insert a “New Drawing Canvas” into Word document first before you insert all the shapes.
- To begin with, click “Insert” tab.
- Then choose “Shapes” in “Illustrations” group.
- Next click “New Drawing Canvas”.

- Then insert shapes you need on the drawing canvas.
- Next, click “Home” tab.
- And go to click “Select” option in “Editing” group.
- Choose “Select Objects” on the list-menu.

- Now you can see the indication on the left-down corner of the document page, such as below:


Just follow the lead, and click and drag to draw an area including all objects on the canvas so as to select them.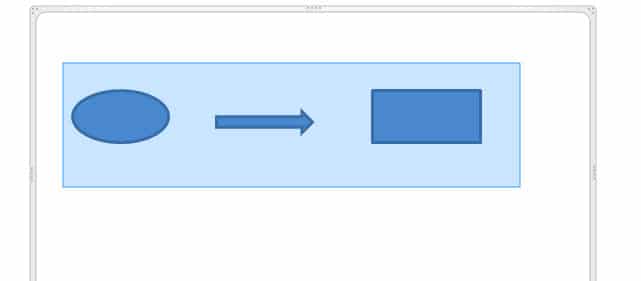

- Again repeat from step 3 to step 5 in method 1.
Method 4: Group Objects by Using “Select Objects” Option in Other Word Versions
Actually, in all Word versions except Word 2010, you can use “Select Objects” option directly to select and group objects without inserting a canvas first. What you need to do is follow from step 5 to step 9 in method 3.
Also you can save the .docxs file as .doc file so you can select objects on document directly.
And if you try to group pictures, then you have to change the pictures’ “Text Wrapping” style into any one but “In line with text”.
Comparison
| Methods | Advantages | Disadvantages |
| Method 1: Group Objects by Selecting them One by One | 1. It’s an easy and simple way.
2. You can apply this method no matter what Word version you’re using. |
1. You have to select objects one by one.
2. You could miss some small objects since there are too many. |
| Method 2: Group Objects by Selecting them on “Selection Pane” | 1. It’s an easy and simple way.
2. You won’t miss objects since they are listed on the pane. 3. You can apply this method no matter what Word version you’re using. |
You have to select objects one by one. |
| Method 3: Group Objects by Using “Select Objects” Option in Word 2010
& Method 4: Group Objects by Using “Select Objects” Option in Other Word Versions |
1. You can select multiple objects at one time.
2. You’re less likely to miss some objects. 3. If you are not using Word 2010, then you can select multiple objects directly by drawing an area to include them. |
1. For Word 2010 users, you have to insert a drawing canvas before inserting shapes into documents so as to select them multiply.
2. For Word 2010 users, you may need to save the .docx file as .doc file so as to select objects directly. |
Keep Handy a High Efficiency Recover Tool
Basically, in modern business practices, time is money. So there is not so much time for you to think about what to do once you get files corrupted. Therefore, the best way is to keep a well-functioned Word file repair tool in place so you can address the corruption issues efficiently.
Author Introduction:
Vera Chen is a data recovery expert in DataNumen, Inc., which is the world leader in data recovery technologies, including corrupted Excel file repair and pdf repair software products. For more information visit www.datanumen.com
![]()
Загрузить PDF
![]()
Загрузить PDF
Группировка объектов в Microsoft Word является эффективным способом манипулировать ими (чтобы программа рассматривала несколько объектов как один). Например, вы можете группировать фигуры, чтобы при их перемещении не нарушилось расстояние между ними.
-
1
Запустите MS Word, дважды щелкнув по ярлыку программы на рабочем столе.
-
2
Нажмите «Файл» — «Открыть», в открывшемся окне найдите и выделите нужный документ и нажмите «Открыть».
-
3
В документе найдите объекты, которые нужно сгруппировать.
Реклама


-
1
Откройте вкладку «Вид» (или нажмите «Вид» в строке меню).
-
2
Наведите указатель мыши на «Панели инструментов» и выберите «Панель рисования». Эта панель отобразится в левом нижнем углу документа (это относится к Microsoft Word 2003; в Word 2010/2013 эта панель является вкладкой «Формат» и отображается после щелчка по рисунку/изображению).
Реклама


-
1
Выделите объекты или фигуры, которые требуется сгруппировать. Для этого, удерживая клавишу CTRL, щелкните по нужным объектам/фигурам.
- Убедитесь, что объекты расположены относительно друг друга так, как вы этого хотите.
-
2
Нажмите «Группировать» (на вкладке «Формат»), чтобы открыть меню.
-
3
В меню нажмите «Группировать», чтобы объединить несколько объектов/фигур; при перемещении сгруппированные объекты двигаются как одно целое.
Реклама


Советы
- Альтернативный способ открыть документ в программе Word. Запустите проводник Windows, найдите в нем нужный документ и дважды щелкните по нему.
Реклама
Об этой статье
Эту страницу просматривали 31 136 раз.
Была ли эта статья полезной?
Lesson 22: Aligning, Ordering, and Grouping Objects
/en/word2016/text-boxes/content/
Introduction
There may be times when your documents have multiple objects, such as pictures, shapes, and text boxes. You can arrange the objects any way you want by aligning, grouping, ordering, and rotating them in various ways.
Optional: Download our practice document.
Watch the video below to learn more about arranging objects in Word.
To align two or more objects:
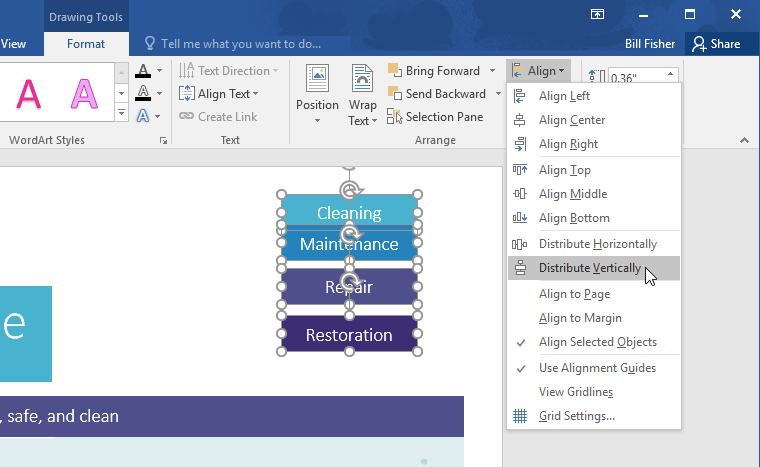
- Hold the Shift (or Ctrl) key and click the objects you want to align. In our example, we’ll select the four shapes on the right.
- From the Format tab, click the Align command, then select one of the alignment options. In our example, we’ll choose Align Right.
- The objects will be aligned based on the selected option. In our example, the shapes are now aligned with each other.
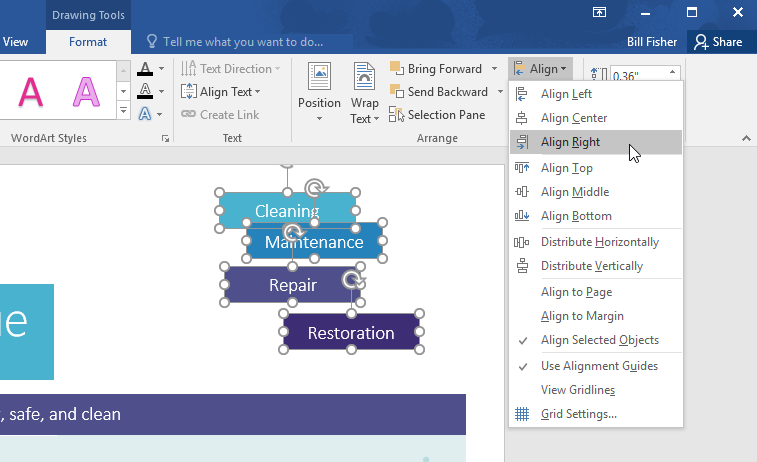

Note that the Align Selected Objects option is selected by default, which allows you to align objects without moving them to a different part of the page. However, if you want to move the objects the top or bottom of the page, select Align to Page or Align to Margin before choosing an alignment option.
To distribute objects evenly:
If you have arranged your objects in a row or column, you may want them to be an equal distance from one another for a neater appearance. You can do this by distributing the objects horizontally or vertically.
- Hold the Shift (or Ctrl) key and click the objects you want to distribute.
- On the Format tab, click the Align command, then select Distribute Horizontally or Distribute Vertically.
- The objects will be evenly spaced from one another.
Grouping objects
At times, you may want to group multiple objects into one object so they will stay together. This is usually easier than selecting them individually, and it also allows you to resize and move all of the objects at the same time.
To group objects:
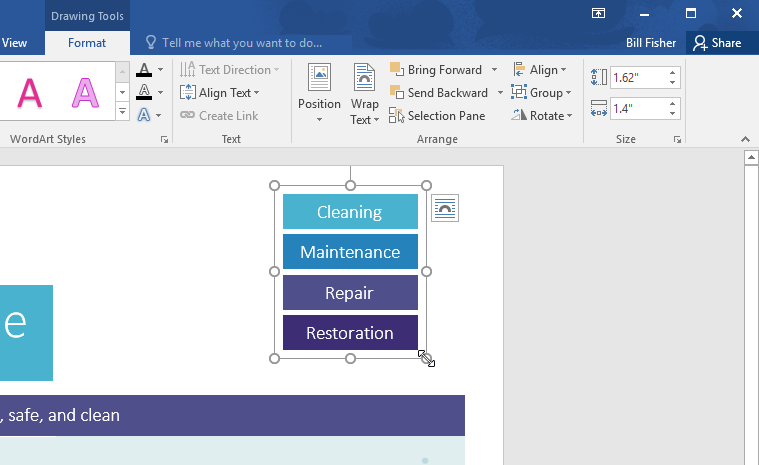
- Hold the Shift (or Ctrl) key and click the objects you want to group.
- Click the Group command on the Format tab, then select Group.
- The selected objects will now be grouped. There will be a single box with sizing handles around the entire group so you can move or resize all of the objects at the same time.

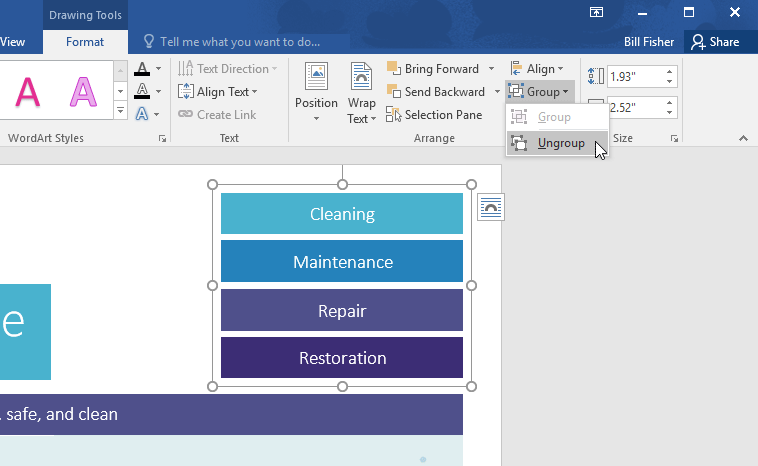
To ungroup objects:
- Select the grouped object. From the Format tab, click the Group command and select Ungroup.
- The objects will be ungrouped.
Ordering objects
In addition to aligning objects, Word gives you the ability to arrange objects in a specific order. The ordering is important when two or more objects overlap because it determines which objects are in the front or the back.
Understanding levels
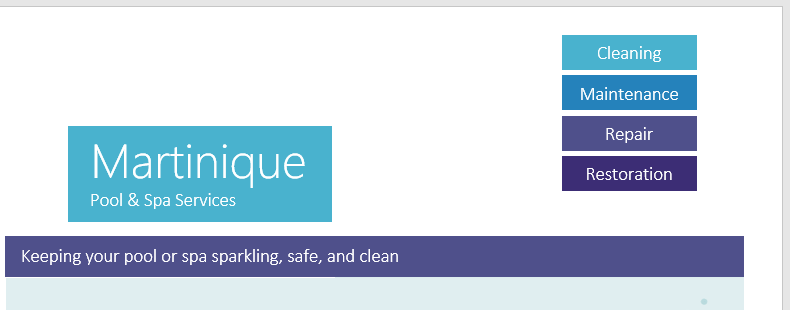
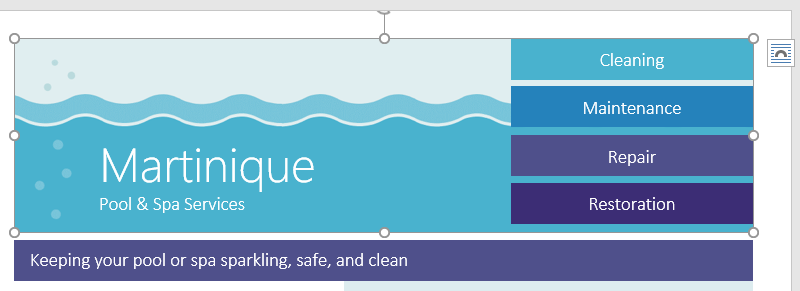
Objects are placed on different levels according to the order in which they were inserted into a document. In the example below, if we move the waves image to the beginning of the document, it covers up several of the text boxes. That’s because the image is currently on the highest—or top—level. However, we can change its level to put it behind the other objects.
To change an object’s level:
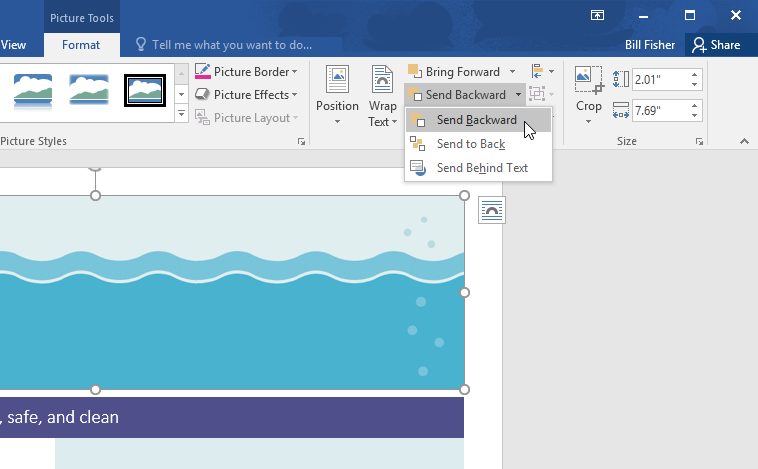
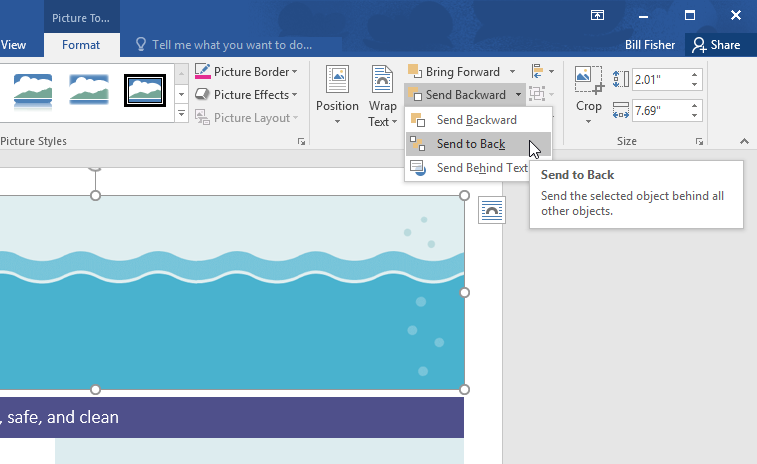
- Select the object you want to move. In our example, we’ll select the image of the waves.
- From the Format tab, click the Bring Forward or Send Backward command to change the object’s ordering by one level. In our example, we’ll select Send Backward.
- The objects will be reordered. In our example, the image is now behind the text on the left, but it’s still covering the shapes on the right.
- If you want to move an object behind or in front of several objects, it’s usually faster to use Bring Forward or Send Backward instead of clicking the other ordering command multiple times.
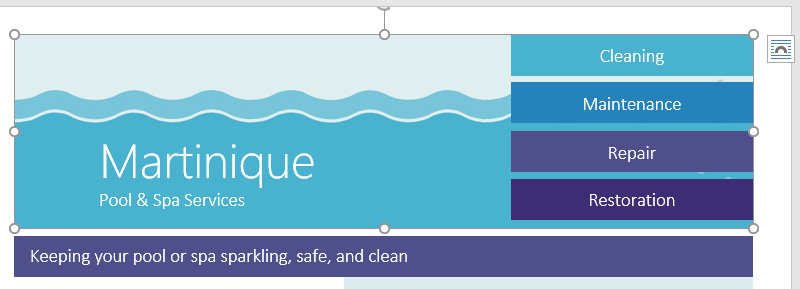
- In our example, the image has been moved behind everything else on the page, so all of the other text and shapes are visible.
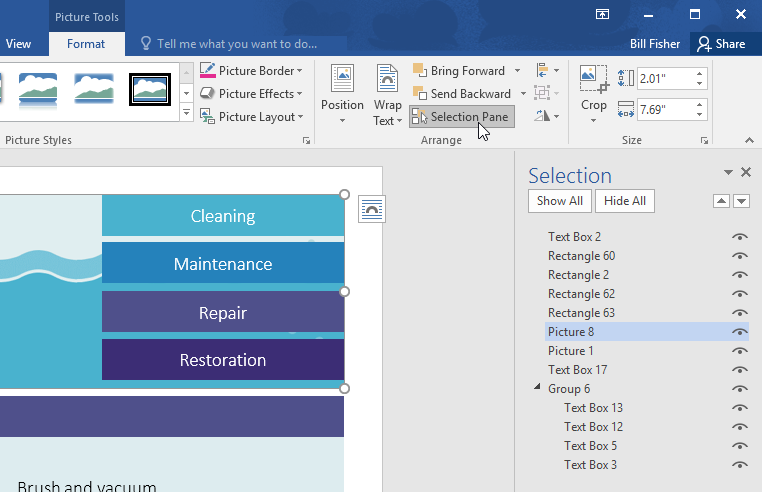
If you have several objects placed on top of each other, it may be difficult to select an individual object. The Selection Pane allows you to easily drag an object to a different level. To view the Selection Pane, click Selection Pane on the Format tab.
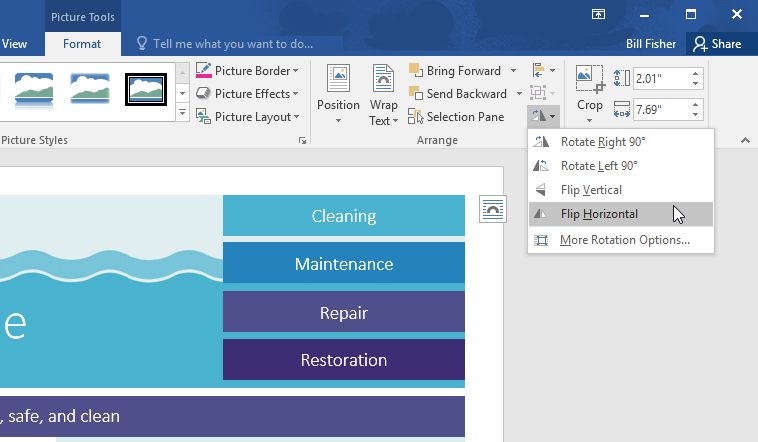
To rotate or flip an object:
If you need to turn an object so it faces a different direction, you can rotate it to the left or right, or you can flip it horizontally or vertically.
- With the desired object selected, click the Rotate command on the Format tab, then choose the desired rotation option. In our example, we’ll choose Flip Horizontal.
- The object will be rotated. In our example, we can now see the bubbles on the left that were previously hidden behind the text boxes.
Challenge!
- Open our practice document.
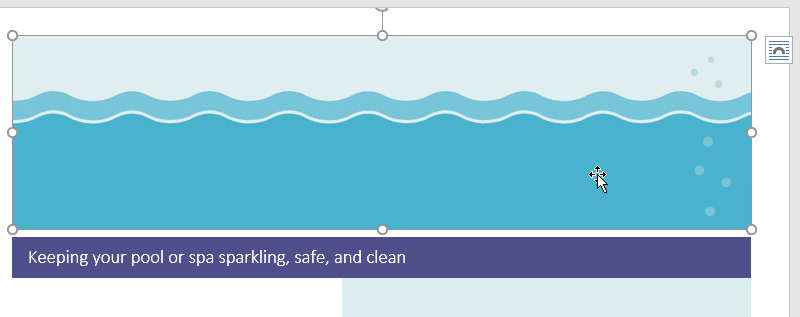
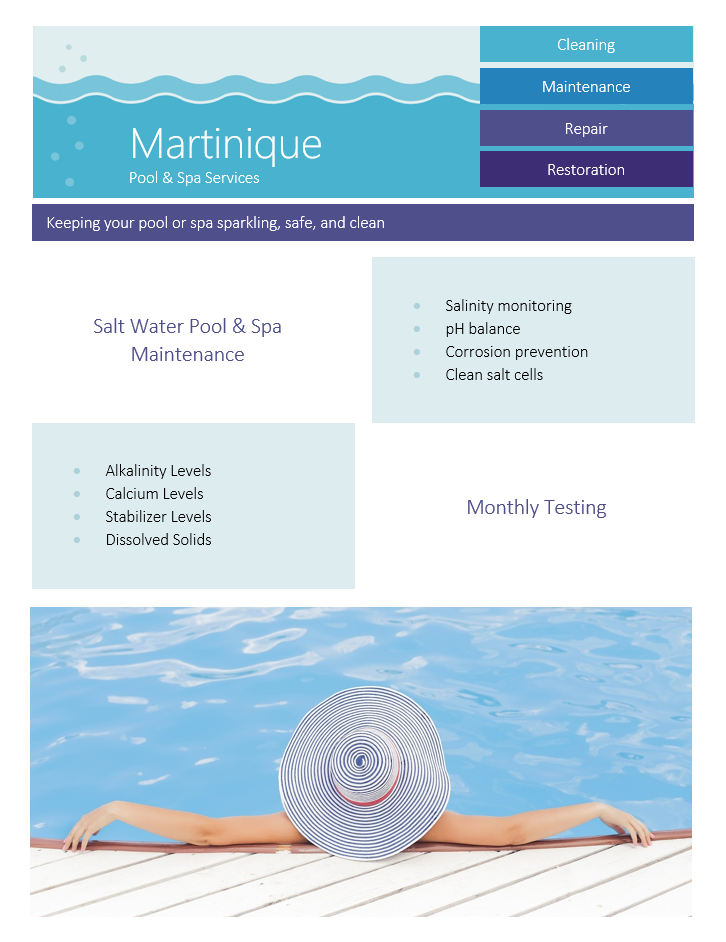
- Scroll to page 2 and select the picture of the waves at the top of the page.
- Use the Rotate command to flip the waves vertically.
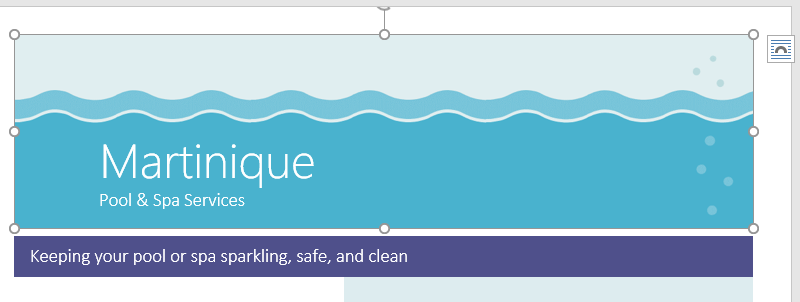
- Use the Send to Back command to move the waves behind the Martinique text box.
- Move the Martinique text box so it is near the bottom of the waves image.
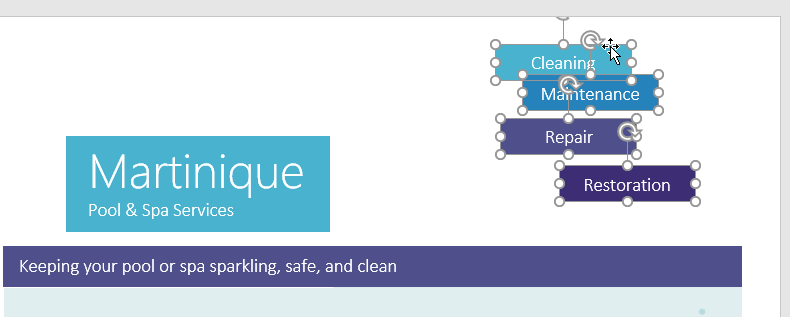
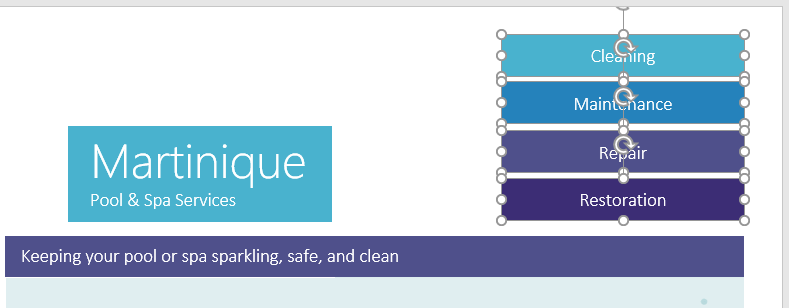
- Make sure the waves picture and Martinique text box are no longer selected. Hold down the Shift key, then select the text boxes containing Cleaning, Maintenance, Repair, and Restoration.
- Click the Align command, and make sure the Align Selected Objects option is selected. Select Align Right and Distribute Vertically.
- With the text boxes still selected, group them.
- When you’re finished, your page should look something like this:
/en/word2016/tables/content/
Download PC Repair Tool to quickly find & fix Windows errors automatically
Have some text or pictures in your Word document, and you do not want anyone to make changes to it easily? There is a feature in Word called Group or Ungroup text range; the purpose of this feature is to Group or Ungroup a selected range of text. Once the text is Grouped, the text range cannot be edited, except in areas containing editable content controls.
To Group a selected range of text in Word, follow these steps:
- Launch Word
- Enter text or use an existing document.
- Highlight the text
- Click on the Developer tab
- Click the Group or Ungroup text range button
- The selected range of text in the document is Grouped.
Launch Microsoft Word.

Enter text or use an existing document.
Now highlight the text in the document.
Then click the Developer tab on the menu bar.
If you do not see the Developer tab on the menu bar, you need to select it from Customize the Ribbon.
On the Developer tab in the Controls group, select the Group or Ungroup text range button.
Select the Group option from the drop-down menu.
The selected range of text in the document is Grouped.
Notice when you try to type between the text or create space between the words; notice that nothing is not changing; this is because the highlighted text cannot be edited.
Try typing below the text once highlighted; you will notice that you can enter text in the area outside the range of the text; this is because it is in an area on the document containing editable content controls.
We hope this tutorial helps you understand how to group a selected range of text in Microsoft Word.
Related: How to Insert an Online Video into a Word Document.
Shantel has studied Data Operations, Records Management, and Computer Information Systems. She is quite proficient in using Office software. Her goal is to become a Database Administrator or a System Administrator.
Содержание
- Выбор стиля для списка со встроенной коллекции
- Создание нового стиля
- Определение новых стилей
- Ручная нумерация элементов списка
- Вопросы и ответы
Многоуровневый список — это список, в котором содержатся элементы с отступами разных уровней. В программе Microsoft Word присутствует встроенная коллекция списков, в которой пользователь может выбрать подходящий стиль. Также, в Ворде можно создавать новые стили многоуровневых списков самостоятельно.
Урок: Как в Word упорядочить список в алфавитном порядке
Выбор стиля для списка со встроенной коллекции
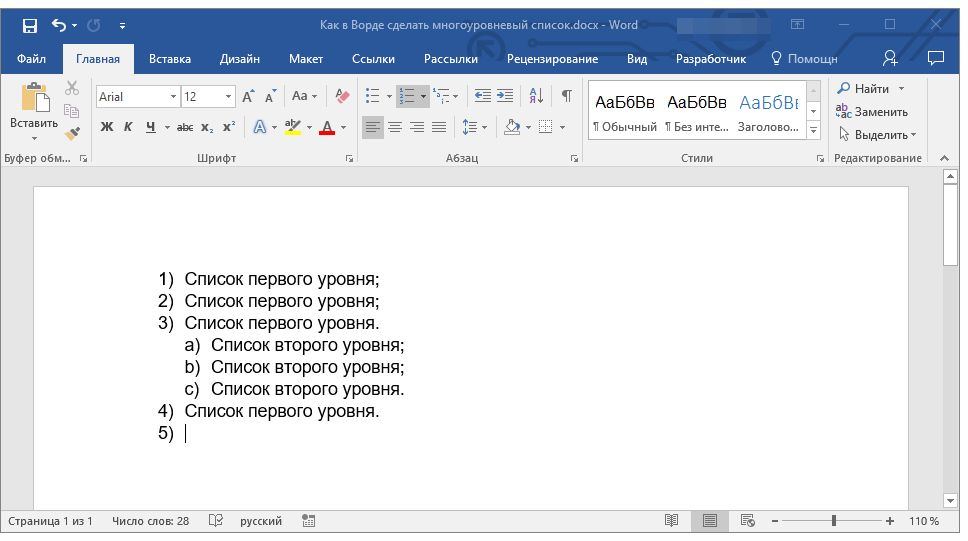
1. Кликните в том месте документа, где должен начинаться многоуровневый список.
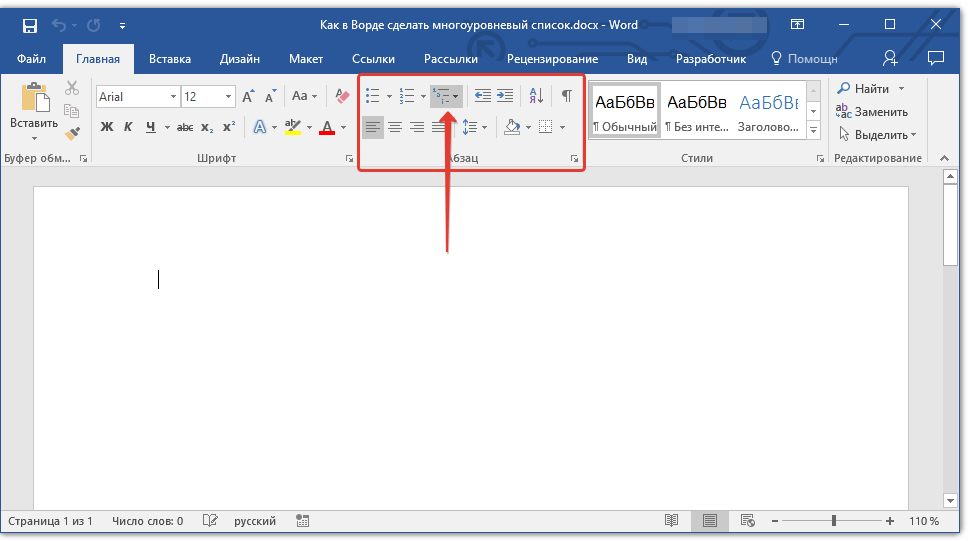
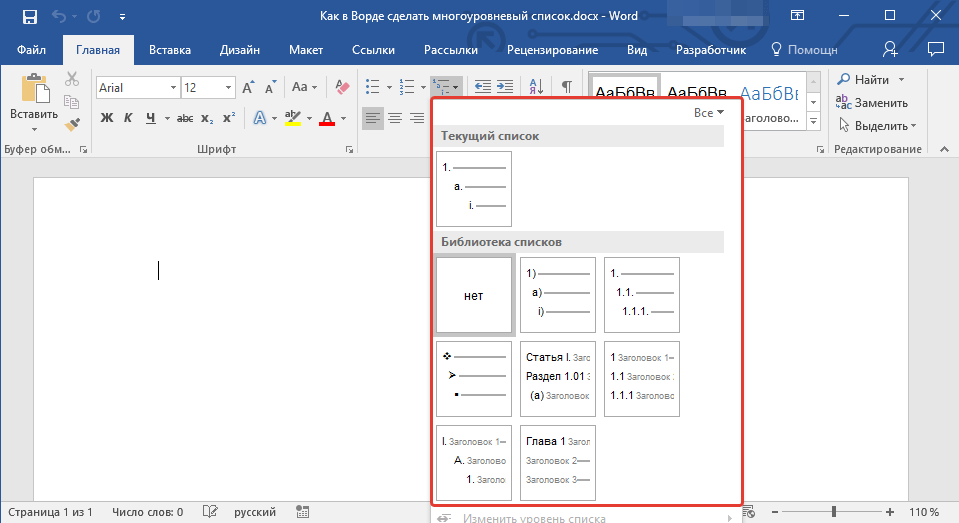
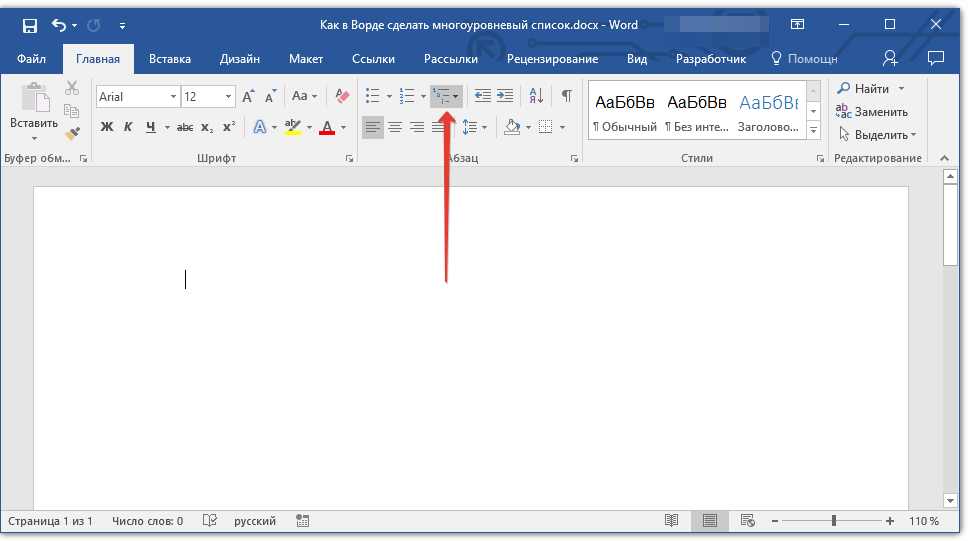
2. Кликните по кнопке “Многоуровневый список”, расположенной в группе “Абзац” (вкладка “Главная”).
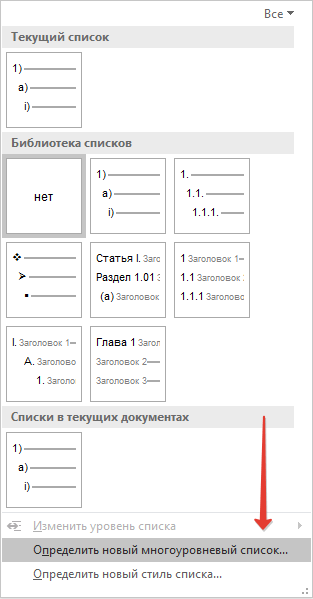
3. Выберите понравившийся стиль многоуровневого списка из тех, что представлены в коллекции.
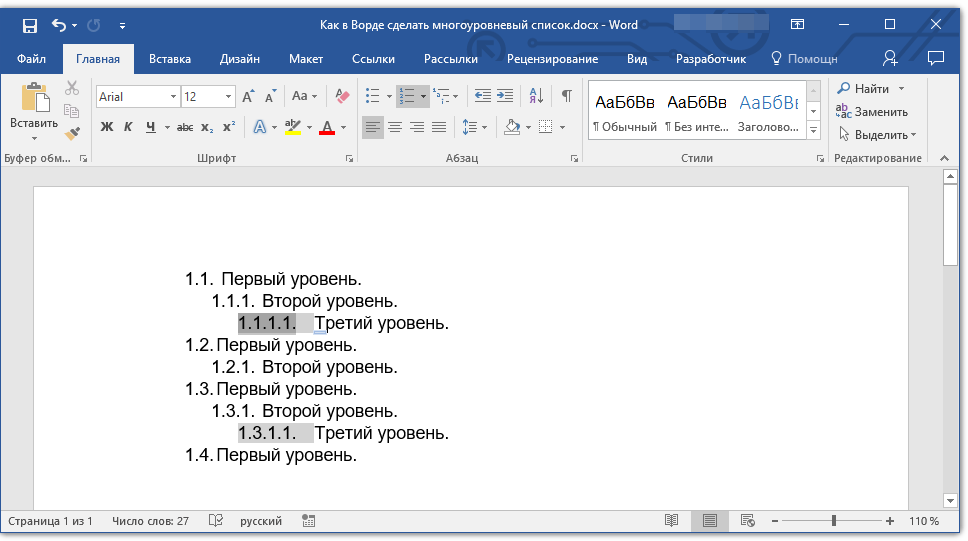
4. Введите элементы списка. Для изменения уровней иерархии элементов, представленных в списке, нажмите “TAB” (более глубокий уровень) или “SHIFT+TAB” (возвращение к предыдущему уровню.
Урок: Горячие клавиши в Ворде
Создание нового стиля
Вполне возможно, что в числе многоуровневых списков, представленных в коллекции Microsoft Word, вы не найдете того, который бы вас устроил. Именно для таких случаев в этой программе предусмотрена возможность создания и определения новых стилей многоуровневых списков.
Новый стиль многоуровневого списка может быть применен при создании каждого последующего списка в документе. Кроме того, новый стиль, созданный пользователем, автоматически добавляется в доступную в программе коллекцию стилей.
1. Кликните по кнопке “Многоуровневый список”, расположенной в группе “Абзац” (вкладка “Главная”).

2. Выберите “Определить новый многоуровневый список”.
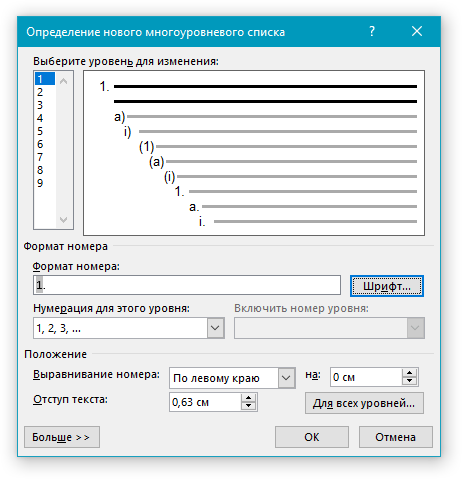
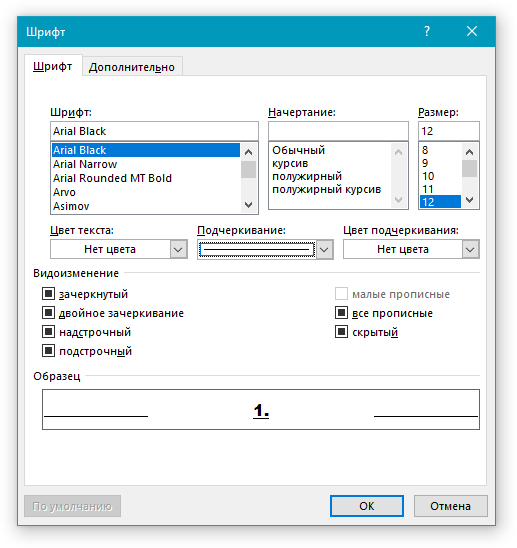
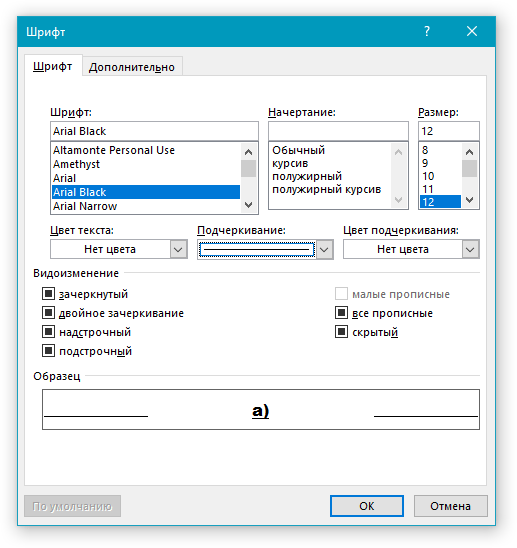
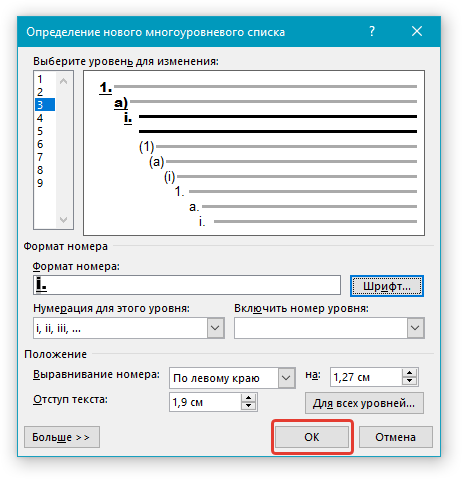
3. Начиная с уровня 1, введите желаемый формат номера, задайте шрифт, расположение элементов.
Урок: Форматирование в Ворде
4. Повторите аналогичные действия для следующих уровней многоуровневого списка, определив его иерархию и вид элементов.
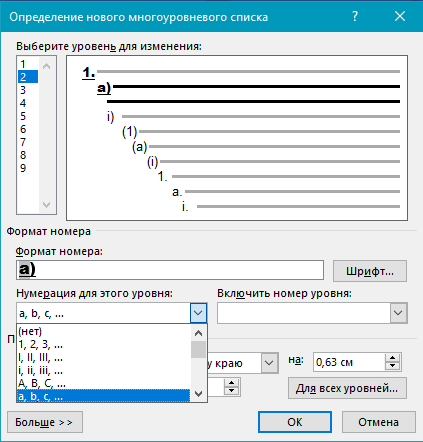
Примечание: Определяя новый стиль многоуровневого списка, в этом же списке вы можете использовать и маркеры и номера. К примеру, в разделе “Нумерация для этого уровня” вы можете пролистать перечень стилей многоуровневого списка, выбрав подходящий стиль маркера, который и будет применен к конкретному уровню иерархии.
5. Нажмите “ОК” для принятия изменения и закрытия диалогового окна.
Примечание: Стиль многоуровневого списка, который был создан пользователем, будет автоматически установлен в качестве стиля, используемого по умолчанию.
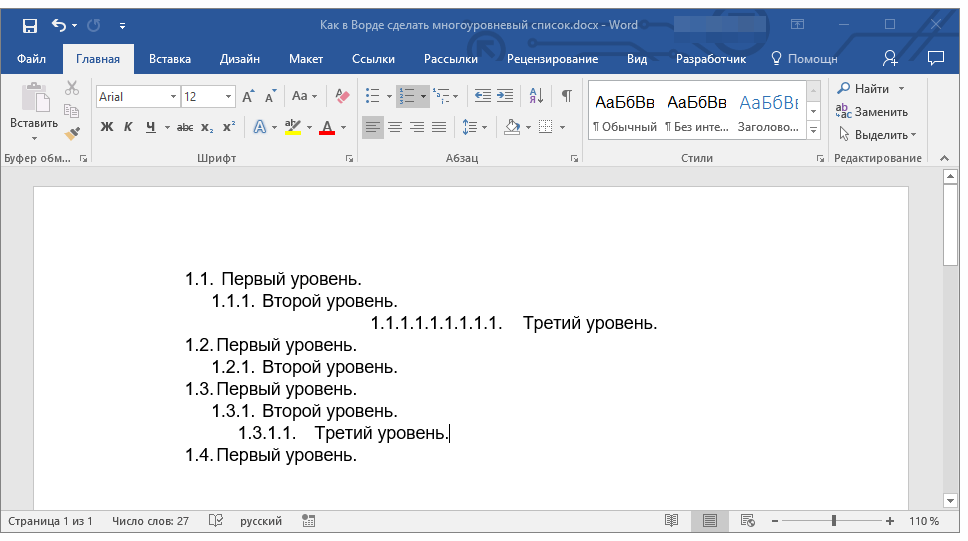
Для перемещения элементов многоуровневого списка на другой уровень, воспользуйтесь нашей инструкцией:
1. Выберите элемент списка, который нужно переместить.
2. Кликните по стрелке, расположенной около кнопки “Маркеры” или “Нумерация” (группа “Абзац”).
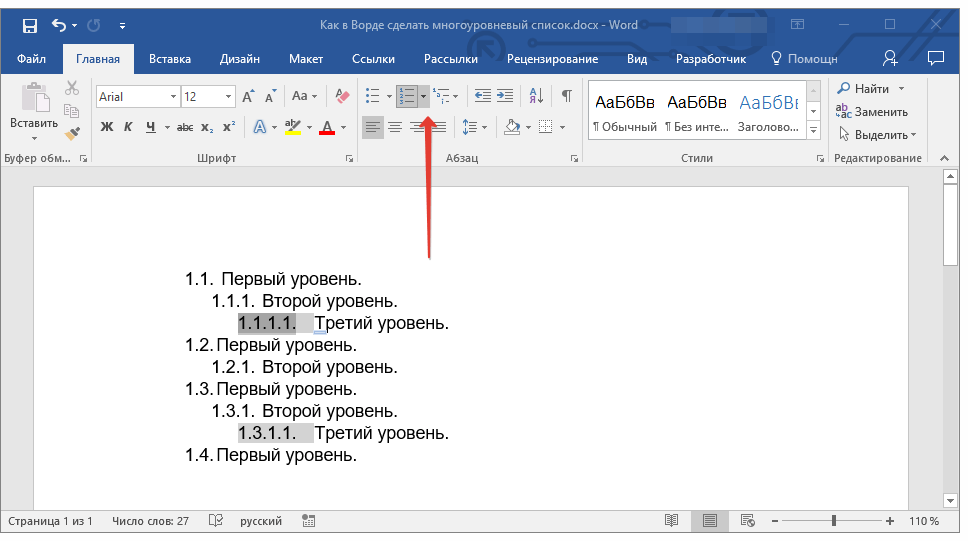
3. В выпадающем меню выберите параметр “Изменить уровень списка”.
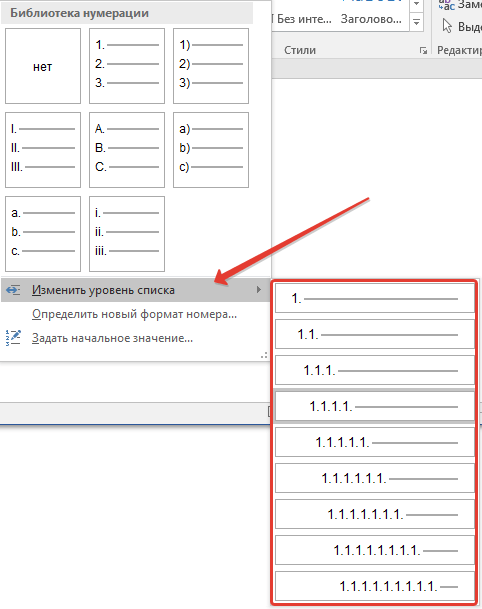
4. Кликните по тому уровню иерархии, на который нужно переместить выбранный вами элемент многоуровневого списка.
Определение новых стилей
На данном этапе необходимо пояснить, в чем заключается разница между пунктами “Определить новый стиль списка” и “Определить новый многоуровневый список”. Первую команду уместно использовать в ситуациях, когда необходимо изменить стиль, созданный пользователем. Новый стиль, созданный с помощью этой команды, обнулит все его вхождения в документе.
Параметр “Определить новый многоуровневый список” крайне удобно использовать в случаях, когда нужно создать и сохранить новый стиль списка, который в дальнейшем не будет изменяться или же будет использоваться только в одном документе.
Ручная нумерация элементов списка
В некоторых документах, содержащих нумерованные списки, необходимо обеспечить возможность ручного изменения нумерации. При этом, необходимо, чтобы MS Word правильно изменял номера следующих элементов списка. Один из примеров документов такого типа — юридическая документация.
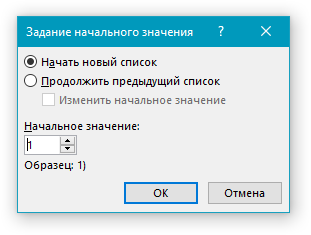
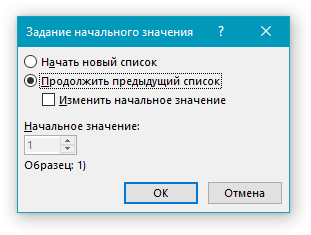
Для ручного изменения нумерации необходимо воспользоваться параметром “Задание начального значения” — это позволит программе корректно изменить нумерацию следующих элементов списка.
1. Кликните правой кнопкой мышки по тому номеру в списке, который нужно изменить.
2. Выберите параметр “Задать начальное значение”, а затем выполните необходимое действие:
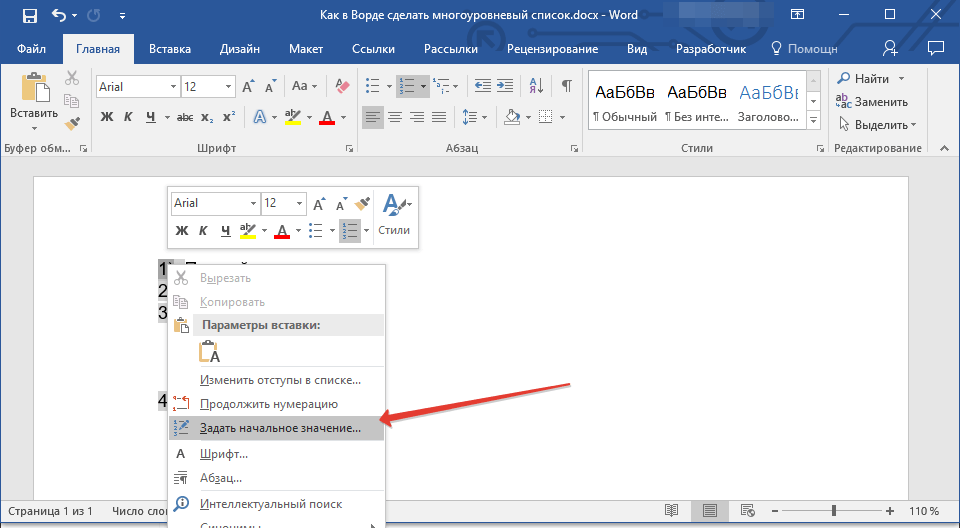
- Активируйте параметр “Начать новый список”, измените значение элемента в поле “Начальное значение”.
- Активируйте параметр “Продолжить предыдущий список”, а затем установите галочку “Изменить начальное значение”. В поле “Начальное значение” задайте необходимые значения для выбранного элемента списка, связанного с уровнем заданного номера.
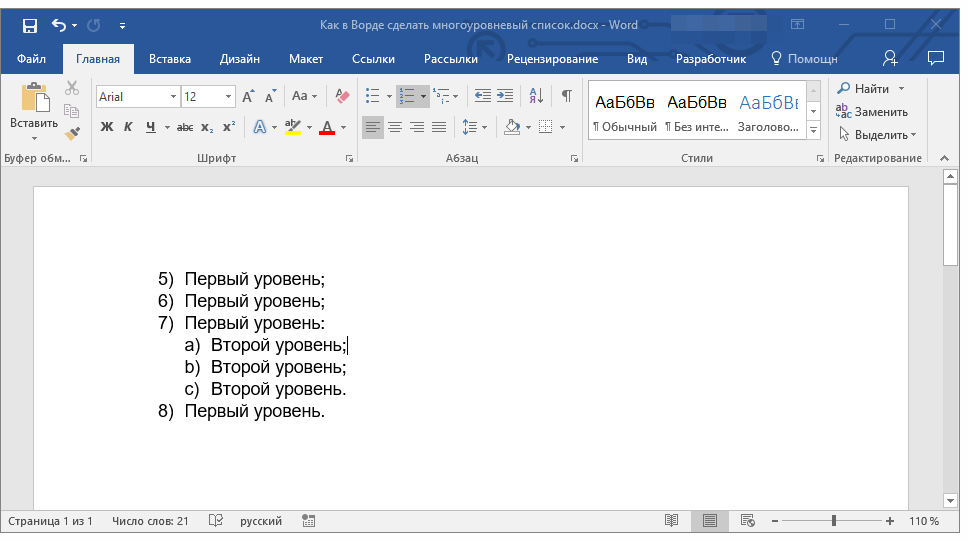
3. Порядок нумерации списка будет изменен согласно заданным вами значениям.
Вот, собственно, и все, теперь вы знаете, как создавать многоуровневые списки в Ворде. Инструкция, описанная в данной статье, применима ко всем версиям программы, будь то Word 2007, 2010 или его более новые версии.

When you work with shapes and objects in Microsoft Word, one of the most convenient features is Grouping. By grouping these types of elements together, they become one. This makes moving, resizing, and formatting them easier.
Maybe you’re making a flowchart or creating instructions using arrows in Word. You can group them to control them at the same time.
Select all of the shapes or objects that you want to group. You can do this by holding Ctrl (Windows) or Command (Mac) and clicking each one. If you want to group all elements in your document, you can use Ctrl+A (Windows) or Command+A (Mac) to speed things up.
When you have the shapes or objects selected, you’ll see a border indicator for each. This is a good way to make sure that you have them all selected.

Go to the Layout tab and the Arrange section of the ribbon. Click “Group” and select “Group.” Alternatively, you can right-click, move your cursor to Grouping, and pick “Group.”
You’ll then see all of those shapes or objects within one border area. It’s now a single element.
Then, you can drag to move the group, resize it using one of the corners, add color to the elements, or perform whatever action you need.
In the screenshot below, we’re moving the group upward. You can see the outline of each element in the group, but they stay together.
How to Ungroup Objects in Word
Once you group your shapes or objects together, they don’t have to stay that way forever. You might only group them to execute a few actions and then want to work with them individually again.
Select the group and go back to the Layout tab. Click “Group” and select “Ungroup.”
Alternatively, you can right-click, move your cursor to Grouping, and pick “Ungroup.”
You’ll then see all elements in the group within their own borders like before you grouped them initially.
How to Regroup Objects
A super handy trick after you’ve grouped and then ungrouped your objects is that you can easily regroup them. The best part is that you don’t have to click each one.
Simply select one of the objects that was in the group and go to the Layout tab once more. Click “Group” and select “Regroup.”
Or, you can right-click, move to Grouping, and pick “Regroup.”
Like magic, Word remembers the shapes and objects that were in the group and regroups them for you!
For additional tips, check out our tutorial on working with shapes, pictures, and other graphics in Microsoft Word.
READ NEXT
- › How to Group Images in Google Docs
- › Google+ Will Come to a Final End on July 5, 2023
- › Universal Audio Volt 2 Review: A Workhorse Audio Interface With Vintage Charm
- › The Best DNS Servers for Secure Browsing
- › Why the Right-Click Menu in Windows 11 Is Actually Good
- › Why One Ultrawide Is Better Than Two Monitors
- › Get to Your Windows 11 Desktop: 7 Fastest Methods
How-To Geek is where you turn when you want experts to explain technology. Since we launched in 2006, our articles have been read billions of times. Want to know more?
Asked by: Kaden Leannon
Score: 4.9/5
(25 votes)
«Characters, Sections, and Paragraphs» are used to do the «formatting of text’ in Word.
What group is formatting text in Word?
Formatting text in Microsoft Word involves tasks like bolding the text, italicising it, and changing the font and size. The commands to perform all of these formatting tasks are found on the Home tab in the Font group. Select your text and then click on the required formatting button to see the effects.
What are the 4 types of formatting?
To help understand Microsoft Word formatting, let’s look at the four types of formatting:
- Character or Font Formatting.
- Paragraph Formatting.
- Document or Page Formatting.
- Section Formatting.
What is text formatting in Word?
Formatted text can draw the reader’s attention to specific parts of a document and emphasize important information. In Word, you have several options for adjusting text, including font, size, and color. You can also adjust the alignment of the text to change how it is displayed on the page.
Which type of processing the formatting of text is?
Formatting of text is an example of text processing .
33 related questions found
Which is not related to text formatting?
Unformatted text is any text that is not associated with any formatting information. It is plain text, containing only printable characters, white space, and line breaks.
What is an example of text processing?
The text processing of a regular expression is a virtual editing machine, having a primitive programming language that has named registers (identifiers), and named positions in the sequence of characters comprising the text. Using these, the «text processor» can, for example, mark a region of text, and then move it.
What is meant by font formatting?
Sometimes users want to specify or change the appearance of a group of words or characters, or even of a single word or character, and they are not familiar enough with all of Word’s font formatting options to know how to achieve the effect that they are seeking.
Where is formatting in word?
Open one word document, in the group of the «Menus» tab at the far left of the Ribbon of word 2007/2010/2013, you can view the «Format» menu and execute many commands from the drop-down menu of Format.
How do I see formatting in word?
Finding and Replacing Formatting
- Click the Home tab. …
- Click the Find button arrow, and then click Advanced Find.
- To clear any previous settings, click No Formatting.
- If you want to locate formatted text, type the word or words.
- Click More, click Format, and then click the formatting you want to find.
What are the 2 types of formatting?
Word has two basic types of Word document formatting styles: Paragraph Styles — They apply to a minimum of an entire paragraph, and contain paragraph formatting (alignment, indents, etc.) and character formatting (font, color, etc.)
What are 3 formatting styles?
Formatting Basics. Word deals with formatting on three levels encompassing small and specific on up to big and broad—through characters, paragraphs, and sections. You apply different types of formatting to each of these parts. Character formatting includes selecting a font, a font size, bold or italics, and so on.
What are formatting techniques?
You can format paragraphs in a variety of ways to improve the readability and overall appearance and layout of a document. Using correct formatting techniques gives you much greater control over the layout and positioning of sections, headings and paragraphs.
What is a simple text file?
Plain text (. txt) is a type of digital file that is free of computer tags, special formatting, and code. … Note: Copying and pasting or uploading text and text files other than plain text may include computer tags, special formatting, and code.
What is text formatting Class 9?
text formatting refers to the attributes of text other than the actual text itself. for example:bold,italics,underlining,color,and size,are all formatting attributes of text…text can be automatically centered, indented,or positioned in other ways.
How you edit and format a document text?
Edit a Microsoft Word document
- Click the. Edit. tab.
- Select the text that you want to edit.
- Using the tools in the edit toolbar, change the required formatting including font style, paragraph alignment, list formatting, and indentation options.
How do I remove text formatting?
Use Ctrl + A to select all text in a document and then click the Clear All Formatting button to remove the formatting from the text (aka character level formatting.) You can also select just a few paragraphs and use the same method to remove formatting from part of a document.
How do I format a text document?
Format text
- Select the text you want to format. To select a single word, double-click it. To select a line of text, click to the left of it.
- Select an option to change the font, font size, font color, or make the text bold, italic, or underline.
What is page formatting?
A page format contains formatting controls for your data set that indicate where and how text, and optionally, page overlays and page segments are to be placed on the page. The page format is defined relative to the origin of the sheet specified in the form definition.
How can you format a document?
- On your Windows 10 tablet.
- Select text. To select a word, double-tap it. …
- Change the font, font size, or font style. You can use the formatting options available on the Home tab to format text. …
- Format paragraphs. …
- Use editing tools.
What are the processing features of text input?
Text Input
Typically, text is entered into the word processor from a keyboard; other input methods include: Copying text from other applications (such as from hypertext markup language [HTML] documents, e-mail messages, or online encyclopedias) and pasting it into a word-processing document.
What is text processing tools?
Using natural language processing (NLP) and machine learning, subfields of artificial intelligence, text processing tools are able to automatically understand human language and extract value from text data.
What is a text processing application?
What is text processing? The term text processing refers to the automation of analyzing electronic text. … Text processing is one of the most common tasks used in machine learning applications such as language translation, sentiment analysis, spam filtering, and many others.
What is an example of formatting?
The definition of a format is an arrangement or plan for something written, printed or recorded. An example of format is how text and images are arranged on a website. To arrange according to a format.
What is the purpose of formatting text?
The purpose of formatting is for changing the font style , size , colour and appearance of the text .