3 Ways to Keep Text Together in Microsoft Word Documents
by Avantix Learning Team | Updated April 5, 2021
Applies to: Microsoft® Word® 2010, 2013, 2016, 2019, 2021 and 365 (Windows)
You can keep text together in several ways in Word. If you want to keep words or characters together, you can use nonbreaking spaces or nonbreaking hyphens or dashes and insert them using a dialog box or a keyboard shortcut. If you want to keep lines or paragraphs together on the same page, you can apply settings in the Paragraph dialog box (which can be built into styles if you use styles).
You may want to keep the lines in a paragraph together so that the paragraph doesn’t break across pages or you may want to keep a paragraph with the next paragraph and avoid inserting manual page breaks. This can be accomplished easily using the Paragraph dialog box (and can be built into styles if you use styles).
It’s important to understand some key paragraph concepts:
- A paragraph in Word is anything with a hard return after it (you have pressed Enter or Return).
- It’s best to eliminate any blank paragraphs in a long document.
- You can view paragraph marks or symbols by clicking Show/Hide ¶ on the Home tab in the Ribbon in the Paragraph group.
Recommended article: 14 Timesaving Microsoft Word Selection Shortcuts to Quickly Select Text
Do you want to learn more about Microsoft Word? Check out our virtual classroom or live classroom Word courses >
Keeping lines together in a paragraph
To keep the lines in a paragraph together on the same page in Word using the Ribbon:
- Select the paragraph in the Word document with the text you want to keep together. You can simply click in the paragraph to select it.
- Click the Home tab in the Ribbon and click the dialog box launcher on the bottom right of the Paragraph group. The Paragraph dialog box appears.
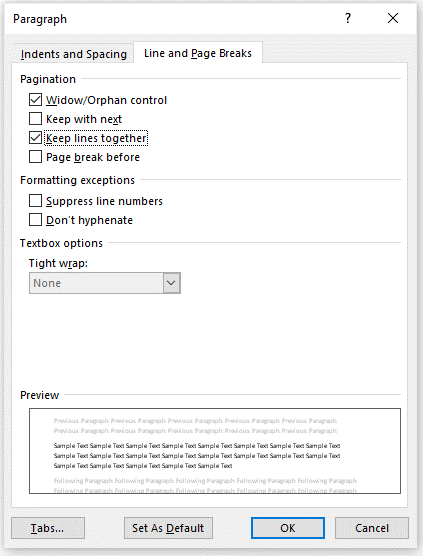
- Select the Line and Page breaks tab. Word displays options to keep the lines of the paragraph together or to keep the paragraph with the next paragraph.
- Check Keep lines together.
- Click OK. The paragraph will no longer break across pages.
Below is the Paragraph dialog box in Word with Keep lines together selected:
You can also use a context menu to access the Paragraph dialog box (right-click in a paragraph and choose Paragraph from the drop-down menu).
Keeping a paragraph with the next paragraph
To keep a paragraph on the same page with the next paragraph using the Ribbon:
- Click in the paragraph you want to keep with the next paragraph (the next paragraph should not be a blank paragraph).
- Click the Home tab in the Ribbon.
- Click the dialog box launcher on the bottom right of the Paragraph group. The Paragraph dialog box appears.
- Select the Line and Page breaks tab.
- Check Keep with next.
- Click OK.
You can also use a context menu to access the Paragraph dialog box (right-click in a paragraph and choose Paragraph from the drop-down menu).
Keeping text together with nonbreaking spaces
If you want specific words or characters to stay together on the same line (such as De Marco), you can use nonbreaking spaces instead of regular spaces.
To insert a nonbreaking space between two words or characters using a keyboard shortcut:
- Position the cursor between the two words or characters you want to keep together (there should be no space between these characters).
- Press Ctrl + Shift + Spacebar. Word inserts a nonbreaking space.
To insert a nonbreaking space between two words or letters using the Ribbon:
- Position the cursor between the two words or characters you want to keep together (there should be no space between these characters).
- Click the Insert tab in the Ribbon.
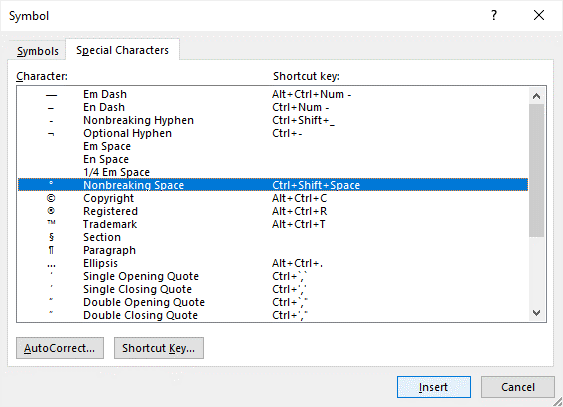
- Click Insert Symbol and then More Symbols in the drop-down menu. A dialog box appears.
- Select the Special Characters tab.
- Select Nonbreaking space and click Insert.
- Click Close. Word inserts a nonbreaking space.
Below is the Insert Symbol dialog box to insert a non-breaking space:
Keeping text together with nonbreaking hyphens or dashes
You can also use nonbreaking hyphens or dashes to keep words or characters together (such as co-ordinator or 416‑222‑9999).
To insert a nonbreaking hyphen between two words or characters using a keyboard shortcut:
- Position the cursor between the two words or characters you want to keep together (there should be no space between these characters).
- Press Ctrl + Shift + Underscore (_). Word inserts a nonbreaking hyphen.
To insert a nonbreaking hyphen between two words or characters using the Ribbon:
- Position the cursor between the two words or characters you want to keep together (there should be no space between these characters).
- Click the Insert tab in the Ribbon.
- Click Insert Symbol and then More Symbols in the drop-down menu. A dialog box appears.
- Select the Special Characters tab.
- Select Nonbreaking hyphen and click Insert.
- Click Close. Word inserts a nonbreaking hyphen.
To view nonbreaking spaces, nonbreaking hyphens and paragraph marks:
- Click the Home tab in the Ribbon.
- Click the Show/Hide ¶ in the Paragraph group.
You can turn off the symbols by clicking on the same button.
You can also quickly find and remove nonbreaking spaces or hyphens using the Replace dialog box.
To find and remove nonreaking spaces or hyphens:
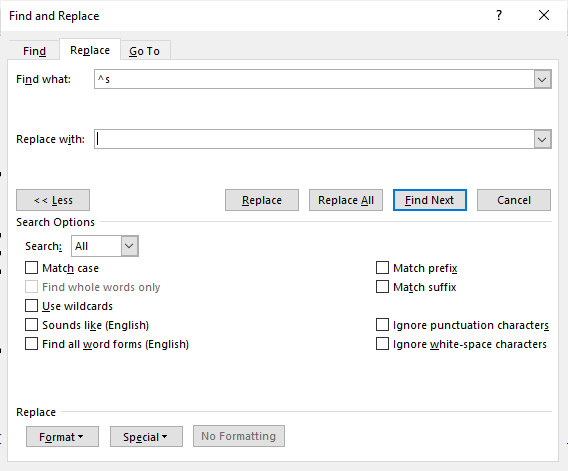
- Press Ctrl + H. The Replace dialog box appears. You can also click the Home tab in the Ribbon and click Replace in the Editing group.
- Click More to expand the dialog box if necessary.
- Click in the Find What box.
- Click Special. A drop-down menu appears.
- Select nonbreaking space or nonbreaking hyphen.
- Ensure the Replace with box is empty.
- Click Find Next. Word should find the first nonbreaking space or nonbreaking hyphen.
- Click Replace or Replace All.
- Click Close.
Below is the Replace dialog box:
Although all of these techniques will keep text together, keeping paragraphs together is the most important. If you start using paragraph formatting to keep specific paragraphs together, you can avoid using manual page breaks for pagination.
This article was originally published on July 14, 2017 and has been updated for clarity and content.
Subscribe to get more articles like this one
Did you find this article helpful? If you would like to receive new articles, JOIN our email list.
More resources
How to Center Text Vertically on a Page in Word
How to Insert an Em Dash in Word (4 Ways with Shortcuts)
How to Quickly Remove Hard Returns in Word Documents
How to Insert, Format and Update Cross-References in Word
How to Convert a PDF to Word in Microsoft Word (for Free – No Third Party Programs Needed)
Related courses
Microsoft Word: Intermediate / Advanced
Microsoft Excel: Intermediate / Advanced
Microsoft PowerPoint: Intermediate / Advanced
Microsoft Word: Long Documents Master Class
Microsoft Word: Styles, Templates and Tables of Contents
Microsoft Word: Designing Dynamic Word Documents Using Fields
VIEW MORE COURSES >
To request this page in an alternate format, contact us.
Our instructor-led courses are delivered in virtual classroom format or at our downtown Toronto location at 18 King Street East, Suite 1400, Toronto, Ontario, Canada (some in-person classroom courses may also be delivered at an alternate downtown Toronto location). Contact us at info@avantixlearning.ca if you’d like to arrange custom instructor-led virtual classroom or onsite training on a date that’s convenient for you.
Copyright 2023 Avantix® Learning
Microsoft, the Microsoft logo, Microsoft Office and related Microsoft applications and logos are registered trademarks of Microsoft Corporation in Canada, US and other countries. All other trademarks are the property of the registered owners.
Avantix Learning |18 King Street East, Suite 1400, Toronto, Ontario, Canada M5C 1C4 | Contact us at info@avantixlearning.ca
Table of Contents
- 1 Can you group text together in Word?
- 2 What are group texts?
- 3 How do you know if someone blocked you on text?
- 4 Why are my iPhone texts not delivering?
- 5 When you send a text and it says delivered?
- 6 Will a text say delivered if I’m blocked?
Can you group text together in Word?
Press and hold CTRL while you select the shapes, pictures, or objects that you want to group. The Wrap Text option for each object must be other than In line with Text. For more info, see Wrap Text. , and then select Group.
What are group texts?
A group text messaging service allows businesses to connect with assortments of people, large and small, all at once. Share special offers, announcements, all within a single text blast. Plus, with our iOS and Android apps, you can send group texts while on-the-go.
Why am I receiving my own text messages in group text?
If you use an Android smartphone, this happens when there is difficulty establishing a good connection between your phone and your network carrier. In a bid to deliver the message, several attempts are made, and in the process, you receive that same message you just sent to another person.
What is the difference between text and SMS?
Short Message Service (SMS) & Text Messaging (Texting) are the same thing. It is a means of sending short messages to and from mobile phones. Most SMS messages are mobile-to-mobile text messages, though the standard supports other types of broadcast messaging as well. …
How do you know if someone blocked you on text?
If an Android user has blocked you, Lavelle says, “your text messages will go through as usual; they just won’t be delivered to the Android user.” It’s the same as an iPhone, but without the “delivered” notification (or lack thereof) to clue you in.
Why are my iPhone texts not delivering?
If your iPhone is not sending messages, first make sure your phone has service, as the issue may be with the Wi-Fi or cellular network, not your device itself. Check in your iPhone’s Settings app that various messaging options are turned on so that your phone can dispatch texts if iMessage fails.
How do you know if a text message was delivered?
Turn on Delivery Receipts to find out if your text message was delivered to the recipient. (This option doesn’t tell you if the message was read.) On newer phones, open the Messages app and go to Settings > Advanced > Get SMS delivery reports.
How do you know if a text message was delivered iPhone?
Answer: A: If you’re sending an iMessage (they’re blue and they only go to other iOS/MacOS users), you will see a delivered indicator under the message once it has been delivered. If the person you’re sending the message to has the Read Receipt feature enabled, “Delivered” will change to “Read” once it’s been read.
When you send a text and it says delivered?
The most an Android user can do is to turn on Delivery Reports on the Android Messages app. All this setting does is notify a text message sender whenever a text was successfully delivered (but can’t tell if a message was read or not).
Will a text say delivered if I’m blocked?
If you suspect you have indeed been blocked, first try to send a courteous text of some kind. If you get the “Delivered” notification underneath it, you weren’t blocked. If you get a notification like “Message Not Delivered” or you get no notification at all, that’s a sign of a potential block.
Do Imessages always say delivered?
Enable Send AS SMS iMessage doesn’t say “Delivered” on your iPhone may due to the person you sending the message to has a non-iOS device. In this way, if you fail to send a message, you should resend the message as a text message by enabling Send as SMS in Settings on your device (Settings > Messages > Send as SMS).
Does Do Not Disturb block messages?
Here, you can choose to allow calls or messages (or both) from your “starred” contacts, even when Do Not Disturb is on. This allows you to block most notifications but allow those from your spouse, mother or other important people.
Keeping the flow of lines together in a paragraph
In order to keep the lines in a paragraph together on the same page, you can use the Ribbon in Word.
1. In the Word document, select the paragraph that contains the text that you want to keep together. To select a paragraph, simply click on it within the paragraph.
2. Click the Home tab in the Ribbon, followed by the dialog box launcher in the bottom right corner of the Paragraph group in the Paragraph group. When you click on the Paragraph button, the Paragraph dialog box appears.
3. Select the Tabs menu option, followed by the Line and Page breaks option. Microsoft Word provides options for aligning the lines of a paragraph or aligning the paragraph with the lines of the paragraph immediately following it.
4. Verify that the lines are together.
5. Press the OK button to confirm your action. It will no longer be necessary to divide the paragraph into multiple pages.
A screenshot of the Word Paragraph dialog box with the option to Keep lines together selected can be found below:
Additionally, the Paragraph dialog box can be accessed through a context menu option (right-click in a paragraph and choose Paragraph from the drop-down menu).
Keeping a paragraph in sync with the paragraph that comes after it
Maintain the continuity of a paragraph on the same page as the next paragraph by using the Ribbon:
1. To continue with a paragraph, first select the paragraph you want to continue with by clicking on it (the next paragraph should not be a blank paragraph).
2. To begin, select the Home tab from the Ribbon.
3. In the Paragraph group, locate the dialog box launcher, which is located at the bottom right of the group. When you click on the Paragraph button, the Paragraph dialog box appears.
4. Select the Tabs menu option, followed by the Line and Page breaks option.
5. Click on the Continue with next option.
6. Press the OK button to confirm your action.
Additionally, the Paragraph dialog box can be accessed through a context menu option (right-click in a paragraph and choose Paragraph from the drop-down menu).
Right-click the paragraph that you want to keep together. In the box that opens, select Paragraph. In the Paragraph dialog box, click the Line and Page Breaks tab. In the Pagination section, select the Keep lines together check box, and click OK.
How do I enable Keep with next in Word?
Keeping a paragraph with the next paragraph Click the dialog box launcher on the bottom right of the Paragraph group. The Paragraph dialog box appears. Select the Line and Page breaks tab. Check Keep with next.
How do I keep a table next in Word?
Select the table rows, and click the anchor at bottom-right corner of Paragraph group on the Home tab. See screenshot: 4. In the Paragraph dialog box, please (1) enable the Line and Page Breaks tab, (2) check the Keep with next option, and (3) click the OK button.
How do you unsplit a table in Word?
The merging of table can be done using text wrapping properties. For that, select first table. Go to properties–> In table properties, select text wrapping as none and then click OK.
How do I put two tables next to each other in Word?
On the Page Layout tab, in the page Setup group, click Columns and select Two.
- Select the Insert tab, and in the Tables group, click Tables and select an option to insert a table.
- Drag the table created in point 3, and move it adjacent to the first table.
How do I manage figures in Word?
Add captions
- Select the object (table, equation, figure, or another object) that you want to add a caption to.
- On the References tab, in the Captions group, click Insert Caption.
- In the Label list, select the label that best describes the object, such as a figure or equation.
How do I move a figure caption in Word?
Click on the figure or table where you want the caption to appear. On the References tab, click the Insert Caption button. In the Caption window, in the Label menu, select the label Figure or Table. In the Position menu, select where you want the caption to appear.
How do I change the figure number in Word?
Place your cursor in front of ANY automated caption number for ANY figure. Go to the References tab and click Insert Caption to open the Caption dialog box. Change the Label to Figure. Click Numbering to open the Caption Numbering dialog box.
How do I automate table numbers in Word?
One way is to use Word’s built-in numbering, in this manner:
- Insert your table as you normally would.
- Select the cells in the table that you want to have numbered.
- Display the Home tab of the ribbon.
- Click the Numbering tab, in the Paragraph group. Word adds numbering, automatically, to the selected cells.
How do you do number figures?
Figures should be: Labeled (under the figure) with the figure number and appropriate descriptive title (“Figure” can be spelled out [“Figure 1.”] or abbreviated [“Fig. 1.”] as long as you are consistent). Numbered in the order they appear in the text.
How do you name a figure in APA?
APA does not require a title within the chart itself. BUT all figures need be numbered and have a title in a caption below the chart. The text in a figure should be in a san serif font (such as Helvetica, Arial, or Futura).
When you create a Word document, often you need to add some words that should be kept together even if
Word wants to put them on different lines.
The most popular example is an abbreviation and a name such as:
- An organization — Plexico LLC, W. H. Allen & Co.
- The address — N Rengstorff Ave, N Shoreline Blvd.
- The person — Dr. S. Hawking, prof. Smith.
It will be correct to see these words always on the same line.
When you type the text, usually you separate words (sentences or even syllables in some languages) by
pressing the Space key (also known as Spacebar):

To keep words together, you can use a Nonbreaking space (also called non-breaking
space, no-break space, non-breakable space (NBSP),
hard space, or fixed space):

To add the nonbreaking space to your document, do one of the following:
- On the Insert tab, in the Symbols group, click on the Symbol drop-down list
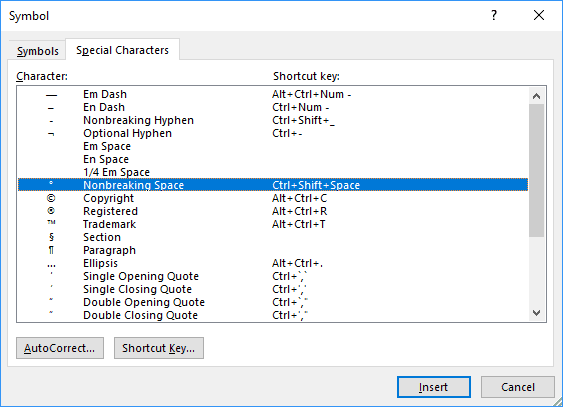
and then choose More Symbols…:In the Symbol dialog box, on the Special Characters tab, choose the
Nonbreaking Space:After choosing the symbol, press the Insert button and close the Symbol dialog
box. - Or simply press Ctrl+Shift+Space.
If you toggle on showing of non-printable symbols, you will see a regular space as a little dot between
words ˙, and a nonbreaking space as a degree symbol between words °:

Note: In this mode you can see spaces or other special symbols (see
How to show/hide nonprintable symbols in a Word document),
but they are still non-printable!
See also this tip in French:
Comment garder deux ou plusieurs mots ensemble dans un document Word.
Please, disable AdBlock and reload the page to continue
Today, 30% of our visitors use Ad-Block to block ads.We understand your pain with ads, but without ads, we won’t be able to provide you with free content soon. If you need our content for work or study, please support our efforts and disable AdBlock for our site. As you will see, we have a lot of helpful information to share.


