
If you create an official document in Microsoft Word, you must adhere to strict formatting rules. One of
them is avoiding “hanging” lines, i.e., a single line of a paragraph should not be on a separate page,
neither the first nor the last.
The last line of the paragraph that is moved to the next page is called a widow. The first
line of the paragraph that is left on the page is called an orphan.
The option to keep at least two lines of a paragraph at the top or the bottom of a page
is turned on by default (see how to change it below in this tip).
If you need to keep two lines or paragraphs together without splitting them to the
different pages. For example:
- keep together an image, a table or an equation and its title (even if you use captions,
Word sptils them by default):
- keep together all lines of the quotes in the text:


To format lines or paragraphs, do the following:
1. Select the text which you want to format and do one
of the following:
- Right-click on the selected text and choose Paragraph… in the popup menu:

- On the Home tab, in the Paragraph group, click on the dialog box launcher:

- On the Layout tab, in the Paragraph group, click on the dialog box launcher:


2. In the Paragraph dialog box, on the
Line and Page Breaks tab, choose the option you need:

- Widow/Orphan control ensures that at least two lines of a paragraph stay at the
top or bottom of a page.If you uncheck this option, one line of the paragraph can be on a different page.
This option is useful, for example, if you create a draft or try to save the space. - Keep with next avoids breaks between the selected paragraphs:

This option helps to
keep the table on one page. - Keep lines together prevents a page break in the middle of a selected paragraph or
paragraphs:
- Page break before uses to add a page break before the selected text.
It is useful for some headings, which should always
start at the beginning
of the page.


See also this tip in French:
Comment garder des lignes et des paragraphes ensemble dans le document Word.
Please, disable AdBlock and reload the page to continue
Today, 30% of our visitors use Ad-Block to block ads.We understand your pain with ads, but without ads, we won’t be able to provide you with free content soon. If you need our content for work or study, please support our efforts and disable AdBlock for our site. As you will see, we have a lot of helpful information to share.
Word for Microsoft 365 Word for Microsoft 365 for Mac Word 2021 Word 2021 for Mac Word 2019 Word 2019 for Mac Word 2016 Word 2016 for Mac Word 2013 Word 2010 More…Less
You can group shapes, pictures, or other objects. Grouping lets you rotate, flip, move, or resize multiple shapes or objects as though they’re a single shape or object.
Group shapes, pictures, or other objects
-
Press and hold CTRL and select shapes, pictures, or other objects to group.
The Wrap Text option for each object must be other than In line with Text. For more info, see Wrap Text.
-
Do one of the following:
-
Go to Picture Format or Picture Tools Format >
 Group > Group.
 -
Go to Shape Format or Drawing Tools Format > Group > Group.
To still work with an individual item in the group, select the group, and then select the item.
The Group button is enabled for two or more selected objects.
-
 Group > Group.
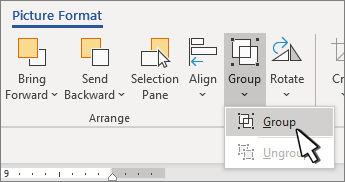
Group shapes, pictures, or objects
-
Press and hold CTRL while you select the shapes, pictures, or objects that you want to group.
The Wrap Text option for each object must be other than In line with Text. For more info, see Wrap Text.
-
Go to Drawing Tools or Picture Tools, on the Format tab, in the Arrange group, select Group
, and then select Group.
To work with an individual item in the group, select the group, and then select the item.
 , and then select Group.
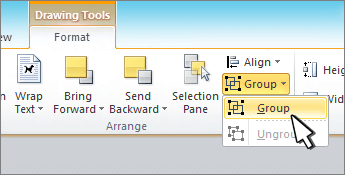
Group shapes, pictures, or other objects
-
Press and hold command while selecting the shapes, pictures, or other objects to group.
The Wrap Text option for each object must be other than In line with Text. For more info, see Wrap Text.
-
Go to Shape Format or Picture Format, and then select Group
> Group.If Group
isn’t visible on the ribbon, select Arrange to display it.
 > Group.
To work with an individual item in the group, select the group, and then select the item.
If the Group button is unavailable, verify that you have more than one object selected.
See also
For more info selecting shapes or pictures, see Select a shape or other object in Word.
SVG icons must converted to shapes before grouping. For more info, see Convert an SVG image to an Office shape.
Need more help?
Want more options?
Explore subscription benefits, browse training courses, learn how to secure your device, and more.
Communities help you ask and answer questions, give feedback, and hear from experts with rich knowledge.
There are many word processing tools available but once worked in the comfort of Microsoft Word, you may not like any other software. It is pretty sure no one exactly knows the complete features Word offers. Adding dividers is one such hidden features and you can do this with shortcuts. In this article we will show how to add dividers in Microsoft Word documents quickly.
Related: How to fix slow Microsoft Word and speed up you productivity?
You can add dividers with different methods.
- Use hyphen and underscore
- Using other symbol shortcuts
- Insert image as divider
- Insert from the menu
1. Using Hyphens and Underscores
The simplest and most easy method is to use continuous hyphens and underscores. You can continuously press hyphen or underscore to insert the divider line between paragraphs. The advantage is that you can define the length and alignment of the divider as per your need.
- Divider using hyphens: —————–
- Divider using underscore: ____________
2. Quick Way to Add Dividers with Shortcuts
When you want to insert a full width divider between two sections or elements, you can use the following shortcuts.
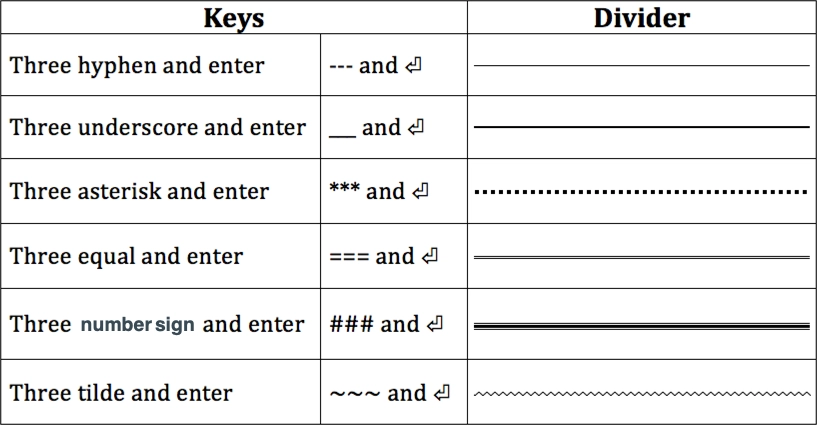
- Press hyphens for three or more times and press the enter key (— and ⏎). This will create a full width divider as a thin continuous line.
- Press three asterisks and enter (*** and ⏎) to if you want a dotted line.
- Use three equal signs and enter (=== and ⏎) to add a double line.
- Use three underscores and enter (___ and ⏎) to make a divider with medium thickness.
- Type three number signs and enter key (### and ⏎) to create a thicker line with borders.
- And finally with three tildes and enter (~~~ and ⏎) to create a wavy divider line.
Below picture explains the shortcut keys and the display of the divider in Word document.
Deleting Dividers Inserted with Shortcuts
Well, you have created the dividers using the above shortcuts and now is the time to see how to delete them. You may find it difficult to delete since those dividers are not actually lines – they are bottom borders act like an underline. In fact, you can simply click on the “Borders” icon to insert divider in Word. Since “Borders” option by default uses “Bottom Border” clicking on it will insert a line similar to the above shortcuts. Follow the below instructions in order to delete the dividers.
- Position your cursor on the previous line of the divider. If you have an element like paragraph before the divider then select the paragraph.
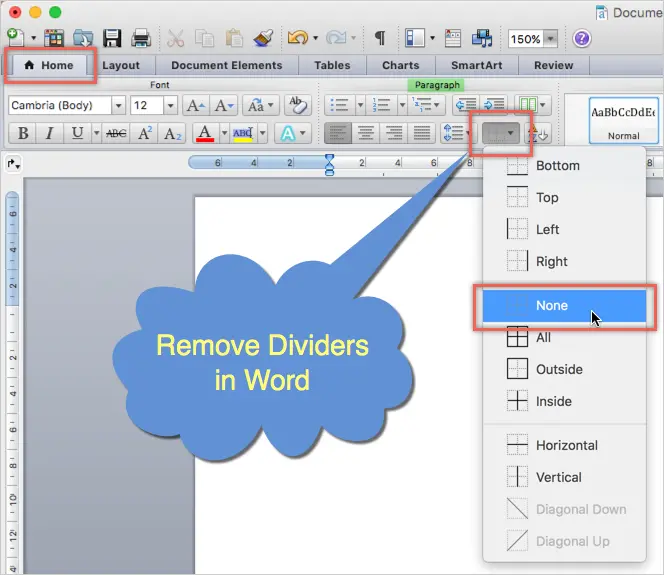
- Click on the “Home” tab and then click the small arrow next to “Border” button in the “Paragraph” group.
- Select “No Border” or “None” option from the list.
This works on all Word versions like 2019, Microsoft 365, etc. on all platforms like Windows 10 / 11. This also works on Microsoft Word for Mac.
3. Using Images for Dividers
Using image is another option to insert divider image on your Word document. You can create suitable images and insert between elements as an object. Remember, not to copy image from website and paste on your document. Word will take long time to extract the image and also link the image to the webpage from where you are copying. The best option is to right click and save the image to your computer. After that, you can either copy paste from local computer or insert the image from menu.
4. Using Horizontal Line as Divider
The last option to insert divider in Word documents is using horizontal line menu option available. You can access this option under “Paragraph” group in “Home” tab. However, this option varies in Word 2016 onwards and earlier versions.
Word 2010 or Earlier
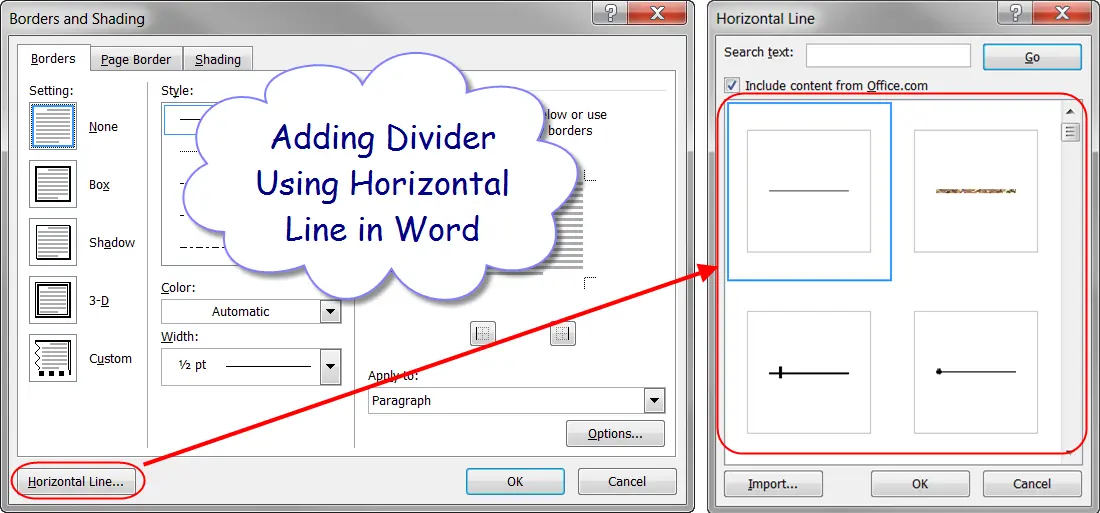
- Click on the “Borders and Shading” button and click on the “Horizontal Line” option to insert a divider on your document.
- If you want to insert a fancy divider, choose the menu option click on the “Horizontal Line…” button. On the popup box, select the divider style you want to insert.
Word 2016 or Later
- If you use Word 2016 or later versions like Microsoft 365, click on the small arrow next to “Border” icon. This is available in “Paragraph” group under “Home” menu.
- Choose “Horizontal Line” option to insert a grey color divider line.
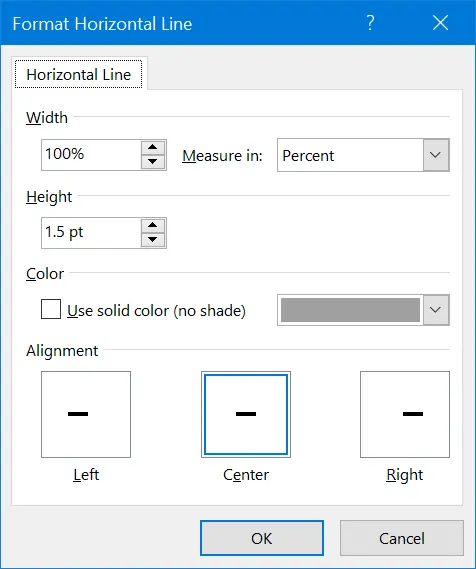
- Double click on the divider to open the “Format Horizontal Line” pop-up.
- Choose the color, alignment, width and height for your divider.
- Unlike dividers inserted with shortcuts, you can move the horizontal lines by dragging it to required place in your document.
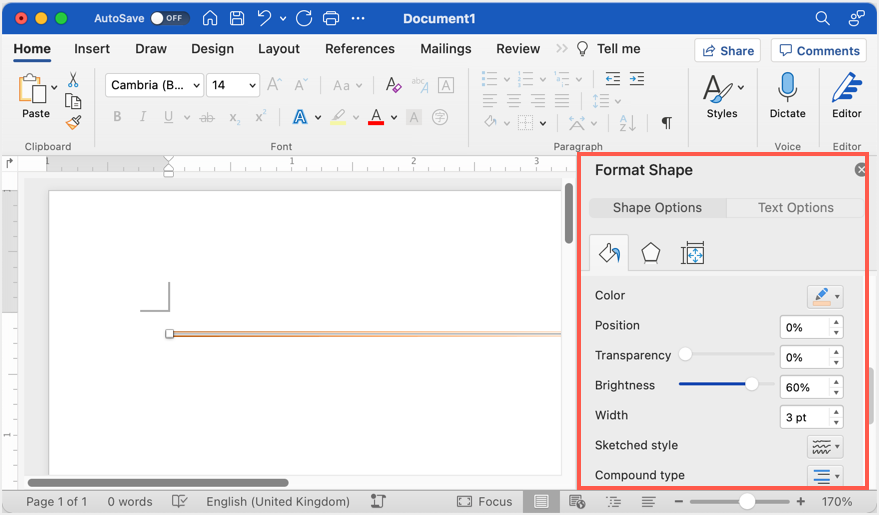
Horizontal line is a perfect option for inserting dividers in Word and it will also work on Word Microsoft 365 subscription in Mac also. However, double clicking on horizontal line in Mac Word will open “Format Shape” options in the sidebar. You can go to “Shape Options” tab and start customizing the color, thickness and other styles of the line.
Word has a set of AutoFormat shortcuts that make horizontal lines, here’s how they work, how to change them, color the lines and how to stop lines when they get out of control.
Line shortcuts
There are six horizontal line shortcuts. For each one type the same character three times at the start of a new line then press Enter.
For example, press the dash key three times on a new line, then enter.
Dashes give you a horizontal line
Underscores give you a bold horizontal line
Equals gives you a double horizontal line

And there’s more …
The three above are the best known but there are others.
Asterisk makes a dotted line
Tilde makes a wavy line
Pound/Hash makes a triple line
Tooltip controls
Whenever you automatically make a line, a small tooltip appears with some options.

Undo Border Line – changes back to the characters you typed. The usual undo shortcut, Ctrl + Z, will do the same thing.
Stop Automatically Creating Border Lines – will turn off the AutoFormat | Border Lines option entirely.
Control AutoFormat Options … goes to the settings for AutoFormat as you type.
Autoformat Options
The automatic lines and all other AutoFormat options are controlled from Options | Proofing | AutoCorrect options | AutoFormat As You Type:

Border lines can be turned on/off from there. There are no options to select just some character/line combinations – it’s all or nothing.
Under the hood
Word isn’t making the lines by adding a lot more characters across the page. That’s where confusion can begin if you’re trying to stop the lines appearing.
It’s converting your dash/underscore/equals etc. into a paragraph border. Specifically, a bottom border line on the paragraph.
For example, here’s how an automatic double horizontal line appears in Paragraph | Borders and Shading
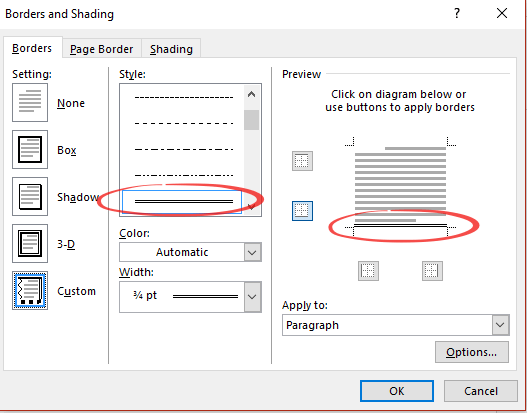
It’s just the double line style applied to the bottom line of the paragraph. Strictly, at the bottom of group of paragraphs with the same formatting. Knowing that detail is useful when you’re fixing the extra lines that start appearing.
Color
The automatic lines are always black (actually ‘Automatic’). Word doesn’t pick up the color of the three characters nor the paragraph as you might expect.
To change the line color, select the line then go to Home | Paragraph | Borders | Borders and Shading. Select the color you want from the pull-down list and then click on the borders you want the color change to apply.

Other lines
You’re not limited to the lines that Microsoft provides via AutoCorrect. You can add your own or change the look of a line added with AutoCorrect.
Select the line then go to Home | Paragraph | Borders | Borders and Shading. That opens up the many options you have:
Styles: there are over 20 line styles to choose from.
Color: as mentioned above, the full Word color range is available.
Width: thin, medium or thick – take your pick from ¼ point to 6pt.
Top, bottom, left, right – click in the preview box to choose which lines to show and the style of each one.
Whatever you choose, remember to click on the line/s in the preview box to apply the look you want.
For consistency, you can have a horizontal line as part of a paragraph style. For example, a line above or below a heading.
Unwanted horizontal lines
A common problem with the automatic lines is extra lines appearing where you don’t want them.
It happens when you add paragraphs immediately above the horizontal line. Each of those paragraphs inherits the same (bottom border) formatting that Word made for the horizontal line.
You won’t see a line under each paragraph because Word groups together paras with the same formatting. Only the last paragraph of a group will have a bottom border line.
The problem usually rises because people try to fix the extra lines by selecting just the paragraphs showing horizontal line and change the formatting.
That doesn’t change the ‘bottom border’ formatting for other lines that have the setting. So it seems like extra lines keep popping up without reason!

The solution is to make sure you select all the affected paragraphs – not just the ones with horizontal lines.
Choose a paragraph and look carefully at the Home | Paragraph | Borders icon. That icon changes according to the current border settings. In this, enlarged, example you can see the bottom line is solid.

To change the border setting, pull-down the borders list and choose ‘No Border’.

To stop the creeping lines in the first place, get into the habit of not adding extra paragraphs from the horizontal line itself. Instead, go to the paragraph ABOVE the horizontal line and add new paras from there.
Five ways to add vertical lines in Word
Six Word tricks to reduce space between lines
Multi-Line Picture Borders in Word or PowerPoint
Create your own I ♥ Love…. Signs in Word
When editing documents with Microsoft Word there are two small things that I do all the time:
- to group few lines together on the same page , in other words to be sure that the paragraph is not split between two pages when I modify the text above.
- to group few words together on the same line, in other words to not split those words between two lines
Here are the tricks how you can do it in Microsoft Word 2010.
Let’s start with the 1st thing: group few lines to stay together on the same page .
So, first select the text that you want to group, then mouse right click and select Paragraph, like in the picture below:
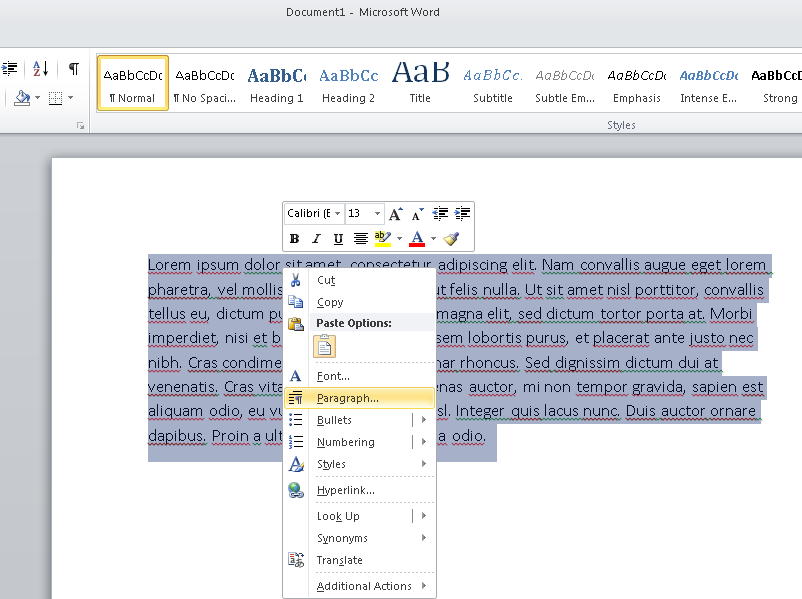
ms word select paragraph
You will see a popup where you can set the paragraph properties, select the Line and Page Breaks tab and check the boxes Window/Orphan control and Keep lines together, just like bellow and press OK button. Now you are sure that the selected block will always stay on the same page.

Now the 2nd thing: group words together, on the same line.
E.g. You will want to do it when you have a formula and you want to me sure that the entire formula will stay on the same line/row.
The solution is next one:
- write the words/phrase that you want to group
- replace the SPACEs with no breaking spaces using CTRL + SHIFT + SPACE, now we are sure that our words will always stay on the same line.
E.g. in the picture below we have a formula in bold, just replace the ALL the spaces in that formula with CTRL+SHIFT+SPACE and new we are safe.
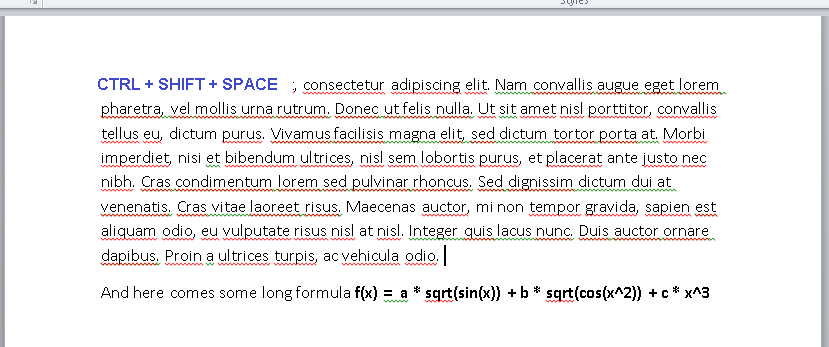
group words together