
Word for Microsoft 365 Word for Microsoft 365 for Mac Word 2021 Word 2021 for Mac Word 2019 Word 2019 for Mac Word 2016 Word 2016 for Mac Word 2013 Word 2010 More…Less
You can group shapes, pictures, or other objects. Grouping lets you rotate, flip, move, or resize multiple shapes or objects as though they’re a single shape or object.
Group shapes, pictures, or other objects
-
Press and hold CTRL and select shapes, pictures, or other objects to group.
The Wrap Text option for each object must be other than In line with Text. For more info, see Wrap Text.
-
Do one of the following:
-
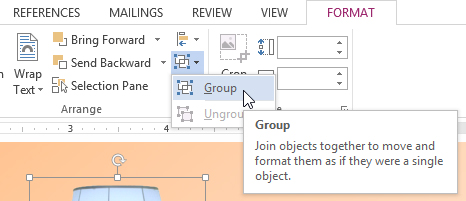
Go to Picture Format or Picture Tools Format >
 Group > Group.
 -
Go to Shape Format or Drawing Tools Format > Group > Group.
To still work with an individual item in the group, select the group, and then select the item.
The Group button is enabled for two or more selected objects.
-
 Group > Group.
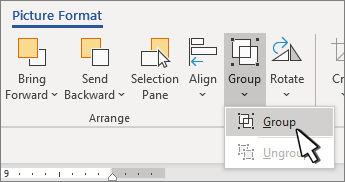
Group shapes, pictures, or objects
-
Press and hold CTRL while you select the shapes, pictures, or objects that you want to group.
The Wrap Text option for each object must be other than In line with Text. For more info, see Wrap Text.
-
Go to Drawing Tools or Picture Tools, on the Format tab, in the Arrange group, select Group
, and then select Group.
To work with an individual item in the group, select the group, and then select the item.
 , and then select Group.
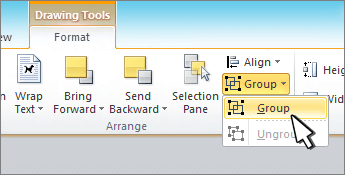
Group shapes, pictures, or other objects
-
Press and hold command while selecting the shapes, pictures, or other objects to group.
The Wrap Text option for each object must be other than In line with Text. For more info, see Wrap Text.
-
Go to Shape Format or Picture Format, and then select Group
> Group.If Group
isn’t visible on the ribbon, select Arrange to display it.
 > Group.
To work with an individual item in the group, select the group, and then select the item.
If the Group button is unavailable, verify that you have more than one object selected.
See also
For more info selecting shapes or pictures, see Select a shape or other object in Word.
SVG icons must converted to shapes before grouping. For more info, see Convert an SVG image to an Office shape.
Need more help?
Want more options?
Explore subscription benefits, browse training courses, learn how to secure your device, and more.
Communities help you ask and answer questions, give feedback, and hear from experts with rich knowledge.
If you work with several objects and have to move them or apply shared formatting to them, you must select
these objects every time. Apply formal grouping and you will be able to operate those objects quickly as a
unit.
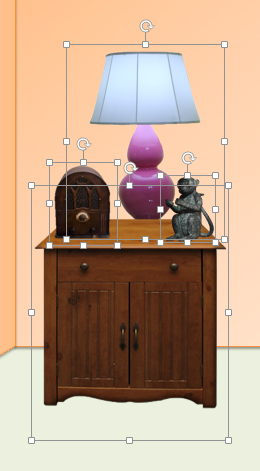
To group several objects, select all objects you want to group by pressing Ctrl or
Shift and clicking every of these objects:

Then do one of the following:
- On the Format tab, in the Arrange group, click the Group command:

- Right-click one of the objects and choose Grouping -> Group from the popup menu:


Word puts a single box around the objects instead of a separate box around each object:

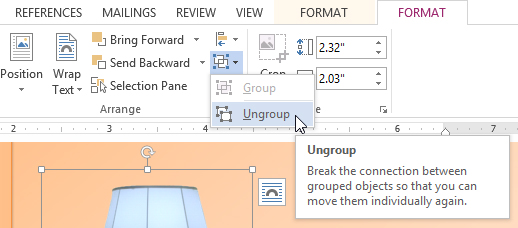
To ungroup grouped objects, do one of the following:
- On the Format tab, in the Arrange group, click Ungroup:

- Right-click a grouped object, and then choose Grouping -> Ungroup from the popup menu:


To regroup objects, do one of the following:
- On the Format tab, in the Arrange group, click Regroup.
- Right-click a grouped objects, and then choose Grouping -> Regroup from the popup menu.
Please, disable AdBlock and reload the page to continue
Today, 30% of our visitors use Ad-Block to block ads.We understand your pain with ads, but without ads, we won’t be able to provide you with free content soon. If you need our content for work or study, please support our efforts and disable AdBlock for our site. As you will see, we have a lot of helpful information to share.
Если вы работаете с несколькими объектами и должны перемещать их или применять к ним общее форматирование, нет необходимости каждый раз выбирать эти объекты. Вы можете использовать группировку в ворде, которая позволяет управлять этими объектами, как единым целым. Таким образом Word позволяет группировать объекты вместе, чтобы они могли обрабатываться программой как один объект.
Как сделать группировку
- Выберите все объекты, которые вы хотите сгруппировать, удерживая клавишу Shift или Ctrl, и нажав на каждый из этих объектов:

Группировка в Word – Выделение объектов для группировки
- Нажмите команду «Группировать» на вкладке «Формат», затем выберите «Сгруппировать».

Группировка в Word – Сгруппировать объекты в ворде
Или щелкните правой кнопкой мыши и в раскрывающемся меню выберите «Группировать» —> «Сгруппировать»:

Группировка в Word – Группировка объектов в ворде
- Выбранные объекты теперь будут сгруппированы. Для всей группы будет создана рамка с маркерами размера, чтобы вы могли одновременно перемещать или изменять размер всех объектов.

Группировка в Word – Сгруппированные объекты в ворде
Как разгруппировать объекты
Чтобы разгруппировать сгруппированные объекты, выполните одно из следующих действий:
- Выберите сгруппированный объект. На вкладке «Формат» выберите команду «Группировать» и выберите «Разгруппировать».

Группировка в Word – Разгруппировать объекты
- Или щелкните правой кнопкой мыши по сгруппированному объекту, а затем в раскрывающемся меню выберите «Группировать» —> «Разгруппировать»:

Группировка в Word – Другой способ, как разгруппировать объекты в ворде
Объекты будут разгруппированы.

Группировка в Word – Разгруппированные объекты в ворде
Ну вот и все. Теперь вы знаете, как сделать группировку в ворде. Теперь вы можете перемещать, поворачивать, отражать сгруппированные объекты как одно целое. И конечно же вы можете разгруппировать или перегруппировать объекты в любое время.
Lesson 22: Arranging Objects
/en/word2013/text-boxes-and-wordart/content/
Introduction
In Word, a page may have multiple objects, such as pictures, shapes, and text boxes. You can arrange the objects the way you want by aligning, ordering, rotating, and grouping them in various ways.
Optional: Download our practice document.
Modifying text wrapping
When pictures are first inserted, you may notice that it’s difficult to move them. This is because by default, pictures are in line with the text. To arrange them, you’ll always need to choose a different text-wrapping setting. To review how to modify text wrapping, visit our lesson on Pictures and Text Wrapping.
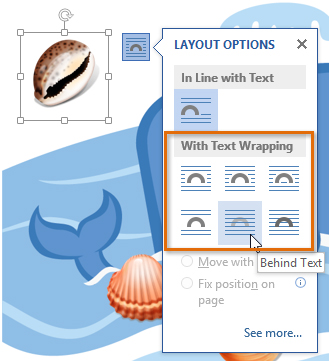 Selecting a text wrap option
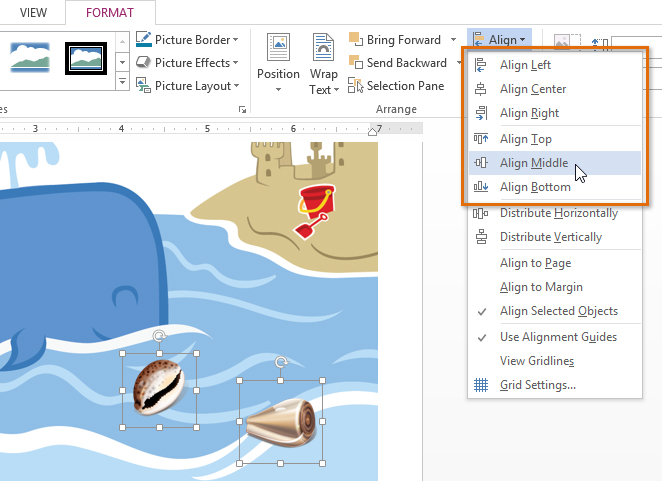
To align two or more objects:
- Hold the Shift (or Ctrl) key and click the objects you want to align.
 Selecting objects to align
 - From the Format tab, click the Align command and select one of the six alignment options.
 Choosing an alignment option
 - The objects will align based on the option you selected.
 The aligned objects
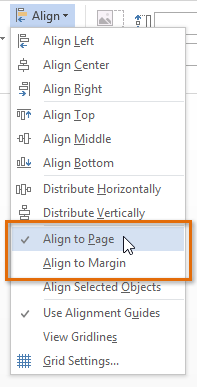
By default, Align Selected Objects will be selected, which will allow objects to be aligned without moving them to a different part of the page. If you want the objects to move to the top or bottom of the page, select Align to Page or Align to Margin before choosing an alignment option.
 Arranging objects to the page
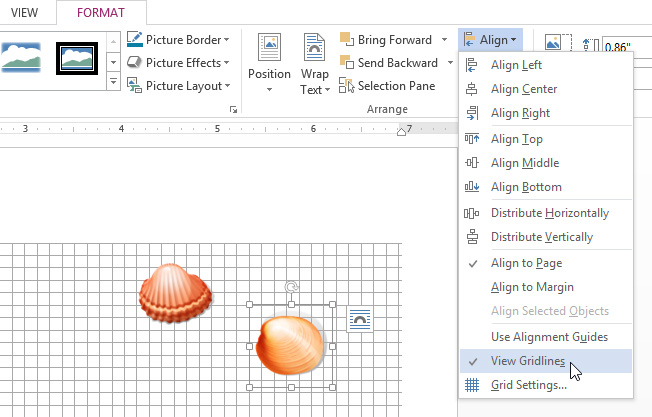
If you prefer to align objects manually, select View Gridlines. This option snaps objects to a grid, making it easier for you to align them with the mouse.
 Turning on gridlines
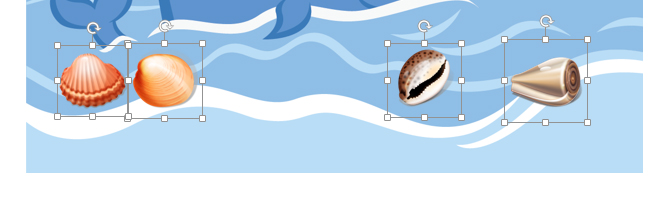
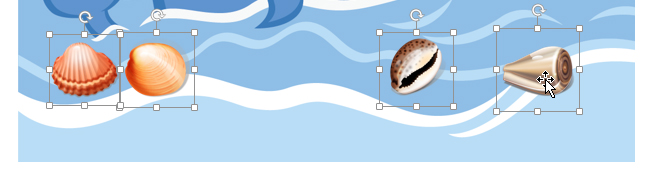
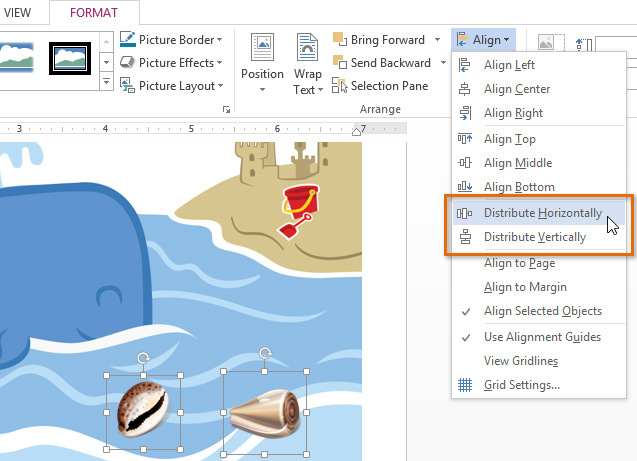
To distribute objects evenly:
If you have arranged objects in a row or column, you may want them to be an equal distance from one another for a neater appearance. You can do this by distributing the objects horizontally or vertically.
- Hold the Shift (or Ctrl) key and click the objects you want to align. The Format tab will appear.
 Selecting objects to distribute
 - On the Format tab, click the Align command and select Distribute Horizontally or Distribute Vertically from the drop-down menu that appears.
 Selecting a distribute option
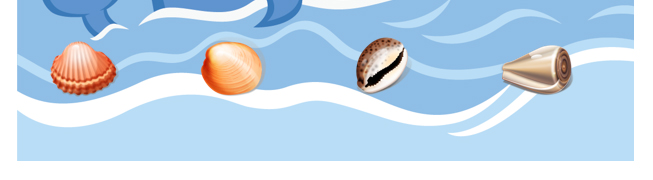
 - The objects will distribute evenly.
 The distributed objects
Ordering and rotating objects
In addition to aligning objects, Word gives you the ability to arrange objects in a specific order. The ordering is important when two or more objects overlap because it will determine which objects are in the front or the back.
Understanding levels
When objects are inserted into a document, they are placed on levels according to the order in which they were inserted into the document. In the image below, the table is on the top level, but we can change the level to put it behind the other objects.
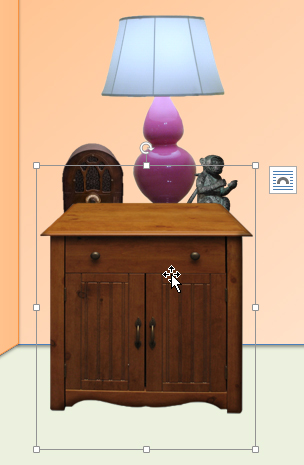 The top level
To change the ordering by one level:
In our example, we’ll change the ordering so the table moves back by one level.
- Select an object. The Format tab will appear.
 The selected object
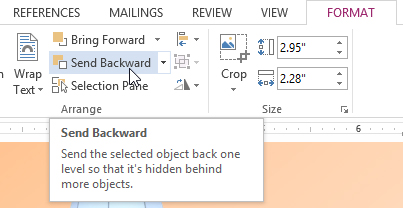
 - From the Format tab, click the Bring Forward or Send Backward command to change the object’s ordering by one level. If the object overlaps with more than one other object, you may need to click the command several times to achieve the desired ordering. In our example, we’ll select Send Backward.
 Sending an object backward
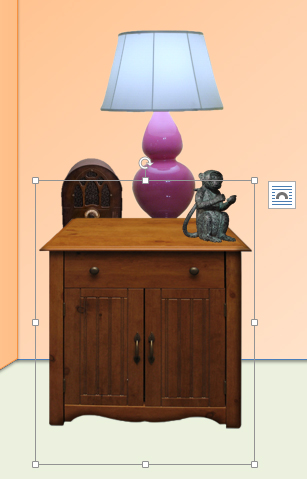
 - The objects will reorder. In our example, the table is now one level below the statue.
 The reordered objects
If you have several objects placed on top of each other, it may be difficult to select an individual object. The Selection Pane allows you to easily drag an object to a new location. To access the Selection Pane, click Selection Pane on the Format tab.
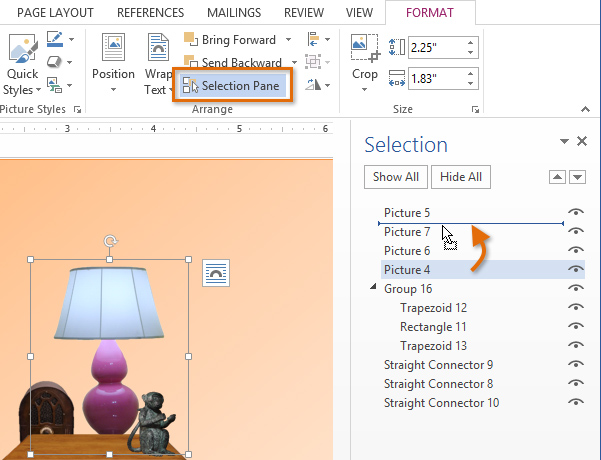 Arranging objects in the Selection Pane
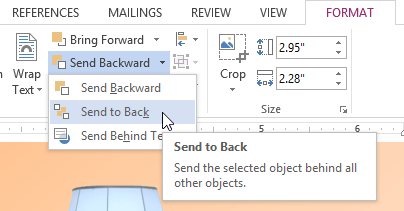
To bring an object to the front or back:
If you want to move an object behind or in front of several objects, it’s usually faster to bring it to front or send it to back instead of clicking the ordering commands multiple times.
- Select an object. The Format tab will appear.
- From the Format tab, click the Bring Forward or Send Backward drop-down box.
- From the drop-down menu, select Bring to Front or Send to Back.
 Sending an object to the back
 - The objects will reorder.
 The reordered objects
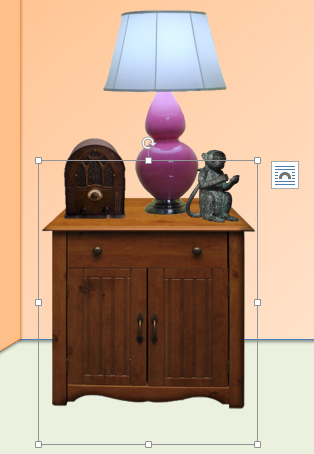
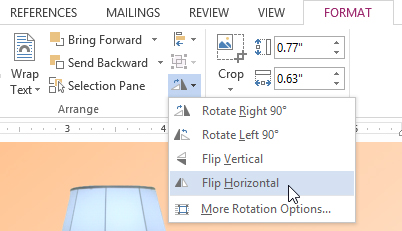
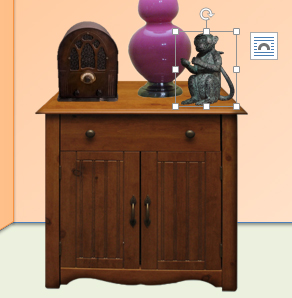
To rotate an object:
- Select an object. The Format tab will appear.
- From the Format tab, click the Rotate command. A drop-down menu will appear.
- Select the desired rotation option.
 Selecting a rotation option
 - The object will rotate.
 The rotated image
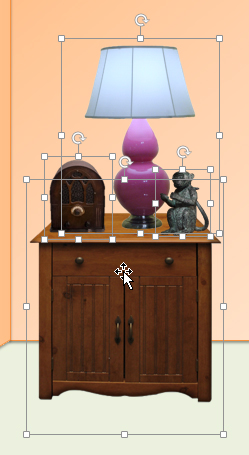
Grouping objects
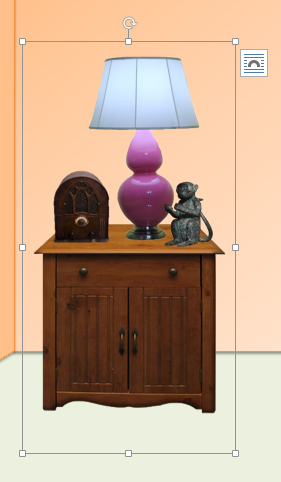
At times, you may want to group multiple objects into one object so they will stay together if they are moved or resized. Often, this is easier than selecting all of the objects every time you want to move them. Shapes, clip art, and text boxes can be grouped together.
To group objects:
- Hold the Shift (or Ctrl) key and click the objects you want to group.
 Selecting multiple objects
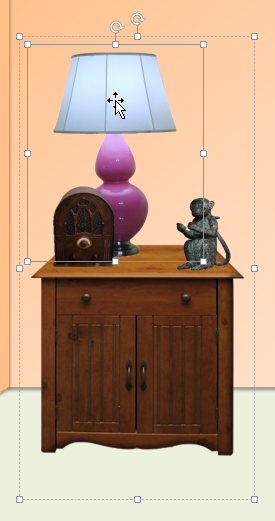
 - From the Format tab, click the Group command and select Group.
 Grouping objects
 - The selected objects will now be grouped. There will be a single box with sizing handles around the entire group to show that they are one object. You can now move or resize all of the objects at once.
 The grouped objects
If you want to edit or move one of the objects in the group, double-click to select the object. You can then edit it or move it to the desired location.
 Moving an object within a group
To ungroup objects:
- Select the grouped object you want to ungroup.
- From the Format tab, click the Group command and select Ungroup.
 Ungrouping objects
 - The objects will be ungrouped.
 The ungrouped objects
Challenge!
- Open an existing Word 2013 document that contains objects or images. If you want, you can use our practice document.
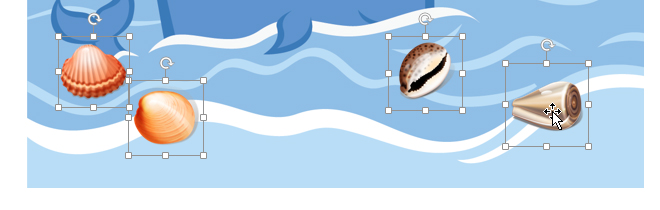
- Practice using the align options from the Align command. If you’re using the example, align the seashells and starfish so they are in a row.
- Practice using the rotate options.
- Create a new shape, then send it behind the other objects. If you’re using the example, bring the fish forward in front of the red text box.
- Group the objects into one object. If you’re using the example, group the red text box and the fish.
- Move the grouped object to a new location on the document.
- Ungroup the object.
/en/word2013/tables/content/
Как сгруппировать фигуры и объекты в Word
Текстовый редактор Word имеет встроенные инструменты для вставки в документ различных фигур и объектов. С их помощью можно строить несложные схемы и иллюстрации, которые будут хорошо дополнять текст. Более подробно о том, как пользоваться этими инструментами можно почитать в этой статье.
Здесь же мы расскажем о том, как сгруппировать фигуры и объекты Word. С помощью такой группировки можно объединить ряд фигур или объектов и в дальнейшем управлять ими как единым целым. Такая возможность бывает полезной в разных ситуациях, например, без группировки не обойтись в том случае, если нужно переместить нарисованную ранее схему в другое место документа. Также группировка будет полезной при изменении параметров большого количества объектов, например, при изменении цвета.
Статья будет полезной для пользователей всех современных версий Word, включая Word 2007, 2010, 2013 и 2016.
Группировка фигур и объектов в Word
Предположим у вас есть какая-то схема или набор фигур, которые вы хотите сгруппировать в один объект. Чтобы это сделать вам нужно сначала выделить мышкой все фигуры, которые входят в вашу схему. Для этого нажмите на кнопку CTRL или SHIFT на клавиатуре и не отпуская ее поочередно нажмите левой кнопкой мышки на каждую из фигур. Таким образом вы выделите все фигуры.

После выделения всех фигур, их можно сгруппировать. Для этого отпустите кнопку CTRL или SHIFT, которую вы удерживали, и кликните по выделенным фигурам правой кнопкой мышки. В появившемся меню выберите пункт «Группировать».

Также вы можете перейти на вкладку «Формат» и нажать там на кнопку «Группировать».

В любом случае после группировки выделенные объекты будут вести себя как единое целое и вы сможете без проблем перемещать их по документу Word.

Управление cгруппированными фигурами и объектами в Word
Также вы можете редактировать отдельные фигуры в группе не разделяя их. Например, можно изменить цвет объекта, добавить контуры или тени. Для этого нужно выделить мышкой сгруппированный объект, а потом еще одним кликом выделить отдельный объект внутри группы. После параметры выделенного объекта можно изменять, не разделяя всю группу. Для управления параметрами отдельных фигур или всей группы используйте инструменты на вкладке «Формат».

При необходимости к уже готовой группе фигур можно добавить еще одну или несколько новых фигур. Для этого просто нарисуйте нужные фигуры рядом с группой, после чего выделите новые фигуры и группу фигур и сгруппируйте их так как это описано в начале статьи.

Если вам нужно сгруппировать нарисованные фигуры и картинку (растровое изображение), то картинку нужно вставить внутрь объекта «Надпись». Иначе вы не сможете одновременно выделить мышкой и картинку, и фигуры. Делается это следующим образом, переходим на вкладку «Вставка», нажимаем на кнопку «Фигуры» и выбираем объект «Надпись».

После этого рисуем с помощью мышки рамку, которая будет ограничивать объект «Надпись». В результате вы получите рамку, в которую можно вставить текст или картинку (с помощью обычного перетаскивания). В дальнейшем рамку с надписью можно будет сгруппировать с другими фигурами.

Для того чтобы отменить группирование фигур или объектов нужно кликнуть по ним правой кнопкой мышки и выбрать пункт «Разгруппировать».
Посмотрите также:
- Как перевернуть страницу в Word
- Как построить график в Excel
- Как сделать альбомную страницу в Word
- Как сделать вертикальный текст в Word
- Как закрепить область в Экселе
Автор
Александр Степушин
Создатель сайта comp-security.net, автор более 2000 статей о ремонте компьютеров, работе с программами, настройке операционных систем.
Остались вопросы?
Задайте вопрос в комментариях под статьей или на странице
«Задать вопрос»
и вы обязательно получите ответ.