
Word for Microsoft 365 Word for Microsoft 365 for Mac Word 2021 Word 2021 for Mac Word 2019 Word 2019 for Mac Word 2016 Word 2016 for Mac Word 2013 Word 2010 More…Less
You can group shapes, pictures, or other objects. Grouping lets you rotate, flip, move, or resize multiple shapes or objects as though they’re a single shape or object.
Group shapes, pictures, or other objects
-
Press and hold CTRL and select shapes, pictures, or other objects to group.
The Wrap Text option for each object must be other than In line with Text. For more info, see Wrap Text.
-
Do one of the following:
-
Go to Picture Format or Picture Tools Format >
 Group > Group.
 -
Go to Shape Format or Drawing Tools Format > Group > Group.
To still work with an individual item in the group, select the group, and then select the item.
The Group button is enabled for two or more selected objects.
-
 Group > Group.
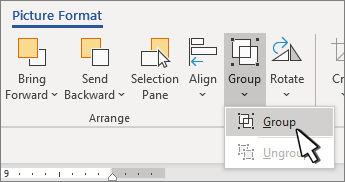
Group shapes, pictures, or objects
-
Press and hold CTRL while you select the shapes, pictures, or objects that you want to group.
The Wrap Text option for each object must be other than In line with Text. For more info, see Wrap Text.
-
Go to Drawing Tools or Picture Tools, on the Format tab, in the Arrange group, select Group
, and then select Group.
To work with an individual item in the group, select the group, and then select the item.
 , and then select Group.
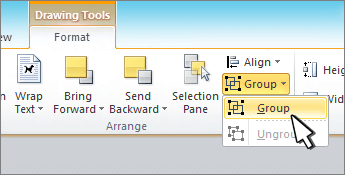
Group shapes, pictures, or other objects
-
Press and hold command while selecting the shapes, pictures, or other objects to group.
The Wrap Text option for each object must be other than In line with Text. For more info, see Wrap Text.
-
Go to Shape Format or Picture Format, and then select Group
> Group.If Group
isn’t visible on the ribbon, select Arrange to display it.
 > Group.
To work with an individual item in the group, select the group, and then select the item.
If the Group button is unavailable, verify that you have more than one object selected.
See also
For more info selecting shapes or pictures, see Select a shape or other object in Word.
SVG icons must converted to shapes before grouping. For more info, see Convert an SVG image to an Office shape.
Need more help?
![]()
Download Article
![]()
Download Article
- Grouping Objects in Word
- Why is the Group button grayed out?
- Q&A
|
|
Do you want to move or resize multiple pictures, shapes, or other objects in your document at the same time? Grouping objects in Microsoft Word is an efficient way to manipulate them to act as a whole instead of individual pieces. You can group shapes, pictures, and other objects so that if you wish to relocate them but not change the distance between them, they will move as one. This wikiHow article teaches you step-by-step how to group and ungroup shapes, pictures, and other objects in Word on your PC or Mac.
Things You Should Know
- Group items by selecting them and then going to «Layout > Group».
- Make sure none of the objects have the «In Line with Text» wrap setting before creating a group.
- If the Group option is grayed out, make sure you have more than one object selected & that none of the objects is a SVG, table, or worksheet.
-
1
Open your document in Word. You can either double-click the file in your file manager (Finder for Mac and File Explorer for Windows) or you can click the Word app icon and go to File > Open.
-
2
Make sure none of your objects are set to «In Line with Text.» If a picture or object you want to add to the group has its text wrapping set to «In Line with Text,» you won’t be able to select it while creating your group.[1]
Here’s how to check and change the text wrap settings:- Click any object you want to add to the group.
- Click the «Layout Options» icon that appears at the top-right corner.
- If the «In Line with Text» option is selected, choose any of the other text wrapping options.
- Repeat for all objects you want to group.
Advertisement
-
3
Select the objects you want to group. If you’re using Windows, press and hold Ctrl as you click each object. If you’re on a Mac, press and hold Cmd instead.
-
4
Click the Shape Format or Picture Format tab. You’ll see one or both of these tabs at the top of Word, depending on which objects you’ve selected. The option to group objects appears on both of these tabs.
- If you don’t see either of these tabs, click the Layout tab instead. You’ll also find the option to group here.
- If you’re using Office 2010, click the Drawing Tools or Picture Tools tab, then click the Format tab.[2]
-
5
Click Group on the toolbar. You’ll see this on the Arrange panel near the top-right corner of Word. If you don’t see this option, click Arrange to make it visible. A brief menu will expand.
-
6
Click Group again to group the selected objects. The objects are now grouped together, which allows you to rotate,
- To ungroup objects, click your group to select it, click the Layout tab, then select Ungroup.
- Once you’ve grouped, then separated a group, you can regroup it. Go to Layout > Regroup.


Advertisement
-
1
You can’t include SVG icons in your groups. If there are SVG icons in your selection, you’ll first have to convert the SVG icons to shapes, which is a feature that only Windows 365 subscribers have access to. There will be a «Convert to Shape» button under Graphics Tools > Format.
-
2
You only have one shape, picture, or object selected. Since you can’t create a group with only 1 item, you’ll need to add more items. Press and hold Ctrl (Windows) or Cmd (Mac) as you click to add other objects.
-
3
Your selection includes a table or worksheet. Unfortunately, you cannot add these things to your group.


Advertisement
Add New Question
-
Question
How can I group text boxes in Word?

Click one after the other while holding Ctrl. Then do a right-click and press ‘Group’.
-
Question
Microsoft Word wouldn’t allow me to group for some reason. Do you have any idea what I’m doing wrong?
Objects with «In Line» text wrapping and GIFs cannot be grouped. Since wrapping is difficult in a text box, it is best to move any items out of a text box, change the word wrap setting, and then group. You can then copy the group and paste it back into a text box and finish by deleting the group outside the box.
Ask a Question
200 characters left
Include your email address to get a message when this question is answered.
Submit
Advertisement
Thanks for submitting a tip for review!
About This Article
Thanks to all authors for creating a page that has been read 190,876 times.
Is this article up to date?

When you work with shapes and objects in Microsoft Word, one of the most convenient features is Grouping. By grouping these types of elements together, they become one. This makes moving, resizing, and formatting them easier.
Maybe you’re making a flowchart or creating instructions using arrows in Word. You can group them to control them at the same time.
Select all of the shapes or objects that you want to group. You can do this by holding Ctrl (Windows) or Command (Mac) and clicking each one. If you want to group all elements in your document, you can use Ctrl+A (Windows) or Command+A (Mac) to speed things up.
When you have the shapes or objects selected, you’ll see a border indicator for each. This is a good way to make sure that you have them all selected.

Go to the Layout tab and the Arrange section of the ribbon. Click “Group” and select “Group.” Alternatively, you can right-click, move your cursor to Grouping, and pick “Group.”
You’ll then see all of those shapes or objects within one border area. It’s now a single element.
Then, you can drag to move the group, resize it using one of the corners, add color to the elements, or perform whatever action you need.
In the screenshot below, we’re moving the group upward. You can see the outline of each element in the group, but they stay together.
How to Ungroup Objects in Word
Once you group your shapes or objects together, they don’t have to stay that way forever. You might only group them to execute a few actions and then want to work with them individually again.
Select the group and go back to the Layout tab. Click “Group” and select “Ungroup.”
Alternatively, you can right-click, move your cursor to Grouping, and pick “Ungroup.”
You’ll then see all elements in the group within their own borders like before you grouped them initially.
How to Regroup Objects
A super handy trick after you’ve grouped and then ungrouped your objects is that you can easily regroup them. The best part is that you don’t have to click each one.
Simply select one of the objects that was in the group and go to the Layout tab once more. Click “Group” and select “Regroup.”
Or, you can right-click, move to Grouping, and pick “Regroup.”
Like magic, Word remembers the shapes and objects that were in the group and regroups them for you!
For additional tips, check out our tutorial on working with shapes, pictures, and other graphics in Microsoft Word.
READ NEXT
- › How to Group Images in Google Docs
- › BLUETTI Slashed Hundreds off Its Best Power Stations for Easter Sale
- › How to Adjust and Change Discord Fonts
- › Expand Your Tech Career Skills With Courses From Udemy
- › Google Chrome Is Getting Faster
- › Mozilla Wants Your Feature Suggestions for Thunderbird
- › The New NVIDIA GeForce RTX 4070 Is Like an RTX 3080 for $599
How-To Geek is where you turn when you want experts to explain technology. Since we launched in 2006, our articles have been read billions of times. Want to know more?
In the following text, there are 4 effective ways which enable you to quickly select and group multiple objects in your Word document.
It’s not unusual for some of you to create a Word document with plenty of shapes, text boxes, and pictures, etc. And there are also occasions when you have to select them to group so you can move them together instead of operating one by one. Doubtlessly, the question lies at how to select numerous objects. So we will take the example of selecting several flowchart shapes to demonstrate you the 4 methods.
Method 1: Group Objects by Selecting them One by One
Obviously, you can select number of objects one by one.
- Firstly, suppose we have an example as below:


Press either “Ctrl” or “Shift”.
- Then left click shapes to be group one by one.
- Next right click.
- Click “Group” option on the list-menu.
- And again click “Group” on the extend list-menu.


Now you have succeeded in grouping these objects, and you can move them together as a whole.
Method 2: Group Objects by Selecting them on “Selection Pane”
- This time click “Page Layout” tab first.
- Then click “Selection Pane” in “Arrange” group.

- Next on the right side of the document, there will open the “Selection Pane” where you can see all the shapes on a certain page. Press “Ctrl” and hold on.
- And click the shape name on the pane one by one. You can see the shapes on the document page have been selected.

- Then repeat from step 3 to step 5 in method 1.


Method 3: Group Objects by Using “Select Objects” Option in Word 2010
Here is what you need to know that you are unable to use “Select Objects” option in Word 2010 directly but to insert a “New Drawing Canvas” into Word document first before you insert all the shapes.
- To begin with, click “Insert” tab.
- Then choose “Shapes” in “Illustrations” group.
- Next click “New Drawing Canvas”.

- Then insert shapes you need on the drawing canvas.
- Next, click “Home” tab.
- And go to click “Select” option in “Editing” group.
- Choose “Select Objects” on the list-menu.

- Now you can see the indication on the left-down corner of the document page, such as below:


Just follow the lead, and click and drag to draw an area including all objects on the canvas so as to select them.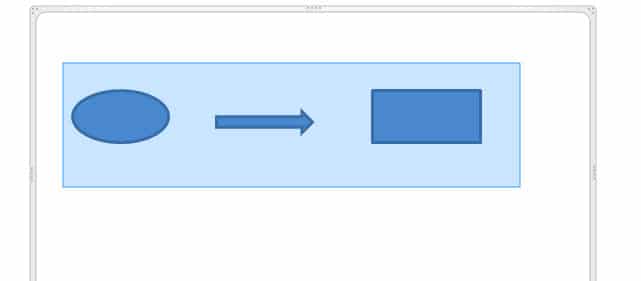

- Again repeat from step 3 to step 5 in method 1.
Method 4: Group Objects by Using “Select Objects” Option in Other Word Versions
Actually, in all Word versions except Word 2010, you can use “Select Objects” option directly to select and group objects without inserting a canvas first. What you need to do is follow from step 5 to step 9 in method 3.
Also you can save the .docxs file as .doc file so you can select objects on document directly.
And if you try to group pictures, then you have to change the pictures’ “Text Wrapping” style into any one but “In line with text”.
Comparison
| Methods | Advantages | Disadvantages |
| Method 1: Group Objects by Selecting them One by One | 1. It’s an easy and simple way.
2. You can apply this method no matter what Word version you’re using. |
1. You have to select objects one by one.
2. You could miss some small objects since there are too many. |
| Method 2: Group Objects by Selecting them on “Selection Pane” | 1. It’s an easy and simple way.
2. You won’t miss objects since they are listed on the pane. 3. You can apply this method no matter what Word version you’re using. |
You have to select objects one by one. |
| Method 3: Group Objects by Using “Select Objects” Option in Word 2010
& Method 4: Group Objects by Using “Select Objects” Option in Other Word Versions |
1. You can select multiple objects at one time.
2. You’re less likely to miss some objects. 3. If you are not using Word 2010, then you can select multiple objects directly by drawing an area to include them. |
1. For Word 2010 users, you have to insert a drawing canvas before inserting shapes into documents so as to select them multiply.
2. For Word 2010 users, you may need to save the .docx file as .doc file so as to select objects directly. |
Keep Handy a High Efficiency Recover Tool
Basically, in modern business practices, time is money. So there is not so much time for you to think about what to do once you get files corrupted. Therefore, the best way is to keep a well-functioned Word file repair tool in place so you can address the corruption issues efficiently.
Author Introduction:
Vera Chen is a data recovery expert in DataNumen, Inc., which is the world leader in data recovery technologies, including corrupted Excel file repair and pdf repair software products. For more information visit www.datanumen.com
If you work with several objects and have to move them or apply shared formatting to them, you must select
these objects every time. Apply formal grouping, and you will be able to operate those objects quickly as a
unit.
To group several objects, select all objects you want to group by pressing Ctrl or
Shift and clicking every of these objects:

Then do one of the following:
- On the Format tab, in the Arrange group, click the Group command:

- Right-click one of the objects and choose Group -> Group from the popup menu:


Word puts a single box around the objects instead of a separate box around each object:

To ungroup grouped objects, do one of the following:
- On the Format tab, in the Arrange group, click Ungroup:
- Right-click a grouped object, and then choose Group -> Ungroup from the popup menu:


See also this tip in French:
Grouper et dissocier des objets.
Please, disable AdBlock and reload the page to continue
Today, 30% of our visitors use Ad-Block to block ads.We understand your pain with ads, but without ads, we won’t be able to provide you with free content soon. If you need our content for work or study, please support our efforts and disable AdBlock for our site. As you will see, we have a lot of helpful information to share.