
You can group shapes, pictures, or other objects (but not text boxes). Grouping lets you rotate, flip, move, or resize all shapes or objects at the same time as though they were a single shape or object.
You can also change the attributes of all of the shapes in a group at one time, such as adding a shape fill or effect, or an effect to a picture. You can ungroup a group of shapes at any time and then regroup them later.
Click the headings below for more information
-
Press and hold CTRL while you click the shapes, pictures, or other objects to group. You will need to select more than one shape, picture or object in order to enable the Group button.
-
Do one of the following:
Tips:
-
To group multiple SVG icons together you have to convert them to shapes first. For more information on converting them to shapes, see: Convert an SVG image to an Office shape.
-
After you make your group, you can still work with a single item in the group. Select the group, and then click the item to select it.
-
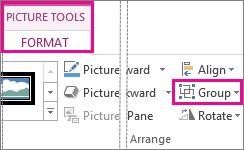
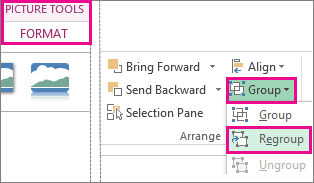
To group pictures, on the Picture Tools Format tab, click Group > Group.

Note: The Drawing Tools Format or Picture Tools Format tabs are contextual, which means that they only appear on the ribbon when you have a shape or a picture selected.
-
To group shapes and other objects, on the Drawing Tools Format tab, click Group > Group.
-

-
Select the group that you want to ungroup.
-
Do one of the following:
-
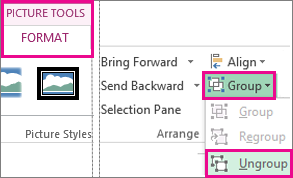
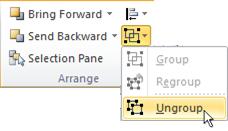
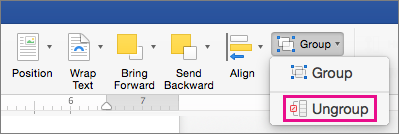
To ungroup pictures, on the Picture Tools Format tab, click Group > Ungroup.
-
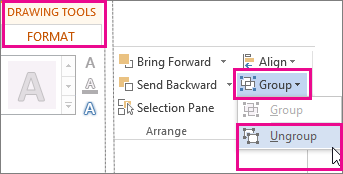
To ungroup shapes and objects, on the Drawing Tools Format tab, click Group > Ungroup.
-
Notes:
-
If you converted a SmartArt graphic to individual shapes, you can’t convert them back to a SmartArt graphic or regroup them.
-
Select any one of the shapes, pictures, or objects that were previously in a group.
-
Do one of the following:
-
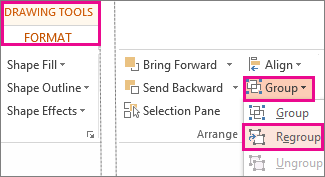
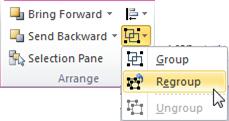
To regroup shapes and objects, on the Drawing Tools Format tab, click Group > Regroup.
-
To regroup pictures, on the Picture Tools Format tab, click Group > Regroup.
-
Here are some reasons why the Group button is grayed out and the things you can do to get it back.
-
Only one shape or picture is selected. Make sure you have multiple shapes or pictures selected. You can’t use the Group tool with SVG icons, so those don’t count.
-
To group SVG icons together you have to convert them to shapes first. For more information on converting them to shapes, see: Convert an SVG image to an Office shape.
-
Your selection includes a table, worksheet, or GIF image. The Group button will not be available if any of these objects is selected.
-
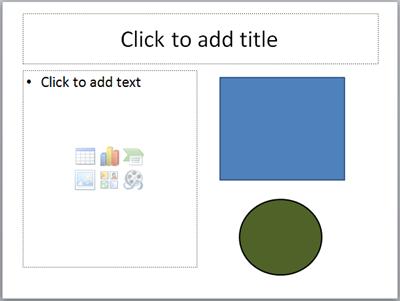
If you are using PowerPoint, you might have tried to group something with the title placeholder text (“Click to add title”) or with the content placeholder (“Click to add text”).
In the above example, the blue square and the green circle can be grouped together. But the shapes cannot be grouped with the placeholder text.
To get the Group button back, move the shape, picture, or object to another location on your slide outside of the placeholder text, or remove the placeholder from the things you want to group.
Click the headings below for more information
-
Press and hold CTRL while you select the shapes, pictures, or objects that you want to group.
-
Do one of the following:
-
To group pictures: under Picture Tools, on the Format tab, in the Arrange group, click
, and then click Group.If you do not see the Drawing Tools or Picture Tools tabs, make sure that you selected a shape, picture, or other object. You might have to double-click the object to open the Format tab.
-
To group shapes and other objects: under Drawing Tools, on the Format tab, in the Arrange group, click
, and then click Group .
Tip: After you group items, you can continue to select any single item within the group. Select the group, and then click the individual item that you want to select.
-
 , and then click Group.
-
Select the group that you want to ungroup.
-
Do one of the following:
-
To ungroup shapes or other objects, under Drawing Tools, on the Format tab, in the Arrange group, click Group
, and then click Ungroup.
-
To ungroup pictures, under Picture Tools, on the Format tab, in the Arrange group, click
, and then click Ungroup.
If you do not see the Drawing Tools, Picture Tools, or Format tabs, make sure that you selected a group of shapes, pictures, or other objects. You might have to double-click the object to open the Format tab.
-
-
Select any one of the shapes or objects that were previously in a group.
Note: If you converted a SmartArt graphic to individual shapes, it is not possible to convert them back to a SmartArt graphic or to regroup them.
-
Do one of the following:
-
To regroup shapes and objects: under Drawing Tools, on the Format tab, in the Arrange group, click
, and then click Regroup. -
To regroup pictures: under Picture Tools, on the Format tab, in the Arrange group, click
, and then click Regroup.
If you do not see the Drawing Tools, Picture Tools, or Format tabs, make sure that you selected a group of shapes, pictures, or other objects. You might have to double-click the object to open the Format tab.
-
If your selection includes a table, worksheet, or GIF image, the Group button will not be available. In PowerPoint, the Group button may not be available if the shape, picture or object has been inserted into a placeholder or you are trying to group a placeholder, as placeholders cannot be grouped with other shapes, pictures, objects.
-
Move the shape, picture, or object to another location on your slide outside of the placeholder or remove the placeholder from the objects that you want to group.
Group shapes, pictures, or other objects
-
Press and hold command while you use the mouse or touchpad to select the shapes, pictures, or other objects that you want to group.
-
Click the Shape Format tab or the Picture Format tab, and then click Group > Group.
Note: The Shape Format and Picture Format tabs are contextual, which means that they only appear on the ribbon when you have a shape or a picture selected.
Microsoft 365 may display one or both of these tabs, depending on the types of objects that are currently selected in a page.
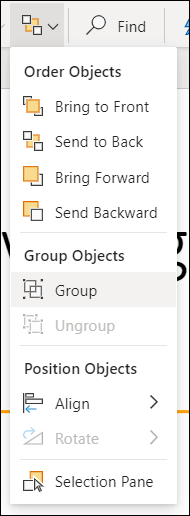
If Group isn’t visible on the ribbon,
, click Arrange to display it.


 , click Arrange to display it.
After you make a group of objects, you can still work with an individual item in the group by selecting the group, and then clicking the item to select it.
Note: If the Group button is unavailable, verify that you have more than one object selected. If you can’t select an additional object, verify that none of the objects that you want to add to the group has Word Wrap set to In Line with Text.
You might want to move a group but leave one shape or picture behind, or you might need to make extensive changes to one shape without changing the other shapes in the group. To do this, you first dissolve, or ungroup, the grouping of objects.
-
Select the group that has the object or objects that you want to separate from the others.
-
On the Shape Format tab or the Picture Format tab, click Group, and then click Ungroup.
If Group isn’t visible on the ribbon,
, click Arrange to display it.Microsoft 365 dissolves the group, leaving the individual objects in their current location and selected.
Note: If you converted a SmartArt graphic to individual shapes, you can’t convert them back to a SmartArt graphic or regroup them.
-
Select any one of the shapes, pictures, or objects that were previously in a group.
-
Do one of the following:
-
To regroup shapes and objects, on the Shape Format tab, click Group > Regroup.
-
To regroup pictures, on the Picture Format tab, click Group > Regroup.
-
Here are some reasons why the Group button is grayed out and the things you can do to get it back.
-
Only one shape or picture is selected. Make sure you have multiple shapes or pictures selected. You can’t use the Group tool with SVG icons, so those don’t count.
-
Your selection includes a table, worksheet, or GIF image. The Group button will not be available if any of these objects is selected.
-
If you are using PowerPoint, you might have tried to group something with the title placeholder text (“Click to add title”) or with the content placeholder (“Click to add text”).
In the above example, the blue square and the green circle can be grouped together. But the shapes cannot be grouped with the placeholder text.
To get the Group button back, move the shape, picture, or object to another location on your slide outside of the placeholder text, or remove the placeholder from the things you want to group.
Group shapes, pictures, or other objects
-
Press and hold CTRL while you click the shapes, pictures, or other objects to group. You will need to select more than one shape, picture or object in order to enable the Group button. You can select all the objects on a slide by pressing CTRL+A.
-
Select the Arrange button and choose Group.
Tip: To ungroup objects select the group, select the Arrange button and select Ungroup.
Содержание
- Свойство GroupShapes.Range (Excel)
- Синтаксис
- Параметры
- Замечания
- Пример
- Поддержка и обратная связь
- Working with shapes (drawing objects)
- Setting properties for a shape
- Applying a property or method to several shapes at the same time
- Creating a ShapeRange collection that contains all shapes on a sheet
- Applying a property or method to a ShapeRange collection
- Looping through a Shapes or ShapeRange collection
- Aligning, distributing, and grouping shapes in a ShapeRange
- See also
- Support and feedback
- VBA Vault
- Group All Shapes Within A Selection Of Cells
- What This VBA Code Does
- VBA Code:
- Using VBA Code Found On The Internet
- Getting Started Automating Excel
- How Do I Modify This To Fit My Specific Needs?
Свойство GroupShapes.Range (Excel)
Возвращает объект ShapeRange , представляющий подмножество фигур в коллекции Shapes .
Синтаксис
expression. Диапазон (индекс)
Выражение Переменная, представляющая объект GroupShapes .
Параметры
| Имя | Обязательный или необязательный | Тип данных | Описание |
|---|---|---|---|
| Индекс; | Обязательный | Variant | Отдельные фигуры, которые будут включены в диапазон. Может быть целым числом, указывающим номер индекса фигуры, строкой, указывающей имя фигуры, или массивом, содержащим либо целые числа, либо строки. |
Замечания
Хотя свойство Range можно использовать для возврата любого количества фигур, проще использовать метод Item , если требуется вернуть только один член коллекции. Например, проще, Shapes(1) чем Shapes.Range(1) .
Пример
В этом примере задается шаблон заливки для фигур один и три в myDocument.
Чтобы указать массив целых чисел или строк для index, можно использовать функцию Array . Например, следующая инструкция возвращает две фигуры, указанные по имени.
В Microsoft Excel это свойство нельзя использовать для возврата объекта ShapeRange , содержащего все объекты Shape на листе. Вместо этого используйте следующий код.
В этом примере задается шаблон заливки для фигур с именами Oval 4 и Rectangle 5 в myDocument.
В этом примере задается шаблон заливки для фигуры в myDocument.
В этом примере создается массив, который содержит все автофигуры в myDocument, использует этот массив для определения диапазона фигур, а затем распределяет все фигуры в этом диапазоне по горизонтали.
Поддержка и обратная связь
Есть вопросы или отзывы, касающиеся Office VBA или этой статьи? Руководство по другим способам получения поддержки и отправки отзывов см. в статье Поддержка Office VBA и обратная связь.
Источник
Working with shapes (drawing objects)
Shapes, or drawing objects, are represented by three different objects:
| Object | Description |
|---|---|
| Shapes collection | Use to create shapes and to iterate through all the shapes on a given worksheet. |
| ShapeRange collection | Use to modify multiple shapes the same way you work with multiple shapes in the user interface. |
| Shape object | Use to format or modify a single shape. |
Setting properties for a shape
Many formatting properties of shapes are not set by properties that apply directly to the Shape or ShapeRange object. Instead, related shape attributes are grouped under secondary objects, such as the FillFormat object, which contains all the properties that relate to the shape’s fill, or the LinkFormat object, which contains all the properties that are unique to linked OLE objects.
To set properties for a shape, you must first return the object that represents the set of related shape attributes and then set properties of that returned object. For example, you use the Fill property to return the FillFormat object, and then you set the ForeColor property of the FillFormat object to set the fill foreground color for the specified shape, as shown in the following example.
Applying a property or method to several shapes at the same time
In the user interface, you can perform some operations with several shapes selected; for example, you can select several shapes and set all their individual fills at once. You can perform other operations with only a single shape selected; for example, you can edit the text in a shape only if a single shape is selected.
In Visual Basic, there are two ways to apply properties and methods to a set of shapes. These two ways allow you to perform any operation that you can perform on a single shape on a range of shapes, whether or not you can perform the same operation in the user interface.
If the operation works on multiple selected shapes in the user interface, you can perform the same operation in Visual Basic by constructing a ShapeRange collection that contains the shapes you want to work with, and applying the appropriate properties and methods directly to the ShapeRange collection.
If the operation does not work on multiple selected shapes in the user interface, you can still perform the operation in Visual Basic by looping through the Shapes collection or through a ShapeRange collection that contains the shapes you want to work with, and applying the appropriate properties and methods to the individual Shape objects in the collection.
Many properties and methods that apply to the Shape object and ShapeRange collection fail if applied to certain kinds of shapes. For example, the TextFrame property fails if applied to a shape that cannot contain text.
If you are not positive that each of the shapes in a ShapeRange collection can have a certain property or method applied to it, don’t apply the property or method to the ShapeRange collection. If you want to apply one of these properties or methods to a collection of shapes, you must loop through the collection and test each individual shape to make sure it is an appropriate type of shape before applying the property or method to it.
Creating a ShapeRange collection that contains all shapes on a sheet
You can create a ShapeRange object that contains all the Shape objects on a sheet by selecting the shapes and then using the ShapeRange property to return a ShapeRange object containing the selected shapes.
In Microsoft Excel, the Index argument is not optional for the Range property of the Shapes collection, so you cannot use this property without an argument to create a ShapeRange object containing all shapes in a Shapes collection.
Applying a property or method to a ShapeRange collection
If you can perform an operation on multiple selected shapes in the user interface at the same time, you can do the programmatic equivalent by constructing a ShapeRange collection and then applying the appropriate properties or methods to it. The following example constructs a shape range that contains the shapes named «Big Star» and «Little Star» on myDocument and applies a gradient fill to them.
The following are general guidelines for how properties and methods behave when they are applied to a ShapeRange collection.
Applying a method to the collection is equivalent to applying the method to each individual Shape object in that collection.
Setting the value of a property of the collection is equivalent to setting the value of the property of each individual shape in that range.
A property of the collection that returns a constant returns the value of the property for an individual shape in the collection if all shapes in the collection have the same value for that property. If not all shapes in the collection have the same value for the property, it returns the «mixed» constant.
A property of the collection that returns a simple data type (such as Long, Single, or String) returns the value of the property for an individual shape if all shapes in the collection have the same value for that property.
The value of some properties can be returned or set only if there is exactly one shape in the collection. If the collection contains more than one shape, a run-time error occurs. This is generally the case for returning or setting properties when the equivalent action in the user interface is possible only with a single shape (actions such as editing text in a shape or editing the points of a freeform).
The preceding guidelines also apply when you are setting properties of shapes that are grouped under secondary objects of the ShapeRange collection, such as the FillFormat object. If the secondary object represents operations that can be performed on multiple selected objects in the user interface, you’ll be able to return the object from a ShapeRange collection and set its properties.
For example, you can use the Fill property to return the FillFormat object that represents the fills of all the shapes in the ShapeRange collection. Setting the properties of this FillFormat object will set the same properties for all the individual shapes in the ShapeRange collection.
Looping through a Shapes or ShapeRange collection
Even if you cannot perform an operation on several shapes in the user interface at the same time by selecting them and then using a command, you can perform the equivalent action programmatically by looping through a Shapes or ShapeRange collection that contains the shapes you want to work with, applying the appropriate properties and methods to the individual Shape objects in the collection.
The following example loops through all the shapes on myDocument and changes the foreground color for each AutoShape shape.
The following example constructs a ShapeRange collection that contains all the currently selected shapes in the active window and sets the foreground color for each selected shape.
Aligning, distributing, and grouping shapes in a ShapeRange
Use the Align and Distribute methods to position a set of shapes relative to one another or relative to the document that contains them.
Use the Group method or the Regroup method to form a single grouped shape from a set of shapes.
See also
Support and feedback
Have questions or feedback about Office VBA or this documentation? Please see Office VBA support and feedback for guidance about the ways you can receive support and provide feedback.
Источник
VBA Vault
An Excel, PowerPoint, & MS Word blog providing handy and creative VBA code snippets. These macro codes are well commented and are completely functional when copied into a module.
Group All Shapes Within A Selection Of Cells

What This VBA Code Does
This VBA code is a nifty little I created to solve the hassle of selecting each shape individually in order to group them. With this code, you can essentially select a range of cells and any shapes within that selected range will get automatically grouped together. Once you have this capability added to your personal macro workbook, you won’t know how you ever lived without it! Enjoy!!
VBA Code:
Sub GroupShapesInsideCellRange()
‘PURPOSE: Group all Shapes within a User’s Selected Range
‘SOURCE: www.TheSpreadsheetGuru.com/the-code-vault
Dim shp As Shape
Dim rng As Range
Dim grp As Object
‘Pull-in what is selected on screen
Set UserSelection = ActiveWindow.Selection
‘Test to see if there is a range selected by the user
On Error Resume Next
Set rng = Selection
On Error GoTo 0
‘Group Shapes Within Selected Range
If Not rng Is Nothing Then
‘Hide any Shape Outside of User’s Selected Range
For Each shp In ActiveSheet.Shapes
If Intersect(rng, shp.TopLeftCell) Is Nothing And _
Intersect(rng, shp.BottomRightCell) Is Nothing Then
If shp.Type <> msoComment Then shp.Visible = msoFalse
End If
Next shp
‘Select All Visible Shapes
On Error GoTo Skip
ActiveSheet.Shapes.SelectAll
On Error GoTo 0
‘Group Shapes Together and select
If VarType(Selection) = 9 Then
Set grp = Selection.Group
grp.Select
End If
Skip:
‘Unhide the rest of the Shapes
For Each shp In ActiveSheet.Shapes
If shp.Type <> msoComment Then
If shp.Visible = msoFalse Then shp.Visible = msoTrue
End If
Next shp
End If
Using VBA Code Found On The Internet
Now that you’ve found some VBA code that could potentially solve your Excel automation problem, what do you do with it? If you don’t necessarily want to learn how to code VBA and are just looking for the fastest way to implement this code into your spreadsheet, I wrote an article (with video) that explains how to get the VBA code you’ve found running on your spreadsheet.
Getting Started Automating Excel
Are you new to VBA and not sure where to begin? Check out my quickstart guide to learning VBA. This article won’t overwhelm you with fancy coding jargon, as it provides you with a simplistic and straightforward approach to the basic things I wish I knew when trying to teach myself how to automate tasks in Excel with VBA Macros.
Also, if you haven’t checked out Excel’s latest automation feature called Power Query, I have put together a beginner’s guide for automating with Excel’s Power Query feature as well! This little-known built-in Excel feature allows you to merge and clean data automatically with little to no coding!
How Do I Modify This To Fit My Specific Needs?
Chances are this post did not give you the exact answer you were looking for. We all have different situations and it’s impossible to account for every particular need one might have. That’s why I want to share with you: My Guide to Getting the Solution to your Problems FAST! In this article, I explain the best strategies I have come up with over the years to get quick answers to complex problems in Excel, PowerPoint, VBA, you name it!
I highly recommend that you check this guide out before asking me or anyone else in the comments section to solve your specific problem. I can guarantee that 9 times out of 10, one of my strategies will get you the answer(s) you are needing faster than it will take me to get back to you with a possible solution. I try my best to help everyone out, but sometimes I don’t have time to fit everyone’s questions in (there never seem to be quite enough hours in the day!).
I wish you the best of luck and I hope this tutorial gets you heading in the right direction!
Источник
I am iterating over data on the Electrical Tables sheet and creating shapes on a Shape sheet. Once the shapes are created I would like to programmatically group them. However I can’t figure out the right syntax. The shapes are there, selected, and if I click the group button, they group perfectly. However with the following code I get
Runtime Error 438 Object does not support this method or property.
I am basing this code on VBA examples off the web — I am not a strong VBA programmer. What is the right way to do this? I am working with excel 2007 and switching excel versions isn’t an option.
Problematic snippet:
Set shapeSheet = Worksheets("Shapes")

With shapeSheet
    Selection.ShapeRange.Group.Select
End With
Context:
Dim shapeSheet As Worksheet
Dim tableSheet As Worksheet
Dim shpGroup As Shape

Set shapeSheet = Worksheets("Shapes")
Set tableSheet = Worksheets("Electrical Tables")


With tableSheet
    For Each oRow In Selection.Rows
            rowCount = rowCount + 1
            Set box1 = shapeSheet.Shapes.AddTextbox(msoTextOrientationHorizontal, 50, 50 + ((rowCount - 1) * 14), 115, 14)
            box1.Select (False)
            Set box1Frame = box1.TextFrame
            Set box2 = shapeSheet.Shapes.AddTextbox(msoTextOrientationHorizontal, 165, 50 + ((rowCount - 1) * 14), 40, 14)
            box2.Select (False)
            Set box2Frame = box2.TextFrame
     Next
End With

Set shapeSheet = Worksheets("Shapes")

With shapeSheet
    Selection.ShapeRange.Group.Select
End With
Hi there,
I’m using VS 2015 and Excel 2016 to develop my Addin.
In the below function, I’ve created a button to add the shapes in Excel depending on how user select the cell.
Private Sub MultiIllu_Click(sender As Object, e As RibbonControlEventArgs) Handles MultiIllu.Click
        Dim app As Excel.Application = Globals.ThisAddIn.Application
        Dim shp As Excel.Shape
        Dim sht As Excel.Worksheet = app.ActiveWorkbook.ActiveSheet
        Dim arrow As Excel.Shape
        Dim connectorref As Excel.Shape = Nothing
        Dim r As Excel.Range
        Dim i As Integer = Nothing

        Dim selection As String = app.Selection.Address(ReferenceStyle:=Excel.XlReferenceStyle.xlA1,
                                        RowAbsolute:=False, ColumnAbsolute:=False)

        r = app.Range(selection)
        shp = app.ActiveSheet.Shapes.Addconnector _
(Microsoft.Office.Core.MsoConnectorType.msoConnectorStraight, r.Left + r.Width + 8, r.Top + 10, r.Left + r.Width + 8, r.Height + r.Top + 8)
        shp.Line.ForeColor.RGB = RGB(255, 0, 0)

        arrow = app.ActiveSheet.Shapes.Addconnector _
(Microsoft.Office.Core.MsoConnectorType.msoConnectorStraight, r.Left + r.Width + 8, r.Height + r.Top + 8, r.Left + r.Width + 22, r.Top + r.Height + 8)
        arrow.Line.ForeColor.RGB = RGB(255, 0, 0)
        arrow.Line.EndArrowheadStyle = Microsoft.Office.Core.MsoArrowheadStyle.msoArrowheadTriangle

        For i = 0 To (r.Height / 16.5 - 1)
            connectorref = app.ActiveSheet.Shapes.Addconnector _
(Microsoft.Office.Core.MsoConnectorType.msoConnectorStraight, r.Left + r.Width, r.Top + 10 + i * 16.5, r.Left + r.Width + 8, r.Top + 10 + i * 16.5)
            connectorref.Line.ForeColor.RGB = RGB(255, 0, 0)            connectorref.Name = "connectorref" & i
        Next

        'Group shps all together
        Dim MidObj As Object() = New Object() {shp.Name, arrow.Name, connectorref.Name}

        app.ActiveSheet.Shapes.Range(MidObj).Group()

    End Sub
I want to group all the shapes I created. I think I can use loop like do until to achieve that, but somehow I stuck here.
How should I do to add the
connectorref.Name programmatically depending on the variable i?
Dim MidObj As Object() = New Object() {shp.Name, arrow.Name,
(connectorref0, connectorref1, to .... connectorref(r.Height / 16.5 - 1))}
Please help me!
Any suggestion would be appreciated. Thanks a lot in advance.
-
#2
I suggest you record a macro.
Once shapes are grouped we cannot change them individually.
You may just need to change the size of the Group.
(select the group and look at name box top left of sheet)
-
#3
Thank-you for getting back!
This I’ve discovered through trial and error.
Any tier of Grouped Shapes CAN be accessed through VBA (2007).
If the Work Sheet contains 2 or more Groups or Shapes with the same name, the code below will access the Group or shape at the bottom on the Selection and Visibility pane only (in this case «Outside Diameter»).
Sub Shapes()
ActiveSheet.Shapes(«Outside Diameter»).LockAspectRatio = msoFalse
ActiveSheet.Shapes(«Outside Diameter»).Height = 40
ActiveSheet.Shapes(«Outside Diameter»).Width = 40
ActiveSheet.Shapes(«Outside Diameter»).LockAspectRatio = msoTrue
End Sub
So at this point I’m looking for a way to get the Code to move through all the Groups or Shapes that match it’s criteria.
Ian
-
#5
That occurred to me — that I should give each Shape a unique name.
I am having the same problem as crackjack in that when I record Macros, there’s nothing Recorded.
Ian
-
#6
2010 does record Drawing Tools based Macros, so that’s helpful.
Ian
-
#7
I can get this code to work for one Shape, but not multiple.
Not have time to do code. If you set a variable to include all shapes in a ShapeRange (search on this) you can change the whole lot in one go.
-
#8
Thank-you Brian.
I’m also thinking the AutoShapes may be more solid with 2010, in that they don’t change size on their own (which was the case with 2007).
Ian
-
#9
may be more solid with 2010,
Works fine in XL2000

ZVI
MrExcel MVP
-
#10
Hi Ian,
1) I would suggest to install all service packs for Excel 2007.
2) All shapes even items of the grouped one are accessible via VBA:
Rich (BB code):
Sub Test()
  Dim Shp1 As Shape, Shp2 As Shape
  On Error Resume Next
  For Each Shp1 In ActiveSheet.Shapes
    Debug.Print Shp1.Name, Shp1.Width, Shp1.Height
    For Each Shp2 In Shp1.GroupItems
      Debug.Print vbTab & Shp2.Name, Shp2.Width, Shp2.Height
'      If Shp2.Name = "MyShapeName" Then
'        Shp2.Width = 36
'        Shp2.Height = 258
'      End If
    Next
  Next
End Sub
Regards,
Vladimir