
I might be late to the party here but I have found a solution that will work using the inbuilt filtering options of the GridMvc plugin. This solution DOES not require any client side manipulations or custom filter applying. This is how you go about it.
When you install the plugin, it generates a partial view called: _Grid.cshtml which is found at: ~/Views/Shared/_Grid.cshtml location.
Now I had observed that everytime you invoke an event on the grid, this partial view is called and I then debugged into the flow and found that the Model in question has different properties like RenderOptions, ItemsToDisplay etc.
So I found that the filtered data is also stored but not directly in a property. There is a property called: ItemsToDisplay but unfortunately if you apply paging on the grid then it will only store the first n items where n is the paging limit.
Then finally I had to resort to reflection to get the entire filtered list which impacts the performance of the grid but not very much and it will get the job done.
_Grid.cshtml:
@using GridMvc.Columns
@using System.Reflection;
@model GridMvc.IGrid
@{
    try
    {
        Type t = typeof(GridMvc.Html.GridHtmlOptions<MyModel>);
        FieldInfo[] fi = t.GetFields(BindingFlags.Public | BindingFlags.Instance | BindingFlags.NonPublic);
        foreach (FieldInfo info in fi)
        {
            if (info.Name == "_source")
            {
                object _source = info.GetValue(Model);
                PropertyInfo gridItemsProperty = _source.GetType().GetProperty("GridItems");
                object gridItemsData = gridItemsProperty.GetValue(_source);
                //Set the filtered list here in Session
                Session["CurrentFilteredGridForExcelExport"] = (IEnumerable<MyModel>)(gridItemsData);
            }
        }
    }
    catch
    {

    }
}

@if (Model.RenderOptions.RenderRowsOnly)
{
    @RenderGridBody();
}
else
{
    <div class="grid-mvc" data-lang="@Model.Language" data-gridname="@Model.RenderOptions.GridName" data-selectable="@Model.RenderOptions.Selectable.ToString().ToLower()" data-multiplefilters="@Model.RenderOptions.AllowMultipleFilters.ToString().ToLower()">
        <div class="grid-wrap">
            <table class="table table-striped grid-table">
                @* Draw grid header *@
                <thead>
                    @RenderGridHeader()
                </thead>
                <tbody>
                    @RenderGridBody()
                    @RenderGridFooter()
                </tbody>
            </table>
            @RenderGridFooter()
        </div>
    </div>
}
@helper RenderGridBody()
{
    if (!Model.ItemsToDisplay.Any())
    {
        <tr class="grid-empty-text">
            <td colspan="@Model.Columns.Count()">
                @Model.EmptyGridText
            </td>
        </tr>
    }
    else
    {
        foreach (object item in Model.ItemsToDisplay)
        {
            <tr class="grid-row @Model.GetRowCssClasses(item)">
                @foreach (IGridColumn column in Model.Columns)
                {
                    @column.CellRenderer.Render(column, column.GetCell(item))
                }
            </tr>
        }
    }
}
@helper RenderGridHeader()
{
    if (Model.RenderOptions.ShowGridItemsCount)
    {
            <div class="grid-itemscount">
                <span class="grid-itemscount-label">@Model.RenderOptions.GridCountDisplayName:</span>
                <span class="grid-itemscount-caption">@Model.ItemsCount</span>
            </div>
    }

    <tr>
        @foreach (IGridColumn column in Model.Columns)
        {
            @column.HeaderRenderer.Render(column)
        }
    </tr>
}
@helper RenderGridFooter()
{
    <div class="grid-footer">
        @if (Model.EnablePaging && Model.Pager != null)
        {
            @Html.Partial(Model.Pager.TemplateName, Model.Pager)
        }
    </div>
}
And finallllllyy, you can export this filtered grid on your Controller side like this:
public void ExportToExcel()
{
    List<MyModel> mymodel= new List<MyModel>();
    if(Session["CurrentFilteredGridForExcelExport"] != null)
    {
        var datasetFromSession = (IEnumerable<MyModel>)(Session["CurrentFilteredGridForExcelExport"]);
        mymodel = datasetFromSession.ToList();
    }

    //Use your export logic with this dataset
}
Hope this helps someone who is still using this grid plugin. Cheers!
In this article I will explain with an example, how to export WebGrid to Excel file in ASP.Net Core MVC.
The WebGrid will be populated from database using Entity Framework and then the WebGrid will be sent as HTML string to the Controller which will be exported to Excel file in ASP.Net Core MVC.
MVC6 Grid for ASP.Net Core
This article makes use of MVC6 Grid library for implementing WebGrid, as it is not available by default in .Net Core.
Database
Here I am making use of Microsoft’s Northwind Database. You can download it from here.
Namespaces
You need to import the following namespace.
Model
The Model class consists of the following four properties.
public class Customer
{
public string CustomerID { get; set; }
public string ContactName { get; set; }
public string City { get; set; }
public string Country { get; set; }
}
Database Context
Once the Entity Framework is configured and connected to the database table, the Database Context will look as shown below.
using Microsoft.EntityFrameworkCore;
namespace Export_WebGrid_Excel_MVC_Core
{
public class DBCtx : DbContext
{
public DBCtx(DbContextOptions<DBCtx> options) : base(options)
{
}
public DbSet<Customer> Customers { get; set; }
}
}
Controller
The Controller consists of following two Action methods.
Action method for handling GET operation
Inside this Action method, the Top 10 records are fetched from the Customers table using Entity Framework and returned to the View.
Action method for handling the Excel file Export and Download operation
This Action method is executed when the Export Button is clicked.
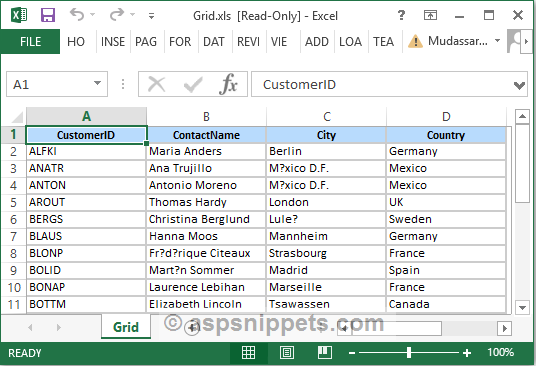
Note: The following Action method performs File Download operation. Hence the return type is set to FileResult.
The HTML string sent from the View is extracted from the GridHtml parameter.
Then, the HTML string is read and converted to a Byte Array using the GetBytes method of Encoding class.
Finally, the Byte Array is exported and downloaded as Excel file using the File function.
public class HomeController : Controller
{
private DBCtx Context { get; }
public HomeController(DBCtx _context)
{
this.Context = _context;
}
public IActionResult Index()
{
return View(this.Context.Customers.Take(10).ToList());
}
[HttpPost]
public FileResult Export(string GridHtml)
{
return File(Encoding.ASCII.GetBytes(GridHtml), «application/vnd.ms-excel», «Grid.xls»);
}
}
View
Inside the View, in the very first line the Customer Model is declared as IEnumerable which specifies that it will be available as a Collection.
The ASP.Net TagHelpers, NonFactors.Mvc.Grid namespace and mvc-grid.css file is inherited inside the View.
Displaying the records
For displaying the records, MVC6 Grid is used.
The IEnumerable collection of Customer Model class object is passed to the Grid function of the MVC6 Grid HTML Helper class.
Exporting WebGrid to Excel file
Below the MVC6 WebGrid, there is an HTML Form created with following ASP.Net Tag Helpers attributes.
asp-action – Name of the Action. In this case the name is Export.
asp-controller – Name of the Controller. In this case the name is Home.
method – It specifies the Form Method i.e. GET or POST. In this case it will be set to POST.
The Form consists of a Submit Button and an HTML Hidden Field element which will be used to send the MVC6 WebGrid content to the Controller’s Action method.
When the Export Button is clicked, first the HTML of the MVC6 WebGrid is extracted and set into the Hidden Field element and finally, the Form is submitted.
@model IEnumerable<Export_WebGrid_Excel_MVC_Core.Models.Customer>
@addTagHelper*, Microsoft.AspNetCore.Mvc.TagHelpers
@using NonFactors.Mvc.Grid;
@{
Layout = null;
}
<!DOCTYPE html>
<html>
<head>
<meta name=»viewport» content=»width=device-width» />
<title>Index</title>
<link href=»~/css/mvc-grid/mvc-grid.css» rel=»stylesheet» />
</head>
<body>
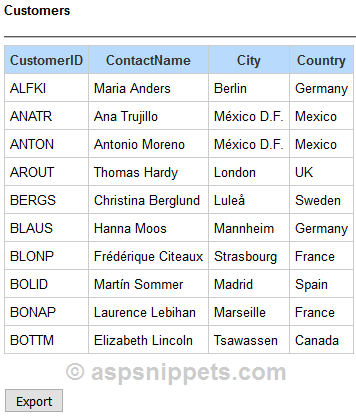
<h4>Customers</h4>
<hr />
<div id=»Grid»>
@(Html.Grid(Model).Build(columns =>
{
columns.Add(model => model.CustomerID).Titled(«CustomerID»);
columns.Add(model => model.ContactName).Titled(«ContactName»);
columns.Add(model => model.City).Titled(«City»);
columns.Add(model => model.Country).Titled(«Country»);
})
)
</div>
<br /><br />
<form method=»post» asp-action=»Export» asp-controller=»Home»>
<input type=»hidden» name=»GridHtml» />
<input type=»submit» id=»btnSubmit» value=»Export» />
</form>
<script type=»text/javascript» src=»https://ajax.googleapis.com/ajax/libs/jquery/1.8.3/jquery.min.js»></script>
<script type=»text/javascript»>
$(function () {
//Add CSS to the Table for formatting.
$(«#Grid table»).attr(«cellpadding», «5»);
$(«#Grid table»).css({ «border-collapse»: «collapse», «border»: «1px solid #ccc» });
$(«#Grid th»).css({ «background-color»: «#B8DBFD», «border»: «1px solid #ccc» });
$(«#Grid td»).css({ «width»: «150px», «border»: «1px solid #ccc» });
//Assign Click event to Button.
$(«#btnSubmit»).click(function () {
$(«input[name=’GridHtml’]»).val($(«#Grid»).html());
});
});
</script>
</body>
</html>
Screenshots
WebGrid
Exported Excel file
Downloads
Hi again everyone. In this tutorial, I am going to explain how to export Webgrid data into Microsoft Excel sheets. If you are new to Webgrid, please refer to the links of the posts, given below, to understand the basics of Webgrid.
- Webgrid implementation in ASP.NET MVC5 application
- Implementing Custom paging in Webgrid in MVC5
If you have gone through these tutorials, you will get a basic understanding of Webgrid implementation. In this tutorial, I am going to use the code of the previous posts. I have implemented the screenshots given below of the Webgrid in the previous posts.
Exporting Webgrid to Excel in ASP.NET MVC
- Create Visual Studio Application in (2013 or 2015).
- Please refe to this tutorial Webgrid implementation in ASP.NET MVC5 Application. I am using the code in this tutorial, without creating a new Application.
- I am adding an extra code to implement exporting the data.
- Add ActionLink, given below, in an Index View, as shown below:
- @Html.ActionLink(«Export to Excel», «PrintExcel», «Home», new { @class=«btn btn-success»})
- <br/>
- The complete code of the View is shown below:
Index.cshtml
- @model List<WebGridinMVC5.Models.UserTable>
- @{
- ViewBag.Title = «www.mitechdev.com»;
- //create object for webgrid to use Webgrid helper
- var grid = new WebGrid(source: Model, canPage: true, rowsPerPage: 7);
- //pager
- grid.Pager(WebGridPagerModes.All);
- }
- <h2>Fetching and displaying data from server in WebGrid</h2><br/>
- @Html.ActionLink(«Export to Excel», «PrintExcel», «Home», new { @class=«btn btn-success»})
- <br/>
- <style type=«text/css»>
- /*styles for altering rows*/
- .webgrid-row-style {
- padding: 3px 7px 2px;
- }
- .webgrid-alternating-row {
- background-color: #EAF2D3;
- padding: 3px 7px 2px;
- }
- </style>
- <div id=«webgrid»>
- @grid.GetHtml(
- //styles class for table
- //here i used bootstrap table templates
- tableStyle: «table table-responsive backcolor»,
- headerStyle:»wedgrid-header»,
- footerStyle:»webgrid-footer»,
- alternatingRowStyle:»webgrid-alternating-row»,
- rowStyle:»webgrid-row-style»,
- //binding table column to the grid
- columns:grid.Columns(
- grid.Column(header:»Serial No»,format:@<text><div>@(item.WebGrid.Rows.IndexOf(item)+1)</div></text>),
- grid.Column(columnName:»Name»,header:»Name»),
- grid.Column(header:»Email», format:@<text><a href=«mailto:@item.Email»>@item.Email</a></text>),
- grid.Column(columnName:»PhoneNumber»,header:»Phone No»),
- grid.Column(header:»Is Active», format:@<text><input type=«checkbox» checked=«@item.Status» disabled=«disabled» /></text>)
- )
- )
- </div>
- You can get the code, shown above, from the previous post’s links also (I specified above).
Create method to Export the Data into Excel
- Now, add a method to export the data into Microsoft Excel format. When you click ‘Export to Excel’ button in an Index view page this method (PrintExcel) gets the grid data from the Server and exports it to Excel Sheet.
- Replace the HomeController.cs file with the code, given below:
HomeController.cs
- using System;
- using System.Collections.Generic;
- using System.Linq;
- using System.Web;
- using System.Web.Mvc;
- using System.Web.Helpers;
- using WebGridinMVC5.Models;
- namespace WebGridinMVC5.Controllers
- {
- public class HomeController : Controller
- {
- public ActionResult Index()
- {
- List lst = new List();
- using (DatabaseEntities db = new DatabaseEntities())
- {
- lst = db.UserTables.ToList();
- }
- return View(lst);
- }
- public void PrintExcel()
- {
- List exceldata = new List();
- using (DatabaseEntities db = new DatabaseEntities())
- {
- exceldata = db.UserTables.ToList();
- }
- WebGrid grid = new WebGrid(source: exceldata,canPage:false, canSort: false);
- string gridData = grid.GetHtml(
- columns: grid.Columns(
- grid.Column(«UserID», «UserID»),
- grid.Column(«Name», «Name»),
- grid.Column(«Email», «Email»),
- grid.Column(«PhoneNumber», «PhoneNumber»),
- grid.Column(«Status», «Status»)
- )).ToString();
- Response.ClearContent();
- Response.AddHeader(«content-disposition», «attachment; filename=UserData.xls»);
- Response.ContentType = «application/excel»;
- Response.Write(gridData);
- Response.End();
- }
- }
- }
- Now, run the Application and see the output.
- Now, click on «Export to Excel» and you will get the Window, as shown below:
Conclusion: I hope, this blog may be helpful for many readers.
Introduction
This article is a «how to» on converting a tabulated or grid representation of data from an ASP.NET MVC web application to a downloadable Excel data file.
Background
I was recently building an ASP.NET MVC 3 based reporting application.
One of the features was to provide a downloadable Excel file for the
report that was being rendered as a grid/table. Rather than recreate an entire module to accomplish this, I wanted to find a way to reuse the data being used to render the view, with the least amount of code possible.
Using the code
I have tried to encapsulate much of the implementation in a custom ActionResult class (DownloadFileActionResult), so you can just pass data in the form of a GridView object and expect a downloadable Excel file with tabulated data.
You can download the complete code from the below link.
- Download MvcGridApp — 494.87 KB
As stated above most of the implementation is contained in the DownloadFileActionResult class.
Firstly the DownloadFileActionResult inherits from the abstract ActionResult class, the constructor accepts two parameters the databound gridview object and the name of the downloadable Excel file.
The ExecuteResult is overridden with the custom implementation that creates a response, then uses a HtmlTextWriter and a StringWriter to pipe the rendering of a gridview to a string. This string is then streamed back to the response to be delivered as an Excel file. Its that simple
public class DownloadFileActionResult : ActionResult
    {

        public GridView ExcelGridView { get; set; }
        public string fileName { get; set; }


        public DownloadFileActionResult(GridView gv, string pFileName)
        {
            ExcelGridView = gv;
            fileName = pFileName;
        }


        public override void ExecuteResult(ControllerContext context)
        {


            HttpContext curContext = HttpContext.Current;
            curContext.Response.Clear();
            curContext.Response.AddHeader("content-disposition", "attachment;filename=" + fileName);
            curContext.Response.Charset = "";
            curContext.Response.Cache.SetCacheability(HttpCacheability.NoCache);
            curContext.Response.ContentType = "application/vnd.ms-excel";


            StringWriter sw = new StringWriter();
            HtmlTextWriter htw = new HtmlTextWriter(sw);
            ExcelGridView.RenderControl(htw);


            byte[] byteArray = Encoding.ASCII.GetBytes(sw.ToString());
            MemoryStream s = new MemoryStream(byteArray);
            StreamReader sr = new StreamReader(s, Encoding.ASCII);


            curContext.Response.Write(sr.ReadToEnd());
            curContext.Response.End();

        }

    }
Within your controller’s Action result where you bind the view with model data you will need to create a gridview, bind the model data to it and store it in a session variable.
public ActionResult Index()
       {
           ViewBag.Message = "Welcome to ASP.NET MVC!";
           CarModels cm = new CarModels();
           List<Cars> model = cm.getAllCars();

           GridView gv = new GridView();
           gv.DataSource = model;
           gv.DataBind();
           Session["Cars"] = gv;

           return View(model);
       }
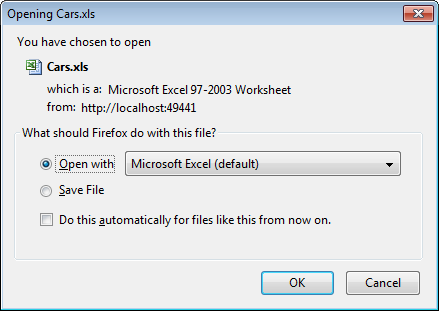
In the same controller we need to create a new ActionResult called Download to handle the file download request.
public ActionResult Download()
        {
            if (Session["Cars"] != null)
            {
                return new DownloadFileActionResult((GridView)Session["Cars"], "Cars.xls");
            }
            else
            {


            }
        }
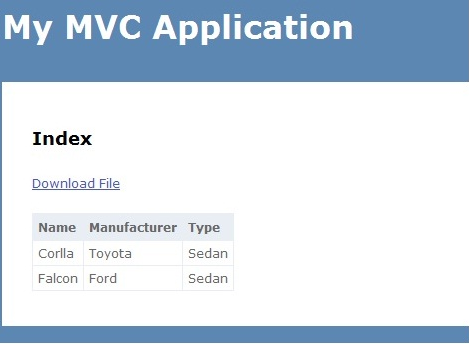
In the view you place the following download link
@Html.ActionLink("Download File", "Download")
Points of Interest
I hope this article goes to show how you can override the default ActionResult class with a custom implementation to generate a custom response.
I am somehow not too happy about storing the results of the grid in a Session variable and will endeavor to come up with a for a better solution.
Limitation
As this is html being rendered as an Excel sheet you will not be able to make use of most of the Excel functionality. In my case, the client wanted was a downloadable version of the data so it was fine. But in case you want to create a true Excel file you could look at using XSLT to convert your html output to an Excel file.
Reference
http://www.codeshelve.com/code/details/54/export-to-excel-in-asp-net-mvc
Table of Contents
- Introduction
- Configuration and Process
- Using the Code
- Download
Introduction
This article introduces how to export data to an Excel file. Most of the back-end applications have report functionality that shows the data in the grid. So, we are required to export this grid data into an Excel file. The export to Excel functionality is
implemented using the EPPlus NuGet package, as shown in this example.
Configuration and Process
We install EPPlus NuGet package in the application. The EPPlus is a library to manage Excel spreadsheets using OOXML. The OOXML stands for Office Open Extended Markup Language and is also called Open XML. The OOXML is developed by Microsoft. It has by default
target file formats for Microsoft office.
The EPPlus is a NuGet package and can be installed from Manage NuGet Packages window, as shown in figure 1. The package is available
here also.

Figure 1: Install EPPlus NuGet
When we use ORM in our application, we keep most of the data in the collection which easily converts it into a list. The list can’t be exported to the Excel directly. That’s why we need to convert this list into a data table first. After that, this data
table can be exported in the Excel file as shown in figure 2.

Figure 2: Process Export to Excel
Using the Code
As per the above process, we need four operations here. These are as follows,
- Data: We use static data to keep this example simple.
- List: Static data store in a List.
- Data Table : Convert List in to DataTable.
- Export: DataTable exports to excel file.
First of all, we create a class, so that we can have a collection of similar data. The following code snippet is for Technology class.
namespace
ExportExcel.Code
{
public
class
Technology
{
public
string
Name { get;
set; }
public
int
Project { get;
set; }
public
int
Developer { get;
set; }
public
int
TeamLeader { get;
set; }
}
}
Now, we create a static data list of Technology types in that StaticData class, as per the following code snippet.
using
System.Collections.Generic;
namespace
ExportExcel.Code
{
public
class
StaticData
{
public
static
List<Technology> Technologies
{
get
{
return
new
List<Technology>{
new
Technology{Name="ASP.NET", Project=12,Developer=50, TeamLeader=6},
new
Technology{Name="Php", Project=40,Developer=60, TeamLeader=9},
new
Technology{Name="iOS", Project=11,Developer=5, TeamLeader=1},
new
Technology{Name="Android", Project=20,Developer=26, TeamLeader=2}
};
}
}
}
}
This data will be used to export to Excel. After that, we create export to excel functionality helper class which has the following features.
- Convert List to DataTable method
- Customize the columns which need to export means dynamically choose columns which will be export from list to Excel.
- Serial number in Excel sheet.
- Add and Remove functionality for the custom heading in Excel sheet.
- Excel sheet heading with colors.
- Dynamic name for worksheet.
The following code snippet is used for the class ExcelExportHelper
using
OfficeOpenXml;
using
OfficeOpenXml.Style;
using
System;
using
System.Collections.Generic;
using
System.ComponentModel;
using
System.Data;
using
System.Linq;
namespace
ExportExcel.Code
{
public
class
ExcelExportHelper
{
public
static
stringExcelContentType
{
get
{
return
"application/vnd.openxmlformats-officedocument.spreadsheetml.sheet"; }
}
public
static
DataTable ListToDataTable<T>(List<T> data)
{
PropertyDescriptorCollection properties = TypeDescriptor.GetProperties(typeof(T));
DataTable dataTable =
new
DataTable();
for
(int
i = 0; i < properties.Count; i++)
{
PropertyDescriptor property = properties[i];
dataTable.Columns.Add(property.Name, Nullable.GetUnderlyingType(property.PropertyType) ?? property.PropertyType);
}
object[] values =
new
object[properties.Count];
foreach
(T item in
data)
{
for
(int
i = 0; i < values.Length; i++)
{
values[i] = properties[i].GetValue(item);
}
dataTable.Rows.Add(values);
}
return
dataTable;
}
public
static
byte[] ExportExcel(DataTable dataTable, string
heading = "",
bool
showSrNo = false,
params
string[] columnsToTake)
{
byte[] result =
null;
using
(ExcelPackage package = new
ExcelPackage())
{
ExcelWorksheet workSheet = package.Workbook.Worksheets.Add(String.Format("{0} Data",heading));
int
startRowFrom = String.IsNullOrEmpty(heading) ? 1 : 3;
if
(showSrNo)
{
DataColumn dataColumn = dataTable.Columns.Add("#",
typeof(int));
dataColumn.SetOrdinal(0);
int
index = 1;
foreach
(DataRow item in
dataTable.Rows)
{
item[0] = index;
index++;
}
}
// add the content into the Excel file
workSheet.Cells["A"
+ startRowFrom].LoadFromDataTable(dataTable, true);
// autofit width of cells with small content
int
columnIndex = 1;
foreach
(DataColumn column in
dataTable.Columns)
{
ExcelRange columnCells = workSheet.Cells[workSheet.Dimension.Start.Row, columnIndex, workSheet.Dimension.End.Row,

 columnIndex];
int maxLength = columnCells.DefaultIfEmpty().Max(cell => cell.Value == null ? 0 :
cell.Value.ToString().Count());
if
(maxLength < 150)
{
workSheet.Column(columnIndex).AutoFit();
}
columnIndex++;
}
// format header - bold, yellow on black
using
(ExcelRange r = workSheet.Cells[startRowFrom, 1, startRowFrom, dataTable.Columns.Count])
{
r.Style.Font.Color.SetColor(System.Drawing.Color.White);
r.Style.Font.Bold =
true;
r.Style.Fill.PatternType = OfficeOpenXml.Style.ExcelFillStyle.Solid;
r.Style.Fill.BackgroundColor.SetColor(System.Drawing.ColorTranslator.FromHtml("#1fb5ad"));
}
// format cells - add borders
using
(ExcelRange r = workSheet.Cells[startRowFrom + 1, 1, startRowFrom + dataTable.Rows.Count, dataTable.Columns.Count])
{
r.Style.Border.Top.Style = ExcelBorderStyle.Thin;
r.Style.Border.Bottom.Style = ExcelBorderStyle.Thin;
r.Style.Border.Left.Style = ExcelBorderStyle.Thin;
r.Style.Border.Right.Style = ExcelBorderStyle.Thin;
r.Style.Border.Top.Color.SetColor(System.Drawing.Color.Black);
r.Style.Border.Bottom.Color.SetColor(System.Drawing.Color.Black);
r.Style.Border.Left.Color.SetColor(System.Drawing.Color.Black);
r.Style.Border.Right.Color.SetColor(System.Drawing.Color.Black);
}
// removed ignored columns
for
(int
i = dataTable.Columns.Count - 1; i >= 0; i--)
{
if
(i == 0 && showSrNo)
{
continue;
}
if
(!columnsToTake.Contains(dataTable.Columns[i].ColumnName))
{
workSheet.DeleteColumn(i + 1);
}
}
if
(!String.IsNullOrEmpty(heading))
{
workSheet.Cells["A1"].Value = heading;
workSheet.Cells["A1"].Style.Font.Size = 20;
workSheet.InsertColumn(1, 1);
workSheet.InsertRow(1, 1);
workSheet.Column(1).Width = 5;
}
result = package.GetAsByteArray();
}
return
result;
}
public
static
byte[] ExportExcel<T>(List<T> data, string
Heading = "",
bool
showSlno = false,
params
string[] ColumnsToTake)
{
return
ExportExcel(ListToDataTable<T>(data), Heading, showSlno, ColumnsToTake);
}
}
}
Now, we do front-end development and create Model, View, and Controller. We create TechnologyViewModel view model that binds to the View, as per the following code snippet.
using
ExportExcel.Code;
using
System.Collections.Generic;
namespace
ExportExcel.Models
{
public
class
TechnologyViewModel
{
public
List<Technology> Technologies
{
get
{
return
StaticData.Technologies;
}
}
}
}
After this, we create a controller, HomeController, which has an Index action method. It returns View with Model in the browser.
using
ExportExcel.Code;
using
ExportExcel.Models;
using
System.Collections.Generic;
using
System.Web.Mvc;
namespace
ExportExcel.Controllers
{
public
class
HomeController : Controller
{
[HttpGet]
public
ActionResult Index()
{
TechnologyViewModel model =
new
TechnologyViewModel();
return
View(model);
}
}
}
Now, we create a view that shows the data in the listing and has a button linked to export to Excel functionality. The following code snippet is for the Index view.
@model ExportExcel.Models.TechnologyViewModel
@{
ViewBag.Title = "Export To Excel";
}
<div
class="panel">
<div
class="panel-heading">
<a
href="@Url.Action("ExportToExcel")"
class="btn btn-primary">Export</a>
</div>
<div
class="panel-body">
<table
class="table table-striped table-bordered">
<thead>
<tr>
<th>Name</th>
<th>Project</th>
<th>Team Leader</th>
<th>Developer</th>
</tr>
</thead>
<tbody>
@foreach (var item in Model.Technologies)
{
<tr>
<td>@item.Name</td>
<td>@item.Project</td>
<td>@item.TeamLeader</td>
<td>@item.Developer</td>
</tr>
}
</tbody>
</table>
</div>
</div>
The application runs and shows results as follows.

Figure 3: Listing for Data
Now, we write the action method to call the export to Excel functionality. This action method returns an exported Excel file. The action method returns FileContentResult which is used when we have a byte array and return as a file. The following code snippet
is used for the same.
[HttpGet]
public
FileContentResult ExportToExcel()
{
List<Technology> technologies = StaticData.Technologies;
string[] columns = {"Name","Project","Developer"};
byte[] filecontent = ExcelExportHelper.ExportExcel(technologies,
"Technology",
true,columns );
return
File(filecontent, ExcelExportHelper.ExcelContentType,
"Technologies.xlsx");
}
Now, click The Export button. The button calls the above action method and the result is as shown in the figure.

Figure 4: Dialog for Excel
The resulted Excel file has the data. It has only those columns that we exported rather than all the columns of the collection.

Figure 5: Excel with Data
Download
You can download the complete solution source code from the code gallery using the following URL.
https://gallery.technet.microsoft.com/Export-To-Excel-In-ASPNET-cf17ea0d