
Excel for Microsoft 365 Word for Microsoft 365 PowerPoint for Microsoft 365 PowerPoint 2021 PowerPoint 2019 Excel 2016 Word 2016 PowerPoint 2016 Excel 2016 for Mac Word 2016 for Mac Excel 2013 Word 2013 PowerPoint 2013 Excel 2010 Word 2010 PowerPoint 2010 Excel 2007 Word 2007 PowerPoint 2007 More…Less
Gridlines help give you visual cues when you’re formatting in Office. You can align shapes and other objects in your PowerPoint slides and Word documents, and distinguish between cell boundaries in and sections of your spreadsheets and workbooks in Excel.
Note: This article doesn’t apply to PowerPoint for the web or Word for the web.

In Word and PowerPoint, gridlines are for visual reference only and cannot be printed. If you want to print gridlines in Excel, see Print gridlines in a worksheet.
To show the gridlines, in Excel, PowerPoint, or Word, click the View tab, and then check the Gridlines box.
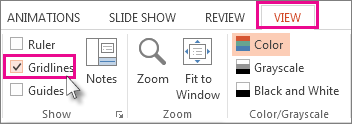
To hide the gridlines, clear the Gridlines check box.
More about tools that help you align and place text and objects:
-
Snap charts, pictures, and objects to a grid to align them in Word
-
Work with gridlines and use snap-to-grid in PowerPoint
-
Turn the snap to grid and snap to object options on or off in Excel
-
Print gridlines in a worksheet
-
Show or hide the ruler in PowerPoint
-
Show or hide rulers in Word
Need more help?
In previous post, I’ve shown you how to hide and restore gridlines in Excel. But do you know how to insert and delete gridlines in Word? Although they cannot be printed, but gridlines give users the feeling of writing on real paper and also allow text to be aligned. Let’s see how to achieve it.
1. First, go to Layout tab, click the small arrow at the bottom right corner of Page Setup section.

2. Then the Page Setup window will pop out. Switch to Document Grid tab and hit Drawing Grid… button at the bottom.

3. Here in the Grid and Guides popping out window, check the box of Display gridlines on screen, and enter the number “2” in the textbox after Horizontal every.

4. Hit OK to confirm the settings, then the gridlines will be displayed throughout the whole document like below.
Note: if you want to delete the gridlines, just follow aboving steps to uncheck Display gridlines on screen and click OK, then the document will be restored.

Copyright Statement: Regarding all of the posts by this website, any copy or use shall get the written permission or authorization from Myofficetricks.
To show the gridlines, in Excel, PowerPoint, or Word, click the View tab, and then check the Gridlines box. To hide the gridlines, clear the Gridlines check box.
Contents
- 1 How do I turn on gridlines?
- 2 How do I add gridlines to a table in Word?
- 3 What are grid lines?
- 4 How do I show grid in PowerPoint for Mac?
- 5 Why is my Word document showing gridlines?
- 6 How do you write gridlines?
- 7 What is grid line with example?
- 8 Is grid line one or two words?
- 9 How do you get gridlines on PowerPoint?
- 10 How do I add gridlines to PowerPoint?
- 11 How do you add gridlines in PowerPoint?
- 12 How do I show gridlines in Word for labels?
- 13 How do you insert lines in Word?
- 14 Where do you put gridlines?
- 15 How do I show grid lines in CSS?
- 16 How do you use grid layout?
- 17 How far apart are grid lines?
- 18 How do I make a grid for drawing?
- 19 Where are smart guides in PowerPoint?
How do I turn on gridlines?
To show gridlines: On the Layout tab, under View, select the Gridlines check box. Note: Gridlines cannot be customized. To change the width, color, or other attributes of the lines around cells, use border formatting. To hide gridlines: On the Layout tab, under View, clear the Gridlines check box.
How do I add gridlines to a table in Word?
Click in a table. Click the Table Tools Layout or Table Layout tab. Click View Gridlines. Gridlines will stay on for all Word documents.
What are grid lines?
Definition of grid line
: any of a series of numbered horizontal and perpendicular lines that divide a map into squares to form a grid by means of which any point may be located by a system of rectangular coordinates.
How do I show grid in PowerPoint for Mac?
Select View on the ribbon, and in the Show group, select the dialog-box launcher. The Grid and Guides dialog box appears. To position shapes or objects to the closest intersection of the grid, under Snap to, check the Snap objects to grid box.
Why is my Word document showing gridlines?
For Word 2013 and Word 2016, display the Design tab of the ribbon. Click Page Color, in the Page Background group. Word displays a drop-down palette of options. Click No Color.
How do you write gridlines?
Lines can be addressed using their line number. In a left-to-right language such as English, column line 1 will be on the left of the grid, row line 1 on the top. Lines numbers respect the writing mode of the document and so in a right-to-left language for example, column line 1 will be on the right of the grid.
What is grid line with example?
Alternatively referred to as a column separator or row separator, grid lines or gridlines divide each of the cells, rows, and columns in a spreadsheet.
Is grid line one or two words?
A Grid Line (or Gridline) is 1) any of a series of numbered horizontal and perpendicular lines that divide a map into squares to form a grid by means of which any point may be located by a system of rectangular coordinates; 2) is the light gray line that divides each of the cells, rows, and columns in a spreadsheet; 3)
How do you get gridlines on PowerPoint?
To enable gridlines, select the View tab of the Ribbon, and make sure you select the Gridlines check-box, as shown highlighted in red within Figure 3. Conversely, if you want to hide gridlines again, just deselect the Gridlines check-box (refer to Figure 3).
How do I add gridlines to PowerPoint?
To show the gridlines, in Excel, PowerPoint, or Word, click the View tab, and then check the Gridlines box.
How do you add gridlines in PowerPoint?
PowerPoint can display guides that you can use to create a grid.
- Choose View (tab)>Guides.
- To add additional guides, press CTRL and drag the vertical guide to the left or right.
- Continue with up to eight guides.
- Do the same with the horizontal guide.
How do I show gridlines in Word for labels?
How To Turn On Label Gridlines in MS Word:
- Click the “Layout” tab.
- Find “Table Tools” section.
- Click “View Gridlines”
How do you insert lines in Word?
Insert a line
- On the Insert tab, select Shapes.
- Under Lines, select any line style you like.
- Select a location in the document, hold and drag your pointer to a different location, and then release the mouse button.
Where do you put gridlines?
Aligning Gridlines
Gridlines are aligned to the center of internal walls and outer face of external walls. This arrangement allows for a fixing of the position of the four corners of the building and footprint to meet planning requirements by authority.
How do I show grid lines in CSS?
You can turn on the grid button located in the div which has display: grid declared. All you have to do is go to your browser’s developer tools (mine is Microsoft Edge which is based on Chromium). You will see a button like this. And then you can code and test as you wish.
How do you use grid layout?
To get started you have to define a container element as a grid with display: grid , set the column and row sizes with grid-template-columns and grid-template-rows , and then place its child elements into the grid with grid-column and grid-row .
How far apart are grid lines?
Remember that the grid lines on a 1:25 000 scale map are 1km apart. A quick way of estimating distance is to count each square you cross in a straight line. If going diagonally the distance across the grid square is about 1½km.
How do I make a grid for drawing?
To draw the grid:
Each square is 1 square inch. To draw this grid, put your ruler at the top of the paper, and make a small mark at every inch. Place the ruler at the bottom of the paper and do the same thing. Then use the ruler to make a straight line connecting each dot at the bottom with its partner at the top.
Where are smart guides in PowerPoint?
Select the Guides check box on the View tab to turn them on. Horizontal and vertical guides appear on the slide. You can click and drag them wherever you want.

on
November 1, 2010, 6:43 AM PDT
Display gridlines in a Microsoft Word document
Susan Harkins shows you how to use Microsoft Word’s gridlines settings to position text and objects in your documents.
We may be compensated by vendors who appear on this page through methods such as affiliate links or sponsored partnerships. This may influence how and where their products appear on our site, but vendors cannot pay to influence the content of our reviews. For more info, visit our Terms of Use page.
A while back, I showed you how to make graph paper using Excel–it’s a neat trick. You can display gridlines in Word—but you can’t print them. That’s a pretty big limitation. However, Word’s gridlines are meant to be guide rules, not printable borders. As guide rules, gridlines can be very useful for positioning objects, pictures, even text.
To enable Word’s gridlines in Word 2007/2010, do the following:
- Click the Page Layout tab.
- Click the Align dropdown in the Arrange group.
- Check View Gridlines. To disable gridlines, uncheck View Gridlines.
To control the gridlines, choose Grid Settings from the Align dropdown. These settings let you enable snap-to grids, snap-to objects, adjust the size of the gridlines, and more. The most interesting to me, is the Use Margins option in the Grid Options section. If you uncheck this option, Word will extend the grid to the margins.
In Word 2003, enable gridlines as follows:
- On the Drawing toolbar, click Draw.
- Click Grid.
- Check Display Gridlines.
Unfortunately, I am unable to determine any way to print these gridlines and every resource I’ve consulted confirms that you can not print Word’s gridlines. If you know of a way to print Word’s gridlines, please share!
Stay on top of the latest Microsoft Windows tips and tricks with TechRepublic’s Windows Desktop newsletter, delivered every Monday and Thursday. Automatically sign up today!
-
Software
Gridlines are straight lines, which may be horizontal, vertical or a combination of both. Word uses gridlines for specific purposes, such as for:
- Defining borders of cells in tables
- Defining major and minor axes in charts
- Aligning pictures and text
Using grids to define the borders of cells in tables makes the document more readable. Using grids in Word you can easily locate and enter data within individual cells in business documents.
Charts are easier to read and interpret if they show the major and minor axes as grids together with boundary lines. Grids help to position elements such as images and text on a page.
Microsoft Word supports printable gridlines.
Although gridlines look good on the document and serve a useful purpose, printing them may be an issue—Word does not always print gridlines—unless you specifically set it up for printing them.
Here, we will guide you so that you can print gridlines easily under different circumstances.
- Printing Gridlines in Table
- Printing the Axes in the chart
- Printing Gridlines in text and for Image Alignment.
Lets get started.
Method #1: Printing gridlines in Tables
Step #1: Open the Word document containing a table
Open the Word document, and navigate to the table. Depending on the border settings, gridlines on the table may or may not be visible. Hovering the mouse pointer on the table will cause two icons to become visible in the top left corner and bottom right corner of the table.

Step #2: Change the Border settings
Right-click on the icon in the top left corner, and two menus will open.

Click on the small triangle next to the border icon in the top menu. This will open the border menu.

Step #3: Make Borders visible
Click on All Borders to make all the gridlines visible.
Note: If you do not want all borders or all gridlines to be visible, selectively choose the type of border you require from the Border menu.
You can change the thickness, type, and color of the borderlines by clicking on Borders and Shading and setting the parameters in the new menu that opens.
If you select View Gridlines, you can see the borders in the document, but they will not print.
With all borders visible, your table will look like this.

Step #4: Print the gridlines (Borders)
Click on the File tab in the top menu bar. The file menu opens. Click on the Print tab on the left side. The print preview displays all gridlines and you can print them by clicking on the Print icon.

Method #2: Printing the Axes in Charts
Step #1: Open the Document with Chart
Open the Word document and navigate to the chart. Depending on the Gridline settings, major and minor axes on the chart may or may not be visible. Clicking anywhere inside the chart area will open four icons on the right side.

Step #2: Turn Gridlines on
Click on the second Icon from the top. The Chart Elements menu will open. Click on Gridlines, and the axes on the chart will become visible.

Step #3: Add More Gridlines
Hover the mouse pointer over Gridlines and click on the small triangle on the right side. This will open another menu allowing you to add more axes as necessary and display them as additional gridlines.

Step #4: Format the Gridlines
Once you are satisfied with the additional axes, click on More Options to open the menu Format Major Gridlines. Make necessary changes like line type, color, transparency, width, etc., and close the menu by clicking on the close icon at the top right.

This is how the chart will look like with the gridlines visible.

Step #5: Print the Chart with Gridlines (Axes)
Click on the File tab in the top menu bar. The file menu opens. Click on the Print tab on the left side. The print preview displays all gridlines (axes) and you can print them by clicking on the Print icon.

Method #3: Printing Gridlines for Text and Image Alignment
Step #1: Open the Word document containing an image
Open the Word document, and navigate to the page with the image.

Step #2: Turn Gridlines on
Click on View tab on the top menu bar and click on Gridlines to turn it on. A grid should now cover the page.

You can use this grid to align your text and image, but you cannot print it. However, you can use an alternate method to print the grid along with the page. For this, you must turn the grid into an image first.
Windows 10 offers a nifty tool called Snip & Sketch, which allows taking snapshots of a portion of the screen using the key combination Win+Shift+S.
You can save the snapshot as an image. Read on for more.
Step #3: Capture the Gridlines into the Clipboard
With the gridlines turned on, proceed to an empty page on your document.
Press the keys Win+Shift+S together and the mouse cursor will change into a cross.
Position the cross in the top left corner of the grid and while holding the left mouse button down, drag the cross to the right bottom corner.
Release the mouse button.
This action will capture the grid as an image and save it into the clipboard. A notification will appear at the bottom of the window and disappear.

Step #4: Move Clipboard Image into Snip & Sketch
Click the Windows Notifications (top right-hand corner) and select Snip saved to clipboard from the notifications displayed. This will open the app Snip & Sketch with the image of the grid inside.

Step #5: Save the Grid Image as a file.
Click on Save as and save the grid image as a PNG file at a suitable location with a suitable name (example grid.png). Close Snip & Sketch.

Step #6: Insert Grid into a Page in Word
Follow this step onwards if you want to insert the grid image in any single page in your Word document. If you want to insert it in all the pages, proceed from Step #9.
Return to your Word document and navigate to the page with an image.

Click on the Insert tab on the top menu bar. The ribbon changes to display the Insert options. Click on Pictures and select the saved Grid image.
The image will cover the page contents.

Step #7: Make Page Content Visible
Click on the icon on the top right side of the grid. Layout Options will appear. Select the Behind Text option. Click on X in the Layout Options menu to close it.

The page with the grid image inserted will now look like this. Click on the grid image to select it and position or size it as necessary. Click outside the image to exit the selection.

Step #8: Print the Page with Gridline Image
Click on the File tab in the top menu bar. The file menu opens. Click on the Print tab on the left side. The print preview displays all gridlines and you can print them by clicking on the Print icon.

Step #9: Insert Grid into all Pages in Word
If you want to insert the grid image in all pages in the Word document, you must insert it as a watermark. Open your document at any page. Click on the Design tab on the top menu bar. The ribbon changes into the Design menu. Click on Watermark to open the Watermark menu.

Choose Custom Watermark and a Printed Watermark menu opens to allow image selection.

Click on Picture watermark and then on Select Picture. Choose to work offline and select the grid.png file you had saved earlier. Turn off Washout before clicking on Apply. Click on Cancel to exit the menu. Word will apply the grid image as a watermark on all pages. However, you will not be able to resize or move the watermark.

Step #10: Print all Pages with Gridline image as Watermark
Click on the File tab in the top menu bar. The file menu opens. Click on the Print tab on the left side. The print preview displays all gridlines and you can print them by clicking on the Print icon.

Conclusion
Gridlines are an effective way of making information in a Word document more presentable and easier to use. The three methods outlined above allow you to print your document together with gridlines under different circumstances.