
Word for Microsoft 365 Word 2021 Word 2019 Word 2016 Word 2013 Word 2010 Word Starter 2010 More…Less
You can make a chart in Word. If you have lots of data to chart, create your chart in Excel, and then copy from Excel to another Office program. This is also the best way if your data changes regularly and you want your chart to always reflect the latest numbers. In that case, when you copy the chart, keep it linked to the original Excel file.
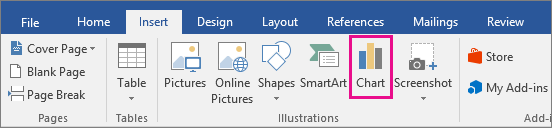
To create a simple chart from scratch in Word, click Insert > Chart, and pick the chart you want.
-
Click Insert > Chart.

-
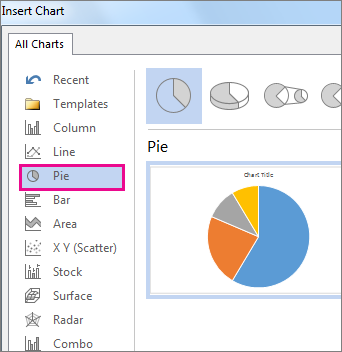
Click the chart type and then double-click the chart you want.
-
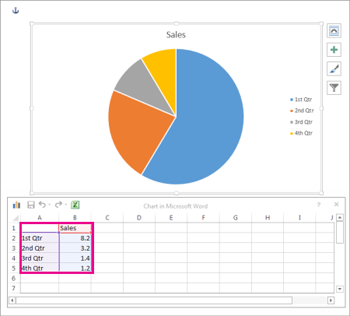
In the spreadsheet that appears, replace the default data with your own information.
-
When you’ve finished, close the spreadsheet.
-
If you want, use the Layout Options button
to arrange the chart and text in your document.
 to arrange the chart and text in your document.
You can make a chart in Word or Excel. If you have lots of data to chart, create your chart in Excel, and then copy from Excel to another Office program. This is also the best way if your data changes regularly and you want your chart to always reflect the latest numbers. In that case, when you copy the chart, keep it linked to the original Excel file.
To create a simple chart from scratch in Word, click Insert > Chart and pick the chart you want.
-
Click Insert > Chart.
-
Click the chart type and then double-click the chart you want.
-
In the spreadsheet that appears, replace the default data with your own information.
-
When you’ve finished, close the spreadsheet.
-
If you want, use the Layout Options button
to arrange the chart and text in your document.
Important:
Office 2010 is no longer supported. Upgrade to Microsoft 365 to work anywhere from any device and continue to receive support.
Upgrade now
In Microsoft Word 2010, you can insert many kinds of data charts and graphs, such as column charts, line graphs, pie charts, bar charts, area graphs, scatter graphs, stock charts, surface charts, doughnut charts, bubble graphs, and radar graphs.
Notes:
-
Don’t see the chart that you want in this article? For more information about the variety of graphs and charts you can use, see Available chart types.
-
Want to create an organization chart? For more information about how to create organization charts, see Create an organization chart.
-
If Microsoft Excel 2010 isn’t installed on your computer, you will not be able to take advantage of the advanced data charting capabilities in the Microsoft Office 2010. Instead, when you create a new data chart in Word 2010, Microsoft Graph opens.
How?
|
|
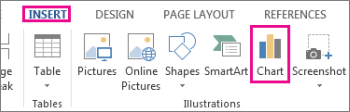
On the Insert tab, in the Illustrations group, click Chart.
|

|
|
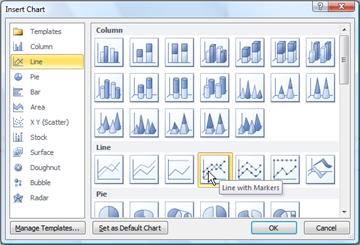
In the Insert Chart dialog box, click the arrows to scroll through the chart types. Select the type of chart that you want and then click OK.
When you rest the mouse pointer over any chart type, a ScreenTip displays its name. |

|
|
Edit the data in Excel 2010. When you are finished editing your data, you can close Excel.
Sample data in an Excel worksheet |

Tips
-
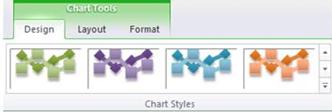
To get a good idea of what you can add to or change in your chart, under Chart Tools, click the Design, Layout, and Format tabs, and then explore the groups and options that are provided on each tab.
Note: If you don’t see the Chart Tools, make sure that you click anywhere inside the chart to activate it.
-
You can also access design, layout, and formatting features that are available for specific chart elements (such as chart axes or the legend) by right-clicking those chart elements.
More information
-
To learn about the available chart types, see Available chart types.
-
To edit data in your chart, see Change the data in an existing chart.
Top of Page
See also
Present data in a chart
Need more help?
To insert a line graph, go to the Insert Tab and click on Charts. A pop-up window will appear containing different types of charts and graphs. Scroll down to Line Chart and select the desired one. Then click on OK to insert the line graph on your blank page.
Contents
- 1 How do I make an XY graph in Word?
- 2 How do you insert a line graph?
- 3 How do I make a line graph in Word 2021?
- 4 How do I make a line graph in Office 365?
- 5 How do you make a line graph slide?
- 6 What is an example of a line graph?
- 7 How do I create a bar graph in Word?
- 8 How do I make a flow chart in Word?
- 9 Can I draw a line in Word?
- 10 How do you draw a line in Word 2020?
- 11 How do you make a graph in office?
- 12 How do you draw a graph slide?
- 13 How do I make a chart?
- 14 How do you draw a line graph step by step?
- 15 What is needed for a line graph?
- 16 What are the 7 parts of a line graph?
- 17 How do I create a bar graph from Excel in Word?
- 18 How do you make a 3 column graph in Word?
- 19 How do you draw a flow chart?
- 20 How do you create a process flow chart?
How do I make an XY graph in Word?
Step 1: Open the Word document. Step 2: Go to the Insert tab on the ribbon and click on the Chart option under the Illustrations group. Step 3: An Insert Charts dialog box will appear on the screen. Select the XY (Scatter) option from the left pane and pick a line graph that you want to insert.
Click the Insert tab, and then click Insert Line or Area Chart. Click Line with Markers. Click the chart area of the chart to display the Design and Format tabs. Click the Design tab, and then click the chart style you want to use.
How do I make a line graph in Word 2021?
Add a chart to your document in Word
- Click Insert > Chart.
- Click the chart type and then double-click the chart you want.
- In the spreadsheet that appears, replace the default data with your own information.
- When you’ve finished, close the spreadsheet.
- If you want, use the Layout Options button.
How do I make a line graph in Office 365?
Excel: On the Insert tab, open the drop-down list on one of the buttons in the Charts group (Column, Bar, and so on) and select a chart type; or click the Recommended Charts button or Charts group button to open the Insert Chart dialog box and select a chart there.
How do you make a line graph slide?
Choose Insert > Chart > Line to start inserting a line chart in Slides. You can insert a line graph on a slide with just a few quick steps. First, navigate to the slide you want to insert a chart on. Then go up to the Insert menu, hover over Chart, and then click Line.
What is an example of a line graph?
A line graph is usually used to show the change of information over a period of time. This means that the horizontal axis is usually a time scale, for example minutes, hours, days, months or years. Example: The table shows the daily earnings of a store for five days.
How do I create a bar graph in Word?
Open Microsoft Word, go to the “insert” tab on the ribbon, and select the “chart” icon. Once the “chart” wizard window has opened, select “column” and then select “clustered bar type.” Then select “OK.”
How do I make a flow chart in Word?
From the Insert tab within the Ribbon, select a flowchart shape from the dropdown gallery. You can then click and drag it to the size you want on the page to place it. Continue to add shapes and lines to complete your flowchart.
Can I draw a line in Word?
Draw a line
To add a line, follow these steps. On the Insert tab, select Shapes. Under Lines, select any line style you like. Select a location in the document, hold and drag your pointer to a different location, and then release the mouse button.
How do you draw a line in Word 2020?
How to draw in Word
- Click the ‘Shapes’ button and select ‘Scribble’ Open up your Microsoft Word document.
- Hold down your mouse to draw. Click and hold down your mouse to draw.
- Release the mouse. As soon as you release your mouse, the drawing will be finished.
- Edit your drawing. Double-click your drawing.
How do you make a graph in office?
How to Make Graphs in Microsoft Office
- Excel Chart Data. Open Excel.
- Chart Data Cells Selected. Click and drag to select all the cells that contain labels and data for the chart.
- Insert Chart Command.
- Chart Type Options.
- Sort Chart Data by Row or Column.
- Insert Chart Command.
- Chart Type Options.
- Data Template in Excel.
How do you draw a graph slide?
How to Create a Chart
- Select the slide where you want to insert a chart.
- Click Insert → Chart. You’ll see different options: bar, column, line and pie. There’s also an option to add a chart from an already existing Google Sheets document. Select the one that best fits your data.
How do I make a chart?
Create a chart
- Select the data for which you want to create a chart.
- Click INSERT > Recommended Charts.
- On the Recommended Charts tab, scroll through the list of charts that Excel recommends for your data, and click any chart to see how your data will look.
- When you find the chart you like, click it > OK.
How do you draw a line graph step by step?
First Step: Draw a line for your x axis and your y axis. Second Step: add axis labels and an axis scale. Third Step: After that, mark your data points. Fourth Step: Next draw a line through the data points.
What is needed for a line graph?
Constructing a Line Graph
Line graphs consist of two axes: x-axis (horizontal) and y-axis (vertical). Each axis represents a different data type, and the points at which they intersect is (0,0). The x-axis is the independent axis because its values are not dependent on anything measured.
What are the 7 parts of a line graph?
The following pages describe the different parts of a line graph.
- The Title. The title offers a short explanation of what is in your graph.
- The Legend. The legend tells what each line represents.
- The Source. The source explains where you found the information that is in your graph.
- Y-Axis.
- The Data.
- X-Axis.
How do I create a bar graph from Excel in Word?
Select the “Insert” tab in the Ribbon at the top of the page. Click the drop-down box for the “Column,” “Pie” or “Bar” chart type. These chart types allow number and word variables, where Line charts, Scatter charts, and Area charts require two numeric variables.
How do you make a 3 column graph in Word?
If two columns are not enough, you can also create three or even more columns in your Word document. Write your text, select it, and go to the Layout tab. Click Columns, and choose Three or click or tap More Columns if you need even more.
How do you draw a flow chart?
Create a flowchart
- Click the File tab.
- Click New, click Flowchart, and then under Available Templates, click Basic Flowchart.
- Click Create.
- For each step in the process that you are documenting, drag a flowchart shape onto your drawing.
- Connect the flowchart shapes in either of the following ways.
How do you create a process flow chart?
The 6 steps to making a business process flow diagram
- Determine the main components of the process.
- Order the activities.
- Choose the correct symbols for each activity.
- Make the connection between the activities.
- Indicate the beginning and end of the process.
- Review your business process diagram.
In this tutorial you will learn How to Make a Line Graph in Microsoft Word
To make a Line Graph in Microsoft Word Navigate to the Insert Menu and Clkck on Charts.On the Insert Chart Screen ,Select the Line Chart with a specific style then Click OK .
A Chart with demo data will be inserted which you can customize later.Let’s go through the steps in detail.
Enclosed are the steps to Make a Line Graph in Microsoft Word
Step 1 : Start Microsoft Word
- Start Microsoft Word on your Laptop or desktop .After Opening Microsoft word Click on New Blank document.
- You can also open and use an exisiting document where you need to make a Line Graph
Shortcut to open a new blank Microsoft Word document
Press Win+R key in combination and type winword on the Run dialog box and press OK
Step 2 : Add a Chart to Microsoft Word
Go to Insert Menu and Click on Chart Option

Once you click on the Insert->Chart option. Insert Chart screen will appear

Step 3 : Select a Chart Style
- On the left-hand side of the Insert Chart screen, Click on the Line option as shown below
- Now Select a Chart Style from the available option,then click OK.

Step 4 : Customize the Chart
- Once you click on OK an example Line Graph with an excel dataset will appear on your word document.
- You can customize the demo data shown as Category and Series in the spreadsheet with your own dataset to create a Line graph.
- You can also customize the color,font and size in your line graph

To Edit the data on Chart ,Righ Click on the Chart and Select “Edit data“

Step 5 : Save your Document.
- Once your done with your final formatting and Changes .You can save the document by clicking on File->Save.
- A window will pop up which will ask you to save the document .
- Specify a name for the document and Select the Location on your PC where you need to save tjhe file
How to Make a Line Graph in Microsoft Word(Conclusion)
In the above tutorial, we have provided you with a Step by Step Guide using which you can make a Line in Ms word. You can further explore various customizing options for the Line Graph in Ms Word.
Related articles :
How to Make a Pie Chart in Ms Word(Quick & Easy Guide )
How to disable Live Preview in Outlook and MsWord
is it possible to export Notion to Word (Easy Essential Guide )
Many people assume that Microsoft Word is only for text and Microsoft Excel is for data and graphs. Surprisingly, Microsoft Word can actually be used to create line graphs. It is helpful when putting a presentation or data analysis together to include a line graph along with text.
Line graphs are very useful if one wants to show continuous data over a period of time with a common scale. Line graphs connect data points to form a line that represents the data. Follow the instructions below to create a line graph on Microsoft Word.
Instructions for Making a Line Graph on Microsoft Word
The instructions may vary depending on the Microsoft Word version. This basic set of instructions should work for all Microsoft Word versions. If the options on one’s Microsoft Word version are not worded exactly how they are in these instructions, they should be similar enough to recognize which option to choose.
Follow these instructions to create a line graph on Microsoft Word:
- Open up Microsoft Word. To add a line graph to an existing file, pull up that file. If not, start with a new page.
- Click the Insert tab on the screen’s top left.
- Click Object on the drop-down menu.
- For some Microsoft Word versions, another menu appears to the side after Object is clicked. Click Chart on this menu. For other versions, a window pops up after Object is clicked. Go to the Object Type section and click Microsoft Graph Chart then click OK.
- A bar graph will appear in the text document. Right-click the center of the bar graph and a pop-up menu will appear. Choose Chart Type on this pop-up menu.
- When the Chart Type dialog box comes up on the screen, click Line in the left-hand menu then click OK.
- Insert all of one’s data into the data sheet provided. The data sheet should be below one’s line graph and one will be able to insert one’s numbers in place of the example provided.
- If the data sheet is not below the chart, select and right-click the chart’s center then select Chart Data Table from the pop-up menu. This will allow one to insert all of one’s data.
- Microsoft Word automatically creates the line graph after one’s data is entered.
- If one double-clicks the chart, one should be able to select the specific details for the chart, such as color.
Visualize data in MS Word with graphs
Updated on December 9, 2021
What to Know
- In a Word document, select Insert > Chart. Select the graph type and then choose the graph you want to insert.
- In the Excel spreadsheet that opens, enter the data for the graph. Close the Excel window to see the graph in the Word document.
- To access the data in the Excel workbook, select the graph, go to the Chart Design tab, and then select Edit Data in Excel.
This article explains how to create a graph in Microsoft Word for a Mac or a Windows computer. Instructions in this article apply to Microsoft Word 2019, Word 2016, Word 2013, and Microsoft 365 for Windows and Mac.
How to Create a Graph in Microsoft 365 for Mac
Microsoft Word offers a variety of ways to visualize data. When you know how to make a graph in Word, you can create visual aids by importing data from Microsoft Excel.
Follow these steps to create and customize graphs in the version of Word that comes with Microsoft 365 for Mac:
-
Select Insert in the upper-left corner of Word.
-
Select Chart.
-
Hover the mouse cursor over the type of graph that you wish to create, for example, Line or Statistical.
-
A sub-menu appears that contains multiple options, including different formats and variations. Select the graph you want to insert in the document.
-
In the Excel spreadsheet that opens, enter the data for the graph.
-
When you’re satisfied with the category names and values, close the Excel window to see the graph in the Word document.
-
To access the data in the Excel workbook at a later time, select the graph, go to the Chart Design tab, and then select Edit Data in Excel.
How to Create a Graph in Word for Windows
To create a graph in Word for Microsoft 365, Word 2019, Word 2016, and Word 2013:
-
Select Insert in the upper-left corner of Word.
-
Select Chart.
-
In the Insert Chart dialog box, select the type of graph that you wish to create. For example, choose either Line, Bar, or Histogram.
-
Each grouping of graphs contains multiple options, including different formats and variations. After choosing the graph that you wish to insert, select OK.
-
The graph appears in the Word document, and a new window containing editable data in a spreadsheet opens. To modify the category names and data, replace the existing text and numeric values with the appropriate entries. Changes made in the spreadsheet are instantly reflected in the graph.
If you want to edit the data in Microsoft Excel, select Edit Data in Microsoft Excel in the miniature spreadsheet.
-
When you’re satisfied with the category names and values, close the spreadsheet window.
How to Change the Graph Format and Edit Data
After the graph is created, formatting buttons appear to the right. If these buttons aren’t visible, select the chart. These settings control how the graph interacts with the text around it from a layout perspective.
You can also add or remove elements in the graph (including titles, labels, gridlines, and a legend), change graph styles and colors, and apply filters to the graph. More configurable options are found in the Windows version as opposed to macOS.
To access or edit the data in the graph, select Edit Data or Edit Data in Excel.
Thanks for letting us know!
Get the Latest Tech News Delivered Every Day
Subscribe
-
1
Open a Microsoft Word document. To do so, you can double-click an existing Word document, or you can open Microsoft Word and select your document from the Recent section.
- If you’re opening a new document, simply open the Microsoft Word program and click Blank document instead.
-
2
Click in the document where you want to insert your graph. Doing so will place the blinking cursor where you clicked; this is where your graph will appear when you add it.
- For example, clicking below a paragraph of text will set that location as the place to insert your graph.
Advertisement
-
3
Click the Insert tab. It’s at the top of the Word page, to the right of the Home tab.
-
4
Click Chart. You’ll see this option below and to the right of the Insert tab. Its icon resembles several different-colored bars.
-
5
Click a chart format. These are listed on the left side of the Chart pop-up window.
- A few common chart formats are Line, Column, and Pie.
- You can customize your chart’s format by clicking an appearance option at the top of your format’s window.
-
6
Click OK. Doing so will insert your chart into your document.
- You’ll also see a small Excel window with cells appear—this is where you’ll input your data.


Advertisement
-
1
Click a cell in the Excel window. Doing so will select it, which will allow you to add a point of data to that cell.
- The values in the «A» column dictate the X-axis data of your graph.
- The values in the «1» row each pertain to a different line or bar (e.g., «B1» is a line or bar, «C1» is a different line or bar, and so on).
- Numerical values outside of the «A» column or the «1» row represent different points of data on the Y-axis.
- Anything written in an Excel cell can be re-written to reflect your data.
-
2
Type in a number or name.
-
3
Press ↵ Enter or ⏎ Return. Doing so will enter your data into the cell, allowing you to move on to another cell.
-
4
Repeat this process for every point of data you need. As you enter data, your graph will change to display it.
-
5
Click X in the top right corner of the Excel window. Doing so will close the window and save your graph changes.
- You can re-open the Excel window at any time by clicking on your graph.


Advertisement
Add New Question
-
Question
How do I label the axes in a line graph?

The «Chart Tools» menu. Click on the tab entitled «Layout» in the Chart Tools menu. Click on «Axis Titles» from within the «Labels» group. Click on «Primary Horizontal Axis Title» or «Secondary Horizontal Axis Title» to add a horizontal axis text box to your chart.
-
Question
How do I make a table around existing text in my document?
You need to click «Insert» and then click «Smartapp.» Then click on «Relationships» on the left hand side and pick your table.
-
Question
How do I change the title if I update entries?
You can just click on your title and type in the updated title when you’re ready.
See more answers
Ask a Question
200 characters left
Include your email address to get a message when this question is answered.
Submit
Advertisement
-
On Word 2010 or earlier, the Excel window will pop up outside of Microsoft Word as an entirely new Excel document.
Thanks for submitting a tip for review!
Advertisement
-
Make sure you save your work!
Advertisement
About This Article
Article SummaryX
1. Click where you want to put the graph.
2. Click Insert.
3. Click Chart.
4. Select a format.
5. Click OK.
6. Click the Excel window.
7. Add graph data.
Did this summary help you?
Thanks to all authors for creating a page that has been read 646,939 times.