
Switch from Excel to Sheets
Next: Export spreadsheets

On this page
- Share spreadsheets
- Add comments and assign tasks
- Email collaborators
- Switch to an earlier version or name a version
- Create filters and filter views
- Protect content
- Limit sharing, downloading, printing, or copying
- Set an expiration date for sharing
- See who’s viewed a spreadsheet
Share spreadsheets

Excel:
|
Sheets:
|
|---|---|
|
Excel 2013
Excel 2010 |
Share with specific people:
Share using a link:
For more details, see Share files from Google Drive.
|

Add comments and assign tasks
Excel:
|
Sheets:
|
|---|---|
|
Excel 2013
Excel 2010 |
Note: If a file reaches the maximum number of comments, you can make a copy of the file without copying over any comments.
|
Email collaborators
Excel:
|
Sheets:
|
|---|---|
|
Excel 2013 Excel 2010 |
To follow up on a conversation that’s too long for comments, email collaborators right from Sheets.
|

Switch to an earlier version or name a version
If you own the spreadsheet or have edit access to it, you can see past versions and restore them.
Sheets: See versions or restore a version:
- Select File
 Version historySee version history.
 - (Optional) To see only named versions in the list, click Only show named versions.
- Click a timestamp to see a previous version of the file.
Below the timestamp, you’ll see:
- The names of anyone who edited the document.
- A color next to each person’s name. The edits they made appear in that color.
- (Optional) To make the version the active version, click Restore this version.
Name a version:
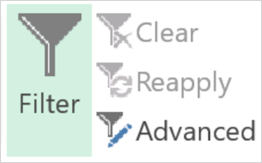
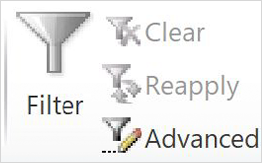
Create filters and filter views
Excel:
|
Sheets:
|
|---|---|
|
Excel 2013
Excel 2010 |
To filter out data in a spreadsheet, create a filter. If you want filters that don’t affect anyone else’s view, create filter views. Create a filter:
Create a filter view:
For more information, see Sort & filter your data and Create, name, and save a filter view.
|
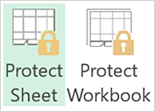
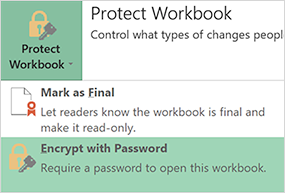
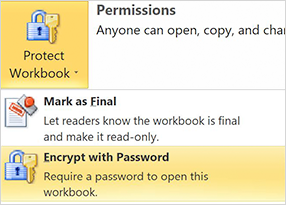
Protect content
Excel:
|
Sheets:
|
|---|---|
|
Excel 2013
Excel 2010 |
If you have sensitive content in a spreadsheet, you can restrict people from updating it.
For details, see Protect content in a spreadsheet.
|

Limit sharing, downloading, printing, or copying
Excel:
|
Sheets:
|
|---|---|
|
Excel 2013
Excel 2010 |
If you have sensitive content in a spreadsheet, you can prevent people from downloading, printing, or copying it.
|
Set an expiration date for sharing
Sheets: Set sharing expirations
When you’re working with people outside of your organization, such as clients or agencies, you might want to restrict their access to certain files when your projects are complete.
Set an expiration date:
- At the top of the spreadsheet, click Share.
- If the file isn’t already shared, share it.
- Click Advanced.
- Hover over a person’s name and click Set expiration .
- Change the access expiration date.
Note: You can’t set the expiration for the current day. If you need to restrict access immediately, just unshare the file.
- Click Save changesDone.
See who’s viewed a spreadsheet
Sheets: See who’s viewed a spreadsheet
In Sheets, if you have edit access to a spreadsheet, you can see:
- Who it’s shared with
- Who viewed it
- A chart of viewers over time
To see the Activity dashboard, at the top right, click Activity dashboard .
If you don’t want your view history to appear in the Activity dashboard, you can change the privacy settings.
Google, Google Workspace, and related marks and logos are trademarks of Google LLC. All other company and product names are trademarks of the companies with which they are associated.
Next: Export spreadsheets
Was this helpful?
How can we improve it?
![]()
Загрузить PDF
![]()
Загрузить PDF
Google Документы является одним из лучших инструментов, используемых при совместной работе людей по всей стране. Вот как можно загрузить таблицу в Google Документы и установить к ней совместный доступ для своих коллег.
Шаги
-
1
Прежде всего подготовьте ваш файл с электронной таблицей и поместите его в директорию, которую легко сможете найти.
-
2
Начните с того, что откройте ваш аккаунт Gmail и выберите опцию ‘Диск’, которая находится в левой верхней части экрана.
- Вы будете перенаправлены на https://docs.google.com/
-
3
Перед загрузкой убедитесь, что ‘Настройки загрузки’ выставлены правильно. Для этого нажмите на иконку с изображением шестеренки ->’Настройки загрузки’->’Преобразовывать загруженные файлы в формат Google Документов’.
-
4
Немного сместите указатель мыши вниз, пока не найдете кнопку с надписью ‘Загрузить’
-
5
Нажмите «Загрузить» и появится всплывающее меню с двумя типами загрузки: «Файлы» и «Папки».
-
6
Выберите ‘Файлы’, чтобы импортировать ваш файл.
-
7
Выберите файл и в сплывающем окне нажмите ‘Открыть’.
-
8
Процесс загрузки начался
-
9
После того, как файл будет загружен, появится ссылка ‘Поделиться’.
-
10
Нажмите на ссылку ‘Поделиться’, чтобы открыть файл для совместного доступа для ваших друзей или коллег.
-
11
Введите электронный адрес вашего друга или коллеги.
-
12
Установите уровень доступа для вновь добавленного электронного адреса, выберите из вариантов «Может редактировать», «Может комментировать» и «Может просматривать». Нажмите на «Готово».
-
13
После того, как вы нажмете «Готово», ваша электронная таблица будет помечена как «В совместном доступе».
-
14
Ваша таблица должна быть настроена таким образом, чтобы ее можно было открыть с помощью инструмента «Google Таблицы» и редактировать как электронную таблицу.
- Чтобы это сделать, щелкните правой кнопкой мыши на файле, выберите «Открыть с помощью->Google Таблицы».
-
15
Теперь вы можете открывать и редактировать таблицу как в Excel, также как ваши друзья и сотрудники.
Реклама


Советы
- Нажмите на изображение, чтобы увидеть его версию большего размера.
- Эта инструкция предназначена для новичков.
Реклама
Об этой статье
Эту страницу просматривали 10 312 раз.
Была ли эта статья полезной?
See all How-To Articles
This tutorial demonstrates how to make a shared spreadsheet for multiple users in Excel and Google Sheets.
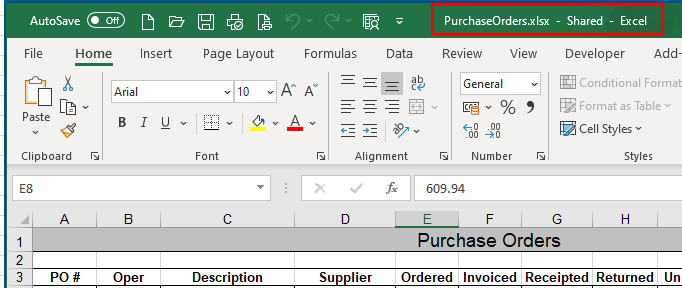
Depending on the version of Excel, users can either share a workbook, or allow co-authoring. In Office 365, Microsoft encourages users to use OneDrive and allow co-authoring of workbooks on the web. For this reason in Office 365, the traditional share feature has been hidden by default. Instead there is a share option in the top right-hand corner of the screen which allows the user to save the workbook to OneDrive and send a co-authoring link to another user.
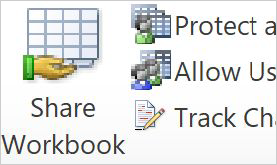
Share Workbooks
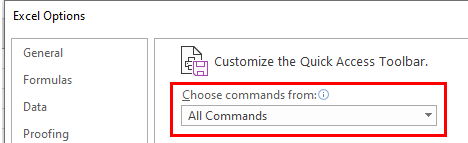
In Office 365, you must enable the sharing of workbooks before you can share the workbook.
- In the Ribbon, select File > Options > Quick Access Toolbar.
- In the Choose commands from drop-down list select All Commands.
- Scroll down and select Share Workbook (Legacy). Then click Add >> to add it to the Quick Access Toolbar.
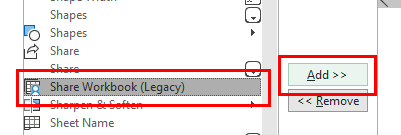
- Scroll through the list and add Track Changes (Legacy), Protect Sharing (Legacy), and Compare and Merge Workbooks.
The icons are added to the Quick Access Toolbar in the title bar.
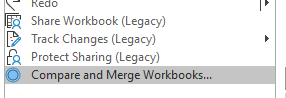
- To share the current workbook, click on the Share Workbook icon.

- Check Use the old shared workbooks feature instead of the new co-authoring experience.
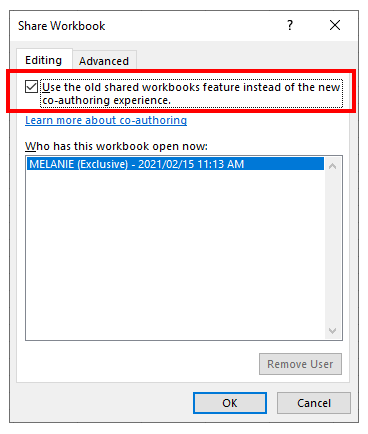
- Click OK to save the workbook.
Track Changes in Excel
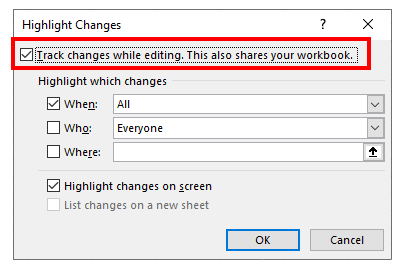
Tracking changes in Excel also shares the workbook, if it is not already shared.
- In the Quick Access Toolbar, select Track Changes > Highlight Changes.

- Check Track changes which editing. This also shares you workbook. and click OK.
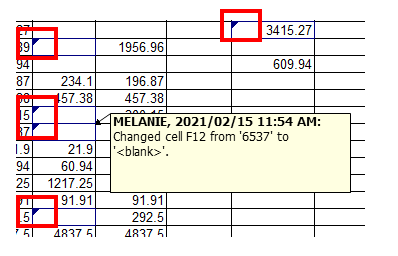
Any changes made to the workbook are then shown by small triangles in the top left-hand corner of the amended cell. If you rest your mouse over a cell that has been changed, the change and author of that change is shown in a comment (note). The color of the triangle is different for each author.
Co-Author in Excel 365
In Excel 365 you can use the new co-authoring feature instead.
- In the top right corner of the Excel screen, just below the title bar, click on Share.

- To co-author this file with other users, first save the file to OneDrive.
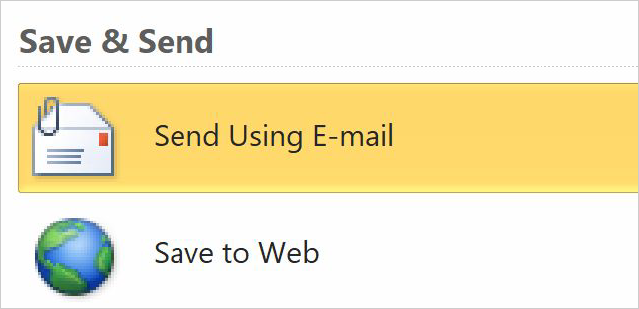
Alternatively, you can send the file in an email as an Excel or PDF attachment.
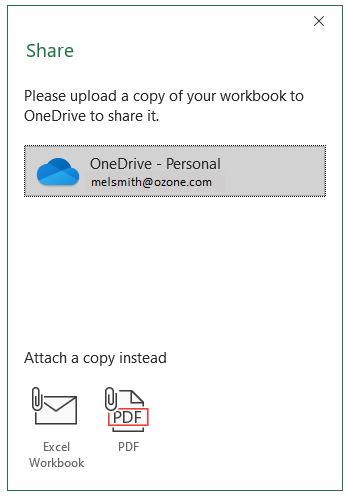
- Once the file is saved to OneDrive, it can be shared with other users.

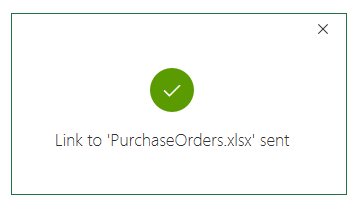
Type the email addresses of the users to send the file to and click the Send button.
- To amend the link settings, click the Anyone with the link can edit box prior to sending the link.
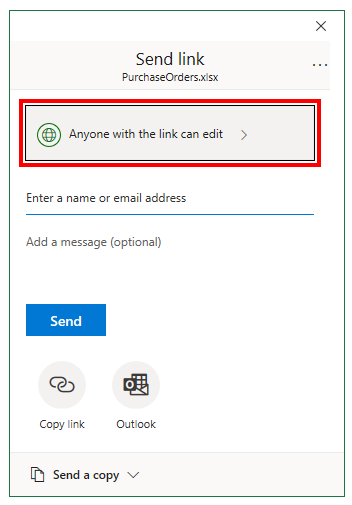
This allows us to set the “Allow Editing” option. If you have a OneDrive paid subscription, you will also be able to set a password and expiry date for the link that you are sending.
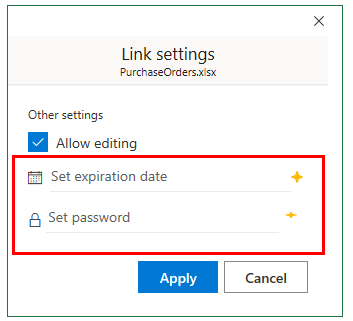
- Set a password and an expiry date for the link.
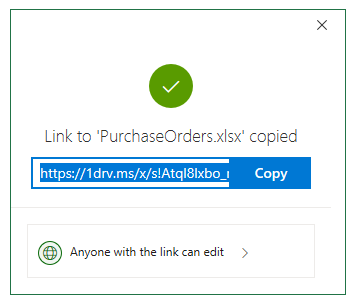
Copy Link and Outlook Buttons
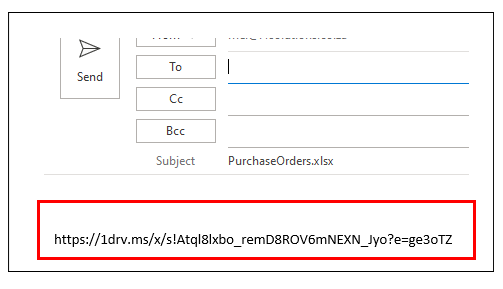
Instead of Send, you could have clicked the Copy link or Outlook button.

The Copy link button creates a link you can copy and send to a different user.
The Outlook button opens a blank email in Outlook with the link already inserted.
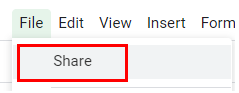
Share Spreadsheets in Google Sheets
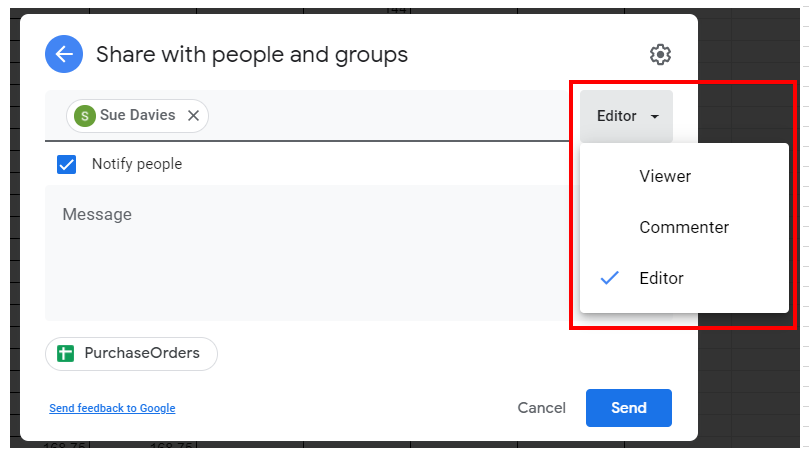
- In the File menu, select Share.
- Type the email of the person you wish to share the file with then select their editing role: Viewer to view only, Commenter to add comments, or Editor to be able to edit the file.
- If the email address is not associated with a Google Account, you get the following message.
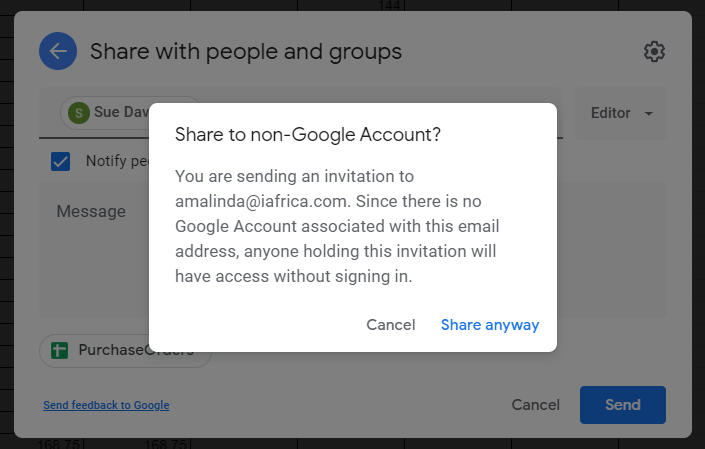
- Click Share anyway.
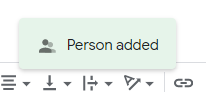
- Click Send to send the added person an email notification. A “Person added” message appears on the screen.
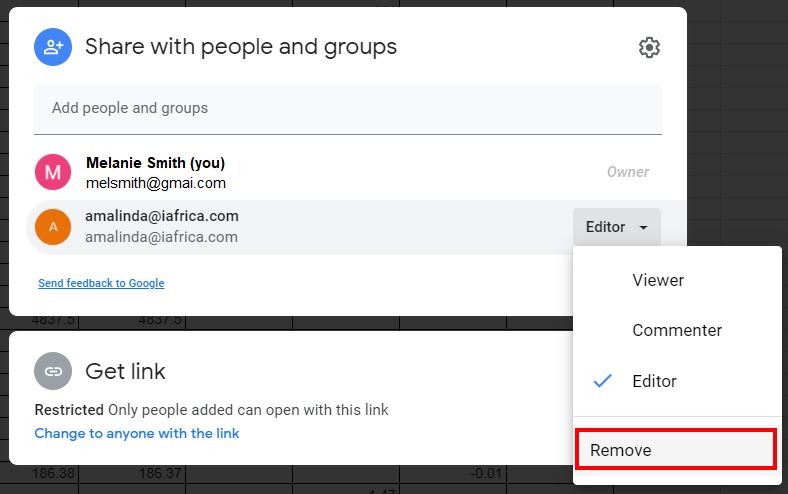
You can see how many people are sharing the file by resting the mouse on the Share button in the top right hand corner of the screen.

- To remove a person’s access to the file, click on the Share button again then click Remove under the person’s editor role.
When Google Sheets launched in 2006, one of its most exciting features was real-time collaboration. Years later, it still feels like magic to share and collaborate on Google spreadsheets with anyone, anytime, anywhere.
Note that sharing and collaboration are slightly different features:
- Collaboration, where you and others work on the same spreadsheet at the same time or at separate times.
- Sharing, where you simply publish your spreadsheet so others can use it, and even make their own copies depending on permission levels.
Table of Contents
- How to Share Google Sheets
- Stop, limit, or change sharing
- To prevent commenters and viewers from downloading, printing, or copying your file:
- How to make it so only you can share a Google Sheet
- Set an expiration date for a file
- How to share & collaborate on a spreadsheet with more than 100 people
- Sharing A Template in Google Sheets
- If you want to stop sharing a file you own:
- When you see anonymous or unknown people in a shared Google Sheet file
- Remove Google Sheets files or folders people have shared with you
- Tracking changes made by others in shared Google Sheets
- Collaboration in Google Sheets – Email, Chat, Comments
- Live chat with others in a Google Sheet
- Email collaborators in Google Sheets
- Add comments and assign tasks in Google Sheets
Note: you can share a Google spreadsheet through a desktop browser or a mobile device. This walk-through focuses on desktop sharing. Google’s help docs include tips for mobile collaboration.
You can easily share a Google spreadsheet with anyone via their email address. However, only people with a Google Account will be able to edit the Google Sheet.
1 – Open the file you want to share and click the green “Share” button in the upper right corner of your screen

2 – Enter the email addresses for each person with whom you want to share your spreadsheet.
3 – Set sharing limits. When you share a Google Sheet, you can choose what they can do with it. The levels are:
- View: The lowest level of access. People can view, but can’t change or share the file with others
- Comment: People can make comments and suggestions, but can’t change or share the file with others.
- Edit: The highest level of access. People can make changes, accept or reject suggestions, share the file with others, add or remove specific people, and copy, print, or download the file. Note: this is the default level of sharing in Google Sheets.
- Advanced Settings: If you click the “Advanced” link in the lower right corner of the “Share with others” window, you can additionally prevent editors from changing access and adding new people, and disable options to download, print, and copy for commenters and viewers.

4 – Add a message (optional). Add a note to explain why you are sharing the spreadsheet or to include any special instructions.
5 – Send – Click the blue “send” button in the lower-left corner of the dialog box to share the spreadsheet
Stop, limit, or change sharing
After you share a file, you can stop sharing it at any time. You can also prevent people from making any changes or sharing your file.
To stop sharing a Google spreadsheet:
- Open the spreadsheet
- Click Share
- At the bottom right of the “Share with others” window, click Advanced.
- Next to the person, you want to stop sharing with, click Delete
- Click Save changes.
To prevent commenters and viewers from downloading, printing, or copying your file:
If you’re sharing a file, the owner or anyone with edit access can change the sharing settings for the file.
- Open the file you want to limit.
- Click Share
- In the bottom right, click Advanced.
- Check the box next to “Disable options to download, print, and copy for commenters and viewers.”
- Click Save changes and click Done.
Note: You can limit how people share, print, download, and copy within Google Drive, Docs, Sheets, and Slides, but you can’t stop how others share the file content in other ways, including copying and pasting contents from your file into another file.
- Click Share
- In the bottom right, click Advanced.
- Check the box next to “Prevent editors from changing access and adding new people.”
- Click Save changes and click Done.
Note: If you prevent sharing of a folder, it only applies to the folder. To turn this on for the files inside, you have to change the settings for the files inside.
Set an expiration date for a file
This option is only available for people with educational or paid G Suite accounts. To set an expiration date for a file:
- Click Share or Share
- At the bottom right of the “Share with others” window, click Advanced.
- Under “Who has access,” move your cursor over the person you want to limit and click Set expiration
- Next to “Access expires,” click the number of days to change the expiration date. Choose a date within one year of the current date.
- Click Save changes.
Up to 100 people with view, edit, or comment permissions can work on Google Docs, Sheets, or Slides file at the same time. When more than 100 people are accessing a file, only the owner and some users with editing permissions can edit the file.
If you need many people to view a file at once, publish it and create a link to share to viewers. You can give edit access to people who need to edit or comment on the file. Learn how to publish a file.
Publishing a file makes it visible to everyone on the web. Be careful when publishing private or sensitive info. If you have an account through work or school, your administrator can limit who can view a published file. If you’re an administrator, learn how to control who can publish documents to the web.
To remove a file from the web, you must stop publishing it. Learn how to stop publishing a file.
To stop sharing a file with collaborators, learn how to change sharing permissions.
Sharing A Template in Google Sheets

It’s easy to share a Google Sheet as a template that others can use and edit:
Open your Google Sheet and click the green share button in the upper right corner of the screen.
Click “get shareable link” and select “anyone with link can view,” then click “copy link.”
You’ll then get a link that looks like:
https://docs.google.com/spreadsheets/d/<spreadsheetID>/<strong>edit?usp=sharing</strong> To use the document as a template, change the last part of the URL from
/edit?usp=sharingto
/template/previewThe link should should look like this:
https://docs.google.com/spreadsheets/d/<spreadsheetID>/template/previewNow, when someone opens the link they’ll see a preview of the file with a blue “Use template” button.
If you want to stop sharing a file you own:
If you share a file with people, you (or anyone with edit permissions) can change the sharing settings for the file. Learn how to do this here.
If you don’t want anyone to publicly access your file, stop publishing the file.
When you see anonymous or unknown people in a shared Google Sheet file
People you invite individually will show by name when they’re in the file. People you didn’t invite individually will show as anonymous animals when they’re in the file.
You might see a name you don’t recognize or “anonymous animals” viewing your document, spreadsheet, or presentation. This can happen when a document is shared publicly or with anyone who has the link.
- Read more about anonymous sharing from Google.
Remove Google Sheets files or folders people have shared with you
If someone shared a file or folder with you that you don’t want to see anymore, you can remove it:Go to drive.google.com.
- On the left, click Shared with me.
- Right-click the file you want to remove.
- Click Remove.
Note: You can’t remove files stored in shared drives.
Tracking changes made by others in shared Google Sheets
If you’re collaborating with several people on a single file, it can be difficult to pinpoint who made certain changes and when. Fortunately, Google Sheets has robust features for seeing who made changes to a shared file. You can:
- See all changes to a file or revert to a previous version.
- See what’s changed since you last opened a file
- See who’s viewed your file or who you’ve shared it with
- See who commented, edited, moved, or shared a file
Read more about tracking changes here.
Beyond sharing in Google Sheets, you can also actively collaborate with others in real-time via chat. You can also collaborate asynchronously by assigning tasks, sending email, and leaving comments directly in the spreadsheet.
Live chat with others in a Google Sheet
If you work on a Google Sheet at the same time as other people, you can chat with each other inside the spreadsheet.
- On your computer, open a document, spreadsheet, or presentation.
- At the top right, click Chat . This feature won’t be available if you’re the only one in the file.
- Enter your message in the chat box.
- When you’re finished, at the top right of the chat window, click Close .
Note: All chats in Google Docs, Sheets, and Slides include anyone viewing the file. The chats aren’t saved.
Email collaborators in Google Sheets
You can easily email collaborators right from Google Sheets. This is especially helpful when you want to ask questions about a spreadsheet or follow up on a conversation that’s too long for comments.
- Open your Google Sheets file. Click File > Email collaborators. (Optional, shared drive files only)
- To email all members of the shared drive, check the Members box. (Optional)
- Change the email recipients or add a subject. Add a message. (Optional)
- To send a copy of the email to yourself, check the Send a copy to myself box. (Optional, Drive files only)
- To paste the file directly into the email, check the Paste the item itself into the email box. Click Send.
Add comments and assign tasks in Google Sheets

- In Google Sheets, select the cell or text you’d like to comment on.
- Click Add comment
- Enter your comment in the box.
- (Optional) To direct your task or comment to a specific person, enter a plus sign (+) followed by their email address. You can add as many people as you want. Each person will get an email with your comment and a link to the file.
- (Optional) To assign the comment to a specific person, check the Assign to box.
- Click Comment or Assign.
74
74 people found this article helpful
Easily collaborate or distribute important information
Updated on April 24, 2022
What to Know
- Open spreadsheet > select Share > add emails > use down arrow to set users’ permissions > add note to invite > Send.
- To send just the link itself, select Share > Copy Link from Get link box > paste into an email.
This article explains how to share Google Sheets, the platform’s free online spreadsheet application. Additional information covers how to share Sheets in Google Workspace.
How to Share a Google Sheets File
To share a Google Sheets file, add the email addresses of your invitees, include a note, then send the invitation. You can determine whether recipients may just view your spreadsheet, or also comment on, or edit it.
When you share a Google Sheets file, all invitees must have a Google account before they can view it. Creating a Google account is easy and free. If invitees don’t have an account, a link on the Google login page takes them to the account registration page.
-
Log in to Google Sheets and create or open the spreadsheet you want to share.
-
In the top-right corner of the screen, select Share.
-
In the Share With People and Groups dialog box, add the email addresses of the people you want to invite to view, comment on, or edit your Google Sheets file.
-
Next to the email address field, select the down-arrow and choose one of the three options: Editor, Viewer, or Commenter.
Your choice will depend on how much you want recipients to be able to interact with the file. Editor means the recipients can make changes to the file. Commenter means they can’t change anything but can make comments. Viewer means they can only view the file without making any changes or comments.
-
Add a note to accompany the invitation, then select Send.
-
Alternatively, open your Google Sheets file, select Share, and in the Get link box, choose Copy Link. The link is copied to your clipboard, and you can paste it into an email message to send to recipients that way.
-
To stop sharing a Google Sheets file, select Share. In the drop-down menu next to the collaborator’s name, select Remove.
Sharing Sheets in Google Workspace
Google Sheets is also part of Google Workspace, an integrated collaboration environment that merges Gmail, Chat, and Meet. Google Workspace is free to anyone with a Google Account, though there are paid subscriptions that offer additional capabilities and features for organizations.
If you’re using Sheets within Google Workspace, you’ll share a Google Sheets file the same way as you would in the standalone application. Select the file, click Share, then add your recipients and choose their editing or viewing privileges.
Thanks for letting us know!
Get the Latest Tech News Delivered Every Day
Subscribe