
Hi
I have an excel userform with several functions..
What I would like is, when a user selects a date and a time, it would then automatically update Google Calendar. Is this possible at all?
Appreciate the help
Cheers
P4nny,
‘Automatic’ this is not…So unless someone else on this forum has an ‘automatic update’ solution…But here is something
I did for a vetinarian friend to put the doctor’s schedules on the company’s Google calendar.
You can place the data from your userform into a separate excel sheet (using a macro) and compile a list similar to this in Excel:
| Excel 2007 | |||||
|---|---|---|---|---|---|
|
|
|||||
| A | B | C | D | E | |
| 1 | Subject | Start Date | Start Time | End Time | End Date |
| 2 | JA | 12/30/2013 | 7:00 AM | 7:00 PM | 12/30/2013 |
| 3 | KW | 12/30/2013 | 7:00 PM | 7:00 AM | 12/31/2013 |
| 4 | Intern | 12/30/2013 | 2:00 PM | 10:00 PM | 12/30/2013 |
| 5 | JA | 12/31/2013 | 7:00 AM | 7:00 PM | 12/31/2013 |
| 6 | LBW | 12/31/2013 | 7:00 PM | 7:00 AM | 1/1/2014 |
| 7 | JEB | 12/31/2013 | 2:00 PM | 10:00 PM | 12/31/2013 |
|
Sheet2 |
Then you periodically save the workheet as a CSV file (using a macro or not)… The filename could include the date and time.
The CSV format for the above should look like this:
(The five commas at the end of each line are placeholders for additional headers, if needed. See ‘About…’ below).
Subject,Start Date,Start Time,End Time,End Date,,,,,
JA,9/30/2013,7:00 AM,7:00 PM,9/30/2013,,,,,
KW,9/30/2013,7:00 PM,7:00 AM,10/1/2013,,,,,
Intern,9/30/2013,2:00 PM,2:00 AM,10/1/2013,,,,,
JA,10/1/2013,7:00 AM,7:00 PM,10/1/2013,,,,,
LBW,10/1/2013,7:00 PM,7:00 AM,10/2/2013,,,,,
JEB,10/1/2013,2:00 PM,2:00 AM,10/2/2013,,,,,
You will need the complete pathname of the CSV file. That can be provided in a Message Box that
appears after a macro saves the worksheet as a CSV file. Whether you use a macro or not, you need to
copy or jot down the complete pathname and filename for use in Google Calendar. I used the same
pathname as my original data.
Then open Google Calendar and import the file to the appropriate calendar as follows:
I selected ‘Test Calendar’ under the ‘My Calendars’ heading so I was
viewing only one calendar. You need to deselect any other calendars before
importing the CSV file or they will also be populated with the same info. You do that by
clicking on the colored squares to the left side of each calendar listed…
IMPORTANT NOTE: You can use the ‘Browse’ button in Google Calendar to search for the CSV file in your
directory. You select the calendar to import the data ‘TO’ from a drop down list on the input box that
comes up in Google Calendar. And that is it!
I am including some notes here that I got from the internet about creating CSV files.
Like I said in the beginning, this solution is not ‘automatic’…but it will import ALL your data to Google Calendar.
I suggest you post a sample of your list and perhaps someone will come along with a more ‘automatic’ solution,
but you need to show them sample data in the format (which columns and rows) you are working with.
Good Luck!
Perpa
About Importing CSV files (calendar info from Excel) into Google Calendar
https://support.google.com/calendar/answer/45656
CSV stands for ‘Comma Separated Values,’ so CSV files have a comma between each item
of information they contain. Google Calendar supports most CSV formatted files from
commonly used calendar applications such as Yahoo! Calendar and Microsoft Outlook.
All CSV files must have a correctly formatted header. The minimum amount of header
information required to import events into Google Calendar is: Subject, Start Date.
With that header information, Google Calendar will recognize the event as an All Day
event by default. To add more information to your events, simply add more headers.
Possible headers include: Subject, Start Date, Start Time, End Date, End Time, All Day Event,
Description, Location, and Private.
To edit a CSV file, first make sure that the file is originally saved with the .csv extension
(many text editing applications cannot «Save As…» a CSV, and manually appending the
extension does not make it a readable CSV file). However, Excel can save as a CSV.
An example CSV file looks like this:
Subject,Start Date,Start Time,End Date,End Time,All Day Event,Description,Location,Private
Final Exam,05/12/20,07:10:00 PM,05/12/07,10:00:00 PM,False,Two essay questions that will
cover topics covered throughout the semester,»Columbia, Schermerhorn 614″,True
This event, ‘Final Exam,’ would then appear on May 12, 2020 from 7:10 PM to 10:00 PM. The
location would be ‘Columbia, Schermerhorn 614,’ the description would be ‘Two essay
questions that will cover topics covered throughout the semester,’ and it would be a private
event. Note that if any of your fields have commas in them (location, in the example above),
you can include them in your file by making sure to place quotation marks around the text.
Check out this article if you’re having trouble importing your CSV file:
https://support.google.com/calendar/answer/45654
Многие бизнес-процессы (и даже целые бизнесы) в этой жизни предполагают выполнение заказов ограниченным количеством исполнителей к заданным срокам. Планирование в таких случаях происходит, что называется, «от календаря» и часто возникает потребность переноса запланированных в нём событий (заказов, встреч, поставок) в Microsoft Excel — для дальнейшего анализа формулами, сводными таблицами, построения диаграмм и т.п.
Само-собой, хотелось бы реализовать такой перенос не тупым копированием (что как раз несложно), а с автоматическим обновлением данных, чтобы в будущем всё внесенные в календарь изменения и новые заказы «на лету» отображались бы в Excel. Реализовать такой импорт можно за считанные минуты с помощью надстройки Power Query, встроенной в Microsoft Excel, начиная с 2016-й версии (для Excel 2010-2013 её можно скачать с сайта Microsoft и установить отдельно по ссылке).
Предположим, что мы используем для планирования бесплатный Google Calendar, в котором я, для удобства, создал отдельный календарь (кнопка со знаком «плюс» в правом нижнем углу рядом с Другие календари) с названием Работа. Сюда мы заносим все заказы, которые нужно выполнить и доставить клиентам по их адресам:

Открыв двойным щелчком любой заказ можно просмотреть или отредактировать его детали:

Обратите внимание, что:
- В названии мероприятия указано имя менеджера, который выполняет этот заказ (Елена) и номер заказа (45).
- Указан адрес доставки
- В примечании вписаны (отдельными строками, но в любом порядке) параметры заказа: тип оплаты, сумма, имя клиента и т.д. в формате Параметр=Значение.
Для наглядности, заказы каждого менеджера выделяются своим цветом, хотя это и не обязательно.
Шаг 1. Получаем ссылку на Google Calendar
Сначала нам нужно получить веб-ссылку на наш календарь с заказами. Для этого щёлкаем по кнопке с тремя точками Параметры календаря Работа рядом с названием календаря и выбираем команду Настройки и общий доступ:

В открывшемся окне можно, при желании, сделать календарь общедоступным или открыть к нему доступ для отдельных пользователей. Нам же нужна ссылка для закрытого доступа к календарю в формате iCal:

Шаг 2. Загружаем данные из календаря в Power Query
Теперь открываем Excel и на вкладке Данные (если у вас Excel 2010-2013, то на вкладке Power Query) выбираем команду Из интернета (Data — From Internet). Затем вставляем скопированный путь к календарю и жмём ОК.
Распознавать формат iCal Power Query не умеет, но ему легко помочь. По сути, iCal — это обычный текстовый файл c двоеточием в качестве разделителя и внутри он выглядит примерно так:

Так что можно просто щелкнуть правой кнопкой мыши по значку загруженного файла и выбрать максимально близкий по смыслу формат CSV — и наши данные о всех заказах будут загружены в редактор запросов Power Query и разделены на два столбца по двоеточию:

Если присмотреться, то хорошо видно, что:
- Информация о каждом мероприятии (заказе) группируется в блок, начинающийся со слова BEGIN и заканчивающийся END.
- Дата-время начала и окончания хранится в строках с метками DTSTART и DTEND.
- Адрес доставки — это LOCATION.
- Примечание к заказу — поле DESCRIPTION.
- Название мероприятия (имя менеджера и номер заказа) — поле SUMMARY.
Осталось извлечь эту полезную информацию и преобразовать её в удобную таблицу.
Шаг 3. Преобразуем в нормальный вид
Для этого выполним следующую цепочку действий:
- Удалим ненужные нам верхние 7 строк до первого BEGIN командой Главная — Удалить строки — Удаление верхних строк (Home — Remove rows — Remove top rows).
- Отфильтруем по столбцу Column1 строки, содержащие нужные нам поля: DTSTART, DTEND, DESCRIPTION, LOCATION и SUMMARY.
- На вкладке Добавление столбца выберем Столбец индекса (Add column — Index column), чтобы добавить к нашим данным колонку с порядковым номером строки.
- Там же на вкладке Добавление столбца выберем команду Условный столбец (Add column — Conditional column) и в начале каждого блока (заказа) выведем значение индекса:

- Заполним пустые ячейки в получившемся столбце Блок, щёлкнув по его заголовку правой кнопкой мыши и выбрав команду Заполнить — Вниз (Fill — Down).
- Удалим ненужный больше столбец Индекс.
- Выделим столбец Column1 и выполним по нему свёртку данных из столбца Column2 с помощью команды Преобразование — Столбец сведения (Transform — Pivot column). В параметрах обязательно выбрать Не агрегировать (Don’t aggregate), чтобы к данным не применялась никакая математическая функция:

- В получившейся двумерной (кросс) таблице зачистить обратные слэши в столбце адреса (правой кнопкой по заголовку столбца — Замена значений) и удалить ненужный более столбец Блок.
- Чтобы превратить содержимое столбцов DTSTART и DTEND в полноценную дату-время, выделив их, выберем на вкладке Преобразование — Дата — Выполнить анализ (Transform — Date — Parse). Затем подправим код в строке формул, заменив функцию Date.From на DateTime.From, чтобы не терять значения времени:

- Затем, щёлкнув правой кнопкой мыши по заголовку, разделим столбец DESCRIPTION с параметрами заказов по разделителю — символу n, но при этом в параметрах выберем деление на строки, а не на столбцы:

- Еще раз разделим получившийся столбец на два отдельных — параметр и значение, но уже по знаку «равно».
- Выделив колонку DESCRIPTION.1 выполним свёртку, как уже делали ранее, командой Преобразовать — Столбец сведения (Transform — Pivot column). Столбцом значений в этом случае будет колонка со значениями параметров — DESCRIPTION.2 В параметрах обязательно выбрать функцию Не агрегировать (Don’t aggregate):

- Останется задать форматы для всех столбцов и переименовать их желаемым образом. И можно выгружать результаты обратно в Excel командой Главная — Закрыть и загрузить — Закрыть и загрузить в… (Home — Close&Load — Close&Load to…)


И вот наш список заказов, загруженный в Excel из Google-календаря:

В будущем, при изменении-добавлении новых заказов в календарь, достаточно будет лишь обновить наш запрос командой Данные — Обновить всё (Data — Refresh All).
Ссылки по теме
- Производственный календарь в Excel с обновлением из интернета через Power Query
- Трансформация столбца в таблицу
- Создание базы данных в Excel
Welcome to the Calendar API Tutorial Series.
How does Google Calendar API help you add Calendar in Google Sheets
When you want your Google Calendar, Google Sheets, and personal assistant to collaborate, you’ll need the Google Calendar API to integrate them all together.
In this series you will be learning how to export Gmail Calendar with Google Apps Script:
(1) Importing events from your Google Calendar into your Google Sheets
(2) Add Google Meet links to Calendar Events
Welcome to the first part of the Calendar API Tutorial Series.
In this blog, I am going to show you how to create calendar events from a Google Sheet using the Calendar API and Google Apps Script.
So let’s get started.
If you prefer to watch a video instead of read, we’ve got you covered:
Step 1: Sample Google Spreadsheet and Calendar
The Google Sheet that I will be using in this blog, contains the following details.
- Name of the Event
- Start date/time of the Event
- End date/time of the Event
- Location of the Event
- Description of the Event
- Visibility of the Event
- Start Date/Time
- End Date/Time
- Calendar ID

Step 2: Add the Google Calendar API
- To add the Google Calendar API, follow these steps:
Open the Script Editor. To open the Script Editor, follow these steps :(1) Click on the Tools button next to the Add-ons button.

(2) Next click on the Script Editor option. This brings up the Script Editor as
shown below.

We have reached the Script Editor.
(3) Go to the left side of the Script Editor and click on the Add a Service button.

On clicking on Add a Service, you will see the following Services you can add to your Google Apps Script Project.
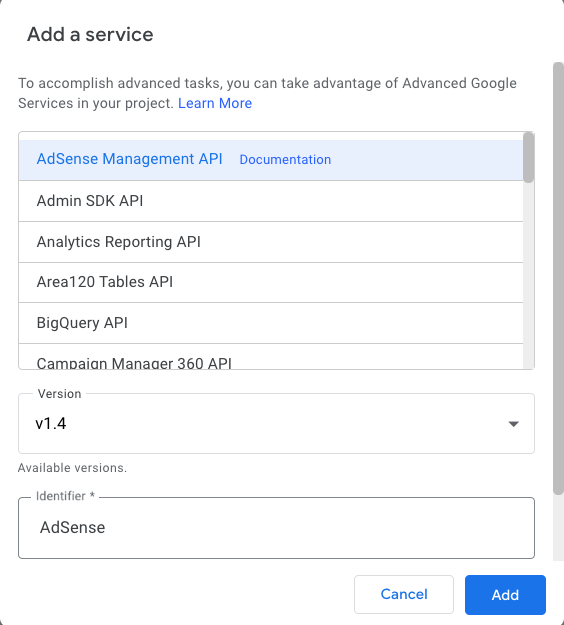
Scroll down to Google Calendar API and select it.

After selecting the Google Calendar API, click on Add.
The Google Calendar API has successfully been added to the Project.
Step 3: Write the Automation Script to Export Google Calendar Events
We have already opened the Script Editor, it’s time to write the script.
function create_Events(){
(1)  var ss = SpreadsheetApp.getActiveSpreadsheet();
(2)  var sheet = ss.getSheetByName("GetEvents");
(3)  var id_cal = sheet.getRange(“C2”).getValue();
(4)  var cal= CalendarApp.getCalendarById(id_cal);
Declaring the function :
- Get the Active Spreadsheet
- Get the sheet by name
- Get the Calendar ID from the sheet using the getRange Google Script function followed by getting the value
- Next using the CalendarApp and the calendar ID we have got the calendar.
To get the Calendar ID, follow these steps :
- Open your Google Calendar
- Select the Calendar that you are going to use and click on the three dots next to it.

3. Click on Settings and Sharing

4. Scroll down to Integrate Calendar.
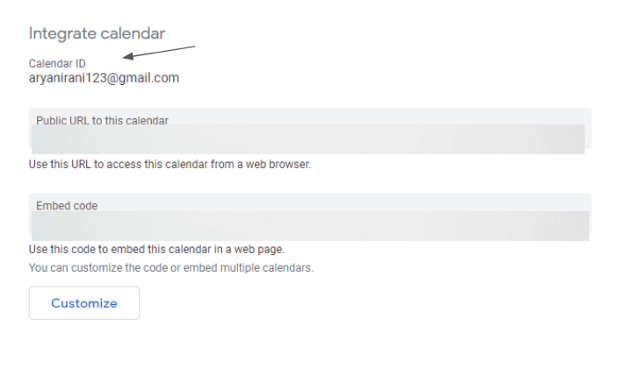
Copy the Calendar ID and paste it into the getCalendarById function.
(1)   var start_time = sheet.getRange(“G2”).getValue();
(2)   var end_time  = sheet.getRange(“H2”).getValue();
(3)   var events = cal.getEvents(new Date(start_time), new Date(end_time));
Here we have got the start and end time from the sheet, between which we want all the events. To do that we have used the getRange function and specified the range followed by getting the values using the getValue function.
Now, whenever the user wants to change the start and end time all he has to do is change the details in the sheet and run the script.
These values will be stored in the events variable. We are going to do this using the getEvents function followed by the start date and end date.
for(var i = 0;i<events.length;i++){
    var title = events[i].getTitle();
    var start_time = events[i].getStartTime();
    var end_time = events[i].getEndTime();
    var loc = events[i].getLocation();
    var des = events[i].getDescription();
    var vis = events[i].getVisibility();
Here we have created a for loop that will go through all the events that we created in the Google Calendar. Using the for loop we are going to get the following details from the events in the Google Calendar :
- Title of the event
- Start time of the event
- End time of the event
- Location of the event
- Description of the event
- Visibility of the Event
sheet.getRange(i+5,1).setValue(title);
sheet.getRange(i+5,2).setValue(start_time);
sheet.getRange(i+5,3).setValue(end_time);
sheet.getRange(i+5,4).setValue(loc);
sheet.getRange(i+5,5).setValue(des);
sheet.getRange(i+5,6).setValue(vis);
   }
Logger.log("Events have been added to the Spreadsheet");
     }
Now that we have got all the calendar events in the variables. It’s time to send the data back to the sheet. To do that we are going to start by getting the range followed by setting the values using the setValue command, followed by the variable that you want to set. Here the i+5 denotes the 5th row in the sheet and the 1 specifies the column. The column number keeps increasing with new values.
After we set the values we print a confirmatory message using the Logger.log function that says “Events have been added to the Spreadsheet”.
We are done with our code.
Step 4: Check the Output
Our code is complete. Select the correct function (getEvents) as shown below and run the program. Or you can run the code using a trigger, macros and more. Check out the link below to know more.

On successful execution, the script will add all the events to the Spreadsheet.

Here you can see all the details have come into the sheet :
- Title of the event
- Start and End time of the event
- Location and Description of the event
- Visibility of the Event
Summary: How to export Gmail Calendar to Sheets
We saw how you can add calendar to Google Sheets using the Calendar API and Google Apps Script. To sum up :
- Created the spreadsheet
- Added some events to the Google Calendar
- Accessed the sheet by name
- Got the Calendar by ID
- Specified the start date and end date between which we want the events
- Created a for loop to go through each of the events in the Google Calendar
- Stored all the event details into variables
- Set the values back into the sheet
I hope you have understood how to add Calendar Events into your spreadsheet using the Google Calendar API and Google Apps Script. In the next blog, I am going to show you how to Create Calendar Events in Google Calendar using the Google Calendar API and Google Apps Script.

Using a calendar to track and organize life is a great tool. Google’s calendar is very flexible with multiple calendars, repeat events, reminders and more. Recently I needed to do some analysis on my calendar to tabulate how many events and activities I had done. I soon realized there was no easy way to summarize or list view the calendar. I wanted to get the information exported to Excel so I could complete my analysis. After some searching on the Internet, I was surprised to find there was no easy solution.
Google does allow you to search and maintains your calendar forever. The only mechanism to get the data out is through the Import/Export feature. You can export to an ics file for each calendar you have in your account. However, the ics file format is not friendly to anyone!
If you search the Internet, you will find there are monthly services and software tools you can purchase to convert an ics file to a usable format. The idea of paying for such a tool did not make sense since the ics file was fundamentally just a text file. I embraced my passion for Excel and created a macro to do the work for me. In the overview below, you can follow my steps to get your calendar and create an Excel spreadsheet. Then, create a macro and insert the code provided for the function and subroutine. You can feel free to customize and optimize from there! Enjoy!
STEP 1 – Export your Google calendar
Open your Google calendar and click the gear icon for Settings. Next click on the left menu option for Import & Export. From the screen, select one or more calendars to export and click the “Export” button. You will get an ics file for each calendar and need to process each one separately.
STEP 2 – Open in Excel
Launch Excel and choose FILE > OPEN. Go to the “Browse” file selection window and change the file filter to look at All Files. The file filter is in the bottom right corner if you aren’t familiar with that screen.
Browse to your ics file. Select and open the file. Excel will launch the text conversion wizard. Just leave the default options and click Next until you get to Finish. The resulting Excel workbook should have one sheet and the data will be in column A. It will likely be a long sheet (lots of rows) if your calendar had a lot of events. I tested with over 20,000 rows and the macro processed in under a minute.
STEP 3 – Create a macro
With your workbook open, go to the “View” ribbon can select to “View Macros”. From the popup window, you can create a new macro and name it. Copy and paste the macro code provided below. You will create a function and a subroutine. Then, run the macro!
The macro will present a popup with the total number of rows found in the ics input.This is a simple check in case you end up with a blank row or something unusual.As the macro runs, the status bar at the bottom left of Excel will update as each event is processed.The result will be in the “Output” worksheet.
' Function to check if a sheet exists
Function WorksheetExists(sName As String) As Boolean
    WorksheetExists = Evaluate("ISREF('" & sName & "'!A1)")
End Function

Sub Convert_ics()
'
' Convert Google exported ics file to Excel column sheet
' Created 2-7-2021 by Infotect Design Solutions
'
Dim OutputSheetName As String
Dim ColonPos As Integer

' Main variables
OutputSheetName = "Output"
CurrCell = ""
EndCalendar = "END:VCALENDAR"
EventBegin = "BEGIN:VEVENT"
EventEnd = "END:VEVENT"
EventDateStartPre = "DTSTART"
EventDataEndPre = "DTEND"
EventDescPre = "DESCRIPTION:"
EventSummPre = "SUMMARY:"
EventTracker = 0
Set CalSheet = Sheets(1)
CalCol = "A"    ' The ics sheet will have only one column when converted into Excel
CalLastRow = 0
RowIndex = 1
CalCounter = 0

' Output sheet tracking variables
Ocurrcol = 1
Ocurrrow = 2

' Output sheet - clear it or create it
' TIP - If you want to tweak the output, rename the tab after running the macro to preserve
If WorksheetExists(OutputSheetName) Then
    Sheets(OutputSheetName).Select
    Cells.Clear
Else
    Sheets.Add(After:=Sheets(Sheets.Count)).Name = OutputSheetName
    Sheets(OutputSheetName).Select
End If

' Setup output column headers
Range("A1").Select
ActiveCell.FormulaR1C1 = "Begin_Date"
Range("B1").Select
ActiveCell.FormulaR1C1 = "End_Date"
Range("C1").Select
ActiveCell.FormulaR1C1 = "Description"
Range("D1").Select
ActiveCell.FormulaR1C1 = "Summary"
Range("A2").Select

' Macro assume first sheet is ICS output and data is in column A
Sheets(1).Select
Range("A1").Select

With ActiveSheet
    CalLastRow = .Cells(.Rows.Count, "A").End(xlUp).Row
    MsgBox CalLastRow
End With

CalRange = "A1:A" & CalLastRow

For RowIndex = 1 To CalLastRow
    CurrCell = Cells(RowIndex, CalCol)
    If CurrCell = EventBegin Then
        EventTracker = 1 ' start processing an event
    Else
        If EventTracker = 1 Then
            ' The following IF statements must be in the order of the events in the ics sheet
            If Left(CurrCell, Len(EventDateStartPre)) = EventDateStartPre Then   ' Get event start date and time
                ColonPos = InStr(CurrCell, ":")
                Sheets(OutputSheetName).Cells(Ocurrrow, Ocurrcol).Value = Right(CurrCell, Len(CurrCell) - ColonPos)
                Ocurrcol = Ocurrcol + 1
            End If
            If Left(CurrCell, Len(EventDataEndPre)) = EventDataEndPre Then  ' Get event end date and time
                ColonPos = InStr(CurrCell, ":")
                Sheets(OutputSheetName).Cells(Ocurrrow, Ocurrcol).Value = Right(CurrCell, Len(CurrCell) - ColonPos)
                Ocurrcol = Ocurrcol + 1
            End If
            If Left(CurrCell, Len(EventDescPre)) = EventDescPre Then    ' Get event description
                Sheets(OutputSheetName).Cells(Ocurrrow, Ocurrcol).Value = Right(CurrCell, Len(CurrCell) - Len(EventDescPre))
                Ocurrcol = Ocurrcol + 1
            End If
            If Left(CurrCell, Len(EventSummPre)) = EventSummPre Then    ' Get event summary
                Sheets(OutputSheetName).Cells(Ocurrrow, Ocurrcol).Value = Right(CurrCell, Len(CurrCell) - Len(EventSummPre))
                Ocurrcol = Ocurrcol + 1
            End If
            If CurrCell = EventEnd Then
                EventTracker = 0 ' end processing an event
                Ocurrrow = Ocurrrow + 1
                Ocurrcol = 1
                CalCounter = CalCounter + 1
                Application.StatusBar = "Calendar items processed " & CalCounter
            End If
        End If
    End If

Next RowIndex

End Sub
Thanks to everyone who shares the Excel VBA talents on the Internet, and I hope this helps contribute to the community!
Infotect Design Solutions has over 20 years’ experience helping companies achieve their IT success. Infotect was founded to bridge the gap between an organization’s technology needs and the availability of reliable, value-based consulting services. If you would like to see if we are right for your company, or get your company’s security score, please call us at (813) 630-2400 or email us at Startfresh@infotectdesign.com.
-Blog written by Steve Williams
President & Founder of Infotect Design Solutions
Google Calendar Help
Sign in
Google Help
- Help Center
- Community
- Google Calendar
- Privacy Policy
- Terms of Service
- Submit feedback
Send feedback on…
This help content & information
General Help Center experience
- Help Center
- Community
Google Calendar