

Creating high quality PDF reports can be a challenge for an organization. A company has to create reports for budget, daily activities and project descriptions amongst many more. Creating these reports can be a time consuming process and the majority of them follow a specific template with minimal changes.
For such large-scale repetitive PDF reports that usually follow a template, it is wise to use a software library. UniPDF is one such GoLang based library that offers a diverse set of functionalities that can simplify the task of report generation.
Using the library, you can automate the redundant process of manually creating each PDF. It offers support for adding in images, tables, headers, footers and a lot more. The PDF report generation process is simplified and quickened with the help of the said tools and allows for creating beautifully designed PDF documents.
UniPDF makes it easier for you to place images in the PDF document, without having to worry about coordinates. This removes the burden from the user to calculate the right coordinates to place the image. In UniPDF, you simply input the path to the image, select its size and simply add it where you want to.
Support For Dynamic Content
The most important art of any PDF generation library is its ability to support dynamic content. Let’s say that you have to create PDF invoice or some other report, where each report has some sort of personalized information. Normally, you would have an employee manually create each PDF with personal information of each recipient.
Using UniPDF, you can do this much faster. If the recipient information is stored in a database, then you can have a script extract the data from the database and pass it to the UniPDF library.
This way, you can create hundreds of invoices or reports in a matter of seconds by simply writing a few lines of code. Similarly, you can create a GoLang script that can take data from a .csv file or any other source and create personalized PDF reports.
Generating a PDF Report Using UniPDF
UniPDF has numerous example scripts listed on the GitHub repository that you can use to get started with the library. For this article, we will be discussing the PDF report example in the unipdf-examples repository: pdf_report.go.
The example discusses the use of UniPDF’s creator package to create PDF reports. The creator package was introduced in the v.2 of UniPDF and has been briefly described in the v.2 public release. The package allows you to efficiently work with PDF documents and supports the functionality of adding text, images and other content.
Back to the example, if you’d like to run the default example and check the performance of the UniPDF library, go ahead and clone the unipdf-examples repository.
Inside the report folder: You can run the reporting example with command:
Code Breakdown
If you want to understand the code and learn how you can customize it, then read ahead. We’ll be explaining how you can include text, images and create tables in your PDF report. By the end of this guide, you should be able to create a basic PDF report using UniPDF. You can also find the full example here.
The first few lines of the code mention the packages that have to be included to run the code. The packages required to run the reporting example are:
import (
    "bytes"
    "fmt"
    "image"
    "math"
    "time"

    "github.com/wcharczuk/go-chart"

    "github.com/boombuler/barcode"
    "github.com/boombuler/barcode/qr"

    "github.com/unidoc/unipdf/v3/common"
    "github.com/unidoc/unipdf/v3/creator"
    "github.com/unidoc/unipdf/v3/model"
)
The creator and model are the main UniPDF packages and were originally released in the v.2 of UniDoc and further improved after the release of v.3.
The creator model makes it easy for you to edit the PDF documents and includes the functions needed for the manipulation of PDFs. The purpose of the creator package is to create beautifully formatted reports.
The model package builds on the core package of UniPDF and contains important functions that deals with the read and write of PDF documents.
As the names explain, the go-chart, barcode and qr packages enable the inclusion of the respective elements in the reports. The math and time packages let you perform mathematical calculations and the time measurement respectively. The fmt package is a native GoLang package that deals with I/O processes. Similarly, the remaining packages help by including some useful functionality.
How to Add Paragraphs
Let’s start with the basics. Let’s try to add some text on a new page of your PDF document. The first step would be the creation of your main() function.
Main Function
func main() {
    err := RunPdfReport("unidoc-report.pdf")
    if err != nil {
        panic(err)
    }
}
The main function simply calls the RunPdfReport(“report_name.pdf”) function. It checks that if the function fails to complete its execution then it will report an error.
RunPdfReport Function
This is where all the action takes place. This is a customized function that takes care of our requirements. It accepts an output path as an argument.
func RunPdfReport(outputPath string) error {
    robotoFontRegular, err := model.NewPdfFontFromTTFFile("./Roboto-Regular.ttf")
    if err != nil {
        return err
    }

    robotoFontPro, err := model.NewPdfFontFromTTFFile("./Roboto-Bold.ttf")
    if err != nil {
        return err
    }
The first few lines of the function open the font files of your choice, the ones listed here are available in the example repo. You can change them to any other font and you simply have to replace the name of the font file in the argument of the NewPdfFontFromTTFFile(“font_file.tff”) function.
Adding Paragraphs
To create the content, the first step is to initialize a creator object. This object has the functions to create new pages, add text, images and a whole lot more.
    c := creator.New()
    c.SetPageMargins(50, 50, 100, 70)
Creating a creator is as simple as shown above, we also define the margins of the page by using its native SetPageMargins(x,y,z,k) function.
    c.NewPage()

    ch := c.NewChapter("Feature Overview")

    chapterFont := robotoFontPro
    chapterFontColor := creator.ColorRGBFrom8bit(72, 86, 95)
    chapterRedColor := creator.ColorRGBFrom8bit(255, 0, 0)
    chapterFontSize := 18.0

    normalFont := robotoFontRegular
    normalFontColor := creator.ColorRGBFrom8bit(72, 86, 95)
    normalFontColorGreen := creator.ColorRGBFrom8bit(4, 79, 3)
    normalFontSize := 10.0

    ch.GetHeading().SetFont(chapterFont)
    ch.GetHeading().SetFontSize(chapterFontSize)
    ch.GetHeading().SetColor(chapterFontColor)

    p := c.NewParagraph("This chapter demonstrates a few of the features of UniDoc that can be used for report generation.")
    p.SetFont(normalFont)
    p.SetFontSize(normalFontSize)
    p.SetColor(normalFontColor)
    p.SetMargins(0, 0, 5, 0)
    ch.Add(p)

    // Paragraphs.
    sc := ch.NewSubchapter("Paragraphs")
    sc.GetHeading().SetMargins(0, 0, 20, 0)
    sc.GetHeading().SetFont(chapterFont)
    sc.GetHeading().SetFontSize(chapterFontSize)
    sc.GetHeading().SetColor(chapterRedColor)

    p = c.NewParagraph("Paragraphs are used to represent text, as little as a single character, a word or " +
        "multiple words forming multiple sentences. UniDoc handles automatically wrapping those across lines and pages, making " +
        "it relatively easy to work with. They can also be left, center, right aligned or justified as illustrated below:")
    p.SetFont(normalFont)
    p.SetFontSize(normalFontSize)
    p.SetColor(normalFontColorGreen)
    p.SetMargins(0, 0, 5, 0)
    p.SetLineHeight(2)
    sc.Add(p)
To start adding text, we first create a new page by using the creator. It’s worth mentioning here that you can create structured reports using UniPDF since it allows you to create hierarchical chapters and subchapters.
In the code above, we are creating a Feature Overview chapter, and defining its property such as font style, colour (RBG) and size of the heading and the paragraphs inside. These properties are assigned to the heading by using the GetHeading().SetFont() function.
The paragraphs are generated using the creator and are assigned to the chapter by ch.Add(p).
To create a subchapter, we use its parent chapter’s NewSubchapter(“name”) function. This creates a hierarchical link between the chapters and subchapters. After that, similar to the chapter, we set its font and styles.
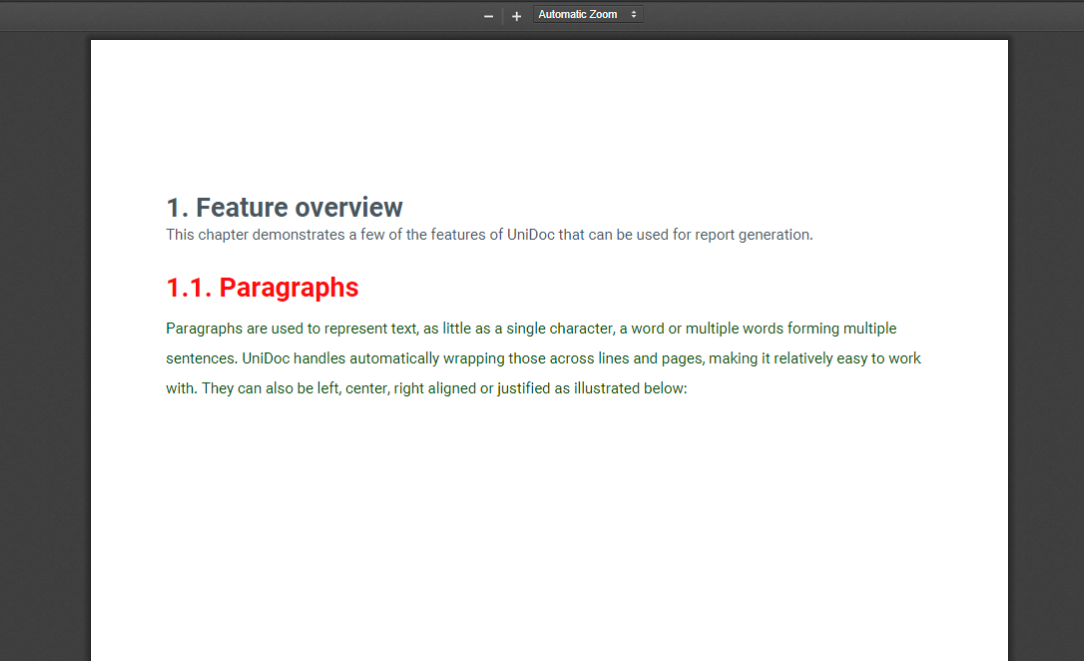
Fig 1: Creating Chapters and Adding Paragraphs
Formatted text via StyledParagraphs
A great feature of UniPDF is StyledParagraph, which allows you to change the style of different chunks of the same paragraph. Its implementation has been shown below.
    // Styled paragraphs.
    stChap := sc.NewSubchapter("Styled Paragraphs")
    sc.GetHeading().SetMargins(0, 0, 20, 0)
    sc.GetHeading().SetFont(chapterFont)
    sc.GetHeading().SetFontSize(chapterFontSize)
    sc.GetHeading().SetColor(chapterRedColor)

    stylPar := c.NewStyledParagraph()
    stylPar.SetLineHeight(3)

    boldStyle := c.NewTextStyle()
    boldStyle.Font = robotoFontPro
    boldStyle.Color = creator.ColorGreen
    chunk := stylPar.Append("This text is bolded and is in green color. We're showing how styled paragraphs work.")
    chunk.Style = boldStyle

    normStyle := c.NewTextStyle()
    normStyle.Font = robotoFontRegular
    normStyle.Color = creator.ColorBlue
    chunktwo := stylPar.Append("You can change the size, color and almost anything of the font using the StyledParagraph command. This font is in blue color and is not bold.")
    chunktwo.Style = normStyle

    hugeStyle := c.NewTextStyle()
    hugeStyle.Font = robotoFontRegular
    hugeStyle.FontSize = 25
    chunkthree := stylPar.Append("This is HUGE and black.")
    chunkthree.Style = hugeStyle

    stChap.Add(stylPar)
We’re creating a new subchapter titled Styled Paragraphs, which contains a styled paragraph, which is further decomposed to uniquely styled chunks. The first chunk has a bold font and is of colour green.
Similarly, we create two more styled chunks, one is of normal font but of the colour blue. The final chunk has the colour black and a huge font size. You can edit the code to create customized paragraphs containing different styles.
The code generates the output shown in figure 2.
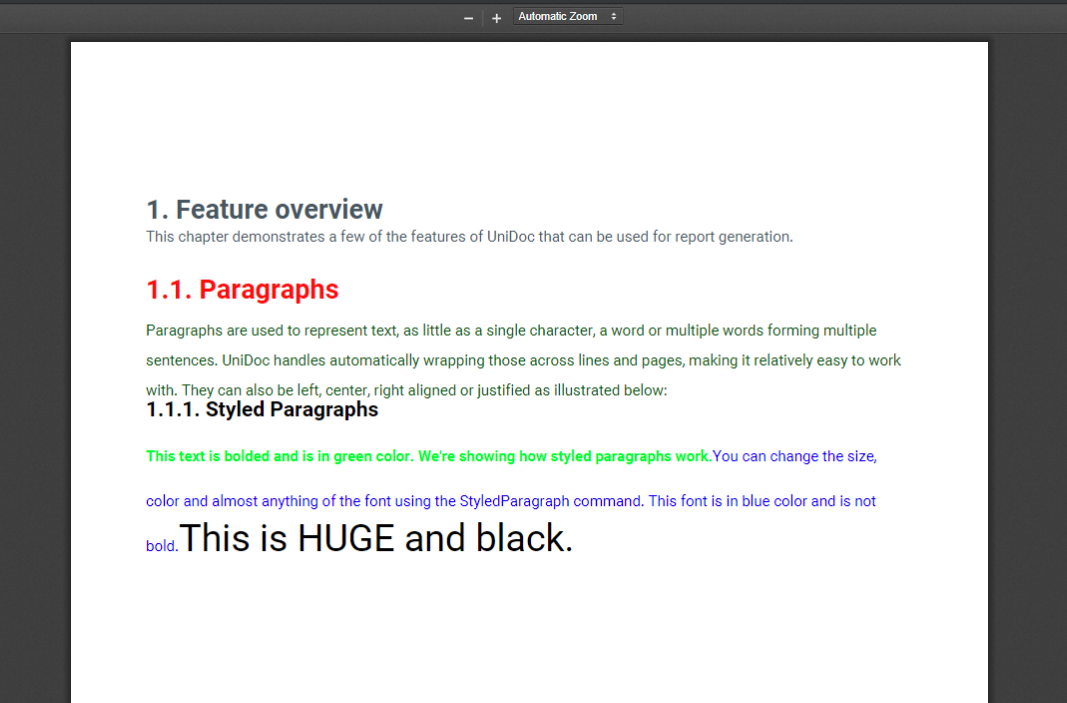
Fig 2: Adding Styled Paragraphs
Adding Tables
Now let’s move on to tables, we’re going to extend the code we used above to also generate tables in a subchapter.
    // TABLES CHAPTER.
    subChap := sc.NewSubchapter("Tables")
    subChap.GetHeading().SetMargins(0, 0, 20, 0)
    subChap.GetHeading().SetFont(chapterFont)
    subChap.GetHeading().SetFontSize(chapterFontSize)
    subChap.GetHeading().SetColor(chapterFontColor)

    ptwo := c.NewParagraph("We can also create tables using UniPDF library. Its pretty simple, read the guide to learn how we created the tables shown  below.")
    ptwo.SetFont(normalFont)
    ptwo.SetFontSize(normalFontSize)
    ptwo.SetColor(normalFontColor)
    ptwo.SetMargins(0, 0, 5, 0)
    ptwo.SetLineHeight(2)
    subChap.Add(ptwo)

    // Tables
    issuerTable := c.NewTable(2)
    issuerTable.SetMargins(0, 0, 30, 0)
    pColor := creator.ColorRGBFrom8bit(72, 86, 95)
    bgColor := creator.ColorRGBFrom8bit(56, 68, 67)
We create a subchapter, Tables and give it an opening paragraph. A table is added under this chapter.
You can initialize a table by using the creator and pass the number of columns in the arguments. In this code, we’ve set the number of columns to 2. We’ve also defined the colours of the header and contents to make it easy to distinguish between the two.
    // Creating First ROW:
    p = c.NewParagraph("Issuer")
    p.SetFont(robotoFontPro)
    p.SetFontSize(10)
    p.SetColor(creator.ColorWhite)
    cell := issuerTable.NewCell()
    cell.SetBorder(creator.CellBorderSideAll, creator.CellBorderStyleSingle, 1)
    cell.SetBackgroundColor(bgColor)
    cell.SetContent(p)

    p = c.NewParagraph("UniDoc")
    p.SetFont(robotoFontRegular)
    p.SetFontSize(10)
    p.SetColor(pColor)
    cell = issuerTable.NewCell()
    cell.SetBorder(creator.CellBorderSideAll, creator.CellBorderStyleSingle, 1)
    cell.SetContent(p)
After the table has been initialized, we move forward to create the rows and in the code shown above, we’re adding two rows. We’re setting the background colours, borders and the colour of the font of the cells. Everything is customizable and you can change it to meet your needs.
Figure 3 shows the table created using the code above, it contains more rows than the ones mentioned in the code above.
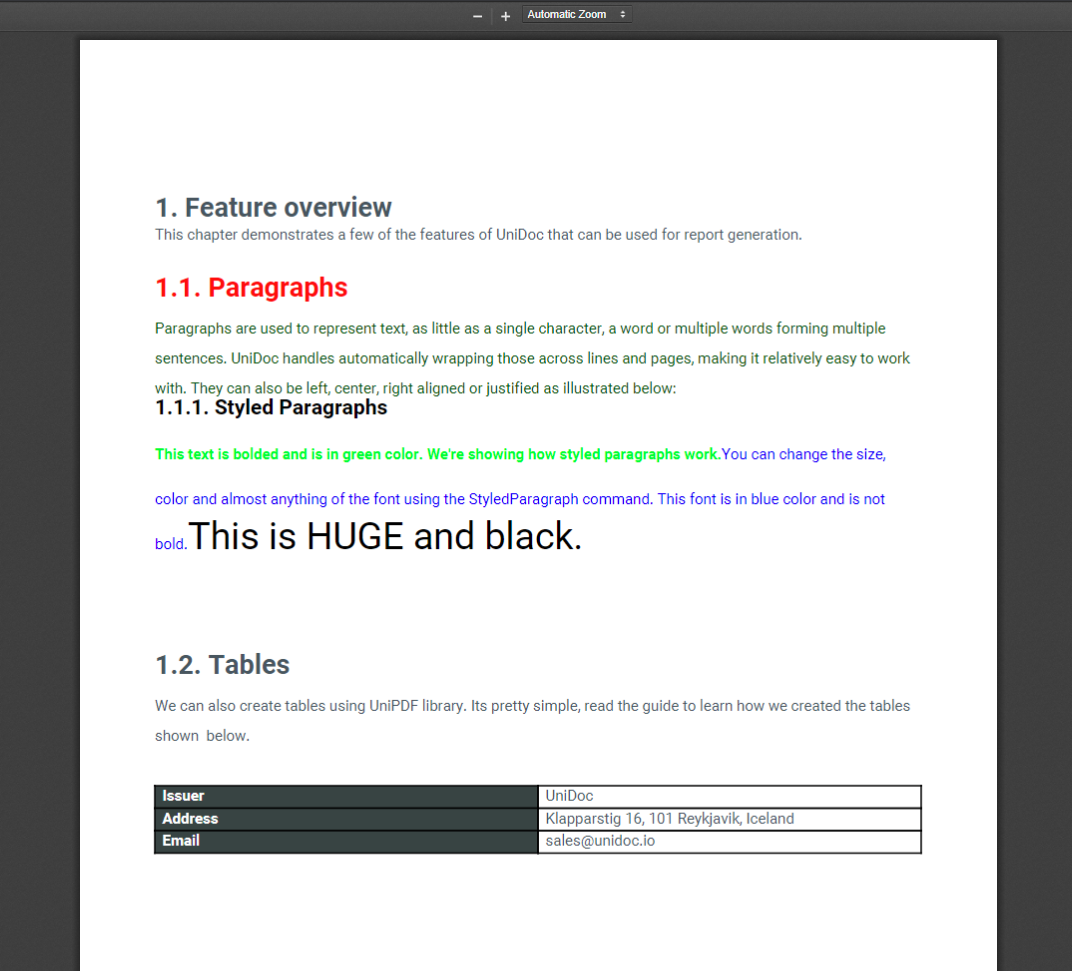
Fig 3: Creating Tables and Adding Rows
Adding Images
Images can be added in the PDF reports by using UniPDF’s creator package, which contains an inbuilt image reader. It supports all major formats of images, in this example, we are adding a PNG file.
    // Adding Images.
    subChap = ch.NewSubchapter("Images")
    subChap.GetHeading().SetMargins(0, 0, 20, 0)
    subChap.GetHeading().SetFont(chapterFont)
    subChap.GetHeading().SetFontSize(chapterFontSize)
    subChap.GetHeading().SetColor(chapterFontColor)
    ptwo = c.NewParagraph("UniPDF also provides you with the power to add images in your PDF documents. This is a very simple process and you can position images quite accurately. This enables you to create aesthetically beautiful reports. The library supports multiple image formats, here's an example with a PNG image.")
    ptwo.SetFont(normalFont)
    ptwo.SetFontSize(normalFontSize)
    ptwo.SetColor(normalFontColor)
    ptwo.SetMargins(0, 0, 5, 0)
    ptwo.SetLineHeight(2)
    subChap.Add(ptwo)

    // Show logo.
    img, err := c.NewImageFromFile("./unidoc-logo.png")
    if err != nil {
        panic(err)
    }
    img.ScaleToHeight(50)

    subChap.Add(img)
In this code, we’re creating a new subchapter for images and giving it an opening paragraph. The image is read by using the creator’s NewImageFromFile(“path_to_img”) function and added to the chapter.
The code generates the following output:
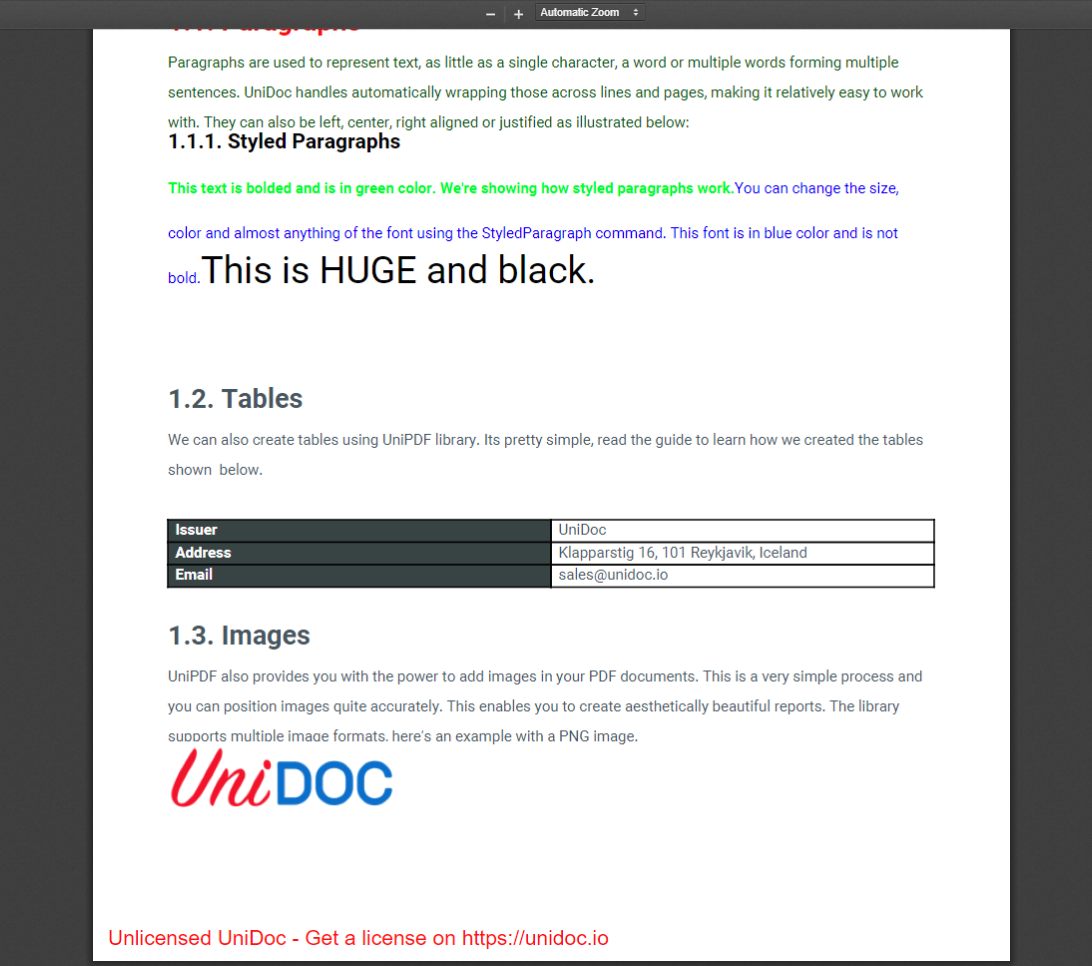
Fig 4: Adding Images
Adding Headers and Footers
To add a logo image in the header of your PDF report, we can call the creator’s DrawHeader() function.
    // Show logo.
    logoimg, err := c.NewImageFromFile("./unidoc-logo.png")
    if err != nil {
        panic(err)
    }

    c.DrawHeader(func(block *creator.Block, args creator.HeaderFunctionArgs) {
        // Draw the header on a block.
         logoimg.ScaleToHeight(25)
         logoimg.SetPos(58, 20)
         block.Draw(logoimg)
    })
The code is short and precise. You call the draw header function and in its arguments, you pass a block, which is equal the size of the page’s top margins.
We used the same logo we used earlier and set its size and position within the block before drawing it. The position we set in this context is relative to the position of the block.
The output can be viewed in the figure below
![]()
Fig 5: Adding Logo in Header
Similarly, we can create a footer by using the DrawFooter() function of the creator. The code for it is as follows:
    // Draw footer on each page.
    c.DrawFooter(func(block *creator.Block, args creator.FooterFunctionArgs) {
        // Draw the on a block for each page.
        p := c.NewParagraph("This is a footer")
        p.SetFont(robotoFontRegular)

        p.SetFontSize(8)
        p.SetPos(50, 20)
        p.SetColor(creator.ColorRGBFrom8bit(63, 68, 76))
        block.Draw(p)

        strPage := fmt.Sprintf("Page %d of %d", args.PageNum, args.TotalPages)
        p = c.NewParagraph(strPage)
        p.SetFont(robotoFontRegular)
        p.SetFontSize(8)
        p.SetPos(300, 20)
        p.SetColor(creator.ColorRGBFrom8bit(63, 68, 76))
        block.Draw(p)
    })
We’re creating a footer with a text on the left side and the page number in the center bottom. You can get the page number and the total number of pages by using the arguments passed in the function.
The positions of the paragraphs can easily be adjusted by changing the parameters of the SetPos(x,y) function.
The output of this code is as follows:

Fig 6: Adding Text in Footer
Adding Table of Contents
To add a table of contents, you simply need to define the style of the heading and the contents while initializing a new TOC() object. The code is as follows:
    // Generate the table of contents.
    c.AddTOC = true
    toc := c.TOC()
    hstyle := c.NewTextStyle()
    hstyle.Color = creator.ColorRGBFromArithmetic(0.2, 0.2, 0.2)
    hstyle.FontSize = 28
    toc.SetHeading("Table of Contents", hstyle)
    lstyle := c.NewTextStyle()
    lstyle.FontSize = 14
    toc.SetLineStyle(lstyle)

    c.draw(ch)

    err = c.WriteToFile(outputPath)
    if err != nil {
	    return err
    }
We set the boolean AddTOC to true, which tells the creator that there is going to be a table of contents for this report. After which, we initialize the inbuilt TOC() object and define the style of the heading and the lines.
UniPDF automatically creates an anchored table of content consisting of the chapters and subchapters that you create. The last few lines simply draw the main chapter and then write the whole output to the output path.
The output of the code written above is shown in figure 7.
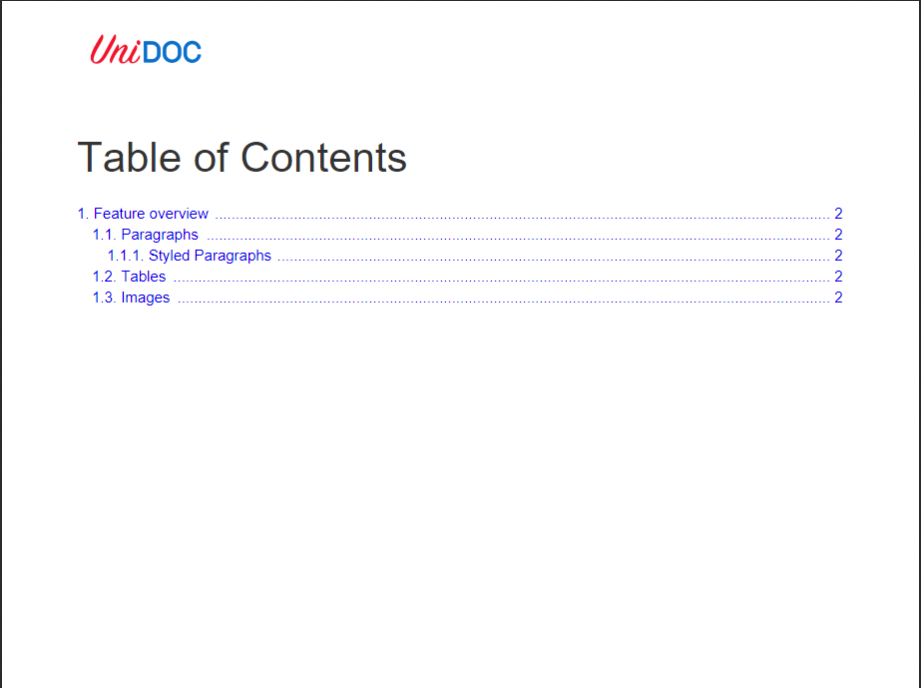
Fig 7: Creating Table of Content
Conclusion
UniPDF is a highly customizable library written in GoLang, which makes it incredibly fast. Here, we learned how to create a PDF using UniPDF, which also supports compressing, securing and extracting text and images from PDFs.
Check out the examples in the UniPDF repository. They will help you get started on using the UniPDF library. If you feel that more examples are required, open a new issue on the repo and we will try to fulfill your requirements. If you run into any other issues, open an issue on the main unipdf repository or reach out to us.
- func ConvertDoc(r io.Reader) (string, map[string]string, error)
- func ConvertDocx(r io.Reader) (string, map[string]string, error)
- func ConvertHTML(r io.Reader, readability bool) (string, map[string]string, error)
- func ConvertImage(r io.Reader) (string, map[string]string, error)
- func ConvertODT(r io.Reader) (string, map[string]string, error)
- func ConvertPDF(r io.Reader) (string, map[string]string, error)
- func ConvertPDFText(path string) (BodyResult, MetaResult, error)
- func ConvertPages(r io.Reader) (string, map[string]string, error)
- func ConvertPathReadability(path string, readability bool) ([]byte, error)
- func ConvertPptx(r io.Reader) (string, map[string]string, error)
- func ConvertRTF(r io.Reader) (string, map[string]string, error)
- func ConvertURL(input io.Reader, readability bool) (string, map[string]string, error)
- func ConvertXML(r io.Reader) (string, map[string]string, error)
- func DocxXMLToText(r io.Reader) (string, error)
- func HTMLReadability(r io.Reader) []byte
- func HTMLToText(input io.Reader) string
- func MimeTypeByExtension(filename string) string
- func SetImageLanguages(…string)
- func Tidy(r io.Reader, xmlIn bool) ([]byte, error)
- func XMLToMap(r io.Reader) (map[string]string, error)
- func XMLToText(r io.Reader, breaks []string, skip []string, strict bool) (string, error)
- type BodyResult
- type HTMLReadabilityOptions
- type LocalFile
-
- func NewLocalFile(r io.Reader) (*LocalFile, error)
-
- func (l *LocalFile) Done()
- type MetaResult
- type Response
-
- func Convert(r io.Reader, mimeType string, readability bool) (*Response, error)
- func ConvertPath(path string) (*Response, error)
This section is empty.
This section is empty.
ConvertDoc converts an MS Word .doc to text.
ConvertDocx converts an MS Word docx file to text.
ConvertHTML converts HTML into text.
ConvertImage converts images to text.
Requires gosseract (ocr build tag).
ConvertODT converts a ODT file to text
ConvertPages converts a Pages file to text.
ConvertPathReadability converts a local path to text, with the given readability
option.
ConvertPptx converts an MS PowerPoint pptx file to text.
ConvertRTF converts RTF files to text.
ConvertURL fetches the HTML page at the URL given in the io.Reader.
ConvertXML converts an XML file to text.
DocxXMLToText converts Docx XML into plain text.
HTMLReadability extracts the readable text in an HTML document
HTMLToText converts HTML to plain text.
MimeTypeByExtension returns a mimetype for the given extension, or
application/octet-stream if none can be determined.
func SetImageLanguages(...string)
SetImageLanguages sets the languages parameter passed to gosseract.
Tidy attempts to tidy up XML.
Errors & warnings are deliberately suppressed as underlying tools
throw warnings very easily.
XMLToMap converts XML to a nested string map.
XMLToText converts XML to plain text given how to treat elements.
type HTMLReadabilityOptions struct {
	LengthLow             int
	LengthHigh            int
	StopwordsLow          float64
	StopwordsHigh         float64
	MaxLinkDensity        float64
	MaxHeadingDistance    int
	ReadabilityUseClasses string
}
HTMLReadabilityOptions is a type which defines parameters that are passed to the justext package.
TODO: Improve this!
var HTMLReadabilityOptionsValues HTMLReadabilityOptions
HTMLReadabilityOptionsValues are the global settings used for HTMLReadability.
TODO: Remove this from global state.
type LocalFile struct {
	*os.File

}
LocalFile is a type which wraps an *os.File. See NewLocalFile for more details.
NewLocalFile ensures that there is a file which contains the data provided by r. If r is
actually an instance of *os.File then this file is used, otherwise a temporary file is
created and the data from r copied into it. Callers must call Done() when
the LocalFile is no longer needed to ensure all resources are cleaned up.
func (l *LocalFile) Done()
Done cleans up all resources.
type MetaResult struct {

}
Meta data
Response payload sent back to the requestor
Convert a file to plain text.
ConvertPath converts a local path to text.
Pure data is for computers and nerds like you and me. Anyone else likes nicely formatted reports. Go and a good PDF package can help.
The above video is available on the
Applied Go channel on YouTube.
This article examines the code used in the video.
Numbers have an important story to tell. They rely on you to give them a clear and convincing voice.
(Stephen Few)
In the last article we exported orders from a spreadsheet and turned them into a report that we saved as CSV data.
Now our boss requests this data as a shiny PDF report on her desk. Let’s do that, no problem! But wait, the standard library has no PDF package, right? Luckily, after a short search, we find a package called
gofpdf on GitHub.
After go getting the package, we can start coding right away.
package main

import (
	"encoding/csv"
	"log"
	"os"
	"time"

	"github.com/jung-kurt/gofpdf"
)
	pdf = header(pdf, data[0])
	pdf = table(pdf, data[1:])
	pdf = image(pdf)

	if pdf.Err() {
		log.Fatalf("Failed creating PDF report: %sn", pdf.Error())
	}
	err := savePDF(pdf)
	if err != nil {
		log.Fatalf("Cannot save PDF: %s|n", err)
	}
}
Side Note: gofpdf Error Handling
A somewhat unusual feature of gofpdf is that it does not return errors in the usual way. Instead, if one of the methods of the Fpdf object triggers any error, the Fpdf object stores this error and lets all subsequent method calls “fall through”.
The error can then be verified by calling Fpdf’s Err() method, and printed by calling its Error() method.
if pdf.Err() {
    log.Fatalf("Cannot create PDF: %sn", pdf.Error())
}
We make use of this error mechanism in main(), after all PDF processing is done.
func loadCSV(path string) [][]string {
	f, err := os.Open(path)
	if err != nil {
		log.Fatalf("Cannot open '%s': %sn", path, err.Error())
	}
	defer f.Close()
	r := csv.NewReader(f)
	rows, err := r.ReadAll()
	if err != nil {
		log.Fatalln("Cannot read CSV data:", err.Error())
	}
	return rows
}
func path() string {
	if len(os.Args) < 2 {
		return "ordersReport.csv"
	}
	return os.Args[1]
}
func newReport() *gofpdf.Fpdf {
pdf := gofpdf.New("L", "mm", "Letter", "")
pdf.SetFont("Times", "B", 28)
pdf.Cell(40, 10, "Daily Report")
	pdf.Ln(12)

	pdf.SetFont("Times", "", 20)
	pdf.Cell(40, 10, time.Now().Format("Mon Jan 2, 2006"))
	pdf.Ln(20)

	return pdf
}
How Cell() and Ln() advance the output position
As mentioned in the comments, the Cell() method takes no coordinates. Instead, the PDF document maintains the current output position internally, and advances it to the right by the length of the cell being written.
Method Ln() moves the output position back to the left border and down by the provided value. (Passing -1 uses the height of the recently written cell.)
func header(pdf *gofpdf.Fpdf, hdr []string) *gofpdf.Fpdf {
	pdf.SetFont("Times", "B", 16)
	pdf.SetFillColor(240, 240, 240)
	for _, str := range hdr {
		pdf.CellFormat(40, 7, str, "1", 0, "", true, 0, "")
	}
func table(pdf *gofpdf.Fpdf, tbl [][]string) *gofpdf.Fpdf {
	pdf.SetFont("Times", "", 16)
	pdf.SetFillColor(255, 255, 255)
	align := []string{"L", "C", "L", "R", "R", "R"}
	for _, line := range tbl {
		for i, str := range line {
			pdf.CellFormat(40, 7, str, "1", 0, align[i], false, 0, "")
		}
		pdf.Ln(-1)
	}
	return pdf
}
func image(pdf *gofpdf.Fpdf) *gofpdf.Fpdf {
	pdf.ImageOptions("stats.png", 225, 10, 25, 25, false, gofpdf.ImageOptions{ImageType: "PNG", ReadDpi: true}, 0, "")
	return pdf
}
func savePDF(pdf *gofpdf.Fpdf) error {
	return pdf.OutputFileAndClose("report.pdf")
}
How to get and run the code
Step 1: go get the code. Note the -d flag that prevents auto-installing
the binary into $GOPATH/bin.
go get -d github.com/appliedgo/pdf
Step 2: cd to the source code directory.
cd $GOPATH/src/github.com/appliedgo/pdf
Step 3. Run the binary.
go run pdf.go
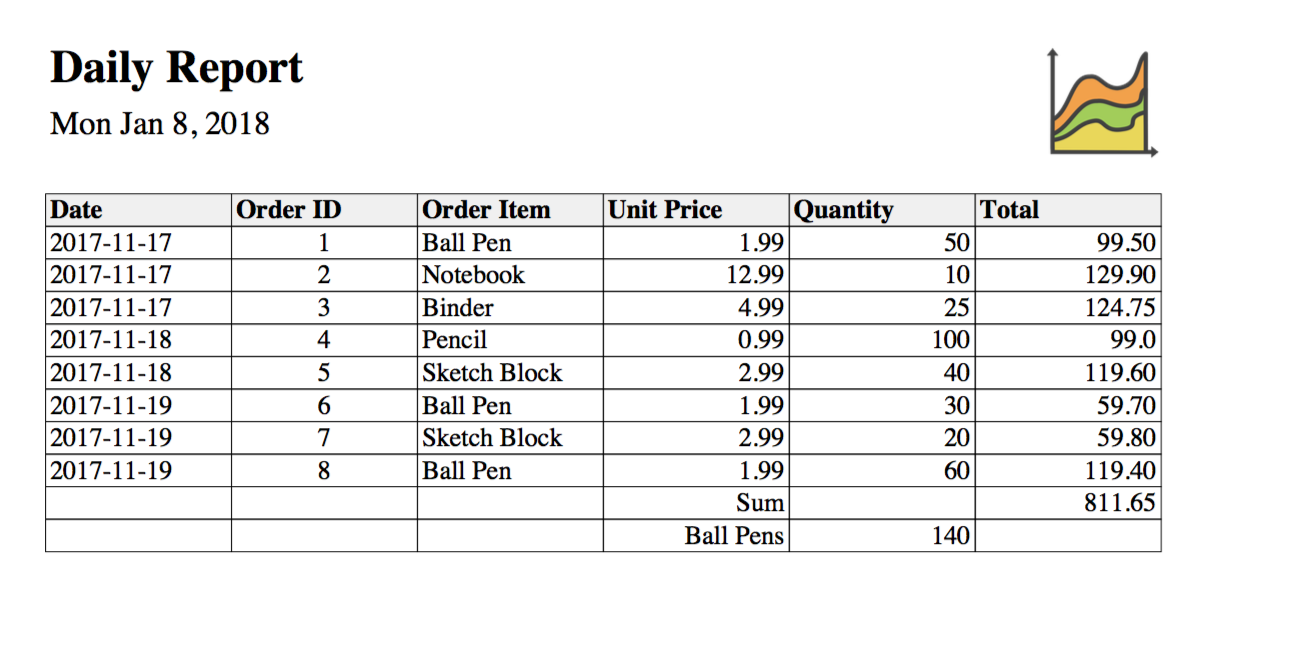
Then you should find a file named “report.pdf” in the same directory. The document should look like this:
Try pimping up the report a bit! How about:
- adjusting the column widths
- ensuring the table always spans the printable width (and then change the orientation to portrait)
- aligning the decimal points (hint: cheat a bit by using a fixed-width font)
Links
If you want to look into a real-world scenario, read [this blog post] (
https://blog.gopheracademy.com/advent-2017/building-medical-reports-in-go/) from the Gopher Academy Advent series 2017.
And
don’t go overboard with the formatting. Less is more.
Happy coding!
I am writing an api. I want to be able to download the table as pdf and excel with api. How can I convert a struct array to excel and pdf? Is there a library in Golang like datafram.to_excel , dataframe.to_csv in Python?
package main

import (
    "github.com/gocarina/gocsv"
    "github.com/gorilla/mux"
    "log"
    "net/http"
)

type Test struct {
    ID     int    `json:"ID"`
    Name   string `json:"Name"`
    Delete string `json:"Delete"`
}

func main() {

    r := mux.NewRouter().StrictSlash(true)
    r.HandleFunc("/a", func(rw http.ResponseWriter, req *http.Request) {

        tests := []*Test{
            {
                ID:     1,
                Name:   "a",
                Delete: "delete",
            },
            {
                ID:     2,
                Name:   "b",
                Delete: "delete",
            },
        }

        gocsv.Marshal(tests, rw)

    }).Methods(http.MethodGet)

    log.Fatal(http.ListenAndServe(":8000", r))
}
I found something like this to export csv file. Do you have anything you can recommend for PDF and Excel?
Golang is one of the fastest growing languages today. Its popularity has no doubt given rise to a lot of packages being built by the Go community, and we will take a look at one of these packages today.
In this article, we will be taking a look at how we can convert a text file to PDF format with Golang. Excited? So am I! Let’s get into it.
A look at the gofpdf package
The gofpdf package is a document generator with high-level support for text, drawing and images. It was created by Jung Kurt and you can find the GitHub repository here. The repository is currently archived and read-only, but the package is stable enough for our use case.
The package comes with a lot of features like page compression; clipping; barcodes; inclusion of JPEG, PNG, GIF, TIFF and basic path-only SVG images; document protection; charts, etc. The package has no other dependencies other than the Golang standard library.
Installing dependencies
We’ll install two packages, which in this case are the fmt library for printing text out to the console and the github.com/jung-kurt/gofpdf package for converting a text file to PDF format.
Create a file called main.go and paste in the following code:
package main

import (
   "fmt"

   "github.com/jung-kurt/gofpdf"
)
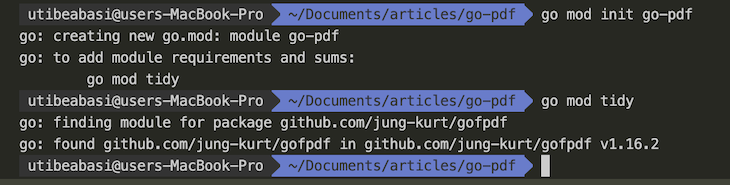
Now, in your terminal, navigate to the directory containing your main.go file and run the command go mod init go-pdf to initialize Go modules in the current directory.
Next, run go mod tidy to download all the required packages.
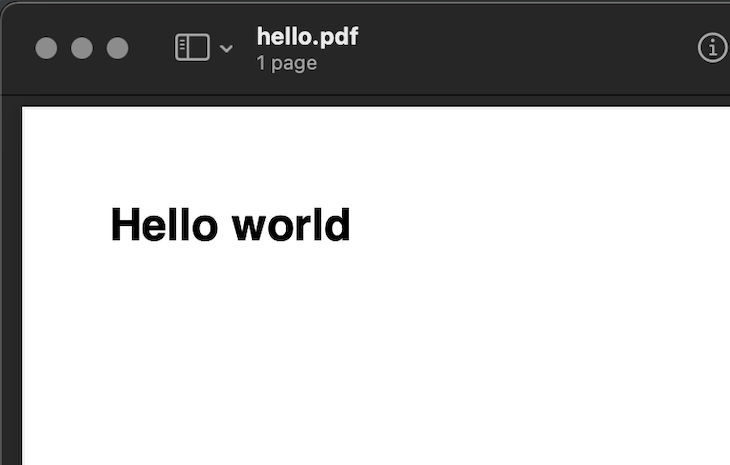
Creating our first PDF file
In order to create our first PDF, we’ll update the main.go file with the following code:
...
func main() {
   pdf := gofpdf.New("P", "mm", "A4", "")
   pdf.AddPage()
   pdf.SetFont("Arial", "B", 16)
   pdf.MoveTo(0, 10)
   pdf.Cell(1, 1, "Hello world")
   err := pdf.OutputFileAndClose("hello.pdf")
   if err == nil {
       fmt.Println("PDF generated successfully")
   }
}
Here, we create a new PDF object with gofpdf.New, set the orientation to portrait, the unit system to millimeters, the paper size to A4, and we leave the option for the font directory as a blank string. Then, we set the font to Arial with a weight of bold and set the font size to 16.
We proceed to create a cell that’s 40mm wide and 10mm high and we write the text “Hello world” in there. Then, we save it to a file called "hello.pdf" and we write out a message saying the PDF was created successfully.
After this, run the command go run main.go to run the code, and you should see a PDF file generated in your current directory.

Converting a text file to PDF
To convert a text file to a PDF, first we read the file using the io/ioutil library and write the output to a PDF file. Replace the code in your main.go file with the following:
package main

import (
   "fmt"
   "io/ioutil"

   "github.com/jung-kurt/gofpdf"
)

func main() {
   text, err := ioutil.ReadFile("lorem.txt")
   pdf := gofpdf.New("P", "mm", "A4", "")
   pdf.AddPage()
   pdf.SetFont("Arial", "B", 16)
   pdf.MoveTo(0, 10)
   pdf.Cell(1, 1, "Lorem Ipsum")
   pdf.MoveTo(0, 20)
   pdf.SetFont("Arial", "", 14)
   width, _ := pdf.GetPageSize()
   pdf.MultiCell(width, 10, string(text), "", "", false)
   err = pdf.OutputFileAndClose("hello.pdf")
   if err == nil {
       fmt.Println("PDF generated successfully")
   }
}
First, we read the text from the lorem.txt file, then we write the title of the document as we did before except we change the text to Lorem Ipsum. We move the cursor to the start of the line, then, we set the font size to 14, the font weight to normal, and we create a pdf.Multicell that spans the entire width of the page.
Here, we write the text content in the cell and save to a file called hello.pdf.
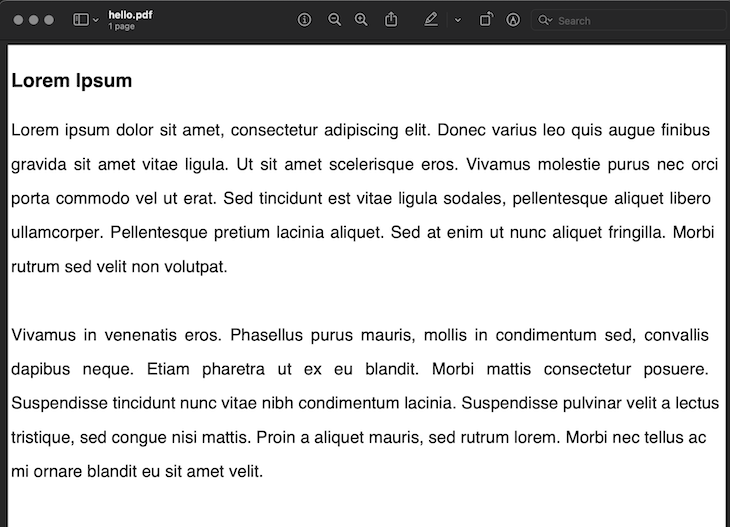
Create a file called lorem.txt and paste the following text:
Lorem ipsum dolor sit amet, consectetur adipiscing elit. Donec varius leo quis augue finibus gravida sit amet vitae ligula. Ut sit amet scelerisque eros. Vivamus molestie purus nec orci porta commodo vel ut erat. Sed tincidunt est vitae ligula sodales, pellentesque aliquet libero ullamcorper. Pellentesque pretium lacinia aliquet. Sed at enim ut nunc aliquet fringilla. Morbi rutrum sed velit non volutpat.
Vivamus in venenatis eros. Phasellus purus mauris, mollis in condimentum sed, convallis dapibus neque. Etiam pharetra ut ex eu blandit. Morbi mattis consectetur posuere. Suspendisse tincidunt nunc vitae nibh condimentum lacinia. Suspendisse pulvinar velit a lectus tristique, sed congue nisi mattis. Proin a aliquet mauris, sed rutrum lorem. Morbi nec tellus ac mi ornare blandit eu sit amet velit.
Now, save and run the command go run main.go and a hello.pdf file should be generated in the current directory.
Conclusion
In this article, we took a look at the gofpdf library and some of its features for generating documents. We also have seen how easy it is to convert a text file to PDF format using the gofpdf library.
Unipdf is a gofpdf alternative that you would like to consider if you are interested in advanced page manipulations. It allows you to create and read PDF files, compress and optimize PDF files, watermark PDF files, process PDF files, and much more.
Check out the gofpdf GitHub repository if you are interested in exploring more about the package and its features.
Cut through the noise of traditional error reporting with LogRocket

LogRocket is a digital experience analytics solution that shields you from the hundreds of false-positive errors alerts to just a few truly important items. LogRocket tells you the most impactful bugs and UX issues actually impacting users in your applications.
Then, use session replay with deep technical telemetry to see exactly what the user saw and what caused the problem, as if you were looking over their shoulder.
LogRocket automatically aggregates client side errors, JS exceptions, frontend performance metrics, and user interactions. Then LogRocket uses machine learning to tell you which problems are affecting the most users and provides the context you need to fix it.
Focus on the bugs that matter — try LogRocket today.