
Области видимости процедур VBA, объявления
Public, Private, Static, команда Option Private Module
По умолчанию все процедуры VBA (за
исключением процедур обработки событий)
определяются как открытые (Public). Это
значит, что их можно вызвать из любой
части программы — из того же модуля, из
другого модуля, из другого проекта.
Объявить процедуру как Public можно так:
Public Sub Farewell()
или, поскольку процедура определяется
как Public по умолчанию, то можно и так:
Sub Farewell()
Можно объявить процедуру локальной:
Private Sub Farewell()
В этом случае эту процедуру можно будет
вызвать только из того же модуля, в
котором она расположена. Такое решение
иногда может предотвратить ошибки,
связанные с вызовом процедур, не
предназначенных для этого, из других
модулей.
Можно ограничить область видимости
открытых процедур (тех, которые у вас
определены как Public) в каком-то модуле
рамками одного проекта. Для этого
достаточно в разделе объявлений этого
модуля вписать строку
Option Private Module
Если при объявлении процедуры использовать
ключевое слово Static, то все переменные
в этой процедуре автоматически станут
статическими и будут сохранять свои
значения и после завершения работы
процедуры (см. раздел про переменные).
Пример:
Private Static Sub Farewell()
1.8.3 Объявление процедур
Объявление процедур в VBA
Объявить процедуру можно вручную,
например, впечатав в коде строку
Private Sub Farewell ()
(редактор кода автоматически добавит
строку End Sub и разделитель), а можно — на
графическом экране, воспользовавшись
меню Insert -> Procedure. Разницы не будет
никакой.
1.8.4 Передача параметров
Передача параметров процедурам и
функциям в VBA, необязательные (optional)
параметры, передача по ссылке (ByRef) и по
значению (ByVal), применение ссылок при
передаче параметров
Параметры — значения, которые передаются
от одной процедуры другой. В принципе,
можно обойтись и без параметров,
воспользовавшись только переменными
уровня модуля, но при использовании
параметров читаемость программы
улучшается. Чтобы процедура имела
возможность принимать параметры, ее
вначале нужно объявить с параметрами.
Например, вот пример простой функции,
которая складывает два числа и выводит
результат:
Function fSum (nItem1 As Integer, nItem2 As Integer)
fSum = nItem1 + nItem2
End Function
Вызов ее может выглядеть так:
MsgBox(fSum(3, 2))
В данном случае мы объявили оба параметра
как обязательные, и поэтому попытка
вызвать функцию без передачи ей
какого-либо параметра (например, так:
MsgBox (fSum(3))) приведет к ошибке «Argument not
optional» — «Параметр не является
необязательным». Чтобы можно было
пропускать какие-то параметры, эти
параметры можно сделать необязательными.
Для этой цели
используется ключевое
слово Optional:
Function fSum (nItem1 As Integer, Optional nItem2 As Integer)
В справке по встроенным функциям VBA
необязательные параметры заключаются
в квадратные скобки.
Для проверки того, был ли передан
необязательный параметр, используется
либо функция IsMissing (если для этого
параметра был использован тип Variant),
либо его значение сравнивается со
значениями переменных по умолчанию
(ноль для числовых данных, пустая строка
для строковых и т.п.)
Вызов функции с передачей параметров
может выглядеть так:
nResult = fSum (3, 2)
Однако здесь есть несколько моментов,
которые необходимо рассмотреть.
В нашем примере мы передаем параметры
по позиции, то есть значение 3 присваивается
первому параметру (nItem1), а значение 2 —
второму (nItem2). Однако параметры можно
передавать и по имени:
nResult = fSum (nItem 1 := 3, nItem 2 := 2)
Обратите внимание, что несмотря на то,
что здесь выполняется вполне привычная
операция — присвоение значений, оператор
присвоения используется не совсем
обычный — двоеточие со знаком равенства,
как в C++. При использовании знака равенства
возникнет ошибка.
Конечно, вместо явной передачи значений
(как у нас — 3 и 2) можно использовать
переменные. Однако что произойдет с
переменными после того, как они «побывают»
в функции, если функция изменяет их
значение? Останется ли это значение за
пределами функции прежним или изменится?
Все зависит от того, как именно передаются
параметры — по ссылке (по умолчанию,
можно также использовать ключевое слово
ByRef или по значению — нужно использовать
ключевое слово ByVal).
Если параметры передаются по ссылке,
то фактически в вызываемую процедуру
передается ссылка на эту переменную в
оперативной памяти. Если эту переменную
в вызываемой процедуре изменить, то
значение изменится и в вызывающей
функции. Это — принятое в VBA поведение
по умолчанию.
Если параметры передаются по значению,
то фактически в оперативной памяти
создается копия этой переменной и
вызываемой процедуре передается эта
копия. Конечно же, чтобы вы не сделали
с этой копией, на исходную переменную
это никак не повлияет и в вызывающей
процедуре не отразится.
Продемонстрировать разницу можно на
простом примере:
Private Sub TestProc ()
‘Объявляем переменную nPar1 и присваиваем
ей значение
Dim nPar1 As Integer
nPar1 = 5
‘Передаем ее как параметр nItem1 функции
fSum
MsgBox (fSum(nItem1:=nPar1, nItem2:=2))
‘А теперь проверяем, что стало в нашей
переменной nPar1, ‘после того, как она
побывала в функции fSum:
MsgBox nPar1
End Sub
Function fSum(nItem1 As Integer, nItem2 As
Integer)
‘Используем значение переменной
fSum = nItem 1 + nItem 2
‘А затем ее меняем!
nItem 1 = 10
End Function
Проверьте, что будет, если поменять
строку объявления функции
Function fSum(nItem1 As Integer, nItem2 As Integer)
на следующую
строку :
Function fSum(byVal nItem1 As Integer, nItem2 As Integer)
Можно продемонстрировать компилятору
VBA, что то, что возвращает функция, наш
совершенно не интересует. Для этого
достаточно не заключать ее параметры
в круглые скобки. Например, в случае со
встроенной функцией MsgBox это может
выглядеть так:
MsgBox «Test»
а для нашей функции —
fSum 3, 2
Такой код будет работать совершенно
нормально. Однако, если нам потребуется
все-таки узнать, что возвращает MsgBox, то
придется передаваемые ему параметры
заключать в круглые скобки:
nTest = MsgBox(«Test»)
Для многих встроенных функций компилятор
VBA в принципе не дает возможности
игнорировать возвращаемое значение,
заставляя помещать параметры в круглые
скобки и принимать возвращаемое значение.
Соседние файлы в предмете [НЕСОРТИРОВАННОЕ]
- #
- #
- #
18.02.2016194.27 Кб44V.docx
- #
- #
- #
- #
- #
- #
- #
- #
Глобальная переменная в проекте VBA Excel. Объявление глобальной переменной в модуле проекта VBA и обращение к ней из других модулей того же проекта.
Объявление глобальной переменной
Глобальная переменная — это переменная, которая объявлена в одном из модулей проекта VBA и доступна для использования во всех остальных модулях.
Чтобы переменная стала глобальной, она должна быть объявлена в начале модуля перед первой процедурой (раздел Declarations) с помощью оператора Public. Этот способ работает во всех модулях проекта VBA Excel.
Допускается объявление глобальной переменной с помощью оператора Global, но такой способ считается устаревшим и на сайте разработчиков уже не упоминается. Объявить глобальную переменную с оператором Global можно только в стандартном модуле.
Пример объявления глобальных переменных в любом модуле проекта VBA:
|
Public myGlobVar1 ‘по умолчанию — As Variant Public myGlobVar2 As String Public myGlobVar3 As Double |

Объявление глобальных переменных
Обращение к глобальной переменной
Примеры обращения к глобальной переменной, объявленной в разных типах модулей проекта VBA Excel. Актуально для обращения из модуля любого типа данного проекта.
Переменная в стандартном модуле
Если глобальная переменная (myGlobVar) объявлена в стандартном модуле (Module1) с уникальным именем, не повторяющимся в других модулях, к ней можно обращаться из других модулей по одному имени (в примере — из модуля формы):
|
Private Sub CommandButton1_Click() myGlobVar = «Глобальная переменная» TextBox1.Text = myGlobVar End Sub |
Стандартное обращение с указанием имени модуля (Module1), в котором объявлена глобальная переменная (myGlobVar):
|
Private Sub CommandButton1_Click() Module1.myGlobVar = «Глобальная переменная» TextBox1.Text = Module1.myGlobVar End Sub |
Переменная в модуле книги
Глобальная переменная (myGlobVar), объявленная в модуле книги, доступна при обращении к ней из других модулей с помощью следующего кода VBA Excel:
|
Sub Primer1() ThisWorkbook.myGlobVar = «Глобальная переменная» MsgBox ThisWorkbook.myGlobVar End Sub |
Переменная в модуле листа
Обращение к глобальной переменной (myGlobVar), объявленной в модуле рабочего листа (Лист1), из других модулей по имени листа (в проводнике проекта находится без скобок слева от имени ярлыка):
|
Sub Primer2() Лист1.myGlobVar = «Глобальная переменная» MsgBox Лист1.myGlobVar End Sub |
По имени ярлыка (в проводнике проекта находится в полукруглых скобках справа от имени листа):
|
Sub Primer3() Worksheets(«Лист1»).myGlobVar = «Глобальная переменная» MsgBox Worksheets(«Лист1»).myGlobVar End Sub |
Переменная в модуле формы
Глобальная переменная (myGlobVar), объявленная в модуле формы (UserForm1), доступна при обращении к ней из других модулей с помощью следующего кода VBA Excel:
|
Sub Primer4() UserForm1.myGlobVar = «Глобальная переменная» MsgBox UserForm1.myGlobVar End Sub |
Переменная в личной книге макросов
Обращение к глобальной переменной (myGlobVar), объявленной в модуле ЭтаКнига проекта VBAProject (PERSONAL.XLSB) из модуля проекта VBA обычной книги Excel:
|
Sub Primer5() Workbooks(«PERSONAL.XLSB»).myGlobVar = «Глобальная переменная» MsgBox Workbooks(«PERSONAL.XLSB»).myGlobVar End Sub |
Мне не удалось получить доступ из проекта VBA текущей книги Excel к глобальной переменной, объявленной в стандартном модуле личной книги макросов.
- Sneaky Pete
- Начинающий

- Сообщения: 3
- Зарегистрирован: 24.08.2006 (Чт) 21:56

Как в Excel объявить функцию глобально?
Сосбсвенно, есть функция каторую хочется вызывать методом call
из разных листов и форм.
Я ее добавляю в ThisWorkBook General , затем вызываю из других листов — пишет ошибку — функция неопределена. sub or function not defined
- GSerg
- Шаман
- Сообщения: 14286
- Зарегистрирован: 14.12.2002 (Сб) 5:25
- Откуда: Магадан

![]() GSerg » 24.08.2006 (Чт) 22:07
GSerg » 24.08.2006 (Чт) 22:07
Собственно, метод call, являющийся наследнием не пойми чего, я никогда не понимал.
А что, в модуль поместить функцию никак нельзя совсем?
Как только вы переберёте все варианты решения и не найдёте нужного, тут же обнаружится решение, простое и очевидное для всех, кроме вас
- Sneaky Pete
- Начинающий
- Сообщения: 3
- Зарегистрирован: 24.08.2006 (Чт) 21:56
![]() Sneaky Pete » 24.08.2006 (Чт) 22:33
Sneaky Pete » 24.08.2006 (Чт) 22:33
Собсвенно как выполнить функцию я понял…
call thisworkbook.function_name
А вот как передать из нее значение, в модуль, откуда она была вызвана мне не понятно.
Проше говоря…
Есть функция, мы ее вызываем.. она отрабатывает и должна вернуть значение, например число… и вот как это значение получить после вызова ?
- Bagathur
- Обычный пользователь
- Сообщения: 88
- Зарегистрирован: 10.08.2006 (Чт) 12:36
- Откуда: Moscow
-
- ICQ

![]() Bagathur » 25.08.2006 (Пт) 0:45
Bagathur » 25.08.2006 (Пт) 0:45
Как сказал ГСерг, поместить функцию в тот же модуль.
А вообще если ты определишь переменные в модуле класса и поставишь туда функцию, а потом будешь отдельно запускать только другие модули или формы, не запустив модуль класса, то функция не будет работать.
‘Til the blood on your hans is the blood of the King!
- GSerg
- Шаман
- Сообщения: 14286
- Зарегистрирован: 14.12.2002 (Сб) 5:25
- Откуда: Магадан
![]() GSerg » 25.08.2006 (Пт) 0:47
GSerg » 25.08.2006 (Пт) 0:47
Bagathur
Очень сложно в excel не запустить модуль класса thisworkbook…
У меня ни разу не получилось…
Как только вы переберёте все варианты решения и не найдёте нужного, тут же обнаружится решение, простое и очевидное для всех, кроме вас
- Bagathur
- Обычный пользователь
- Сообщения: 88
- Зарегистрирован: 10.08.2006 (Чт) 12:36
- Откуда: Moscow
-
- ICQ
![]() Bagathur » 25.08.2006 (Пт) 1:57
Bagathur » 25.08.2006 (Пт) 1:57
Я говорю про то, что у меня было, а именно
- Код: Выделить всё
Public dirsave, projname, projpath As String
Public i, j, s, r, As IntegerPublic Sub auto_open()
projpath = ActiveWorkbook.path
projname = ActiveWorkbook.Name
dirsave = ActiveWorkbook.Sheets(1).Cells(100, 5).Value
(...)
Было там, где «невозможно пропустить», да ещё и с автораном.
При открывании книги всё было ОК, значения переменным присваивались, по модулям передавались, в формы выводились и тп
Но при выходе из выполнения кода и попытке отладки-настройки его отдельных элементов и форм значения публично объявлённых переменных скидывались и процедуры начинали ругаться.
Мб я что-то не так делал и ты подскажешь, как этого избегать кроме дублирования строк присвоения значения публичным переменным в отлаживаемой процедуре?
‘Til the blood on your hans is the blood of the King!
- KL
- Microsoft MVP
- Сообщения: 483
- Зарегистрирован: 30.10.2005 (Вс) 0:31
- Откуда: Madrid
![]() KL » 25.08.2006 (Пт) 2:46
KL » 25.08.2006 (Пт) 2:46
Привет Bagathur,
Bagathur писал(а):…поместить функцию в тот же модуль…
Думаю, что речь не о том же модуле, а о стандартном модуле, т.е. не модуле класса (в т.ч. ThisWorkbook). Достаточно поместить функцию в модуль типа Модуль1 и вызывай откуда хочешь как любую другую.
Но в принцыпе можно и то, о чем говорит Sneaky Pete, напр.:
в модуле ThisWorkbook:
- Код: Выделить всё
Function MyFunction(txt As String) As Long
    MyFunction = Len(txt)
End Function
в любом другом модуле:
- Код: Выделить всё
Sub test()
    MsgBox ThisWorkbook.MyFunction("abracadabra")
End Sub
И не нужен никакой Call
Привет,
KL
Вернуться в VBA
Кто сейчас на конференции
Сейчас этот форум просматривают: нет зарегистрированных пользователей и гости: 1
 If you’ve read other Excel tutorials covering the topics of macros and Visual Basic for Applications, you’ve probably seen the term procedure mentioned several times. If you’re only beginning to read about these topics, you’ll probably see this term in the near future.
And there are good reasons for this:
If you want to become a powerful macro and VBA user, you must understand the concept of procedures, the different types of procedures and how to work with them. In fact, procedures are so important that I’ve included them among the 16 essential terms you need to know in order to learn VBA programming.
However, the post I reference above only provides an introduction to the topic of procedures. Today I’m digging much deeper and explaining, in a lot more detail, one of the most common types of procedures: VBA Sub procedures. More particularly, in today’s VBA tutorial I cover the following topics:
Let’s start with the most basic topic:
What Is A Procedure: VBA Sub Procedures And Function Procedures
When you’re using Excel’s Visual Basic Editor, a procedure is the block of statements that is enclosed by a particular declaration statement and End declaration. The main purpose of a procedure is to carry out a particular task or action.
VBA instructions are generally within a procedure. Therefore, if you want to master Visual Basic for Applications and macros, you should get familiar with this topic.
The 2 most common types of procedures in Visual Basic for Applications are Sub procedures and Function procedures. In this VBA tutorial, I focus on VBA Sub procedures. I cover Function procedures in this separate Excel tutorial.
The main difference between VBA Sub procedures and Function procedures is the following:
- VBA Sub procedures perform an action with Excel.
In other words, when you execute a VBA Sub procedure, Excel does something. What happens in Excel depends on what the particular VBA code says.
- Function procedures carry out calculations and return a value. As explained by John Walkenbach in Excel VBA Programming for Dummies, this value can be either a single value or an array.
If you’ve worked with regular Excel functions and formulas, you already have a good basis to understand how Function procedures work. Function procedures work similarly to regular Excel functions; they carry out certain calculations behind the scenes before returning a value.
According to Walkenbach, one of the foremost Excel authorities:
Most of the macros you write in VBA are Sub procedures.
Additionally, if you use the macro recorder to create a macro, Excel always creates a VBA Sub procedure.
The above comments make it quite clear that you’ll be working quite a bit with VBA Sub procedures. Therefore, let’s start taking a more detailed look at them…
How Does A VBA Sub Procedure Look Like
The image below shows how a basic VBA Sub procedure looks like in the Visual Basic Editor. Notice how, this VBA Sub procedure:
- Begins with the declaration statement “Sub”.
- Has an End declaration statement.
- Has a block of statements that is enclosed by the declaration and End declaration statements.

The purpose of this particular VBA Sub procedure, named “Delete_Blank_Rows_3”, is to delete rows when some of the cells in those rows are blank.
Before we continue, let’s take a look at the first statement of this VBA Sub procedure. There are 3 items:
- The Sub keyword which you already know is used to declare the beginning of the VBA Sub procedure.
- The name of the VBA Sub procedure.
VBA Sub procedure names must follow certain rules, which I explain in the following section.
- Parentheses.
If you’re creating a particular VBA Sub procedure that uses arguments from other procedures, you should list them here. The arguments must be separated by a comma (,).
You can have a VBA Sub procedure without arguments (they’re optional). However, the parentheses themselves aren’t. If the relevant procedure uses no arguments, such as the example above, you must have the set of empty parentheses.
I’ve described 4 elements that are required in any VBA Sub procedure:
- Sub statement.
- Name.
- Parentheses.
- End Sub keyword.
Additionally, I’ve also described 2 elements that are optional:
- The list of arguments that may go within the parentheses.
- The valid VBA instructions that are enclosed by the declaration and End declaration statements.
However, there 3 other main optional items of a VBA Sub procedure. I introduce them below…
But first, let’s take a look at how a procedure with all the most important elements (both optional and required) is structured, as explained in Excel 2013 Power Programming with VBA:
[Private/Public] [Static] Sub name ([Argument list])
[Instructions]
[Exit Sub]
[Instructions]
End Sub
You can learn more about the different parts of the Sub statement (including some that I don’t describe above) at the Microsoft Dev Center.
Now, let’s take a look at the optional elements within the above structure. You can identify these elements because I’ve written them within square brackets ([ ]).
Element #1: [Private/Public].
Private and Public are known as access modifiers.
If you type “Private” at the beginning of a VBA Sub procedure, the only procedures that are able to access it are those stored in the same VBA module.
If, on the other hand, you use “Public”, the VBA Sub procedure has no access restrictions. Despite this, if the procedure is located in a module that uses the Option Private Statement, the VBA Sub procedure can’t be referenced outside the relevant project.
I explain the topic of procedure scope below.
Element #2: [Static].
If you type “Static” before indicating the beginning of the VBA Sub procedure, the variables of the relevant procedure are preserved when the module ends.
Element #3: [Exit Sub].
An Exit Sub statement is used to immediately exit the VBA Sub procedure in which the statement is included.
How To Name A VBA Sub Procedure
Procedures must always be named. The main rules that you must follow when naming a VBA Sub procedure are the following:
- The first character must be a letter.
- Despite the above, the other characters can be letters, numbers or certain (but not any) punctuation characters.
For example, the following characters can’t be used: #, $, %, &, @, ^, * and !.
- Periods (.) and spaces ( ) are not allowed.
- There is no distinction between upper and lowercase letters. In other words “A” is the same as “a”.
- The maximum number of characters a name can have is 255.
In Excel VBA Programming for Dummies and Excel 2013 Power Programming with VBA, Excel authority John Walkenbach suggests that your VBA Sub procedure names:
- Describe the purpose of the VBA Sub procedure or what the procedure does.
- Are not meaningless.
- Usually, combine a verb and a noun.
Walkenbach goes on to explain how certain practitioners name the VBA Sub procedures using sentences that provide a complete description. In his opinion, this method has one main advantage and one main disadvantage:
- On the one hand, using sentences to name VBA Sub procedures pretty much guarantees that the names are descriptive and unambiguous.
- On the other, typing a full sentence requires more time. This may slow you down a little bit while working.
In my opinion, as long as the VBA Sub procedure names you use are descriptive, meaningful and unambiguous, you should be fine. This is an aspect where you can and should choose a style that you find comfortable and appropriate to achieve your own goals and purposes.
How To Determine The Scope Of A VBA Sub Procedure
The word scope refers to how a VBA Sub procedure may be called.
When creating a VBA Sub procedure you have the option of determining which other procedures are able to call it. This is done through the use of the Public or Private keywords that I introduce above and which are one of the optional elements of VBA Sub procedures. However, let’s take a deeper look at what is the meaning of public or private procedures, and how can you determine whether a particular VBA Sub procedure is public or private.
Public VBA Sub Procedures
VBA Sub procedures are, by default, public. When a particular procedure is public, there are generally no access restrictions.
Since the default is that procedures are public, you actually don’t need to use the Public keyword. For example, the following VBA Sub procedure, Delete_Blank_Rows_3, is public. Note that there is no Public keyword.

However, in order to make your VBA code clearer, you may want to include the Public keyword in your VBA Sub procedures. This practice is relatively common among programmers. The following screenshot shows how the VBA code of the Delete_Blank_Rows_3 macro looks like with this keyword included.

In both of the above cases, the VBA Sub procedures are public. In other words, both are essentially the same.
Private VBA Sub Procedures
As explained by Microsoft, when you use the Private keyword, the relevant element can only be accessed from within the context in which it was declared. In the case of private VBA Sub procedures, this means that they can only be accessed or called by those procedures that are stored in the same VBA module. Any procedures within any other module are not able to call it, even if those other modules are in the same Excel workbook.
For example, continuing with the Delete_Blank_Rows_3 macro, the following screenshot shows the relevant VBA code to make the VBA Sub procedure private:

How To Make All VBA Sub Procedures In a Module Private To A VBA Project
In addition to the public and private scopes that I’ve explained above, you can make all the VBA Sub procedures within a particular module accessible only from the VBA project that contains them (but not from other VBA projects) by using a single statement: the Option Private Statement.
The syntax of the Option Private Statement is: “Option Private Module”. If you decide to use it, the statement must go before the first Sub statement of the module.
For example, the following screenshot shows how the VBA code of a module with 3 macros that delete blank rows based on whether a row has empty cells. The last of these VBA Sub procedures is the Delete_Blank_Rows_3 macro that I’ve used as an example in other parts of this VBA tutorial, and doesn’t appear fully.

All of the 3 VBA Sub procedures contained in the module above can only be referenced and accessed from the VBA project that contains them.
When To Make VBA Sub Procedures Private: An Example
One way of executing a VBA Sub procedure is by having another procedure call it. You’re quite likely to use this method of running procedures in the future. In fact, in some cases, you may have certain procedures that aren’t stand-alone and are designed to be called by another Sub procedure.
If you have such procedures within a particular Excel workbook, it is advisable to make them private. If you do this, these private VBA Sub procedures aren’t listed in the Macro dialog which is one of the most common methods to execute a Sub procedure.
Don’t worry if you don’t fully understand how this works yet. I explain how to execute VBA Sub procedures both by calling them from other procedures or by using the Macro dialog below.
How To Execute / Run / Call a VBA Sub Procedure
While working with macros, you may use the terms execute, run or call when referring to the action of executing a VBA Sub procedure. As explained by John Walkenbach in Excel VBA Programming for Dummies, they mean the same thing and “you can use whatever terminology you like”.
You can execute, run or call a VBA Sub procedure in a variety of ways. In this section, I illustrate 9 of the ways in which you can execute a Sub procedure. There is an additional (tenth) option that I don’t explain in this VBA tutorial: executing a macro from a customized context menu. The reason for this is that context menu customization is a different topic that I may cover in a separate guide. If you want to receive emails whenever I publish new posts in Power Spreadsheets, please enter your email below.
The VBA Sub procedure that I use as an illustration is the Delete_Blank_Rows_3 macro that I show you above.
This Excel VBA Sub Procedures Tutorial is accompanied by Excel workbooks containing the data and macros I use throughout this Tutorial (including Delete_Blank_Rows_3). You can get immediate free access to these example workbooks by subscribing to the Power Spreadsheets Newsletter.
Option #1: How To Execute A VBA Sub Procedure Directly From The Visual Basic Editor
According to Walkenbach, this method is the fastest way to execute a VBA Sub procedure. In this case, you’re basically running the procedure directly from the module within the Visual Basic Editor.
Despite the above, I believe you’ll probably not use this method too often. In practice, you’ll usually want to execute VBA Sub procedures while you’re in Excel, not in the VBE. Some of the other options that I describe below allow you to do this.
This particular method only works when the particular VBA Sub procedure that you want to run doesn’t rely on arguments that come from another procedure. The reason for this is that this option doesn’t allow you to pass the arguments from the other procedures to the VBA Sub procedure you’re calling.
If you want to run a VBA Sub procedure that contains arguments, John Walkenbach explains that you can only do it by calling it from another procedure. That procedure from which you make the calling needs to supply the arguments that are required by the Sub procedure you want to execute.
In any case, if you choose to use this first method, you can call a VBA Sub procedure in 3 easy steps:
Step #1: Open The Visual Basic Editor.
You can open the VBE with the keyboard shortcut “Alt + F11”. Alternatively, click on the Visual Basic icon in the Developer tab of the Ribbon.

Step #2: Open The VBA Module That Contains The VBA Sub Procedure You Want To Execute.
You want the Visual Basic Editor to show you the VBA code of the Sub procedure that you want to call.
You can do this in several ways, which I explain in The Beginner’s Guide to Excel’s Visual Basic Editor. One of the methods you can use is to double-click on the relevant VBA module.
For example, if the VBA Sub procedure is within Module1, simply double-click on “Module1” in the Project Explorer of the VBE.

As a result of the above, the Visual Basic Editor displays the relevant code in the Programming Window and places the cursor there:

Step #3: Run The VBA Sub Procedure.
You can call a VBA Sub Procedure directly from the relevant module in the Visual Basic Editor using any of the following methods:
- Click on “Run Sub/UserForm” in the Run menu.

- Use the keyboard shortcut “F5”.

Option #2: How To Execute A VBA Sub Procedure Using The Macro Dialog
This method only works if the VBA Sub procedure you want to call doesn’t contain arguments. The reason for this is the same that I explained previously: You can’t specify those arguments.
Regardless of the above, this option is one of the most commonly used methods to execute VBA Sub procedures. When using it, you can run a VBA Sub procedure in 2 simple steps. Let’s take a look at them.
Step #1: Open the Macro dialog.
You can ask Excel to open the Macro dialog box in either of the following ways:
- Use the “Alt + F8” keyboard shortcut.
- Click on “Macros” in the Developer tab of the Ribbon.


Excel displays the Macro dialog, which looks roughly as follows:

Step #2: Select The Macro You Want To Execute And Execute It.
You’ve probably notice in the screenshot above that there is only 1 macro in all open Excel workbooks (Delete_Blank_Rows_3). Therefore, this is the only macro listed and, obviously, is the macro that we’ll be executing.
You already know that this method for running macros doesn’t allow you to call VBA Sub procedures that use arguments. Therefore, any such Sub procedure wouldn’t even appear in the Macro dialog.
Additionally, the Macro dialog only shows public procedures. However, you can still execute private VBA Sub procedures from the Macro dialog. To do this, type the name of the relevant private Sub procedure in the Macro name field that appears in the image below.
Similarly, the Macro dialog doesn’t show VBA Sub procedures that are contained in Add-Ins. In that case, you can also execute the procedure by typing the name of the relevant macro in the Macro name field.
In any case, the rules to select and execute a macro are the same regardless of whether you have only 1 or several macros in the open Excel workbooks. You can do the selection and execution in either of the following ways:
- Double-click on the macro you want to execute. For example, in the image below you’d double-click on the macro Delete_Blank_Rows_3.

- Click on the macro you want to execute to select it, and click on the Run button.


Option #3: How To Execute A VBA Sub Procedure Using A Keyboard Shortcut
You can execute VBA Sub procedures by using keyboard shortcuts. To run a macro using this method, simply press the relevant key combination.
This option doesn’t work for macros that use arguments. I explain the reasons for this above.
However, you may be wondering:
How does one assign a keyboard shortcut to a macro?
There are 2 main ways of assigning a keyboard shortcut to a macro.
The first method to assign a keyboard shortcut to a macro works only if you’re using the macro recorder. If this is the case, during the recording process (which I explain in detail in an Excel macro tutorial for beginners), you’ll encounter the Record Macro dialog. This dialog allows you to determine whether the macro you’ll be recording can be called by a keyboard shortcut and which keys compose that shortcut.

The second method of assigning a keyboard shortcut to a macro is perhaps more interesting. This method allows you to assign or edit the keyboard shortcut of any macro in the following 3 quick steps.
Step #1: Open The Macro Dialog.
You can access the Macro dialog by using the “Alt + F8” keyboard shortcut or going to the Developer tab and clicking on “Macros”.

Step #2: Select The Macro You Want To Assign A Keyboard Shortcut To.
On the Macro dialog, simply select the VBA Sub procedure you want to assign a macro to and click on “Options…” on the lower right side of the dialog box. For example, in the screenshot below I’ve selected the macro Delete_Blank_Rows_3.

Step #3: Assign A Keyboard Shortcut.
When Excel displays the Macro Options dialog, assign the keyboard shortcut and click on the OK button at the bottom of the dialog box.

Keyboard shortcuts are of the form “Ctrl + Letter” or “Ctrl + Shift + Letter”.
When selecting a keyboard shortcut, be mindful about what is the combination you’re assigning to the VBA Sub procedure. The reason for this is that assigned macro keyboard shortcuts override built-in shortcuts. Therefore, if you choose a shortcut that is the same as a built-in one, you’ll be disabling the latter.
For example, “Ctrl + B” is the default built-in keyboard shortcut for bold. If you were to assign the same shortcut to a macro, you’ll not be able to use the shortcut in order to make text bold.
Using keyboard shortcuts of the form “Ctrl + Shift + Letter” reduces the risk of overriding pre-existing keyboard shortcuts. In any case, remember to be careful about what is the exact combination that you assign.
Option #4: How To Execute A VBA Sub Procedure Using A Button Or Other Object
The idea behind this method is that you can assign or attach a macro to certain “objects”. I put quotations around the word objects because, in this particular case, I’m not referring to any type of object but to certain types of objects that Excel allows you to put in a worksheet. In Excel 2013 Power Programming with VBA, John Walkenbach classifies these objects into 3 classes:
- ActiveX controls.
- Form controls.
- Inserted objects, such as shapes, text boxes, clip art, SmartArt, WordArt, charts and pictures.
In this guide I explain how you can attach a macro to a button from the Form controls or to other inserted objects.
How To Assign A Macro To A Form Control Button
Let’s look at how you can attach a macro to a Form control button in just 4 steps.
Step #1: Insert A Button.
Go to the Developer tab in the Ribbon. Click on “Insert” and choose the Button Form Control. The following screenshot shows you the location of all of these:

Step #2: Create The Button.
Once you’ve clicked on the Button Form Control, you can actually create the button in the Excel worksheet by simply clicking on section of the worksheet where you want the top left corner of the button to appear.
For example, if I want the button to appear in cell B5, I click on the top left corner of that cell.

Step #3: Assign A Macro To The Button.
Once you’ve clicked on the location where you want the button to appear, Excel displays the Assign Macro dialog.

Excel suggests a macro that is based on the button’s name. In the case below, this is “Button1_Click”.

In many cases, this suggestion isn’t going to match what you want. Therefore, select the macro that you actually want to assign to the button and click on the OK button at the bottom right corner of the Assign Macro dialog.
In the example we’ve been working with, the macro to be assigned to the button is Delete_Blank_Rows_3.

Step #4: Edit Button (Optional).
Once you’ve completed the 3 steps described above, Excel shows the button that you’ve created. Now you can execute the relevant VBA Sub procedure by simply clicking on the button.

After the button has been created, you can edit it in a few ways. The following are 4 of the main things you can change:
- Size: The button created by Excel has the default size. You can change this size by dragging any of the handles with your mouse.

For example, if I want to increase the size of the button so that it covers 4 cells (B5, B6, C5 and C6), I drag the bottom right handle as required.

If the handles are not visible, you can make Excel show them by right-clicking on the button or pressing the left mouse button at the same time as the Ctrl key.
- Location: You can modify the location of the button by dragging it with your mouse.
You can only drag the button with the left button of your mouse if the handles (as shown above) are visible. Therefore, if they’re not, right-click on the button or press the left mouse button at the same time of the the Ctrl key before attempting to drag it somewhere else.
Alternatively, you can simply drag the button using the right mouse button. For example, if you want to move the button a couple of cells down, so that it covers cells B8, B9, C8 and C9, drag the button with the right mouse until the desired point. As you drag, Excel shows a shadow in the new location, but the button continues in the original spot.

Once you let go off the right mouse button, Excel displays a contextual menu. Click on “Move Here” to move the button.

- Text: To edit the text of the button, right click on the button. Excel displays a contextual menu, where you can choose “Edit Text”.

Excel places the cursor inside the button so you can modify the text as you desire. Once you’re done, click outside the button to confirm the change.
In the case used as an example throughout this VBA tutorial, a more appropriate button label is Delete Blank Rows. Once the process is completed, the button looks as follows:
- Assigned macro: If necessary, you can change the VBA Sub procedure that has been assigned to any button by right-clicking on it and selecting “Assign Macro…”.

In that case, Excel takes you back to the Assign Macro dialog, which allows you to select which particular VBA Sub procedure is assigned to the button. You’re already familiar with this dialog box, which I explain above.


In addition to the above, you can edit several other aspects of the button by right-clicking on it and selecting “Format Control…”.

Excel displays the Format Control dialog. By using this dialog you can determine several settings of the macro button.

Some of the main settings you can modify from the Format Control dialog are the following:
- Font, including typeface, style, size, underline, color and effects.
- Text alignment and orientation.
- Internal margins.
- Size.
- Whether the button moves and/or sizes with cells.
How To Assign A Macro To Another Object
In addition to the ability to assign macros to Form Control buttons, Excel allows you to assign a macro to other objects. As I explain above, these objects include shapes, text boxes, clip art, SmartArt, WordArt, charts or pictures.
Attaching a VBA Sub procedure to these objects is very easy. Let’s see how to do it in the case of a WordArt object which says “Delete Blank Rows”.
Step #1: Open The Assign Macro Dialog.
To open the Assign Macro dialog, right-click on the object and select “Assign Macro…”

Step #2: Select Macro To Assign.
Once you’ve completed the first step above, Excel displays the Assign Macro dialog. You’re already familiar with this dialog box.
To complete the process of assigning a VBA Sub procedure to the object, simply select the macro you want to assign and click the OK button on the bottom right corner of the dialog box. In the example used throughout this VBA tutorial, the macro to be assigned is Delete_Blank_Rows_3.

Once you’ve completed the 2 steps above, you can execute the VBA Sub procedure by simply clicking on the relevant object.

Option #5: How To Execute A VBA Sub Procedure From Another Procedure
In Excel 2013 Power Programming with VBA, John Walkenbach explains that executing a VBA Sub procedure from another procedure is fairly common. The term used to refer to this way of running a procedure is procedure call and the code that is invoking the procedure is known as the calling code.
As explained by Microsoft, the calling code specifies the relevant Sub procedure and transfers control to it. Once the called procedure has ran, control returns to the calling code.
According to Walkenbach, there are several reasons why calling other procedures is advisable, including the following:
- As explained by Microsoft, this makes VBA code simpler, smaller and clearer. As a consequence, it is easier to understand, debug, maintain or modify.
More generally, maintaining several separate and small VBA Sub procedures is a good practice. Even though you can create very long procedures, I suggest you avoid this. Instead, when working with Visual Basic for Applications, follow Walkenbach’s suggestion of (i) creating several small procedures, and then (ii) create a main procedure that calls the other small procedures.
The following diagram shows how a possible structure of several VBA Sub procedures calling each other can work. The main procedure appears on the left side. This main procedure then calls each of the smaller VBA Sub procedures, all of which appear on the right side.

- It helps you avoid repetition and redundancies.
There are cases where you’ll need to create a macro that carries out the same action in several different places. You can either create a VBA Sub procedure that is called in all those places, or enter the full piece of VBA code each and every time. As you can imagine, having a VBA Sub procedure that is executed in those different places is a more appropriate option.
- If you have certain VBA Sub procedures that you use frequently, you can store them in a frequently-used module which can be easily imported into all your VBA projects. Once the module is imported, you can easily call those macros whenever you need them.
The alternative is to always be copying and pasting VBA code into your new VBA procedures. You’ll probably agree that the first option (importing a module with frequently-used VBA Sub procedures) is easier and faster to implement on your day-to-day work.

There are 3 methods you can use to call a VBA Sub procedure from another procedure. Let’s take a look at each of them.
Method #1: Use VBA Sub Procedure’s Name
Under this method, you enter the following 2 things in the VBA code of the calling Sub procedure:
- #1: The name of the procedure that is being called.
- #2: The arguments of the procedure that is being called. The arguments are separated by commas.
In other words, the syntax you must apply when using this method is simply “Procedure_Name Arguments”.
As a very simple example, let’s assume that you create a VBA Sub procedure that only calls the Delete_Blank_Rows_3 macro.
This new macro doesn’t make much sense, because you may as well simply execute the Delete_Blank_Rows_3 macro directly. However, since the structure is extremely simple, I’ll use it as an example so you can clearly see how this method works.
The new VBA Sub procedure is called “Calling_Delete_Blank_Rows”. The macro contains just 3 statements:
Sub Calling_Delete_Blank_Rows()
Delete_Blank_Rows_3
End Sub
The following screenshot shows the whole VBA code (including comments) as it appears in the Visual Basic Editor:

You can, obviously, add statements to the VBA Sub procedure used as an example in order to make it more realistic and useful.
Method #2: Use Call Statement
To apply this method you must proceed, to a certain extent, similarly as with method #1 above. In this particular case, you also enter the name and arguments of the procedure that is being called within the VBA code of the calling Sub procedure.
There are, as explained by Microsoft, 2 main differences between methods #1 and #2:
- In method #2, you use the Call statement. This keyword goes before the name of the procedure you’re calling.
- In method #2, the arguments of the VBA Sub procedure being called are enclosed in parentheses.
In other words, when using method #2, the syntax you must apply is “Call Procedure_Name (Arguments)”.
Let’s see how this looks in practice. Again, we’ll be creating a very simple VBA Sub procedure whose sole purpose if to call the Delete_Blank_Rows_3 macro. The VBA code behind this new macro, called “Delete_Blank_Rows_2”, is as follows:
Sub Calling_Delete_Blank_Rows_2()
Call Delete_Blank_Rows_3
End Sub
Within the Visual Basic Editor environment, this VBA Sub procedure looks as follows:

The question you may have is, if I can use method #1 which doesn’t require the use of any keyword to call another VBA Sub procedure, why would I use method #2 which requires the use of the Call keyword?
The main reason for using this method #2 is simple: clarity. In the words of John Walkenbach:
Even though it’s optional, some programmers always use the Call keyword just to make it perfectly clear that another procedure is being called.
Despite the above, Microsoft states that the use of the Call keyword is generally not recommended. According to the information available at the Microsoft Dev Center, the Call statement is usually used when the VBA Sub procedure you’re calling doesn’t begin with an identifier.
Method #3: Use The Application.Run Method
You can use the Application.Run method to run a VBA Sub procedure.
As explained in Excel 2013 Power Programming with VBA, this particular method is useful if you want to call a VBA Sub procedure whose name is assigned to a variable. Using the Application.Run method is the only way of running a procedure like that. The reason for this is that, when you use the Application.Run method, you’re taking the variable and passing it as an argument to the Run method.
You can see an example of this method being applied in the above-cited Excel 2013 Power Programming with VBA.
How To Call A VBA Sub Procedure From A Different Module
When you call a VBA Sub procedure from another procedure, the process followed to search for the relevant Sub procedure is as follows:
- First, the search is carried in the same module.
- If the desired VBA Sub procedure is not found in the same module, search among the accessible procedures in the other modules within the same Excel workbook takes place.
A logical consequence of the above is that, in order for a procedure to be able to call a private procedure, both procedures must be in the same module.
There may be cases where you have procedures that have the same name but are in different modules (they can’t be in the same module). If you try to call one of these VBA Sub procedures by simply stating its name, an error message (Ambiguous name detected) is displayed.
However, this doesn’t mean that you can’t ask Excel to execute the procedure that you want. More precisely:
If you want to call the VBA Sub procedure that is located in a different module, you need to clarify this by:
- Stating the name of the relevant module before the name of the procedure.
- Using a dot (.) to separate the name of the module and the name of the procedure.
The precise syntax you must use in these cases is “Module_Name.Procedure_Name”.
Now you know how to handle the cases where you need to call a VBA Sub procedure that is in a different module. However, there are times where you may want to run procedures that are not only in a different module but in an altogether different Excel workbook. Therefore, let’s take a look at…
How To Call A VBA Sub Procedure From A Different Excel Workbook
In Excel 2013 Power Programming with VBA, John Walkenbach explains that there are 2 main methods to execute a VBA Sub procedure that is stored in a different Excel workbook:
- Establish a reference to the other workbook.
- Use the Run method and specify the name of the workbook explicitly.
Let’s take a look at how you can use either of these methods:
Method #1: Establish A Reference To Another Excel Workbook.
You can establish a reference to an Excel workbook in the following 2 simple steps:
Step #1: Open The References Dialog.
Inside the Visual Basic Editor, go to the Tools menu and select “References…”.

Step #2: Select The Excel Workbook To Add As Reference.
Once you’ve completed step #1 above, Excel displays the References dialog.
This dialog box lists all the possible references you can use and establish. All the Excel workbooks that are currently open are listed there. Notice, for example, all the Excel workbooks that appear in the screenshot below.
In this particular case, Excel workbooks are not listed using their regular file name. Instead, they appear under their VBE project names. Since “VBAProject” is the default name for every project, the situation below (where “VBAProject” appears several times) isn’t uncommon.
In order to help you identify which particular VBA project you want to add as reference, you can use the location data that appears at the bottom of the dialog box. Alternatively, you can go back to the Visual Basic Editor and change the relevant project’s name.

In order to add an Excel workbook that is currently open as reference, double-click on it or select it (by checking the box to its left) and click the OK button.

Even though the References dialog only lists Excel workbooks that are currently open, you can also create references to workbooks that aren’t currently open. To do this, you need to first click on the Browse button on the right side of the References dialog.

The Add Reference dialog is displayed. This dialog looks pretty much like any other browsing dialog box you’ve used before. Use the Add Reference dialog to browse to the folder where the relevant Excel workbook is saved, select the workbook and click on “Open”.
In the example below, I’m adding one of the sample Excel workbooks for this post.

Once you’ve completed the step above, the relevant Excel workbook is added to the bottom of the list of Available References in the References dialog. You can then select it and click the OK button to add it as a reference.

Done! Once you’ve carried out the 2 steps above, the new references that you’ve added are listed in the Project Window of the Visual Basic Editor under the References node.

You can now start calling procedures that are in the reference Excel workbook as if they were in the same workbook of the VBA Sub procedure that is calling them. You can do this, for example, by using the Sub Procedure’s name or the Call keyword.
In Excel 2013 Power Programming with VBA, John Walkenbach suggests that, in order to clearly identify a procedure that is within a different Excel workbook, you use the following syntax:
Project_Name.Module_Name.Procedure_Name
In other words, he suggests that you first specify the name of the project, followed by the name of the module and the name of the actual VBA Sub procedure.
You’ll notice that whenever you open an Excel workbook that references another workbook, the latter is opened automatically. Additionally, you won’t be able to close the referenced Excel workbook without closing the one that you originally opened. If you try to do this, Excel warns you that the workbook is currently referenced by another workbook and cannot be closed.

Method #2: Use The Application.Run Method.
You can use the Application.Run method to execute a VBA Sub procedure.
If you choose to apply this method, you don’t need to create any reference (as explained above). However, the Excel workbook that contains the VBA Sub procedure that you want to execute must be open.
You can see an example of this method being applied in the above-cited Excel 2013 Power Programming with VBA.
Option #6: How To Execute A VBA Sub Procedure Using The Ribbon
You can customize the Ribbon in order to add a new button which is assigned to a particular VBA Sub procedure. Then, you can execute the relevant macro by simply clicking on its button.
I cover the topic of Ribbon customization (with code) in this Excel tutorial. In this particular post, I show you (in a slightly simplified manner) one of the ways in which you can add a button that allows you to execute a VBA Sub procedure from the Ribbon. As with the other sections throughout this VBA tutorial, I use the Delete_Blank_Rows_3 macro as an example.
As explained by Excel experts Bill Jelen and Tracy Syrstad in Excel 2013 VBA and Macros, this method of executing a VBA Sub procedure is most appropriate for macros that are in the personal macro workbook.
The personal macro workbook is a special workbook where you can store macros that later you can apply to any Excel workbook. In other words, the macros saved in the personal macro workbook are available when you use Excel in the same computer, regardless of whether you’re working on a different Excel workbook from the one you were when you created the macro.
Let’s check out these 5 easy steps to add a new button to the Ribbon.
Step #1: Access The Excel Options Dialog.
Right-click anywhere on the Ribbon to have Excel display a context menu. On the context menu, select “Customize the Ribbon…”.

Step #2: Choose To Work With Macros.
At the top left corner of the Customize Ribbon tab in the Excel Options dialog, you’ll see the Choose commands from drop-down menu.

This drop-down menu allows you to choose from several sub-sets of commands to browse when adding commands to the Ribbon. Click on it and select “Macros”.

Once you’ve done this, Excel displays all the Macros that you can currently add to the Ribbon on the Choose commands from list. This is the list that appears just below the Choose commands from drop-down menu, as shown in the image below.

Step #3: Select The Tab And Group Of Commands To Which You Want To Add The Macro.
The Customize the Ribbon list is located on the right side of the Excel Options dialog. Here is where you find all the commands that are currently in the Ribbon. These commands are organized by tabs and groups of commands.
For example, the screenshot below shows how, within the Developer tab, there are 5 group of commands: Code, Add-Ins, Controls, XML and Modify.

In the Customize the Ribbon list is where you’ll be able to choose the location of the button that you’re about to add to the Ribbon. You can expand and contract any tab or group of commands by clicking on the “+” and “-” signs that appear on the left side of the list.

You can also add new tabs or new command groups (and rename them) using the buttons that appear below the Customize the Ribbon list.

Therefore, you can either select a pre-existing command group or create a new one for purposes of adding a macro to the Ribbon. Below I show you how you can add a new tab and group of commands to the Ribbon.
In this example, and for purposes of organization, I add a new tab just after the Developer tab by clicking on “Developer” and the New Tab button.

I rename the tab by selecting the newly added tab and clicking on the Rename button.

Excel displays the Rename dialog. I enter the new display name (Macro Collection) and click the OK button.

I repeat the process with the command group. First, I select “New Group (Custom)” and click on the Rename button.

Excel displays a slightly different Rename dialog, which provides you the opportunity to choose a symbol that represents the new group of commands. I choose an icon, enter the new display name for the command group (Delete Blank Rows) and click the OK button.

Once everything is in order, I select the group of commands to which I want to add the macro. In this example, that command group is the newly created Delete Blank Rows group.

Step #4: Add VBA Sub Procedure To The Ribbon.
To add a macro to the Ribbon, simply select the relevant item in the Choose commands from list and click the Add button that appears in the middle of the Excel Options dialog.
The following screenshot shows how this works for the Delete_Blank_Rows_3 macro:

Step #5: Finish The Process.
Click on the OK button at the lower right corner of the Excel Options dialog to finish the process.

Excel closes the Excel Options dialog and implements the changes you’ve made. Notice how, in the case of the example, Excel has added a new tab (Macro Collection), group of commands (Delete Blank Rows) and button (Delete_Blank_Rows_3) to the Ribbon.

Once you’ve completed the process described above for any VBA Sub procedure, you’ll be able to execute it by simply clicking on the relevant button in the Ribbon. This icon is enabled even if the Excel workbook that is holding the macro is closed. If this is the case, Excel opens the relevant Excel workbook that contains the macro before actually running it.
Option #7: How To Execute A VBA Sub Procedure Using The Quick Access Toolbar
The Quick Access Toolbar is the small toolbar located on the upper left corner of Excel.

Just as with the Ribbon, you can customize the Quick Access Toolbar in order to add a button that is assigned to a VBA Sub procedure. Afterwards, you can execute the macro by clicking that button.
Also, just as with the method of executing VBA Sub procedures using the Ribbon, this method is most appropriate when the macro you want to add to the Quick Access Toolbar is stored in the personal macro workbook. However, as explained in Excel 2013 VBA and Macros, if the VBA Sub procedure you want to add to the Quick Access Toolbar is stored in the Excel workbook you’re currently working on, you can indicate that Excel should only show the button when that particular workbook is open.
I’ll cover how to customize the Quick Access Toolbar more in detail in future tutorials. For the moment, let’s take a look at how you can add a macro button to the Quick Access Toolbar in 5 easy steps.
Step #1: Access The Excel Options Dialog.
You already know one of the ways you can access the options dialog. I will be covering additional methods of doing this in future Excel tutorials.
However, for this particular case, the fastest way to access the Quick Access Toolbar tab (which is the one we need) of the Excel Options dialog is the following:
Right-click on the Quick Access Toolbar and select “Customize Quick Access Toolbar…”.

Once you’ve completed this step, Excel opens the Options dialog.
Step #2: Choose For Which Excel Workbooks The Customized Quick Access Toolbar Applies.
At the top right corner of the Excel Options dialog, you can see the Customize Quick Access Toolbar drop-down menu. This is the section that allows you to determine to which workbooks does the customized Quick Access Toolbar with the macro button applies.

Click on the Customize Quick Access drop-down menu and select your preferred option.
- If you want the macro button to appear in all Excel workbooks, select “For all documents (default)”. As implied by the description, this is the default setting.
- If the macro button should only appear in a particular Excel workbook, select that particular workbook.
The screenshot below shows the rough look of the options above when the Customize Quick Access Toolbar drop-down menu is expanded. In this particular case, the only Excel workbook that is open is called “Book 1”:

For this example, I simply leave the default option. Therefore, the customization applies to all Excel workbooks.

Step #3: Choose To Work With Macros.
At the top left corner of the Quick Access Toolbar tab in the Excel Options dialog you can find the Choose commands from drop-down menu.

Click on this drop-down menu and select “Macros”.

Step #4: Add Macro To Quick Access Toolbar.
After you’ve completed step #3 above, the Excel Options dialog displays a list of macros that you can add to the Quick Access Toolbar. You can find these macros in the Choose commands from list box which appears on the left side of the Quick Access Toolbar tab of the dialog box.

Choose the macro you want to add from the Choose commands from list box and click on the Add button that appears in the middle of the Excel Options dialog. The following screenshot shows how to add the Delete_Blank_Rows_3 macro:

Step #5: Click The OK Button.
Once you’ve completed the 4 steps above, Excel adds the relevant macro button to the Quick Access Toolbar. Notice how it appears in the Customize Quick Access Toolbar list on the right side of the Excel Options dialog:

To complete the process and implement the changes, simply press the OK button on the lower right corner of the Excel Options dialog.

Once you’re back in Excel, notice how the relevant macro button has been added to the Quick Access Toolbar.

Now you can execute the relevant VBA Sub procedure by simply clicking on the button that you’ve just added to the Quick Access Toolbar.
Option #8: How To Execute A VBA Sub Procedure When A Particular Event Occurs
Excel allows you to determine that a particular VBA Sub procedure is to be executed whenever a certain event occurs. I cover this particular topic in more detail here.
In Excel 2013 Power Programming with VBA, John Walkenbach provides several examples of events, such as the following:
- Opening an Excel workbook.
- Entering data in a worksheet.
- Saving a file.
- Clicking a CommandButton ActiveX control.
The name for VBA Sub procedures that are executed when a particular event occurs is “event handler procedure”. These procedures have 2 main characteristics that distinguish them from other types of VBA Sub procedures:
- Their names have a different structures than usual. More particularly, their name syntax is “object_EventName”. In other words, these names are composed of 3 elements:
Element #1: An object.
Element #2: An underscore.
Element #3: The name of the relevant event.
- The VBA module in which they’re stored is the module for the relevant object.
Event handler procedures are different topic that requires its own VBA tutorial. If you’re interested in learning more about this topic, please refer to Chapter 17 of the above cited Excel 2013 Power Programming with VBA.
Option #9: How To Execute A VBA Sub Procedure From The Immediate Window Of The Visual Basic Editor
Executing a VBA Sub procedure from the Immediate Window of the VBE is useful, in particular, if you’re in the middle of the developing a particular procedure within the Visual Basic Editor environment.
When displayed, the Immediate Window usually appears at the bottom of the Visual Basic Editor.

You can check out my introduction to the Immediate Window by checking my post about the Visual Basic Editor. You can find this, along with all other VBA tutorials within Power Spreadsheets, in the Archives.
In order to execute a VBA Sub procedure using the Immediate Window, simply type the name of the relevant procedure in the Immediate Window and press the Enter key.

Conclusion
The concept of procedures is frequently used in the books and blogs that cover the topic of macros and Visual Basic for Applications. If you don’t understand what Excel authorities are talking about when using this term, you’ll have a very hard time learning VBA.
Perhaps most importantly, once you reach a certain expertise level with Excel you must work with VBA Sub procedures.
Therefore, if your purpose is becoming a powerful Excel user, understanding VBA Sub procedures and mastering how to work with them is not optional. However, after reading this VBA tutorial you have a good understanding of the concept itself. Additionally, you probably also have a basic understanding of how to work with Sub procedures in practice, including the following topics:
- What is the syntax you should use when creating VBA Sub procedures.
- What rules and suggestions to bear in mind when naming a VBA Sub procedure.
- What are the different scopes that a VBA Sub procedure can have, and how you can (and whether should) limit that scope.
- What are some of the most common ways to execute a VBA Sub procedure.
Books Referenced In This Excel Tutorial
- Jelen, Bill and Syrstad, Tracy (2013). Excel 2013 VBA and Macros. United States of America: Pearson Education, Inc.
- Walkenbach, John (2013). Excel VBA Programming for Dummies. Hoboken, NJ: John Wiley & Sons Inc.
- Walkenbach, John (2013). Excel 2013 Power Programming with VBA. Hoboken, NJ: John Wiley & Sons Inc.
Время на прочтение
7 мин
Количество просмотров 312K
Приветствую всех.
В этом посте я расскажу, что такое VBA и как с ним работать в Microsoft Excel 2007/2010 (для более старых версий изменяется лишь интерфейс — код, скорее всего, будет таким же) для автоматизации различной рутины.

VBA (Visual Basic for Applications) — это упрощенная версия Visual Basic, встроенная в множество продуктов линейки Microsoft Office. Она позволяет писать программы прямо в файле конкретного документа. Вам не требуется устанавливать различные IDE — всё, включая отладчик, уже есть в Excel.
Еще при помощи Visual Studio Tools for Office можно писать макросы на C# и также встраивать их. Спасибо, FireStorm.
Сразу скажу — писать на других языках (C++/Delphi/PHP) также возможно, но требуется научится читать, изменять и писать файлы офиса — встраивать в документы не получится. А интерфейсы Microsoft работают через COM. Чтобы вы поняли весь ужас, вот Hello World с использованием COM.
Поэтому, увы, будем учить Visual Basic.
Чуть-чуть подготовки и постановка задачи
Итак, поехали. Открываем Excel.
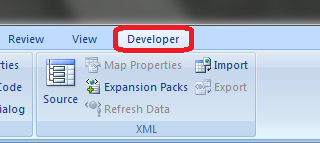
Для начала давайте добавим в Ribbon панель «Разработчик». В ней находятся кнопки, текстовые поля и пр. элементы для конструирования форм.

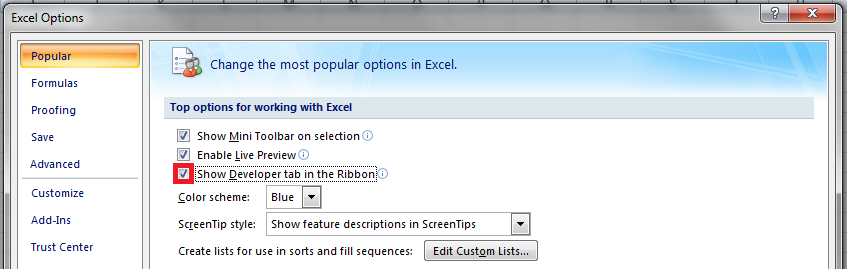
Появилась вкладка.
Теперь давайте подумаем, на каком примере мы будем изучать VBA. Недавно мне потребовалось красиво оформить прайс-лист, выглядевший, как таблица. Идём в гугл, набираем «прайс-лист» и качаем любой, который оформлен примерно так (не сочтите за рекламу, пожалуйста):

То есть требуется, чтобы было как минимум две группы, по которым можно объединить товары (в нашем случае это будут Тип и Производитель — в таком порядке). Для того, чтобы предложенный мною алгоритм работал корректно, отсортируйте товары так, чтобы товары из одной группы стояли подряд (сначала по Типу, потом по Производителю).
Результат, которого хотим добиться, выглядит примерно так:

Разумеется, если смотреть прайс только на компьютере, то можно добавить фильтры и будет гораздо удобнее искать нужный товар. Однако мы хотим научится кодить и задача вполне подходящая, не так ли?
Кодим
Для начала требуется создать кнопку, при нажатии на которую будет вызываться наша програма. Кнопки находятся в панели «Разработчик» и появляются по кнопке «Вставить». Вам нужен компонент формы «Кнопка». Нажали, поставили на любое место в листе. Далее, если не появилось окно назначения макроса, надо нажать правой кнопкой и выбрать пункт «Назначить макрос». Назовём его FormatPrice. Важно, чтобы перед именем макроса ничего не было — иначе он создастся в отдельном модуле, а не в пространстве имен книги. В этому случае вам будет недоступно быстрое обращение к выделенному листу. Нажимаем кнопку «Новый».


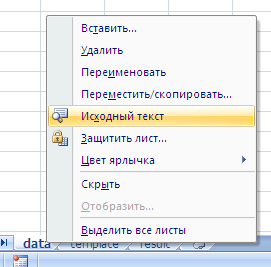
И вот мы в среде разработки VB. Также её можно вызвать из контекстного меню командой «Исходный текст»/«View code».

Перед вами окно с заглушкой процедуры. Можете его развернуть. Код должен выглядеть примерно так:
Sub FormatPrice()End Sub
Напишем Hello World:
Sub FormatPrice()

    MsgBox "Hello World!"

End Sub
И запустим либо щелкнув по кнопке (предварительно сняв с неё выделение), либо клавишей F5 прямо из редактора.
Тут, пожалуй, следует отвлечься на небольшой ликбез по поводу синтаксиса VB. Кто его знает — может смело пропустить этот раздел до конца. Основное отличие Visual Basic от Pascal/C/Java в том, что команды разделяются не ;, а переносом строки или двоеточием (:), если очень хочется написать несколько команд в одну строку. Чтобы понять основные правила синтаксиса, приведу абстрактный код.
Примеры синтаксиса
' Процедура. Ничего не возвращает

' Перегрузка в VBA отсутствует

Sub foo(a As String, b As String)

    ' Exit Sub ' Это значит "выйти из процедуры"

    MsgBox a + ";" + b

End Sub' Функция. Вовращает Integer

Function LengthSqr(x As Integer, y As Integer) As Integer

    ' Exit Function

    LengthSqr = x * x + y * y

End FunctionSub FormatPrice()

    Dim s1 As String, s2 As String

    s1 = "str1"

    s2 = "str2"

    If s1 <> s2 Then

        foo "123", "456" ' Скобки при вызове процедур запрещены

    End IfDim res As sTRING ' Регистр в VB не важен. Впрочем, редактор Вас поправит

    Dim i As Integer

    ' Цикл всегда состоит из нескольких строк

    For i = 1 To 10

        res = res + CStr(i) ' Конвертация чего угодно в String

        If i = 5 Then Exit For

    Next iDim x As Double

    x = Val("1.234") ' Парсинг чисел

    x = x + 10

    MsgBox xOn Error Resume Next ' Обработка ошибок - игнорировать все ошибки

    x = 5 / 0

    MsgBox xOn Error GoTo Err ' При ошибке перейти к метке Err

    x = 5 / 0

    MsgBox "OK!"

    GoTo ne
Err:
MsgBox
"Err!"
ne:
On Error GoTo 0 ' Отключаем обработку ошибок
' Циклы бывает, какие захотите
Do While True
Exit DoLoop 'While True
Do 'Until False
Exit Do
Loop Until False
' А вот при вызове функций, от которых хотим получить значение, скобки нужны.
' Val также умеет возвращать Integer
Select Case LengthSqr(Len("abc"), Val("4"))
Case 24
MsgBox "0"
Case 25
MsgBox "1"
Case 26
MsgBox "2"
End Select' Двухмерный массив.
' Можно также менять размеры командой ReDim (Preserve) - см. google
Dim arr(1 to 10, 5 to 6) As Integer
arr(1, 6) = 8Dim coll As New Collection
Dim coll2 As Collection
coll.Add "item", "key"
Set coll2 = coll ' Все присваивания объектов должны производится командой Set
MsgBox coll2("key")
Set coll2 = New Collection
MsgBox coll2.Count
End Sub
Грабли-1. При копировании кода из IDE (в английском Excel) есь текст конвертируется в 1252 Latin-1. Поэтому, если хотите сохранить русские комментарии — надо сохранить крокозябры как Latin-1, а потом открыть в 1251.
Грабли-2. Т.к. VB позволяет использовать необъявленные переменные, я всегда в начале кода (перед всеми процедурами) ставлю строчку Option Explicit. Эта директива запрещает интерпретатору заводить переменные самостоятельно.
Грабли-3. Глобальные переменные можно объявлять только до первой функции/процедуры. Локальные — в любом месте процедуры/функции.
Еще немного дополнительных функций, которые могут пригодится: InPos, Mid, Trim, LBound, UBound. Также ответы на все вопросы по поводу работы функций/их параметров можно получить в MSDN.
Надеюсь, что этого Вам хватит, чтобы не пугаться кода и самостоятельно написать какое-нибудь домашнее задание по информатике. По ходу поста я буду ненавязчиво знакомить Вас с новыми конструкциями.
Кодим много и под Excel
В этой части мы уже начнём кодить нечто, что умеет работать с нашими листами в Excel. Для начала создадим отдельный лист с именем result (лист с данными назовём data). Теперь, наверное, нужно этот лист очистить от того, что на нём есть. Также мы «выделим» лист с данными, чтобы каждый раз не писать длинное обращение к массиву с листами.
Sub FormatPrice()

    Sheets("result").Cells.Clear

    Sheets("data").Activate

End Sub
Работа с диапазонами ячеек
Вся работа в Excel VBA производится с диапазонами ячеек. Они создаются функцией Range и возвращают объект типа Range. У него есть всё необходимое для работы с данными и/или оформлением. Кстати сказать, свойство Cells листа — это тоже Range.
Примеры работы с Range
Sheets("result").Activate

Dim r As Range

Set r = Range("A1")

r.Value = "123"

Set r = Range("A3,A5")

r.Font.Color = vbRed

r.Value = "456"

Set r = Range("A6:A7")

r.Value = "=A1+A3"
Теперь давайте поймем алгоритм работы нашего кода. Итак, у каждой строчки листа data, начиная со второй, есть некоторые данные, которые нас не интересуют (ID, название и цена) и есть две вложенные группы, к которым она принадлежит (тип и производитель). Более того, эти строки отсортированы. Пока мы забудем про пропуски перед началом новой группы — так будет проще. Я предлагаю такой алгоритм:
- Считали группы из очередной строки.
- Пробегаемся по всем группам в порядке приоритета (вначале более крупные)
- Если текущая группа не совпадает, вызываем процедуру AddGroup(i, name), где i — номер группы (от номера текущей до максимума), name — её имя. Несколько вызовов необходимы, чтобы создать не только наш заголовок, но и всё более мелкие.
- После отрисовки всех необходимых заголовков делаем еще одну строку и заполняем её данными.
Для упрощения работы рекомендую определить следующие функции-сокращения:
Function GetCol(Col As Integer) As String

    GetCol = Chr(Asc("A") + Col)

End FunctionFunction GetCellS(Sheet As String, Col As Integer, Row As Integer) As Range

    Set GetCellS = Sheets(Sheet).Range(GetCol(Col) + CStr(Row))

End FunctionFunction GetCell(Col As Integer, Row As Integer) As Range

    Set GetCell = Range(GetCol(Col) + CStr(Row))

End Function
Далее определим глобальную переменную «текущая строчка»: Dim CurRow As Integer. В начале процедуры её следует сделать равной единице. Еще нам потребуется переменная-«текущая строка в data», массив с именами групп текущей предыдущей строк. Потом можно написать цикл «пока первая ячейка в строке непуста».
Глобальные переменные
Option Explicit ' про эту строчку я уже рассказывал

Dim CurRow As Integer

Const GroupsCount As Integer = 2

Const DataCount As Integer = 3
FormatPrice
Sub FormatPrice()

    Dim I As Integer ' строка в data

    CurRow = 1

    Dim Groups(1 To GroupsCount) As String

    Dim PrGroups(1 To GroupsCount) As String
Sheets(
"data").Activate
I = 2
Do While True
If GetCell(0, I).Value = "" Then Exit Do
' ...
I = I + 1
Loop
End Sub
Теперь надо заполнить массив Groups:
На месте многоточия
Dim I2 As Integer

For I2 = 1 To GroupsCount

    Groups(I2) = GetCell(I2, I)

Next I2

' ...

For I2 = 1 To GroupsCount ' VB не умеет копировать массивы

    PrGroups(I2) = Groups(I2)

Next I2

I =  I + 1
И создать заголовки:
На месте многоточия в предыдущем куске
For I2 = 1 To GroupsCount

    If Groups(I2) <> PrGroups(I2) Then

        Dim I3 As Integer

        For I3 = I2 To GroupsCount

            AddHeader I3, Groups(I3)

        Next I3

        Exit For

    End If

Next I2
Не забудем про процедуру AddHeader:
Перед FormatPrice
Sub AddHeader(Ty As Integer, Name As String)

    GetCellS("result", 1, CurRow).Value = Name

    CurRow = CurRow + 1

End Sub
Теперь надо перенести всякую информацию в result
For I2 = 0 To DataCount - 1

    GetCellS("result", I2, CurRow).Value = GetCell(I2, I)

Next I2
Подогнать столбцы по ширине и выбрать лист result для показа результата
После цикла в конце FormatPrice
Sheets("Result").Activate

Columns.AutoFit
Всё. Можно любоваться первой версией.

Некрасиво, но похоже. Давайте разбираться с форматированием. Сначала изменим процедуру AddHeader:
Sub AddHeader(Ty As Integer, Name As String)

    Sheets("result").Range("A" + CStr(CurRow) + ":C" + CStr(CurRow)).Merge

    ' Чтобы не заводить переменную и не писать каждый раз длинный вызов

    ' можно воспользоваться блоком With

    With GetCellS("result", 0, CurRow)

        .Value = Name

        .Font.Italic = True

        .Font.Name = "Cambria"

        Select Case Ty

        Case 1 ' Тип

            .Font.Bold = True

            .Font.Size = 16

        Case 2 ' Производитель

            .Font.Size = 12

        End Select

        .HorizontalAlignment = xlCenter

    End With

    CurRow = CurRow + 1

End Sub
Уже лучше:

Осталось только сделать границы. Тут уже нам требуется работать со всеми объединёнными ячейками, иначе бордюр будет только у одной:

Поэтому чуть-чуть меняем код с добавлением стиля границ:
Sub AddHeader(Ty As Integer, Name As String)

    With Sheets("result").Range("A" + CStr(CurRow) + ":C" + CStr(CurRow))

        .Merge

        .Value = Name

        .Font.Italic = True

        .Font.Name = "Cambria"

        .HorizontalAlignment = xlCenterSelect Case Ty

        Case 1 ' Тип

            .Font.Bold = True

            .Font.Size = 16

            .Borders(xlTop).Weight = xlThick

        Case 2 ' Производитель

            .Font.Size = 12

            .Borders(xlTop).Weight = xlMedium

        End Select

        .Borders(xlBottom).Weight = xlMedium ' По убыванию: xlThick, xlMedium, xlThin, xlHairline

    End With

    CurRow = CurRow + 1

End Sub

Осталось лишь добится пропусков перед началом новой группы. Это легко:
В начале FormatPrice
Dim I As Integer ' строка в  data

CurRow = 0 ' чтобы не было пропуска в самом начале

Dim Groups(1 To GroupsCount) As String
В цикле расстановки заголовков
If Groups(I2) <> PrGroups(I2) Then

    CurRow = CurRow + 1

    Dim I3 As Integer

В точности то, что и хотели.
Надеюсь, что эта статья помогла вам немного освоится с программированием для Excel на VBA. Домашнее задание — добавить заголовки «ID, Название, Цена» в результат. Подсказка: CurRow = 0 CurRow = 1.
Файл можно скачать тут (min.us) или тут (Dropbox). Не забудьте разрешить исполнение макросов. Если кто-нибудь подскажет человеческих файлохостинг, залью туда.
Спасибо за внимание.
Буду рад конструктивной критике в комментариях.
UPD: Перезалил пример на Dropbox и min.us.
UPD2: На самом деле, при вызове процедуры с одним параметром скобки можно поставить. Либо использовать конструкцию Call Foo(«bar», 1, 2, 3) — тут скобки нужны постоянно.
Return to VBA Code Examples
In this tutorial we will cover VBA Global Variables.
In VBA, variables can be declared with different scopes. The scope determines where the variable can be used.
Procedure-level Variable
Typically, you will see variables declared at the procedure-level within Sub Procedures or Functions. Procedure-level variables must be declared using the Dim keyword within the procedure where they will be used.
This example declares someNumber as an integer variable within the procedure.
Sub DeclaringAProcedureLevelVariable()

Dim someNumber As Integer
someNumber = 5
MsgBox someNumber

End Sub
You can only use this variable within this Sub Procedure. If you call the variable from another Sub Procedure you would get the following Compile Error:
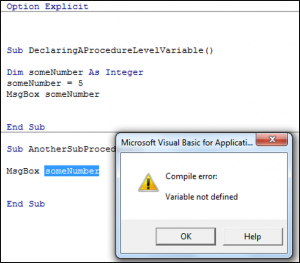
Module Level Variable
A Module-level variable can be used by any Sub Procedure or Function within that module. You need to place the variable declaration at the top of the module in the Declarations section, under the Option Explicit statement, and use the Dim keyword:
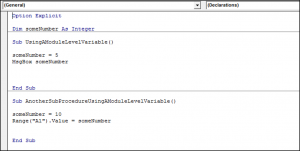
Now the variable someNumber can be used in both sub procedures.
Global Level Variable
A global-level variable can be used anywhere within your code, within Modules, Functions, Sub Procedures and Classes. Global variables are declared in the Declarations Section, under the Options Explicit statement and using the keyword Global. The way you declare a Global level variable is shown below. Both of the Sub Procedures in Module1 can use this variable.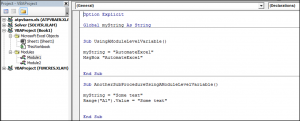
Since this variable is a Global level variable, you can also use it in Module2:
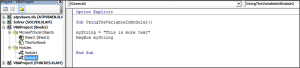
VBA Coding Made Easy
Stop searching for VBA code online. Learn more about AutoMacro — A VBA Code Builder that allows beginners to code procedures from scratch with minimal coding knowledge and with many time-saving features for all users!

Learn More!
When writing VBA macros, the concept of Private or Public is important. It defines how VBA code within one module can interact with VBA code in another module. This concept applies to both Private Subs and Private Functions.
As a simple analogy – on social media, you can set parts of your profile so that everybody can see it (Public), or only those you allow, such as friends or followers, to see it (Private). The Private vs. Public concept in VBA is similar, but since we’re talking about VBA here, it’s not quite as straightforward.
Before we launch into the difference between Public and Private, we first need to understand what Modules are and how they work.
Modules
Modules are the place where VBA code is written and stored. There are many different module types in Excel, and we use each module for a different purpose.
Worksheet Modules
Worksheet Modules are generally used to trigger code related to that specific worksheet. Each worksheet contains its own module, so if there are 6 worksheets, then we have 6 Worksheet Modules.
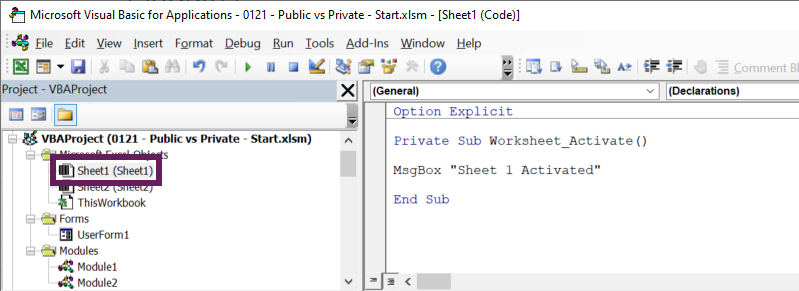
In the screenshot above, the VBA code is contained within the Worksheet Module of Sheet1. As we have used the Worksheet_Activate event, the code is triggered only when Sheet1 is activated. Any event-based code (such as worksheet activation) in a Worksheet Module only applies to the worksheet in which the code is stored.
Workbook Module
The Workbook Module is generally used to trigger code related to workbook-level events.
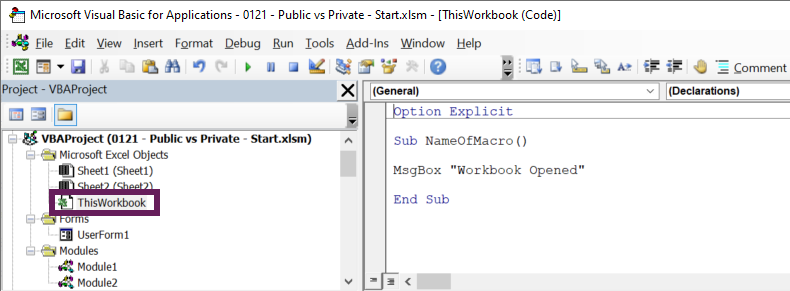
In the screenshot above, we have used the Workbook_Open event. Therefore, the VBA code will run when a workbook is opened. Every workbook has its own module.
UserForm Module
UserForm Modules generally contain code that relates to UserForm events. Each UserForm has its own module.
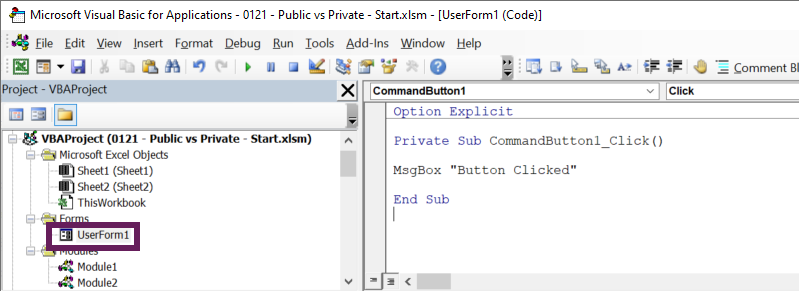
In the screenshot above, the VBA code will run when the user clicks on CommandButton1 in the UserForm.
Standard Modules
Standard Modules are not related to any specific objects and do not have any events related to them. Therefore, standard Modules are not triggered by user interaction. If we are relying on triggered events, we need the Workbook, Worksheet, or UserForm Modules to track the event. However, that event may then call a macro within a Standard Module.
TIP: Find out how to run a macro from another macro here: Run a macro from a macro (from another workbook)
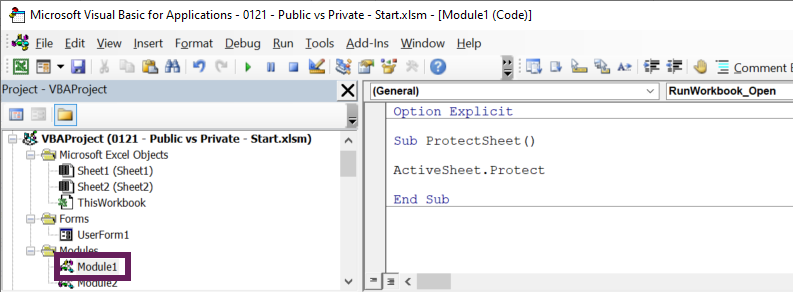
The screenshot above shows a code that password protects the ActiveSheet, no matter which workbook or worksheet.
Other Module Types
The final type of VBA module available is a Class Module. These are for creating custom objects and operate very differently from the other module types. Class Modules are outside the scope of this post.
The terms Public and Private are used in relation to Modules. The basic concept is that Public variables, Subs, or Functions can be seen and used by all modules in the workbook, while Private variables, Subs, and Functions can only be used by code within the same module.
Declaring a Private Sub or Function
To treat a Sub or Function as Private, we use the Private keyword at the start of the name.
Private Sub nameOfSub()Private Function nameOfFunction()Declaring a Public Sub or Function
To treat a Sub or Function as Public, we can use the Public keyword. However, if the word Public or Private is excluded, VBA treats the sub/function as if it were public. As a result, the following are all Public, even though they do not all include the keyword.
Public Sub nameOfSub()
Sub nameOfSub()
Public Function nameOfFunction()
Function nameOfFunction()Let’s look at Subs and Functions in a bit more detail
Sub procedures (Subs)
When thinking about the difference between a Public Sub and a Private Sub, the two primary considerations are:
- Do we want the macro to appear in the list of available macros within Excel’s Macro window?
- Do we want the macro to be run from another Macro?
Does it appear in the Macro window?
One of the most important features of Private subs is that they do not appear in Excel’s Macro window.
Let’s assume Module1 contains the following two macros:
Private Sub NotVisible()

MsgBox "This is a Private Sub"

End Sub
Public Sub IAmVisible()
MsgBox "This is a Public Sub"
End SubThe Macro dialog box only displays the Public sub.
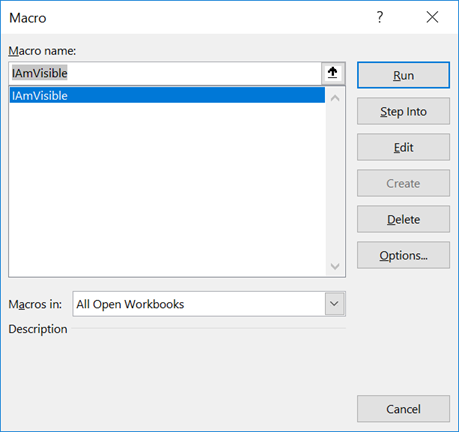
I don’t want you to jump to the conclusion that all Public Subs will appear in the Macro window, as that is not true. Any Public sub which requires arguments, also does not appear in this window, but it can still be executed if we know how to reference it.
Can the code be run from another macro?
When we think about Private Subs, it is best to view them as VBA code that can only be called by other code within the same module. So, for example, if Module1 contains a Private Sub, it cannot be called by any code in another module.
Using a simple example, here is a Private Sub in Module1:
Private Sub ShowMessage()

MsgBox "This is a Private Sub"

End Sub
Now let’s try to call the ShowMessage macro from Module2.
Sub CallAPrivateMacro()

Call ShowMessage

End Sub
Running CallAPrivateMacro generates an error, as the two macros are in different modules.
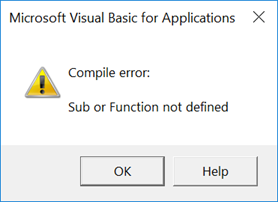
If the ShowMessage macro in Module1 were a Public Sub, it would execute correctly.
There are many ways to run a macro from another macro. One such method allows us to run a Private Sub from another Module. If we use the Application.Run command, it will happily run a Private sub. Let’s change the code in Module2 to include the Application.Run command:
Sub CallAPrivateMacro()

Application.Run "ShowMessage"

End Sub
Instead of an error, the code above will execute the ShowMessage macro.
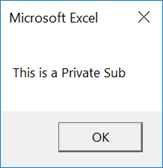
Working with object-based module events
Excel creates the Worksheet, Workbook, and UserForm Module events as Private by default, but they don’t need to be. If they are changed to Public, they can be called from other modules. Let’s look at an example.
Enter the following code into the Workbook Module (notice that I have changed it to a Public sub).
Public Sub Workbook_Open()

MsgBox "Workbook Opened"

End Sub
We can call this from another macro by using the object’s name followed by the name of the Public sub.
Sub RunWorkbook_Open()

Call ThisWorkbook.Workbook_Open

End Sub
This means that we can run the Workbook_Open event whenever we need to. If the sub in the Workbook Module is Private, we can still use the Application.Run method noted above.
Functions
VBA functions are used to return calculated values. They have two primary uses:
- To calculate a value within a cell on a worksheet (known as User Defined Functions)
- To calculate a value within the VBA code
Like Subs, Functions created without the Private or Public declaration are treated as Public.
Calculating values within the worksheet (User Defined Functions)
User Defined Functions are worksheet formulas that operate similarly to other Excel functions, such as SUMIFS or XLOOKUP.
The following code snippets are included within Module1:
Public Function IAmVisible(myText As String)

IAmVisible = myText

End Function
Private Function NotVisible(myText As String)
NotVisible = myText
End FunctionIf we look at the Insert Function dialog box, the IAmVisible function is available as a worksheet function.
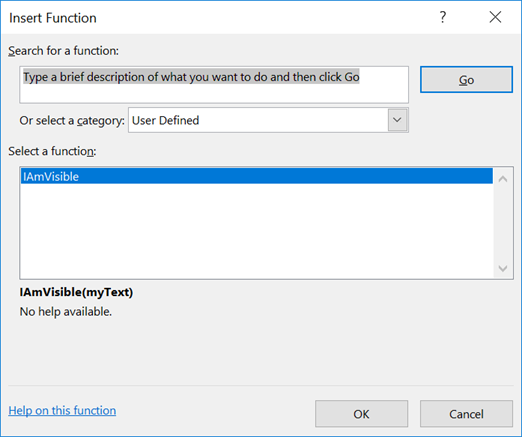
Functions must be declared in a Standard Module to be used as User Defined Functions in an Excel worksheet.
Function within the VBA Code
Functions used within VBA code operate in the same way as subs; Private functions should only be visible from within the same module. Once again, we can revert to the Application.Run command to use a Private function from another module.
Let’s assume the following code were entered into Module2:
Sub CallAPrivateFunction()

MsgBox Application.Run("NotVisible", "This is a Private Function")

End Sub
The code above will happily call the NotVisible private function from Module1.
Variables
Variables hold values or references to objects that change while the macro runs. Variables come in 3 varieties, Public, Private and Dim.
Public Variables
Public variables must be declared at the top of the code module, directly after the Option Explicit statement (if you have one), and before any Subs or Functions.
The following is incorrect and will create an error if we try to use the Public Variable.
Option Explicit

Sub SomethingElseAtTheTop()
MsgBox "Public Variable is not first"
End Sub

Public myPublicMessage As String
The correct approach would be: (The Public variable is declared before any subs or functions):
Option Explicit

Public myPublicMessage As String

Sub SomethingAfterPrivateVariables()
MsgBox "Public Variable is first"
End Sub
As it is a Public variable, we can use and change the variable from any module (of any type) in the workbook. Look at this example code below, which could run from Module2:
Sub UsePublicVariable()

myPublicMessage = "This is Public"
MsgBox myPublicMessage

End Sub
Private Variables
Private Variables can only be accessed and changed by subs and functions within the same Module. They too, must also be declared at the top of the VBA code.
The following demonstrates an acceptable usage of a Private variable.
Module1:
Option Explicit

Private myPrivateMessage As String


Sub UsePrivateVariable()

myPrivateMessage = "This is Private"
MsgBox myPrivateMessage

End Sub
Dim Variables
Most of us learn to create variables by using the word Dim. However, Dim variables behave differently depending on how they are declared.
Dim variables declared within a Sub or Function can only be used within that Sub or Function. In the example below, the Dim has been declared inside a Sub called CreateDim, but used within a sub called UseDim. If we run the UseDim code, it cannot find the Dim variable and will error.
Sub CreateDim()

Dim myDimMessage

End Sub
Sub UseDim()
myDimMessage = "Dim inside Sub"
MsgBox myDimMessage
End SubIf a Dim variable is created at the top of the module, before all the Subs or Functions, it operates like a Private variable. The following code will run correctly.
Option Explicit
Dim myDimMessage
Sub UseDim()

myDimMessage = "Dim inside Sub"

MsgBox myDimMessage

End SubDoes this really matter?
You might think it sounds easier to create everything as Public; then it can be used anywhere. A logical, but dangerous conclusion. It is much better to control all sections of the code. Ask yourself, if somebody were to use your macro from Excel’s Macro window, should it work? Or if somebody ran your function as a User Defined Function, should it work? Answers to these questions are a good guiding principle to help decide between Public and Private.
It is always much better to limit the scope of your Subs, Functions, and variables initially, then expand them when required in specific circumstances.

About the author
Hey, I’m Mark, and I run Excel Off The Grid.
My parents tell me that at the age of 7 I declared I was going to become a qualified accountant. I was either psychic or had no imagination, as that is exactly what happened. However, it wasn’t until I was 35 that my journey really began.
In 2015, I started a new job, for which I was regularly working after 10pm. As a result, I rarely saw my children during the week. So, I started searching for the secrets to automating Excel. I discovered that by building a small number of simple tools, I could combine them together in different ways to automate nearly all my regular tasks. This meant I could work less hours (and I got pay raises!). Today, I teach these techniques to other professionals in our training program so they too can spend less time at work (and more time with their children and doing the things they love).
Do you need help adapting this post to your needs?
I’m guessing the examples in this post don’t exactly match your situation. We all use Excel differently, so it’s impossible to write a post that will meet everybody’s needs. By taking the time to understand the techniques and principles in this post (and elsewhere on this site), you should be able to adapt it to your needs.
But, if you’re still struggling you should:
- Read other blogs, or watch YouTube videos on the same topic. You will benefit much more by discovering your own solutions.
- Ask the ‘Excel Ninja’ in your office. It’s amazing what things other people know.
- Ask a question in a forum like Mr Excel, or the Microsoft Answers Community. Remember, the people on these forums are generally giving their time for free. So take care to craft your question, make sure it’s clear and concise. List all the things you’ve tried, and provide screenshots, code segments and example workbooks.
- Use Excel Rescue, who are my consultancy partner. They help by providing solutions to smaller Excel problems.
What next?
Don’t go yet, there is plenty more to learn on Excel Off The Grid. Check out the latest posts: