Excel is a powerful and most popular tool for data analysis! HTTP requests in VBA gives additional capabilities to Excel. XmlHttpRequest object is used to make HTTP requests in VBA. HTTP requests can be used to interact with a web service, API or even websites. Let’s understand how it works.
Open an excel file and open VBA editor (Alt + f11) > new module and start writing code in a sub
Public sub XmlHttpTutorial

End Sub
Define XMLHttpRequest
Define http client using following code
Dim xmlhttp as object
Set xmlhttp = CreateObject("MSXML2.serverXMLHTTP")
If you need VBA’s Intellisense autocomplete then do it this way :
First, Add a reference to MSXML (Tools > references)
Select appropriate version based on your PC :
1. Microsoft XML, v 3.0.
2. Microsoft XML, v 4.0 (if you have installed MSXML 4.0 separately).
3. Microsoft XML, v 5.0 (if you have installed Office 2003 – 2007 which provides MSXML 5.0 for Microsoft Office Applications).
4. Microsoft XML, v 6.0 for latest versions of MS Office.
Then define http client
Dim xmlhttp As New MSXML2.XMLHTTP
'Dim xmlhttp As New MSXML2.XMLHTTP60 for Microsoft XML, v 6.0
VBA Intellisense will show you the right one when you start typing.
Make requests
Requests can be made using open and send methods. Open method syntax is as follows :
xmlhttp.Open Method, URL, async(true or false)
I’m using requestBin to test requests. Create a bin there and send requests to that URL to test requests.
A simple GET request would be :
Dim xmlhttp As New MSXML2.XMLHTTP60, myurl As String
myurl = "http://requestb.in/15oxrjh1" //replace with your URL
xmlhttp.Open "GET", myurl, False
xmlhttp.Send
MsgBox(xmlhttp.responseText)
Run this code, a message box is displayed with the response of the request.
Request headers
Request headers can be set using setRequestHeader method. Examples :
xmlhttp.setRequestHeader "Content-Type", "text/json"
xmlhttp.setRequestHeader "Content-Type", "application/x-www-form-urlencoded"
xmlhttp.setRequestHeader "User-Agent", "Mozilla/5.0 (iPad; U; CPU OS 3_2_1 like Mac OS X; en-us) AppleWebKit/531.21.10 (KHTML, like Gecko) Mobile/7B405"
xmlhttp.setRequestHeader "Authorization", AuthCredentials
Simple POST request to send formdata
POST requests are used to send some data, data can be sent in Send method. A simple POST request to send form data :
Public Sub httpclient()
Dim xmlhttp As New MSXML2.XMLHTTP, myurl As String
myurl = "http://requestb.in/15oxrjh1"
xmlhttp.Open "POST", myurl, False
xmlhttp.setRequestHeader "Content-Type", "application/x-www-form-urlencoded"
xmlhttp.Send "name=codingislove&[email protected]"
MsgBox (xmlhttp.responseText)
End Sub
Basic Authentication in VBA
When we need to access web services with basic authentication, A username and password have to be sent with the Authorization header. Username and password should also be base64 encoded. Example :
user = "someusername"
password = "somepassword"
xmlhttp.setRequestHeader "Authorization", "Basic " + Base64Encode(user + ":" + password)
Here’s a paste of utility function that helps to encode string to Base64
Practical use cases
Practical use cases of http requests in VBA are unlimited. Some of them are pulling data from Yahoo finance API, weather API, pulling orders from Ecommerce store admin panel, uploading products, retrieving web form data to excel etc.
Read : Parse HTML in Excel VBA – Learn by parsing hacker news home page where I retrieve a web page using HTTP GET request and parse its HTML to get data from a web page.
Read How to build a simple weather app in Excel VBA where I make a HTTP Get request to weather API
Read JSON Api in Excel VBA where I call JSON Apis using HTTP GET and POST requests.
If you have and questions or feedback, comment below.
- Author
- Recent Posts
A CA- by education, self taught coder by passion, loves to explore new technologies and believes in learn by doing.
28 Aug Return Stock Data Using Excel VBA
Posted at 12:35h
in Excel VBA
0 Comments
Howdee! Querying data over the web becomes more common every day. Almost every cloud based program has the ability to serve up its data through some sort of API. Sometimes, the data can be extracted to Excel through some sort of reporting interface within the program. However, I’ve found that this functionality is usually difficult to use and/or incredibly slow or doesn’t exist at all. This is where the ability to make an Excel http get request is so valuable.
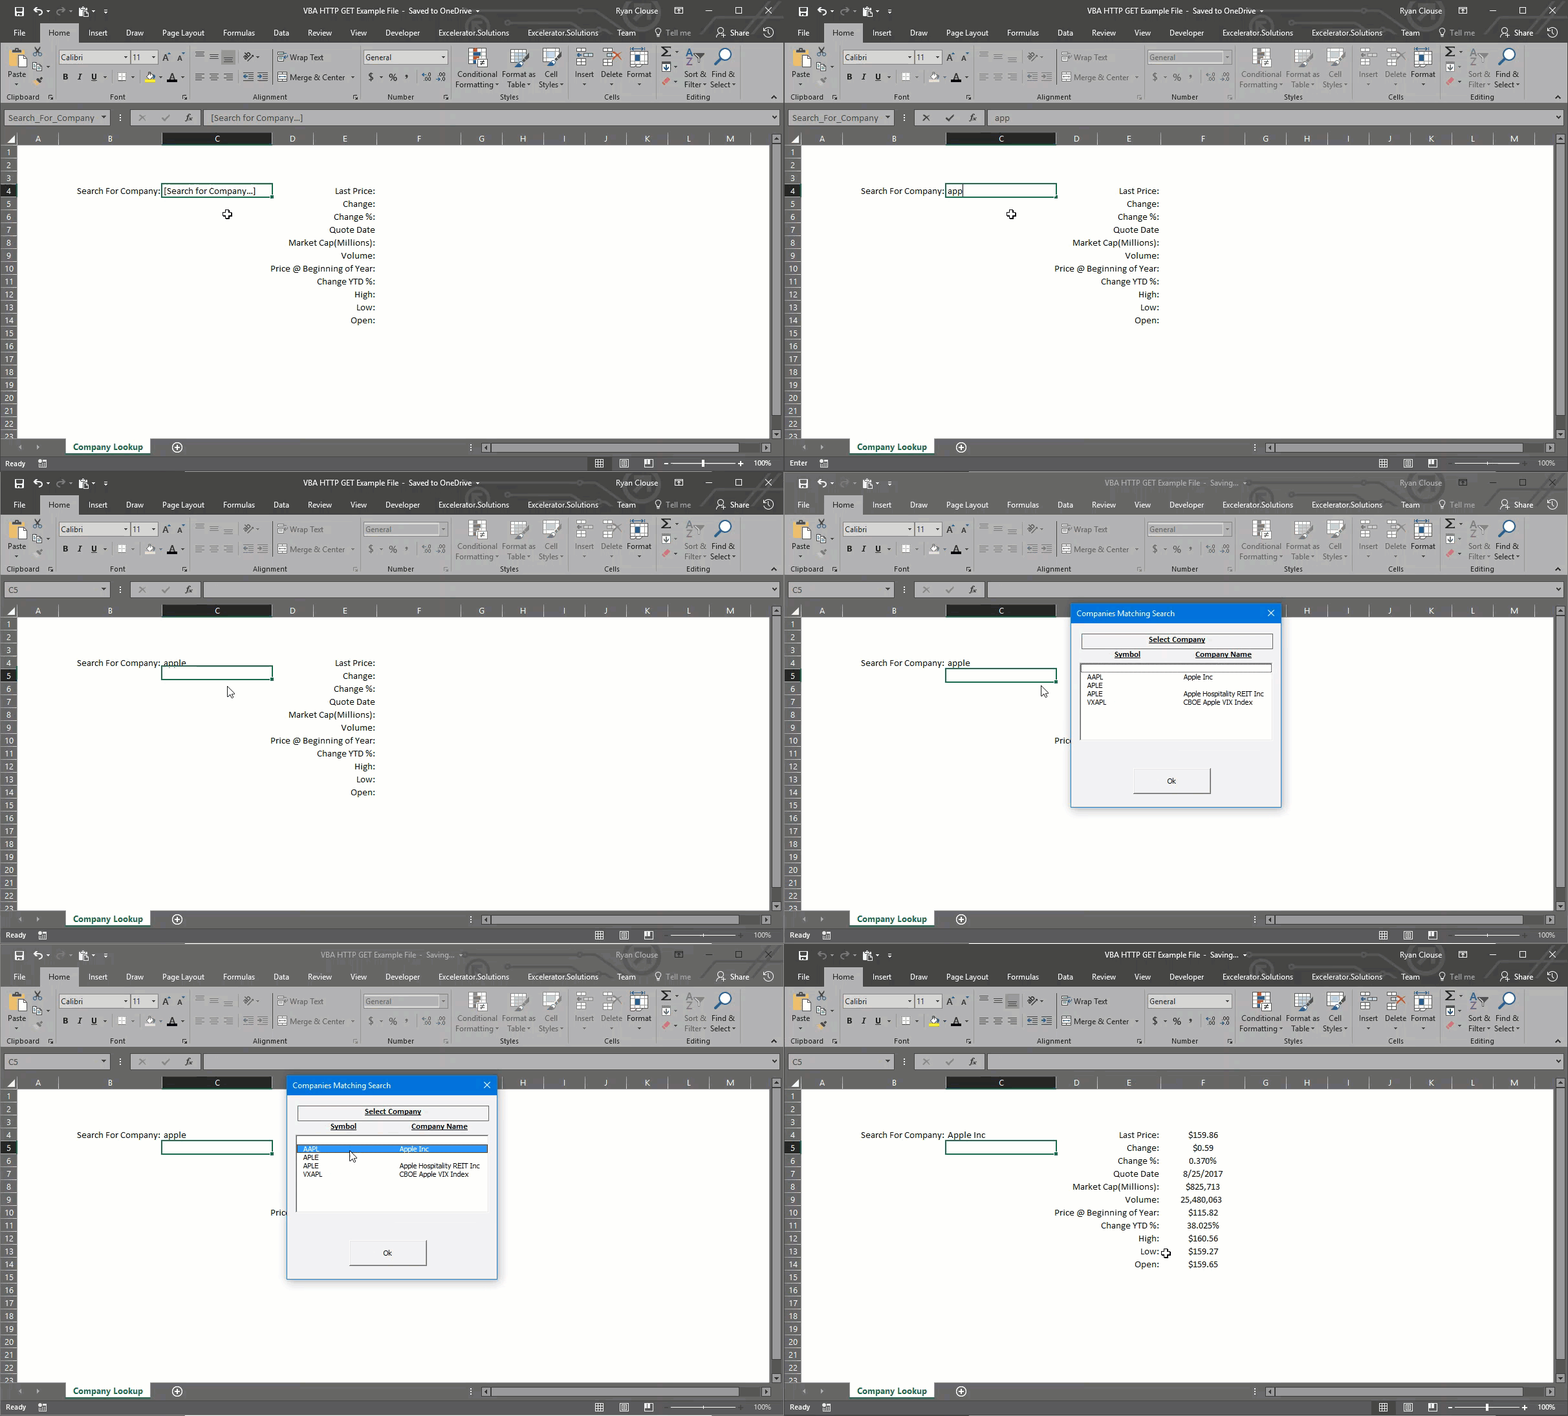
In my example today I’ll be building a small excel application that will allow the user to search for a company’s ticker and then return the most recent stock data using an http request. To do this, we will use the site http://dev.markitondemand.com/MODApis/Api/v2/doc. It is a free service that provides the ability to search for tickers and company names and then fetch stock data on that entity.
HTTP Basics
Before diving into the technical aspects of an Excel http get request, let’s first explore what http requests are. HTTP stands for “Hypertext Transfer Protocol”. In laymen’s terms, it is a means of communicating between a host and a client.
Let’s assume you type www.facebook.com into a web browser. You, the client, have just initiated an HTTP GET request to Facebook, the host (for thoroughness, it’s worth mentioning that sites like Facebook that contain sensitive information use an HTTPS request to secure the data being transferred). What you’ve sent is called the “Request” and the HTML page that Facebook sends back is the “Response”.
The request is sent using a URL (Uniform Resource Locator). While you might be familiar with URL’s, you might not be familiar with their structure. They consist of these components:
Protocol is usually HTTP but, as I said earlier, HTTPS is used when the connection needs to be secured (personal data, credit card information, etc.). The host is just that, the domain address a host has chosen for you to reach their server. The port is usually not needed to be explicitly typed. The default port is 80 and the URL implicitly sends that if you exclude it. The resource path and the query are the import parts I want to point out.
The resource path is instructions sent to the host that tell the server where to navigate to so that your information can be found. Lastly, the query section is always kicked off with a question mark. This section provides any parameters you want to include as well the option to explicitly list the precise data you want returned.
This is as dep as I’ll go into HTTP since this is enough to get started querying information. However, if you’re planning to develop an application that will make HTTP calls, I recommend reading up on the subject so you can handle several types of responses. Let’s say a user passes a bad request to the program you build; the host will send back an HTTP response but it could be an error 404 response and not include any data. You’ll need to be able to handle that and other issues that could arise. This article on the Mozilla Developer Network is a great place to start.
Excel HTTP Get Request – Creating the Search
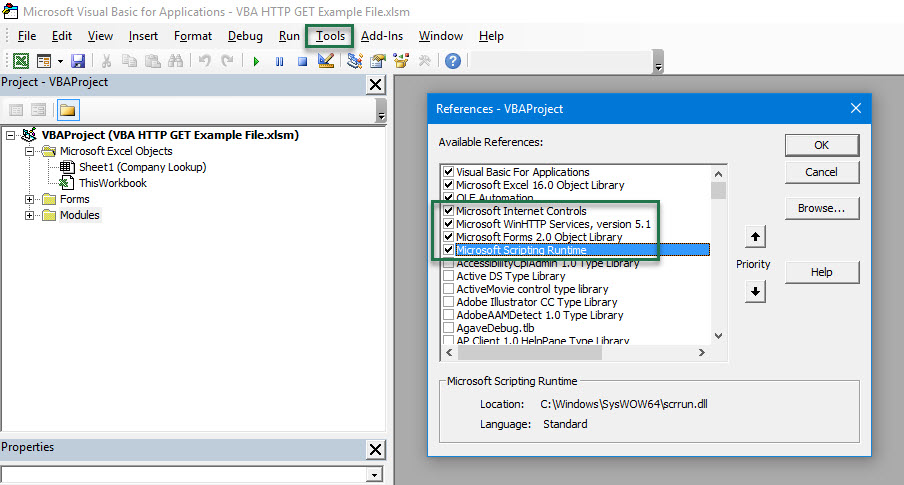
Now that we know a little about HTTP, let’s dive into the Excel http request using VBA. To get started open a new Excel file and press alt + F11 to open the VBA editor window. The first thing we need to do is add some library references so we can access the controls we will need to make HTTP calls. Click on “Tools” and then “References” and add a check box to Microsoft Scripting Runtime, Microsoft Internet Controls, and Microsoft WinHTTP Services, version 5.1 as pictured below.
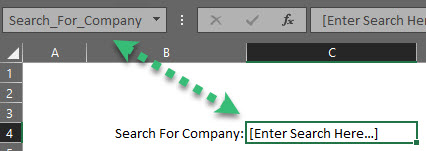
In this application, we want to allow the user the ability to search for a company’s stock ticker. We will then need to pass that data into our code. When my program needs to interact with data on a spreadsheet, I prefer to name the range or cell that it will be interacting with so that, when I’m writing code, it’s evident exactly what data I’m collecting or where I need to write data to. I’ve named a cell “Search_For_Company” and put instructions on the sheet so the user realizes that he/she needs to enter a search term there.
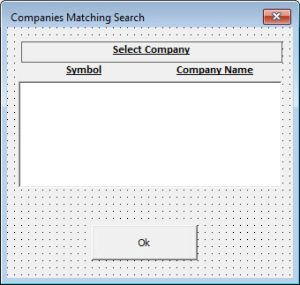
Now, we need to write the code that will accept this input, and then make an http get request to return potential matches. But, before that, let’s consider the returned results. I user might type in “face” when searching for Facebook. That would return dozens of companies so we need somewhere to store those values temporarily. For this, I’ve created a basic user form with a list box to display the values. It looks like this:
Typically I’ll break my code down in to sections to discuss, but I think this makes sense to look at the code in its entirety and then explain what’s happening step by step.
Sub GetCompanyInformation()

Dim hReq As Object, JSON As Dictionary
Dim i As Long
Dim var As Variant
Dim ws As Worksheet

Set ws = Sheet1

'create our URL string and pass the user entered information to it
Dim strUrl As String
    strUrl = "http://dev.markitondemand.com/MODApis/Api/v2/Lookup/json?input=" & ws.[Search_For_Company]

Set hReq = CreateObject("MSXML2.XMLHTTP")
    With hReq
        .Open "GET", strUrl, False
        .Send
    End With

'wrap the response in a JSON root tag "data" to count returned objects
Dim response As String
    response = "{""data"":" & hReq.ResponseText & "}"

Set JSON = JsonConverter.ParseJson(response)

'set array size to accept all returned objects
ReDim var(JSON("data").Count, 1)

i = 1
'loop through returned data and get Symbol & Name
For Each Item In JSON("data")
    var(i, 0) = Item("Symbol")
    var(i, 1) = Item("Name")
    i = i + 1
Next

ufCompaniesReturned.lbCompaniesReturned.List = var

Erase var
Set var = Nothing
Set hReq = Nothing
Set JSON = Nothing

If ufCompaniesReturned.Visible = False Then
    ufCompaniesReturned.Show
End If

End Sub
Let’s skip over the variable declarations as we’ll discuss each as they’re used. The first line simply assigns the “ws” variable to the sheet where I’m working, Sheet1 in this case. Next, I dimension a new string variable (I could have dimensions this variable above with the others but this is just personal preference when I’m creating a variable that represents a URL) and assign the URL I’m using to it. Note here that for the query section of the URL, I’m using a combination of text entered and I’m pulling the value the user typed into the range we named earlier. This is why I like to use that approach in my Excel http get request programs. I can easily see that I’m passing a value from Sheet1 that represents a company to search for.
Next set the Object variable “hReq” equal to a new object in the Microsoft XML Core Services. If you want to read more about what this entails, MSDN has a great write up on it. Suffice it to say this service allows us to send HTTP requests and parse the responses. Now, with that variable we will open a connection and pass it three parameters. We are telling it that we are sending a “GET” request, we pass the URL to use, and lastly, we want to explicitly tell it the call is not asynchronous (also could be said the call is synchronous). This prevents anything further from happening until we get a response from the host. If we left this blank, the default is true. The program could then move on while we are waiting the call and break. There are two more optional parameters in this Open method for username and password, in that order. If that information is required for your request, you’ll need to provide them. They are not required in this example however.
In the next section of code, we create a response variable and store the response from the request as a string. Since this response is returned in JSON, I’m using the VBA-JSON library to parse the JSON. If you’re unfamiliar with this, click here for my blog post on how to use the library. Note that I wrap my response in some additional text. This is a root JSON object that I wrap the data in so I can perform a count on how many objects were returned, which I do in the next step when I’m resizing the array I declared at the beginning of the code.
Lastly we will loop through each object returned by our Excell http get request, and assign the company’s symbol and name to the array. Once the array has been populated, we will pass that array to a listbox, dispose of some resources, and finally check if the form is already visible and, if it isn’t, show it.
Excel HTTP Get Request – Returning the Stock Quote
Now that we’ve successfully written code that will perform our search query, let’s move on to the http get request to return our stock quote. In the form that pops up, our user will select a company for which they want to return a stock quote. Once they click “OK” we will want the result to be returned. To do this, we need to have this process kick off when the event for the button click occurs. To create a sub routine that subscribes to that event, simply double click the “OK” on your user from inside the VBA editor window.
We can certainly embed all the code we want to run inside this event and call it a day. However, I prefer to keep my code separate. I’ve created another module called “Functions” and created a function inside to run my Excel http get request stock quote call when passed the correct parameters. That function looks like this:
Function GetStockData(company As String, companyName As String)
Dim hReq As Object, JSON As Dictionary
Dim sht As Worksheet

Set sht = Sheet1

Dim strUrl As String
    strUrl = "http://dev.markitondemand.com/Api/v2/Quote/json?symbol=" & company

Set hReq = CreateObject("MSXML2.XMLHTTP")
    With hReq
        .Open "GET", strUrl, False
        .Send
    End With

Dim response As String
    response = hReq.ResponseText

Set JSON = JsonConverter.ParseJson(response)
    sht.[Last_Price] = JSON("LastPrice")
    sht.[Change] = JSON("Change")
    sht.[Change_Percent] = JSON("ChangePercent") / 100
    sht.[Quote_Time] = JSON("MSDate")
    sht.[Market_Cap] = JSON("MarketCap") / 1000000
    sht.[Volume] = JSON("Volume")
    sht.[Change_YTD] = JSON("ChangeYTD")
    sht.[Change_YTD_Percent] = JSON("ChangePercentYTD") / 100
    sht.[High] = JSON("High")
    sht.[Low] = JSON("Low")
    sht.[Open] = JSON("Open")
sht.[Search_For_Company].Value = companyName

End Function
As you can see, this code structure is very like the previous code structure so I won’t go through every detail. The first thing you might notice is that this isn’t a subroutine. I’ve made this a function and given it two parameters to receive. I first pass in the “company” parameter which will represent the stock ticker symbol. This is the parameter I pass to the strUrl variable to complete my Excel http get request string. Next, I pass in the company Name parameter which will be the formal name returned from our previous query.
The next difference you might notice is that I don’t wrap the HTTP response like I did previously. Since I know this response will only return one object, I don’t need to count or loop through the response. I can simply parse that response into a dictionary and then access them through the respective keys. Also, I’ve created several more named ranges to write these values to. Again, this is not necessary but I find it helps tremendously with the readability of my code. Lastly, I just assign the formal name I used in the call back to the cell.
To call this function, I used this code in the button click event handler:
Dim i As Long

For i = 0 To ufCompaniesReturned.lbCompaniesReturned.ListCount - 1
    If lbCompaniesReturned.Selected(i) = True Then
        Call GetStockData(lbCompaniesReturned.List(i, 0), lbCompaniesReturned.List(i, 1))
    Else
        'do nothing
    End If
Next i

ufCompaniesReturned.Hide
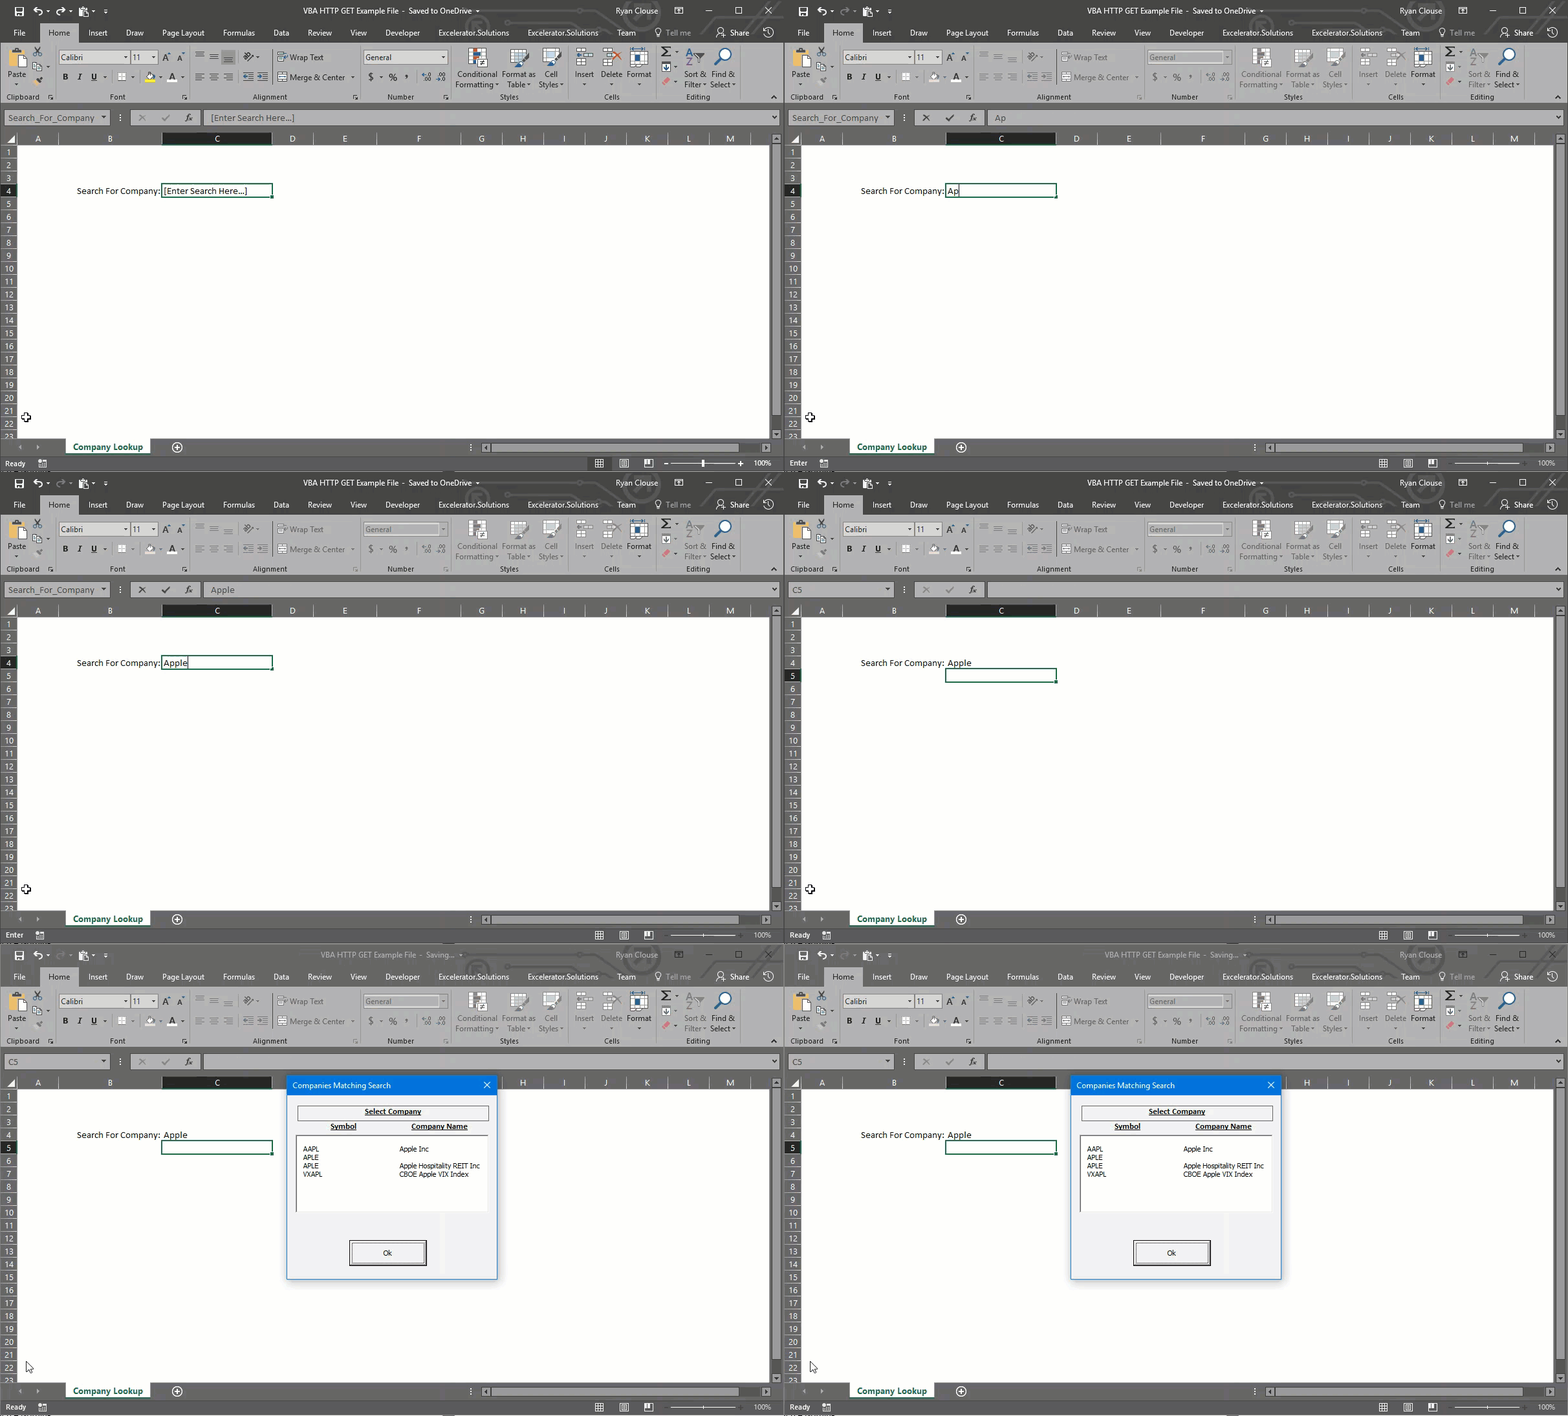
This code is pretty straight forward. I’m first looping through each item in my list box and checking to see if that item has a selected property of true. If it does, I’m passing the two values in the list box to my GetStockData function. From there, the code is handled by the function in my Functions module. All of this together ends up with this result:
I hope this article showed you the power of being able to make http requests from within an Excel application. You can customize the user experience, pull only the data you need, and it’s very fast. As always, the file I worked with today is available for download if you’re a subscriber to my site. It’s free, easy to sign-up, and I won’t be spamming you with dozens of emails each week. If you have questions on anything I went over, please drop them in the comments section below.
Cheers,
R
РАБОТА С ИНТЕРНЕТОМ ЧЕРЕЗ EXCEL VBA
23.06.2018 admin
0 Comment
VBA, Visual Basic
Сегодня расскажу Вам как работать с интернетом через VBA Excel.
Давайте перейдем в редактор кода Excel, для этого нажмите сочетание горячих клавиш Alt + F11 или через вкладку «просмотр кода». В открывшемся окне редактора через вкладку insert -> procedure добавим простую процедуру “Test” и нажмем ок.
Теперь нужно подключить специальный внешний компонент т.к. excel по умолчанию не умеет работать с удаленными серверами. Сам компонент представляет из себя файл библиотеку с расширением .dll (dynamic link library).
Чтобы добавить библиотеку нажмите на вкладку Tools -> References
В открывшемся окне найдите библиотеку с названием (Microsoft XML, v6.0). При установке windows данная библиотека устанавливается на Ваш компьютер автоматически. Проставьте галочку и нажмите ок.
Теперь внутри любой процедуры нам будет доступен класс XMLHTTP60. Внутри нашей процедуры напишем следующее выражение.
Public Sub Test()
Dim xhr As New XMLHTTP60
End Sub
Вообще данный класс XMLHTTP60 в большинстве случаев известен как XmlHttpRequest, используется сегодня в разработке современных веб приложений, которые модно называют web 2.0 или Ajax. Однако сам класс довольно древний, впервые был разработан как не странно компанией Microsoft и работал уже в Internet Explorer 5. В те времена основным форматом обмена дынными был XML, поэтому в название класса присутствует xml хотя ничего общего c xml на сегодняшний день не имеет.
Давайте просто получим разметку странички google. Пока не очень полезно, но для примера сойдет.
В коде напишем следующий текст.
Public Sub Test()
Dim xhr As New XMLHTTP60
xhr.Open «GET», «https://google.com», False
xhr.send
Debug.Print xhr.responseText
End Sub
Если пример вернут ошибку 70, то вставьте другой адрес. Ошибка может быть связанна с механизмом безопасности google, потому просто проигнорируйте её и добавьте любой другой адрес, любимого сайта.
Запустим нажав на иконку run или клавишу F5
Как мы видим в окне immediate мы получили сырую разметку гугла.
Давайте откроем браузер. В области открытой страницы браузера нажмите правую кнопку мышки и выберете «Посмотреть код страницы»
В открывшейся вкладке мы увидим то, что получили через нашу среду разработки в Excel. Можете сравнить разметку, чтобы убедится в этом, но я не рекомендую терять время.
Теперь давайте пробежимся по строчкам нашего кода.
Сначала мы объявляем переменную xhr и стразу инициализируем её через ключевое слово new. Если не совсем понятно, как работает данная строчка, то посмотрите уроки по объектам в Excel ссылка в описание.
Далее мы обязательно должны указать основные параметры через метод Open
Первый параметр — это глагол запросов протокола http. Официально их не много около 8 штук, могут быть и пользовательские. Но сейчас достаточно запомнить два часто употребляемых глагола GET и POST (более подробно сюда)
Второй параметр – это адрес веб ресурса, тут всё ясно.
Третий параметр – это указатель на… хотя просто запомните, что сюда ставится false))
Потом мы просто вызываем удаленный сервер методом send
Наша программа на некоторое время зависает т.к. ожидает ответа от сервера, возможно вы не почувствуете этого. Но если Ваш интернет слабый Вы можете долго ожидать ответа до тех пор, пока не вылети таймаут.
Свойство responseText содержит все данные которые вернул сервер, обычно это текстовый формат.
Необходимо добавить, что если всё хорошо и удаленный сервер работает верно, то сервер вместе с текстом или телом ответа, возвращает код ответа.
Если всё хорошо, то код ответа начинается с цифры 200 (201, 202, 203, 204, 205, 206) (код ответов можно посмотреть тут (http://lib.ru/WEBMASTER/rfc2068/))
Однако бывает такое, что удаленный ресурс отработал неверно. Скорее всего сервер в таком случае вернет ошибку с кодом ответа начинающуюся с цифры 400, например, знаменитую ошибку 404 (страница не найдена) или 500 (ошибка сервера).
Чтобы проверить, что сервер отработал верно и вернул нам то, что надо проверим код ошибки.
Изменим на следующий блок кода.
Public Sub Test()
Dim xhr As New XMLHTTP60
xhr.Open «GET», «https://google.com», False
xhr.send
If xhr.Status = 200 Then ‘If xhr.Status >= 200 And xhr.Status < 300 Then
Debug.Print xhr.responseText
Else
Debug.Print xhr.responseText
End If
End Sub
В комментариях я указал более надежный способ проверки положительного ответа от сервера всё что выше 200, но ниже 300 считается ок.
Очистите окно Immediate
Нажмите F5 или иконку старт.
Мы видим, что всё тоже самое ответ пришел верный.
Чтобы проверить блок else давайте в адрес добавим что-то неправильное, например, восклицательные знаки https://google.com/!!
Нажмите F5 или иконку старт.
В окне Immediate уже пришла страничка с ошибкой.
Таким образом можно обращается к серверу через VBA Excel
Я рекомендую нажать клавишу F8 чтобы по шагам прогрессировать программу и посмотреть каждый шаг.
Excel is probably one of the most used tools in this world, so the demand for integrations with extremely complex spreadsheets is a recurring scenario. APIs allow easy access to information in systems, which is becoming more and more standard in the market, with that in mind, some demands of connecting to systems via API in Excel are necessary and very useful, so I decided to share a little how I created this integration. Let’s learn how to query Rest APIs using VBA and convert the result to JSON for use in the spreadsheet.
This article hopes you will know the basics of Excel and VBA, as well as what is an API and how it works . Our goal will be to consult a Public Pokemon API and list the result in the tab results .
Creating a blank worksheet
First let’s create a blank sheet with macro enabled, inside it I’ll create a tab called results .
Creating the macro to query the API
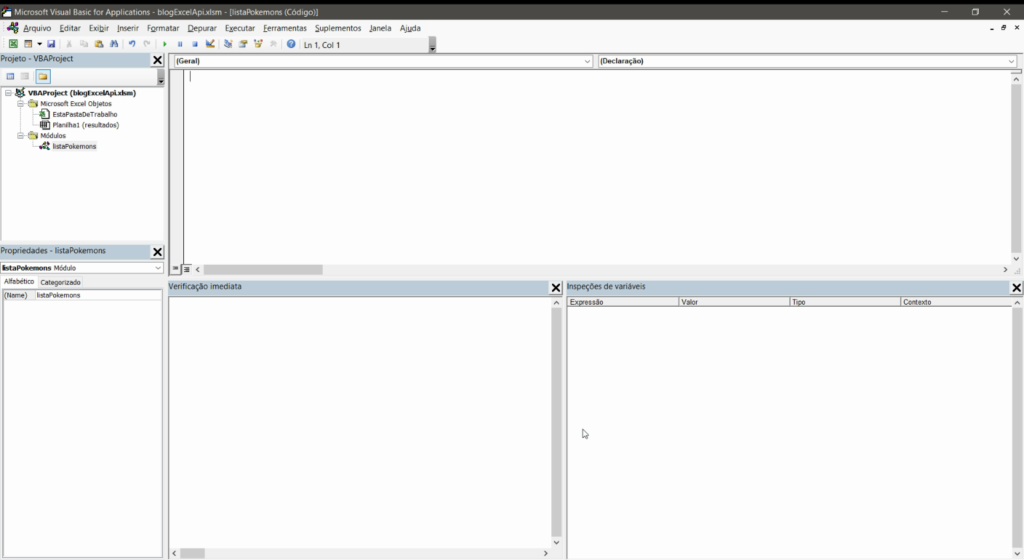
by shortcut alt + f11 let’s open the Excel macro editor, and create a module called list pokemons .
Importing the VBA-JSON library
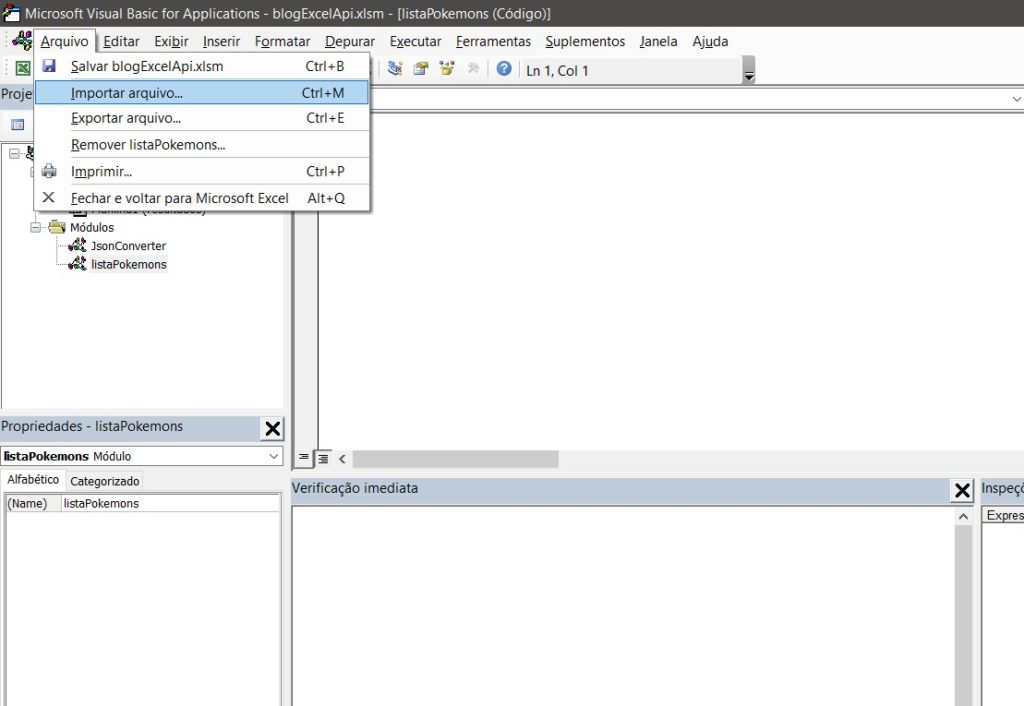
As the API we’re going to query returns a JSON as an answer we will need to import the library VBA JSON , it will take care of all the boring work of translating the JSON and returning as an array and object. Installation is very simple, just download the latest version here and in the macro editor go to File > Import File > JsonConverter.bas .
Enabling Microsoft Scripting Runtime
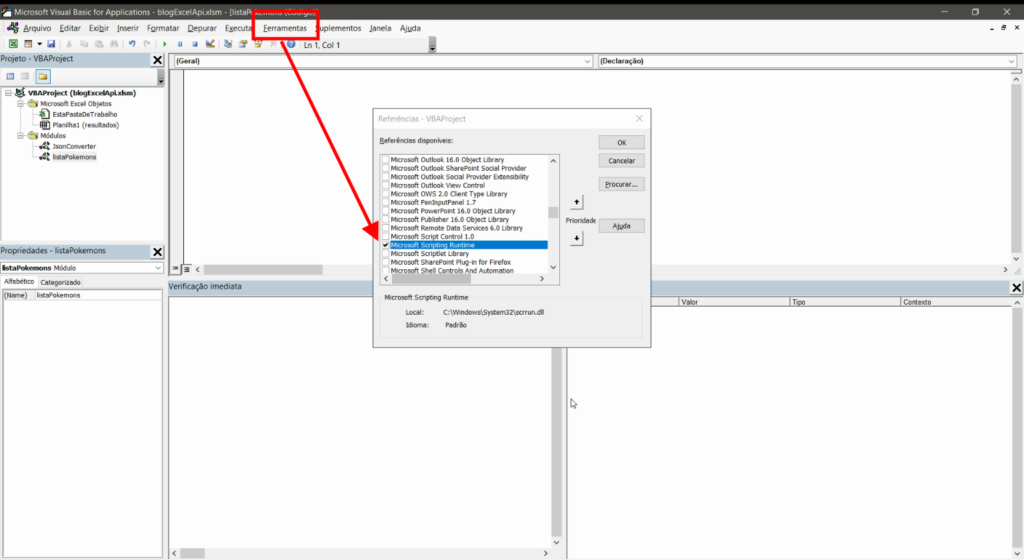
We also need to enable Microsoft Scripting Runtime, to do this just browse Tools > References and search and enable in the list the Microsoft Scripting Runtime .
Creating the VBA macro to query the REST API
Below is the complete code for our request, it might sound scary, but don’t worry, I’ll explain what each part is doing:
Sub listPokemons()
Dim json As String
Dim jsonObject As Object, item As Object
Dim i As Long
Dim ws As Worksheet
Dim objHTTP As Object

'We selected our results sheet
Set ws = Worksheets("results")

'We create our request object and send
Set objHTTP = CreateObject("WinHttp.WinHttpRequest.5.1")
URL = "https://pokeapi.co/api/v2/pokemon"
objHTTP.Open "GET", URL, False
objHTTP.Send
strResult = objHTTP.responseText
json = strResult

Set objectJson = JsonConverter.ParseJson(json)

'We create the header cells
ws.Cells(1, 1) = "name"
ws.Cells(1, 2) = "link"

'We loop the results property of the API response
i = 2 'We will start the counter on line 2
For Each pokemon InJsonObject("results")
    ws.Cells(i, 1) = pokemon("name")
    ws.Cells(i, 2) = pokemon("url")
    i = i + 1
next

End Sub
First we define all the variables that we will use in our scripts, including the VBA JSON library import that we previously imported into our project.
Dim json As String
Dim jsonObject As Object, item As Object
Dim i As Long
Dim ws As Worksheet
Dim xmlhttp As Object
Set xmlhttp = CreateObject("MSXML2.serverXMLHTTP")
Dim objHTTP As Object
Then we select the spreadsheet we want to display the results of the API query, in our case Worksheets("results") and then we create an object that will allow us to make the request to the API. https://pokeapi.co/api/v2/pokemon . We’ll take the answer and put it in the variable json , for now it is nothing more than a text.
'We selected our results sheet
Set ws = Worksheets("results")

'We create our request object and send
Set objHTTP = CreateObject("WinHttp.WinHttpRequest.5.1")
URL = "https://pokeapi.co/api/v2/pokemon"
objHTTP.Open "GET", URL, False
objHTTP.Send
strResult = objHTTP.responseText
json = strResult
Here where the magic happens, the function parsejson from the VBA JSON library converts the text of our variable json for an accessible object in our script. We are now able to access all properties programmatically in our code.
Set objectJson = JsonConverter.ParseJson(json)
Now that we have the result of our API accessible, we create in the first row of the spreadsheet the header containing the columns Name and link .
'We create the header cells
ws.Cells(1, 1) = "name"
ws.Cells(1, 2) = "link"
Now before analyzing the script we need to understand the result of the API. If you open the link https://pokeapi.co/api/v2/pokemon in your browser you will see the following result:
{
  "count": 964,
  "next": "https://pokeapi.co/api/v2/pokemon?offset=20&limit=20",
  "previous": null,
  "results": [
    {
      "name": "bulbasaur",
      "url": "https://pokeapi.co/api/v2/pokemon/1/"
    },
    {
      "name": "ivysaur",
      "url": "https://pokeapi.co/api/v2/pokemon/2/"
    },
    {
      "name": "venusaur",
      "url": "https://pokeapi.co/api/v2/pokemon/3/"
    },
    {
      "name": "charmander",
      "url": "https://pokeapi.co/api/v2/pokemon/4/"
    },
    {
      "name": "charmeleon",
      "url": "https://pokeapi.co/api/v2/pokemon/5/"
    },
    {
      "name": "charizard",
      "url": "https://pokeapi.co/api/v2/pokemon/6/"
    },
    {
      "name": "squirtle",
      "url": "https://pokeapi.co/api/v2/pokemon/7/"
    },
    {
      "name": "wartortle",
      "url": "https://pokeapi.co/api/v2/pokemon/8/"
    },
    {
      "name": "blastoise",
      "url": "https://pokeapi.co/api/v2/pokemon/9/"
    },
    {
      "name": "caterpie",
      "url": "https://pokeapi.co/api/v2/pokemon/10/"
    },
    {
      "name": "metapod",
      "url": "https://pokeapi.co/api/v2/pokemon/11/"
    },
    {
      "name": "butterfree",
      "url": "https://pokeapi.co/api/v2/pokemon/12/"
    },
    {
      "name": "weedle",
      "url": "https://pokeapi.co/api/v2/pokemon/13/"
    },
    {
      "name": "kakuna",
      "url": "https://pokeapi.co/api/v2/pokemon/14/"
    },
    {
      "name": "beedrill",
      "url": "https://pokeapi.co/api/v2/pokemon/15/"
    },
    {
      "name": "pidgey",
      "url": "https://pokeapi.co/api/v2/pokemon/16/"
    },
    {
      "name": "pidgeotto",
      "url": "https://pokeapi.co/api/v2/pokemon/17/"
    },
    {
      "name": "pidgeot",
      "url": "https://pokeapi.co/api/v2/pokemon/18/"
    },
    {
      "name": "rattata",
      "url": "https://pokeapi.co/api/v2/pokemon/19/"
    },
    {
      "name": "raticate",
      "url": "https://pokeapi.co/api/v2/pokemon/20/"
    }
  ]
}
We are interested in the property. results , an array containing a list of pokemons with their names and links to more details. We will access this matrix at jsonobject("results") and we will loop to display each pokemon result in a new row of our table.
'We loop the results property of the API response
i = 2 'We will start the counter on line 2
For Each pokemon InJsonObject("results")
    ws.Cells(i, 1) = pokemon("name")
    ws.Cells(i, 2) = pokemon("url")
    i = i + 1
next
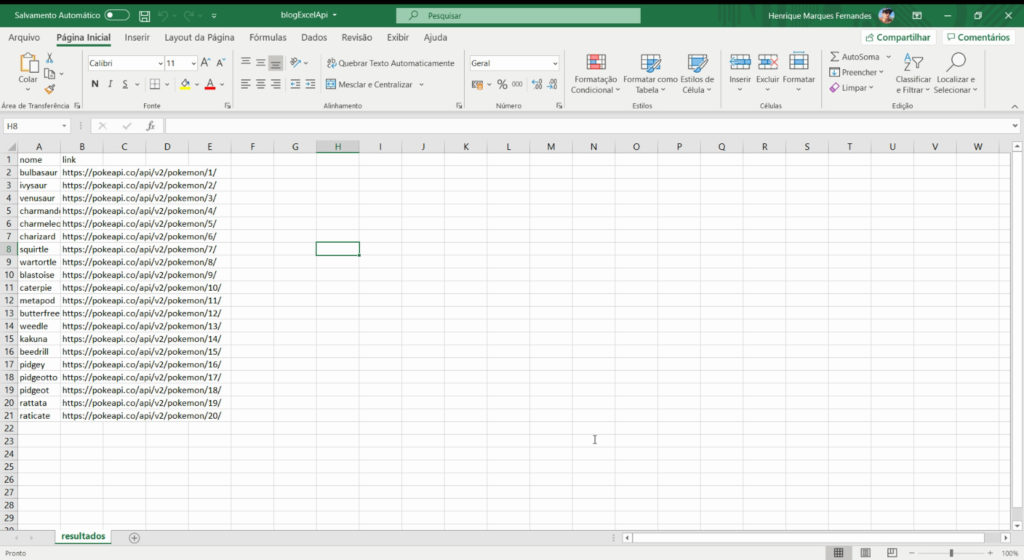
If everything goes as expected, by pressing f5 to run our macro, in your spreadsheet you should see the following result:
Conclusion
This was a very simple example of a query, with the object of HT TP it is possible to perform all types of requests, GET, POST, UPDATE, … The interesting thing is to understand how the request is made and how you can display the result, thanks to the VBA JSON library, which already drastically reduces the work required. Now you just need to adapt this flow and script to your needs.
3.7
6
votos
Nota do Artigo
This tutorial is for you if you’re an Excel user who would like to learn how to extend your spreadsheets with data from APIs. You might be one of the people who spend most of their workdays in Excel and do calculations and visualizations but still work manually to import or even just copy and paste data from external sources.
If data is available from an API, however, there are various ways in which can consume it directly from Excel, saving you time and preventing errors.
That is, unfortunately, just as long you are using a Windows PC. The integrations presented in this article do not work in Excel for Mac or the web-based version of the Office apps.
BASF provides the Periodic Table of Elements API, which enables you to query the periodic table and retrieve all kinds of information about chemical elements.
We assume you came here from the Introduction to APIs. If not, please check out that document to learn the basics of APIs before continuing.
The Periodic Table of Elements API follows the CRUD/RESTful paradigm but implements only a subset. Specifically, the periodic table is read-only and allows HTTP GET requests exclusively. It is also limited to one resource called «element».
The base URL for the API is https://dev.api.basf.com/chemical/. Every endpoint starts with this URL.
For the elements, there are two endpoints. The first is a collection endpoint that allows you to either retrieve the full periodic table or request a subset of elements through filter parameters. It is called a collection endpoint because it always returns a collection data structure containing multiple items. The second is an individual resource endpoint that allows you to retrieve a single element.
Both endpoints return JSON-formatted responses.
All BASF APIs require authentication. The Periodic Table of Elements API uses an app-only context with an API key. If you haven’t done so, please read the introduction, terminology, and app-only context sections of the Authentication and Authorization guide. You can skip the part on the app and user context and OAuth as it is not required for this API.
To use authentication, you need to create an account and an application. The process gives you a Client ID, which you can then use as your API key. If you do not have an API key, follow the steps outlined in the Get Started guide. Make sure you select the API product BASF Periodic Table while creating your app.
In Excel for Windows, there are three options for getting external data from an API, which we’ll investigate throughout this article.
The first option is the built-in WEBSERVICE() function. Retrieving data from a URL is a single step. However, extracting the information is rather cumbersome as Excel doesn’t understand JSON responses and you have to use string processing functions. Also, as the function only supports the URL as a parameter, this works only with APIs that allow you to provide authentication information as part of the URL. The BASF Periodic Table of Elements API fits the criteria, as it uses a query string for authentication. For other APIs that require custom headers, though, you’re out of luck.
The second option is using VBA, Visual Basic for Applications, to write a Macro in Basic code to consume an API and fill the sheet programmatically. It is the most powerful and flexible option and should work with all kinds of APIs, but it requires you to have some basic programming knowledge.
The third option is the Power Query builder that allows you to gather and combine data from different sources, including APIs. If you have already used the Power Query builder, for example, to access a database directly, this is the sensible way to do it. It’s also a good choice if you do not want to work with code and the WEBSERVICE() option is too limited.
We’ll use an individual resource endpoint with the WEBSERVICE() function as well as the VBA macro, and we’ll demonstrate the collection endpoint with the Power Query builder.
Before we introduce the WEBSERVICE() function, let’s look at functions in Excel in general. They allow you to fill a table cell with computed data. To enter a function into a cell, you start with the equals sign (=), followed by the function name, a left parenthesis [(], your arguments (if needed), and a right parenthesis [)] to end. If there is more than one argument, you separate them with semicolons (;). A common function that you may have used is SUM(), which adds the data from a number of other cells and returns the result. It takes a range of cells as its argument.
The WEBSERVICE() function also takes one argument, a URL. Then, Excel issues an HTTP GET request to fetch whatever is available at that URL, and puts it into the cell as its result. If we want to do an API requests, since the function only allows a single argument, we have to encode the full API request into the URL. As mentioned before, this rules out APIs that require other HTTP methods (such as POST) or custom headers, e.g., for authorization. With the Periodic Table API, however, we put the API key in the URL and only need the GET method.
Open a new Excel workbook, and enter the following line into a cell, replacing the string APIKEY with the previously generated key:
=WEBSERVICE("https://dev.api.basf.com/chemical/elements/He?x-api-key=APIKEY")
Once you hit Enter or click on another cell, you should see a JSON structure describing the Helium element appear in your cell.
As mentioned before, every API endpoint starts with the base URL. For the Periodic Table API, that is https://dev.api.basf.com/chemical/. Then, the path to a resource or collection endpoint follows. In our example, we retrieved a single element, hence, we used a resource endpoint. Typically, the path to a resource starts with the pluralized resource name, followed by a slash (/) and finally an identifier. If you look at the URL above, you can identify elements/He as this path. The question mark (?) separates the parameter section, and you can see the x-api-key parameter that authenticates the request.
We can separate the base URL and the API key from the URL and build the URL dynamically through string concatenation. That is useful if you have multiple requests in the same Excel sheet and, let’s say, you want to share this sheet with another person who then provides a different API key. The other person then only has to enter their API key in one designated cell instead of modifying your API requests.
As next step, we’ll create a sheet that allows users to modify the base URL and API key in one place. We’ll also apply string processing functions to parse a single field from the JSON response. You can follow along these steps. If something is unclear or doesn’t work for you, you can compare your sheet with the screenshots as well as the full Excel workbook that we’ll provide as download further below.
Here we go:
- Type «Base URL» in A1 and the base URL https://dev.api.basf.com/chemical/ in B1.
- Type «API Key» in A2 and paste your API key from the developer portal in B2.
- Type «Element» as a header in A4 and some elements below it. As an example, we’ll put «H» in A5 and «N» in A6.
- Type «API URL» as a header in B4. To build the URL, concatenate the following elements: a reference to the field containing the base URL, «elements/», a reference to the field containing the element name, «?x-api-key=», and a reference to the field containing the API key. You need to use absolute references to base URL and API key and a relative reference to the element name. Your function call should look like this: =CONCAT($B$1;»elements/»;A5;»?x-api-key=»;$B$2)
- Type «API Response» as a header in C4. Make the webservice call using the URL you built in the previous step by typing =WEBSERVICE(B5) in C5. You should see a JSON API response appear in the cell.
- Type «Atomic Mass» as a header in D4. As there is no JSON parser in Excel, we copy a substring from the API response between the atomic_mass field and the subsequent field, covalent_radius. The whole function looks like this: =MID(C5;SEARCH(«atomic_mass»;C5)+13;SEARCH(«covalent_radius»;C5)-SEARCH(«atomic_mass»;C5)-16) You should now see only the atomic mass as a number in the cell.
- Select the cells B5 to D5, grab the right bottom corner, and drag them down to the B6 to D6. You should see the API URL, API response and atomic mass for the second element appear.
- To get the atomic mass for more elements, add a new element symbol in column A and copy or drag down the three other columns.
Please note that Excel function names are localized along with the Excel user interface. If your Excel installation is in German, replace the names based on this list:
- CONCAT – TEXTKETTE
- MID – TEIL
- SEARCH – SUCHEN
You can get a working Excel workbook in the PeriodicTableWebservice.xlsx file (TODO: add download).
Visual Basic for Applications, or VBA for short, is a powerful programming language that you can use to automate Microsoft Office applications, including Excel. VBA is closely related to, but not fully compatible with, other versions of the Basic language (such as Visual Basic .NET).
If you not worked with VBA before but have programming skills in a different language, you have to learn a new syntax, but should be able to understand the structure of the macro we build in this section.
Our goal is to retrieve various attributes of specific chemical elements (but not the entire periodic table). The sheet layout uses one row per element. The user should enter the element names into the first column of the sheet (A). Then, upon running the macro, it should go through the list of rows and fill the other columns with details. For example, the atomic mass in the second column (B) and the covalent radius in the third column (C).
Open Excel with a new, empty sheet. Then, press the combination Alt and F11 on your keyboard to launch the Visual Basic editor.
On the left side of the editor, you can see the project structure. There’s an entry for your sheet. Double-click on this entry to open the code view where you can enter Basic code that is specific to that sheet.
We start by creating two global string variables, one for the base URL and the API key. It helps us separate them from the code itself so we can swap them if necessary.
Dim baseUrl, apiKey As String
It’s not possible to assign a value to these variables yet. We’ll do that later.
As mentioned under the objective above, we need to retrieve specific elements that the user enters into the sheet, not the full periodic table. For this purpose, we use the API endpoint for specific elements and have to make multiple requests. Hence it is useful to develop an abstraction and put the logic for the API request into a function.
In VBA, you can define functions with the Function keyword. They have parameters with types and a return type. Here is the definition of our getElement() function:
Function getElement(id As String) As Object
Next, we create a script control. That is actually a workaround because there is no native JSON parser available and we don’t want to install a third-party module. The script control can execute JScript, which is a version of JavaScript, and thus understand JSON.
Dim scriptControl As Object
Set scriptControl = CreateObject("MSScriptControl.ScriptControl")
scriptControl.Language = "JScript"
Then, we can make an HTTP request to the API endpoint. VBA makes HTTP requests through the XMLHTTP object. While building the request, we use string concatenation to build the API URL and include the base URL and API key from the variables we defined earlier.
With CreateObject("MSXML2.XMLHTTP")
    .Open "GET", baseUrl + "elements/" + id + "?x-api-key=" + apiKey, False
    .send
Once we have a response, we can parse it with the script control and assign the result to the function name, which is VBA’s way of specifying the returned value for a function:
    Set getElement = scriptControl.Eval("(" + .responsetext + ")")
    .abort
After that, all is left is closing the With-block and the function. The VBA editor might have already generated this code for you automatically.
End With
End Function
Macros are public VBA subroutines. Let’s call ours getPeriodicElementData():
Public Sub getPeriodicElementData()
Inside the subroutine, we first assign some values to our global variables. Add these lines and replace APIKEY with your API key from the developer portal:
baseUrl = [https://dev.api.basf.com/chemical/](https://dev.api.basf.com/chemical/)
apiKey = "APIKEY"
Then, as we want to go through our sheet row by row to get element data, we set up a counter variable:
Dim row As Integer
row = 1
Our algorithm goes through all rows until it stops at an empty row. We can achieve this with a Do-Until-loop:
Do Until IsEmpty(Cells(row, 1))
Inside the loop, we call our getElement() function we created in the previous section. By using a With-block, we can access the attributes of the elements directly and write them in the cells. Our sample code reads two attributes, atomic mass and covalent radius, which go in the row of the current element and the second or third column respectively.
    With getElement(Cells(row, 1))
        Cells(row, 2) = .atomic_mass
        Cells(row, 3) = .covalent_radius
    End With
If you want, you can extend this code with more properties from the element object and put them in additional columns. Tip: Use the WEBSERVICE() function to get the full JSON structure so you can see the available properties.
Afterwards, make sure to increase the row variable, otherwise you have an infinite loop:
row = row + 1
Finally, we close the loop and the subroutine. The VBA editor might have already generated this code for you automatically.
Loop
End Sub
Before we can run the macro, we should add a couple of element symbols in the first column (A) so that the macro has something to do. As an example, use the elements H, S and O. Use one row for each, so that H is in the first, S in the second and O in the third row.
During development, you can run your macro directly from the VBA editor, using either the play button in the toolbar, the Run menu, or the F5 key on your keyboard.
The macro should run and automatically fill the other columns for your three rows.
To re-run your macro later when you’ve closed the VBA editor, follow these steps:
- Open the View ribbon.
- Click on Macros.
- Select the macro and click Run to execute.
The Power Query builder provides access to a variety of data sources. It even enables the combination of data from multiple sources. In this tutorial, though, we’ll just show you the basics to make an API call and display the results in your Excel sheet. We use the collection endpoint to retrieve the complete periodic table.
To get started, go to the Data ribbon, click the Get Data button, choose From Other Sources, and From Web.
In the popup window, enter the URL for the API. You can configure advanced settings such as HTTP headers for your request, but the BASF Periodic Table API doesn’t need any. You have to provide the full URL to the collection endpoint and add the query parameter for authentication directly into the URL. In the following sample, replace APIKEY with the Client ID of your application
https://dev.api.basf.com/chemical/elements?x-api-key=APIKEY
Once you confirm with OK, the Power Query Builder opens and shows the API response. At first, you just see the container element items. Right-click on it and select Drill Down.
Note the list of applied steps on the right side of the window. It shows you everything you did in the query builder and you can undo any step by clicking the X next to it.
Now you see a list of records and you can click on each to see the different attributes of each element. The next step is converting this list into a table and you do this by clicking the To Table button.
A popup with additional options may appear which you can simply confirm with OK. After that, you see the list as a table but it still has just one column that we need to expand into multiple columns so you can see each attribute of the element in its own column. To do so, click the expand icon (<>) in the column header.
In the popup, select the fields that you like or keep all fields intact. You can uncheck «Use original column name as prefix» as the prefix doesn’t provide any value when you’re just working with one data source.
Once you see the data you want in the query builder, your final step is transferring the table into the Excel sheet. You do this with the Close&Load button.
You’re done! Your excel sheet contains the periodic table of elements now.
Congratulations on making it through the tutorial! We hope it deepened your understanding of APIs and how to consume them with Excel. Feel free to contact developer@basf.com with feedback and questions.


