
 Зачастую в документах Word пользователи пересылают друг другу картинки. При этом забывая, что вытащить картинки из Word не так уж и просто. Здесь нельзя нажать правой кнопкой на изображение и сохранить его в удобное место, как это реализовано в браузере и различных приложениях. Если сделать скриншот картинки из Word, то значительно снизится ее качество. Но есть способ вытащить картинки из Word в оригинальном размере, как они были вставлены. В нашей статье подробно о таких способах.
Оглавление:
1. Преобразуя документ в ZIP-архив
2. Копируя изображения из Word в редактор изображений
3. Сохранив документ в формате HTML
4. Используя приложение Total Commander
Преобразуя документ в ZIP-архив
Самый простой способ вытащить значительное количество картинок из Word — это преобразовать документ в ZIP-архив. По сути, любой документ Word и представляет собой архив с информацией, но скомпилирован он таким образом, чтобы при открытии в приложении Microsoft Word (и подобных) отображать пользователю эту информацию в виде классического документа.
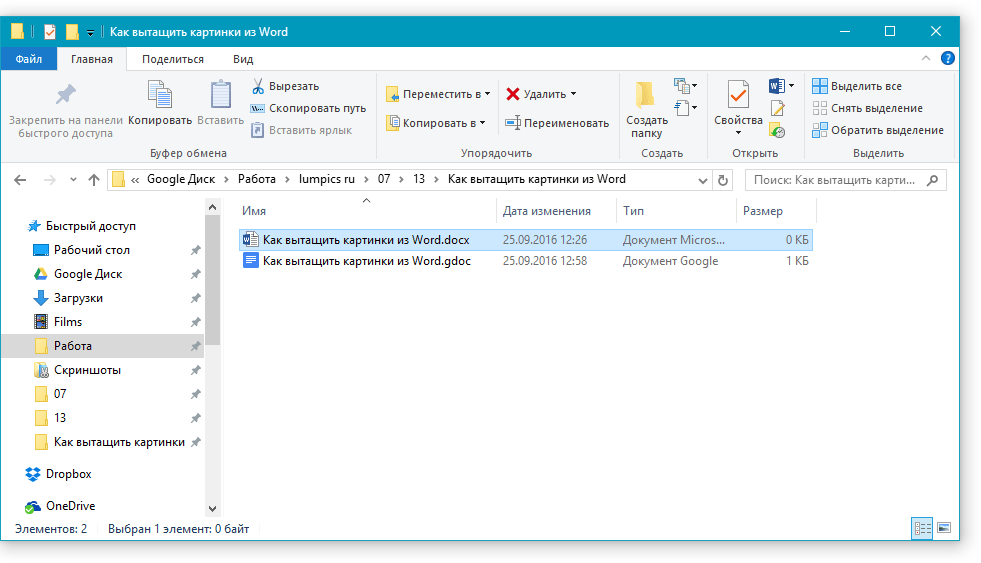
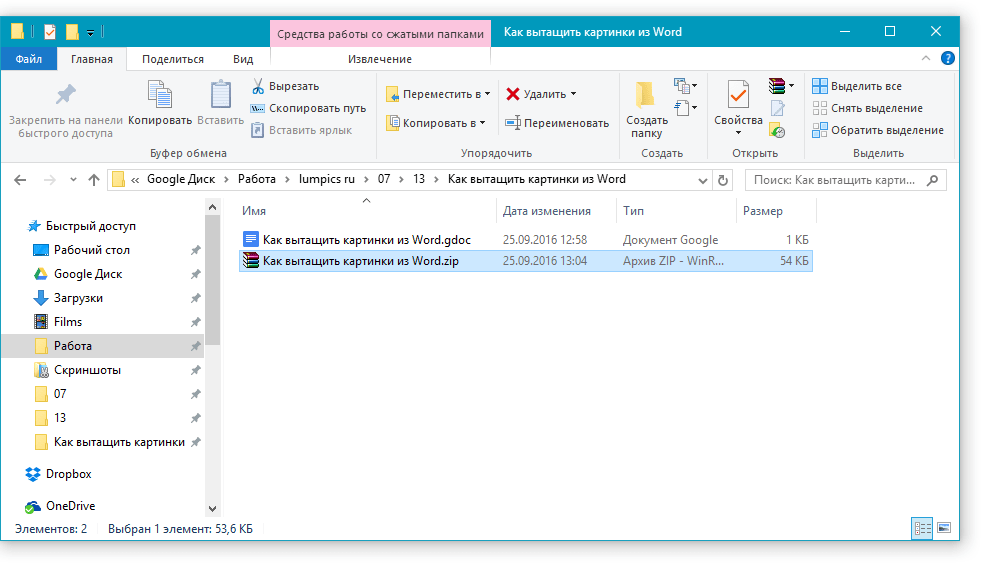
Чтобы преобразовать любой документ Word в ZIP-архив и вытащить из него картинки, нужно сделать следующее. Включить в проводнике на вкладке “Вид” пункт “Расширение имен файлов”. Это даст возможность менять не только название файла, но и его расширение.

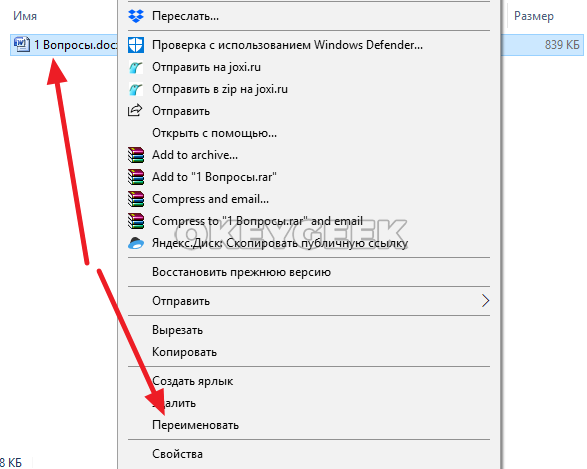
Далее нажмите правой кнопкой мыши на документ, из которого нужно достать картинки, и выберите пункт “Переименовать”.
Обратите внимание
Рекомендуем заранее сделать копию документа.
Поменяйте формат документа на ZIP. То есть, укажите расширение zip после “.” в названии документа. В зависимости от того, в каком формате у вас сохранен документ, потребуется заменить doc или docx.

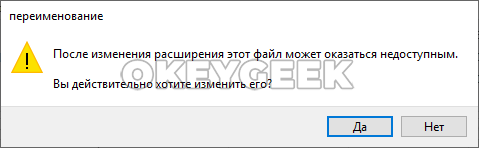
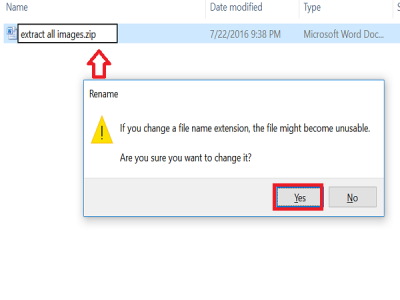
Появится сообщение об изменении расширения файла. Согласитесь с вносимыми изменениями, нажав на кнопку “Да”.
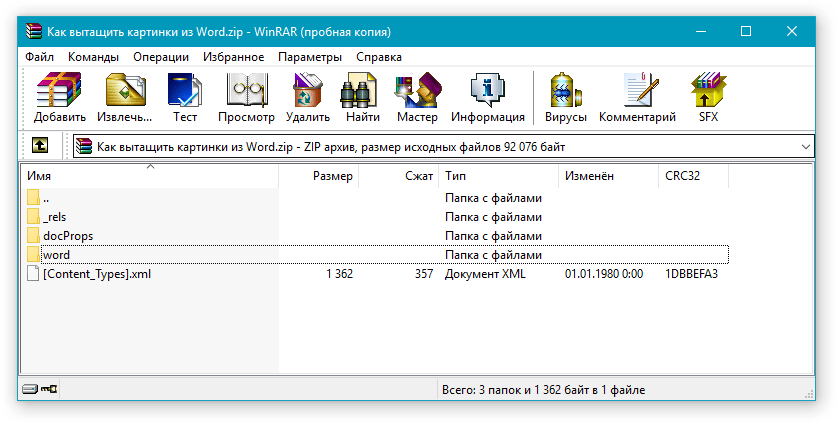
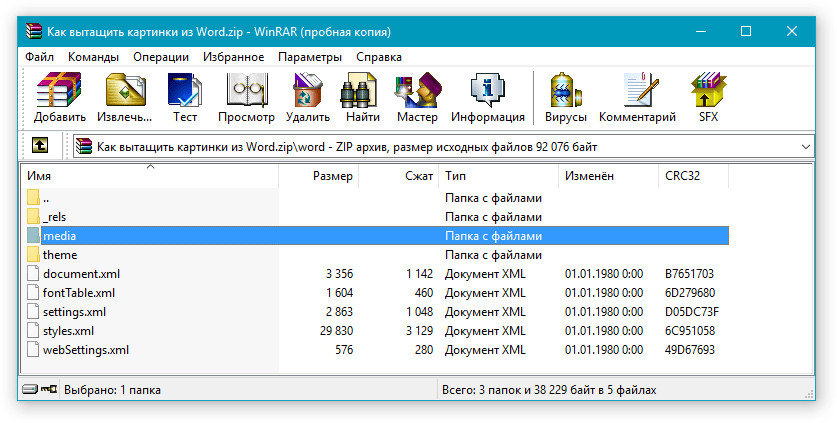
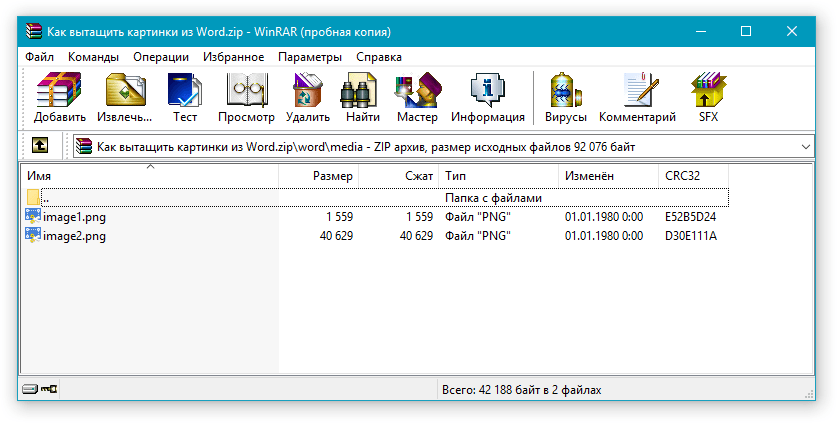
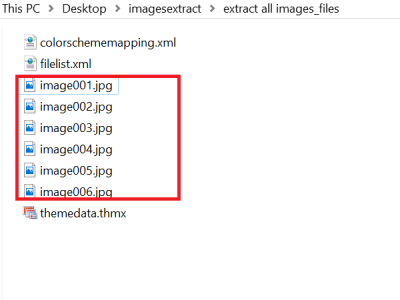
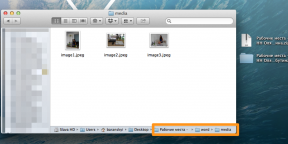
Далее остается открыть образованный ZIP-архив при помощи любого архиватора, например, при помощи WinRar. В архиве будет папка Word, а в ней папка Media. В этой папке находятся все изображения из документа.
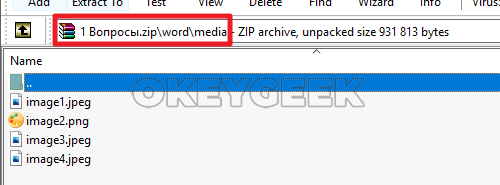
Таким образом, остается просто вытащить картинки из архива и сохранить в нужном месте.
Копируя изображения из Word в редактор изображений
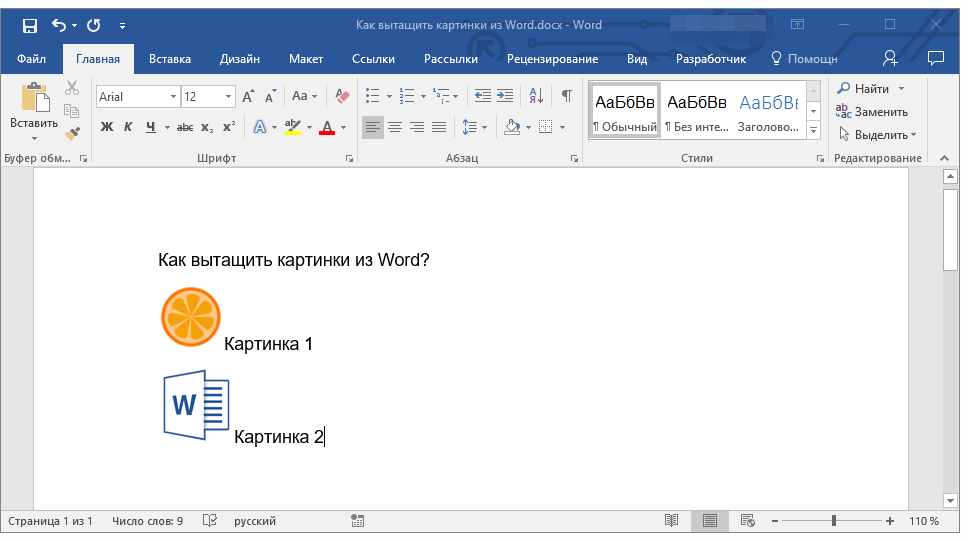
Если нужно достать не все изображения из Word, а одну или две картинки, то может быть удобнее воспользоваться способом, который мы опишем в этом разделе. Способ очень простой — нужно добавить изображение из документа в буфер обмена, после чего вставить из буфера обмена изображение в любой редактор. Рассмотрим на примере.
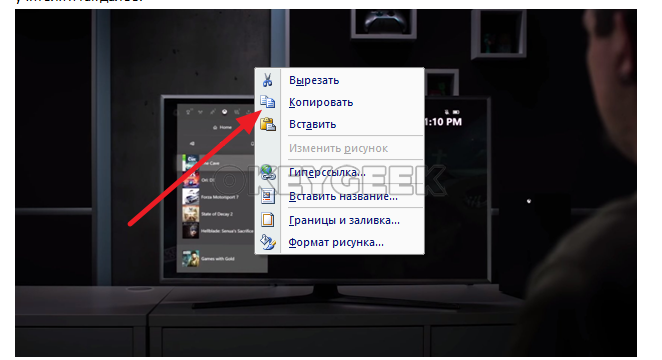
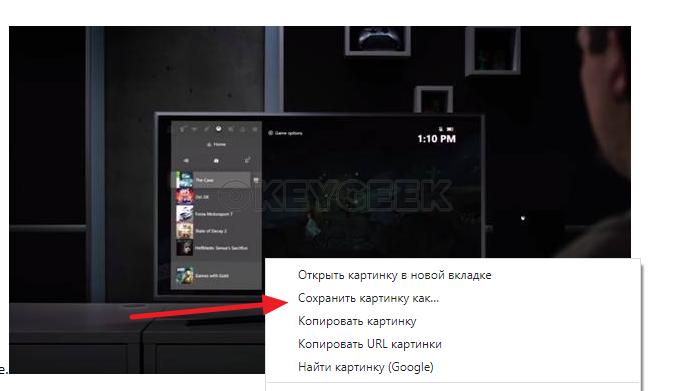
Откройте документ, в котором есть изображение. Нажмите на это изображение правой кнопкой мыши и выберите пункт “Копировать”.
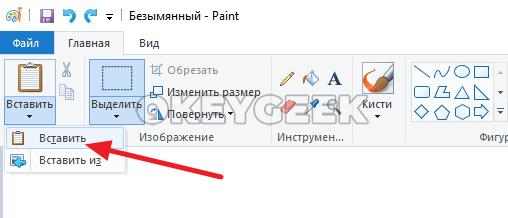
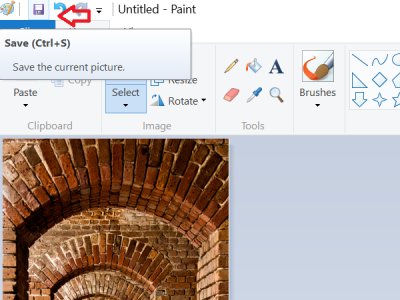
Изображение отправится в буфер обмена. Далее нужно запустить любой редактор изображения, например, Paint.

Нажмите “Вставить”, чтобы вставить изображение из буфера обмена в редактор.
После этого остается сохранить в удобном месте и формате полученное изображение.
Данный способ проще, чем описанный вариант с ZIP-архивом, но у него есть существенный минус — он довольно медленный. В случае, когда надо достать десятки, а то и сотни, изображений из Word-документа, удобнее пользоваться первым способом.
Сохранив документ в формате HTML
HTML — формат веб-страницы. Если сохранить документ Word в формате HTML, то у вас появится возможность быстро заполучить изображения, которые содержатся в этом документе. Рассмотрим на конкретном примере.
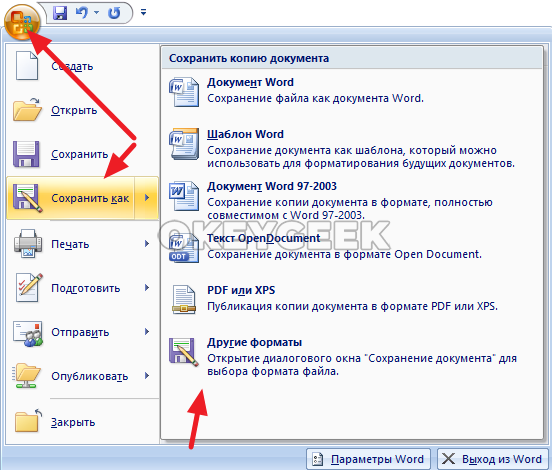
Откройте документ, из которого вам необходимо извлечь картинки. После этого сохраните его в формате HTML. Для этого нажмите “Сохранить как” — “Другие форматы”.
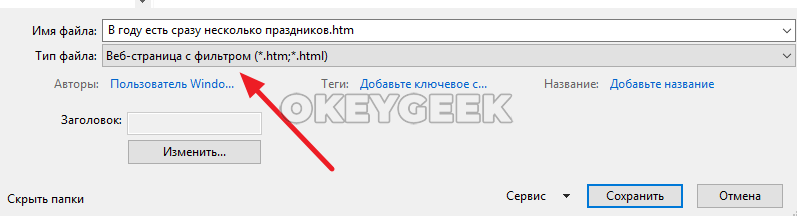
Выберите в списке форматов для сохранения вариант htm, html.
Нужно будет подтвердить действия, нажав «Да» в появившемся окне.

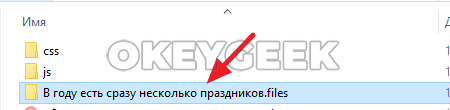
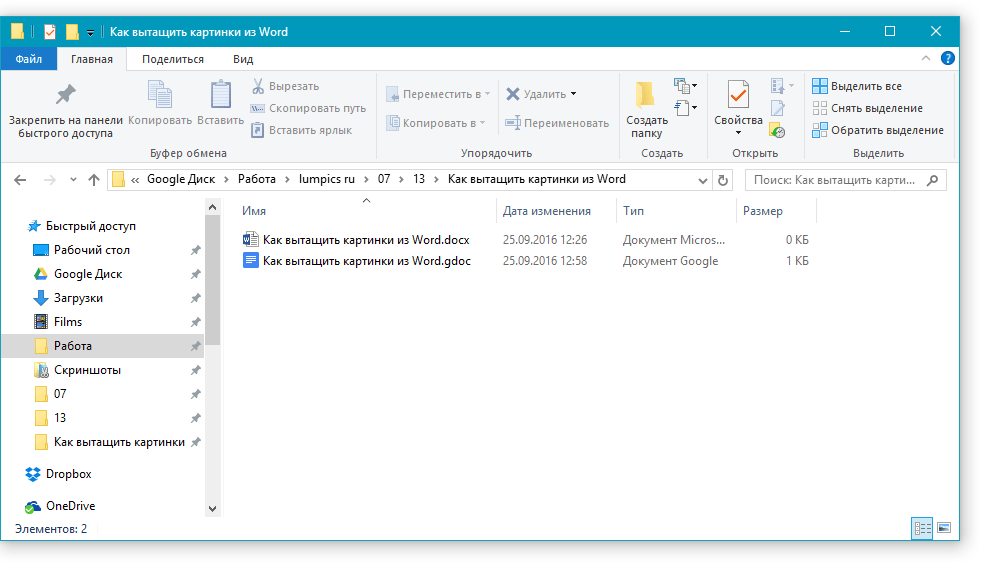
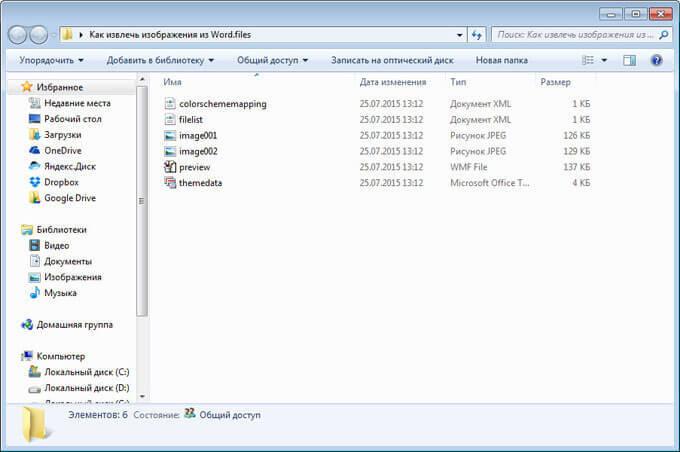
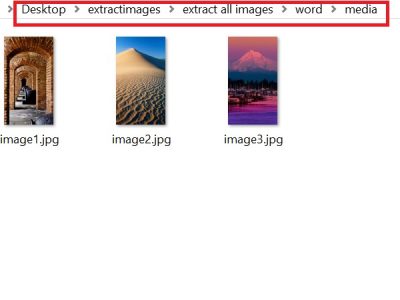
Далее зайдите в папку, куда вы сохранили данный документ в формате веб-страницы, и вы увидите, что в этой папке, помимо самого документа, есть еще одна папка, в которой находятся все изображения.
Стоит отметить, что если вам нужно сохранить отдельно взятое изображение, и его сложно найти в папке со всеми сохраненными картинками, можно открыть документ в формате html в любом браузере, нажать правой кнопкой на нужное изображение и сохранить его.
Используя приложение Total Commander
Еще один способ вытащить изображения из документа Word — это использовать программу Total Commander. Это многофункциональное бесплатное приложение, которое используется в качестве менеджера файлов, в том числе и для работы с ними на удаленных серверах (хостингах). Приложение имеет ряд полезных функций, одну из которых рассмотрим ниже.
Скачайте, установите и откройте приложение Total Commander. Далее найдите через него документ Word, из которого вы хотите извлечь изображения. Выделите этот документ.
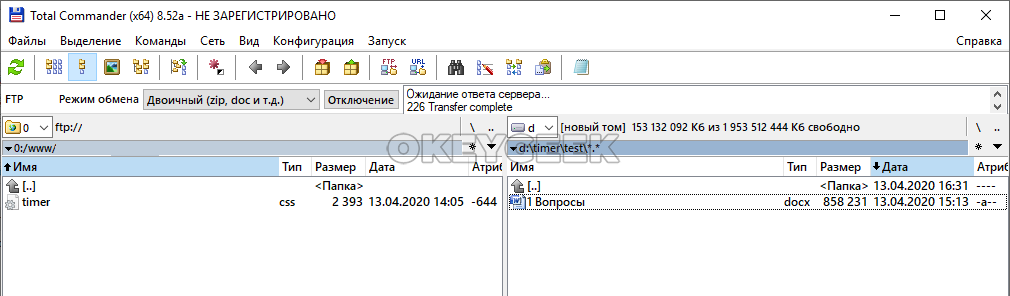
Нажмите сочетание клавиш Ctrl+PageDown.
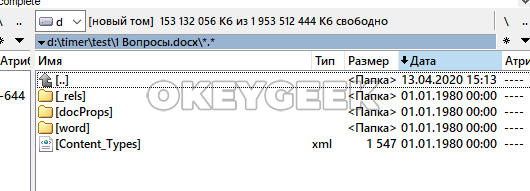
Сразу после этого произойдет переход в структуру данных документа. Способ близок к первому варианту с ZIP-архивом, рассмотреному выше. Останется перейти в папку Word, далее в папку Media, и там будут все изображения из документа.
![]()
![]()
![]()
![]()
![]() (18 голос., средний: 4,61 из 5)
(18 голос., средний: 4,61 из 5)
![]() Загрузка…
Загрузка…
 Please Note:
This article is written for users of the following Microsoft Word versions: 97, 2000, 2002, and 2003. If you are using a later version (Word 2007 or later), this tip may not work for you. For a version of this tip written specifically for later versions of Word, click here: Getting Pictures Out of Word.
![]()
Written by Allen Wyatt (last updated February 2, 2019)
This tip applies to Word 97, 2000, 2002, and 2003
When working with other people’s documents, you may wonder if there is a way to move graphic images out of the document and into their own files. There are actually several different ways you can accomplish this.
First, if you have a graphics program on your computer, you can simply copy the files from Word to the graphics program. Follow these steps:
- Load the document that contains the graphics images.
- Start your graphics program.
- In Word, click once on the graphic you want saved in a file. Small squares (handles) should appear around the graphic, and the Picture toolbar may also appear.
- Press Ctrl+C. This copies the graphic to the Clipboard.
- In the graphics program, press Ctrl+V. This pastes the graphic into the graphics program.
- Use the controls in the graphics program to save the graphic as you desire.
If you don’t remember installing a graphics program on your computer, you should check to see if Microsoft Photo Editor is on your system. It has been available with several versions of Office, although it is not installed by default. If you would like to install it, you can run the Office setup program to do so, and then use the steps above.
Another approach to getting graphics out of your document is to save the document in HTML format. When you do, Word extracts the graphic images and stores them in their own JPG files. Use these steps:
- Create a folder that will contain the HTML document.
- In Word, open the document containing the images.
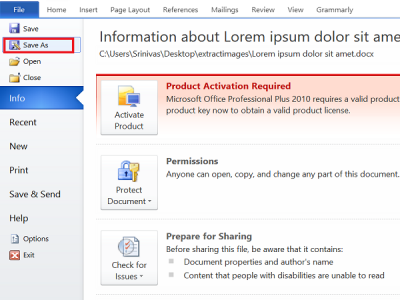
- Choose Save As Web Page from the File menu. Word displays the Save As dialog box. (See Figure 1.)
- Use the controls in the dialog box to select the folder you created in step 1.
- In the File Name field, specify a name for the file.
- Click on Save.
- Close the document.
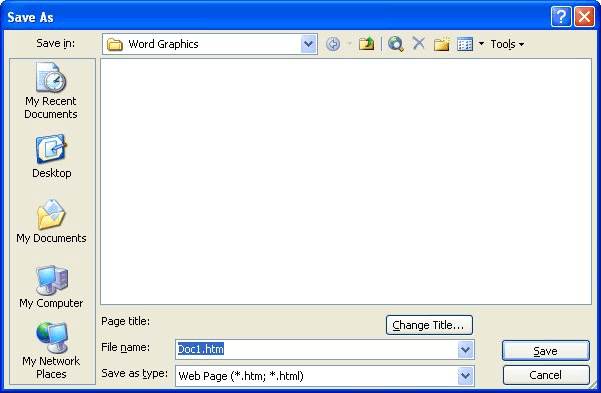
Figure 1. The Save As dialog box, ready to save a Web page.
At this point, the folder contains the HTML document and it also contains a new folder that contains all the images that were in the document. These are regular JPG files; you can open them with any graphics program. There is a drawback to using this approach, however: If you only wanted to save one of the graphics from the document, you will find that all of them have been saved in individual files, and you will need to search through them to find the one you want.
WordTips is your source for cost-effective Microsoft Word training.
(Microsoft Word is the most popular word processing software in the world.)
This tip (1861) applies to Microsoft Word 97, 2000, 2002, and 2003. You can find a version of this tip for the ribbon interface of Word (Word 2007 and later) here: Getting Pictures Out of Word.
Author Bio
With more than 50 non-fiction books and numerous magazine articles to his credit, Allen Wyatt is an internationally recognized author. He is president of Sharon Parq Associates, a computer and publishing services company. Learn more about Allen…
MORE FROM ALLEN
Starting with a Different Template
Don’t want Word to start by using the Normal.dot template? This tip explains how to start using a different template.
Discover More
Editing a Template
Editing a template can be as easy as editing a regular Word document, provided you know where to find the templates. Here …
Discover More
Recording a Data Entry Time
When entering information in a worksheet, it is common to also note a date or time corresponding to the entry. There are …
Discover More
Бывало ли у вас такое, что в документе Word вы нашли изображение или изображения, которые бы хотелось сохранить и использовать в дальнейшем? Желание сохранить картинку — это, конечно, хорошо, вопрос лишь в том, как это сделать?
Простое “CTRL+C”, “CTRL+V” работает далеко не всегда и не везде, да и в контекстном меню, которое открывается по нажатию на файл, тоже нет пункта “Сохранить”. В этой статье мы расскажем о простом и эффективном способе, с помощью которого можно сохранить картинку из Ворд в JPG или любом другом формате.
Лучшее решение в ситуации, когда нужно сохранить рисунок из Word отдельным файлом, это изменение формата текстового документа. Если говорить точнее, расширение DOCX (или DOC) нужно изменить на ZIP, то есть, сделать из текстового документа архив. Непосредственно внутри этого архива вы сможете найти все содержащиеся в нем графические файлы и сохранить их все или только те, что вам нужны.
Урок: Вставка изображения в Ворд
Создание архива
Прежде, чем приступить к выполнению манипуляций, описанных ниже, сохранить документ, содержащий графические файлы, и закройте его.
1. Откройте папку с документом Word, содержащим необходимые вам картинки, и кликните по нему.
2. Нажмите “F2”, чтобы его переименовать.
3. Удалите расширение файла.

Примечание: Если расширение файла не отображается при попытке его переименовать, выполните следующие действия:
4. Введите новое имя расширения (ZIP) и нажмите “ENTER”.
5. Подтвердите действие, нажав “Да” в появившемся окне.
6. Документ DOCX (или DOC) будет изменен на ZIP-архив, с которым мы и продолжим работать.
Извлечение содержимого из архива
1. Откройте созданный вами архив.
2. Перейдите в папку “Word”.
3. Откройте папку “Media” — именно в ней и будут содержаться ваши картинки.
4. Выделите эти файлы и скопируйте, нажав “CTRL+C”, вставьте их в любое удобное место, нажав “CTRL+V”. Также, вы можете просто перетащить изображения из архива в папку.
Если текстовый документ, который вы преобразовали в архив, все еще нужен вам для работы, повторно изменить его расширение на DOCX или DOC. Для этого воспользуйтесь инструкцией с предыдущего раздела этой статьи.
Стоит отметить, что изображения, которые содержались в документе DOCX, а теперь стали частью архива, сохраняются в своем оригинальном качестве. То есть, даже если в документе большая картинка была уменьшена, в архиве она будет представлена в полном размере.
Урок: Как в Word обрезать изображение
Вот, собственно, и все, теперь вы знаете, как можно быстро и удобно извлекать графические файлы из Ворд. Используя этот простой метод, вы можете вытащить из текстового документа фото или любые картинки, которые в нем содержатся.
Встречаются такие ситуации, когда пользователю бывает необходимо сохранить картинки из Ворда. Вытащить картинки из документа Word на свой компьютер можно будет разными способами.
Извлечение изображения из документа Word может быть нужно для редактирования, вставки в другой документ, просто для сохранения в виде файла в каком-либо графическом формате. В разных случаях, может понадобиться сохранить не только отдельные картинки, а например, часть изображений, или все рисунки из документа Ворд в виде графических файлов на свой компьютер.
Содержание:
- Сохранение документа Word в качестве веб-страницы
- Открытие документа Word при помощи архиватора
- Извлечение картинок из Word при помощи Total Commander
- Как вытащить картинки из Ворда в Paint
- Сохранение изображений из Ворда в Microsoft Office Picture Manager
- Сохранение рисунка из Word в PowerPoint
- Сохранение рисунка в Word 2010, Word 2013, Word 2016, Word 2019
- Сохранение картинки с помощью скриншота
- Выводы статьи
- Как извлечь изображение из Word (видео)
Способ сохранения, в некоторых случаях, зависит от версии программы Microsoft Word. В версиях приложений Word 2010, Word 2013, Word 2016, Word 2019 можно будет сохранить отдельные картинки из Ворда напрямую, без участия дополнительных программ. В Word 2007 сохранить изображения на компьютер напрямую уже не получится.
В этой статье мы разберем разные способы извлечения изображений из Word. Сделать это можно будет несколькими способами:
- сохраняя картинку как рисунок в Word 2010, Word 2013, Word 2016, Word 2019;
- сохраняя Word как веб-страницу;
- при помощи архиватора;
- при помощи Total Commander;
- копируя изображения в Paint;
- используя Microsoft Office Picture Manager;
- при помощи PowerPoint;
- сделав снимок экрана (скриншот).
В одних случаях можно будет сохранить только отдельные картинки, извлекая их по очереди, при помощи других способов, можно будет сразу вытащить все картинки из Ворда.
Сохранение документа Word в качестве веб-страницы
Документ Word со всеми картинками можно будет сохранить в виде архива html. Войдите в меню Microsoft Word, потом выберите пункт «Сохранить как», а затем «Другие форматы». В открывшемся окне «Сохранение документа», в поле «Тип файла» выберите «Веб-страница».

После этого, документ Word будет сохранен в виде двух файлов (папка и файл в формате «HTML»). Далее откройте папку, которая повторяет название документа Ворд. В папке вы увидите все изображения, которые есть в данном документе.
В моем случае, это файлы в формате «JPEG».
Открытие документа Word при помощи архиватора
Вы можете открыть документ Word при помощи архиватора (7-Zip, WinRAR и т. д.). Это вариант подойдет для документов, сохраненных в современном формате «docx», который практически является Zip-архивом.
На этом примере, я открою документ Ворд при помощи архиватора WinRAR. Сначала кликните по документу Ворд правой кнопкой мыши, а в контекстном меню выберите пункт «Открыть с помощью». В окне Проводника, вам нужно будет выбрать архиватор, который установлен на вашем компьютере (в моем случае WinRAR).
Все изображения в архиве будут расположены по такому пути: «wordmedia». Вы можете сразу извлечь весь документ Word из архива, или перейти в папку «media» для извлечения всех изображений, или только конкретных картинок.

Извлечение картинок из Word при помощи Total Commander
При помощи файлового менеджера Total Commander, вы без труда можете вытащить картинки из Ворда. Для этого необходимо будет выполнить следующие действия:
- Выделите файл в формате «docx» в файловом менеджере.
- Далее нажмите на кнопки клавиатуры «Ctrl» + «PageDown».
- Затем откройте последовательно папки «word» и «media».
- В папке «media» будут находиться все изображения из документа Word.

Теперь вы можете скопировать картинки в другое место на своем компьютере.
Как вытащить картинки из Ворда в Paint
Вы можете сохранить картинки из Word, скопировав их по отдельности в стандартный графический редактор Paint, который входит в состав операционной системы Windows.
- Для сохранения картинки в графическом редакторе Paint, вам нужно будет кликнуть по рисунку правой кнопкой мыши, а затем выбрать пункт контекстного меню «Копировать», или нажать на клавиши клавиатуры «Ctrl» + «C».
- Откройте программу Paint.
- Затем кликните в окне программы правой кнопкой мыши. С помощью пункта контекстного мню «Вставить», или при помощи клавиш клавиатуры «Ctrl» + «V», вставьте картинку в окно программы Paint.
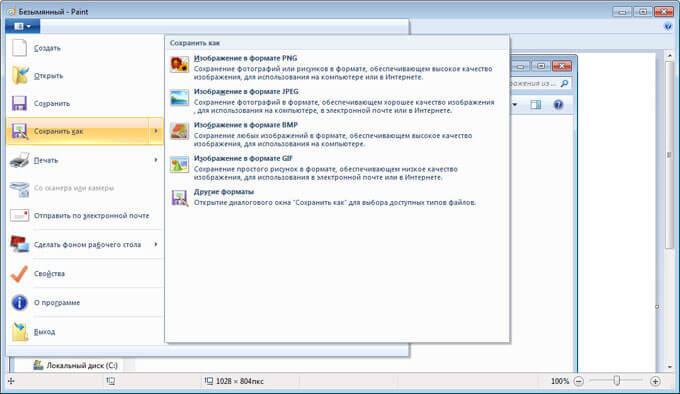
- Далее, из окна программы Paint, вы можете сохранить изображение в необходимом графическом формате на своем компьютере.
Сохранение изображений из Ворда в Microsoft Office Picture Manager
Для сохранения изображений из Ворда можно использовать программу Microsoft Office Picture Manager, которая входит в состав пакета Microsoft Office.
- Скопируйте картинку в программе Word, а затем вставьте ее в окно программы Microsoft Office Picture Manager.
- Далее нажмите на ссылку «Экспортировать рисунки», которая находится в правой части окна программы.
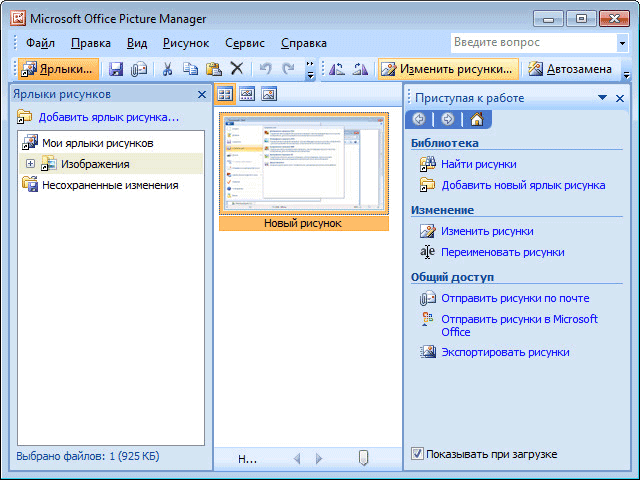
- Выберите формат, имя и папку для сохранения рисунка, а затем нажмите на кнопку «ОК».

После этого, картинка будет сохранена в папке на вашем компьютере.
Сохранение рисунка из Word в PowerPoint
Вы можете сохранить рисунок из Word на свой компьютер при помощи программы Microsoft PowerPoint, которая входит в пакет Microsoft Office.
- Скопируйте изображение из документа Ворд.
- Откройте программу PowerPoint, а затем вставьте картинку в окно программы.
- Далее кликните по изображению правой кнопкой мыши, в контекстном меню выберите пункт «Сохранить как рисунок…».
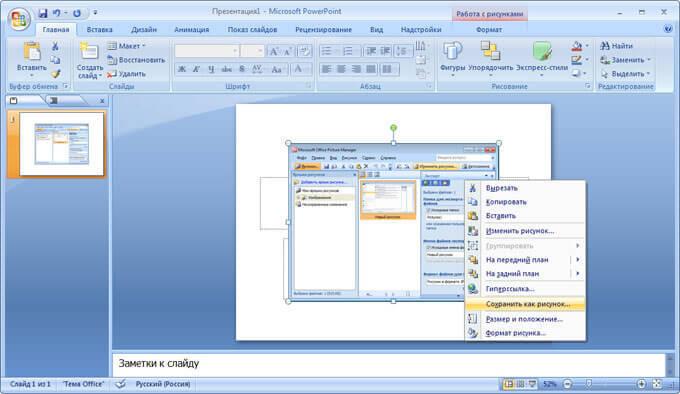
- В модальном окне Проводника выберите место для сохранения картинки на своем компьютере.
Сохранение рисунка в Word 2010, Word 2013, Word 2016, Word 2019
В программах MS Word 2010, MS Word 2013, MS Word 2016, MS Word 2019 вы можете сохранить картинку непосредственно из окна программы Ворд.
Для того, чтобы извлечь картинку из Word, кликните по изображению правой кнопкой мыши, а затем выберите в контекстном меню пункт «Сохранить как рисунок…».

Затем выберите формат, имя и место сохранения рисунка на своем компьютере.
Сохранение картинки с помощью скриншота
Сохранить изображение из документа Ворд можно также при помощи снимка экрана (скриншота). Это можно сделать при помощи стандартных сочетаний клавиш клавиатуры, или с помощью штатной программы «Ножницы».
В отличие от предыдущих способов, размер изображения может быть отличным от оригинала, потому что размер выделенной области будет зависеть от сноровки пользователя при ручном выделении объекта.
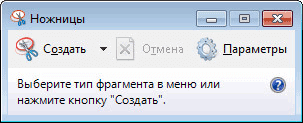
В самом начале вам необходимо будет выбрать тип фрагмента в меню программы «Ножницы», а затем нужно будет нажать на кнопку «Создать» для выделения картинки в документе Word.
После выделения изображения, вы можете вставить его в программу Paint для последующего сохранения на своем компьютере.
Выводы статьи
Вы можете сохранить картинки из Ворда на свой компьютер разными удобными способами, в том числе при помощи программ: архиватора (7-Zip, WinRAR), Paint, PowerPoint, Microsoft Office Picture Manager, сохранить как рисунок, или сделать снимок экрана.
Как извлечь изображение из Word (видео)
Похожие публикации:
- Как посчитать количество символов в Word: все способы
- Дневник Punto Switcher — сохранение текста и клавиатурный шпион
- Как поставить пароль на документ Word
- Как сделать ссылку в документе Word
- Озвучивание текста в Ворде — «Прочесть вслух» или «Проговорить»
3 Ways to Extract Images from a Word File
by Avantix Learning Team | Updated April 7, 2021
Applies to: Microsoft® Word® 2010, 2013, 2016, 2019 or 365 (Windows)
In Microsoft Word, images can be extracted one by one or you can extract all images by converting a Word document to a zip file or saving it as a web page. Extracting all images is helpful if you’d like to find pictures that are inflated in size or reuse pictures in other files. In this article, we’ll use 3 methods to extract images (we’re referring to images or pictures that have been inserted into your Word document, not shapes or SmartArt you’ve created).
Recommended article: How to Reduce the Size of a Microsoft Word Document (10 Ways to Compress a Word File)
Do you want to learn more about Word? Check out our virtual classroom or live classroom Word courses >
Extracting one image at a time using Save as Picture
You can extract individual images and save them as new files using Save As Picture.
There are two benefits to this method:
- You can give each image a meaningful name and save it in a specific location.
- You can save the image as a different file type.
To save an image as a new file:
- Right-click the image and then click Save as Picture from the drop-down menu.
- In the Save as type drop-down menu, select the image file format you want to use. You can save a picture in many formats but common choices are JPG or JPEG (Joint Photographics Experts Group) or PNG (Portable Network Graphics).
- In the File name box, type a name for the file.
- Navigate to the desired location.
- Click Save.
Displaying file extensions in Windows
In order to use the zip procedure (below), you may need to display file extensions in Windows if they are not showing automatically.
If you’re using Windows 8 or 10:
- In File Explorer, click the View tab in the Ribbon.
- In the Show/Hide group, click the File name extensions check box.
If you’re using Windows 7:
- In Windows Explorer, click Folder and Search Options and then click Organize.
- On the View tab, under Files and Folders, clear the check box for Hide extensions for known file types.
- Click OK.
Extracting all images by changing the file to a zip format
If you want to extract all images, the following trick works with any Microsoft Word file using XML (Extensible Markup Language) format. XML files are stored as a package and can therefore be unzipped. They also end with an «x» such as .docx.
In order to use the zip method, you will need a document created in Word 2007 or a later version and File Explorer or Windows Explorer must be set so that it shows file names with extensions (see the following section if extensions are not displayed).
To extract all image files from a Microsoft Word file:
- In File Explorer or Windows Explorer, select the document (it should have a .dotx extension) with the images you wish to extract.
- Right-click and choose Copy or press Ctrl + C.
- Right-click and choose Paste or press Ctrl + V.
- Right-click the copy of the document and choose Rename.
- Change the file extension from .dotx to .zip (Windows must be set to display file extensions).
- Press Enter. A dialog box appears warning you that the file may become unusable if you change the extension.
- Click Yes to continue. The file icon changes to a folder icon.
- Double-click the zipped folder. The zipped folder contains multiple folders (some contain information such as XML code or properties).
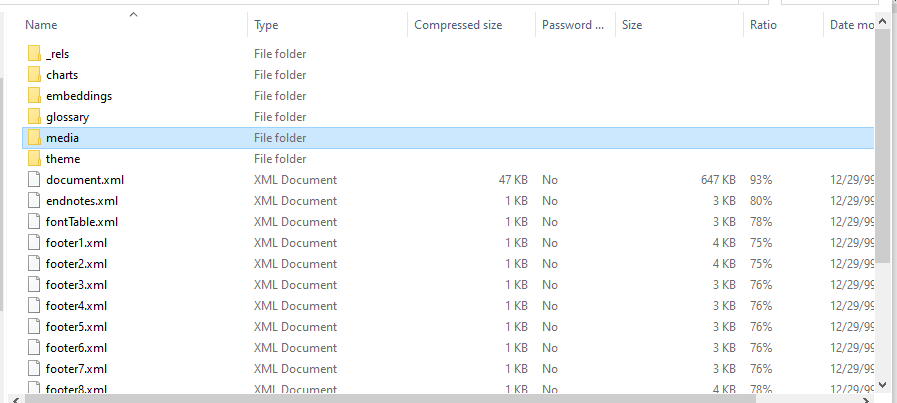
- Double-click the Word folder.
- Double-click the media folder to view image, video and audio files. Each file is given a generic name.
- Copy these files (or the entire folder) to another location to use in other documents and to rename the files. Copying to another location will unzip the files. You can also click the Extract button in Windows Explorer to extract the files to another location.
Below is a sample Word folder (with a media folder) created during this process:
Extracting all images by saving the Word file as a web page
Unlike PowerPoint, Microsoft Word files can be saved as web pages (HTML format). If you save a Word file as a web page, then separate files are created for pictures and media files.
To extract all image files from a Microsoft Word file by saving the file as a web page:
- Click the File tab in the Ribbon and select Save As.
- From the Save As Type drop-down menu, select Web Page.
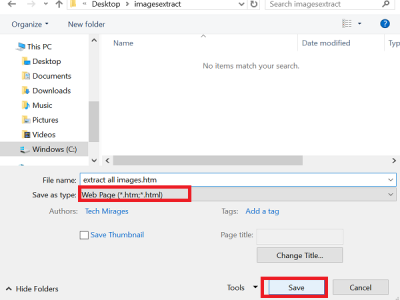
- Enter a new name for the file. A .htm extension will be added.
- Click OK.
- A dialog box may appear indicating that you may lose some formatting. Click Continue. Word will change the view to Web Layout View.
- Close the file.
- In File Explorer or Windows Explorer, navigate to the location in which you had saved the file. A folder should have been created with the same name and «files» at the end.
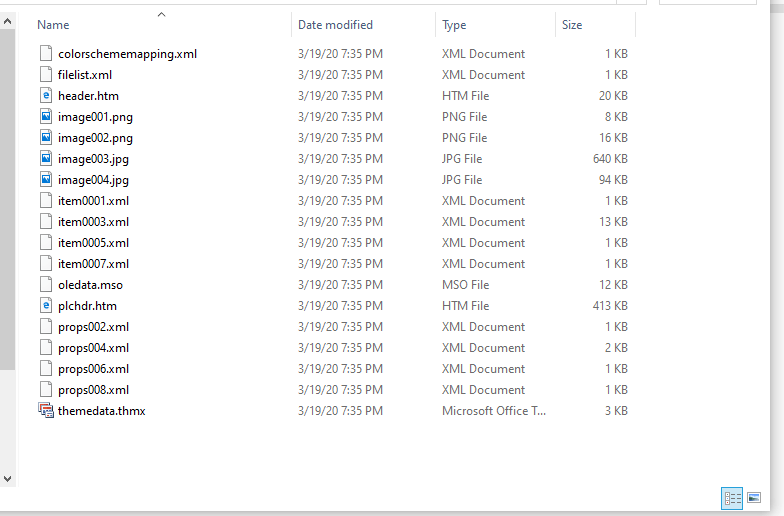
- Double-click the folder. Image, video and audio files should appear in this folder. Each file is given a generic name.
- Right-click any of the files to rename them.
Below are the contents of a folder that was created when a Word file was saved as a web page:
When you open Word again, click the View tab and select Print Layout (the default view).
It’s up to you which method you’d prefer but the last two are the easiest if you are extracting multiple images.
Subscribe to get more articles like this one
Did you find this article helpful? If you would like to receive new articles, join our email list.
More resources
How to Double Space in Word (4 Ways)
14 Shortcuts to Quickly Select Text in Microsoft Word
How to Check Word Count in Microsoft Word (4 Ways)
How to Show or Hide White Space in Word Documents
How to Create a Hanging Indent or First Line Indent in Microsoft Word
Related courses
Microsoft Word: Intermediate / Advanced
Microsoft Excel: Intermediate / Advanced
Microsoft PowerPoint: Intermediate / Advanced
Microsoft Word: Long Documents Master Class
Microsoft Word: Styles, Templates and Tables of Contents
Microsoft Word: Designing Dynamic Word Documents Using Fields
VIEW MORE COURSES >
Our instructor-led courses are delivered in virtual classroom format or at our downtown Toronto location at 18 King Street East, Suite 1400, Toronto, Ontario, Canada (some in-person classroom courses may also be delivered at an alternate downtown Toronto location). Contact us at info@avantixlearning.ca if you’d like to arrange custom instructor-led virtual classroom or onsite training on a date that’s convenient for you.
Copyright 2023 Avantix® Learning
Microsoft, the Microsoft logo, Microsoft Office and related Microsoft applications and logos are registered trademarks of Microsoft Corporation in Canada, US and other countries. All other trademarks are the property of the registered owners.
Avantix Learning |18 King Street East, Suite 1400, Toronto, Ontario, Canada M5C 1C4 | Contact us at info@avantixlearning.ca
Download PC Repair Tool to quickly find & fix Windows errors automatically
Microsoft Word allows us to insert images easily and without reducing any resolution. We might come across a situation where we want to share only images and not the entire document, or you might have deleted all images from your Windows PC and want to get them back from the Word document. Normally, what everyone would do is right-click on the image and select “Save image as”, but that is a time-consuming and tedious task. In this article, I will let you know of three ways to extract all images from Word documents in an easy way without the need for any special tools or 3rd-party software.
There may be other ways to extract all the images from a Word document, but here are the 3 best ways to do it. So, let us start without any ado.
1. Save the Word Document as Web Page
This is one of the easiest methods to extract all images from a Word document. We will save the Word document as a Web Page and it will extract all images as a batch.
Open the Word document from which you want to extract all images. Now, click on the “File” button on the top left of the document and select “Save As”.
Select the location where you want to save and give the meaningful name. Now, under “Save As” dropdown, select “Web Page”.
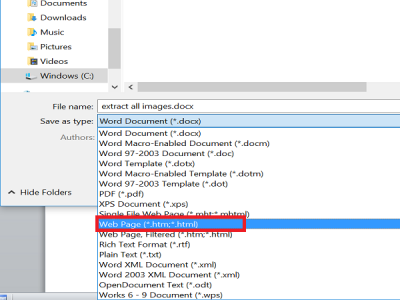
You will also see “Web Page, Filtered” but do not select it as it may reduce the resolution of images. Click on “Save” button to save the Word document as the Web Page.
Go to the location where you have saved the document and you would see ‘.htm’ file and the folder with the given name will be created.
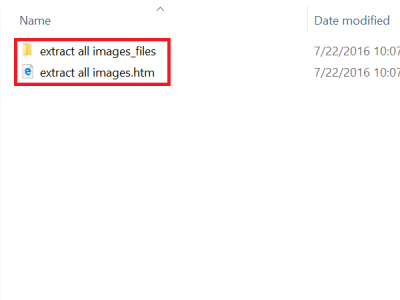
Open the folder and you could see all the images listed there. Copy all these images to any folder you like.
2. Change the extension from ‘.docx’ to ‘.zip’
This method to extract all images as a batch from the document is so simple that all you need to do is rename the extension of the file from ‘.docx’ to ‘.zip’.
Select the required document, right-click on it and select “Rename”.

Now, change the extension from ‘.docx’ to ‘.zip’ and hit Enter. It will show you this dialog box, but do not worry and click “Yes”.
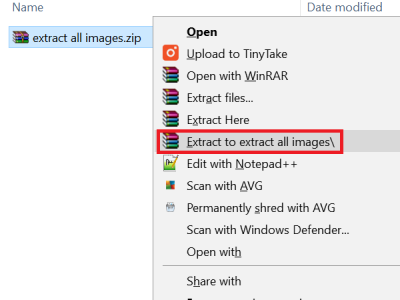
Use any of the zip extraction software like 7-Zip, WinRAR, etc, to extract this zip file. Give the location where you want to extract the zip folder.
Now, open the folder you have extracted and go to Word > Media.
Now, in the ‘media’ folder you will find all images which you can copy to another folder if you want.
UPDATE: You may just right-click the Word file and use 7-Zip to extract the images.
3. Copy and Paste Method
This method is not as good as the above two, but it would be very helpful when you want to extract one or two images only.
Right-click on the image and select “Copy” from the options. The size and resolution of the copied image will not be affected.
Now, open any image processing tool like Paint, Photoshop or GIMP, but here I would use the default tool called “Paint”. Open Paint, paste the image and press “CTRL+S” or click Save button to save the image.
These are some of the ways to extract images in a Word document as a batch.
If you are looking for a freeware to easily batch extract and save images from any Office document use the Office Image Extraction Wizard.
Also read: How to Find and Replace all Images in Word at once.

Sridhar is a Software Engineer who loves to stay updated with developments in the world of technology. He is fond of writing everything related to Internet, Computers and Mobile and Desktop Operating Systems.
Наверняка у вас возникали ситуации, когда было необходимо вытащить картинки из документов Word или Google Docs. Расскажем о том, как быстро это сделать.
Бывали ли у вас такие ситуации, когда вам присылали документ с расширением .docx или расшаривали подобный в Google Docs, например, для публикации в интернете, а вы понятия не имели, как из него вытащить картинки? Есть простой способ решения этой проблемы. При этом никакие дополнительные инструменты для этого не понадобятся.
Если сохранить документ формата .docx и переименовать расширение файла в .zip, то можно открыть этот архив и быстро вытащить всю папку со всеми картинками, которые были использованы в документе: *.zipwordmedia.
Для тех, кто обычно использует Google Docs в качестве текстового редактора, но сталкивается с необходимостью вытащить картинки, советуем скачать документ в формате .docx и вытащить папку с картинками. Кроме того, можно просто скачать файл архивом. Для этого в Google Docs выбираем Файл → Скачать как → Веб-страница (HTML, ZIP-архив). В архиве будут все необходимые вам картинки.
In the following article, we will emphasize on discussing 3 easy and operable ways to extract pictures from Word documents.
Now and then there are times when you need to save all the pictures from a Word document. As a result, here we are to offer you 3 quick ways to extract images with original resolution. Read on to find out more details.
Method 1: Save as Picture
- Firstly, open a Word document which contains images.
- Second, right click a picture to be saved.
- Next choose “Save as Picture” option on the drop-down menu.

- In “File Save” window, choose a location for the image.
- Remember to name the image.
- Then click “Save”.

- To extract all images, however, you have to repeat from step 2 to step 6 so that you can save them one by one.


Method 2: Save as Web Page
- Similarly, open a Word document first.
- Then click “File”.
- Next go to click “Save As” option to open the “Save As” window.

- Choose a location for the document first.
- This time, choose “Web Page” in “Save as type” list box.
- Click “Save”. Now you will notice the document is on a “Web Layout” view.

- Move to the place where you save the document.
- Find the file holder with the document name.
- Next double click to open it.
- Then you can find all images in both original and Word intrinsic resolution.


Method 3: Change File Extension Name from “.docx” to “.zip”
If you decide to use this way to extract images, then you have to make sure the extension of your file is shown first.
Display the File Extension
Below are steps for displaying the file extension:
- To begin with click “Start”.
- Then click “Computer”.
- In the window, click “Organize” first.
- Next, click “Folder and search options”.

- Now the “Folder Options” window will pop up. Firstly, click “View”.
- Then, in the group boxes below the “Advanced settings”, remove the check mark in “Hide extensions for known file types” box.
- Then click “OK”.


Steps to Extract Images
- At the beginning, we suggest you take a backup of your file first in case your file get corrupted.
- Next right click the document.
- Then choose “Rename”.
- Just change “.docx” to “.zip”.
- And press “Enter”.
- Now on your screen there will be a warning message. Click “Yes”.

- You can see the document turns into a zipped folder. Double click to open it.
- Then double click the folder with the name “word”.

- And now you can see a folder with the name “media”. Double click it to view all images in original resolution.
- Next right click the “media” folder.
- Choose “Extract to the specified folder”.

- Finally choose a location to save all the images.


Comparison
| Methods | Similarity | Advantages | Disadvantages |
| Save as Picture | All 3 ways enable you to extract images in original resolution. | Simple | 1. Time-consuming when document has a lot of pictures
2. Only works in Word 2010 and higher versions. |
|
Save as Web Page |
1. Simple
2. You can get images in Word intrinsic resolution as well. 3. You can extract all images at one time. 4. Works for all versions of Word |
None |
|
|
Change Extension from “.docx” to “.zip” |
You can extract all images at one time. |
1. Get images in original resolution only.
2. Only works for .docx documents generated by Word 2007 and higher versions |
Remember to Back up Your Files
To sum up, we mentioned changing document type as well as its extension. Admittedly, these operations are absolutely threatening your file security. Therefore if you don’t want to spend time in word recovery, you should take the time to back up your files before every dangerous move. In the long run, take backups will only cost you minutes but can save you much more valuable time.
Author Introduction:
Vera Chen is a data recovery expert in DataNumen, Inc., which is the world leader in data recovery technologies, including excel recovery and pdf repair software products. For more information visit www.datanumen.com