Excel for Microsoft 365 Excel for Microsoft 365 for Mac Excel for the web Excel 2021 Excel 2021 for Mac Excel 2019 Excel 2019 for Mac Excel 2016 Excel 2016 for Mac Excel 2013 Excel 2010 Excel 2007 Excel for Mac 2011 Excel Starter 2010 More…Less
To get detailed information about a function, click its name in the first column.
Note: Version markers indicate the version of Excel a function was introduced. These functions aren’t available in earlier versions. For example, a version marker of 2013 indicates that this function is available in Excel 2013 and all later versions.
|
Function |
Description |
|
DATE function |
Returns the serial number of a particular date |
|
DATEDIF function |
Calculates the number of days, months, or years between two dates. This function is useful in formulas where you need to calculate an age. |
|
DATEVALUE function |
Converts a date in the form of text to a serial number |
|
DAY function |
Converts a serial number to a day of the month |
|
DAYS function |
Returns the number of days between two dates |
|
DAYS360 function |
Calculates the number of days between two dates based on a 360-day year |
|
EDATE function |
Returns the serial number of the date that is the indicated number of months before or after the start date |
|
EOMONTH function |
Returns the serial number of the last day of the month before or after a specified number of months |
|
HOUR function |
Converts a serial number to an hour |
|
ISOWEEKNUM function |
Returns the number of the ISO week number of the year for a given date |
|
MINUTE function |
Converts a serial number to a minute |
|
MONTH function |
Converts a serial number to a month |
|
NETWORKDAYS function |
Returns the number of whole workdays between two dates |
|
NETWORKDAYS.INTL function |
Returns the number of whole workdays between two dates using parameters to indicate which and how many days are weekend days |
|
NOW function |
Returns the serial number of the current date and time |
|
SECOND function |
Converts a serial number to a second |
|
TIME function |
Returns the serial number of a particular time |
|
TIMEVALUE function |
Converts a time in the form of text to a serial number |
|
TODAY function |
Returns the serial number of today’s date |
|
WEEKDAY function |
Converts a serial number to a day of the week |
|
WEEKNUM function |
Converts a serial number to a number representing where the week falls numerically with a year |
|
WORKDAY function |
Returns the serial number of the date before or after a specified number of workdays |
|
WORKDAY.INTL function |
Returns the serial number of the date before or after a specified number of workdays using parameters to indicate which and how many days are weekend days |
|
YEAR function |
Converts a serial number to a year |
|
YEARFRAC function |
Returns the year fraction representing the number of whole days between start_date and end_date |
Important: The calculated results of formulas and some Excel worksheet functions may differ slightly between a Windows PC using x86 or x86-64 architecture and a Windows RT PC using ARM architecture. Learn more about the differences.
Need more help?
The current date and time is a very common piece of data needed in a lot of Excel solutions.
The great news is there a lot of ways to get this information into Excel.
In this post, we’re going to look at 5 ways to get either the current date or current time into our workbook.
Video Tutorial
Keyboard Shortcuts
Excel has two great keyboard shortcuts we can use to get either the date or time.
These are both quick and easy ways to enter the current date or time into our Excel workbooks.
The dates and times created will be current when they are entered, but they are static and won’t update.
Current Date Keyboard Shortcut
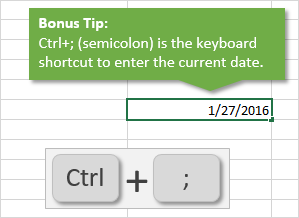
Pressing Ctrl + ; will enter the current date into the active cell.
This shortcut also works while in edit mode and will allow us to insert a hardcoded date into our formulas.
Current Time Keyboard Shortcut
Pressing Ctrl + Shift + ; will enter the current time into the active cell
This shortcut also works while in edit mode and will allow us to insert a hardcoded date into our formulas.
Functions
Excel has two functions that will give us the date and time.
These are volatile functions, which means any change in the Excel workbook will cause them to recalculate. We will also be able to force them to recalculate by pressing the F9 key.
This means the date and time will always update to the current date and time.
TODAY Function
= TODAY()This is a very simple function and has no arguments.
It will return the current date based on the user’s PC settings.
This means if we include this function in a workbook and send it to someone else in a different time zone, their results could be different.
NOW Function
= NOW()This is also a simple function with no arguments.
It will return the current date and time based on the user’s PC date and time setting.
Again, someone in a different time zone will get different results.
Power Query
In Power Query, we only have one function to get both the current date and current time. We can then use other commands to get either the date or time from the date-time.
We first need to add a new column for our date-time. Go to the Add Column tab and create a Custom Column.
= DateTime.LocalNow()In the Custom Column dialog box.
- Give the new column a name like Current DateTime.
- Enter the DateTime.LocalNow function in the formula section.
- Press the OK button.
Extract the Date
Now that we have our date-time column, we can extract the date from it.
We can select the date-time column ➜ go to the Add Column tab ➜ select the Date command ➜ then choose Date Only.
= Table.AddColumn(#"Added Custom", "Date", each DateTime.Date([Current DateTime]), type date)This will generate a new column containing only the current date. Power query will automatically generate the above M code with the DateTime.Date function to get only the date.
Extract the Time
We can also extract the time from our date-time column.
We can select the date-time column ➜ go to the Add Column tab ➜ select the Time command ➜ then choose Time Only.
= Table.AddColumn(#"Added Custom", "Time", each DateTime.Time([Current DateTime]), type time)This will generate a new column containing only the current time. Power query will automatically generate the above M code with the DateTime.Time function to get only the time.
Power Pivot
With power pivot, there are two ways to get the current date or time. We can create a calculated column or a measure.
To use power pivot, we need to add our data to the data model first.
- Select the data.
- Go to the Power Pivot tab.
- Choose the Add to Data Model command.
Power Pivot Calculated Column
A calculated column will perform the calculation for each row of data in our original data set. This means we can use the calculated column as a new field for our Rows or Columns area in our pivot tables.
= TODAY()= NOW()It turns out Power Pivot has the exact same TODAY and NOW functions as Excel!
We can then add a new calculated column inside the power pivot add in.
- Double click on the Add Column and give the new column a name. Then select any cell in the column and enter the TODAY function and press Enter.
- Go to the Home tab ➜ Change the Data Type to Date ➜ Change the Format to any of the date formats available.
We can do the exact same to add our NOW function to get the time and then format the column with a time format.
Power Pivot Measure
Another option with power pivot is to create a measure. Measures are calculations that aggregate to a single value and can be used in the Values area of a pivot table.
Again, we can use the same TODAY and NOW functions for our measures.
Add a new measure.
- Go to the Power Pivot tab.
- Select the Measures command.
- Select New Measure.
This will open up the Measure dialog box where we can define our measure calculation.
- Give the new measure a name.
- Add the TODAY or NOW function to the formula area.
- Select a Date Category.
- Select either a date or time format option.
- Press the OK button.
Now we can add our new measure into the Values area of our pivot table.
Power Automate
If you’re adding or updating data in Excel through some automated process via Power Automate, then you might want to add a timestamp indicating when the data was added or last updated.
We can definitely add the current date or time into Excel from Power Automate.
We will need to use an expression to get either the current date or time. Power Automate expressions for the current time will result in a time in UTC which will then need to be converted into the desired timezone.
= convertFromUtc(utcNow(),'Eastern Standard Time','yyyy-MM-dd')This expression will get the current date in the EST timezone. You can find a list of all the timezone’s here.
= convertFromUtc(utcNow(),'Eastern Standard Time','hh:mm:ss')This expression will get the current time in the EST timezone.
Conclusions
Like most things in Excel, there are many ways to get the current date and time in Excel.
Some are static like the keyboard shortcuts. They will never update after entering them, but this may be exactly what we need.
The other methods are dynamic but need to be recalculated or refreshed.
Do you have any other methods? Let me know in the comments!
About the Author
John is a Microsoft MVP and qualified actuary with over 15 years of experience. He has worked in a variety of industries, including insurance, ad tech, and most recently Power Platform consulting. He is a keen problem solver and has a passion for using technology to make businesses more efficient.
Sample Files
1. DATE Function
DATE function returns a valid date based on the day, month, and year you input. In simple words, you need to specify all the components of the date and it will create a date out of that.
Syntax
DATE(year,month,day)
Arguments
- year: A number to use as the year.
- month: A number to use as the month.
- day: A number to use as a day.
Example
In the below example, we have used cell references to specify the year, month, and day to create a date.

You can also insert arguments directly into the function to create a date as you can see in the below example.

And in the below example, we have used different types of arguments to see the result returned by the function.

2. DATEVALUE Function
DATEVALUE function returns a date after converting a text (which represents a date) into an actual date. In simple words, it converts a date into an actual date which is formatted as text.
Syntax
DATEVAUE(date_text)
Arguments
- date_text: The date which is stored as a text and you want to convert that text into an actual date.
Example
In the below example, we have inserted a date directly into the function by using double quotation marks. If you skip adding these quotation marks it will return a #NAME? error in the result.

In the below example, all the dates on the left side are in textual format.
- A simple textual date that we have converted into a valid date.
- A date with all three components (Year, Month, or Day) in numbers.
- If there is no year in the textual date, it will take the current year as the year.
- And if you have a month name is in alphabets and no year, it will take the current year as a year.
- If you don’t have the day in your textual date it will take 1 as the day number.

3. DAY Function
DAY function returns the day number from a valid date. As you know, in Excel, a date is a combination of day, month, and year, DAY function gets the day from the date and ignores the rest of the part.
Syntax
DAY(serial_number)
Arguments
- serial_number: A valid serial number of the date from which you want to extract the day number.
Example
In the below example, we have used the DAY to simply get the day from a date.

And in the below example, we have used DAY with TODAY to create a dynamic formula that returns the current day number and it will update every time you open your worksheet or when you recalculate your worksheet.

5. DAYS Function
DAYS function returns the difference between two dates. It takes a start date and an end date and then returns the difference between them in days. This function was introduced in Excel 2013 so not available in prior versions.
Syntax
DAYS(end_date,start_date)
Arguments
- start_date: It is a valid date from where you want to start the days’ calculation.
- end_date: It is a valid date from where you want to end the days’ calculation.
Example
In the below example, we have referred the cell A1 as the start date and B1 as the end date and we have 9 days in the result.
Note: You can also use the subtract operator to get the difference between two dates.

In the below example, we have directly inserted two dates into the function to get the difference between them.

6. EDATE Function
EDATE function returns a date after adding a specified number of months to it. In simple words, you can add (with a positive number) or subtract (with a negative number) months from a date.
Syntax
EDATE(start_date,months)
Arguments
- start_date: The date from which you want to start the calculation.
- months: The number of months to calculate the future or the past date.
Example
Here we have used EDATE with different types of arguments.
- In the first example, we have used 5 as a several months and it has added exactly 5 months on 1-Jan-2016 and returned 01-June-2016.
- In the second example, we have used -1 month and it has given 31-Dec-2016, a date which is exactly 1 month back from 31-Jan-2016.
- In the third example, we have inserted a date directly into the function.

7. EOMONTH Function
EOMONTH function returns the end of the month date which is the number of months in the future or the past. You can use a positive number for a future date and a negative number for the past month’s date.
Syntax
EOMONTH(start_date,months)
Arguments
- start_date: A valid date from where you want to start your calculation.
- months: The number of months you want to calculate before and after the start date.
Example
In the below example, we have used EOMONTH with different types of arguments:

- We have mentioned 01-Jan-2016 as the start date and 5 months for getting a future date. As June is exactly 5 months after January, it has returned 30-Jun-2016 in the result.
- As I have already mentioned, EOMMONTH is smart enough to evaluate the total number of days in a month.
- If you mention a negative number, it simply returns a past date which is the number of months back you have mentioned.
- In the fourth example, we have used a date that is in text format and it has returned the date without returning any errors.
8. MONTH Function
MONTH function returns the month number (ranging from 0 to 12) from a valid date. As you know, in Excel, a date is a combination of day, month, and year, MONTH gets the month from the date and ignores the rest of the part.
Syntax
MONTH(serial_number)
Arguments
- serial_number: A valid date from which you want to get the month number.
Example
In the below example, we have used a MONTH in three different ways:

- In the FIRST example, we have simply used date and it has returned the 5 in the result which is the month number of MAY.
- In the SECOND example, we have supplied the date directly in the function.
- In the THIRD example, we have used the TODAY function to get the current date and MONTH has returned the month number from it.
9. NETWORKDAYS Function
NETWORKDAYS function returns the count of days between the start date and end date. In simple words, with NETWORKDAYS you can calculate the difference between two dates, after excluding Saturdays and Sundays, and holidays (which you specify).
Syntax
NETWORKDAYS(start_date,end_date,holidays)
Arguments
- start_date: A valid date from where you want to start your calculation.
- end_date: A valid date up to which you want to calculate working days.
- [holidays]: A valid date that represents a holiday between the start date and end date. You can refer to a cell, range of cells, or an array containing dates.
Example
In the below example, we have specified 10-Jan-2015 as a start date and 20-Feb-2015 as an end date.

We have 41 days between these two dates, out of which 11 days are weekends. After deducting those 11 days it has returned 30 working days.
Now in the below example with the same start and end dates, we have specified a holiday and, after deducting 11 days of the weekend and 1 holiday it has returned 29 working days.

Again with the same start and end dates, we have used a range of three cells for holidays to deduct from the calculation and, after deducting 11 weekend days and 3 holidays which I have mentioned It has returned 27 working days.

10. NETWORKDAYS.INTL Function
NETWORKDAYS.INTL Function returns the count of days between the start date and end date. Unlike NETWORKDAYS, NETWORKDAYS.INTL lets you specify which days you want to exclude from the calculation.
Syntax
NETWORKDAYS.INTL(start_date,end_date,weekend,holidays)
Arguments
- start_date: A valid date from where you want to start your calculation.
- end_date: A valid date up to which you want to calculate working days.
- [weekend]: A number represents to exclude weekends from the calculation.
- [holidays]: A list of dates that represents the holidays you want to exclude from the calculation.
Example
In the below example, we have used 01-Jan-2015 as a start date and 20-Jan-2015 as an end date. And we have specified 1 to take Sunday – Saturday as the weekend. The function has returned 14 days after excluding 6 weekend days.

Below, we have used the same dates. And I have used 11 in for weekend days which means it will only consider Sunday as a weekend. Along with that, we have also used 10-Jan-2015 as a holiday.

We have 3 Sundays between both dates and a holiday. After excluding all these days the function has returned 16 days in the result. Here in the below example, we have used range to specify holidays. If you have more than one date for the holidays you can refer to an entire range.

Quick Tip: If you want to create a dynamic range for holidays, you can use a table for that. If you want to choose custom days to count as working days or weekends, you can use the below format in the weekend argument.

Here, 0 represents a working day and 1 represents a non-working day. And, seven numbers represent 7 days of the week.
11. TODAY Function
The TODAY function returns the current date and time as per the system’s date and time. The date and time returned by the NOW function update continuously whenever you update anything in the worksheet.
Syntax
TODAY()
Arguments
- In the TODAY function, there is no argument, all you need to do is enter it in the cell and hit enter, but be careful as TODAY is a volatile function which updates its value every time you update your worksheet calculations.
Example
In the below example, we have used TODAY with other functions to get the current month number, current year, and current day.

12. WEEKDAY Function
WEEKDAY function returns a day number (ranging from 0 to 7) of the week from a date. In simple words, the WEEKDAY function takes a date and returns the day number of that date’s day.
Syntax
WEEKDAY (serial_number, [return_type])
Arguments
- serial_number: A valid date from which you want to get the week number.
- [return_type]: A number that represents the day of the week to start the week.
Example
In the below example, we have used a WEEKDAY with TODAY to get a dynamic weekday. It will give you the weekday whenever the current date changes. You can use this method in your dashboards to trigger some values which need to change when weekday change.

In the below example, we have used WEEKDAY with IF to create a formula that first checks the weekday of date and return “Weekday” or “Weekend” basis on the value return from WEEKDAY.

13. WEEKNUM Function
WEEKNUM function returns the week number of a date. In simple words, WEEKNUM returns the week number of dates that you specify ranging from 1 to 54.
Syntax
WEEKNUM(serial_number,return_type)
Arguments
- serial_number: A date for which you want to get the week number.
- [return_type]: A number to specify the starting day of the first week of the year. You have two systems to specify the starting date of the week.
Example
In the below example, we have used TODAY with WEEKNUM to get the week number of the current date. It will update the week number automatically every time the date changes.

In the below example, we have added the text “Week-” with the week number for a meaningful result.

14. YEAR Function
YEAR Function returns the year number from a valid date. As you know, in Excel a date is a combination of day, month, and year, and the YEAR function gets the year from the date and ignores the rest of the part.
Syntax
YEAR(date)
Arguments
- date: A date from which you want to get the year.
Example
In the below example, we have used the year function to get the year number from the dates. You can use this function where you have dates in your data and you only need the year number.

And in the below example, we have used today function to get the year number from the current date. It will always update the year whenever you recalculate your worksheet.

Excel spreadsheets provide the ability to work with various types of textual and numerical information. Date processing is also available. In this case, there may be a need to extract from the general meaning of a specific number, for example, a year. There are separate functions for this: YEAR, MONTH, DAY and DAY.
Examples of using functions for date processing in Excel
Excel tables store dates that are presented as a sequence of numeric values. It begins on January 1, 1900. This date will correspond to the number 1. At the same time, January 1, 2009 is laid down in the tables, as the number 39813. This is the number of days between the two designated dates.
The function YEAR is used similarly to the adjacent:
- MONTH;
- DAY;
- WEEKDAY.
All of them display numerical values corresponding to the Gregorian calendar. Even if in the Excel spreadsheet, the Hijra calendar was chosen to display the entered date, then when isolating the year and other composite values by functions, the application will present a number that is equivalent to the Gregorian system of chronology.
To use the YEAR function, you need to enter into the cell the following function formula with one argument:
=YEAR(cell address with date in numeric format)
The function argument is required. It can be replaced by «date_number_number». In the examples below, you can clearly see this. It is important to remember that when displaying the date as text (automatic orientation on the left edge of the cell), the YEAR function will not be executed. Its result will be the # SIGN. Therefore, formatted dates must be presented in a numerical version. Days, months and year can be separated by a dot, slash or comma.
Consider an example of working with the YEAR function in Excel. If we need to get a year from the original date, the function AVAILABLE will not help us since it does not work with dates, but only with text and numeric values. To separate the year, month or day from the full date for this, Excel provides functions for working with dates.
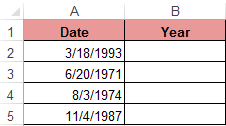
Example: There is a table with a list of dates and in each of them it is necessary to separate the value of only the year.
We introduce the original data in Excel.
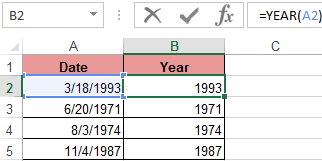
To solve the problem, it is necessary to enter the formula in the cells of column B:
=YEAR(the address of the cell, from the date of which you need to isolate the year value)
As a result, we extract years from each date.
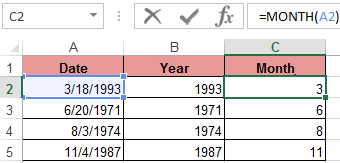
A similar example of the MONTH function in Excel:
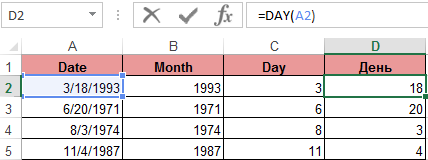
An example of working with functions DAY and WEEKDAY. The DAY function gets to calculate from the date the number of any day:
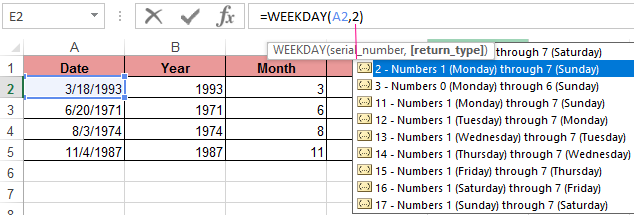
WEEKDAY function returns the number of the day of the week (1-Monday, 2-Tuesday …, etc.) for any date:
In the second optional argument of the WEEKDAY function, the number 2 may specified for our day of the week countdown format (Monday-1 through Sunday-7):
If you omit the second optional argument, then the default format will be used (English from Sunday-1 to Saturday-7).
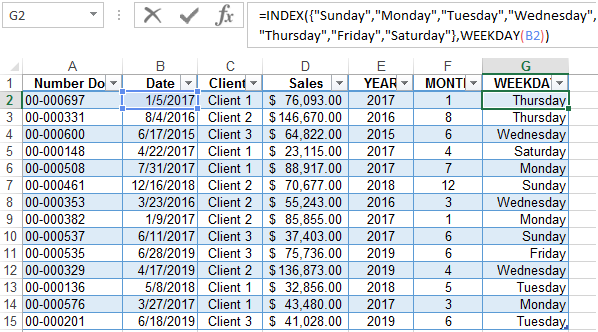
Create a formula of the combination of the functions INDEX and WEEKDAY:
We obtain a more understandable form of the implementation of this function.
Examples of the practical use of functions for working with dates
These primitive functions are very useful when grouping data by: years, months, days of the week, and specific days.
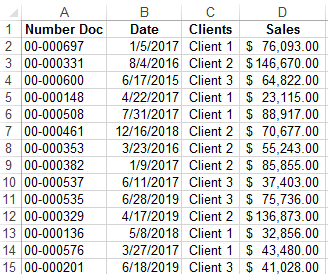
Suppose we have a simple sales report:
We need to quickly organize data for visual analysis without using pivot tables. To do this, we will bring the report into a table where it is convenient and quickly to group data by year, month and day of the week:
Now we have a tool to work with this sales report. We can filter and segment data by specific time criteria:
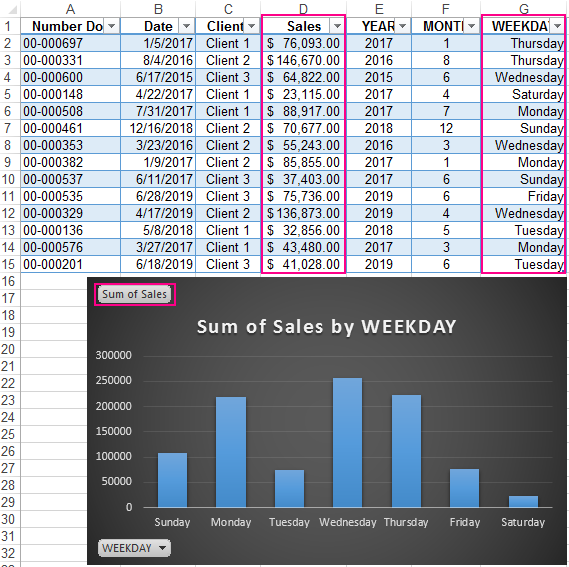
In addition, you can make a histogram to analyze the best-selling days of the week, to understand which day of the week has the largest number of sales:
In this form, it is very convenient to segment sales reports for long, medium and short periods of time.
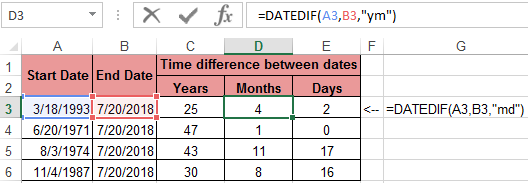
It should be immediately noted that in order to get the difference between the two dates, none of the above functions will help us. For this task, you should use a specially designed function DATEDIF:
Download examples fo functions YEAR MONTH DAY WEEKDAY and DATEDIF
The type of values in the date cells requires a special approach to data processing. Therefore, you should use the appropriate type of function in Excel.
Date and time in excel are treated a bit differently in excel than in other spreadsheets software. If you don’t know how Excel date and time work, you may face unnecessary errors.
So, in this article, we will learn everything about the date and time of Excel. We will learn, what are dates in excel, how to add time in excel, how to format date and time in excel, what are date and time functions in excel, how to do date and time calculations (adding, subtracting, multiplying etc. with dates and times).
What is Date and Time in Excel?
Many of you may already know that Excel dates and time are nothing but serial numbers. A date is a whole number and time is a fractional number. Dates in excel have different regional formatting. For example, in my system, it is mm/dd/YYYY (we will use this format throughout the article). You may be using the same date format or you could be using dd/mm/YYYY date format.
Date Formatting of Cell
There are multiple options available to format a date in Excel. Select a cell that may contain a date and press CTRL+1. This will open the Format Cells dialogue box. Here you can see two formatting options as Date and Time. In these categories, there are multiple date formattings available to suit your requirements.

Dates in Excel are mare serial numbers starting from 1-Jan-1900. A day in excel is equal to 1. Hence 1-Jan-1900 is 1, 2-Jan-1900 is 2, and 1-Jan-2000 is 36526.
Fun Fact: 1900 was not a leap year but excel accepts 29-Feb-1900 as a valid date. It was a desperate glitch to compete Lotus 1-2-3 back in those days.
Shortcut to enter static today’s date in excel is CTRL+; (Semicolon).
To add or subtract a day from a date you just need to subtract or add that number of days to that date.
Time:
Excel by default follows the hh:mm format for time (0 to 23 format). The hours and minutes are separated by a colon without any spaces in between. You can change it to hh:mm AM/PM format. The AM/PM must have 1 space from the time value. To include seconds, you can add :ss to hh:mm (hh:mm:ss). Any other time format is invalid.
Time is always associated with a date. The date comes before the time value separated with a space from time. If you don’t mention a date before time, by default it takes the first date of excel (which is 1/1/1900). Time in excel is a fractional number. It is shown on the right side of the decimal.
Hours:
Since 1 day is equal to 1 in excel and 1 day consists of 24 hours, 1 hour is equal to 1/24 in excel. What does that mean? It means that if you want to add or subtract 1 hour to time, you need to add or subtract 1/24. See the image below.

Calculate hours between time in Excel
Minutes:
From the explanation of the hour in excel, you must have guessed that 1 Minute in excel is equal to 1/(24×60) (or 1/1440 or 0.000694444).
If you want to add a minute to an excel time, add 1/(24×60). See the image below. Sometimes you get the need to Calculate Minutes Between Dates & Time In Excel, you can read it here.

Yes, a second in Excel is equal to 1/(24x60x60). To add or subtract seconds from a time, you just need to do the same things as we did in minutes and hours.
Date and Time in one cell
Dates and times are linked together. A date is always associated with a valid date and time is always associated with a valid excel date. Even if you are not able to see one of them.
If you only enter a time in a cell, the date of that cell will 1-Jan-1900, even if you are not able to see it. If you format that cell as a date-time format, you can see the associated date. Similarly, if you don’t mention time with the date, by default 12:00 AM is attached. See the image below.
In the image above, we have time only in B3 and date only in B4. When we format these cells as mm/dd/yy hh:mm, we get both, time and date in both cells.
So, while doing date and time calculations in excel, keep this in check.
No Negative Time
As I told you the date and time in excel starts from 1-Jan-1900 12:00 AM. Any time before this is not a valid date in excel. If you subtract a value from a date that leads to before 1-Jan-1900 12:00, even one second, excel will produce ###### error. I have talked about it here and in Convert Date and Time from GMT to CST. It happens when we try to subtract something that leads to before 1 Jan-1900 12:00. Try it yourself. Write 12:00 PM and subtract 13 hours from it. see what you get.
Calculations with Dates and Time in Excel
Adding Days to a date:
Adding days to a date in excel is easy. To add a day to date just add 1 to it. See the image below.
You should not add two dates to get the future date, as it will sum up the serial numbers of those days and you may get a date far in the future.
Subtracting Days from Date:
If you want to get a backdate from a date a few days before, then just subtract that number of days from the date and you will get backdate. For example, if I want to know what date was before 56 days since TODAY then I would write this formula in the cell.
This will return us the date of 56 before the current date.
Note: Remember that you can not have a date before 1/Jan/1900 in excel. If you get ###### error, this could be the reason.
Days between two dates:
To calculate days between two dates we just need to subtract the start date from the end date. I have already done an article on this topic. Go and check it out here. You can also use the Excel DAYS Function to calculate days between a start date and end date.
Adding Times:
There’s been a lot of queries on how to add time to excel as many people get confusing results when they do it. There are two types of addition in times. One is adding time to another time. In this case, both times are formatted as hh:mm time format. In this case, you can simply add these times.
The second case is when you don’t have additional time in time format. You just have numbers of hours, minutes and seconds to add. In that case, you need to convert those numbers to their time equivalents. Note these points to add hours, minutes and seconds to a date/time.
- To add N hours to an X time use formula =X+(N/24) (As 1=24 hours)
- To Add N minutes to X time use formula = X+(N/(24*60))
- To Add N Second to X time use formula = X+(N/(24*60*60))
Subtracting Times
It’s the same as adding time, just make sure that you don’t end up with a negative time value when subtracting, because there is no such thing as a negative number in excel.
Note: When you add or subtract time in excel that exceeds 24 hours of difference, excel will roll to the next or previous date. For example, if you subtract 2 hours from 29-Jan-2019 1:00 AM then it will roll back to 28-Jan-2019 11:00 PM. If you subtract 2 hours from 1:00 AM (does not have the date mentioned), Excel will return ###### error. I have told the reason at the beginning of the article.
Adding Months to a Date:
You can’t just add multiples of 30 to add months to date as different months have a different number of days. You need to be careful while adding months to Date. To add months to a date in excel, we use EDATE function of excel. Here I have a separate article on adding months to a date in different scenarios.

Just like adding months to a date, it is not straightforward to add years to date. We need to use YEAR, MONTH, DAY function to add years to date. You can read about adding years to date here.
If you want to calculate years between dates then you can use this.
Excel Date and Time Handling Functions:
Since date and time are special in Excel, Excel provides special functions to handle them. Here I am mentioning a few of them.
- TODAY(): This function returns today’s date dynamically.
- DAY(): Returns Day of the month (returns number 1 to 31).
- DAYS(): Used to count the number of days between two dates.
- MONTH(): Used to get the month of the date (returns number 1 to 12).
- YEAR(): Returns year of the date.
- WEEKNUM(): Returns the weekly number of a date, in a year.
- WEEKDAY(): Returns the day number in a week (1 to 7) of the supplied date.
- WORKDAY(): Used to calculate working days.
- TIMEVALUE(): Used to extract Time value (serial number) from a text formatted date and time.
- DATEVALUE(): Used to extract date value (serial number) from a text formatted date and time.
These are some of the most useful data and time functions in excel. There are plenty more date and time functions. You can check them out here.
Date and Time Calculations
If I explain all of them here, this article will get too long. I have divided these time calculation techniques in excel into separate articles. Here I am mentioning them. You can click on them to read.
- Calculate days, months and years
- Calculate age from date of birth
- Multiplying time values and numbers.
- Get Month name from Date in Excel
- Get day name from Date in Excel
- How to get a quarter of the year from date
- How to Add Business Days in Excel
- Insert Date Time Stamp with VBA
So yeah guys, this is all about the date and time in excel you need to know about. I hope this article was useful to you. If you have any queries or suggestions, write them down in the comments section below.
Bottom line: With Valentine’s Day rapidly approaching I thought it would be good to explain how you can get a date with your Excel skills. Just kidding! 🙂 This post and video explain how the date calendar system works in Excel.
Skill level: Beginner
Dates in Excel can be just as complicated as your date for Valentine’s Day. We are going to stick with dates in Excel for this article because I’m not qualified to give any other type of dating advice. 🙂
Video Tutorial on How Dates Work in Excel
The following is a video from The Ultimate Lookup Formulas Course on how the date system works in Excel.
Watch the Video on YouTube
There are over 100 short videos just like the one above included in the Ultimate Lookup Formulas Course.
This course has been designed to help you master Excel’s most important functions and formulas in an easy step-by-step manner.
The Ultimate Lookup Formulas course is now part of our comprehensive Elevate Excel Training Program.
Click Here to Learn More About Elevate Excel
What is a Date in Excel?
I should first make it clear that I am referring to a date that is stored in a cell.
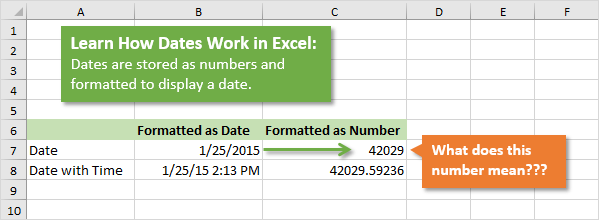
The dates in Excel are actually stored as numbers, and then formatted to display the date. The default date format for US dates is “m/d/yyyy” (1/27/2016).
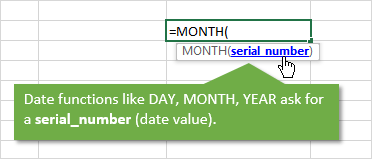
The dates are referred to as serial numbers in Excel. You will see this in some of the date functions like DAY(), MONTH(), YEAR(), etc.
So then, what is a serial number? Well let’s start from the beginning.
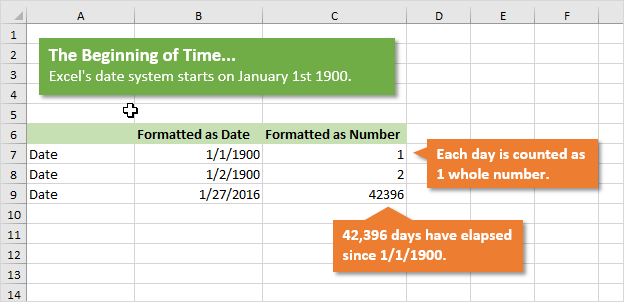
The date calendar in Excel starts on January 1st, 1900. As far as Excel is concerned this day starts the beginning of time.
Each Day is a Whole Number
Each day is represented by one whole number in Excel. Type a 1 in any cell and then format it as a date. You will get 1/1/1900. The first day of the calendar system.
Type a 2 in a cell and format it as a date. You will get 1/2/1900, or January 2nd. This means that one whole day is represented by one whole number is Excel.
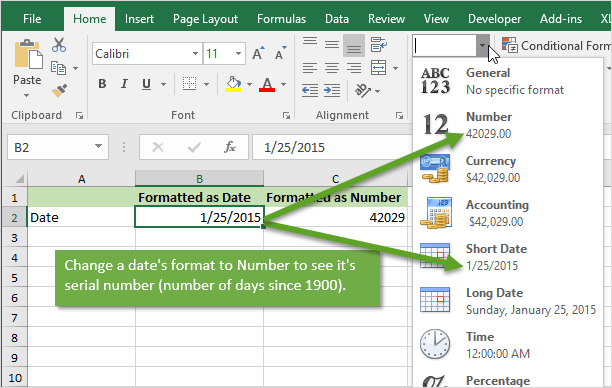
You can also take a cell that contains a date and format it as a number.
For example, this post was published on 1/27/2016. Put that number in a cell (the keyboard shortcut to enter today’s date is Ctrl+;), and then format it as a number or General.
You will see the number 42,396. This is the number of days that have elapsed since 1/1/1900.
Date Based Calculations
It is important to know that dates are stored as the number of days that have elapsed since the beginning of Excel’s calendar system (1/1/1900).
When you calculate the difference between two dates by subtraction, the result will be the number of days between the two dates.
1/27/2016 – 1/1/2016 = 26 days
6/30/2016 – 1/1/2016 = 181 days
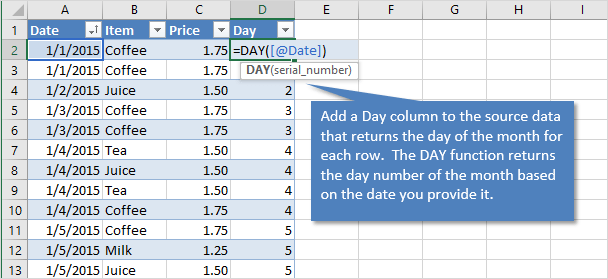
There are a lot of Date functions in Excel that can help with these calculations. Last week we learned about the DAY function for month-to-date calculations with pivot tables.
We won’t go into all the date functions here, but understanding that the serial number represents one day will give you a good foundation for working with dates.
What About Dates with Times?
Do you ever work with dates that contain time values?
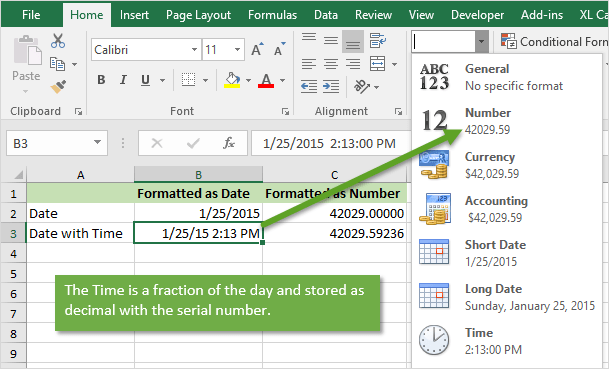
These dates are still stored as serial numbers in Excel. When you convert the date with a time to the number format, you will see a decimal number.
This decimal is a fraction of the day.
One hour in Excel is represented by the number: 1/24 = 0.04167
One minute in Excel is represented by the number: 1/(24*60) = 1/1440 = 0.000694
So 8:30 AM can be calculated as: (8 * (1/24)) + (30 * (1/1440)) = .354167
An easier way to calculate this is by typing 8:30 AM in a cell, then changing the format to Number.
So if you are running a half hour late and want to let your boss know, text him/her and say you will be there at 0.354167. 🙂
Checkout my article on 3 ways to group times in Excel for more date time based calculations.
Don’t Talk About Excel Dates with Your Date
Unless your Valentine shares a similar passion for Excel, I strongly recommend NOT sharing this information on your date.
I remember the first time I met my wife, and told her I worked in finance. The first word out of her mouth was, “BORING!”. Awe… it was love at first sight… LOL 🙂
But you should now be able to use Excel to determine how many days it has been since you last spoke to your date. That’s the only dating advice I can give.
Please leave a comment below with any questions on Excel dates. Thanks!
The DATE function in Excel is a date and time function representing the number provided to it as arguments in a date and time code. The arguments it takes are integers for a day, month, and year separately and give us the result in a simple date. The result displayed is in date format, but the arguments are provided as integers. Therefore, we can use the formula: =DATE( Year, Month, Day) on a sequential basis.
For example, = DATE(2020,5,1) equals May 1, 2020.
Table of contents
- DATE Function in Excel
- DATE Formula for Excel
- How to Use the DATE Function in Excel? (with Examples)
- Example #1 – Get a month from the date
- Example #2 – Find out a leap year
- Example #3 – Highlight a set of dates
- Things to Remember
- Usage of DATE Function in Excel VBA
- DATE function in VBA Example
- DATE Excel Function Video
- Recommended Articles
DATE Formula for Excel
The DATE formula for Excel is as follows:
The DATE formula for Excel has three arguments, out of which two are optional. When,
- year = The year to use while creating the date.
- month = The month to use while creating the date.
- day = The day to use while creating the date
How to Use the DATE Function in Excel? (with Examples)
The DATE is a Worksheet (WS) function. It can be entered as a part of the formula in a worksheet cell as a WS function. You may refer to the DATE function examples given below to understand better.
You can download this DATE Function Excel Template here – DATE Function Excel Template
Example #1 – Get a month from the date
MONTH(DATE(2018,8,28))
As shown in the above DATE formula, the MONTH function is applied on the date represented using the DATE function. The MONTH function will return the month index produced by the DATE function. E.g., 8 in the given example. Cell D2 has a DATE formula, hence the result ‘8’.
Example #2 – Find out a leap year
MONTH(DATE(YEAR(B3),2,29)) = 2
As shown in the above DATE formula, the DATE will automatically adjust to month and year values out of range. Here, the innermost formula is YEAR with parameters as cell B3 indicating the input data, 2 is the index of February month, and 29 for the day. For example, February has 29 days in leap years, so the outer DATE function will return the output as 2/29/2000.
In case of a non-leap year, DATE will return the date March 1 of the year because there is no 29th day, and DATE would roll the date forward into the next month.
The outermost function, MONTH, would extract the month from the result. E.g., 2 or in case of a leap year and 3 in case of a non-leap year.
Further, the result is compared with a constant ‘2’. For example, if the month is 2, the DATE formula in excel returns “TRUE.” If not, the DATE formula returns “FALSE.”
In the following screenshot, cell B2 contains a date belonging to a leap year, and B3 has a date belonging to a non-leap year.
Example #3 – Highlight a set of dates
A conditional formattingA complementary good is one whose usage is directly related to the usage of another linked or associated good or a paired good i.e. we can say two goods are complementary to each other. read more rule is applied to column B in this DATE function example. The dates greater than 2005/1/1 are highlighted using a pink color style. So, as shown in the screenshot, three dates greater than the specified date are highlighted in the configured format. The other two dates that do not satisfy the criteria are left unformatted as no rule applies to such dates.
Things to Remember
- The Excel DATE function returns a date serial number. One must format the result as a date to display the date format.
- If the year is between 0 and 1900, Excel will add 1900 to the year.
- A month can be greater than 12 and less than zero. If the month is greater than 12, Excel will add a month to the first month in the specified year. If the month is less than or equal to zero, Excel will subtract the absolute value of the month plus 1 (i.e., ABS(month) + 1) from the first month of the specified year.
- The day can be positive or negative. If a day is greater than the days in the specified month, Excel will add a day to the first day of the specified month. If a day is less than or equal to zero, Excel will subtract the absolute value of the day plus 1 (i.e., ABS(day) + 1) from the first day of the specified month.
Usage of DATE Function in Excel VBA
The DATE function in VBA returns the current system date. It can be used in Excel VBA as follows:
DATE function in VBA Example
Date()
Result: 12/08/2018
Here, the Date() function returns the current system date. The same can be assigned to a variable as follows:
Dim myDate As String
myDate = Date()
So, myDate = 12/08/2018
DATE Excel Function Video
Recommended Articles
This article has been a guide to the DATE Function in Excel. Here, we discuss the DATE formula for Excel and how to use the DATE function and Excel example, and downloadable Excel templates. You may also look at these useful functions in Excel:-
- VBA Excel Date
- Inserting Date in Excel
- DAY in Excel
- WEEKDAY Function
There are many functions in Microsoft Excel that may be used to work with dates and timings in Excel. Each function completes a straightforward task, but by combining numerous functions into a single formula, you may handle trickier and more complicated problems. The purpose of discussing DATE functions in Excel is to help different people to perform more complex and challenging tasks by combining several functions within one formula.
The DATE function is used to calculate dates in Excel. Excel provides different functions to work with dates & times such as TODAY, NOW, WEEKDAY, EOMONTH, etc. which we will discuss here with examples.
1. DATE Function in Excel
It will return the date in serial number based on the year, month, or day value as provided.
Syntax:
DATE(year,month,day)
Arguments:
- Year – This argument includes – 1 to 4-digit values. Excel understands this ‘year’ argument according to the date system of the local computer which we use. For example- Excel windows uses the 1900 date system by default which means DATE (21,2,6) gives the result as 06-02-1921.
- Month – This argument includes a positive or negative integer that represents the month of the year from January to December.
- Day – This argument also includes a positive or negative integer representing the day of the month from 1 to 31.
Excel Date Function Example 1:
Excel Date Function Example 2:
It will return on the first day of the current year & month.
Excel Date Function Example 3:
2. TODAY Function in Excel
The TODAY() function name suggests it will return today’s date, and it has no arguments.
Syntax:
TODAY()
Example1:
Here we will print the current date and also add 10 days to the current date.
Example 2:
To add 10 days to Today’s date.
3. NOW Function in Excel
This function returns the current date as well as the time & doesn’t have any arguments.
Syntax:
NOW()
Example:
4. DATEVALUE Function
It converts the date in text format to a serial number, which can be represented as a date.
Syntax:
DATEVALUE(date_text)
Arguments:
1. date_text – This argument is a text that represents the date in Excel date format.
Example:
5. TEXT Function
It converts any numeric value not only dates to a text string. Through this function, we can change the date to text strings in a variety of formats.
Syntax:
TEXT(value,format_text)
Arguments:
1. value: The value that is to be converted.
2. format_text: The format in which you want to output the date value.
These are the different formats used in the TEXT function to change dates to text strings.
Example 1:
Example 2:
Example 3:
6. DAY Function
It returns the day of a month, i.e. integer from 1 to 31.
Syntax:
DAY(serial_number)
Arguments:
1. serial_number: This value represents the day of the month you want to find. E.g: 5th day of June
Example 1:
Example 2:
The DAY(TODAY()) function returns the day of today’s date, as shown below:
7. MONTH Function
This function returns the month of the given date as an integer from 1 to 12 (January to December).
Syntax:
MONTH(serial_number)
Arguments:
1. serial_number: This value represents the date for which you want to find the month.
Example:
The MONTH(TODAY()) function returns the month of today’s date.
8. YEAR Function
It returns the year of a specified date.
Syntax:
YEAR(serial_number)
Arguments:
1. serial_number: The date to be specified.
Example 1:
Example 2:
Example 3:
9. EOMONTH Function
This function returns the last day of the month after adding a specified number of months to a given date.
Syntax:
EOMONTH(start_date,months)
Arguments:
1. start_date: In this argument, the date should be written in date format, not in the text.
2. months: In this argument, if a positive integer is given then corresponding months can be added to the start date & if a negative integer is given then the corresponding months can be subtracted from the start date.
Example 1:
Example 2:
Example 3:
The EOMONTH(TODAY(),0) function returns the last day of the current month.
10. WEEKDAY Function
This function returns the day of the week as a number from 1 to 7 (Sunday to Saturday) according to the specified date.
Syntax:
WEEKDAY(serial_number,return_type)
Arguments:
1. serial_number: It can be a date or the cell that contains the date.
2. return_type: It is optional, as it specifies which day should be considered as the first day of the week.
NOTE: 1st day of the week is by default Sunday.
Example 1:
Example 2:
In the below example, 2 is given as return_type i.e. Monday is referred to as the first day of the week.
Example 3:
Here the day of today’s (01-04-2021) date is the result & the default value (Sunday) is considered here because no return_type is given.
11. DATEDIF Function
This function calculates the difference between two dates in days, months, or years. For calculating the difference b/w dates which time interval should be used depends on the letter which we specify in our last argument i.e. at the unit.
Syntax:
DATEDIF(start_date,end_date,unit)
Arguments:
1. start_date: The start date for evaluating the difference.
2. end_date: The end Date for evaluating the difference.
Example 1:
Example 2:
Example 3:
Here “m”,”y”,”d” means month, year & date. In the first example, the difference between dates is calculated by months, second by year & third by date.
12. WEEKNUM Function
It returns the week number based on the specified date, i.e. from 1 to 52 weeks of the year.
Syntax:
WEEKNUM(serial_number,firstday_ofweek)
Arguments:
1. serial_number: This is the date for which we want the week number.
2. firstday_ofweek: This is an optional argument that specifies which numbering system should be considered & which day of the week can be treated as the start of the week, Default(omitted) is 1. The table below is the parameters that can be given in firstday_ofweek argument.
First Day of the Week Start Table:
| 1 | Sunday | 1 |
| 2 | Monday | 1 |
| 11 | Monday | 1 |
| 12 | Tuesday | 1 |
| 13 | Wednesday | 1 |
| 14 | Thursday | 1 |
| 15 | Friday | 1 |
| 16 | Saturday | 1 |
| 17 | Sunday | 1 |
| 21 | Monday | 2 |
Example 1:
Example 2:
Example 3:
In the below example,21 is given as the second argument which means Monday is taken as the first day of the week & in the above example, the result shown is 15 but taking 21 as the first_dayofweek means Monday is the first day, the result is 14.
13. EDATE Function
This function adds or subtracts the specified month to a given date.
Syntax:
EDATE(start_date,months)
Arguments:
1. start_date: This is an initial date on which the months are added or subtracted.
2. months: This is the number of months which is to be added or subtracted in the specified date.
Example 1:
Example 2:
Example 3:
14. YEARFRAC Function
This function returns the fraction of the year which represents the number of whole days between the start & end date.
Syntax:
YEARFRAC(start_date,end_date,[basis])
Arguments:
1. start_date: This is the start date in the serial number.
2. end_date: This is the end date in the serial number.
3. basis: This is the optional argument that specifies the day count method.
| Basis | Day count method |
|---|---|
| 0(default) | US 30/360 |
| 1 | actual/actual |
| 2 | actual/360 |
| 3 | actual/365 |
| 4 | European 30/360 |
Example 1:
Using someday count methods.
Example 2:
Example 3:
15. WORKDAY Function
This function helps if we exactly know how many working days we have & want to find out the date when the number of working will skip. This function always includes working days & excludes weekend days.
Syntax:
WORKDAY(start_date,days,holidays)
Arguments:
1. start_date: This argument is the date from which the counting of weekdays begins. Excel doesn’t include start_date as a working day.
2. days: This is the number of working days.
3. holidays: This is an optional argument. If the days mentioned include any holidays, then we need to make a list of holidays separately for this, and mention it here.
Example 1:
28 workdays from the start date, excluding holidays.
Example 2:
28 workdays before the start date, excluding holidays
Example 3:
28 workdays from the start date, no holidays.
Example 4:
28 workdays from today’s date, no holidays.
16. WORKDAY.INTL Function
This is a modification of the WORKDAY function as it provides a custom weekend parameter that distinguishes this from the WORKDAY function.
Syntax:
WORKDAY.INTL(start_date,days,[weekends],holidays)
Arguments:
1. start_date: This argument is the date from which the counting of weekdays begins. Excel doesn’t include start_date as a working day.
2. days: This is the number of working days.
3. holidays: This is an optional argument. If the days mentioned include any holidays, then we need to make a list of holidays separately for this and mention it here.
4. weekends: Through this argument, we can specify which days of the week to be treated as non-working days, either by weekend number or specific character string.
Weekend Number:
| Numbers | Days |
|---|---|
| 1 (default) | Saturday, Sunday |
| 2 | Sunday, Monday |
| 3 | Monday, Tuesday |
| 4 | Tuesday, Wednesday |
| 5 | Wednesday, Thursday |
| 6 | Thursday, Friday |
| 7 | Friday, Saturday |
| 11 | Sunday |
| 12 | Monday |
| 13 | Tuesday |
| 14 | Wednesday |
| 15 | Thursday |
| 16 | Friday |
| 17 | Saturday |
If this weekend argument is blank in this function, then it will automatically take the combination of Saturday & Sunday.
For instance:
- “0000011”-Saturday & Sunday are weekends(non-working days)
- “1000010”-Monday & Saturday are weekends(non-working days)
Example 1:
30 days from the start date, excluding holidays & Sunday, and Monday as weekends (by giving weekend number 2 as arguments).
Example 2:
30 days from the start date, excluding holidays & Sunday, Monday as weekends(by giving weekend string “1000001” as arguments).
Example 3:
20 days from the start date, no holidays & Monday, Saturday as weekends (by giving weekend string “1000010” as arguments).
17. NETWORKDAYS Function
This function returns the number of working days between two dates, excluding weekends & holidays are as optional arguments.
Syntax:
NETWORKDAYS(start_date,end_date,holidays)
Arguments:
1. start_date: The initial date to start evaluation.
2. end_date: The last date to end the evaluation.
4. holidays: Used to specify holidays.
Example 1:
Example 2:
18. NETWORKDAYS.INTL Function
This function also returns the number of working days between two dates but provides the additional argument weekend to specify which days should be counted as weekend days.
The structure of the weekend argument is the same as for WORKDAY.INTL i.e. we can use either the weekend number or character string.
Syntax:
NETWORKDAYS.INTL(start_date,end_date,[weekend],holidays)
Arguments:
1. start_date: The initial date to start the evaluation.
2. end_date: The last date to end the evaluation.
3. weekend: Use to specify the weekends.
4. holidays: Used to specify holidays.
Example 1:
Here, the weekend argument is given in the form of a number.
Example 2:
Here, the weekend argument is given in the form of a character string of 0’s & 1’s.
Hopefully, this extensive overview of Excel’s date functions has given you a general idea of how date formulas in Excel operate. I advise you to read more articles on Excel if you want to understand more. I appreciate your time and look forward to hearing from you soon!
FAQs on DATE Functions in Excel
Here are some of the most frequently asked questions on DATE Functions in Excel
1. What is a Date function?
The DATE function in Excel combines the three independent values of year, month, and day to create a date.
Syntax: DATE(year,month,day)
2. How do I get DD MMM YYYY in Excel?
- Pick the cell that contain the date>right-click and select Format Cells
- Select Custom in the Number Tab>type ‘dd-mmm-yyyy’ in the Type text box>click OK.


