
Excel handles dates and time using a scheme in which dates are serial numbers and times are fractional values. For example, June 1, 2000 12:00 PM is represented in Excel as the number 36678.5, where 36678 is the date portion and .5 is the time portion.
If you have dates that include time, you can use the INT function to extract just the date part. The INT function returns the integer portion of a number that includes a decimal value.
So, assuming A1 contains the date and time, June 1, 2000 12:00 PM (equivalent to the number 36678.5), the formula below returns just the date portion (36678):
=INT(A1)
The time portion of the value (the fractional part) is discarded. To see the result formatted as a date, be sure to apply a date number format. Make sure you use a date format that does not include a time. Otherwise, you’ll see the time displayed as 12:00 AM.
Excel for Microsoft 365 Excel for Microsoft 365 for Mac Excel for the web Excel 2021 Excel 2021 for Mac Excel 2019 Excel 2019 for Mac Excel 2016 Excel 2016 for Mac Excel 2013 Excel 2010 Excel 2007 Excel for Mac 2011 Excel Starter 2010 More…Less
To get detailed information about a function, click its name in the first column.
Note: Version markers indicate the version of Excel a function was introduced. These functions aren’t available in earlier versions. For example, a version marker of 2013 indicates that this function is available in Excel 2013 and all later versions.
|
Function |
Description |
|
DATE function |
Returns the serial number of a particular date |
|
DATEDIF function |
Calculates the number of days, months, or years between two dates. This function is useful in formulas where you need to calculate an age. |
|
DATEVALUE function |
Converts a date in the form of text to a serial number |
|
DAY function |
Converts a serial number to a day of the month |
|
DAYS function |
Returns the number of days between two dates |
|
DAYS360 function |
Calculates the number of days between two dates based on a 360-day year |
|
EDATE function |
Returns the serial number of the date that is the indicated number of months before or after the start date |
|
EOMONTH function |
Returns the serial number of the last day of the month before or after a specified number of months |
|
HOUR function |
Converts a serial number to an hour |
|
ISOWEEKNUM function |
Returns the number of the ISO week number of the year for a given date |
|
MINUTE function |
Converts a serial number to a minute |
|
MONTH function |
Converts a serial number to a month |
|
NETWORKDAYS function |
Returns the number of whole workdays between two dates |
|
NETWORKDAYS.INTL function |
Returns the number of whole workdays between two dates using parameters to indicate which and how many days are weekend days |
|
NOW function |
Returns the serial number of the current date and time |
|
SECOND function |
Converts a serial number to a second |
|
TIME function |
Returns the serial number of a particular time |
|
TIMEVALUE function |
Converts a time in the form of text to a serial number |
|
TODAY function |
Returns the serial number of today’s date |
|
WEEKDAY function |
Converts a serial number to a day of the week |
|
WEEKNUM function |
Converts a serial number to a number representing where the week falls numerically with a year |
|
WORKDAY function |
Returns the serial number of the date before or after a specified number of workdays |
|
WORKDAY.INTL function |
Returns the serial number of the date before or after a specified number of workdays using parameters to indicate which and how many days are weekend days |
|
YEAR function |
Converts a serial number to a year |
|
YEARFRAC function |
Returns the year fraction representing the number of whole days between start_date and end_date |


Important: The calculated results of formulas and some Excel worksheet functions may differ slightly between a Windows PC using x86 or x86-64 architecture and a Windows RT PC using ARM architecture. Learn more about the differences.
Need more help?
Dates are cleverly stored as serial numbers while times are stored as decimal values relative to 24 hours in one day. While working with Excel, we can extract only the date portion by using the INT or TRUNC function. This step by step tutorial will assist all levels of Excel users in extracting date from a date and time using two methods.
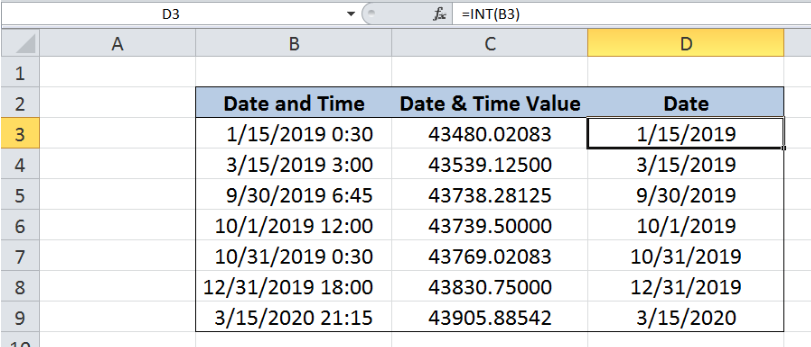 Figure 1. Final result: Extract date from date and time
Formula 1: =INT(B3)
Formula 2: =TRUNC(B3)
Syntax of INT Function
INT rounds a number down to the nearest integer
=INT(number)
- number – the number we want to round down to the nearest integer
Syntax of TRUNC Function
TRUNC returns an integer by removing the fractional part of the number
=TRUNC(number, [num_digits])
- number – the number we want to truncate
- num_digits – Optional; a number that represents the digits after the decimal point specifying the precision of the truncation; If omitted, the default value for num_digits is 0 (zero).
TRUNC and INT are similar such that both functions return integers. TRUNC removes the fraction or decimal part of the number while INT rounds down the numbers to the nearest integer.
Setting up our Data
Our table consists of three columns: Date and Time (column B), Date & Time Value (column C) and Date (column D).
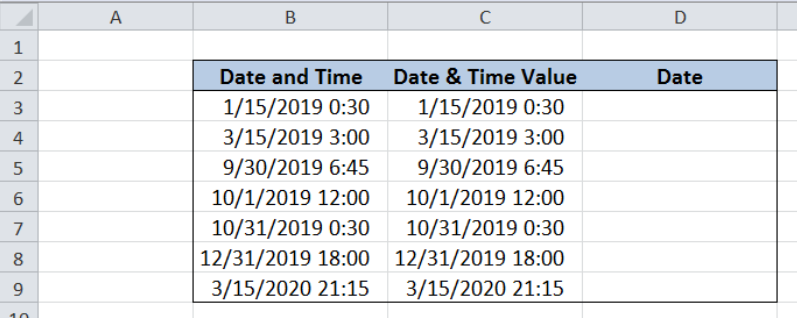 Figure 2. Sample date to extract date from date and time
The values in column B and C are the same, and column C is not needed in our formula. However, we only want to show here how Excel stores date and time through numbers. Let us display the value of the date and time by following these steps:
Step 1. Select cells C3:C9
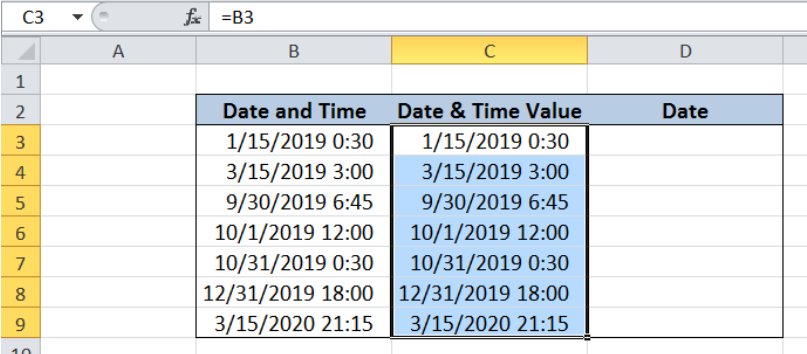 Figure 3. Selecting C3:C9 to change format to numbers
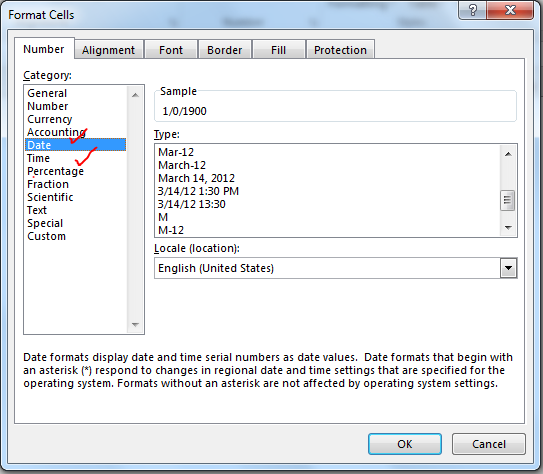
Step 2. Press Ctrl + 1 to launch the Format Cells dialog box
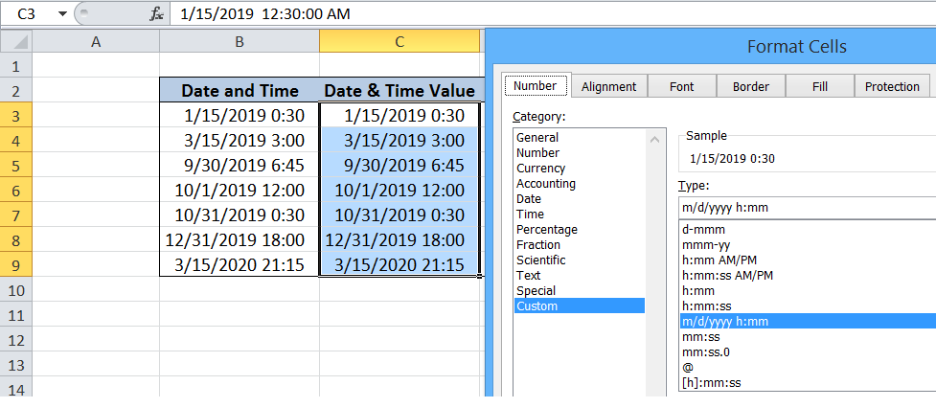 Figure 4. Format Cells preview
Step 3. Change the format to Number, with 5 decimal places.
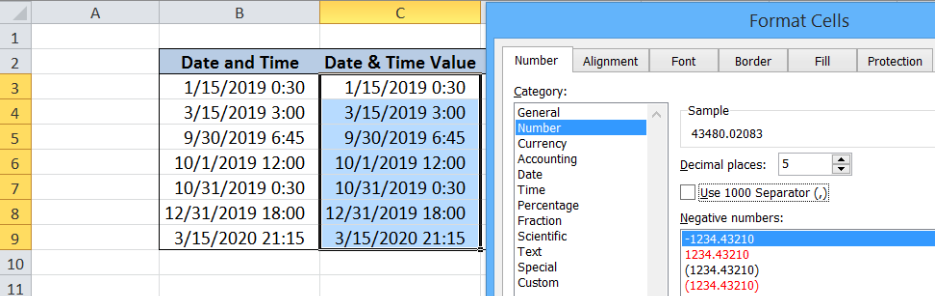 Figure 5. Changing the format to Number with 5 decimal places
Step 4. Click OK.
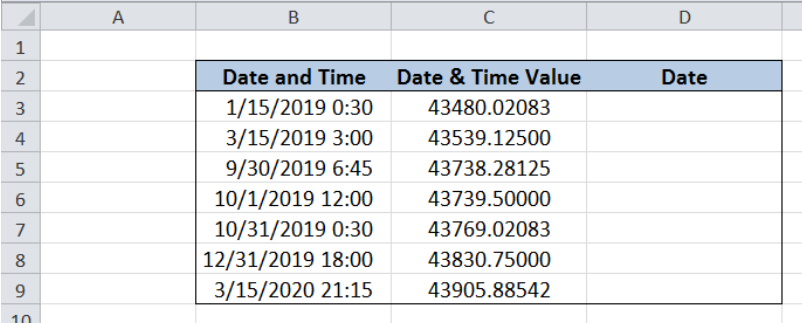 Figure 6. Column C showing values of date and time
We now have a table showing the values in column C. Note that the whole numbers represent the serial number for the date, while the decimal values represent the time.
Dates have serial numbers where the value 1 corresponds to the starting date January 1, 1900, and each succeeding day is incremented by one. One whole day has the value of 1 and one hour is equivalent to 1/24, since there are 24 hours in one day.
We want to extract the date from the date and time. This can be done by extracting only the whole numbers or integers, through the INT or TRUNC function.
Extract date from a date and time using INT
In order to extract the integers that correspond to the date, we will be using the INT function through these steps:
Step 1. Select cell D3
Step 2. Enter the formula: =INT(B3)
Step 3. Press ENTER
The INT function rounds down any number into the nearest integers. We have now extracted only the whole number or integers by using INT function.
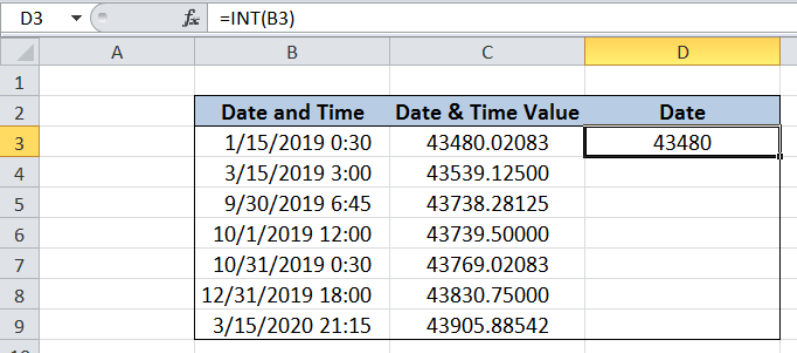 Figure 7. Extracting serial number only from date and time using INT
Step 4. Format the cell to show the date by pressing Ctrl + 1
Step 5. Select the category Date and the Type: d/mm/yyyy
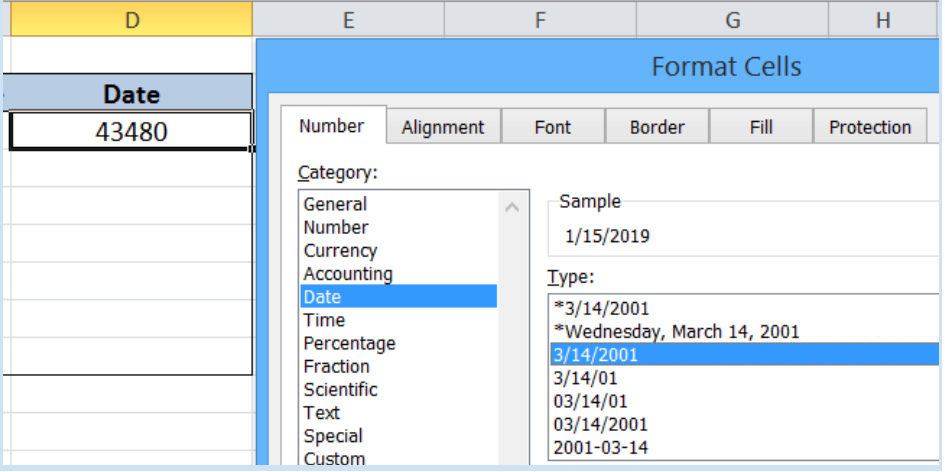 Figure 8. Changing format to show date
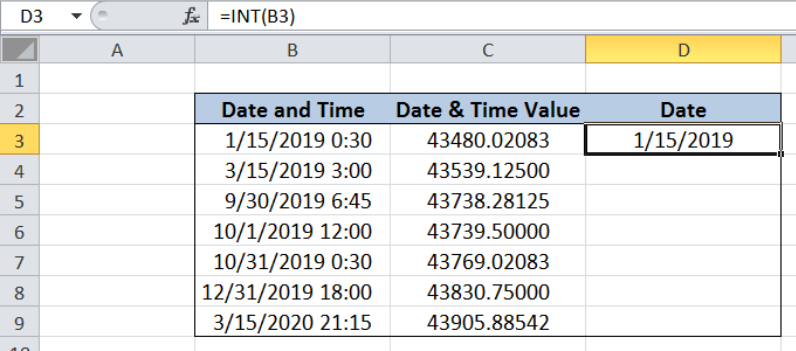 Figure 9. Display changed from serial number to date
Step 6. Copy the formula in D3 to cells D4:D9 by clicking the “+” icon at the bottom-right corner of cell D3 and dragging it down
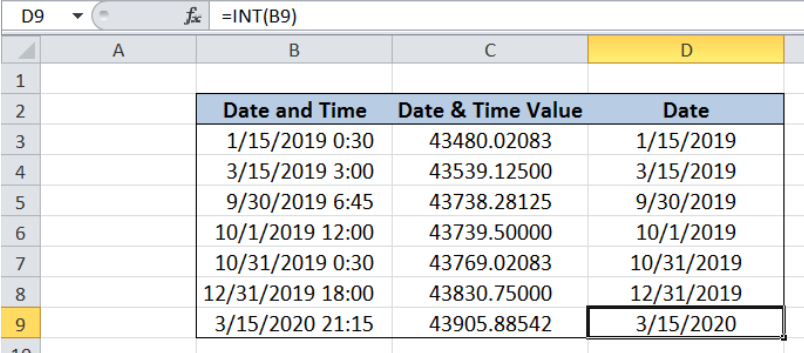 Figure 10. Output: Extract date from date and time using INT
Extract date from a date and time using TRUNC
An alternative method to extract the date from a date and time is by using the TRUNC function. The procedure is the same as in the previous method, but we only replace the function with TRUNC. Our working formula becomes:
=TRUNC(B3)
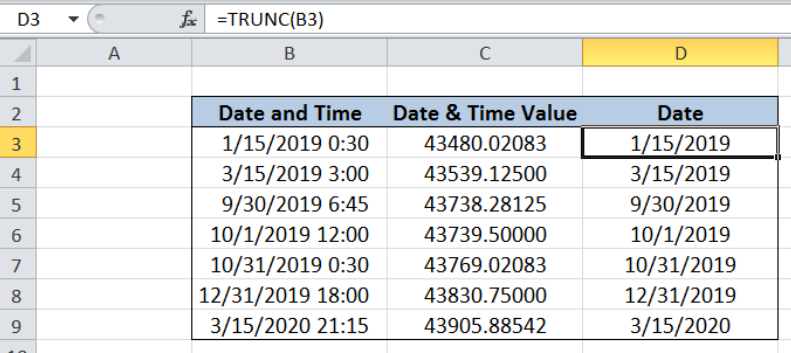 Figure 11. Output: Extract date from date and time using TRUNC
Most of the time, the problem you will need to solve will be more complex than a simple application of a formula or function. If you want to save hours of research and frustration, try our live Excelchat service! Our Excel Experts are available 24/7 to answer any Excel question you may have. We guarantee a connection within 30 seconds and a customized solution within 20 minutes.
How to Use Excel > Excel Formula > How to Extract Day, Month and Year from Date in Excel
How to Extract Day, Month and Year from Date in Excel
Table of contents :
- Extract Day from Date in Excel
- Extract Month from Date in Excel
- Extract Year from Date in Excel

Excel provides three different functions to extract a day, month, and year from date. The following is an explanation of each function to extract each value.
Extract Day from Date in Excel
The formula
=DAY(A2)
The result

If you want to extract the day from the date, you can use the DAY function. The DAY function requires only one argument, fill it with valid excel date value.
The result, there are four days value and one error #VALUE!. An error occurred because 2/29/2006 is not a valid Excel date value. Why? Because 2006 is not a leap year, so there is no February 29th.
The DAY function result is a number between 1 and 31.
Extract Month from Date in Excel
The formula
=MONTH(A2)
The result

To extract month from the date you need the MONTH function. Like the DAY function, the MONTH function has only one argument, filled with a valid Excel date value.
There is a #VALUE error. The error appearance is the same place as the #VALUE error in DAY function result. The cause of the error is the same; the date value in cell A5 is not a valid Excel date value. This error will still appear in all excel functions related to the date.
The MONTH function result is a number between 1 and 12.
Extract Year from Date in Excel
The formula
=YEAR(A2)
The result

To extract the year from date, Excel provides the YEAR function. There is an argument that must be filled with a valid Excel date value.
The results of the DAY and MONTH functions are a number with a narrow range. Instead, the YEAR function is a wide range of numbers between 1900 and 9999.
For years less than 1900 or more than 9999, it will be considered an invalid excel date value. If used by an Excel function (related to the date function) returns a #VALUE! Error.
The DAY, MONTH and YEAR functions extract day, month and year from a date. To do the opposite, converting day, month and year in number to date value, you need the DATE function.
Related Function
Function used in this article
Date and time in excel are treated a bit differently in excel than in other spreadsheets software. If you don’t know how Excel date and time work, you may face unnecessary errors.
So, in this article, we will learn everything about the date and time of Excel. We will learn, what are dates in excel, how to add time in excel, how to format date and time in excel, what are date and time functions in excel, how to do date and time calculations (adding, subtracting, multiplying etc. with dates and times).
What is Date and Time in Excel?
Many of you may already know that Excel dates and time are nothing but serial numbers. A date is a whole number and time is a fractional number. Dates in excel have different regional formatting. For example, in my system, it is mm/dd/YYYY (we will use this format throughout the article). You may be using the same date format or you could be using dd/mm/YYYY date format.
Date Formatting of Cell
There are multiple options available to format a date in Excel. Select a cell that may contain a date and press CTRL+1. This will open the Format Cells dialogue box. Here you can see two formatting options as Date and Time. In these categories, there are multiple date formattings available to suit your requirements.
 Dates:
Dates in Excel are mare serial numbers starting from 1-Jan-1900. A day in excel is equal to 1. Hence 1-Jan-1900 is 1, 2-Jan-1900 is 2, and 1-Jan-2000 is 36526.
Fun Fact: 1900 was not a leap year but excel accepts 29-Feb-1900 as a valid date. It was a desperate glitch to compete Lotus 1-2-3 back in those days.
Shortcut to enter static today’s date in excel is CTRL+; (Semicolon).
To add or subtract a day from a date you just need to subtract or add that number of days to that date.
Time:
Excel by default follows the hh:mm format for time (0 to 23 format). The hours and minutes are separated by a colon without any spaces in between. You can change it to hh:mm AM/PM format. The AM/PM must have 1 space from the time value. To include seconds, you can add :ss to hh:mm (hh:mm:ss). Any other time format is invalid.
Time is always associated with a date. The date comes before the time value separated with a space from time. If you don’t mention a date before time, by default it takes the first date of excel (which is 1/1/1900). Time in excel is a fractional number. It is shown on the right side of the decimal.
Hours:
Since 1 day is equal to 1 in excel and 1 day consists of 24 hours, 1 hour is equal to 1/24 in excel. What does that mean? It means that if you want to add or subtract 1 hour to time, you need to add or subtract 1/24. See the image below.
 you can say that 1 hour is equal to 0.041666667 (1/24).
Calculate hours between time in Excel
Minutes:
From the explanation of the hour in excel, you must have guessed that 1 Minute in excel is equal to 1/(24×60) (or 1/1440 or 0.000694444).
If you want to add a minute to an excel time, add 1/(24×60). See the image below. Sometimes you get the need to Calculate Minutes Between Dates & Time In Excel, you can read it here.
 Seconds:
Yes, a second in Excel is equal to 1/(24x60x60). To add or subtract seconds from a time, you just need to do the same things as we did in minutes and hours.
Date and Time in one cell
Dates and times are linked together. A date is always associated with a valid date and time is always associated with a valid excel date. Even if you are not able to see one of them.
If you only enter a time in a cell, the date of that cell will 1-Jan-1900, even if you are not able to see it. If you format that cell as a date-time format, you can see the associated date. Similarly, if you don’t mention time with the date, by default 12:00 AM is attached. See the image below.
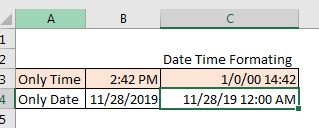
In the image above, we have time only in B3 and date only in B4. When we format these cells as mm/dd/yy hh:mm, we get both, time and date in both cells.
So, while doing date and time calculations in excel, keep this in check.
No Negative Time
As I told you the date and time in excel starts from 1-Jan-1900 12:00 AM. Any time before this is not a valid date in excel. If you subtract a value from a date that leads to before 1-Jan-1900 12:00, even one second, excel will produce ###### error. I have talked about it here and in Convert Date and Time from GMT to CST. It happens when we try to subtract something that leads to before 1 Jan-1900 12:00. Try it yourself. Write 12:00 PM and subtract 13 hours from it. see what you get.
Calculations with Dates and Time in Excel
Adding Days to a date:
Adding days to a date in excel is easy. To add a day to date just add 1 to it. See the image below.
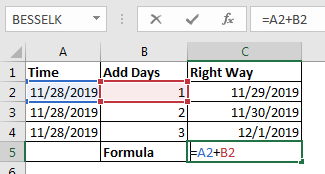
You should not add two dates to get the future date, as it will sum up the serial numbers of those days and you may get a date far in the future.
Subtracting Days from Date:
If you want to get a backdate from a date a few days before, then just subtract that number of days from the date and you will get backdate. For example, if I want to know what date was before 56 days since TODAY then I would write this formula in the cell.
This will return us the date of 56 before the current date.
Note: Remember that you can not have a date before 1/Jan/1900 in excel. If you get ###### error, this could be the reason.
Days between two dates:
To calculate days between two dates we just need to subtract the start date from the end date. I have already done an article on this topic. Go and check it out here. You can also use the Excel DAYS Function to calculate days between a start date and end date.
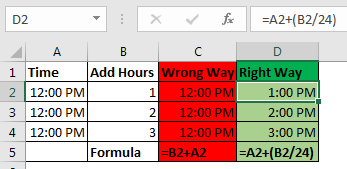
Adding Times:
There’s been a lot of queries on how to add time to excel as many people get confusing results when they do it. There are two types of addition in times. One is adding time to another time. In this case, both times are formatted as hh:mm time format. In this case, you can simply add these times.
The second case is when you don’t have additional time in time format. You just have numbers of hours, minutes and seconds to add. In that case, you need to convert those numbers to their time equivalents. Note these points to add hours, minutes and seconds to a date/time.
- To add N hours to an X time use formula =X+(N/24) (As 1=24 hours)
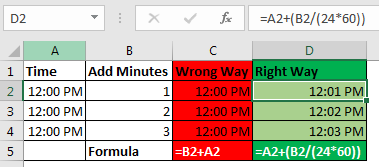
- To Add N minutes to X time use formula = X+(N/(24*60))
- To Add N Second to X time use formula = X+(N/(24*60*60))
Subtracting Times
It’s the same as adding time, just make sure that you don’t end up with a negative time value when subtracting, because there is no such thing as a negative number in excel.
Note: When you add or subtract time in excel that exceeds 24 hours of difference, excel will roll to the next or previous date. For example, if you subtract 2 hours from 29-Jan-2019 1:00 AM then it will roll back to 28-Jan-2019 11:00 PM. If you subtract 2 hours from 1:00 AM (does not have the date mentioned), Excel will return ###### error. I have told the reason at the beginning of the article.
Adding Months to a Date:
You can’t just add multiples of 30 to add months to date as different months have a different number of days. You need to be careful while adding months to Date. To add months to a date in excel, we use EDATE function of excel. Here I have a separate article on adding months to a date in different scenarios.
 Adding years to date:
Just like adding months to a date, it is not straightforward to add years to date. We need to use YEAR, MONTH, DAY function to add years to date. You can read about adding years to date here.
If you want to calculate years between dates then you can use this.
Excel Date and Time Handling Functions:
Since date and time are special in Excel, Excel provides special functions to handle them. Here I am mentioning a few of them.
- TODAY(): This function returns today’s date dynamically.
- DAY(): Returns Day of the month (returns number 1 to 31).
- DAYS(): Used to count the number of days between two dates.
- MONTH(): Used to get the month of the date (returns number 1 to 12).
- YEAR(): Returns year of the date.
- WEEKNUM(): Returns the weekly number of a date, in a year.
- WEEKDAY(): Returns the day number in a week (1 to 7) of the supplied date.
- WORKDAY(): Used to calculate working days.
- TIMEVALUE(): Used to extract Time value (serial number) from a text formatted date and time.
- DATEVALUE(): Used to extract date value (serial number) from a text formatted date and time.
These are some of the most useful data and time functions in excel. There are plenty more date and time functions. You can check them out here.
Date and Time Calculations
If I explain all of them here, this article will get too long. I have divided these time calculation techniques in excel into separate articles. Here I am mentioning them. You can click on them to read.
- Calculate days, months and years
- Calculate age from date of birth
- Multiplying time values and numbers.
- Get Month name from Date in Excel
- Get day name from Date in Excel
- How to get a quarter of the year from date
- How to Add Business Days in Excel
- Insert Date Time Stamp with VBA
So yeah guys, this is all about the date and time in excel you need to know about. I hope this article was useful to you. If you have any queries or suggestions, write them down in the comments section below.
Are you tired of trying to extract date or time from datetime values in Excel? This post will show you how it’s done. Whether you need to separate the date component, the time component, or both, this guide has you covered. You’ll learn how to use formulas and functions to easily extract date or time from datetime values in Excel.
This post will guide you how to extract time from a data and time value with a formula in Excel. How do I extract time from a date-time number in Excel 2013/2016. How to extract hour only from the date time format in Excel.
Table of Contents
- 1. Extract Date from Datetime
- 2. Extract Date from Text String
- 3. Extract Year from Date
- 4. Concatenate Date and Time
- 5. Extract Time from Date and Time
- 6. Extract Hour only from Date and Time
- 7. Split Date and Time in Excel
- 8. Convert Unix Timestamp to a Date in Excel
- 9. If function with dates
- 10. Time Calculations in Excel
- 11. Conclusion
- 12. Related Functions
To extract or get the date from a datetime value in one cell in Excel, you can use the following formula:
=TEXT(datetime,"MM/DD/YYYY").You need to replace “datetime” with the cell reference that contains the datetime value. This formula converts the datetime value to text in the desired date format (MM/DD/YYYY in this case).
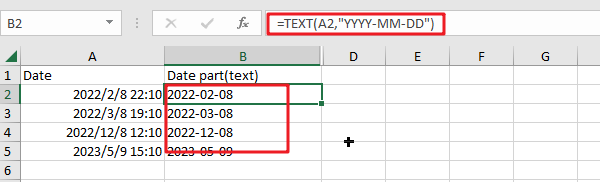
The result will be the date part of the datetime value, displayed as text string. If you need to use the result in further calculations, you can convert the result back to a date value by using the “DATEVALUE” function.
=DATEVALUE(B2)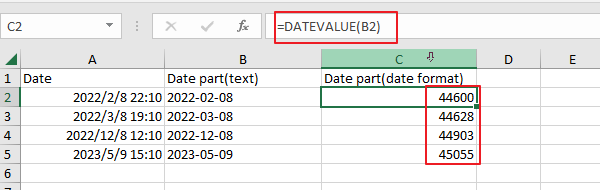
You can also use the “=INT()” function to convert a date and time to a date:
=INT(A2)
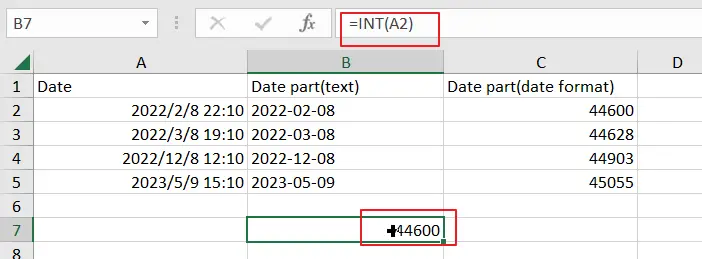
This function will return the date portion of the date and time value as a serial number, which can be formatted as a date using the “Number Format” option in the “Home” tab of the Excel ribbon.
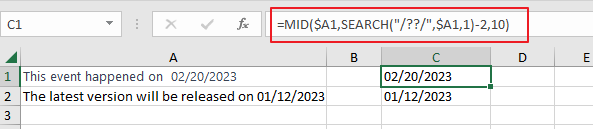
To extract the date from a text string in Excel, you can use the following formula:
=MID($A1,SEARCH("/??/",$A1,1)-2,10)where A1 is the cell that contains the text string.
This formula uses the SEARCH function to locate the position of the date part in the string and the MID function to extract the date part of the string.
If you wish to extract the year part from a date value in Excel, you can use the YEAR function.
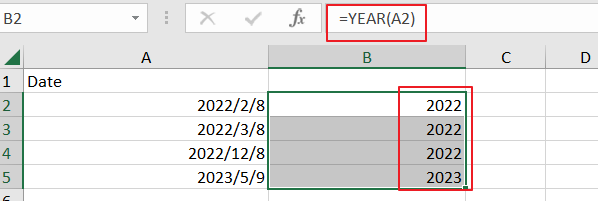
The YEAR function takes a date as an argument and returns the year component of the date, as a number.
For example, if cell A1 contains the date “02/08/2022“, you can extract the year using the following formula:
=YEAR(A1)This formula will return the year “2022“.
4. Concatenate Date and Time
If you want to concatenate date and time in Microsoft Excel, you can use the “&” operator in combination with TEXT function to join the values in separate cells into one cell.
The Steps are as below:
Step 1: Enter the following formula in a empty cell:
=TEXT(A2,"MM/DD/YYYY") & " " & TEXT(B2,"HH:MM:SS")- Replace A2 and B2 with the cells that contain your date and time, respectively.
- The formula uses the TEXT function to format the date and time values, and then joins them with a space in between.
Step 2: Press Enter to see the result of the formula.
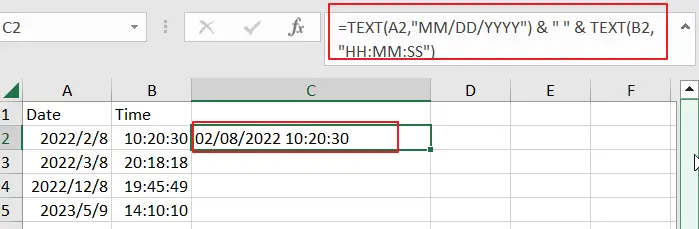
Step 3: If you want to copy the result to multiple cells, simply select the cell with the formula, and then drag the fill handle to the cells you want to copy the formula to.
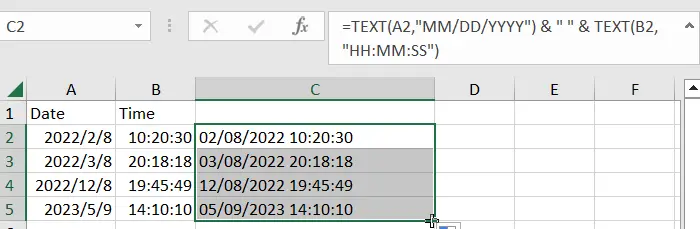
Your date and time values should now be combined into one cell in the format of “MM/DD/YYYY HH:MM:SS“.
5. Extract Time from Date and Time
If you want to extract time from a date and time in Excel, you can use a formula based on the TIME function, The HOUR function, the MINUTE function, and the SECOND function. For example, you want to get time value from a date and time value in Cell B1, you can write down the below formula.
=TIME(HOUR(B1),MINUTE(B1),SECOND(B1))Step 1: Type this formula into a blank cell C1 and press Enter key.
Step 2: Then you need to right click on the Cell C1, and select Format Cell from the pop-up menu list. The Format Cells dialog will open.
Step 3: switch to Number tab, and click Custom from the Category list. And select one type as: h:mm:ss. Click OK button.
#4 let’s see the result.
6. Extract Hour only from Date and Time
If you want to extract hour only, you just need to use the HOUR function. Like this:
=HOUR(B1)If you want to extract minute only from a date and time value, you just need to use the MINUTE function. Like this:
=MINUTE(B1)If you want to extract second only from a date and time value, you just need to use the SECOND function. Like this:
=SECOND(B1)7. Split Date and Time in Excel
If you want to split a date and time value into separate date and time values in Microsoft Excel, and you can use the above TEXT formula to Extract Date portion from date and time value.
Then you can use the below Text formula to extract the time portion of the date and time value:
=TEXT(A2,”HH:MM:SS”)Alternatively, you can also use the INT function to extract the date portion of the date and time value, enter the following formula in a new cell:
=INT(A2)Enter the following formula in another cell to extract the time portion:
=A2-INT(A1)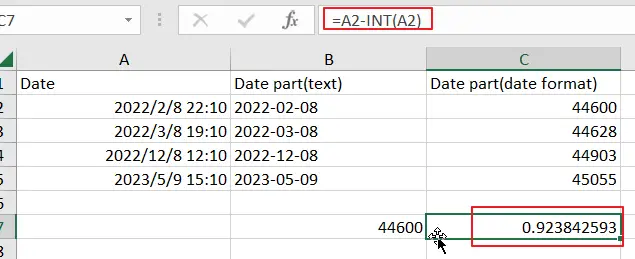
These formulas will return the date and time portions of the date and time value as serial numbers, which can be formatted as dates and times using the “Number Format” option in the “Home” tab of the Excel ribbon.
8. Convert Unix Timestamp to a Date in Excel
If you wish to convert a Unix timestamp to a date in Microsoft Excel, you can use the following TEXT formula:
=TEXT((A1/86400)+DATE(1970,1,1),"MM/DD/YYYY HH:MM:SS")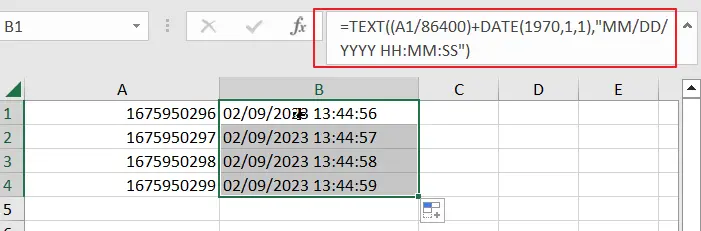
In this formula, “A1” represents the cell that contains the Unix timestamp. The Unix timestamp is divided by 86400 to convert it to the number of days since January 1, 1970. The result is then added to the date “1/1/1970” to give the date and time corresponding to the Unix timestamp. The “TEXT()” function is used to format the result as a date and time in the “MM/DD/YYYY HH:MM:SS” format.
Note that the Unix timestamp is typically stored as an integer value representing the number of seconds since January 1, 1970, so you may need to divide the value in the cell by 86400 to convert it to a number of days.
9. If function with dates
The IF function in Microsoft Excel can be used with dates to perform conditional tests based on the values of dates. Here’s the general syntax for using the IF function with dates:
=IF(condition, [value_if_true], [value_if_false])In this syntax, “condition” is the logical test that you want to perform, [value_if_true] is the value that will be returned if the condition is true, and [value_if_false] is the value that will be returned if the condition is false.
Here’s an example of using the IF function with dates:
=IF(A1>B1, "A1 is later", "B1 is later")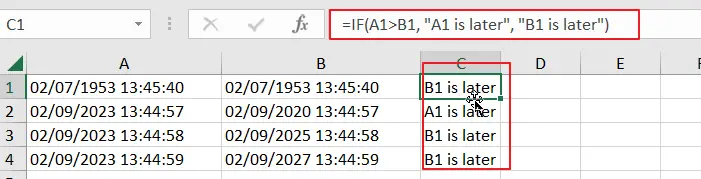
In this example, the condition “A1>B1” checks if the date in cell A1 is later than the date in cell B1. If the condition is true, the result will be “A1 is later“, and if the condition is false, the result will be “B1 is later“.
Note: When working with dates in Excel, it’s important to ensure that the dates are stored as dates and not as text. You can format a cell as a date by selecting it, right-clicking, selecting “Format Cells“, and then selecting the “Date” category under “Number“. From the available date formats, select the one you want to use and click “OK“.
10. Time Calculations in Excel
You can perform various calculations with times to get the result in terms of hours, minutes, or seconds. Here are a few examples of time calculations in Excel:
Add two times:
=A1+B1
In this example, the two times in cells A1 and B1 are added together to give the result in the same time format.
Subtract one time from another:
=A1-B1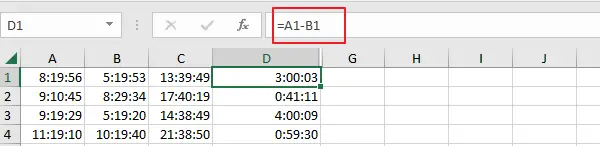
In this example, the time in cell B1 is subtracted from the time in cell A1 to give the result in terms of a time.
Calculate the difference between two times in hours:
=(A1-B1)*24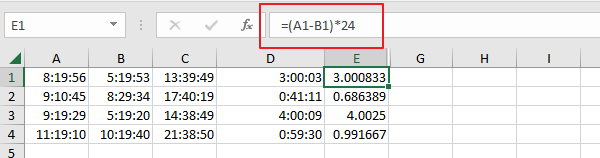
In this example, the difference between the two times is calculated in terms of hours by multiplying the result of the subtraction by 24.
Calculate the difference between two times in minutes:
=(A1-B1)*1440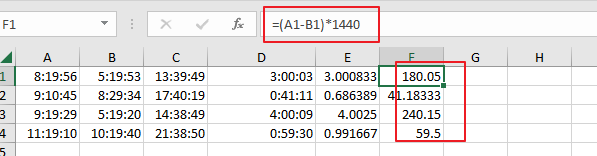
In this example, the difference between the two times is calculated in terms of minutes by multiplying the result of the subtraction by 1440 (24 hours * 60 minutes).
11. Conclusion
In conclusion, extracting dates or times from datetime values in Microsoft Excel is very useful for data analysis and manipulation. Whether you need to separate dates and times for the purpose of sorting or calculating, or just to display the information in a different format, there are several ways to achieve it. Excel offers a range of options for extracting date or time information from datetime values.
- Excel TIME function
The Excel TIME function returns a date in serial number format for a particular time (the hour, minute and second).The syntax of the TIME function is as below:= TIME(hour, minute, second)… - Excel HOUR Function
The Excel HOUR function returns the hour of a time value. Or returns an integer value that represent the hour component of a given time. The syntax of the HOUR function is as below:=HOUR (serial_number) … - Excel MINUTE Function
The Excel MINUTE function returns the minutes of a time value. And the minutes is an integer number from 0 to 59. The syntax of the MINUTE function is as below:=MINUTE (serial_number)… - Excel SECOND Function
The Excel SECOND function returns the seconds of a time value. Or returns an integer value that represent the second component of a given excel time. And the return value is between 0-59.The syntax of the SECOND function is as below:=SECOND (serial_number)…
Sample Files
1. DATE Function
DATE function returns a valid date based on the day, month, and year you input. In simple words, you need to specify all the components of the date and it will create a date out of that.
Syntax
DATE(year,month,day)
Arguments
- year: A number to use as the year.
- month: A number to use as the month.
- day: A number to use as a day.
Example
In the below example, we have used cell references to specify the year, month, and day to create a date.

You can also insert arguments directly into the function to create a date as you can see in the below example.

And in the below example, we have used different types of arguments to see the result returned by the function.

2. DATEVALUE Function
DATEVALUE function returns a date after converting a text (which represents a date) into an actual date. In simple words, it converts a date into an actual date which is formatted as text.
Syntax
DATEVAUE(date_text)
Arguments
- date_text: The date which is stored as a text and you want to convert that text into an actual date.
Example
In the below example, we have inserted a date directly into the function by using double quotation marks. If you skip adding these quotation marks it will return a #NAME? error in the result.

In the below example, all the dates on the left side are in textual format.
- A simple textual date that we have converted into a valid date.
- A date with all three components (Year, Month, or Day) in numbers.
- If there is no year in the textual date, it will take the current year as the year.
- And if you have a month name is in alphabets and no year, it will take the current year as a year.
- If you don’t have the day in your textual date it will take 1 as the day number.

3. DAY Function
DAY function returns the day number from a valid date. As you know, in Excel, a date is a combination of day, month, and year, DAY function gets the day from the date and ignores the rest of the part.
Syntax
DAY(serial_number)
Arguments
- serial_number: A valid serial number of the date from which you want to extract the day number.
Example
In the below example, we have used the DAY to simply get the day from a date.

And in the below example, we have used DAY with TODAY to create a dynamic formula that returns the current day number and it will update every time you open your worksheet or when you recalculate your worksheet.

5. DAYS Function
DAYS function returns the difference between two dates. It takes a start date and an end date and then returns the difference between them in days. This function was introduced in Excel 2013 so not available in prior versions.
Syntax
DAYS(end_date,start_date)
Arguments
- start_date: It is a valid date from where you want to start the days’ calculation.
- end_date: It is a valid date from where you want to end the days’ calculation.
Example
In the below example, we have referred the cell A1 as the start date and B1 as the end date and we have 9 days in the result.
Note: You can also use the subtract operator to get the difference between two dates.

In the below example, we have directly inserted two dates into the function to get the difference between them.

6. EDATE Function
EDATE function returns a date after adding a specified number of months to it. In simple words, you can add (with a positive number) or subtract (with a negative number) months from a date.
Syntax
EDATE(start_date,months)
Arguments
- start_date: The date from which you want to start the calculation.
- months: The number of months to calculate the future or the past date.
Example
Here we have used EDATE with different types of arguments.
- In the first example, we have used 5 as a several months and it has added exactly 5 months on 1-Jan-2016 and returned 01-June-2016.
- In the second example, we have used -1 month and it has given 31-Dec-2016, a date which is exactly 1 month back from 31-Jan-2016.
- In the third example, we have inserted a date directly into the function.

7. EOMONTH Function
EOMONTH function returns the end of the month date which is the number of months in the future or the past. You can use a positive number for a future date and a negative number for the past month’s date.
Syntax
EOMONTH(start_date,months)
Arguments
- start_date: A valid date from where you want to start your calculation.
- months: The number of months you want to calculate before and after the start date.
Example
In the below example, we have used EOMONTH with different types of arguments:

- We have mentioned 01-Jan-2016 as the start date and 5 months for getting a future date. As June is exactly 5 months after January, it has returned 30-Jun-2016 in the result.
- As I have already mentioned, EOMMONTH is smart enough to evaluate the total number of days in a month.
- If you mention a negative number, it simply returns a past date which is the number of months back you have mentioned.
- In the fourth example, we have used a date that is in text format and it has returned the date without returning any errors.
8. MONTH Function
MONTH function returns the month number (ranging from 0 to 12) from a valid date. As you know, in Excel, a date is a combination of day, month, and year, MONTH gets the month from the date and ignores the rest of the part.
Syntax
MONTH(serial_number)
Arguments
- serial_number: A valid date from which you want to get the month number.
Example
In the below example, we have used a MONTH in three different ways:

- In the FIRST example, we have simply used date and it has returned the 5 in the result which is the month number of MAY.
- In the SECOND example, we have supplied the date directly in the function.
- In the THIRD example, we have used the TODAY function to get the current date and MONTH has returned the month number from it.
9. NETWORKDAYS Function
NETWORKDAYS function returns the count of days between the start date and end date. In simple words, with NETWORKDAYS you can calculate the difference between two dates, after excluding Saturdays and Sundays, and holidays (which you specify).
Syntax
NETWORKDAYS(start_date,end_date,holidays)
Arguments
- start_date: A valid date from where you want to start your calculation.
- end_date: A valid date up to which you want to calculate working days.
- [holidays]: A valid date that represents a holiday between the start date and end date. You can refer to a cell, range of cells, or an array containing dates.
Example
In the below example, we have specified 10-Jan-2015 as a start date and 20-Feb-2015 as an end date.

We have 41 days between these two dates, out of which 11 days are weekends. After deducting those 11 days it has returned 30 working days.
Now in the below example with the same start and end dates, we have specified a holiday and, after deducting 11 days of the weekend and 1 holiday it has returned 29 working days.

Again with the same start and end dates, we have used a range of three cells for holidays to deduct from the calculation and, after deducting 11 weekend days and 3 holidays which I have mentioned It has returned 27 working days.

10. NETWORKDAYS.INTL Function
NETWORKDAYS.INTL Function returns the count of days between the start date and end date. Unlike NETWORKDAYS, NETWORKDAYS.INTL lets you specify which days you want to exclude from the calculation.
Syntax
NETWORKDAYS.INTL(start_date,end_date,weekend,holidays)
Arguments
- start_date: A valid date from where you want to start your calculation.
- end_date: A valid date up to which you want to calculate working days.
- [weekend]: A number represents to exclude weekends from the calculation.
- [holidays]: A list of dates that represents the holidays you want to exclude from the calculation.
Example
In the below example, we have used 01-Jan-2015 as a start date and 20-Jan-2015 as an end date. And we have specified 1 to take Sunday – Saturday as the weekend. The function has returned 14 days after excluding 6 weekend days.

Below, we have used the same dates. And I have used 11 in for weekend days which means it will only consider Sunday as a weekend. Along with that, we have also used 10-Jan-2015 as a holiday.

We have 3 Sundays between both dates and a holiday. After excluding all these days the function has returned 16 days in the result. Here in the below example, we have used range to specify holidays. If you have more than one date for the holidays you can refer to an entire range.

Quick Tip: If you want to create a dynamic range for holidays, you can use a table for that. If you want to choose custom days to count as working days or weekends, you can use the below format in the weekend argument.

Here, 0 represents a working day and 1 represents a non-working day. And, seven numbers represent 7 days of the week.
11. TODAY Function
The TODAY function returns the current date and time as per the system’s date and time. The date and time returned by the NOW function update continuously whenever you update anything in the worksheet.
Syntax
TODAY()
Arguments
- In the TODAY function, there is no argument, all you need to do is enter it in the cell and hit enter, but be careful as TODAY is a volatile function which updates its value every time you update your worksheet calculations.
Example
In the below example, we have used TODAY with other functions to get the current month number, current year, and current day.

12. WEEKDAY Function
WEEKDAY function returns a day number (ranging from 0 to 7) of the week from a date. In simple words, the WEEKDAY function takes a date and returns the day number of that date’s day.
Syntax
WEEKDAY (serial_number, [return_type])
Arguments
- serial_number: A valid date from which you want to get the week number.
- [return_type]: A number that represents the day of the week to start the week.
Example
In the below example, we have used a WEEKDAY with TODAY to get a dynamic weekday. It will give you the weekday whenever the current date changes. You can use this method in your dashboards to trigger some values which need to change when weekday change.

In the below example, we have used WEEKDAY with IF to create a formula that first checks the weekday of date and return “Weekday” or “Weekend” basis on the value return from WEEKDAY.

13. WEEKNUM Function
WEEKNUM function returns the week number of a date. In simple words, WEEKNUM returns the week number of dates that you specify ranging from 1 to 54.
Syntax
WEEKNUM(serial_number,return_type)
Arguments
- serial_number: A date for which you want to get the week number.
- [return_type]: A number to specify the starting day of the first week of the year. You have two systems to specify the starting date of the week.
Example
In the below example, we have used TODAY with WEEKNUM to get the week number of the current date. It will update the week number automatically every time the date changes.

In the below example, we have added the text “Week-” with the week number for a meaningful result.

14. YEAR Function
YEAR Function returns the year number from a valid date. As you know, in Excel a date is a combination of day, month, and year, and the YEAR function gets the year from the date and ignores the rest of the part.
Syntax
YEAR(date)
Arguments
- date: A date from which you want to get the year.
Example
In the below example, we have used the year function to get the year number from the dates. You can use this function where you have dates in your data and you only need the year number.

And in the below example, we have used today function to get the year number from the current date. It will always update the year whenever you recalculate your worksheet.
