
Содержание
- Generate .rdl file from Excel file
- 1 Answer 1
- Generating From Microsoft Excel
- VBA Blogs: Create text file from Excel table
- Generate XSD file from MS Excel file definition
- 2 Answers 2
- How to generate a custom word document using excel data
- 4 Answers 4
Generate .rdl file from Excel file
In a current project I have to generate an Excel report. I do have the the Excel file as a template which contains some static data along with some fields which contain parameter values.
On the bottom of the Excel file there should be a table which contains data from Dataset.
Now I am wondering if there is a way/ tool to generate the rdl file from the Excel file rather than creating it by myself (which would be very cumbersome. )
On the other hand is there a way to link static Excel content into the .rdl file?
1 Answer 1
You could use the excel spreadsheet as a data source for the report to pull the information in. But then it would need to be accessible from the report manager server if you’re planning on deploying the report. So unless the information in the spreadsheet is going to change I think this will likely be more trouble than it is worth.
If it isn’t necessary to deploy it to report manager then you could also try embedding the report in the excel file itself and use SSRS to update the dynamic content and you can just leave the static stuff already there. (Of course, depending on the complexity of what you’re doing you could also just automate all of the dynamic stuff in Excel VBA code too.) I’ve personally never done this, but I’ve found a couple of blog posts detailing how it could possibly be pulled off. I think this is nifty enough I may have to try it if I ever get the chance. You can even use cell values in the spreadsheet and pass them as parameter values to the report.
I’ve found a post on embedding the report data as an image that refreshes from the report server. On the upside it seems simple to pull off, but the downside is that it is an image and the numbers won’t be available to be individually selected only looked at. So it would be best for charts but not your data table.
Then there is this article which shows how to actually import the values into the spread sheet by pulling it in from SSRS in CSV format and using some VBA code to put it into the excel file. It is a more complicated solution but I think its a pretty cool idea, though I dunno how well it will work in practice.
Otherwise, I think you’re stuck recreating the static information and formatting from the excel file in your report.
Источник
Generating From Microsoft Excel
You can create an import file from a Microsoft Excel file. In the Excel file, you can create new dimensions and edit dimension and member properties
 To create an import file from a Microsoft Excel file:
Select From Excel File .
Click  , enter a location and file name for the Excel file to create, and click Save .
Optional : Select Save metadata file .
When Performance Management Architect imports an application, it is imported as an .xml file (metadata.xml). Performance Management Architect runs the transformation and creates an .ads file from the metadata.xml file. Typically, this file is used for troubleshooting purposes. For extremely large applications, we recommend that you do not select this option.
Click Execute to launch Excel and open the file.
When you open the file, you must enable macros.
The Excel workbook is created with two existing sheets – Alias and Dimension Association. For each workbook there can be only one sheet for Alias and one sheet for Dimension Association.
On the Alias sheet, enter the language aliases to be used.
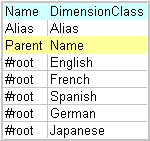
It is important to enter the languages in the Alias sheet before creating dimensions in the workbook because the utility automatically creates extra columns in the dimension sheet so you can enter the aliases for members in the same row. If you add languages after creating dimensions, you will need to manually add extra columns for member aliases.
To generate an *.ads file with aliases, for each dimension sheet, change the Alias column header from «Alias» to «Default» (do not include quotes). Then, modify any additional aliases at the end of the columns by adding new ones in the format Alias=English, Alias=French (each in a separate column). It is important that all aliases are referenced in the Alias sheet. After the members have been entered for each dimension and association entered, use the File Generator to generate the *.ads flat file. Once generated, make sure that all aliases are represented as entered in the Excel worksheet.
Select EPMA Utilities , Manage Dimensions .
In Excel 2007, you may need to click Add-Ins to access EPMA Utilities.
In the Dimension Manager, select one or more application types for which to create dimensions.
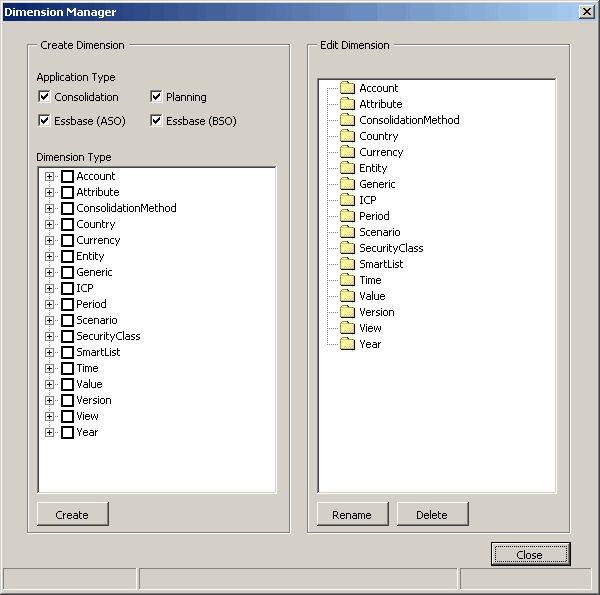
Selecting the application type determines what member properties display in the columns of the dimension sheet. If you select Consolidation, only member properties from the consolidation category display. If you select all application types, all member properties from all categories display.
Select the dimensions that you want to create.
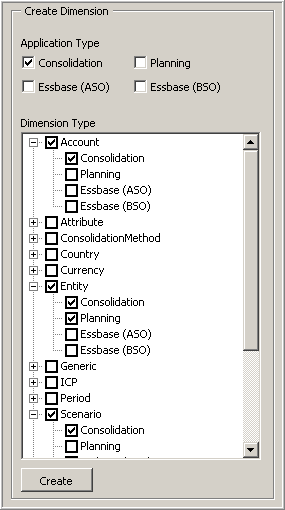
You can add application types on a dimension by dimension basis.
For each dimension that you create, a sheet is added to the Excel workbook.
For each dimension sheet, column headers in Row 1 of the sheet are dimension properties. Column headers in Row 3 of the sheet are member properties.

Enter dimension members and member properties for each dimension.
You enter dimension members in the parent and name columns. For the top-level member of a dimension, enter #root in the parent column.
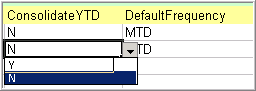
To modify properties, click in the cell to display a drop-down list from which you can select a property value or enter information in the cell.
Select EPMA Utilities , Dimension Association .
For information on dimension associations, see Financial Management Dimension Associations.
In the Target Dimension column, select the cell, and from the drop-down list, select the dimension.
Select EPMA Utilities , Generate Flat File .
Select the type of file delimiter to use in the file.
Click Generate Flat File .
Click Save Flat File to save the file in .ADS format.
Источник
VBA Blogs: Create text file from Excel table
Welcome back to the VBA blog! This week we are going to expand on our blog from last week, relating to file path selectors.
Today, we are going to create a VBA script that will create a text file based on a specific table in the Excel workbook. This is useful to create text templates for a range of purposes, such as uploading data into databases and other systems that only accept text files.
We would like to save the following table (Table1) in Excel:
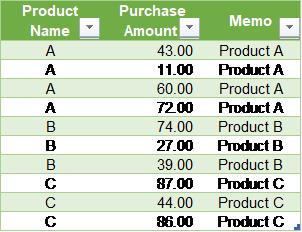
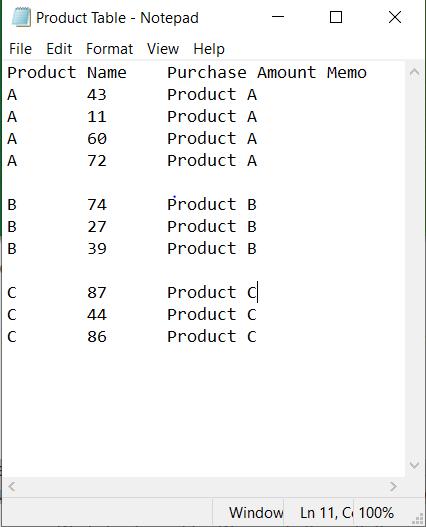
to a text file as below. More specifically, we want to generate a text file with the same content as listed in the Excel table above and insert blank rows between lines with different descriptions in Memo column. Also. We want to keep the structure of the Excel table unchanged:
The first step involves declaring relevant variables.
Dim filename As String, lineText As String
Dim myrng As Range
Then, we define the file path in the local drive where we want the text file to be saved. The code “ThisWorkbook.path” defines the file path for the current workbook and we use this file path as the root directory for the text file. The code “Worksheets(«Product Table»).Name” defines the name of the text file to be saved.
filename = ThisWorkbook.path & «» & Worksheets(«Product Table»).Name & «.txt»
The next line of code sets up the output file and gives a file number for the output file. The file number allows us to distinguish between the different output files if we have more than one output text file.
Open filename For Output As #1
Then, we assign the target table (Table1) range to the pre-defined variable myrng and we will use this variable later on in the code.
Set myrng = Range(«Table1»)
The next several lines of code loops through the rows and columns of the table by using a For Loop. We’ve covered the For loop before in a previous blog, you can read about it here.
For i = 1 To myrng.Rows.Count + 1
For j = 1 To myrng.Columns.Count
The line of code below is then inserted into the loop where we write the content of each row in Table1 to the text file. The code “IIf(j = 1, «», lineText & Chr(9))” defines that if j = 1, then print blank to ignore the content in the first column. If not, we use the combined context of “lineText” and Chr(9) which is equivalent to Horizontal Tab defined in ASCII codes. Chr(9) is used as the Tab delimited for the text file. The next code “myrng.Cells(i — 1, j)” finds the content of the previous row in the data table and then is concatenated to context defined before. Then the new concatenated context is assigned to the variable “lineText” which adds up the content of each column in the data table.
lineText = IIf(j = 1, «», lineText & Chr(9)) & myrng.Cells(i — 1, j)
After defining the content to be printed in the text file, we print out the content by using “Print” syntax. The code below inserts the content of “lineText” into the target text file line by line. Print # statement writes display-formatted data to a sequential file. The first parameter is mandatory and any valid file number could be applied. The next parameter is outputlist which is lineText in our case, it defines the expression to be printed. To view more details about “Print #” statement, please go to here.
Print #1, lineText
In order to create the blank line between the two records with different memo descriptions, we have to write additional code. The code below identifies the contents in the third column of the data table. Firstly, we define the criteria “i > 2”, this is used to exclude the header row because we don’t want to insert a blank row between the header and the first row of the data table. If the content of the current row of data table at the third column is different from the content of the next row, a blank line is inserted. If not, then do nothing.
If i > 2 And Cells(i, 3).Value <> Cells(i + 1, 3) Then
Print #1, lineText
Next, we end the loop and close the text file which is defined as output #1:
Combining all the lines of code together, we get this:
Dim filename As String, lineText As String
Dim myrng As Range
filename = ThisWorkbook.path & «» & Worksheets(«Product Table»).Name & «.txt»
Open filename For Output As #1
Set myrng = Range(«Table1»)
For i = 1 To myrng.Rows.Count + 1
For j = 1 To myrng.Columns.Count
lineText = IIf(j = 1, «», lineText & Chr(9)) & myrng.Cells(i — 1, j)
Print #1, lineText
If i > 2 And Cells(i, 3).Value <> Cells(i + 1, 3) Then
Print #1, lineText
This way, we can create the required text file from the target table without changing the structure in the Excel file.
Источник
Generate XSD file from MS Excel file definition
Hi, I have an Excel that contains fields names and type like the following example.
I would like to generate an XSD from the description that I have.
Is there a tool for this?

2 Answers 2
In notepad, write your new schema like this:
Save the file as schema.xml

- Click Add
- Select schema.xml and click OK twice
- Now simply drag (map) the 4 elements from the tree onto the worksheet (row 1). Image shows the first two done.

- On the Developer tab, under the XML group, click Export.
- Save your file as data-set.xml and press Enter.
Result will look like this:

Note: there is no solution using just Excel.
This was true in 2013 when the OP asked the question, and is still true now, as far as I can tell.
The answers provided on this page, though they use external tooling, represent the only solutions on the internet at this time, and have since been viewed 13,000 times.
If you or anyone you know have a solution using only Excel to generate XSD, please add it, because this is clearly something that would help many people.
Источник
How to generate a custom word document using excel data
Basically we have to make meeting agendas for our conferences (where many firms and attend) and it’s a round table discussion in which one firm is addressed at a time. The general layout is:
My company has to make these frequently and the Firm and representatives are all held in excel files. Is there a way to quickly generate this document?
4 Answers 4
Yes, you can accomplish this using mail merge.
Open your agenda template and go to the Mailings ribbon. Go to «Select Recipients» and choose «Use an Existing List» from the drop down menu. Once that is linked, you can insert fields in the document. Go to «Insert Merge Field» to select the fields to insert. Once you’re finished, go to «Preview Results» to review the document. You’ll want to select the correct record at this time, you can either jump through the records using the arrows to find it or go to «Edit Recipient List» for a custom list. After that, go to «Finish & Merge» and select «Edit Individual Documents» and select the choice for «Current Record» (if you have multiple, I don’t recommend doing them all together because you’ll still have to separate them into individual files). This will create the document and all you need to do is save it.

I would like to suggest two possible solutions, 1st is Non-VBA and another is VBA (Macro).
Method 1 Non VBA:
- Create a single Sheet Workbook or better enter your meeting data in form of TABLE in Excel.
- Open blank file in Word.
- From Insert Tab, select Object from the Drop down button.
- Then click Create from File tab, and Browse to the Workbook you wish to insert.
- Next is, to choose whether you wish the object to be linked or not.
- Finish with Ok.
Method 2 VBA (Macro):
Note:
- This needs a TABLE in Excel (better work with single Sheet file).
- In VB editor click Tools then References and add this Microsoft Word 12.0 Object Library, finish with Ok.
Create Command Button in Excel Sheet and Copy & Paste this code for it.
Источник
You could use the excel spreadsheet as a data source for the report to pull the information in. But then it would need to be accessible from the report manager server if you’re planning on deploying the report. So unless the information in the spreadsheet is going to change I think this will likely be more trouble than it is worth.
If it isn’t necessary to deploy it to report manager then you could also try embedding the report in the excel file itself and use SSRS to update the dynamic content and you can just leave the static stuff already there. (Of course, depending on the complexity of what you’re doing you could also just automate all of the dynamic stuff in Excel VBA code too.) I’ve personally never done this, but I’ve found a couple of blog posts detailing how it could possibly be pulled off. I think this is nifty enough I may have to try it if I ever get the chance. You can even use cell values in the spreadsheet and pass them as parameter values to the report.
I’ve found a post on embedding the report data as an image that refreshes from the report server. On the upside it seems simple to pull off, but the downside is that it is an image and the numbers won’t be available to be individually selected only looked at. So it would be best for charts but not your data table.
Then there is this article which shows how to actually import the values into the spread sheet by pulling it in from SSRS in CSV format and using some VBA code to put it into the excel file. It is a more complicated solution but I think its a pretty cool idea, though I dunno how well it will work in practice.
Otherwise, I think you’re stuck recreating the static information and formatting from the excel file in your report.
Welcome back to the VBA blog! This week we are going to expand on our blog from last week, relating to file path selectors.
Today, we are going to create a VBA script that will create a text file based on a specific table in the Excel workbook. This is useful to create text templates for a range of purposes, such as uploading data into databases and other systems that only accept text files.
We would like to save the following table (Table1) in Excel:
to a text file as below. More specifically, we want to generate a text file with the same content as listed in the Excel table above and insert blank rows between lines with different descriptions in Memo column. Also. We want to keep the structure of the Excel table unchanged:
The first step involves declaring relevant variables.
Dim filename As String, lineText As String
Dim myrng As Range
Dim i, j
Then, we define the file path in the local drive where we want the text file to be saved. The code “ThisWorkbook.path” defines the file path for the current workbook and we use this file path as the root directory for the text file. The code “Worksheets(«Product Table»).Name” defines the name of the text file to be saved.
filename = ThisWorkbook.path & «» & Worksheets(«Product Table»).Name & «.txt»
The next line of code sets up the output file and gives a file number for the output file. The file number allows us to distinguish between the different output files if we have more than one output text file.
Open filename For Output As #1
Then, we assign the target table (Table1) range to the pre-defined variable myrng and we will use this variable later on in the code.
Set myrng = Range(«Table1»)
The next several lines of code loops through the rows and columns of the table by using a For Loop. We’ve covered the For loop before in a previous blog, you can read about it here.
For i = 1 To myrng.Rows.Count + 1
For j = 1 To myrng.Columns.Count
Next j
Next
The line of code below is then inserted into the loop where we write the content of each row in Table1 to the text file. The code “IIf(j = 1, «», lineText & Chr(9))” defines that if j = 1, then print blank to ignore the content in the first column. If not, we use the combined context of “lineText” and Chr(9) which is equivalent to Horizontal Tab defined in ASCII codes. Chr(9) is used as the Tab delimited for the text file. The next code “myrng.Cells(i — 1, j)” finds the content of the previous row in the data table and then is concatenated to context defined before. Then the new concatenated context is assigned to the variable “lineText” which adds up the content of each column in the data table.
lineText = IIf(j = 1, «», lineText & Chr(9)) & myrng.Cells(i — 1, j)
After defining the content to be printed in the text file, we print out the content by using “Print” syntax. The code below inserts the content of “lineText” into the target text file line by line. Print # statement writes display-formatted data to a sequential file. The first parameter is mandatory and any valid file number could be applied. The next parameter is outputlist which is lineText in our case, it defines the expression to be printed. To view more details about “Print #” statement, please go to here.
In order to create the blank line between the two records with different memo descriptions, we have to write additional code. The code below identifies the contents in the third column of the data table. Firstly, we define the criteria “i > 2”, this is used to exclude the header row because we don’t want to insert a blank row between the header and the first row of the data table. If the content of the current row of data table at the third column is different from the content of the next row, a blank line is inserted. If not, then do nothing.
If i > 2 And Cells(i, 3).Value <> Cells(i + 1, 3) Then
lineText = «»
Print #1, lineText
Else
‘Do Nothing
End If
Next, we end the loop and close the text file which is defined as output #1:
Combining all the lines of code together, we get this:
Sub SaveAsTxtFile()
Dim filename As String, lineText As String
Dim myrng As Range
Dim i, j
filename = ThisWorkbook.path & «» & Worksheets(«Product Table»).Name & «.txt»
Open filename For Output As #1
Set myrng = Range(«Table1»)
For i = 1 To myrng.Rows.Count + 1
For j = 1 To myrng.Columns.Count
lineText = IIf(j = 1, «», lineText & Chr(9)) & myrng.Cells(i — 1, j)
Next j
Print #1, lineText
If i > 2 And Cells(i, 3).Value <> Cells(i + 1, 3) Then
lineText = «»
Print #1, lineText
Else
‘Do Nothing
End If
Next i
Close #1
End Sub
This way, we can create the required text file from the target table without changing the structure in the Excel file.
See you next week for more VBA tips!
This article talks about How to Create KML file from Excel file in MS Excel. By following this article, you can create a KML file from geographic data inside Excel sheet. For this purpose, we going to use macro inside Excel. Don’t worry, you don’t have to define a macro yourself. Follow this link and download the predefined macro-enabled excel file from there. This file will do all the stuff for you, you just have to enter the geographic data, like Longitude, latitude, etc.
You can also do the same with the help of a free XLS to KML Converter, follow Free XLS to KML Converter JXLStoKML tutorial for step by step guide to do that.
Before You Begin:
Before using this Excel file, make sure macros are enabled in your MS Excel. You can check/enable that by following these simple steps:
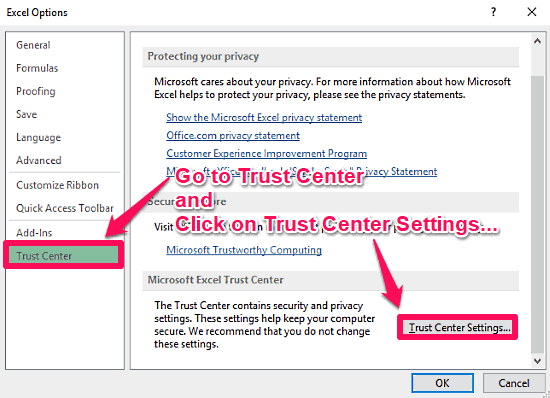
Open MS Excel and select a blank workbook. Then, go to File -> Options. In the options menu, click on Trust Center from the left side panel. Click on the Trust Center Settings in the Trust Center window, present under Microsoft Excel Trust Center. The screenshot below can be seen for help.
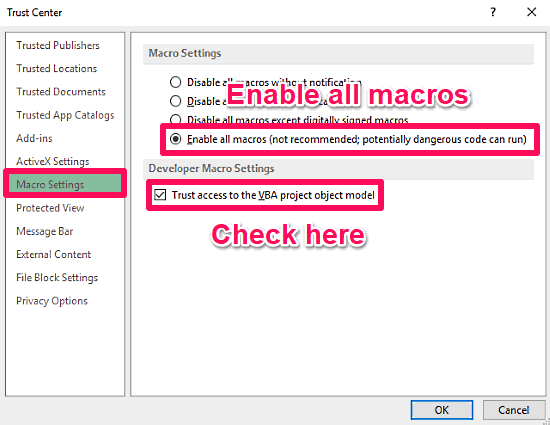
Now from the left panel go to Macro Settings to enable all macros. Also, the Trust Access box needs to be checked.
At this point, you enabled the macros in your MS Excel. Now, let’s see how you can generate KML file from an Excel sheet.
For this purpose, follow this link and download macro enable Excel file. You can easily create KML file from Excel using this Excel sheet. This Excel file contains two sheets, Sheet1 and Sheet2.
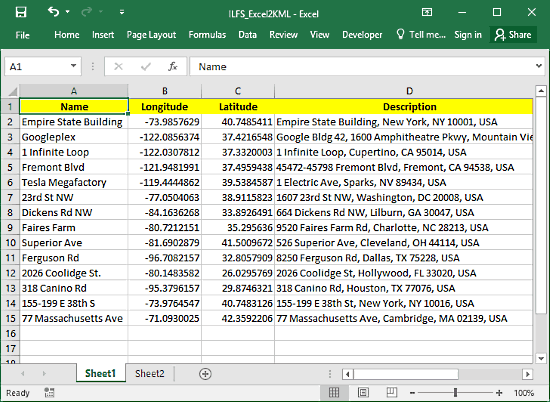
Sheet1
This sheet is for the data. Here, you will see some templates of geographic data. Feel free to delete those entries and enter your data. Follow the same structure though (1st row for Name, 2nd for Longitude, 3rd for Latitude, and 4th for Description). Enter the Longitude and Latitude data in their respective columns. You can define a name for a particular location in its respective column. A description can also be defined under Description column for the locations.
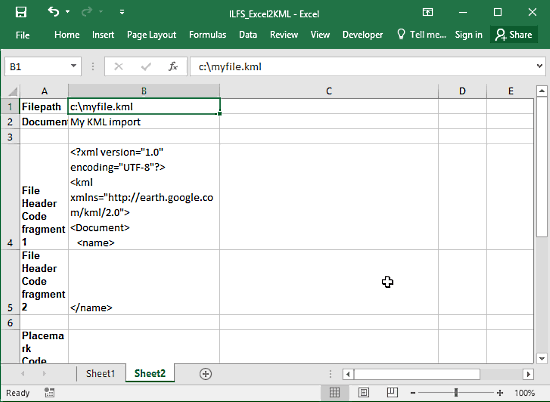
Sheet2
You don’t have to do anything on this sheet. It holds XML data for creating the KML file. But, you can define a name along with destination folder for the KML file in the first row (C:myfile.kml). As you can see, the created KML file will be saved in C drive with the name myfile.kml.
Create KML File from Excel:
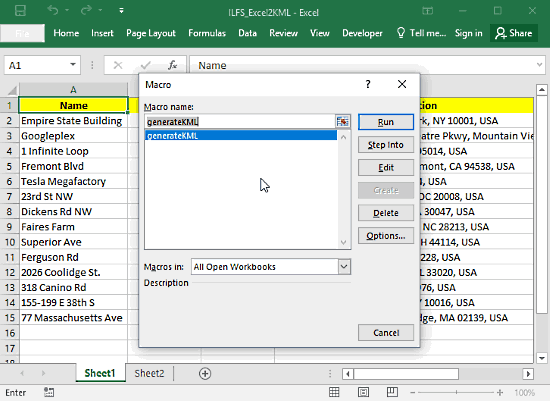
After entering your data in the Sheet1, press ALT+F8 for accessing the macros. This will open a Macro popup on your screen. Select the generateXML macro and click on Run. This will create a KML file respective to your data in the location defined in Sheet2 i.e. C drive (by default).
If you experience any file access error, that is because the file doesn’t have permission to write in C drive (generally happens in Windows 10). In that case, just enter another directory in the 1st row of Sheet2, like, E:/myfile.kml or D:/myfile.kml, etc.
Closing Words:
With the help of this macro-enabled Excel file, you can create KML file from Excel file within MS Excel. The process is straightforward and easy to follow. You can do this for as many entries as you want.
Basically we have to make meeting agendas for our conferences (where many firms and attend) and it’s a round table discussion in which one firm is addressed at a time. The general layout is:
1.) Firm 1 - Representative
bullet point
bullet point
bullet point
2.) Firm 2 - Representative
bullet point
bullet point
bullet point
3.) Firm 3 - Representative
etc. etc.
My company has to make these frequently and the Firm and representatives are all held in excel files. Is there a way to quickly generate this document?
![]()
asked Jul 16, 2019 at 20:28
![]()
3
Yes, you can accomplish this using mail merge.
Open your agenda template and go to the Mailings ribbon. Go to «Select Recipients» and choose «Use an Existing List» from the drop down menu. Once that is linked, you can insert fields in the document. Go to «Insert Merge Field» to select the fields to insert. Once you’re finished, go to «Preview Results» to review the document. You’ll want to select the correct record at this time, you can either jump through the records using the arrows to find it or go to «Edit Recipient List» for a custom list. After that, go to «Finish & Merge» and select «Edit Individual Documents» and select the choice for «Current Record» (if you have multiple, I don’t recommend doing them all together because you’ll still have to separate them into individual files). This will create the document and all you need to do is save it.
answered Jul 17, 2019 at 17:34
![]()
Karen927Karen927
7223 silver badges13 bronze badges
I would like to suggest two possible solutions, 1st is Non-VBA and another is VBA (Macro).
Method 1 Non VBA:
- Create a single Sheet Workbook or better enter your meeting data in form of TABLE in Excel.
- Open blank file in Word.
- From Insert Tab, select Object from the Drop down button.
- Then click Create from File tab, and Browse to the Workbook you wish to insert.
- Next is, to choose whether you wish the object to be linked or not.
- Finish with Ok.
Method 2 VBA (Macro):
Note:
- This needs a TABLE in Excel (better work with single Sheet file).
- In VB editor click Tools then References and add this Microsoft Word 12.0 Object Library, finish with Ok.
-
Create Command Button in Excel Sheet and Copy & Paste this code for it.
 Sub CommandButton1_click()


   Dim tbl As Excel.Range
   Dim WordApp As Word.Application
   Dim myDoc As Word.Document
   Dim WordTable As Word.Table


   Application.ScreenUpdating = False
   Application.EnableEvents = False


    Set tbl = ThisWorkbook.Worksheets(Sheet1.Name).ListObjects("Table1").Range


    On Error Resume Next


     Set WordApp = GetObject(class:="Word.Application")


      Err.Clear

       If WordApp Is Nothing Then Set WordApp = CreateObject(class:="Word.Application")


       If Err.Number = 429 Then
MsgBox "MS-Word not found, aborting now !!."
       GoTo EndRoutine
       End If

       On Error GoTo 0


       WordApp.Visible = True
       WordApp.Activate


       Set myDoc = WordApp.Documents.Add


       tbl.Copy


  myDoc.Paragraphs(1).Range.PasteExcelTable _
        LinkedToExcel:=False, _
        WordFormatting:=False, _
        RTF:=False


        Set WordTable = myDoc.Tables(1)
         WordTable.AutoFitBehavior (wdAutoFitWindow)

        EndRoutine:

        Application.ScreenUpdating = True
        Application.EnableEvents = True


        Application.CutCopyMode = False

        End Sub
N.B. In this code Sheet & Table Names are editable.
answered Jul 17, 2019 at 8:03
![]()
Rajesh SinhaRajesh Sinha
8,8926 gold badges15 silver badges35 bronze badges
I’ve created this free tool to generate word documents from excel data , word template must have placeholders with the columns names as follow ${col_name}
Might be useful !
https://it-tun.com/exceltoword/
answered Nov 7, 2020 at 21:59
![]()