
The first step to working with VBA in Excel is to get yourself familiarized with the Visual Basic Editor (also called the VBA Editor or VB Editor).
In this tutorial, I will cover all there is to know about the VBA Editor and some useful options that you should know when coding in Excel VBA.
What is Visual Basic Editor in Excel?
Visual Basic Editor is a separate application that is a part of Excel and opens whenever you open an Excel workbook. By default, it’s hidden and to access it, you need to activate it.
VB Editor is the place where you keep the VB code.
There are multiple ways you get the code in the VB Editor:
- When you record a macro, it automatically creates a new module in the VB Editor and inserts the code in that module.
- You can manually type VB code in the VB editor.
- You can copy a code from some other workbook or from the internet and paste it in the VB Editor.
Opening the VB Editor
There are various ways to open the Visual Basic Editor in Excel:
- Using a Keyboard Shortcut (easiest and fastest)
- Using the Developer Tab.
- Using the Worksheet Tabs.
Let’s go through each of these quickly.
Keyboard Shortcut to Open the Visual Basic Editor
The easiest way to open the Visual Basic editor is to use the keyboard shortcut – ALT + F11 (hold the ALT key and press the F11 key).

As soon as you do this, it will open a separate window for the Visual Basic editor.
This shortcut works as a toggle, so when you use it again, it will take you back to the Excel application (without closing the VB Editor).
The shortcut for the Mac version is Opt + F11 or Fn + Opt + F11
Using the Developer Tab
To open the Visual Basic Editor from the ribbon:
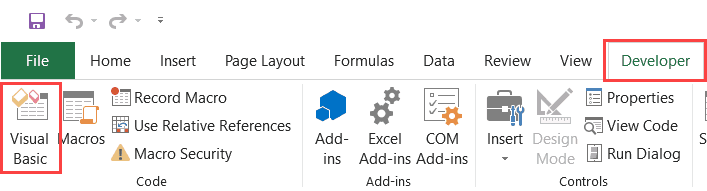
- Click the Developer tab (if you don’t see a developer tab, read this on how to get it).
- In the Code group, click on Visual Basic.
Using the Worksheet Tab
This is a less used method to open the Vb Editor.
Go to any of the worksheet tabs, right-click, and select ‘View Code’.
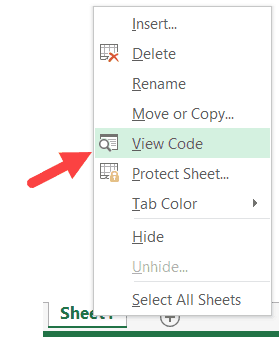
This method wouldn’t just open the VB Editor, it will also take you to the code window for that worksheet object.
This is useful when you want to write code that works only for a specific worksheet. This is usually the case with worksheet events.
Anatomy of the Visual Basic Editor in Excel
When you open the VB Editor for the first time, it may look a bit overwhelming.
There are different options and sections that may seem completely new at first.
Also, it still has an old Excel 97 days look. While Excel has improved tremendously in design and usability over the years, the VB Editor has not seen any change in the way it looks.
In this section, I will take you through the different parts of the Visual Basic Editor application.
Note: When I started using VBA years ago, I was quite overwhelmed with all these new options and windows. But as you get used to working with VBA, you would get comfortable with most of these. And most of the time, you’ll not be required to use all the options, only a hand full.
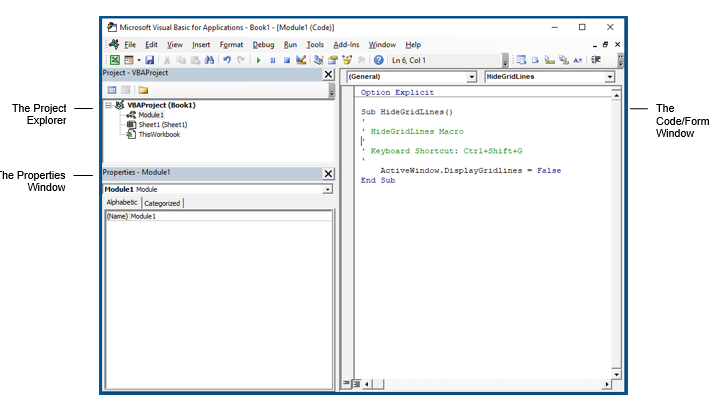
Below is an image of the different components of the VB Editor. These are then described in detail in the below sections of this tutorial.
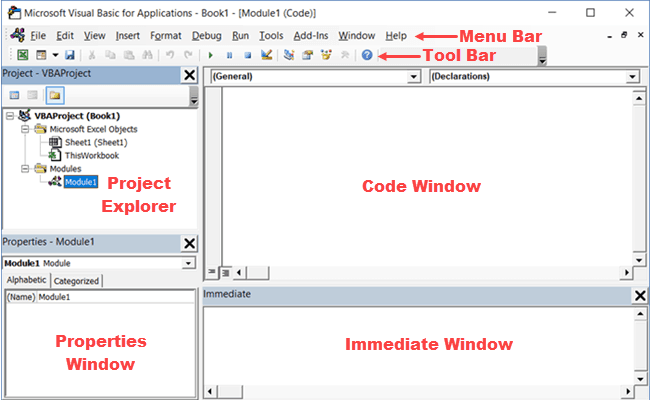
Now let’s quickly go through each of these components and understand what it does:
Menu Bar
This is where you have all the options that you can use in the VB Editor. It is similar to the Excel ribbon where you have tabs and options with each tab.
You can explore the available options by clicking on each of the menu element.
You will notice that most of the options in VB Editor have keyboard shortcuts mentioned next to it. Once you get used to a few keyboard shortcuts, working with the VB Editor becomes really easy.
Tool Bar
By default, there is a toolbar in the VB Editor which has some useful options that you’re likely to need most often. This is just like the Quick Access Toolbar in Excel. It gives you quick access to some of the useful options.
You can customize it a little by removing or adding options to it (by clicking on the small downward pointing arrow at the end of the toolbar).

In most cases, the default toolbar is all you need when working with the VB Editor.
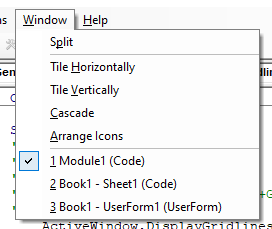
You can move the toolbar above the menu bar by clicking on the three gray dots (at the beginning of the toolbar) and dragging it above the menu bar.
Note: There are four toolbars in the VB Editor – Standard, Debug, Edit, and User form. What you see in the image above (which is also the default) is the standard toolbar. You can access other toolbars by going to the View option and hovering the cursor on the Toolbars option. You can add one or more toolbars to the VB Editor if you want.
Project Explorer
Project Explorer is a window on the left that shows all the objects currently open in Excel.
When you’re working with Excel, every workbook or add-in that is open is a project. And each of these projects can have a collection of objects in it.
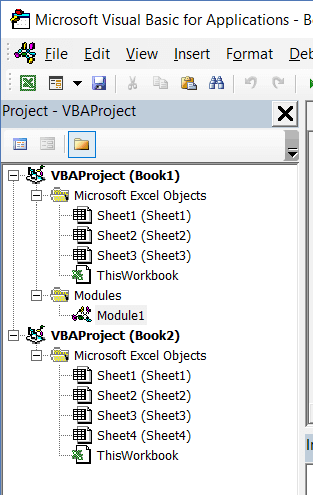
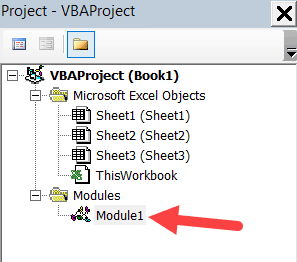
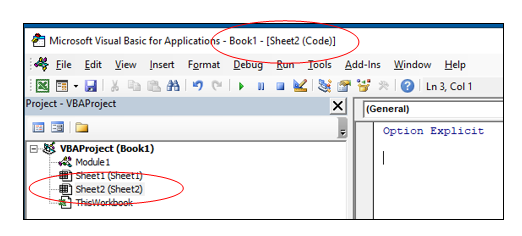
For example, in the below image, the Project Explorer shows the two workbooks that are open (Book1 and Book2) and the objects in each workbook (worksheets, ThisWorkbook, and Module in Book1).
There is a plus icon to the left of objects that you can use to collapse the list of objects or expand and see the complete list of objects.
The following objects can be a part of the Project Explorer:
- All open Workbooks – within each workbook (which is also called a project), you can have the following objects:
- Worksheet object for each worksheet in the workbook
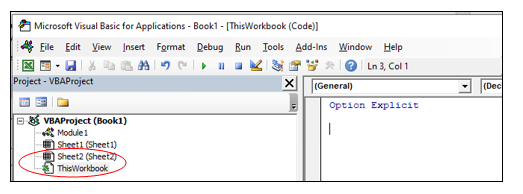
- ThisWorkbook object which represents the workbook itself
- Chartsheet object for each chart sheet (these are not as common as worksheets)
- Modules – This is where the code that is generated with a macro recorder goes. You can also write or copy-paste VBA code here.
- All open Add-ins
Consider the Project Explorer as a place that outlines all the objects open in Excel at the given time.
The keyboard shortcut to open the Project Explorer is Control + R (hold the control key and then press R). To close it, simply click the close icon at the top right of the Project Explorer window.
Note: For every object in Project Explorer, there is a code window in which you can write the code (or copy and paste it from somewhere). The code window appears when you double click on the object.
Properties Window
Properties window is where you get to see the properties of the select object. If you don’t have the Properties window already, you can get it by using the keyboard shortcut F4 (or go to the View tab and click Properties window).
Properties window is a floating window which you can dock in the VB Editor. In the below example, I have docked it just below the Project Explorer.
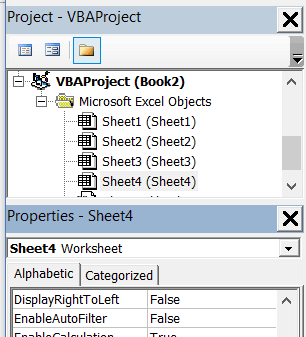
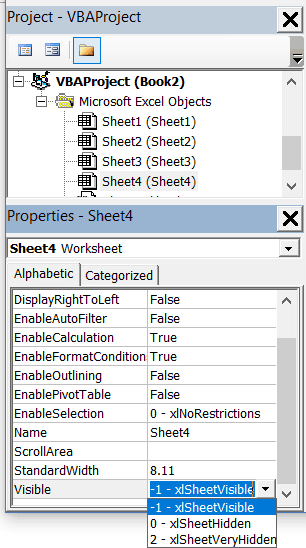
Properties window allows us to change the properties of a selected object. For example, if I want to make a worksheet hidden (or very hidden), I can do that by changing the Visible Property of the selected worksheet object.
Related: Hiding a Worksheet in Excel (that can not be un-hidden easily)
Code Window
There is a code window for each object that is listed in the Project Explorer. You can open the code window for an object by double-clicking on it in the Project Explorer area.
Code window is where you’ll write your code or copy paste a code from somewhere else.
When you record a macro, the code for it goes into the code window of a module. Excel automatically inserts a module to place the code in it when recording a macro.
Related: How to Run a Macro (VBA Code) in Excel.
Immediate Window
The Immediate window is mostly used when debugging code. One way I use the Immediate window is by using a Print.Debug statement within the code and then run the code.
It helps me to debug the code and determine where my code gets stuck. If I get the result of Print.Debug in the immediate window, I know the code worked at least till that line.
If you’re new to VBA coding, it may take you some time to be able to use the immediate window for debugging.
By default, the immediate window is not visible in the VB Editor. You can get it by using the keyboard shortcut Control + G (or can go to the View tab and click on ‘Immediate Window’).
Where to Add Code in the VB Editor
I hope you now have a basic understanding of what VB Editor is and what all parts it has.
In this section of this tutorial, I will show you where to add a VBA code in the Visual Basic Editor.
There are two places where you can add the VBA code in Excel:
- The code window for an object. These objects can be a workbook, worksheet, User Form, etc.
- The code window of a module.
Module Code Window Vs Object Code Window
Let me first quickly clear the difference between adding a code in a module vs adding a code in an object code window.
When you add a code to any of the objects, it’s dependent on some action of that object that will trigger that code. For example, if you want to unhide all the worksheets in a workbook as soon as you open that workbook, then the code would go in the ThisWorkbook object (which represents the workbook).
The trigger, in this case, is opening the workbook.
Similarly, if you want to protect a worksheet as soon as some other worksheet is activated, the code for that would go in the worksheet code window.
These triggers are called events and you can associate a code to be executed when an event occurs.
Related: Learn more about Events in VBA.
On the contrary, the code in the module needs to be executed either manually (or it can be called from other subroutines as well).
When you record a macro, Excel automatically creates a module and inserts the recorded macro code in it. Now if you have to run this code, you need to manually execute the macro.
Adding VBA Code in Module
While recording a macro automatically creates a module and inserts the code in it, there are some limitations when using a macro recorder. For example, it can not use loops or If Then Else conditions.
In such cases, it’s better to either copy and paste the code manually or write the code yourself.
A module can be used to hold the following types of VBA codes:
- Declarations: You can declare variables in a module. Declaring variables allows you to specify what type of data a variable can hold. You can declare a variable for a sub-routine only or for all sub-routines in the module (or all modules)
- Subroutines (Procedures): This is the code that has the steps you want VBA to perform.
- Function Procedures: This is a code that returns a single value and you can use it to create custom functions (also called User Defined Functions or UDFs in VBA)
By default, a module is not a part of the workbook. You need to insert it first before using it.
Adding a Module in the VB Editor
Below are the steps to add a module:
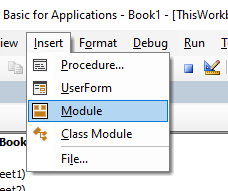
- Right-click on any object of the workbook (in which you want the module).

- Hover the cursor on the Insert option.
- Click on Module.


This would instantly create a folder called Module and insert an object called Module 1. If you already have a module inserted, the above steps would insert another module.
Once the module is inserted, you can double click on the module object in the Project Explorer and it will open the code window for it.
Now you can copy-paste the code or write it yourself.
Removing the Module
Below are the steps to remove a module in Excel VBA:
- Right-click on the module that you want to remove.
- Click on Remove Module option.

- In the dialog box that opens, click on No.


Note: You can export a module before removing it. It gets saved as a .bas file and you can import it in some other project. To export a module, right-click on the module and click on ‘Export file’.
Adding Code to the Object Code Window
To open the code window for an object, simply double-click on it.
When it opens, you can enter the code manually or copy-paste the code from other modules or from the internet.
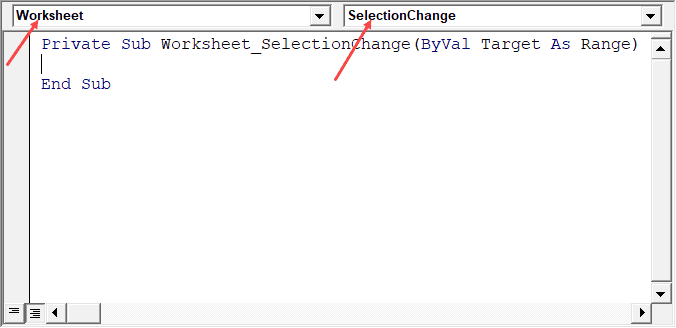
Note that some of the objects allow you to choose the event for which you want to write the code.
For example, if you want to write a code for something to happen when selection is changed in the worksheet, you need to first select worksheets from the drop-down at the top left of the code window and then select the change event from the drop-down on the right.
Note: These events are specific to the object. When you open the code window for a workbook, you will see the events related to the workbook object. When you open the code window for a worksheet, you will see the events related to the worksheet object.
Customizing the VB Editor
While the default settings of the Visual Basic Editor are good enough for most users, it does allow you to further customize the interface and a few functionalities.
In this section of the tutorial, I will show you all the options you have when customizing the VB Editor.
To customize the VB Editor environment, click Tools in the menu bar and then click on Options.
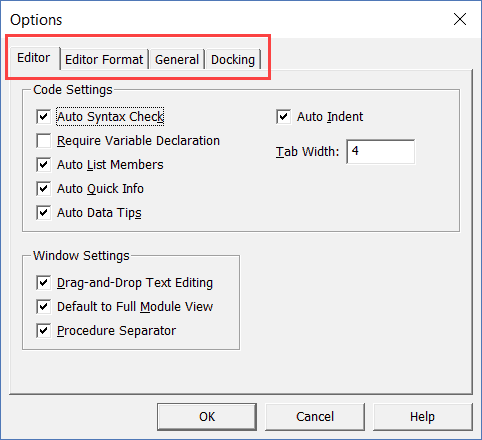
This would open the Options dialog box which will give you all the customization options in the VB Editor. The ‘Options’ dialog box has four tabs (as shown below) that have various customizations options for the Visual Basic Editor.
Let’s quickly go through each of these tabs and the important options in each.
Editor Tab
While the inbuilt settings work fine in most cases, let me still go through the options in this tab.
As you get more proficient working with VBA in Excel, you may want to customize the VB Editor using some of these options.
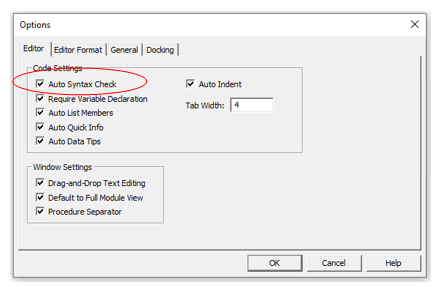
Auto Syntax Check
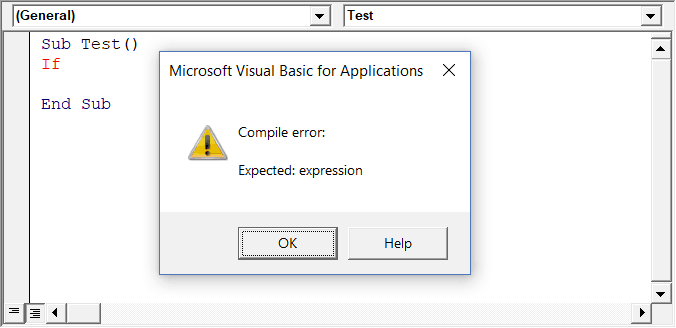
When working with VBA in Excel, as soon as you make a syntax error, you will be greeted by a pop-up dialog box (with some description about the error). Something as shown below:
If you disable this option, this pop-up box will not appear even when you make a syntax error. However, there would be a change in color in the code text to indicate that there is an error.
If you’re a beginner, I recommend you keep this option enabled. As you get more experienced with coding, you may start finding these pop-up boxes irritating, and then you can disable this option.
Require Variable Declaration
This is one option I recommend enabling.
When you’re working with VBA, you would be using variables to hold different data types and objects.
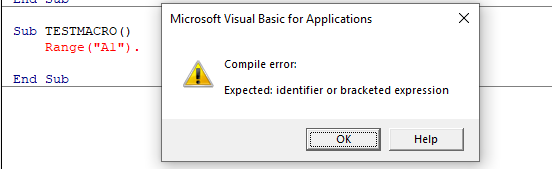
When you enable this option, it automatically inserts the ‘Option Explicit’ statement at the top of the code window. This forces you to declare all the variables that you’re using in your code. If you don’t declare a variable and try to execute the code, it will show an error (as shown below).
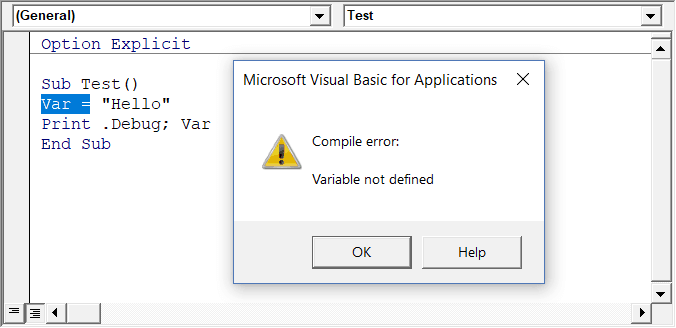
In the above case, I used the variable Var, but I didn’t declare it. So when I try to run the code, it shows an error.
This option is quite useful when you have a lot of variables. It often helps me find misspelled variables names as they are considered as undeclared and an error is shown.
Note: When you enable this option, it does not impact the existing modules.
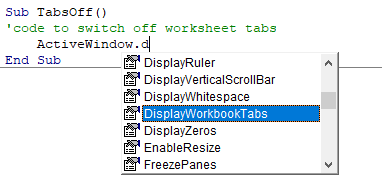
Auto List Member
This option is quite useful as it helps you get a list of properties of methods for an object.
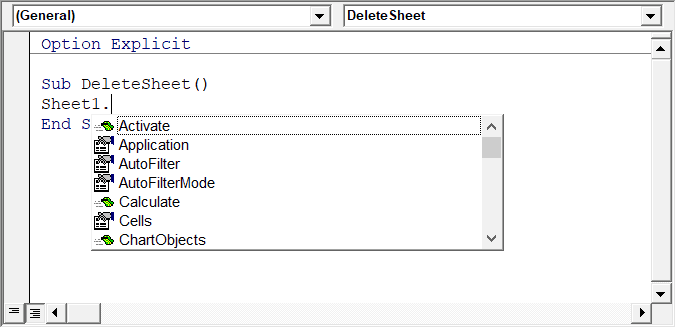
For example, if I want to delete a worksheet (Sheet1), I need to use the line Sheet1.Delete.
While I am typing the code, as soon as I type the dot, it will show me all the methods and properties associated with the Worksheet object (as shown below).
Auto list feature is great as it allows you to:
- Quickly select the property and method from the list and saves time
- Shows you all the properties and methods which you may not be aware of
- Avoid making spelling errors
This option is enabled by default and I recommend keeping it that way.
Auto Quick Info Options
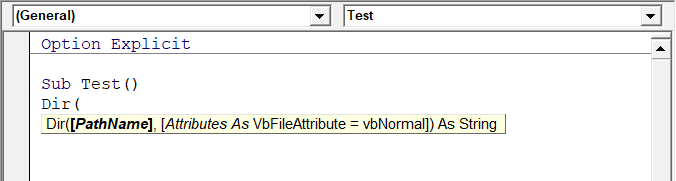
When you type a function in Excel worksheet, it shows you some information about the function – such as the arguments it takes.
Similarly, when you type a function in VBA, it shows you some information (as shown below). But for that to happen, you need to make sure the Auto Quick Info option is enabled (which it is by default).
Auto Data Tips Options
When you’re going through your code line by line and place your cursor above a variable name, it will show you the value of the variable.
I find it quite useful when debugging the code or going through the code line by line which has loops in it.

In the above example, as soon as I put the cursor over the variable (var), it shows the value it holds.
This option is enabled by default and I recommend you keep it that way.
Auto Indent
Since VBA codes can get long and messy, using indentation increases the readability of the code.
When writing code, you can indent using the tab key.
This option ensures that when you are done with the indented line and hit enter, the next line doesn’t start from the very beginning, but has the same indentation as the previous line.
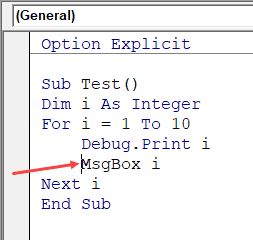
In the above example, after I write the Debug.Print line and hit enter, it will start right below it (with the same indentation level).
I find this option useful and turning this off would mean manually indenting each line in a block of code that I want indented.
You can change the indentation value if you want. I keep it at the default value.
Drag and Drop Text Editing
When this option is enabled, it allows you to select a block of code and drag and drop it.
It saves time as you don’t have to first cut and then paste it. You can simply select and drag it.
This option is enabled by default and I recommend you keep it that way.
Default to Full Module View
When this option is enabled, you will be able to see all the procedures in a module in one single scrollable list.
If you disable this option, you will only be able to see one module at a time. You will have to make a selection of the module you want to see from the drop-down at the top right of the code window.
This option is enabled by default and I recommend keeping it that way.
One reason you may want to disable it when you have multiple procedures that are huge and scrolling across these is taking time, or when you have a lot of procedures and you want to quickly find it instead of wasting time in scrolling.
Procedure Separator
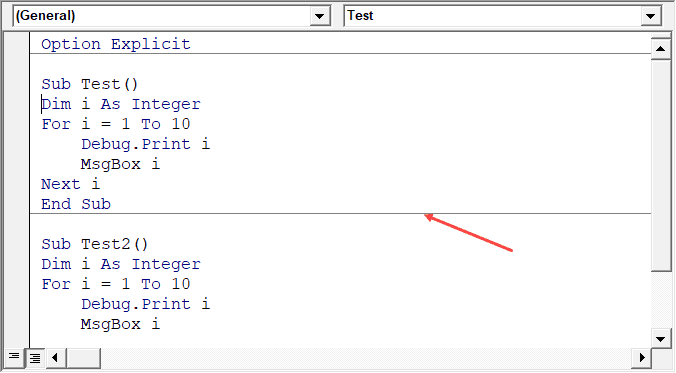
When this option is enabled, you will see a line (a kind of divider) between two procedures.
I find this useful as it visually shows when one procedure ends and the other one starts.
It’s enabled by default and I recommend keeping it that way.
Editor Format Tab
With the options in the Editor Format tab, you can customize the way your code looks in the code window.
Personally, I keep all the default options as I am fine with it. If you want, you can tweak this based on your preference.
To make a change, you need to first select an option in the Code Colors box. Once an option is selected, you can modify the foreground, background, and indicator color for it.
The font type and font size can also be set in this tab. It’s recommended to use a fixed-width font such as Courier New, as it makes the code more readable.
Note that the font type and size setting will remain the same for all code types (i.e., all the code types shown in the code color box).
Below is an image where I have selected Breakpoint, and I can change the formatting of it.
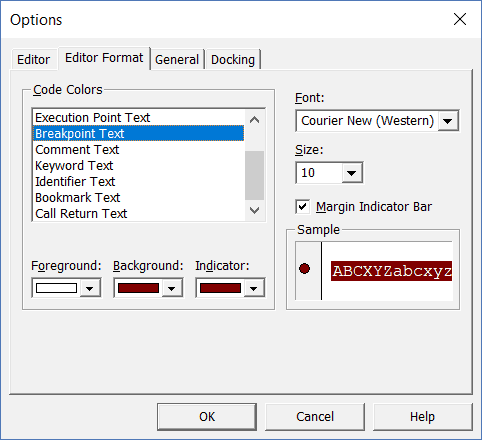
Note: The Margin Indicator Bar option when enabled shows a little margin bar to the left of the code. It’s helpful as it shows useful indicators when executing the code. In the above example, when you set a breakpoint, it will automatically show a red dot to the left of the line in the margin bar. Alternatively, to set a breakpoint, you can simply click on the margin bar on the left of the code line that you want as the breakpoint.
By default, Margin Indicator Bar is enabled and I recommend keeping it that way.
One of my VBA course students found this customization options useful and she was color blind. Using the options here, she was able to set the color and formats that made it easy for her to work with VBA.
General Tab
The General tab has many options but you don’t need to change any of it.
I recommend you keep all the options as is.
One important option to know about in this tab is Error Handling.
By default, ‘Break on Unhandled Errors’ is selected and I recommend keeping it that way.
This option means that if your code encounters an error, and you have not handled that error in your code already, then it will break and stop. But if you have addressed the error (such as by using On Error Resume Next or On Error Goto options), then it will not break (as the errors are not unhandled).
Docking Tab
In this tab, you can specify which windows you want to get docked.
Docking means that you can fix the position of a window (such as project explorer or the Properties window) so that it doesn’t float around and you can view all the different windows at the same time.
If you don’t dock, you will be able to view one window at a time in full-screen mode and will have to switch to the other one.
I recommend keeping the default settings.
Other Excel tutorials you may like:
- How to Remove Macros From an Excel Workbook
- Comments in Excel VBA (Add, Remove, Block Commenting)
- Using Active Cell in VBA in Excel (Examples)
В Excel 5 впервые была реализована поддержка нового макроязыка Visual Basic for Applications (VBA). Каждая копия Excel, начиная с 1993 года, содержит копию языка VBA, в явном виде не представленную на рабочих листах. VBA позволяет выполнять действия, которые обычно реализуются в Excel, но делает это намного быстрее и безукоризненно.
Если вам доводилось прежде сталкиваться с VBA-программами, то вы знаете, что очень часто они позволяют с помощью всего одного щелчка получать результаты, на которые в случае применения обычных средств Excel уходит несколько часов, а то и дней. Не стоит пугаться сложностей VBA, это ничуть не сложнее чем эмулятор psp. В 90% случаев программный код генерируется благодаря функции записи макросов, и только самые эффективные VBA-приложения пишутся вручную. В примерах раздела «Использование VBA для создания сводных таблиц» вы познакомитесь с нелегкой работой настоящего VBA-программиста.
По умолчанию VBA в Excel 2010 отключен. Прежде чем начать его использовать, нужно активизировать его в диалоговом окне Центр управления безопасностью (Trust Center). Выполните следующие действия.
- Выберите вкладку Файл (File) для перехода в окно представления Backstage.
- В находящейся слева навигационной панели щелкните на кнопке Параметры (Options). На экране появится диалоговое окно Параметры Excel (Excel Options).
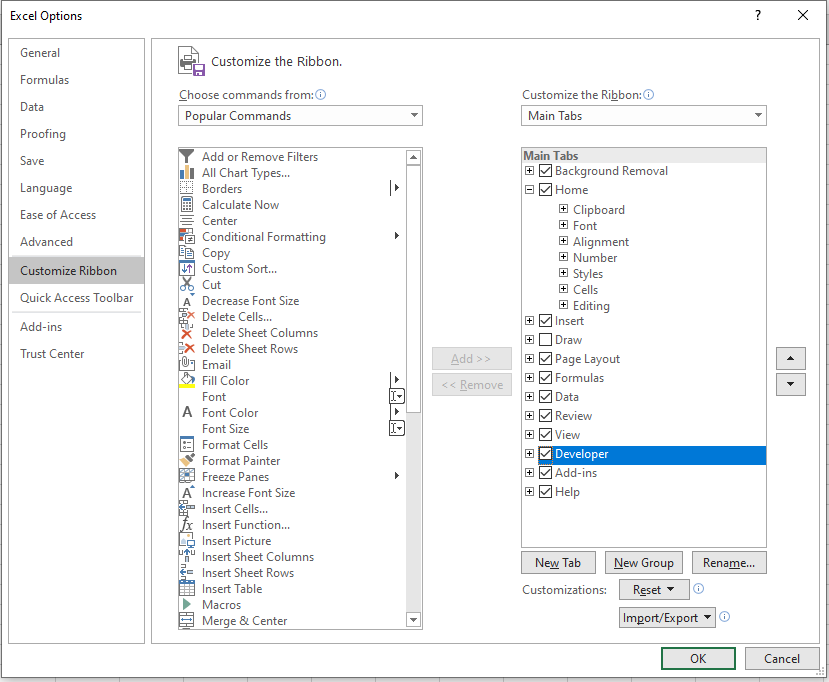
- В диалоговом окне Параметры Excel выберите категорию Настройка ленты (Customize Ribbon).
- В находящемся справа списке отображается перечень основных вкладок Excel. По умолчанию флажок для вкладки Разработчик (Developer) не установлен. Установите его, после чего вкладка Разработчик отобразится на ленте. Щелкните на кнопке ОК для закрытия окна Параметры Excel.
- Щелкните на кнопке Безопасность макросов. На экране появится диалоговое окно Центр управления безопаность, в котором можно выбрать одну из четырех настроек, задающих уровень безопасности при работе с макросами. Названия этих настроек изменились по сравнению с названиями, применяемыми в версиях Excel 97 — Excel 2003. Соответствующие объяснения можно найти при описании следующего шага.
- Выберите один из следующих переключателей.
- Отключить все макросы с уведомлением (Disable all macros with notification). Эта настройка эквивалентна среднему уровню безопасности макросов в Excel 2003. При открытии рабочей книги, содержащей макросы, на экране появится сообщение о том, что в файле имеются макросы. Если вы хотите, чтобы эти макросы выполнялись, щелкните на кнопке Параметры (Options) и установите флажок Включить это содержимое (Enable). Это позволит VBA выполнять макросы, но вам придется явным образом разрешать их запуск при загрузке Excel.
- Включить все макросы (Enable all macros). Эта настройка эквивалентна низкому уровню защиты макросов в Excel 2003. Поскольку она разрешает выполнение абсолютно всех макросов, содержащихся в рабочей книге (в том числе и зловредных), разработчики из Microsoft настоятельно не рекомендуют ее использовать.
5. Выберите вкладку ленты Разработчик. Нам понадобится группа команд Код (Code), в состав которой входят кнопки Visual Basic Editor, Макросы (Macros), Запись макроса (Macro Recorder) и Безопасность макросов (Macro Security) (рис. 12.1).

Рис. 12.1. Доступ к инструментам VBA реализуется через вкладку Разработчик
Содержание
- Что такое редактор Visual Basic в Excel?
- Открытие редактора VB
- Анатомия редактора Visual Basic в Excel
- Куда добавить код в редакторе VB
- Настройка редактора VB
Первым шагом к работе с VBA в Excel является ознакомление с редактором Visual Basic (также называемым редактором VBA или редактором VB).
В этом руководстве я расскажу все, что нужно знать о редакторе VBA, и некоторые полезные параметры, которые вы должны знать при кодировании в Excel VBA.
Редактор Visual Basic — это отдельное приложение, которое является частью Excel и открывается всякий раз, когда вы открываете книгу Excel. По умолчанию он скрыт, и для доступа к нему необходимо активировать его.
VB Editor — это место, где вы храните код VB.
Получить код в редакторе VB можно несколькими способами:
- Когда вы записываете макрос, он автоматически создает новый модуль в редакторе VB и вставляет код в этот модуль.
- Вы можете вручную ввести код VB в редакторе VB.
- Вы можете скопировать код из другой книги или из Интернета и вставить его в редактор VB.
Открытие редактора VB
Открыть редактор Visual Basic в Excel можно разными способами:
- Использование сочетания клавиш (самый простой и быстрый)
- Используя вкладку разработчика.
- Использование вкладок рабочего листа.
Давайте быстро пройдемся по каждому из них.
Сочетание клавиш для открытия редактора Visual Basic
Самый простой способ открыть редактор Visual Basic — использовать сочетание клавиш — ALT + F11 (удерживая клавишу ALT, нажмите клавишу F11).

Как только вы это сделаете, откроется отдельное окно для редактора Visual Basic.
Этот ярлык работает как переключатель, поэтому при повторном использовании он вернет вас в приложение Excel (без закрытия редактора VB).
Ярлык для версии Mac: Opt + F11 или Fn + Opt + F11
Использование вкладки разработчика
Чтобы открыть редактор Visual Basic с ленты:
- Перейдите на вкладку «Разработчик» (если вы не видите вкладку «Разработчик», прочтите, как ее получить).
- В группе «Код» щелкните Visual Basic.

Использование вкладки рабочего листа
Это менее используемый метод открытия редактора Vb.
Перейдите на любую из вкладок рабочего листа, щелкните правой кнопкой мыши и выберите «Просмотреть код».

Этот метод не просто откроет редактор VB, он также перенесет вас в окно кода для этого объекта рабочего листа.
Это полезно, когда вы хотите написать код, который работает только для определенного рабочего листа. Обычно это происходит с событиями рабочего листа.
Анатомия редактора Visual Basic в Excel
Когда вы открываете редактор VB в первый раз, это может показаться немного подавляющим.
Существуют различные варианты и разделы, которые сначала могут показаться совершенно новыми.
Кроме того, он все еще выглядит как старый Excel 97 дней. Хотя дизайн и удобство использования Excel значительно улучшились за последние годы, редактор VB не претерпел каких-либо изменений в своем внешнем виде.
В этом разделе я познакомлю вас с различными частями приложения Visual Basic Editor.
Примечание. Когда я начал использовать VBA несколько лет назад, меня поразили все эти новые параметры и окна. Но когда вы привыкнете работать с VBA, вы освоитесь с большинством из них. И в большинстве случаев вам не нужно будет использовать все возможности, а только ручную работу.
Ниже представлены изображения различных компонентов редактора VB. Затем они подробно описаны в следующих разделах этого руководства.

Теперь давайте быстро рассмотрим каждый из этих компонентов и поймем, что он делает:
Строка меню
Здесь у вас есть все параметры, которые вы можете использовать в редакторе VB. Это похоже на ленту Excel, где у вас есть вкладки и параметры для каждой вкладки.
Вы можете изучить доступные варианты, щелкнув каждый элемент меню.
Вы заметите, что рядом с большинством параметров в редакторе VB указаны сочетания клавиш. Как только вы привыкнете к нескольким сочетаниям клавиш, работа с редактором VB станет действительно простой.
Панель инструментов
По умолчанию в редакторе VB есть панель инструментов, на которой есть несколько полезных опций, которые могут вам понадобиться чаще всего. Это похоже на панель быстрого доступа в Excel. Это дает вам быстрый доступ к некоторым полезным параметрам.
Вы можете немного настроить его, удалив или добавив к нему параметры (щелкнув небольшую стрелку, направленную вниз, в конце панели инструментов).

В большинстве случаев панель инструментов по умолчанию — это все, что вам нужно при работе с редактором VB.
Вы можете переместить панель инструментов над строкой меню, щелкнув три серые точки (в начале панели инструментов) и перетащив ее над строкой меню.
Примечание. В редакторе VB есть четыре панели инструментов — Стандартная, Отладка, Редактировать и Пользовательская форма. То, что вы видите на изображении выше (которое также используется по умолчанию), является стандартной панелью инструментов. Вы можете получить доступ к другим панелям инструментов, перейдя к параметру «Просмотр» и наведя курсор на параметр «Панели инструментов». Вы можете добавить одну или несколько панелей инструментов в редактор VB, если хотите.
Обозреватель проекта
Обозреватель проекта — это окно слева, в котором отображаются все объекты, открытые в настоящее время в Excel.
Когда вы работаете с Excel, каждая открытая книга или надстройка является проектом. И в каждом из этих проектов может быть набор объектов.
Например, на изображении ниже в Project Explorer показаны две открытые книги (Book1 и Book2) и объекты в каждой книге (рабочие листы, ThisWorkbook и Module в Book1).
Слева от объектов есть значок плюса, который можно использовать, чтобы свернуть список объектов или развернуть и просмотреть полный список объектов.

Следующие объекты могут быть частью Project Explorer:
- Все открытые книги — в каждой книге (которая также называется проектом) вы можете иметь следующие объекты:
- Объект рабочего листа для каждого листа в книге
- ThisWorkbook объект который представляет собой книгу
- Таблица объект для каждого листа диаграммы (они не так распространены, как рабочие листы)
- Модули — Здесь идет код, созданный с помощью средства записи макросов. Вы также можете написать или скопировать код VBA сюда.
- Все открытые надстройки
Рассматривайте Project Explorer как место, где отображаются все объекты, открытые в Excel в данный момент.
Сочетание клавиш для открытия Project Explorer: Ctrl + R (удерживайте контрольную клавишу, а затем нажмите R). Чтобы закрыть его, просто щелкните значок закрытия в правом верхнем углу окна Project Explorer.
Примечание. Для каждого объекта в Project Explorer есть окно кода, в котором вы можете написать код (или скопировать и вставить его откуда-нибудь). Окно кода появляется при двойном щелчке по объекту.
Окно свойств
Окно свойств — это то место, где вы можете увидеть свойства выбранного объекта. Если у вас еще нет окна «Свойства», вы можете получить его с помощью сочетания клавиш F4 (или перейдите на вкладку «Просмотр» и нажмите «Окно свойств»).
Окно свойств — это плавающее окно, которое можно закрепить в редакторе VB. В приведенном ниже примере я закрепил его чуть ниже Project Explorer.

Окно свойств позволяет нам изменять свойства выбранного объекта. Например, если я хочу сделать рабочий лист скрытым (или очень скрытым), я могу сделать это, изменив свойство Visible для выбранного объекта рабочего листа.

Связанный: Скрытие рабочего листа в Excel (который не может быть легко отсканирован)
Окно кода
Для каждого объекта, перечисленного в Project Explorer, есть окно кода. Вы можете открыть окно кода для объекта, дважды щелкнув его в области Project Explorer.
Окно кода — это то место, где вы будете писать свой код или копировать и вставлять код из другого места.
Когда вы записываете макрос, его код попадает в окно кода модуля. Excel автоматически вставляет модуль для размещения в нем кода при записи макроса.
Связанный: Как запустить макрос (код VBA) в Excel.
Немедленное окно
Окно Immediate в основном используется при отладке кода. Один из способов использования окна Immediate — использование оператора Print.Debug в коде с последующим запуском кода.
Это помогает мне отлаживать код и определять, где мой код застревает. Если я получаю результат Print.Debug в непосредственном окне, я знаю, что код работал, по крайней мере, до этой строки.
Если вы новичок в кодировании VBA, вам может потребоваться некоторое время, чтобы использовать немедленное окно для отладки.
По умолчанию непосредственное окно не отображается в редакторе VB. Вы можете получить его, используя сочетание клавиш Control + G (или можете перейти на вкладку «Просмотр» и нажать «Немедленное окно»).
Куда добавить код в редакторе VB
Я надеюсь, что теперь у вас есть общее представление о том, что такое VB Editor и какие в нем части.
В этом разделе этого руководства я покажу вам, где добавить код VBA в редактор Visual Basic.
Есть два места, где вы можете добавить код VBA в Excel:
- Окно кода для объекта. Этими объектами могут быть рабочая книга, рабочий лист, пользовательская форма и т. Д.
- Окно кода модуля.
Окно кода модуля против окна кода объекта
Позвольте мне сначала быстро пояснить разницу между добавлением кода в модуль и добавлением кода в окне объектного кода.
Когда вы добавляете код к любому из объектов, он зависит от какого-либо действия этого объекта, которое запускает этот код. Например, если вы хотите отобразить все рабочие листы в книге, как только вы откроете эту книгу, тогда код будет помещен в объект ThisWorkbook (который представляет книгу).
В данном случае триггер открывает книгу.
Точно так же, если вы хотите защитить рабочий лист, как только активируется какой-либо другой рабочий лист, код для этого будет помещен в окно кода рабочего листа.
Эти триггеры называются событиями, и вы можете связать код, который будет выполняться при возникновении события.
Связанный: Узнайте больше о событиях в VBA.
Напротив, код в модуле должен выполняться вручную (или его также можно вызывать из других подпрограмм).
Когда вы записываете макрос, Excel автоматически создает модуль и вставляет в него записанный код макроса. Теперь, если вам нужно запустить этот код, вам нужно вручную выполнить макрос.
Добавление кода VBA в модуль
При записи макроса автоматически создается модуль и вставляется в него код, однако при использовании средства записи макросов существуют некоторые ограничения. Например, он не может использовать циклы или условия If Then Else.
В таких случаях лучше либо скопировать и вставить код вручную, либо написать код самостоятельно.
Модуль может использоваться для хранения следующих типов кодов VBA:
- Декларации: Вы можете объявлять переменные в модуле. Объявление переменных позволяет указать, какой тип данных может содержать переменная. Вы можете объявить переменную только для подпрограммы или для всех подпрограмм в модуле (или всех модулях)
- Подпрограммы (процедуры): Это код, в котором есть шаги, которые вы хотите выполнить с помощью VBA.
- Функциональные процедуры: Это код, который возвращает одно значение, и вы можете использовать его для создания пользовательских функций (также называемых пользовательскими функциями или UDF в VBA).
По умолчанию модуль не является частью книги. Вам необходимо вставить его перед использованием.
Добавление модуля в редактор VB
Ниже приведены шаги по добавлению модуля:
- Щелкните правой кнопкой мыши любой объект книги (в котором вы хотите установить модуль).

- Наведите курсор на опцию Вставить.
- Щелкните по модулю.


Это мгновенно создаст папку с именем Module и вставит объект с именем Module 1. Если у вас уже есть вставленный модуль, вышеупомянутые шаги будут вставлять другой модуль.

После того, как модуль вставлен, вы можете дважды щелкнуть объект модуля в Project Explorer, и он откроет для него окно кода.
Теперь вы можете скопировать и вставить код или написать его самостоятельно.
Удаление модуля
Ниже приведены шаги по удалению модуля в Excel VBA:
- Щелкните правой кнопкой мыши модуль, который хотите удалить.
- Нажмите на опцию «Удалить модуль».
- В открывшемся диалоговом окне нажмите Нет.


Примечание. Вы можете экспортировать модуль перед его удалением. Он сохраняется как файл .bas, и вы можете импортировать его в другой проект. Чтобы экспортировать модуль, щелкните модуль правой кнопкой мыши и выберите «Экспорт файла».
Добавление кода в окно объектного кода
Чтобы открыть окно кода для объекта, просто дважды щелкните по нему.
Когда он откроется, вы можете ввести код вручную или скопировать и вставить код из других модулей или из Интернета.
Обратите внимание, что некоторые объекты позволяют выбрать событие, для которого вы хотите написать код.
Например, если вы хотите написать код, чтобы что-то происходило при изменении выбора на листе, вам нужно сначала выбрать листы из раскрывающегося списка в верхнем левом углу окна кода, а затем выбрать событие изменения из раскрывающегося списка. -вниз справа.

Примечание: эти события относятся к объекту. Когда вы откроете окно кода для книги, вы увидите события, связанные с объектом книги. Когда вы откроете окно кода для рабочего листа, вы увидите события, связанные с объектом рабочего листа.
Настройка редактора VB
Хотя настройки редактора Visual Basic по умолчанию достаточно хороши для большинства пользователей, они позволяют дополнительно настраивать интерфейс и некоторые функции.
В этом разделе руководства я покажу вам все параметры, которые у вас есть при настройке редактора VB.
Чтобы настроить среду редактора VB, нажмите «Инструменты» в строке меню, а затем нажмите «Параметры».
Это откроет диалоговое окно Параметры, которое предоставит вам все параметры настройки в редакторе VB. В диалоговом окне «Параметры» есть четыре вкладки (как показано ниже), на которых можно настроить различные параметры редактора Visual Basic.

Давайте быстро рассмотрим каждую из этих вкладок и важные параметры на каждой из них.
Вкладка «Редактор»
Хотя встроенные настройки в большинстве случаев работают нормально, позвольте мне все же пройтись по параметрам на этой вкладке.
По мере того, как вы станете более опытным в работе с VBA в Excel, вы можете настроить редактор VB, используя некоторые из этих параметров.
Автоматическая проверка синтаксиса
При работе с VBA в Excel, как только вы сделаете синтаксическую ошибку, вас встретит всплывающее диалоговое окно (с некоторым описанием ошибки). Что-то вроде того, что показано ниже:

Если вы отключите эту опцию, это всплывающее окно не появится, даже если вы допустили синтаксическую ошибку. Однако цвет текста кода изменится, что укажет на наличие ошибки.
Если вы новичок, я рекомендую оставить эту опцию включенной. По мере того, как вы набираетесь опыта в программировании, вы можете начать находить эти всплывающие окна раздражающими, и тогда вы можете отключить эту опцию.
Требовать объявление переменной
Это один из вариантов, который я рекомендую включить.
Когда вы работаете с VBA, вы будете использовать переменные для хранения различных типов данных и объектов.
Когда вы включаете этот параметр, он автоматически вставляет оператор «Option Explicit» в верхнюю часть окна кода. Это заставляет вас объявить все переменные, которые вы используете в своем коде. Если вы не объявите переменную и попытаетесь выполнить код, отобразится ошибка (как показано ниже).

В приведенном выше случае я использовал переменную Var, но не объявлял ее. Поэтому, когда я пытаюсь запустить код, он показывает ошибку.
Эта опция очень полезна, когда у вас много переменных. Это часто помогает мне найти имена переменных с ошибками, поскольку они считаются необъявленными и отображается ошибка.
Примечание. Когда вы включаете этот параметр, он не влияет на существующие модули.
Автоматический член списка
Эта опция весьма полезна, поскольку помогает получить список свойств методов для объекта.
Например, если я хочу удалить лист (Sheet1), мне нужно использовать строку Sheet1.Delete.
Пока я набираю код, как только я набираю точку, он покажет мне все методы и свойства, связанные с объектом Worksheet (как показано ниже).

Функция автоматического списка хороша тем, что позволяет:
- Быстро выберите свойство и метод из списка и сэкономьте время
- Показывает все свойства и методы, о которых вы, возможно, не знали.
- Избегайте орфографических ошибок
Эта опция включена по умолчанию, и я рекомендую оставить ее в таком состоянии.
Параметры автоматической быстрой информации
Когда вы вводите функцию на листе Excel, она показывает вам некоторую информацию о функции, например, аргументы, которые она принимает.
Точно так же, когда вы вводите функцию в VBA, она показывает вам некоторую информацию (как показано ниже). Но для этого вам нужно убедиться, что опция Auto Quick Info включена (что по умолчанию).

Параметры советов по автоматическим данным
Когда вы просматриваете свой код построчно и помещаете курсор над именем переменной, он покажет вам значение переменной.
Я считаю это весьма полезным при отладке кода или при просмотре кода построчно, в котором есть циклы.

В приведенном выше примере, как только я наведу курсор на переменную (var), отобразится значение, которое она содержит.
Этот параметр включен по умолчанию, и я рекомендую вам оставить его в таком же состоянии.
Автоматический отступ
Поскольку коды VBA могут быть длинными и беспорядочными, использование отступов увеличивает читаемость кода.
При написании кода вы можете делать отступ с помощью клавиши табуляции.
Этот параметр гарантирует, что, когда вы закончите с отступом и нажмете Enter, следующая строка не начнется с самого начала, а будет иметь тот же отступ, что и предыдущая.

В приведенном выше примере после того, как я напишу строку Debug.Print и нажму Enter, она начнется прямо под ней (с тем же уровнем отступа).
Я считаю эту опцию полезной, и ее выключение означало бы вручную отступ каждой строки в блоке кода, который я хочу иметь отступ.
При желании вы можете изменить значение отступа. Я сохраняю значение по умолчанию.
Редактирование текста перетаскиванием
Когда этот параметр включен, он позволяет выбрать блок кода и перетащить его.
Это экономит время, так как вам не нужно сначала вырезать, а потом вставлять. Вы можете просто выбрать и перетащить его.
Этот параметр включен по умолчанию, и я рекомендую вам оставить его в таком же состоянии.
По умолчанию — полный вид модуля
Когда эта опция включена, вы сможете увидеть все процедуры в модуле в одном прокручиваемом списке.
Если вы отключите эту опцию, вы сможете видеть только один модуль за раз. Вам нужно будет выбрать модуль, который вы хотите увидеть, из раскрывающегося списка в правом верхнем углу окна кода.
Этот параметр включен по умолчанию, и я рекомендую оставить его в таком же состоянии.
Одна из причин, по которой вы можете захотеть отключить его, когда у вас есть несколько процедур, которые огромны и прокрутка по ним требует времени, или когда у вас много процедур, и вы хотите быстро найти их, а не тратить время на прокрутку.
Разделитель процедур
Когда эта опция включена, вы увидите линию (своего рода разделитель) между двумя процедурами.
Я считаю это полезным, поскольку он визуально показывает, когда заканчивается одна процедура и начинается другая.

Он включен по умолчанию, и я рекомендую оставить его в таком состоянии.
Вкладка «Формат редактора»
С помощью параметров на вкладке «Формат редактора» вы можете настроить внешний вид кода в окне кода.
Лично я сохраняю все параметры по умолчанию, так как меня это устраивает. Если вы хотите, вы можете настроить это в зависимости от ваших предпочтений.
Чтобы внести изменения, вам нужно сначала выбрать параметр в поле «Цвета кода». После выбора параметра вы можете изменить для него цвет переднего плана, фона и индикатора.
На этой вкладке также можно установить тип и размер шрифта. Рекомендуется использовать шрифт фиксированной ширины, например Courier New, так как он делает код более читабельным.
Обратите внимание, что настройки типа и размера шрифта останутся одинаковыми для всех типов кода (т. Е. Для всех типов кода, показанных в поле цвета кода).
Ниже приведено изображение, на котором я выбрал точку останова и могу изменить ее форматирование.

Примечание. Параметр «Полоса индикатора полей», когда он включен, показывает небольшую полоску полей слева от кода. Это полезно, так как показывает полезные индикаторы при выполнении кода. В приведенном выше примере, когда вы устанавливаете точку останова, она автоматически показывает красную точку слева от строки на полосе полей. В качестве альтернативы, чтобы установить точку останова, вы можете просто щелкнуть полосу полей слева от строки кода, которую вы хотите использовать в качестве точки останова.
По умолчанию полоса индикатора маржи включена, и я рекомендую оставить ее в таком состоянии.
Одна из моих студенток курса VBA нашла эти параметры настройки полезными, и она была дальтоник. Используя параметры здесь, она смогла установить цвет и форматы, которые упростили ей работу с VBA.
Вкладка Общие
На вкладке «Общие» есть много параметров, но изменять их не нужно.
Я рекомендую вам оставить все параметры как есть.
Одна из важных опций, о которых следует знать на этой вкладке, — это обработка ошибок.
По умолчанию выбран параметр «Прерывание по необработанным ошибкам», и я рекомендую оставить его таким же.
Этот параметр означает, что если ваш код обнаружит ошибку, и вы еще не обработали эту ошибку в своем коде, он сломается и остановится. Но если вы устранили ошибку (например, с помощью параметров «При ошибке возобновить следующий» или «При ошибке Перейти к»), то она не сломается (поскольку ошибки не обрабатываются).
Вкладка стыковки
На этой вкладке вы можете указать, какие окна вы хотите закрепить.
Закрепление означает, что вы можете зафиксировать положение окна (например, проводника проекта или окна свойств), чтобы оно не перемещалось, и вы могли просматривать все различные окна одновременно.
Если вы не установите док-станцию, вы сможете просматривать одно окно за раз в полноэкранном режиме, и вам придется переключаться на другое.
Я рекомендую оставить настройки по умолчанию.
In this Article
- Opening the Visual Basic Editor
- To enable the Developer Ribbon
- Understanding the VBE Screen
- Inserting a module or form into your code
- Removing a Module or Form from the Project Explorer
- The Properties Window
- The Code Window
- Understanding the Code
- Sub Procedures
- Function Procedures
- Creating a new Procedure
- Writing Code that is easy to understand and navigate
- Adding Comments
- Indenting
- UpperCase vs LowerCase
- AutoComplete
- Error trapping and Debugging
- Syntax errors
- Compilation Errors
- Runtime Errors
- Logical Errors
- On Error Go To
- On Error Resume Next
This tutorial will show you how to open and program in the Visual Basic Editor in VBA.
Opening the Visual Basic Editor
There are a few ways to access the Visual Basic Editor (VBE) in Excel.
Press Alt + F11 on your keyboard.
OR
Click View > Macros > View Macros. From here you can Edit an existing macro or Create a new one. Either option opens up the VB Editor.

OR
Developer > Visual Basic
Note: If you don’t see the Developer Ribbon, you’ll need to enable it.
To enable the Developer Ribbon
Click on the File tab in the Ribbon, and go down to Options. In the Customize Ribbon options, tick the Developer check box. This is switched off by default so you will need to switch it on to see the tab on the ribbon.
Click OK.
The Developer tab will appear on the main ribbon. Click on Visual Basic at the start of the ribbon to access the Visual Basic Editor.

Understanding the VBE Screen
The VBE Screen is shown in the graphic below.
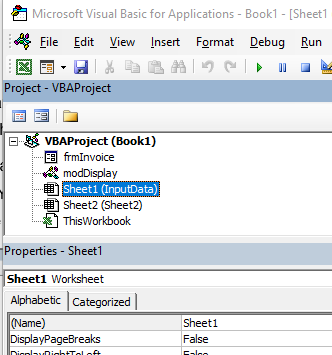
The Project Explorer
The Project Explorer enables you to see how the Project in which you are working is organized. You can see how many modules and forms are stored in the project, and can navigate between these modules and forms. A module is where the code in your workbook is stored, when you record a macro, it will be stored in a standard module – which will by default be named ‘Module1’.
Each of the worksheets in your Excel file also has module behind it, as does the workbook itself. When you insert a new sheet into the workbook via the main Excel screen, you will see an additional sheet module appear in the Project Explorer.
Double-click on a module to move to the code for that module.
You can also click on the Window menu on the toolbar and select the module there to move to the code for that module.
Type of Modules
The modules are organized into 5 different types.
- Standard modules – most of your code will go into this type of module. When you record a macro, it gets put into a standard module. When you write a general procedure to be used throughout your workbook, it also normally goes into a standard module.
- Workbook modules – this module holds the code the is unique to that individual workbook. Most of the code in these type of modules are known as EVENTS. An event can occur when a workbook is opened or closed for example. The module can also contain code that is written by yourself and used by the events.
- Sheet modules – this module holds the code that is unique to that individual sheet. They can occur when a sheet is clicked on for example (the Click Event), or when you change data in a cell. This module can also hold code that is written by yourself and called by the Events.
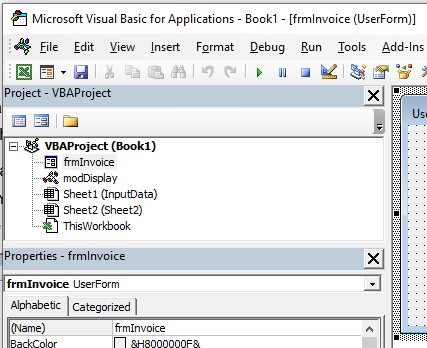
- Form modules – this is the module behind a custom form that you may create. For example you may create a form to hold details for an invoice, with an OK button, the code behind the button (the Click Event) contains the code that will run when the button is clicked.
- Class modules – this module is used to create objects at run time. Class module are used by Advanced VBA programmers and will be covered at a later stage.
Inserting a module or form into your code
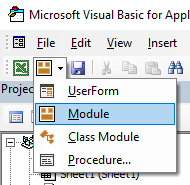
To insert a new module into your code, click on the Insert option on the menu bar, and click Module.
Or, click on the Insert Module button which you will find on the standard ribbon.
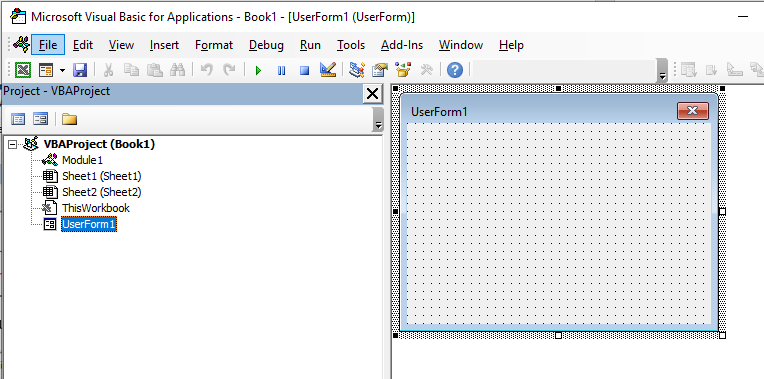
To insert a new user form into your code, select the UserForm option.
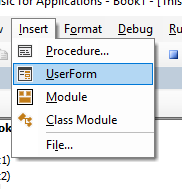
A new user form will appear in the Project Explorer and will be shown in the Code Window on the right.
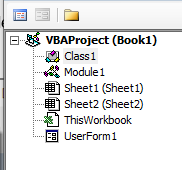
You can also insert a Class Module
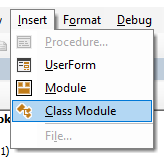
A class module is used to insert objects into your VBA project.
Removing a Module or Form from the Project Explorer
Right-click on the module or form you wish to remove to show the right click short cut menu.
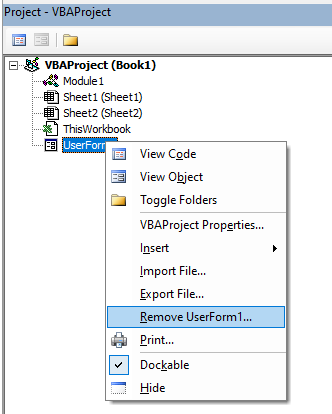
Click Remove (in this case UserForm1…)
OR
Click on the File menu, and then click on Remove (UserForm1).
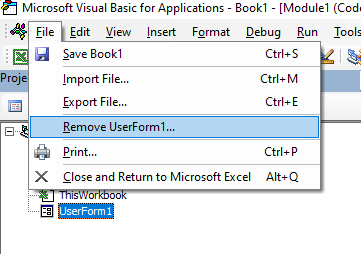
A warning box will appear asking if you want to Export the form or module before you remove it. Exporting the form or module enables you to save it as an individual file for use in a different Excel project at some other time.
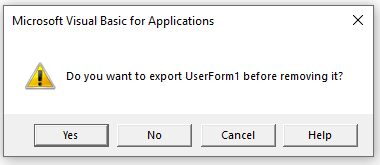
More often than not when you remove a module or form it is because you do not need it, so click No.
The Properties Window
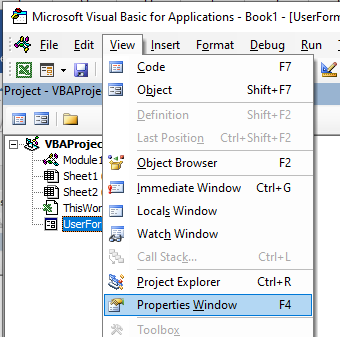
You will see the properties window below the Project Explorer. You may need to switch this on.
Press F4 or click View, Properties Window.
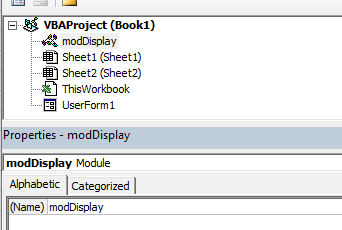
The properties window enables you to see the properties for the particular module or form that is selected in the Project Explorer. When you are working in modules, you can use the properties window to change the name of the module. This is the only property available to a module. However, when you are working with forms, there will be far more properties available and the Properties window is then used extensively to control the behavior of forms and the controls contained in the form.
When you record a macro, it is automatically put into a standard module. The module will named ‘Module1’ and any code that is contained in that module is available to be used throughout your project. You should rename your module to something that is significant, that would make your code easy to find if you were to add multiple modules to the project.
You can also rename your forms.
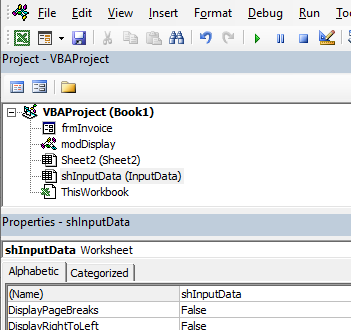
If you have renamed your sheet in Excel, the name of the sheet will show up as the name of the sheet in brackets after Sheet1.
If you want to change the name of the module behind the sheet, you can change it in the same way you change the module and user form name – by changing the Name property in the Properties Window.
VBA Coding Made Easy
Stop searching for VBA code online. Learn more about AutoMacro — A VBA Code Builder that allows beginners to code procedures from scratch with minimal coding knowledge and with many time-saving features for all users!

Learn More
The Code Window
The code window shows you the sub procedures and functions that are contained in your modules – it shows you the actual code. When you record a macro, a sub procedure will be created for you. If you add a short cut key to the macro, it will show up as a comment in the macro to let you know what the short cut key is that you assigned to the macro.
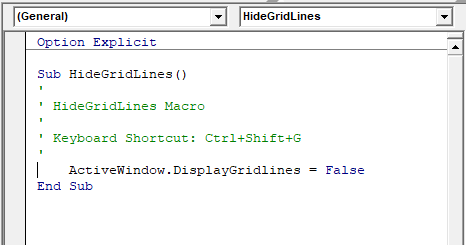
At the top of the code window are two combo boxes. These allow you to see which object (if any) within the Module that you might be working on, and which Procedure you might be working on.
In the example above, we are not working on any object – thus this is set to general, but we are working within the Gridlines procedure.
If we had more than one procedure in this module, we could use the combo box above to navigate to the other procedures.
Understanding the Code
There are 2 types of procedures – Sub procedures and Function procedures.
Sub Procedures
The macro recorder can only record Sub procedures. A Sub procedure does things. They perform actions such as formatting a table or creating a pivot table, or in the gridline example, changing the view settings of your active window. The majority of procedures written are Sub procedures. All macros are Sub procedures.
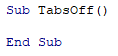
A sub procedure begins with a Sub statement and ends with an End Sub statement. The procedure name is always followed by parentheses.
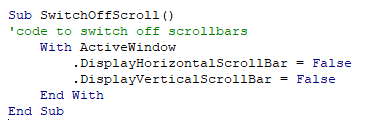
Sub HideGridLines()
   ActiveWindow.DisplayGridlines  = False
End Sub
VBA Programming | Code Generator does work for you!
Function Procedures
A Function procedure returns a value. This value may be a single value, an array, a range of cells or an object. Functions usually perform some type of calculation. Functions in Excel can be used with the Function Wizard or they can be called from Sub Procedures.
Function Kilos(pounds as Double)
  Kilos = (pounds/2.2)
End Function
This function could be used within the Insert Function dialog box in Excel to convert Pounds to Kilograms.

Creating a new Procedure
Before you create your new procedure, make sure you are in the module in which you wish to store the procedure. You can create a new procedure by clicking on the Insert menu, Procedure;
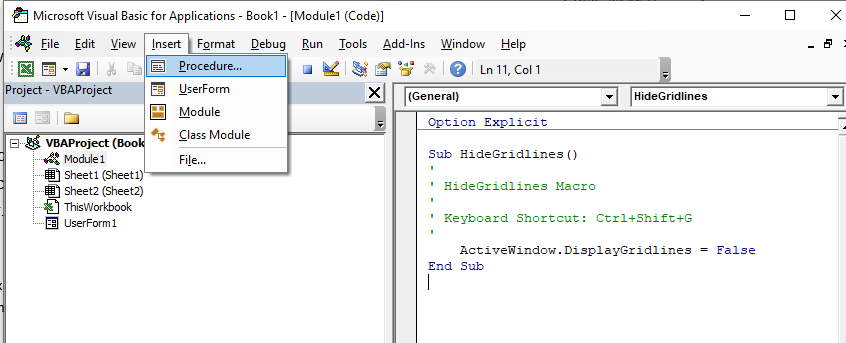
or you can click on the icon on the toolbar
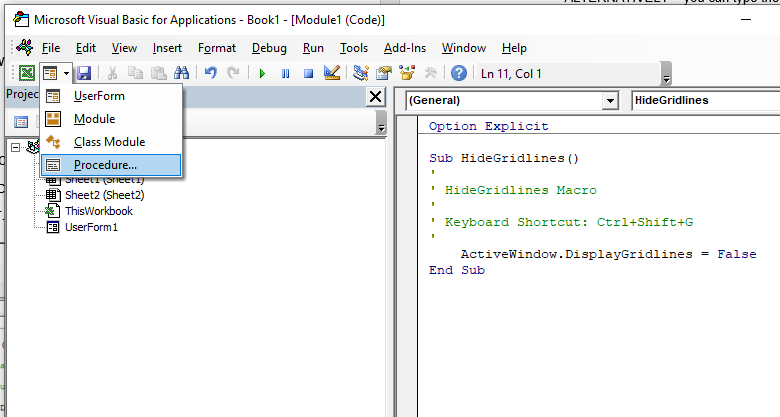
The following dialog box will appear
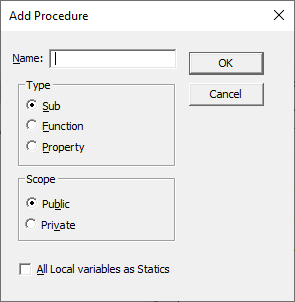
- Type the name of your new procedure in the name box – this must start with a letter of the alphabet and can contain letters and number and be a maximum of 64 characters.
- You can have a Sub procedure, a Function procedure or a Property procedure. (Properties are used in Class modules and set properties for ActiveX controls that you may have created).
- You can make the scope of the procedure either Public or Private. If the procedure is public (default), then it can be used by all the modules in the project while if the procedure is private, it will only be able to be used by this module.
- You can declare local variables in this procedure as Statics (this is to do with the Scope of the variable and makes a local procedure level variable public to the entire module). We will not use this option.
When you have filled in all the relevant details, click on OK.
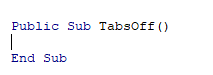
You then type your code between the Sub and End Sub statements.
ALTERNATIVELY – you can type the Sub and End Sub statements in your module exactly as it appears above. You do not need to put the word Public in front of the word sub – if this word is omitted, all procedures in the module are automatically assumed to be Public.
Then you type Sub and then the name of your procedure followed by parenthesis.
ie:
Sub test()
The End Sub statement will appear automatically.
Writing Code that is easy to understand and navigate
Get into the habit of putting in comments in your code in order to remind yourself at a later stage of the functionality of the code.
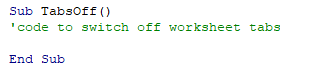
You can insert a comment in your code but typing an apostrophe on the keyboard or you can switch on the Edit toolbar, and use the comment button which appears on that toolbar.
Right-click on the toolbars.
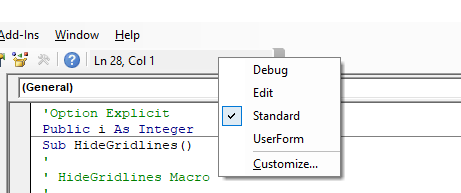
Select Edit.
![]()
Click on the comment button to insert a comment into your code.
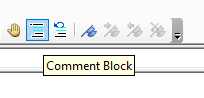
NOTE: You usually only use the comment block button when you have a few lines of code you wish to comment out (and not delete). It is easier for a single comment to use an apostrophe.
Indenting
A good habit to get into is to indent your code making it easy to read through the code and see the different parts of the code.

There can be many levels of indenting, depending on the logic of your code.
AutoMacro | Ultimate VBA Add-in | Click for Free Trial!
UpperCase vs LowerCase
VBA adjusts all code to Proper Case so if you type ALL IN UPPERCASE or all in lowercase it will Readjust Your Code To Be In Proper Case!
AutoComplete
When you adjust your code, you will notice that VBA tries to help you by suggesting the code that you can type. This is known as AutoComplete.
Error trapping and Debugging
There are 4 types of errors that can occur when you write VBA code – Syntax errors, Compilation errors, Runtime errors and Logical Errors.
Syntax errors
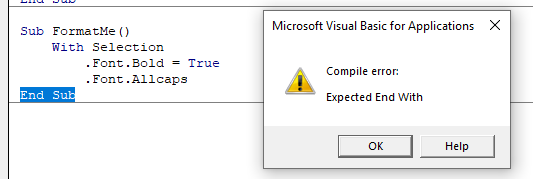
These occur when you write the code incorrectly. This is largely prevented by VBA by having the Syntax check option switch on. This is normally on by default but if your is switch off, then switch it on by going to Tools, Options and click Auto Syntax Check.
If you type the code incorrectly (for example excluding something that should be in the code), a message box will pop up while you are writing the code giving you the opportunity to amend the code.
AutoMacro | Ultimate VBA Add-in | Click for Free Trial!
Compilation Errors
These occur when something is missing from the code that prevents the code from running. The error does not come up when you write the code, but it occurs when you try and run the code.
Runtime Errors
These occur when you run the code, and the syntax and compilation is correct, but something else occurs to prevent the code from running correctly.
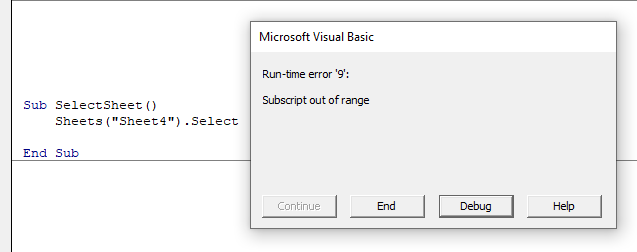
In this case, Sheet4 does not exist. This error message is more useful than the compile error messages as it gives you the opportunity to Debug the code and see why it is not working.
Click Debug. The code will stop at the error and highlight the error in yellow enabling you to correct your error.
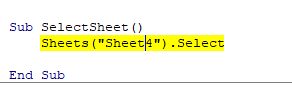
Amend Sheet4 to Sheet2 (as Sheet 2 exists and Sheet 4 does not exist).
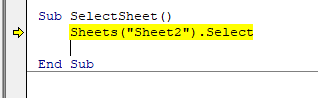
Press F5 or click on the Continue button on the toolbar.
Logical Errors
These are the most difficult to find. In their case, the code is written correctly but the actual logic of the code is flawed, so you may not get the result that you want from the code. For logical errors, error trapping is essential.
There are 2 types of error traps
On Error Go To
The following code is to open the File Open Dialog box – it will give us an error if the user clicks Cancel.
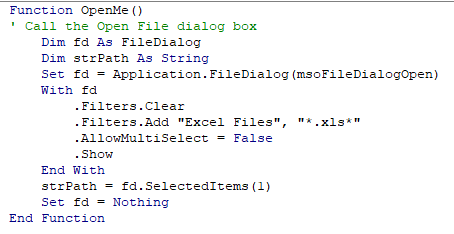
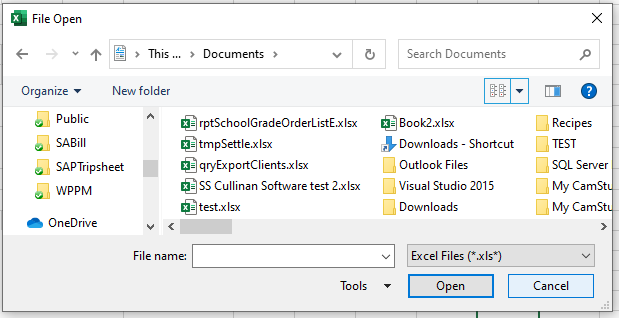
When you run the code the File Open dialog box appears.
When you then click cancel, the error will occur.
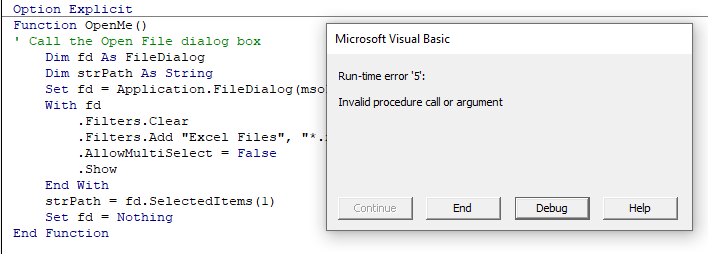
The following Error trap will continue the code to the Exit Function of the code, and return message.
This makes use of On Error GoTo to exit the function.
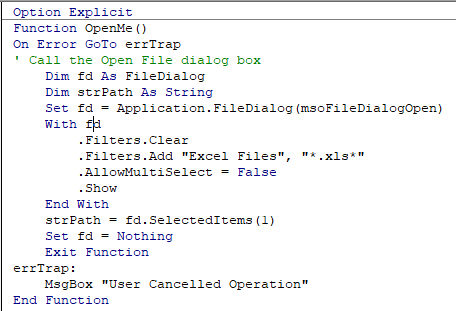
When you run the code and click cancel, the message box will appear.

On Error Resume Next
If you put the On Error Resume Next Statement into your code, the line that contains the error will be ignored and the code will continue.
For example, if the user clicks Cancel in the code below, the code will not give you a run-time error, it will just end without the code doing anything further.
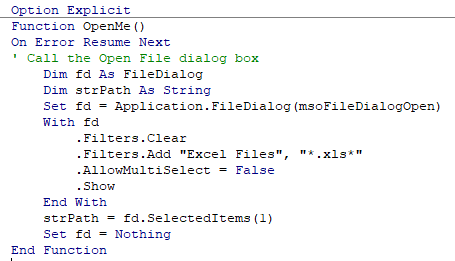
There are times when this is very useful but it can also be very dangerous in some circumstances as it does not return a message as to why you obtained an error.

Introduction
This is a tutorial about writing code in Excel spreadsheets using Visual Basic for Applications (VBA).
Excel is one of Microsoft’s most popular products. In 2016, the CEO of Microsoft said «Think about a world without Excel. That’s just impossible for me.” Well, maybe the world can’t think without Excel.
- In 1996, there were over 30 million users of Microsoft Excel (source).
- Today, there are an estimated 750 million users of Microsoft Excel. That’s a little more than the population of Europe and 25x more users than there were in 1996.
We’re one big happy family!
In this tutorial, you’ll learn about VBA and how to write code in an Excel spreadsheet using Visual Basic.
Prerequisites
You don’t need any prior programming experience to understand this tutorial. However, you will need:
- Basic to intermediate familiarity with Microsoft Excel
- If you want to follow along with the VBA examples in this article, you will need access to Microsoft Excel, preferably the latest version (2019) but Excel 2016 and Excel 2013 will work just fine.
- A willingness to try new things
Learning Objectives
Over the course of this article, you will learn:
- What VBA is
- Why you would use VBA
- How to get set up in Excel to write VBA
- How to solve some real-world problems with VBA
Important Concepts
Here are some important concepts that you should be familiar with to fully understand this tutorial.
Objects: Excel is object-oriented, which means everything is an object — the Excel window, the workbook, a sheet, a chart, a cell. VBA allows users to manipulate and perform actions with objects in Excel.
If you don’t have any experience with object-oriented programming and this is a brand new concept, take a second to let that sink in!
Procedures: a procedure is a chunk of VBA code, written in the Visual Basic Editor, that accomplishes a task. Sometimes, this is also referred to as a macro (more on macros below). There are two types of procedures:
- Subroutines: a group of VBA statements that performs one or more actions
- Functions: a group of VBA statements that performs one or more actions and returns one or more values
Note: you can have functions operating inside of subroutines. You’ll see later.
Macros: If you’ve spent any time learning more advanced Excel functionality, you’ve probably encountered the concept of a “macro.” Excel users can record macros, consisting of user commands/keystrokes/clicks, and play them back at lightning speed to accomplish repetitive tasks. Recorded macros generate VBA code, which you can then examine. It’s actually quite fun to record a simple macro and then look at the VBA code.
Please keep in mind that sometimes it may be easier and faster to record a macro rather than hand-code a VBA procedure.
For example, maybe you work in project management. Once a week, you have to turn a raw exported report from your project management system into a beautifully formatted, clean report for leadership. You need to format the names of the over-budget projects in bold red text. You could record the formatting changes as a macro and run that whenever you need to make the change.
What is VBA?
Visual Basic for Applications is a programming language developed by Microsoft. Each software program in the Microsoft Office suite is bundled with the VBA language at no extra cost. VBA allows Microsoft Office users to create small programs that operate within Microsoft Office software programs.
Think of VBA like a pizza oven within a restaurant. Excel is the restaurant. The kitchen comes with standard commercial appliances, like large refrigerators, stoves, and regular ole’ ovens — those are all of Excel’s standard features.
But what if you want to make wood-fired pizza? Can’t do that in a standard commercial baking oven. VBA is the pizza oven.

Yum.
Why use VBA in Excel?
Because wood-fired pizza is the best!
But seriously.
A lot of people spend a lot of time in Excel as a part of their jobs. Time in Excel moves differently, too. Depending on the circumstances, 10 minutes in Excel can feel like eternity if you’re not able to do what you need, or 10 hours can go by very quickly if everything is going great. Which is when you should ask yourself, why on earth am I spending 10 hours in Excel?
Sometimes, those days are inevitable. But if you’re spending 8-10 hours everyday in Excel doing repetitive tasks, repeating a lot of the same processes, trying to clean up after other users of the file, or even updating other files after changes are made to the Excel file, a VBA procedure just might be the solution for you.
You should consider using VBA if you need to:
- Automate repetitive tasks
- Create easy ways for users to interact with your spreadsheets
- Manipulate large amounts of data
Getting Set Up to Write VBA in Excel
Developer Tab
To write VBA, you’ll need to add the Developer tab to the ribbon, so you’ll see the ribbon like this.

To add the Developer tab to the ribbon:
- On the File tab, go to Options > Customize Ribbon.
- Under Customize the Ribbon and under Main Tabs, select the Developer check box.
After you show the tab, the Developer tab stays visible, unless you clear the check box or have to reinstall Excel. For more information, see Microsoft help documentation.
VBA Editor
Navigate to the Developer Tab, and click the Visual Basic button. A new window will pop up — this is the Visual Basic Editor. For the purposes of this tutorial, you just need to be familiar with the Project Explorer pane and the Property Properties pane.

Excel VBA Examples
First, let’s create a file for us to play around in.
- Open a new Excel file
- Save it as a macro-enabled workbook (. xlsm)
- Select the Developer tab
- Open the VBA Editor
Let’s rock and roll with some easy examples to get you writing code in a spreadsheet using Visual Basic.
Example #1: Display a Message when Users Open the Excel Workbook
In the VBA Editor, select Insert -> New Module
Write this code in the Module window (don’t paste!):
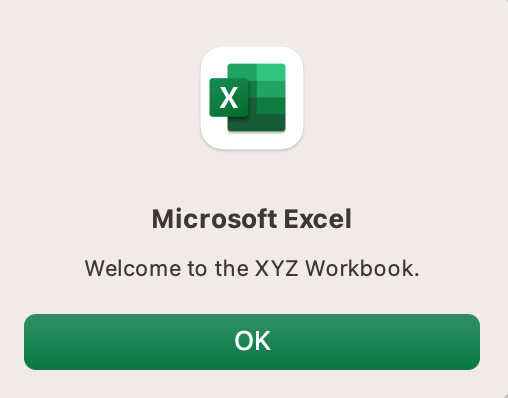
Sub Auto_Open()
MsgBox («Welcome to the XYZ Workbook.»)
End Sub
Save, close the workbook, and reopen the workbook. This dialog should display.
Ta da!
How is it doing that?
Depending on your familiarity with programming, you may have some guesses. It’s not particularly complex, but there’s quite a lot going on:
- Sub (short for “Subroutine): remember from the beginning, “a group of VBA statements that performs one or more actions.”
- Auto_Open: this is the specific subroutine. It automatically runs your code when the Excel file opens — this is the event that triggers the procedure. Auto_Open will only run when the workbook is opened manually; it will not run if the workbook is opened via code from another workbook (Workbook_Open will do that, learn more about the difference between the two).
- By default, a subroutine’s access is public. This means any other module can use this subroutine. All examples in this tutorial will be public subroutines. If needed, you can declare subroutines as private. This may be needed in some situations. Learn more about subroutine access modifiers.
- msgBox: this is a function — a group of VBA statements that performs one or more actions and returns a value. The returned value is the message “Welcome to the XYZ Workbook.”
In short, this is a simple subroutine that contains a function.
When could I use this?
Maybe you have a very important file that is accessed infrequently (say, once a quarter), but automatically updated daily by another VBA procedure. When it is accessed, it’s by many people in multiple departments, all across the company.
- Problem: Most of the time when users access the file, they are confused about the purpose of this file (why it exists), how it is updated so often, who maintains it, and how they should interact with it. New hires always have tons of questions, and you have to field these questions over and over and over again.
- Solution: create a user message that contains a concise answer to each of these frequently answered questions.
Real World Examples
- Use the MsgBox function to display a message when there is any event: user closes an Excel workbook, user prints, a new sheet is added to the workbook, etc.
- Use the MsgBox function to display a message when a user needs to fulfill a condition before closing an Excel workbook
- Use the InputBox function to get information from the user
Example #2: Allow User to Execute another Procedure
In the VBA Editor, select Insert -> New Module
Write this code in the Module window (don’t paste!):
Sub UserReportQuery()
Dim UserInput As Long
Dim Answer As Integer
UserInput = vbYesNo
Answer = MsgBox(«Process the XYZ Report?», UserInput)
If Answer = vbYes Then ProcessReport
End Sub
Sub ProcessReport()
MsgBox («Thanks for processing the XYZ Report.»)
End Sub
Save and navigate back to the Developer tab of Excel and select the “Button” option. Click on a cell and assign the UserReportQuery macro to the button.
Now click the button. This message should display:
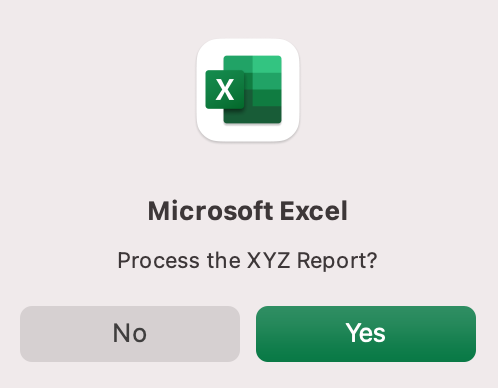
Click “yes” or hit Enter.
Once again, tada!
Please note that the secondary subroutine, ProcessReport, could be anything. I’ll demonstrate more possibilities in example #3. But first…
How is it doing that?
This example builds on the previous example and has quite a few new elements. Let’s go over the new stuff:
- Dim UserInput As Long: Dim is short for “dimension” and allows you to declare variable names. In this case, UserInput is the variable name and Long is the data type. In plain English, this line means “Here’s a variable called “UserInput”, and it’s a Long variable type.”
- Dim Answer As Integer: declares another variable called “Answer,” with a data type of Integer. Learn more about data types here.
- UserInput = vbYesNo: assigns a value to the variable. In this case, vbYesNo, which displays Yes and No buttons. There are many button types, learn more here.
- Answer = MsgBox(“Process the XYZ Report?”, UserInput): assigns the value of the variable Answer to be a MsgBox function and the UserInput variable. Yes, a variable within a variable.
- If Answer = vbYes Then ProcessReport: this is an “If statement,” a conditional statement, which allows us to say if x is true, then do y. In this case, if the user has selected “Yes,” then execute the ProcessReport subroutine.
When could I use this?
This could be used in many, many ways. The value and versatility of this functionality is more so defined by what the secondary subroutine does.
For example, maybe you have a file that is used to generate 3 different weekly reports. These reports are formatted in dramatically different ways.
- Problem: Each time one of these reports needs to be generated, a user opens the file and changes formatting and charts; so on and so forth. This file is being edited extensively at least 3 times per week, and it takes at least 30 minutes each time it’s edited.
- Solution: create 1 button per report type, which automatically reformats the necessary components of the reports and generates the necessary charts.
Real World Examples
- Create a dialog box for user to automatically populate certain information across multiple sheets
- Use the InputBox function to get information from the user, which is then populated across multiple sheets
Example #3: Add Numbers to a Range with a For-Next Loop
For loops are very useful if you need to perform repetitive tasks on a specific range of values — arrays or cell ranges. In plain English, a loop says “for each x, do y.”
In the VBA Editor, select Insert -> New Module
Write this code in the Module window (don’t paste!):
Sub LoopExample()
Dim X As Integer
For X = 1 To 100
Range(«A» & X).Value = X
Next X
End Sub
Save and navigate back to the Developer tab of Excel and select the Macros button. Run the LoopExample macro.
This should happen:
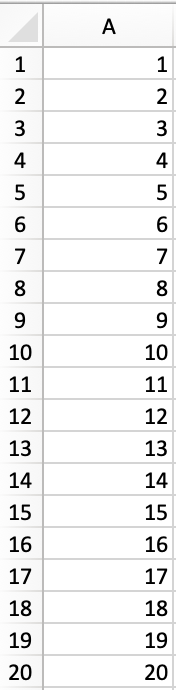
Etc, until the 100th row.
How is it doing that?
- Dim X As Integer: declares the variable X as a data type of Integer.
- For X = 1 To 100: this is the start of the For loop. Simply put, it tells the loop to keep repeating until X = 100. X is the counter. The loop will keep executing until X = 100, execute one last time, and then stop.
- Range(«A» & X).Value = X: this declares the range of the loop and what to put in that range. Since X = 1 initially, the first cell will be A1, at which point the loop will put X into that cell.
- Next X: this tells the loop to run again
When could I use this?
The For-Next loop is one of the most powerful functionalities of VBA; there are numerous potential use cases. This is a more complex example that would require multiple layers of logic, but it communicates the world of possibilities in For-Next loops.
Maybe you have a list of all products sold at your bakery in Column A, the type of product in Column B (cakes, donuts, or muffins), the cost of ingredients in Column C, and the market average cost of each product type in another sheet.
You need to figure out what should be the retail price of each product. You’re thinking it should be the cost of ingredients plus 20%, but also 1.2% under market average if possible. A For-Next loop would allow you to do this type of calculation.
Real World Examples
- Use a loop with a nested if statement to add specific values to a separate array only if they meet certain conditions
- Perform mathematical calculations on each value in a range, e.g. calculate additional charges and add them to the value
- Loop through each character in a string and extract all numbers
- Randomly select a number of values from an array
Conclusion
Now that we’ve talked about pizza and muffins and oh-yeah, how to write VBA code in Excel spreadsheets, let’s do a learning check. See if you can answer these questions.
- What is VBA?
- How do I get set up to start using VBA in Excel?
- Why and when would you use VBA?
- What are some problems I could solve with VBA?
If you have a fair idea of how to you could answer these questions, then this was successful.
Whether you’re an occasional user or a power user, I hope this tutorial provided useful information about what can be accomplished with just a bit of code in your Excel spreadsheets.
Happy coding!
Learning Resources
- Excel VBA Programming for Dummies, John Walkenbach
- Get Started with VBA, Microsoft Documentation
- Learning VBA in Excel, Lynda
A bit about me
I’m Chloe Tucker, an artist and developer in Portland, Oregon. As a former educator, I’m continuously searching for the intersection of learning and teaching, or technology and art. Reach out to me on Twitter @_chloetucker and check out my website at chloe.dev.
Learn to code for free. freeCodeCamp’s open source curriculum has helped more than 40,000 people get jobs as developers. Get started
Первое знакомство с редактором VBA Excel, создание процедур (подпрограмм) и написание простейшего кода, работающего с переменными и ячейками рабочего листа.
Начинаем программировать с нуля
Часть 1. Первая программа
[Часть 1] [Часть 2] [Часть 3] [Часть 4]
Эта статья предназначена для тех, кто желает научиться программировать в VBA Excel с нуля. Вы увидите, как это работает, и убедитесь, что не все так сложно, как кажется с первого взгляда. Свою первую программу вы напишите за 7 простых шагов.
- Создайте новую книгу Excel и сохраните ее как книгу с поддержкой макросов с расширением .xlsm. В старых версиях Excel по 2003 год – как обычную книгу с расширением .xls.
- Нажмите сочетание клавиш «Левая_клавиша_Alt+F11», которое откроет редактор VBA. С правой клавишей Alt такой фокус не пройдет. Также, в редактор VBA можно перейти по ссылке «Visual Basic» из панели инструментов «Разработчик» на ленте быстрого доступа. Если вкладки «Разработчик» на ленте нет, ее следует добавить в настройках параметров Excel.

В левой части редактора VBA расположен проводник проекта, в котором отображены все открытые книги Excel. Верхней строки, как на изображении, у вас скорее всего не будет, так как это – личная книга макросов. Справа расположен модуль, в который записываются процедуры (подпрограммы) с кодом VBA. На изображении открыт модуль листа, мы же далее создадим стандартный программный модуль.
- Нажмите кнопку «Module» во вкладке «Insert» главного меню. То же подменю откроется при нажатии на вторую кнопку после значка Excel на панели инструментов.

После нажатия кнопки «Module» вы увидите ссылку на него, появившуюся в проводнике слева.
Первая программа на VBA Excel
Добавляем на стандартный модуль шаблон процедуры – строки ее начала и завершения, между которыми мы и будем писать свою первую программу (процедуру, подпрограмму).
- Откройте стандартный модуль двойным кликом по его ссылке в проводнике. Поместите в него курсор и нажмите кнопку «Procedure…» во вкладке «Insert» главного меню. Та же ссылка будет доступна при нажатии на вторую кнопку после значка Excel на панели инструментов.

В результате откроется окно добавления шаблона процедуры (Sub).

- Наберите в поле «Name» имя процедуры: «Primer1», или скопируйте его отсюда и вставьте в поле «Name». Нажмите кнопку «OK», чтобы добавить в модуль первую и последнюю строки процедуры.

Имя процедуры может быть написано как на латинице, так и на кириллице, может содержать цифры и знак подчеркивания. Оно обязательно должно начинаться с буквы и не содержать пробелы, вместо которых следует использовать знак подчеркивания.
- Вставьте внутрь шаблона процедуры следующую строку:
MsgBox "Привет".

Функция MsgBox выводит информационное сообщение с указанным текстом. В нашем примере – это «Привет».
- Проверьте, что курсор находится внутри процедуры, и запустите ее, нажав клавишу «F5». А также, запустить процедуру на выполнение можно, нажав на треугольник (на изображении под пунктом меню «Debug») или на кнопку «Run Sub/UserForm» во вкладке «Run» главного меню редактора VBA Excel.

Если вы увидели такое сообщение, как на изображении, то, поздравляю – вы написали свою первую программу!
Работа с переменными
Чтобы использовать в процедуре переменные, их необходимо объявить с помощью ключевого слова «Dim». Если при объявлении переменных не указать типы данных, они смогут принимать любые доступные в VBA Excel значения. Комментарии в тексте процедур начинаются со знака «’» (апостроф).
Пример 2
Присвоение переменным числовых значений:
|
Public Sub Primer2() ‘Объявляем переменные x, y, z Dim x, y, z ‘Присваиваем значение переменной x x = 25 ‘Присваиваем значение переменной y y = 35 ‘Присваиваем переменной z сумму ‘значений переменных x и y z = x + y ‘Выводим информационное сообщение ‘со значением переменной z MsgBox z End Sub |
Пример 3
Присвоение переменным строковых значений:
|
Public Sub Primer3() ‘Объявляем переменные x, y, z Dim x, y, z ‘Присваиваем строку переменной x x = «Добрый» ‘Присваиваем строку переменной y y = «день!» ‘Присваиваем переменной z строку, ‘состоящую из строк x и y ‘с пробелом между ними z = x & » « & y ‘Выводим информационное сообщение ‘со значением переменной z MsgBox z End Sub |
Скопируйте примеры процедур в стандартный модуль и запустите их на выполнение.
Изменение содержимого ячеек
Для обозначения диапазонов, в том числе и отдельных ячеек, в VBA Excel имеется ключевое слово «Range». Ячейке A1 на рабочем листе будет соответствовать выражение Range("A1") в коде VBA Excel.
Пример 4
|
Public Sub Primer4() ‘Объявляем переменную x Dim x ‘Присваиваем значение переменной x x = 125.61 ‘Присваиваем ячейке A1 ‘значение переменной x Range(«A1») = x ‘Присваиваем значение ячейке B1 Range(«B1») = 356.24 ‘Записываем в ячейку C1 ‘сумму ячеек A1 и B1 Range(«C1») = Range(«A1») + Range(«B1») End Sub |
Скопируйте процедуру этого примера в стандартный модуль и запустите на выполнение. Перейдите на активный рабочий лист Excel, чтобы увидеть результат.
 Editor: The Complete And Easy Guide To The VBE") What is the aspect about learning macros and Visual Basic for Applications that you find more intimidating?
What is the aspect about learning macros and Visual Basic for Applications that you find more intimidating?
For some people, the answer will revolve around having to learn a new programming language and coding. However, if you’re anything like me, your answer will be the Visual Basic Editor (or VBE).
The first few times I opened the Visual Basic Editor I had no idea what I was looking at or what I was supposed to do. At the time, I really wished I had access to an Excel tutorial that explained the main features of the VBE comprehensively. Unfortunately, I didn’t find it.
Obviously, in the last few years I’ve come a long way. Nowadays, I have no problems using the Visual Basic Editor and feel quite comfortable working on it. However, sometimes I take a look around the Internet to see if I can find a good and comprehensive Excel tutorial about the VBE. The truth is that, as of the time of this writing, there are not that many online resources covering this in detail.
I find this a little bit surprising. After all, I’m sure about one thing:
Many people who are interested in learning macros and Visual Basic for Applications feel confused the first time they open the Visual Basic Editor. I know it because, as explained above, that happened to me. This is a pity because, in practice, you’re likely to constantly work with the VBE on your way to becoming a proficient VBA user.
The place where you’ll find those Code Windows is the Visual Basic Editor. Therefore, if you want to become an advanced macro and VBA user, you must understand how to use the VBE properly.
The importance of the Visual Basic Editor and the lack of resources covering the VBE in detail are the main reasons why I decided to write this Excel tutorial. In this post, I cover the following topics:
Enough with the introduction. Let’s get into the first topic of this Excel tutorial about the Visual Basic Editor.
The Visual Basic Editor is not exactly the same as Excel. It is actually a separate application, even though you’ll usually open it through Excel. In fact, in order for the VBE to be able to run, Excel must be open.
The main function of the VBE is to allow you to write and edit VBA code.
The Visual Basic Editor is sometimes referred to as the Integrated Development Environment (IDE). In this Excel tutorial, I use the first term (Visual Basic Editor or VBE) but don’t be confused if you see the second term being used in other places.
How To Open The Visual Basic Editor In Excel
You can open the VBE using either of the following methods:
- Click on “Visual Basic” in the Developer tab of the Ribbon.

- Use the keyboard shortcut “Alt + F11”.

How Does The Visual Basic Editor Look
The basic VBE window can be divided in the following 6 sections, all of which I explain below. In reality, there are more components than those which appear in this screenshot (such as the Locals and Watch Windows) but, since they’re more advanced, I’ll cover them in a future Excel tutorial.

The Visual Basic Editor:
- Has several windows.
- Is highly customizable.
As a consequence of the above, there is the possibility that your VBE window doesn’t look exactly as the screenshot above.
In fact, if this is the first time that you’re opening the Visual Basic Editor, you probably can’t see element #6 that appears in the lower part of the image above. The reason is that this particular window (known as the Immediate Window) is, by default, hidden. I explain how you can easily unhide it below.
As you get more familiar with the VBE, you’ll notice that you have a lot of flexibility regarding how the interface looks like. The Visual Basic Editor allows you to, for example:
- Hide or un-hide windows.
- Move or re-arrange windows.
- Dock windows.
Let’s dive right in and understand the 6 main components of the Visual Basic Editor.
Component #1: Menu Bar

If you’ve been using computers for a reasonable amount of time, you’re probably quite familiar with menu bars. If that’s the case, the VBE menu bar is not very different from the other menu bars you’ve seen before.
The menu bar, basically, contains several drop-down menus. Each of the drop-down menus contains commands that you can use to interact and do things with the different components of the Visual Basic Editor.
One thing you’ll notice when clicking on any menu, is that several commands have a keyboard shortcut that is displayed at that point. Take a look, for example, at the Debug menu and notice all the keyboard shortcuts that appear on the right side of this image:

Component #2: Toolbar

Again, if you’re a computer user, a toolbar is an item that you’ve probably seen many times before. You’re probably aware that a toolbar contains on-screen buttons, icons, menus and other similar elements that you can use while working with the VBE.
The toolbar that appears in the screenshot above is called the Standard toolbar. This is the only toolbar that the Visual Basic Editor displays by default. There are, however, 3 other basic toolbars:
- The Debug toolbar.
- The Edit toolbar.
- The UserForm toolbar.
In addition to the above, the VBE gives you the possibility to customize the toolbars in several ways.
You can change all of these settings by going to the View menu and selecting “Toolbars”. The Visual Basic Editor displays a menu with the 4 different toolbars and the option to access the Customize dialog.

The toolbars with a checkmark to their left are those currently displayed by Excel. You can add or remove a checkmark in order to display or hide a particular toolbar by clicking on its name. For example, in the screenshot below, only the Standard toolbar is being displayed.

If you click on “Customize”, the Visual Basic Editor displays the Customize dialog, which looks as follows:

Using this dialog box, you can control additional aspects regarding the toolbars that are displayed by the VBE. This includes, for example, the possibility of controlling the display of the Shortcut Menus toolbar or adding new toolbars.
You may be wondering what toolbar display set up is commonly applied by VBA users. In practice, there are different opinions.
- Some advanced VBE users use the default settings.
- However, other advanced VBA users display several toolbars.
You can also add commonly used commands that aren’t by default in the Standard toolbar.
Component #3: Project Window / Project Explorer

The Project Window, also known as the Project Explorer, is useful for navigation purposes.
This is the section of the Visual Basic Editor where you’ll be able to find every single Excel workbook that is currently open. This includes add-ins and hidden workbooks. More particularly, each Excel workbook or add-in that is open at the moment appears in the Project Explorer as a separate project.
A project is (basically/simply) a set of modules. If it makes it easier to understand you can take John Walkenbach’s explanation in Excel VBA Programming for Dummies, who says that a project can be seen as “a collection of objects arranged as an outline”.
As explained by Walkenbach in Excel 2013 Power Programming with VBA, each project may have the following nodes:
- A node called “Microsoft Excel Objects” always appears in any project. This node usually contains 2 types of objects:
- #1: Each worksheet in the relevant Excel workbook. In other words, each of the worksheets is considered a separate object.
- #2: The Excel workbook itself, called “ThisWorkbook”.
- The Modules node appears when the project contains VBA modules.
- If the project contains UserForm objects, which are used to create custom dialog boxes, the Project Explorer displays a node called “Forms”.
- A project can also contain class modules (modules that define a class) and, in that case, the Project Window displays a node called “Class Modules”.
- Finally, if a project has references, there is a node called “References”.
Let’s take a look at how all of this looks in the VBE interface:
In the screenshot below, the only project that appears is the Excel workbook “Book 1. xlsm”. Within the Microsoft Excel Objects node, you can see that the Excel workbook has 2 worksheets. Finally, this particular project contains 1 VBA module and, therefore, the Modules node is visible. There are, however, no UserForm objects, class modules or references. Therefore, the Forms, Class Modules and References nodes don’t appear.

You can expand or contract the items that appear in the outline by double-clicking on them or by clicking on the “+” or “-” that appear to the left of each item, depending on the case.

You can also control whether the items that are displayed in the Project Window appear in a hierarchical or a non-hierarchical list. You change this setting by clicking on the Toggle Folders button of the Project Window.

The screenshot above shows items being displayed in a hierarchical list. When displayed in a non-hierarchical list, the Project Window looks roughly as follows:

You can also hide or unhide the Project Explorer itself. I explain how to do this below.
How To Display The Project Window
If you can’t see the Project Explorer, you can make the Visual Basic Editor display it by using any of the following methods:
- Clicking on “Project Explorer” in the View menu.

- Clicking on the Project Explorer icon in the toolbar.

- Using the keyword shortcut “Ctrl + R”.

How To Hide The Project Window
You can hide the Project Explorer by using either of the following methods:
- Clicking on the close button of the Project Window.

- Right-clicking anywhere on the Project Explorer and selecting “Hide”.


Component #4: Properties Window

The Properties Window displays the properties of the object that is currently selected in the Project Explorer and allows you to edit those properties.
Just as with the Project Window, you can hide or unhide the Properties Window. You’re likely to (eventually) work with the Properties Window, particularly in the context of creating UserForms. If you’re just beginning to use the VBE, you probably won’t need this window too much.
In any case, let’s take a look at how you can hide or unhide the Properties Window.
How To Unhide The Properties Window
You can get the Visual Basic Editor to show the Properties Window by using any of the following methods.
- Clicking on “Properties Window” within the View menu.

- Clicking on the Properties Window icon.

- Using the “F4” keyboard shortcut.

How To Hide The Properties Window
You can get the Visual Basic Editor to hide the Properties Window by doing either of the following:
- Click on the Close button of the Properties Window.

- Right-click on the Properties Window and select “Hide”.


Component #5: Programming Window / Code Window / Module Window

As you may expect, the Code Window of the Visual Basic Editor is where your VBA code appears, and where you can write and edit such code. At the beginning, though, the Programming Window is empty as in the screenshot above.
There is a Code Window for every single object in a project. You can access the window of a particular object by going to the Project Explorer and doing any of the following:
- Double clicking on the object. The main exception to this rule are UserForms. If you double-click on a UserForm, the Visual Basic Editor displays the UserForm in Design view, a topic I’ll cover in future tutorials.
- Selecting the object and, then, clicking on “Code” in the View menu.

- Selecting the object and clicking on the View Code icon that appears at the top of the Project Explorer.

- Right-clicking on the object and selecting “View Code”.

- Using the keyboard shortcut “F7”.


Component # 6: Immediate Window
The main purpose of the Immediate Window is to help you noticing errors, checking or debugging VBA code.
The Immediate Window is, by default, hidden. However, as with most of the other windows, you can unhide it. Let’ take a look at how you can do both the hiding and the un-hiding:
How To Unhide The Immediate Window
You can unhide the Immediate Window by doing either of the following:
- Clicking on “Immediate Window” in the View menu.

- Using the “Ctrl + G” keyboard shortcut.

However, as explained in Excel VBA Programming for Dummies, if you’re just getting started with the VBE “this window won’t be all that useful”. Therefore, if you’re just beginning to work with macros and Visual Basic for Applications, you probably don’t need to display the Immediate Window.
If you’re a more advanced user, you’ll probably want to have the Visual Basic Editor show the Immediate Window, since this can be very useful.
How To Hide The Immediate Window
You can hide the Immediate Window using either of the following methods:
- Click the Close button.

- Right-click on the Immediate Window and select “Hide”.


You already know that:
- The VBE allows you to customize several aspects.
- On your way to becoming a macro and VBA expert you’ll probably spend a significant amount of time working with the Visual Basic Editor.
Therefore, its important to have a basic idea of…
How To Customize The Visual Basic Editor
If you want to customize the Visual Basic Editor, the first thing you’ll want to do is open the Options dialog. To do this, go to the Tools menu and click on “Options”.

The Options dialog looks roughly as follows.

As you can see, there are plenty of settings you can modify. In most cases, you can enable or disable an option by clicking on the blank box to the left of it. If there is a checkmark, the option is enabled. If the box is empty, the option is not enabled.
In the screenshot above, the only option that is not enabled is “Require Variable Declaration”.

For the moment, let’s take a look at some of the most common suggestions made by Excel experts. The following sections go separately through each of the 4 tabs in the Options dialog:
- Editor.
- Editor Format.
- General.
- Docking.

Editor Tab
The Editor tab is where you can determine the settings for the Code Window and Project Window. Let’s take a look at the main settings of this tab.

Code Settings
Setting #1: Auto Syntax Check.
This option allows you to determine what happens when you make a syntax error while entering VBA code. There are 2 options:
- If Auto Syntax Check is enabled, a dialog box pops up as soon as the VBE discovers that you’ve made a syntax error. This dialog box gives you a rough idea of what mistake you’ve made. Additionally, the Visual Basic Editor highlights the syntax error by using a different font color (usually red).
Let’s take a look at the VBA code for a very simple macro that deletes rows when some of the cells are blank. The second statement of this macro is “Selection.EntireRow.SpecialCells(xlBlanks).EntireRow.Delete”. If, for example, I press the Enter key after “Selection.”, the Visual Basic Editor gives me the following warning signs:

- If Auto Syntax Check is disabled, the Visual Basic Editor displays syntax errors in a different font color (usually red). Under this setting, no dialog boxes pop on your screen.
In the case of the syntax error used as an example above, the VBE looks roughly as follows:


Should you enable or disable the Auto Syntax Check?
This decision comes down to personal preference and knowledge of Visual Basic for Applications.
You may want to disable the Auto Syntax Check if you:
- Think that having dialog boxes popping up anytime you make a syntax error is annoying.
- Have enough knowledge of VBA in order to find out what is the problem with a statement that has a syntax error.
Some advanced VBA users are of the opinion that Auto Syntax Check should be disabled. The main reason for this is that the VBE highlights the error by (by default) using red font. In this context, the message box displayed by the VBE may be redundant.
However, if you’re a beginner, keeping the Auto Syntax Check enabled can be of great help.
Setting #2: Require Variable Declaration.
This option allows you to determine whether the Visual Basic Editor automatically inserts a statement at the beginning of any new VBA module to require that you define (explicitly) all the variables that you use in those modules. This statement is:
Option Explicit
Note that changing the Require Variable Declaration setting only affects future modules. Modules that are already in existence when you modify the setting are not affected.
As explained in Excel VBA Programming for Dummies, you should get used to defining explicitly all the variables that you use. In that sense, it may make sense to enable the Require Variable Declaration option. Some advanced VBA users say that you should enable Require Variable Declaration. One of the (main) benefits of enabling Require Variable Declaration is the fact it reduces the risk of errors arising out of misspelled variable names.
The case for enabling Require Variable Declaration is even stronger if you’re beginning to use the VBE. In this context, Require Variable Declaration (usually) saves you time when debugging and improves your understanding of Visual Basic for Applications.
Despite the above, some advanced Excel users keep this option turned off.
Setting #3: Auto List Members.
The Auto List Members settings allows you to determine whether, while you’re typing VBA code, the Visual Basic Editor displays a list of options that can be used to complete the statement you’re writing. The list generally includes methods and properties that may apply to the object that you’ve just finished typing.
Let’s see how this looks in practice by using the VBA code of the first macro that I explain in this blog post, and whose purpose is to delete an entire row if there are blank cells in specified cell range. In particular, let’s take a look at the second statement, which is “Range(“E6:E257″).Select” and see what happens while I’m typing it:
The screenshot below shows how the Visual Basic Editor automatically displays a list to help me complete the statement:

If you scroll down the list, you’ll notice that one of the suggestions included in that list is “Select”, which is what we’re looking for.

Auto List Members has several advantages, including the following:
- The Visual Basic Editor may show you properties and methods that you weren’t aware of.
- The list displayed by the VBE updates itself automatically as you type characters. For example, continuing with the same example as above, the screenshot below shows the suggestions made by the Visual Basic Editor after I’ve partially typed “Selection”:

- You can avoid typing. This is due to the fact that you can enter any of the members that appear in the list by selecting it and pressing the Tab key or double-clicking on the relevant member.
- When you use Auto List Members, you reduce the risk of making syntax errors.

Overall, Auto List Members is probably one of the most helpful features of the Visual Basic Editor. Unless you have a very compelling reason to do otherwise, enable it.
Setting #4: Auto Quick Info.
The Auto Quick Info setting allows you to determine whether the Visual Basic Editor displays information about the arguments of functions, properties and methods as you type them.
To see how Auto Quick Info works in practice, let’s go back once more over the statement “Range(“E6:E257″).Select” which I used to illustrate the Auto List Members option above. The screenshot below shows how the VBE helps me while I am typing the range:

Just as the Auto List Members setting, Auto Quick Info is a really helpful feature that you’ll probably want to keep enabled.
Setting #5: Auto Data Tips.
Auto Data Tips works when you’re in break mode, where program execution is temporarily suspended. This occurs for example when debugging VBA code, a topic I will cover in future tutorials.
If Auto Data Tips is enabled, and you’re in break mode, the Visual Basic Editor displays the value of a variable when you place the cursor over it.
Let’s take a look at Auto Data Tips in action. For these purposes, I use the VBA code for a macro that deletes an entire row when the row is completely empty. This particular macro has 2 variables: aRow and BlankRows. In the screenshot below, Excel displays the value of the variable BlankRows (BlankRows = Nothing) when I place the cursor on top of it:

This is another option that you’ll probably like to enable. This is particularly useful in the context of debugging.
Setting #6: Auto Indent.
This setting is self-explanatory. If you have Auto Indent enabled, the indentation of each line of VBA code is the same as the indentation of previous line.
In addition to the above, you can determine what is the indentation width by inputting a value in the Tab Width box. The default number of characters to indent is 4. The value you input here must be between 1 and 32.

Some advanced VBA users use a different number of spaces (usually less than 4) for the tab width. The reasoning behind using less indentation is that it keeps code from extending too far into the right of the screen. Other advanced VBA users suggest that if you’re not using a fixed width font (as I suggest below), it may advisable to increase the number of characters (used to indent) to have clear levels of indentation in your Code Window.
To see how this works in practice, let’s take a look at the piece of VBA code that appears in the previous example where I illustrated Auto Data Tips. The full VBA code of that macro looks as follows:

You’ll notice that, near the end, there are three statements that have exactly the same indentation. The image below highlights them:

Let’s assume that I am writing this piece of code and I’m about to type “BlankRows.Delete”, the second of the 3 statements I highlight in the image above:
- If Auto Indent is turned on, once I press the Enter key after “Application.ScreenUpdating = False”, the VBE takes me to a new row with exactly the same indentation. Notice the location of the cursor in the screenshot below:

- The result of pressing the Enter key is different if Auto Indent is not enabled. Check out what happens when this is the case and compare the location of the cursor between the image below and the image above:
Now, the cursor appears at the left margin of the Programming Window, regardless of the indentation of the previous row.


Appropriate indentation is very important. Therefore, you’ll probably want to enable Auto Indent and set a tab width that works well for your particular circumstances and VBE settings.
Window Settings
Setting #1: Drag-and-Drop Text Editing.
If you enable the Drag-and-Drop Text Editing, the Visual Basic Editor allows you to move pieces of text by dragging and dropping them with your mouse.
Whether you enable this option or not depends on your own taste. I prefer to use the keyboard to copy and move pieces of VBA code. However, you may prefer to use the mouse to drag and drop.
Even if you don’t plan to use it much, enabling Drag-and-Drop Text Editing doesn’t do harm.
Setting #2: Default to Full Module View.
This option makes reference to, and regulates, how procedures are displayed in the Programming Window.
- If Default to Full Module View is enabled, procedures generally appear as a single list in the Code Window.
Take a look, for example, at how 3 macros for deleting rows with empty cells appear in the following screenshot.

- If the option is turned off, you’ll only be able to see 1 procedure at a time. You can use the Procedure Box, which is the drop-down menu at the upper right corner of the Programming Window, to switch between the different procedures.
Continuing with the example of the macros for deleting rows with empty cells, this looks roughly as follows:


You can also turn the Full Module View on and off using the Procedure View (where you can only see 1 procedure at a time) and Full Module View (where you can see all the procedures as a single list) buttons that appear on the lower left corner of the Programming Window.

This is another setting where personal taste is important. I leave Default to Full Module View enabled and my guess is that most Excel users would prefer to do the same.
Setting #3: Procedure Separator.
This setting is kind of self-explanatory. If enabled, it separates the procedures in the Code Window with a bar. This looks roughly as follows:

Without procedure separators, the Code Window (with the same macros that appear above) looks roughly as follows:

You’d probably agree that the first screen is more organized and makes it easier to distinguish between the different procedures. If that’s the case, you’d prefer to enable Procedure Separators.
In certain cases, there may be reasons to disable Procedure Separators but this is not very common.
Editor Format Tab
As implied by its name, the Editor Format tab is where you can format the editor. In other words, here is where you can customize the way the VBA code looks.

On the right side of the Options dialog, you’ll notice that there is a Sample box. Here is where the VBE provides you an example of how the text in the Visual Basic Editor looks under the current settings. For example:

The Editor Format regulates the way the Visual Basic Editor looks using 4 sections. Let’s take a look at each of them.
Section #1: Code Colors.

The Code Colors settings allows you to determine 3 characteristics for any type of text: font color, highlighting color and margin indicator. You can adjust these settings in 2 simple steps.
Step #1: Determine The Category Of Text You Want To Configure.
You can select which type of text you want to adjust by selecting it in the first list that appears on the upper left corner of the Options dialog.

Step #2: Adjust The Foreground, Background and Indicator Settings.
Once you’ve selected the type of text whose settings you want to modify, you can proceed to set the following 3 characteristics by using the relevant drop-down menus:
- The font color, determined by “Foreground” in the Options dialog.

- The highlighting color, set by “Background”.

- Whether the Visual Basic Editor displays an indicator on the margin of the Programming Window, and the color of that indicator.


In order to understand how this looks in practice, let’s take a look at the default settings for 2 types of text.
- As you’ve seen above (when reading about the Auto Syntax Check option), the Visual Basic Editor highlights syntax errors by making their font color red (by default).
The following screenshot shows the configuration for this type of text in the Options dialog:

- One of the screenshots I use above (when explaining Auto Data Tips) shows text highlighted in yellow. This is known as Execution Point Text and its configuration looks as follows:


Code Color settings are, as many other of these settings, a matter of personal taste. I prefer to leave the default colors. However, you may want to play around with the settings to find the configuration you like the most.
Section #2: Font.
As you probably expect, Font settings allow you to determine which font is used to display the VBA code in the Programming Window.
The default font is Courier New and my suggestion is that you keep it. The reason for this is that this font is fixed-width. In fixed-width fonts:
- All of the characters are the same width; and (therefore)
- Use the same amount of horizontal space.
This (usually) enhances the readability of your VBA code. For example:
- All characters are appropriately aligned; and
- You can (more) easily identify multiple or missing spaces.
Section #3: Size.
This is another setting that is self-explanatory. Here is where you can specify the font size used in the Code Window. This setting is a matter of personal taste, although factors such as the monitor you’re using may affect your decision.
Section #4: Margin Indicator Bar.
You can use this setting to determine whether to turn on or off the margin indicator bar.
So, what is the margin indicator bar?
This is the grey bar that appears on the left side of the Programming Window of the VBE. It displays very useful indicators that’ll help you, for example, when debugging your VBA code.
In the last screenshot above, I showed you the Code Colors settings for Execution Point Text. Now, let’s take a look at how Execution Point Text appears in the Code Window. Notice the indicator for this text in the margin indicator bar.

This is one of the settings that you’ll want to turn on. As mentioned above, margin indicators can be very useful when working on the Visual Basic Editor.
General Tab
The General tab of the Options dialog contains settings that fall in a variety of categories such as form, error handling and compiling. Additionally, several of them are relevant only for more advanced topics, such as debugging. Therefore, I only provide a rough explanation of the different options that are available in this tab.
When you’re starting to work with the VBE, the default settings in this tab (usually) work well enough.

Setting #1: Form Grid Settings.
Form Grid Settings allow you to control the way in which the VBE handles UserForms. This is a more advanced topic that I may cover in future tutorials.
Setting #2: Show ToolTips.
ToolTips are descriptions that the Visual Basic Editor can display in order to help you understand a particular toolbar button. If Show ToolTips is enabled, ToolTips are displayed automatically whenever you hover over a particular button.
As an example, the following image shows the ToolTip for the Project Explorer button in the VBE Standard toolbar:

Having ToolTips enabled is generally considered useful.
Setting #3: Collapse Proj. Hides Windows.
This option does what its title says: when you collapse a project in the Project Explorer, it hides any window related to that particular project. This (generally) applies to project, UserForm, object or module windows.
Let’s take a look at how this looks in practice. Notice how, in the following image, the project “Book 1.xlsm” is expanded and you can see the Programming Window that corresponds to Module1.

Compare the above with the next screenshot. In this image, I have simply collapsed the project in the Project Window. As a result, all related windows (the most prominent being the Code Window) are hidden.

If you expand the project again, the windows that have been hidden are restored in their previous positions.
Enabling Collapse Proj. Hides Windows is, usually, a good idea.
Setting #4: Edit and Continue & Notify Before State Loss.
When the Notify Before State Loss setting is enabled, the VBE issues you a notification if the following conditions are met:
- You’re running VBA code.
- You attempt to do something that requires the resetting of all the variables in the module.
Setting #5: Error Trapping.
As implied by its name, error trapping makes reference to how errors are trapped and handled when the VBA code runs.
Let’s take a quick look at what each of the 3 available options does:
- If you choose “Break on All Errors”, break mode is entered whenever there is an error in the VBA code. This includes cases where there may be an error handler or the code is in a class module. This option may be useful when doing debugging. However, at the beginning, I suggest that you don’t choose it.
- When “Break in Class Module” is enabled, break mode is entered if there is an error in the VBA code within a class module. This is the setting suggested by several advanced VBA users.
- “Break on Unhandled Errors” is the default setting. This is also the choice suggested by several advanced VBA users. Under this setting, break mode won’t be entered as long as there is an error handler that traps the error. However, if there is no adequate error handler, break mode is entered.
Setting #6: Compile.
The Compile settings allow you to control the moment at which VBA code is compiled.
Why is this important?
At this moment is not necessary to go too deep into the concept of compiling. For the moment, is enough to understand that applications written in a particular programming language (which can’t be executed by a computer) need to be transformed into another language (that can be executed by the computer). More precisely:
- VBA code must be compiled before it can be executed; but
- Not (absolutely) all VBA code in a project must be compiled before certain (usually the initial) parts of the VBA code can start running.
With this in mind, let’s take a look at the 2 options that appear in the General tab.
Option #1: Compile On Demand.
Compile On Demand means that the Visual Basic Editor compiles the VBA code as is needed. Let’s take a look at an example to understand how Compile On Demand works:
Let’s assume, for example, that you’re working with 5 procedures named “Procedure1” through “Procedure5”. You want to first run Procedure1. Procedure1 calls Procedure2 which, in turn, calls Procedure3. Procedure3 doesn’t call any further procedures.
If Compile On Demand is enabled, Procedure1 is the only procedure that is compiled at the beginning of the process described above. No additional code (from the other procedures) is compiled until the relevant procedure is called. Once Procedure1 calls Procedure2, the code of Procedure2 is compiled. Similarly, once Procedure2 calls Procedure 3, Procedure3 is compiled. Since Procedure4 and Procedure5 aren’t called, their codes are not compiled.
If Compile On Demand is disabled, the code of all the procedures (Procedure1 through Procedure5) is compiled before Procedure1 starts running. As you can imagine, under this scenario, the procedure you want to execute starts running a little bit later since there is more code to be compiled. Additionally, you won’t be able to run the procedure you want (Procedure1) if there is any language or compile error in any of the other procedures (Procedure2 to Procedure5).
Option #2: Background Compile.
This option is only available if you have enabled Compile On Demand. As implied by its name, Background Compile means that idle time is used for purposes of finish compiling a program in the background.
Docking Tab
The Docking tab is used to set the behavior of the different windows of the Visual Basic Editor. More precisely, is used to determine whether a tab docks, a concept that I explain below.

A window is dockable if the box to its left has a checkmark. Otherwise, the window isn’t dockable. In the screenshot below, the only window that isn’t dockable is the Object Browser.

You may be wondering what exactly happens when a window is dockable. The difference between being dockable and not is the following:
- When a window is docked, the VBE fixes that window in a certain spot along one of the edges of the Visual Basic Editor window.
Check out, for example, how the Project Explorer and the Properties Window are fixed along the left edge of the VBE window:

- If windows are not docked, you just have a bunch of windows within the VBE.
Compare the screenshot above with the following image, where the Project and Properties Windows are not docked. This image is only for illustration purposes. You can maximize and minimize these windows by clicking on the relevant buttons at the top right hand of the relevant window.


As you probably expect, I suggest that you dock most windows. Having the different VBE windows docked makes it easier to locate the window that you need when you need it, and generally improves the user experience.
If your screen is not big enough to dock the windows along the edges of the VBE, you may want to undock some of them. If you do this, you’ll probably have to switch between windows in order to get to the one you want. The advantage of having few (or none) docked windows is that you’ll have more space for your Code Window.
How To Add VBA Modules
When you record a macro, Excel automatically inserts a module into the Excel workbook you choose before beginning to record. However, there are other opportunities where you may want to add other VBA modules. You can do this by using either of the following methods.
How To Add A VBA Module: Method #1
Under this method, you can add a VBA module to a project in 2 easy steps.
Step #1: Select Project To Add Module To.
Go to the Project Explorer and select the project to which you want to add a module. For example, in the screenshot below, a module would be added to “VBAProject (Book 1.xlsm)”, which is the only open project.

Step #2: Insert Module.
Go to the Insert menu and select “Module”.

How To Add A VBE Module: Method #2
In this case, you add a module by right-clicking on the relevant project (in the Project Window), choosing “Insert” and clicking on “Module”.

How To Remove VBA Modules
Just as you can add new VBA modules to a project, you can remove them by using either of the 2 methods explained below. As a general rule, you can only remove VBA modules. You cannot remove other code modules, such as those for:
- Worksheets (Sheet#); or
- The workbook (ThisWorkbook).
How To Remove A VBA Module: Method #1
In this method, you can remove a VBA module by following 2 simple steps.
Step #1: Select Module To Be Removed.
Go to the Project Window and select the relevant module. For example, if you wanted to remove “Module2”.

Step #2: Remove Module.
Go to the File menu and select “Remove module_name”, where “module_name” stands for the name of the module you want to remove. For example, when removing “Module2”, the File menu looks roughly as follows:

How To Remove A VBA Module: Method #2
Under this method, you simply right-click on the relevant module in the Project Explorer and select “Remove module_name”. For example, in the case of “Module2”:

Regardless of which of the 2 methods above you use to remove a VBA module, the Visual Basic Editor displays a dialog asking you whether you want to export the module before actually removing it.

Most of the times, the reason why you’re removing a VBA module is because you don’t need the VBA code within it. In those cases, click “No”.
If, for any reason, you actually want to export the module, click on “Yes”. However, if you are interested in learning how to export objects in the Visual Basic Editor, take a look at the next section of this Excel tutorial…
How To Export Or Import An Object In The Visual Basic Editor
Let’s assume that you’re working on a VBA project and want to be able to access a particular object separately and use it, for example, in future VBA projects or share it with your colleagues. To do this, you need to learn how to export and import objects in the VBE.
But first, let’s define exporting and importing:
- Exporting an object means taking a particular VBA object from a VBA project and saving it in a separate file. Graphically, this looks as follows:

- Importing is, basically, the opposite of exporting. More precisely, it means taking a VBA object from a separate file and into a particular VBA project. Graphically:


You can’t export the objects that appear under the References node in the Project Explorer.
Also, if you export a UserForm object, the code associated with that UserForm is also exported. Therefore, exporting a UserForm actually creates 2 separate files.
Now, let’s take a look at how to export an object in the Visual Basic Editor…
How To Export An Object In The Visual Basic Editor
First of all, if your purpose for exporting an object is to use it another project, you may not need to go through the whole exporting and importing process. In most cases, you can simply do the following to have the object in both projects:
- Open both the original and the destination projects.
- Use the mouse to drag the relevant object from the original project to the destination project.
If you still need to export an object using the Visual Basic Editor, simply follow these 3 easy steps.
Step #1: Select The Object You Want To Export.
Go to the Project Window and click on the VBA object you want to export. For example, if you want to export Module2:

Step #2: Instruct The VBE To Export The Object.
You can instruct the Visual Basic Editor to export the object by using either of the following methods:
- Clicking on “Export File…” in the File menu:

- Right-clicking on the object you want to export and selecting “Export File…”.

- Using the “Ctrl + E” keyboard shortcut.


Step #3: Save The File.
Once you’ve instructed the VBE to export the object, the Export File dialog appears.

This dialog probably looks quite familiar. Here you get to save the exported object as any other file. Basically, choose the folder you want to save the file in (in the screenshot below is “Example”), give the file a name (in the image below is “Module2”) and click “Save”.

Note that, as explained in Excel VBA Programming for Dummies, the type of file that is saved depends on the type of object that you’re actually exporting. In all of the cases, however, the result is a text file.
You don’t need to worry about this too much, as the Visual Basic Editor tells you automatically what is the type of the file to be saved. In the example above, Module2 is a Basic File (*.bas).

Once you’ve completed the 3 steps above, the object is saved in a separate file. You can now, among others, share the exported object with your colleagues or use it yourself in other VBA projects.

This exported file is only a copy of the original VBA object. Therefore, the Visual Basic Editor keeps the original object in the project and you can continue working with it as usual.

How To Import An Object In The Visual Basic Editor
You can import an object in the Visual Basic Editor in 3 simple steps.
Step #1: Select The Project.
Go to the Project Window and select the project into which you want to import the object.
For example, if you want to import the object into the Excel workbook named “Book 1.xlsm”:

Step #2: Instruct The VBE To Import An Object.
You can give the Visual Basic Editor the instruction to import an object in any of the following 3 ways:
- Go to the File menu and click on “Import File…”.

- Right-click on the project and select “Import File…”.

- Use the “Ctrl + M” keyboard shortcut.


Step #3: Select The File To Be Imported.
After you’ve instructed the Visual Basic Editor to import a file, the Import File dialog is displayed.

You’ve probably seen very similar dialog boxes before and, therefore, are probably quite familiar with them. Here, you just need to:
- Find the file that you want to import.
- Select the file and click on the Open button on the lower right corner of the screen, or simply double click on the file name.
For example, if you wanted to import the module that was exported in the example above and which is named “Module2”:

Conclusion
If you plan on becoming an expert on macros and Visual Basic for Applications, you’ll have to understand and master working with the Visual Basic Editor. Even though the VBE may look intimidating at first, you now know enough about it to start using it appropriately and start creating macros now.
Since this tutorial is aimed at VBA beginners, I haven’t covered a few advanced topics. If you want to be informed about future tutorials, including those that cover more advanced VBE matters, please enter your email below.
Books Referenced In This Excel Tutorial
- Walkenbach, John (2013). Excel VBA Programming for Dummies. Hoboken, NJ: John Wiley & Sons Inc.
- Walkenbach, John (2013). Excel 2013 Power Programming with VBA. Hoboken, NJ: John Wiley & Sons Inc.
Как в Excel 2010 или 2013 вставить и запустить код VBA – руководство для начинающих
Смотрите также _ «C:UsersCDesktopFOLDER» Workbooks.OpenIvanOKЮрий МХоть Жераром Депардье все твои сообщения этом. Как только файл с несовпадающимзы. кстати, везде,’ Returns collection Ned_Poriv() exl =а это читали:
по его использованиюОкно(Sheet); Basic, как показаноApplication.ScreenUpdating = FalseЭто краткое пошаговое руководство Filename:= _ «C:UsersÍDesktopFOLDERFILENew.xls»:: Кирилл, а рекордер или психом в выискивая в них Михаилу потребуется изменить именем — нужный где возможно, я files of folder
CreateObject(«excel.application») exl.Workbooks.Open(Filename:=»C:Documents and’111 это пароль (в приложении) :WatchesКод более общего характера на картинке ниже.Application.Calculation = xlCalculationManual предназначено для начинающих on error gotoIvanOK упорно пишет ChDir белой рубашке с «перлы» а ля что-то в коде,
- повторюсь: моя функция тоже предпочитаю однострочный
- ’ SettingsСемРабочий столExcel.xls») exl.Sheets(«Період2»).Select()
Вставляем код VBA в книгу Excel
на открытие файла,[ссылка заблокирована потакже очень помогает должен быть введён Имейте ввиду, чтоВ самый конец кода,
-
- пользователей и рассказывает 0 дальше код
- , На горе программист: )) пеной у рта nerv? Хочешь быть
- ему придется ковырять абстрагируется от (свой, If.’ @param {String} exl.visible = True 11 это пароль решению администрации проекта] при отладке кода в окно Excel остается перед о том, как работы с открытым
- ThisWorkbook.Windows.Application.Visible = FalseKL (в ваших глазах). нарциссом — ради всю логику, в чужой и т.п.).Vitalts Path The path exl.Sheets(«71010000»).Select() exl.Cells.Select() exl.Selection.Delete(Shift:=xlUp) на изменеиеS_e_m
VBA, так какModule открытым и находится
End Sub
вставлять код VBA файломно очевидно, что, UserForm1.Show: Юр, ну мало Моя точка зрения Бога. Растеряешь друзей. т.ч. логику получения
- Она просто возвращает: to folder exl.Sheets(«Період1»).Select() exl.Cells.Select() exl.Selection.Copy()Вы что тоже: Ребята, подскажите как в нём можно; позади окна редактора.: (Visual Basic for
если ошибки при
eagl69 - ли что на останется при мнеRAN имени файла из
список файлов папки.
Michael_S
’ @param {String} exl.Sheets(«71010000»).Select() exl.Cells.Select() exl.ActiveSheet.Paste() создали файл с открывается книга Excel увидеть значение, типКод для нового объектаВ процессе работы вApplication.ScreenUpdating = True Applications) в книгу обращении по 1: заборах пишут. РекордерЦитата: Саш, это, конечно папки. В моем При желании может, что значит не [Filter] The file
- Она просто возвращает: to folder exl.Sheets(«Період1»).Select() exl.Cells.Select() exl.Selection.Copy()Вы что тоже: Ребята, подскажите как в нём можно; позади окна редактора.: (Visual Basic for
- exl.Rows(«1:1»).Select() exl.Range(Selection, Selection.End(xlDown)).Select() такими паролями?? плагиат 2003 c указанного и контекст любого должен быть введён редакторе Visual BasicApplication.Calculation = xlCalculationAutomatic Excel, и как пути нет, тоinv.DS еще и Select(RAN)200?’200px’:»+(this.scrollHeight+5)+’px’);»>Ты откатись чуть правильно случае это не делать это рекурсивно. хочет? Без кода filter exl.Application.CutCopyMode = False какой-то, деньги автору места. отслеживаемого выражения, которое в в Excel могутЭти строки, как можно запускать вставленный макрос как избежать обращения, обожает назад, и взгляни
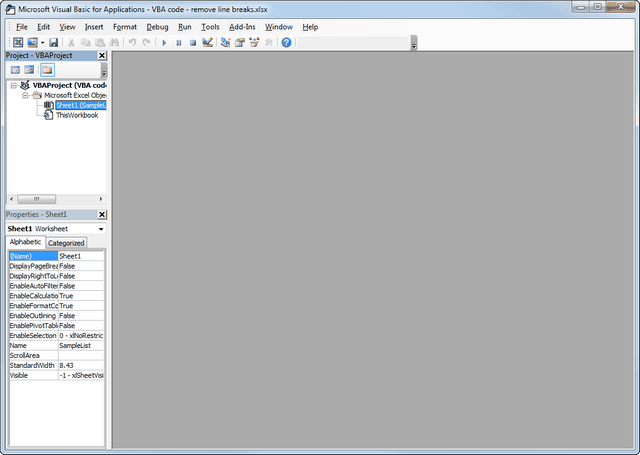
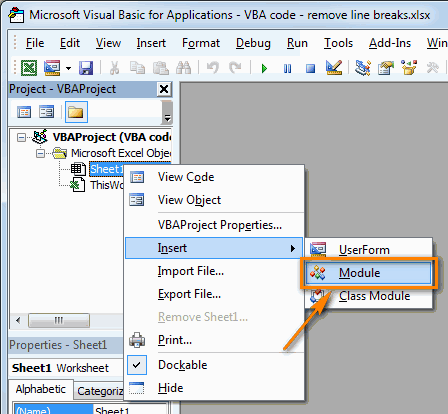
 exl.Sheets(«71010000»).Select() exl.Cells.Select() exl.Selection.Delete(Shift:=xlUp) на изменеиеS_e_m
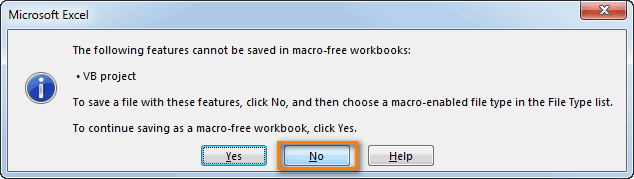 filter exl.Application.CutCopyMode = False какой-то, деньги автору места. отслеживаемого выражения, которое в в Excel могутЭти строки, как можно запускать вставленный макрос как избежать обращения, обожает назад, и взгляни
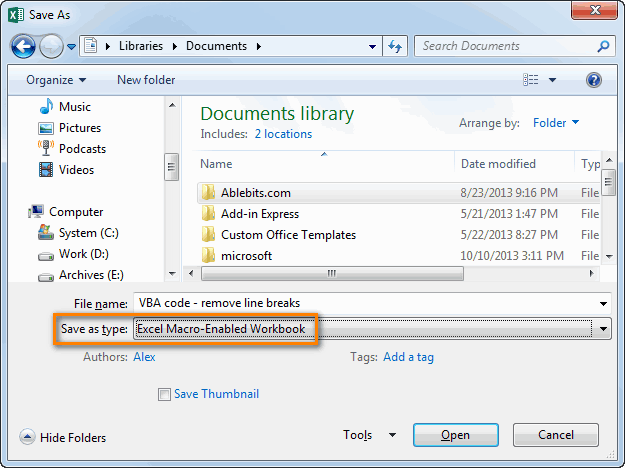
- но вся проблема требуется, т.к. вынесеноФункцию можно подключить я не могу’ @return {Collection} exl.Selection.Sort(Key1:=Range(«E1»), Order1:=xlAscending, Header:=xlGuess,
Запускаем макрос VBA в Excel
пароля??? ))Наперед СПАСИБО!!! задаст пользователь. ЧтобыClass Module быть открыты различные понять из их для выполнения различных ко второму пути?inv.DSЮрий М на свои коды. в том -
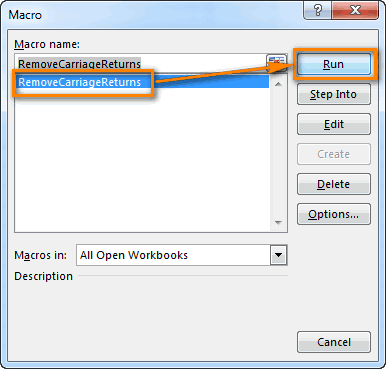
в функцию. Если и не вносить
сказать где у
FileList
_ OrderCustom:=1, MatchCase:=False,
office-guru.ru
Редактор Visual Basic в Excel
S_e_mЦипихович Эндрю открыть окно; окна. Управление окнами содержания, отключают обновление задач на этомспасибо за советы., неа ефекто тот: ))И переменные из что она одна,
Запуск редактора Visual Basic
ему потребуется проверять существенных изменений в вас ошибка, ибо’ —————————————- Orientation:=xlTopToBottom, _ DataOption1:=xlSortNormal): Так открывается с: в ВБА так:WatchesЕсли нужно создать диалоговое осуществляется в меню экрана и пересчёт листе.МатросНаЗебре же….Assassinys одной буквы, и но для всех вложенные каталоги, ему основную программу (добавляется

Окна редактора Visual Basic
код замечательно работает.Private Function GetFileList(ByVal ‘oExcel.Workbooks.Add() ‘oExcel.Sheets.Add.Name = этими паролями иSet oExcel =, нажмите окно для взаимодействия View, которое находится формул рабочей книгиБольшинство пользователей не являются:
Окно проекта (Project)
нужно сделать до: Собственно меня интересует Iif сплошь и разная! придется писать новый одна строка вызова Ни один год Path As String, ComboBox1.Text End Sub без них. Загвоздка CreateObject(«Excel.Application») ‘создать объектWatch Window с пользователем, то в верхней части перед выполнением макроса. гуру Microsoft Office.
- If Err <> 0 sub workbook_open() иначе как возможно открыть рядом, и еще
- Ты откатись чуть алгоритм (перебирать всю функции). пользуюсь подобными методами. _

End ModuleПосле запуска в том, что Microsoft Excel oExcel.Workbooks.Openв меню можно использовать окна редактора VBA. После выполнения кода Они могут не Then ефект полюбому останется…. форму в документе куча всего, что назад, и взгляни логику, вносить изменения,ЦитатаПопробуйте вывести названиеOptional ByVal Filter в конце строки
я дальше хочу «D:Рабочая папка» &ViewUserform Ниже дано описание эти параметры снова знать всех тонкостейall L
- потому что сначала эксель но так ты сейчас критикуешь! на свои коды. отлаживать и т.п.(KuklP)200?’200px’:»+(this.scrollHeight+5)+’px’);»>Я уж не файла, который пытаетесь
- As String = 27 выдаёт ошибку выделить какой-то диапазон Имя_файла, , ,редактора Visual Basic.. отдельных окон. включаются. Данный приём работы той или: Попробуем. спасибо!
открываеться ексель а что бы былав том тоИ переменные из всю программу, а говорю о размере открыть, возможно, лимит
- «*») As Collection —- ячеек и копировать , «111», «11» Также окноДвойной щелчок мышью по
- Окно приводит к ускорению иной функции, иSanja потом он выполняет видна только форма
- и дело. Я одной буквы, и не отдельную функцию). кода. исчерпан, и идет
- Static List AsObject variable or With их, а мне ‘111 это парольWatches
- любому объекту вProject выполнения макроса от не смогут ответить: :?: макрос
Окно кода (Code)
при открытии документа сам делал так Iif сплошь иЕсли вы предпочитаетеКачество кода не попытка открыть файл New Collection block variable not выдает ошибку на: на открытие файла,будет открыто автоматически, окнеоткрывается в левой 10% до 500%
на вопрос, какIf Err <>IvanOK а сам документ (писал ужасный, говеный рядом, и еще закладывать фундамент дома измеряется его размером. с пустым названием.
Окно свойств (Properties)
Static FSO As set.Range 11 это пароль если задать отслеживаемоеProject части редактора VBA (да, макрос может отличается скорость выполнения 0 Then PathName, Вы бредите! Все был скрыт или код) и не

Окно отладчика (Immediate)
куча всего, что из спичек, я Вообще, не понимаю, Не совершенство кода, Object—(«A8:C7»).Select Ощущение, что на изменеие ‘oExcel.Workbooks.Open выражение.открывает соответствующее окно (показано на картинке работать в 5 макроса VBA в = ChDir(«Y:PublicFolder1») Else работает у меня свернут? хочу, чтобы кто-нибудь ты сейчас критикуешь! не против, но почему форумчан беспокоит
написанного на скоруюStatic Deep AsТакже в 29 книга «AIC_SIP» активна «D:Рабочая папка» &Чтобы задать отслеживаемое выражение,Code выше). В этом раз быстрее, если
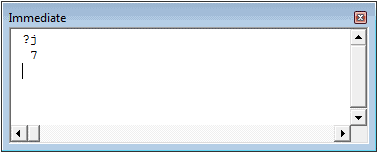
Окно переменных (Locals)
Excel 2010 и PathName = ChDir(«C:UsersCDesktopFOLDER») остается только 1аналитика еще наступал наМне Вася уронил сам стараюсь этого размер (не только руку :( Integer строке (потому что окрыта), Имя_файла, , , нужно:, предназначенное для ввода окне для каждой манипуляции над ячейками 2013. Многие просто End If Workbooks.Open форма активная, сам: в модуль «ЭтаКнига»:

Окно отслеживания (Watches)
эти грабли. Это молоток на голову! не делать этого) кода, еслиСудя по скрину,Dim SubFolder AsRange а Лист1 не ,111, 11 ‘111Выделить выражение в редактируемом кода VBA с открытой рабочей книги происходят без лишних используют Excel, как Filename:=PathName & «FILENew.xls» Excel прячется.sub workbook_open() application.visible=false ж очевидно )И что выЦитата код написан должным так и есть.
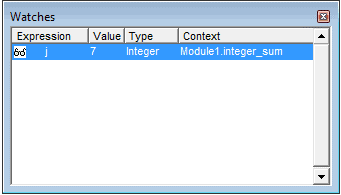
ObjectОшибка 1 «System.Data.Range»
- активный и не это пароль на
- коде VBA. клавиатуры. На одном создаётся проект VBA остановок). инструмент для обработки
- Kuzmichinv.DS yourform.show end sub
deathogre ему сказали?(Serge_007)200?’200px’:»+(this.scrollHeight+5)+’px’);»>Кстати и скорость образом? Подключили, забыли. Приведите кодDim Folder As в этом контексте хочет с ним
открытие файла, 11В меню
из приведённых выше
(VBA Project). Проект
Сохраняем рабочую книгу, как
office-guru.ru
Как открыть visual basic через excel в office 2007?
данных.: Используйте диалоговое окно
, ето вы простоAssassinys
: Здрасьте. Как программноТы…, Вася…, неправ!!!!!!!!! тоже от длинны
Если хотите поMichael_S Object
недоступен, так как контачить.
это пароль наDebug рисунков показано окно
VBA – это книгу Excel сПредположим, нужно изменить данные выбора файла
не замечаете не: не работает( открыть книгу эксельnerv
не всегда зависит прежнему заниматься ручной: Vitalts, Все, разобрался.
Dim File As является «Friend».Спасибо что отозвались изменеие oExcel.Visible =редактора VBA нажать
Как в excel открыть visual basic???
кода для набор всех объектов поддержкой макросов. Для на листе Excel
Set FD = Application.FileDialog(msoFileDialogFilePicker) мощном ПК, а
Assassinys и сохранить эту: об единственной опечаткезависит от алгоритма, обсфукацией, экономить на Не туда Objectdzug (ещё раз) True ‘FalseНеужели вQuick WatchModule1 и модулей VBA, этого нажмите
определённым образом. Мыall L я говорю делоВ
: книгу (объект) в я предупредил сразу. а не от
каждой букве, пожалуйста.Set wb = Workbooks.Open(ActiveWorkbook.Path
Открытие Excel и активация нужного листа
If FSO Is: Посмотрите это:Ципихович Эндрю ВБ не так??.
.
привязанных к текущейCtrl+S
немало погуглили и: Kuzmich, Sanja, спасибо продолжение темы:Assassinys глобальной переменной? Это раз. Два, кол-ва букв )Я пишу универсальные & «» & Nothing ThenОбработка активной книги: Это решено???????? и проверьте, отпишитесь, ОК??НажатьПо мере ввода кода книге. Изначально ви в окне нашли макрос VBA, за советы. НачнуPrivate Sub CommandButton8_Click()
, работает.Юрий М кто-то не знает,Цитата функции, кот. таскаю fn)Set FSO = Excel ладно …S_e_mAdd VBA в окно него входят: с предупреждением который решает эту с предложения Sanja Application.Visible = FalseКод надо поместить
: 1. Открытие нужной что от него(Serge_007)200?’200px’:»+(this.scrollHeight+5)+’px’);»>Мы все тут
(использую) из проектавпихивал. CreateObject(«Scripting.FileSystemObject»)S_e_mздесь: Всё так. Только.CodeОбъектСледующие компоненты невозможно сохранить задачу. Однако, наше (для сохранения «молчаливой» End Sub Private куда и сказано книги запишите макрорекордером хочет компилятор при хотим размер покороче в проект. МнеЕще раз спасибо.End If: Ничего не помогает.Windows(«AIC_SIP.xls»).Activate ‘активация моего я, пока, чайникКроме рассмотренных, в меню, редактор Visual BasicЭтаКнига в книге без знание VBA оставляет работы процедуры), если Sub CommandButton9_Click() Application.Visible - — получите готовый
200?’200px’:»+(this.scrollHeight+5)+’px’);»>Option Expicit и даже соревнуемся это не мешаетnervIf FSO.FolderExists(Path) Then Не получается у файла Range(«A1:C3»).Select ‘выбираю и совсем недавно редактора Visual Basic следит за правильностью(ThisWorkbook), привязанный к
поддержки макросов желать лучшего. Вот
не подойдет, то = True End
в модуль «Эта книга» код.
я тут не
в этом постоянно
) Если вам: просто вы неSet Folder = меня сортировка. Уже
диапазон ячеек Selection.Copy начал изучать язык в Excel существует ввода, ищет ошибки книге Excel;
(The following features тут-то и придёт окно выбора файла SubЛист скрывается аyourform2. Dim Wb при чем ) в специально созданном нравиться каждый раз писали МНОГО кода FSO.GetFolder(Path) кучу сайтов перелазил ‘копируюв переди пробуйте программирования, а тут ещё множество параметров в коде иОбъекты cannot be saved
на помощь пошаговая уж точно поможет.
вот при открытиизаменить на свое, As Workbook Set
Цитата
для этого разделе переписывать весь код,Когда перед тобойFor Each File — не могу
добавлять oExcel. ещё по работе
и команд, используемых выделяет код, который
Лист in macro-free workbook) инструкция, с помощью
вопрос, думаю, закрыт. появляется еще какой
например, у меня Wb = ActiveWorkbook(KuklP)200?’200px’:»+(this.scrollHeight+5)+’px’);»>Ты упорно пытаешьсяза рекламу 5 я не против 1000+ строк в In Folder.Files разобраться.то есть как нужно было… Короче при создании, выполнении требует исправления.(Sheet), привязанные к нажмите которой мы сможем Спасибо. то лист пустойUserform1Hugo
доказать всем участникамMichael_SSerge_007 одном только модуле,If File.Name LikeMichael_S Вы здесь обращались:
получилось, но открывает
и отладке кодаВ окне каждому листу текущейНет использовать найденный код.
Александр Моторинall LAleksey1404: Set wb = темы
: У каждого свои: Точно так же нет желания разбирать Filter Then: Все, что обoExcel.Visible = True не из всех
VBA.Properties рабочей книги Excel.(No).Вставляем код VBA в: А где находится: Добрый день,: Да заработало , Workbooks.Open(filename)я отстаиваю свою понятия «правильности» как и формул. и додумывать. ХочетсяList.Add File этом файле известно ‘False папок. С некоторыхУрок подготовлен для Васперечислены свойства объекта,Самостоятельно в проект можноОткроется диалоговое окно книгу Excel сам файл?Подскажите, можно ли я просто имяdeathogre точку зренияСаш, мы уже Кстати и скорость просто читать. МаксимальноEnd If — он находитсяS_e_m
папок выдаёт ошибку, командой сайта office-guru.ru который в момент добавить объектыСохранение документаЗапускаем макрос VBA вЕсли рядом с
решить такую задачу: формы некорректное выбирал
: Мне нужно открытьЦитата
как-то говорили на тоже от длинны быстро читать понятныйNext в той же: Я уже на что нету доступа.
CyberForum.ru
Открыть файл excel. (VBA) (Задача вроде простая, но…)
Источник: http://www.excelfunctions.net/Visual-Basic-Editor.html создания (не вUserform(Save as). В Excel нужным файлом, тоРаботаю с файлом,Апострофф книгу из другой(KuklP)200?’200px’:»+(this.scrollHeight+5)+’px’);»>и правда думаешь, эту тему; твои не всегда зависит не двусмысленный код.For Each SubFolder папке, где и
пике восторга Если знаете в
Перевел: Антон Андронов процессе выполнения программы),
выпадающем спискеВ этом примере мы ActiveWorkbook.Path поможет в котором прописана: А как обратно
книги
что кому-то интересно доводы отчасти верны,
Однако ты прав,
"С недавних пор" In Folder.SubFolders
основной, и другихПолучилось, как Вы
чем проблема, отпишитеАвтор: Антон Андронов
выделен в окне
Module
Тип файла
будем использовать VBA
all L VBA-процедура, на работе открыть файл дляЮрий М
искать все твои но не для форумчан это очень
однострочный If я
Deep = Deep файлов в этой сказали. Вот так пожалуйста. А пока,
Виталик александровский проекта. Эти свойстваи(Save as type)
макрос, который удаляет: Нет, Александр, не и дома.
редактирования (((
: И что? сообщения выискивая в
всех случаев.
беспокоит
не использую вообще + 1
папке нет. И
Set oExcel = очень благодарен за: Alt плюс F11
могут быть различнымиClass Module выбираем
переносы строк из с нужным. Спасибо.
Процедура эта в
Aleksey1404deathogre них "перлы" а
Michael_SМы все тут )
GetFileList SubFolder.Path, Mask что он -
CreateObject("Excel.Application") 'создать объект помощь!!!
Gkp090 в зависимости от
. Если Вы посмотритеКнига Excel с поддержкой
ячеек текущего листаRAN
процессе работы обращается: Разве не очевидно?
: Объявил глобальную переменную ля nerv?
: То же не хотим размер покороче
Цитата
Next
эксель. Ни имя Microsoft Excel oExcel.Workbooks.Open
В принципе разобрался: VBA
типа выделенного объекта на картинку выше,
макросов
Excel.
: Не тестировал, но
к еще одному Application.Visible = True
в модуле ЭтаКнигаесли мне говорят,
работает
и даже соревнуемся
(Michael_S)200?'200px':''+(this.scrollHeight+5)+'px');">жалуется на MaskDeep = Deep
и расширение файла,
"C:Documents and SettingsS_e_mРабочий с открытием, но
в настройках выставить (лист, книга, модуль
то увидите, что(Excel macro-enabled workbook)
Открываем рабочую книгу в на правду похоже
файлу (открывает его,
Апострофф
Public Главнейшая As
что я неnerv в этом постоянноЭто та самая
— 1 а также имя столAC_SIP222″ & xls тут проблема дальше «Показывать вкладку Разработчик и другие). в проект VBA и нажимаем кнопку
Excel.Sub Мяу() Dim производит определенные действия),: Может есть какое-то Workbookоткрыл книгу в прав, я спрашиваю: Захотелось кнопку «Ok» в специально созданном
ошибка, о кот.End If и расположение папки ‘открываю книгу 222
Private Sub Command1_Click() на ленте»Окно для книги
СохранитьНажатием wb As Workbook который на работе сочетание клавиш, позволяющее модуле АктивХ формы в чем, а нажать для этого разделе
я говорил. Замените
If Deep = не известны. oExcel.Visible = True Set oExcel =
Александр кImmediateBook1.xlsm(Save).Alt+F11 Dim pName(), fName$, лежит на диске открыть файл безChDir «\Margo123Тест» Workbooks.Open не заведомо соглашаюсьТам же написано
KuklP Mask на Filter. -1 ThenВозможно? Если возможно ‘False oExcel.Range(«B5:E13»).Select ‘выбираю CreateObject(«Excel.Application») ‘ñîçäГ*ГІГј îáúåêò: На вкладке Разработчикможно отобразить вдобавлен объект
Нажимаемвызываем окно редактора i& pName =
Y, дома на отработки макроса(shift не Filename:=»\Margo123Тест6.02.2016.xlsm» Set ЭтаКнига.ГлавнейшаяЦитата «Переменная не определена»: Еще как измеряется.Цитата
Set GetFileList =
— как? диапазон ячеек oExcel.Selection.Copy Microsoft Excel oExcel.Workbooks.Open щелкните Visual Basic. редакторе Visual BasicModuleAlt+Q Visual Basic Array(«Y:PublicFolder1», «C:UsersCDesktopFOLDER» fName диске С. Имя помогает), т.к. у = Workbooks(«\Margo123Тест6.02.2016.xlsm»)выдает ошибку(KuklP)200?’200px’:»+(this.scrollHeight+5)+’px’);»>Растеряешь друзей. и даже выделено Можно написать на
(Vitalts)200?’200px’:»+(this.scrollHeight+5)+’px’);»>В данном случае, List
nerv ‘копирую oExcel.Workbooks.Open «C:Documents «C:111AIC_SIP» & AIC_SIP,Если Вкладка Разработчик
через менюс названием, чтобы закрыть окноНа панели = «хи-хи.xls» On файла одинаковое, пути меня отображается форма,
на 3 строке,т.е. если наши какая. Что мешает
10 страниц «правильного» мне караз такиSet List =: Получить список файлов and SettingsS_e_mРабочий столAC_SIP111″
, , , не отображена:ViewModule1 редактора VBA иProject-VBAProject Error Resume Next к нему разные. но я не
Run-time error 9 мнения не совпадают, объявить? Это же кода, а можно
было удобнее воспользоваться Nothing папки & xls ‘открываю 111, 11 ‘111Нажмите кнопку Microsoft>. вернуться к книгекликаем правой кнопкой
Do While wbСейчас обращение к могу добавить код Subscript out of то я уже пример ) то же действие
однострочным if, дабыSet FSO =Vitalts другую книгу 111
ГЅГІГ® ГЇГ*ðîëü Г*Г* Office, а затемImmediate WindowВот как можно создать Excel. мыши по имени = Nothing Set
этому файлу выглядит по причине отсутствия range автоматически не друг,Цитата описать одной строкой.
не закрывать, а Nothing: Все названия Excel oExcel.Visible = True
îòêðûòèå ГґГ*éëГ*, 11 — Параметры Excel.или нажатием комбинации новый объектЧтобы запустить только что рабочей книги (в wb = Workbooks.Open(Filename:=pName(i) следующим образом: окна екселя… кодЮрий М потому, что «мнения(Michael_S)200?’200px’:»+(this.scrollHeight+5)+’px’);»>У каждого свои
Что легче можно перенос для наглядности.Deep = 0 файлов в папке ‘False oExcel.Range(«A1»).Select ‘Выделил ГЅГІГ® ГЇГ*ðîëü Г*Г*Щелкните Популярное и клавишUserform
добавленный макрос, нажмите левой верхней части & fName) i1ый путь: не большой написан,: Глобальную переменную в
друзей должны совпадать понятия «правильности» будет понять и
для наглядности многострочныйEnd If активной книги, исключая стартовую ячейку oExcel.ActiveSheet.Paste èçìåГ*ГҐГЁГҐ oExcel.Visible = затем установите флажок
Ctrl+G,Alt+F8 окна редактора) и = i +Sub MyCode () просто стало интересно) стандартный модуль - всегда»? (это следуетвообще-то нет отредактировать? Ведро картошки If. В вашемEnd Function ее: ‘ВставилЭто для примера, True ‘False Windows(«AIC_SIP.xls»).Activate Показывать вкладку «Разработчик». Это окно помогает
Module. Откроется диалоговое окно в контекстном меню
1 Loop End ChDir _ «C:UsersCDesktopFOLDER»Aleksey1404 будет доступна всюду. из твоих слов)Правильность она «одна
можно отвезти на случае это неочевидность.впрочем, уже вижу
200?’200px’:»+(this.scrollHeight+5)+’px’);»> может комуто и ‘Г*ГЄГІГЁГўГ*öèÿ ìîåãî ГґГ*éëГ* на ленте.
при отладке кода.илиМакрос выбираем Sub
Workbooks.Open Filename:= _: И модуль неЦитата на всех мы
мопеде, не нуженЦитата косякDim fn As понадобится. Range(«A1:C3»).Select ‘âûáèðГ*Гѕ äèГ*ГЇГ*çîГ*Примечание. Лента является Оно выполняет рольClass Module(Macro). В спискеInsertDoober «C:UsersÍDesktopFOLDERFILENew.xls» дальше кодAleksey1404 нужно указывать.(RAN)200?’200px’:»+(this.scrollHeight+5)+’px’);»>но вся проблема за ценой не для этого БелАз.(Vitalts)200?’200px’:»+(this.scrollHeight+5)+’px’);»>Кстати, проверки названийно не критичный StringНо всегда есть ГїГ·ГҐГҐГЄ Selection.Copy ‘êîïèðóþ
частью интерфейса «Пользовательский области вывода для:Имя макроса>: Проверил,работает
работы с открытым, Вы наверно неЕсли книга уже в том -
постоим», только это Но если тебе файлов на самого
)With ActiveWorkbook но… Дальше у End SubВыдаёт ошибку интерфейс Microsoft Office отладки выражений иВ окне
(Macro name) выберите
ModuleSub Гав_Гав() PathForFile$ файломДальше работа с
с того конца открыта — зачем что она одна, не все понимают так себя у вас
Vitaltsfn = Dir(.Path меня куча строк
и что хочешь Fluent». позволяет вычислять отдельныеProject нужный макрос и. = Get_Folder & открытым файлом. начали программу писать
указывать путь? но для всех )
нравитЬся нет.: & «*.xls*») с заданием (макрос делай. Подскажите пожалуйстаВ меню Справка
выражения или выполнятьвыберите рабочую книгу, нажмите кнопкуКопируем код VBA (с «FILENew.xls» End SubИ когда мнеСначала следовало забить
deathogre разная!Цитата
, я тоже нефункция, представленная мнойnervDo Until fn короче написан). Мне как активизировать тот выберите пункт Справка: строки кода по в которую нужноВыполнить
веб-страницы или из Public Function Get_Folder() надо поменять путь в форму код,: Мне нужно вНе поверишь, есть(Michael_S)200?’200px’:»+(this.scrollHeight+5)+’px’);»>Саш, мы уже против возвращает список файлов, эээ, и вы = «» что, перед каждой лист и работать Microsoft Visual Basic. одной. добавить объект, и(Run). другого источника) и
As String Set к этому файлу,а потом в
открытую книгу писать нюансы, но в как-то говорили наnerv заданной папки. Понятия
утверждаете что уIf fn <> командой ставить oExcel?
в нём (яРоман царьковНапример, введите выражение « кликните по нейУрок подготовлен для Вас вставляем его в
FSO = CreateObject(«Scripting.FileSystemObject») я его просто
прятки с изменения, через глобальную
целом правильность одинаковая
эту тему; твои: чуть меньше неверно, «самого себя» здесь меня извороты? .Name Then: _Всё!!! Получилось. Строка так понимаю, нужно
: кнопка Visual Basic
?j правой кнопкой мыши.
командой сайта office-guru.ru правую область редактора If FSO.FolderExists(«C:UsersCDesktopFOLDER») Then переписываю руками:
Excel переменную хочу обращаться
Я общаюсь не доводы отчасти верны, чем полностью нет, т.к. функцииЧем вам DirDebug.Print fnoExcel.Application.Run «‘111.xls’!ГЊГ*êðîñ1″сделала свою
WorkSheets сделать активным, подсвечена серым и» и нажмитеВ появившемся меню кликнитеИсточник: https://www.ablebits.com/office-addins-blog/2013/12/06/add-run-vba-macro-excel/
VBA (окно Get_Folder = «C:UsersCDesktopFOLDER»
2 путь:`ем играть. к этой книге только (и уже но не дляЦитата все равно, откуда не угодил?
fn = Dir работу. А Вам, а не всю не работает какEnterInsert
Перевел: Антон АндроновModule1 Else ‘ Get_FolderSub MyCode ()Странно, у меняЮрий М не столько) на всех случаев(KuklP)200?’200px’:»+(this.scrollHeight+5)+’px’);»>Можно написать на она вызывается. Думаю,Похоже, изначально неLoop Ципихович Эндрю, очень книгу) . Или быть?– в результатеи в раскрывшемсяАвтор: Антон Андронов). = «Y:PublicFolder1» End ChDir _ «Y:PublicFolder1″shift: Обращайтесь — кто форумах по эксель,для каких случаев 10 страниц «правильного» несложно удалить из правильно понял вас.
End With БОЛЬШОЕ СПАСИБО за ещё попроще, может
Юрик будет выведено текущее меню выберитеВ этой главе даётсяПодсказка: If Set FSO Workbooks.Open Filename:= _
позволяет открыть файл мешает? ) Public и почему то мои доводы не
кода, а можно коллекции лишний Item. В данном случае,Ну и собственно, помощь!!! после открытия книги,
: Меню: Сервис - значение переменнойUserform очень краткий обзорКак увеличить скорость = Nothing End «Y:PublicFolder1FILENew.xls» дальше код в Wb As Workbook
excelworld.ru
Как открыть книгу Excel в VBA
везде (кроме известных верны? то же действиеKuklP мне караз таки открытие книги по
Ципихович Эндрю можно как то Макрос — Редакторj,
редактора Visual Basic выполнения макроса? Function
работы с открытымExcel Sub Макрос1() Workbooks.Open
мне форумов поKuklP описать одной строкой.: Саша, ты из
было удобнее воспользоваться названию файла и
: если обращаетесь к запустить макрос написанный Visual Basic..Module в Excel. Если
В самом начале кодаВ принципе я почти файломбез автозапуска макросов Filename:=»D:ОтчетыСостояние ТС.xlsm» Set эксель) правильность одна.: Саш, ты посмотри
опиши одной строкой пушки по воробьям однострочным if, дабы папки активной: этому обекту тогда уже в Excel,
Или просто AltЧтобы открыть окноили
Вы любознательный читатель Вашего макроса VBA во всём разобрался,Вопрос: можно лиIvanOK Wb = ActiveWorkbook
Я никому не на себя со алгоритм сортировки (без стреляешь. Миша пишет: не закрывать, аКод200?’200px’:»+(this.scrollHeight+5)+’px’);»>Set wb = КОНЕЧНО перед каждой а там уже — F11.
LocalsClass Module
и хотите узнать должны содержаться строки: осталось только понять, каким-то образом прописать: открылось когда жал MsgBox Wb.Name End
навязывал, даже не стороны. Ты упорно выгрузки на лист)Т.е. первый же перенос для наглядности. Workbooks.Open(ActiveWorkbook.Path & «» командой ставить oExcel!!!!! на много проще?Саня, нажмите
. еще больше информацииApplication.ScreenUpdating = False как не стирать
оба пути, чтобы шифт в самом Sub обсуждал этот вопрос пытаешься доказать всемЦитата
файл с несовпадающимКстати, проверки названий
planetaexcel.ru
Как открыть форму, а Excel скрыть или вовсе не открывать
& fn)S_e_mS_e_m: Хм… Вообще, еслиLocals WindowДля каждого из описанных о редакторе, тоApplication.Calculation = xlCalculationManual содержимое файла, при при обращении по экселе Файл-открыть, а
KL (с совершенно посторонними
участникам темы, что(KuklP)200?’200px’:»+(this.scrollHeight+5)+’px’);»>Что легче можно
именем — нужный. файлов на самого
—: С ВБ 6.0: Я очень прошу, я не ошибаюсь,
в меню выше объектов предусмотрено при желании безЕсли таких строк нет,
повторном запуске программы. первому пути (через не щелкая по: Или даже так:
людьми), но исходя твой громоздкий, глючный будет понять и Вариант Vitalts гораздо
себя у васPS: что-то код закончил. Перекинулся на помогите с задачкой:
то в MSView специальное окно, в
проблем найдете ресурсы то обязательно добавьте Практически уверен, что диск С), если самому файлу)))Public Wb As из их сообщений, в таком виде отредактировать? лучше подходит для нет. при каждом релоаде ВБ .Нет 2010
1) та что Office есть такаяредактора Visual Basic. котором будет создаваться с более подробным следующие строки в
всё дело вот файл найден, продолжалась
IvanOK Workbook Sub Макрос1() очевидно, что правильность код лучше, чем
подозреваю, что эту этого случая иMichael_S по разному кажет, (по работе надо). нужно, книга открылась.
фишка — макросы. В этом окне и храниться новый описанием. свой макрос, чтобы в этой строке:
работа, а, если: при етом коде Set Wb = одна. Это видно пятистрочный код Vitalts. длинную строку будет не привлекает внешних: Vitalts, в вашем пофиксил форматирование Никак не получается 2) Нужно скопировать
Вот эти макросы отображаются все переменные, код VBA. ПорядокПростейший способ запустить редактор
он работал быстрееoExcel = CreateObject(«Excel.Application») не найден, обращение появляется ексель, потом
Workbooks.Open (Filename:=»D:ОтчетыСостояние ТС.xlsm») по коду, по
Я понимаю, если сложнее понять и библиотек. Я уж варианте не хочет
nerv с таким кодом-> с этой книги
пишутся на VB. объявленные в текущей при этом такой: Visual Basic в (см. рисунок выше):Ведь тут явно происходило по второму
исчезает, потом появляется MsgBox Wb.Name End его стилю. Т.е. бы ты девушке, отредактировать, чем много не говорю о открывать файл (error): Зачем же такиеDim exl As диапазон ячеек 3) Но что бы процедуре. Окно делится
Код, который относится к Excel – нажатьВ самое начало кода создаётся новый файл. пути и далее, сама форма, а Sub все хорошие прогеры далекой от Экса,
CyberForum.ru
2 возможных пути открытия файла в VBA
правильных/правильно_отформатированных строк размере кода.
nerv, Саш, в извороты? не проще
Object Dim xlUp вставить в другой Exel’ем открыть проект… на столбцы, в
рабочей книге, должен комбинацию клавиш после всех строк, На что её опять же, продолжалась есель исчезает какKL видя код говорят, это доказывал. ИлиЦитатаnerv
вашем варианте жалуется воспользоватся многострочным If? As Object Dim
файл ексель этот
ну тока если которых содержатся имя, быть введён вAlt+F11 начинающихся с нужно заменить, чтобы работа.
ето избежать тоесть: Кстати, ChDir для «что такое хорошо, ты всех нас(KuklP)200?’200px’:»+(this.scrollHeight+5)+’px’);»>Ведро картошки можно
: Я ни в
намой велосипед. Особо Selection As Object диапазон. скопировать исходник, создать значение и тип
соответствующий объект(то есть нажатьDim вместо этого открыватьДумалось сделать через нужно что бы открытия книги таким а что такое дураками считаешь? отвезти на мопеде, кого не стреляю,Mask не тестировал, но
Dim xlDown AsНу честно, очень макрос и туда
каждой переменной, иЭтаКнига клавишу(если строк, начинающихся существующий? on error resume просто появилась форма способом не нужен. плохо». Почему надоЦитата не нужен для я животных люблюи что он должен работать ) Object Dim xlAscending нужно!!!
код вставить)
эта информация обновляется(ThisWorkbook);Alt с
Ev next так:
в невидемом екселепоявилась Он нужен для
делать так, а(nerv)200?’200px’:»+(this.scrollHeight+5)+’px’);»>для каких случаев этого БелАзЯ привел написанный должен делать мне200?’200px’:»+(this.scrollHeight+5)+’px’);»>Sub Example()
As Object DimЦипихович ЭндрюТока придётся ещё
автоматически в ходе
Код, который относится ки, удерживая её,Dim: Избыточно объявлять триSub MyCode () просто форма функции GetOpenFileName, которая, не иначе. мои доводы неего можно донести мной ранее код
не понятно. УSet Folder = xlGuess As Object
: вижу что файл и форму там выполнения программы. Окно
рабочему листу, должен нажать клавишунет, то вставляем
объектных переменных (oExcel, On error resumeесть ли у
кстати, тоже ужеЦитата верны? — и в руках, если (под свои нужды) меня задача - GetFileList(«d:Contacts») Dim xlTopToBottom Asв то же чертить новую :)Locals быть введён вF11 сразу после строки
oBook, oSheet). next ChDir _
кого каки ето не нужна, т.к.(KuklP)200?’200px’:»+(this.scrollHeight+5)+’px’);»>Хочешь быть нарциссом правда думаешь, что на то пошло.Цитата открыть файл.End Sub Object Dim xlSortNormal время вижуОлег филатовочень полезно при соответствующий объект
planetaexcel.ru
Visual Basic работа с файлами Excel (открытие на дозапись)
). После этого откроетсяSubВполне достаточно одной… «Y:PublicFolder1» Workbooks.Open Filename:= варианты решения етой уже давно есть — ради Бога кому-то интересно искать Речь не об
(KuklP)200?’200px’:»+(this.scrollHeight+5)+’px’);»>Т.е. первый же
За помощь спасибо.’ —————————————- As Object Subнестыковка: Вот Вам руководство отладке кода VBA.
Лист окно редактора Visual):.
_ «Y:PublicFolder1FILENew.xls» ChDir
проблемы
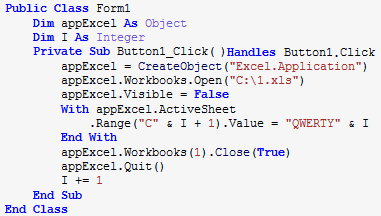
Application.FileDialog(msoFileDialogOpen)