
Input Box is one of the most frequently used functions in VBA Macro. The dialogue box that appeared asks for input from the user and returns a constant/code/number/text. For example, if you want to create a log-in form in VBA, you will require an input box function. Let’s learn how to create an input box in VBA.
InputBox
Input Box is a dialogue box that helps users to take value, and do later computations according to the entered value. The input box is similar to the message box, but the message box is used to display the data while the input box is used to enter the data. By default, a message box shows only the Ok button in its dialogue box but the input box shows both the Ok and Cancel buttons in its dialogue box. You can choose the return type of the data to be entered. The automated data analysis includes entering and displaying the data, which can be achieved if we are using the input box and message box simultaneously.
Syntax: InputBox(arguments)
Temporary and permanent arguments in Input Box
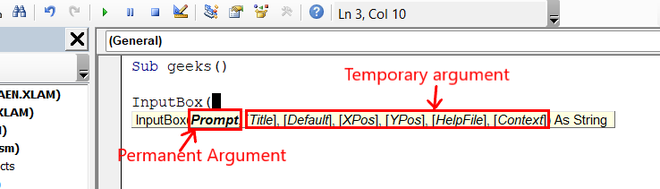
Arguments of the Input box, help customize your input box by changing the title, fixing the position, adding help buttons, etc. In total, eight(8) arguments can be passed in the input box. Out of which one(1) is the permanent argument, and leftover seven(7) are the temporary arguments. Here is present a list of all arguments used by the Input box.
| Temporary Argument | Permanent Argument |
|---|---|
| Prompt | Title |
| Default | |
| X-Position | |
| Y-Position | |
| Helper | |
| Context ID | |
| Data Type |
VBA is smart enough to give you a list of temporary and permanent arguments. Following are the steps:
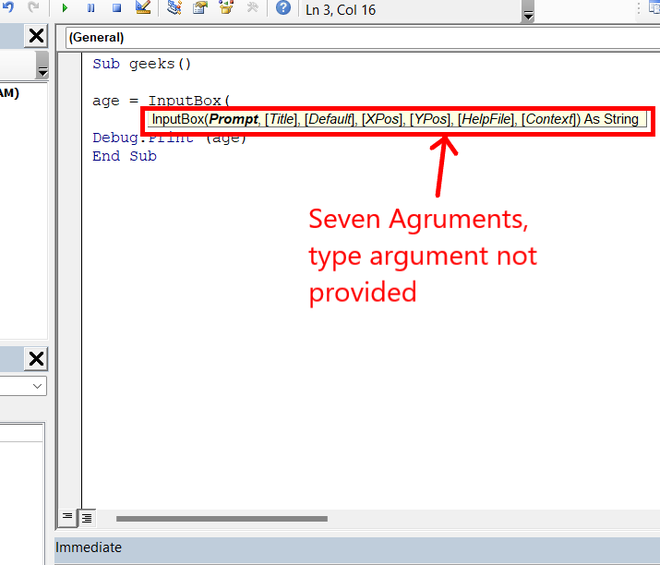
Step 1: Open your VBA editor. Create a procedure named geeks(). Use InputBox, function, as soon as you start the parenthesis for the function, a list automatically appears on your screen.
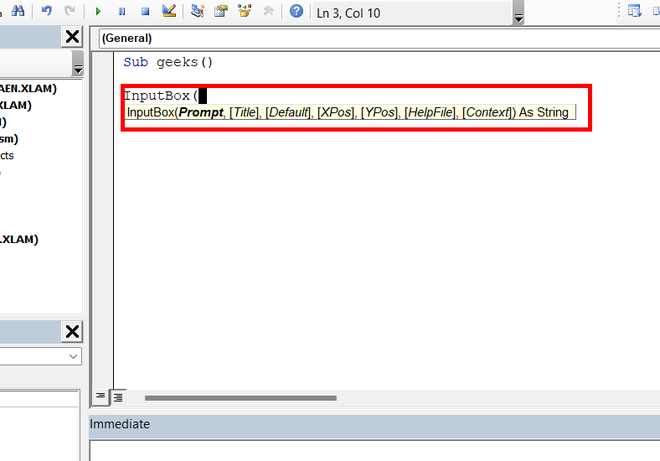
Step 2: The list tells the order of arguments. The argument written in bold and without a square[ ] parenthesis are permanent arguments, while the arguments written without a square[ ] parenthesis are temporary arguments.
Arguments in Input Box
Now, we are going to understand every argument in detail, with examples.
Argument 1: Prompt
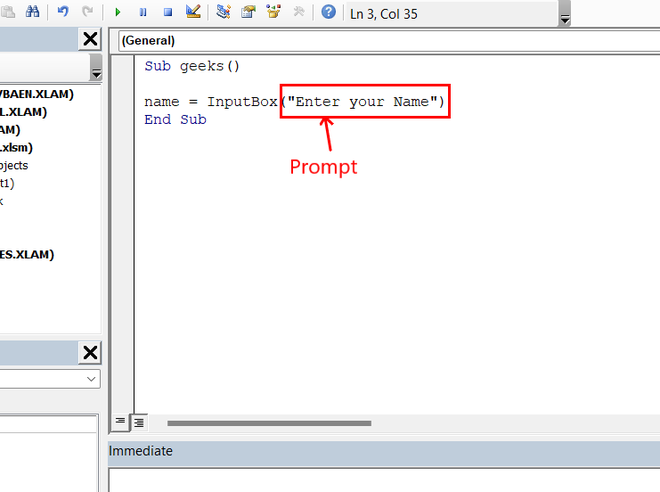
Prompt is the definition for the input box, according to which understanding the user enters the data. Prompt is a required argument. If this argument is not provided, then the VBA might show an error. The prompt returns a string. For example, display the “Enter Your Name” prompt in the input box.
Following are the steps
Step 1: Declare a variable to store the input data in the input box. For example, name. Use the InputBox function. Write InputBox(“Enter Your Name”) and store this in the variable name.
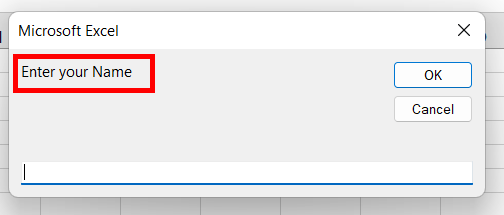
Step 2: Run your macro. You can see the input box appears on the screen, with the prompt “Enter Your Name”.
Argument 2: Title
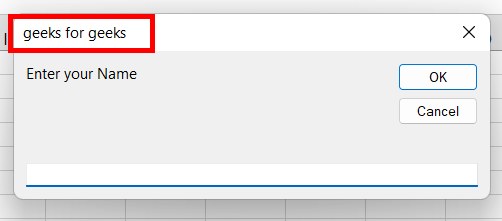
The second argument provided to the input box is the title. The title is the heading of an input box. It is a temporary argument. The default data type of a title is variant. If a custom title is not mentioned, then the default title is “Microsoft Excel”. For example, display “geeks for geeks” as the title of your input box.
Following are the steps
Step 1: Open your VBA editor. Create a sub-procedure called geeks(). Use the InputBox function. The argument 1 of the input box function is the prompt text; it is the same as done in previous examples. The second argument is the title of your input box i.e. “geeks for geeks”. Store the input box function in the variable Name.
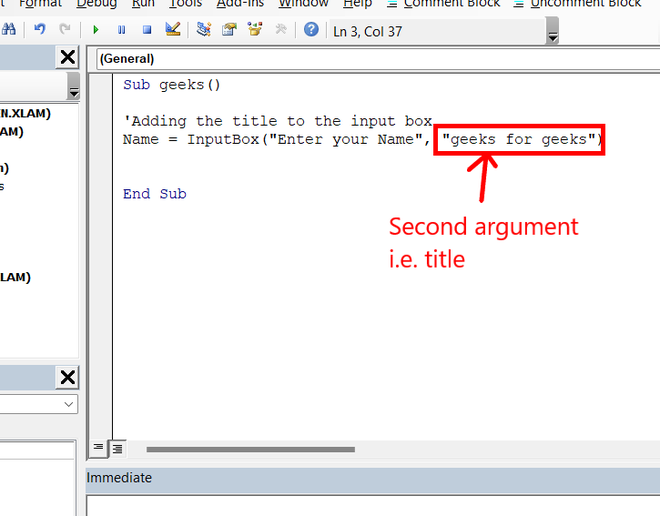
Step 2: Run your macro. An input box is shown on the screen. You can see the title of the input box is “geeks for geeks”.
Argument 3: Default
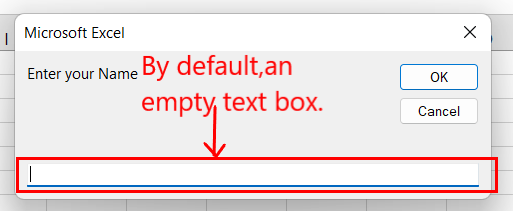
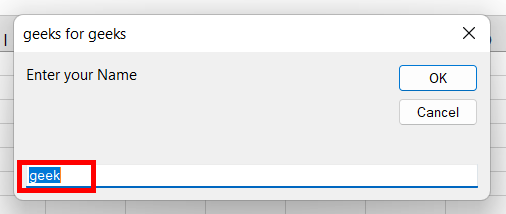
The third argument provided to the input box is the “default”. The “default” is the initial text box value. There can be situations when a user might not enter any data. At that time, the variable used to store the data remains empty. This may cause errors in the code, to remove this breakpoint we can add a default value in the custom text box. It is a temporary argument. The default data type of “default:” is variant. If a custom “default” is not mentioned, then the text box has no value. For example, display “geeks” as the default value of your text box.
Following are the steps
Step 1: Open your VBA editor. Create a sub-procedure name geeks(). The first two arguments of the input box are the same as the above example. The third argument is the custom text box value i.e., “geeks”. Store the input box function in the variable Name.

Step 2: Run your macro. An input box is shown on the screen. You can see the default value of the text box is “geeks”.
Argument 4 and Argument 5: XPos and YPos
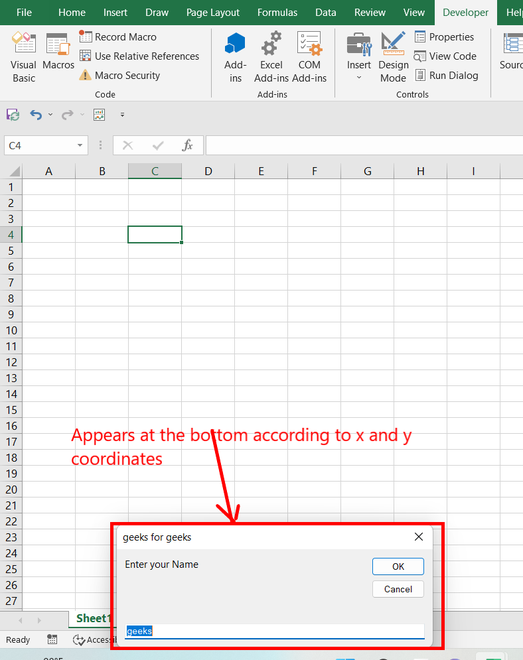
The fourth argument is X- Position(Xpos) and the fifth argument is Y-Position(YPos). Both are the positional arguments provided to set the location of your input box with respect to the home screen of excel. They are temporary arguments. The default data type is variant. For example, XPos as 2000 and YPos as 10000 in the input box.
Following are the steps
Step 1: Open your VBA editor. Create a sub-procedure name geeks(). The first three arguments of the input box are the same as the above example. The fourth argument is a numeric value of 2000, and the fifth argument is 10000. Store the input box function in the variable Name.
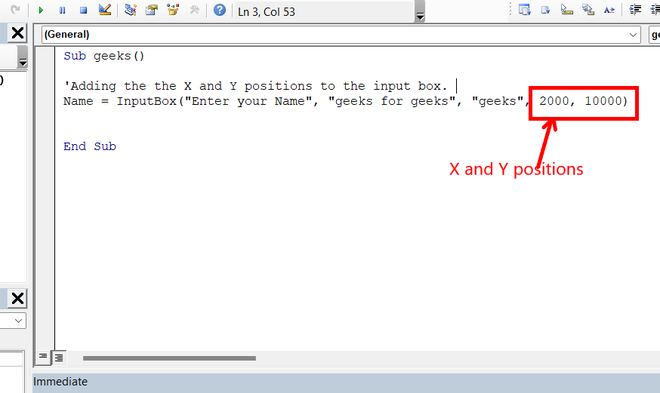
Step 2: Run your macro. You can analyze the position of the input box, it has gone to the end of the worksheet. The X and Y positions can be changed accordingly.
Argument 6 and Argument 76: HelpFile and HelpContext
A HelpFile is provided by the author for resolving errors or to guide how to fill the input box. A HelpFile is called when a user clicks on the help button in the input box. Whenever you are providing a HelpFile, you also need to mention the context ID, which specifies the number of the help topic in the HelpFile. If no HelpFile is specified, then a visual basic file is displayed. You will rarely use, HelpFile and HelpContextId in the input box. Both HelpFile and Context are optional arguments and have data types as variants. The file used by Context is the .hlp file. You might not get a suitable example on the help file and context as they are generally provided by the author or by the VBA community itself.
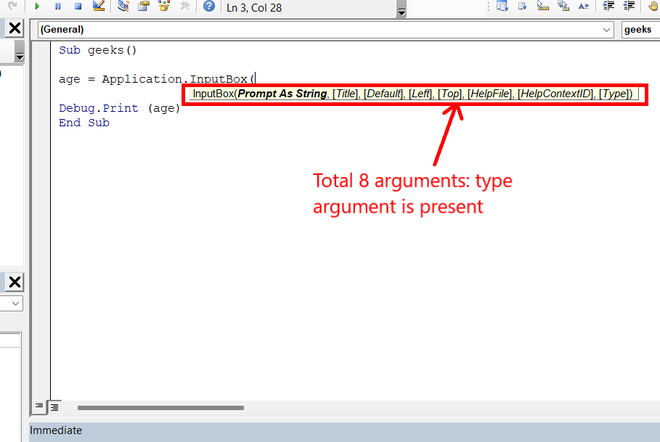
Argument 8: Data type
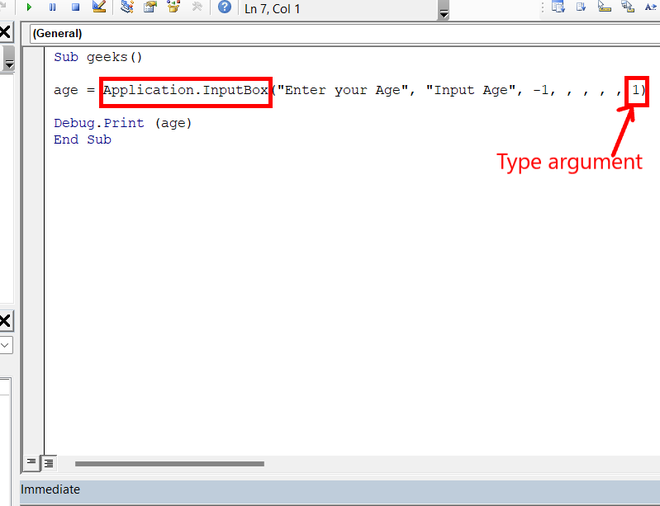
The eighth argument of the input box function is a data type. It is a temporary argument and is not present in the default input box function. Yes, here is the catch, the VBA input box function does not provide a type argument, but an excel specific souped-up provides Application.InputBox function, which has an eighth(8th) data type called type. The type argument is very useful to limit the user’s access to the data. The data type is mentioned in the form of a number. For example, if you want to enter your age in the input box, you will never require text, so this could be limited by type argument.
Here is the list provided by Microsoft to refer to the data type numeric value:
| datatype Value | Description |
|---|---|
| 0 | Formula |
| 1 | Number |
| 2 | Text |
| 4 | Boolean |
| 8 | Range Object |
| 16 | error(#N/A) |
| 64 | Array |
Following are the steps
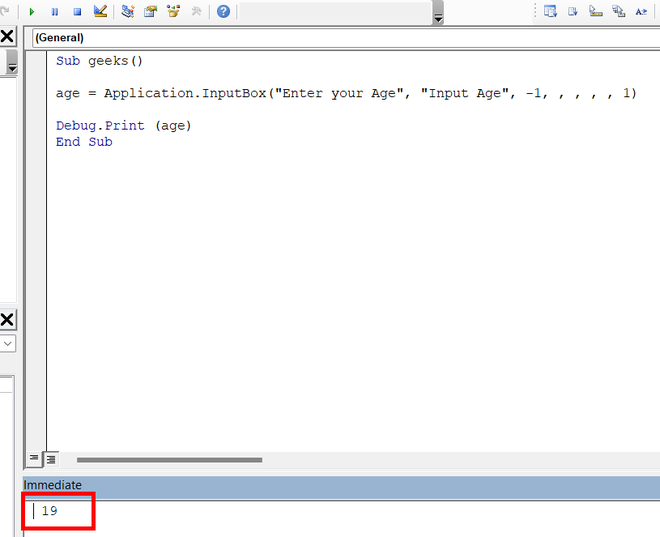
Step 1: Open your VBA editor. Create a sub-procedure name geeks(). Use Application.InputBox() function to access the type argument. Store the result in the variable age. Print the age variable in the immediate window. As you have passed data type as 1, you can only enter numbers in the input box. Run your Macro.
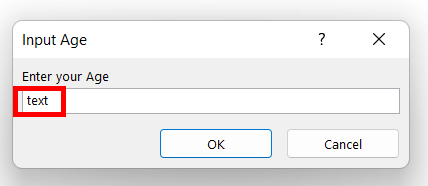
Step 2: Now, if you try to enter a text in the input box, then it will show an error.
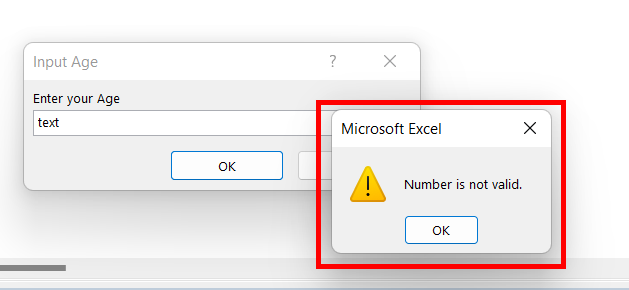
Step 3: A new dialogue box appears, named Microsoft Excel, which specifies you cannot enter a text in the input box.
Step 4: Now, if you enter a number, for example, 19, click Ok. It won’t show any error.
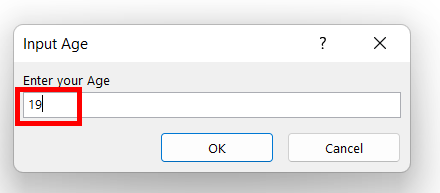
Step 5: The number 19 is printed in the immediate window.
Skipping the Arguments
There can be a probability that you don’t want all the arguments to be added to your input box function. For example, you generally do not require help files and help context arguments, but you want to add a data type argument in the input box. This issue can be solved by skipping the arguments. There are two most used ways to skip arguments in a function.
Method 1: Use (comma) to skip Arguments
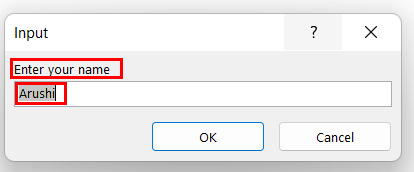
The comma (,) is used to skip the arguments in the function. For example, you want to add the prompt “Enter your name” and default value “Arushi”, but want to skip the temporary argument title.
Following are the steps
Step 1: Open your VBA editor. Write Application.InputBox(“Enter your name”, , “Arushi”), an empty comma(,) will skip the second argument title.
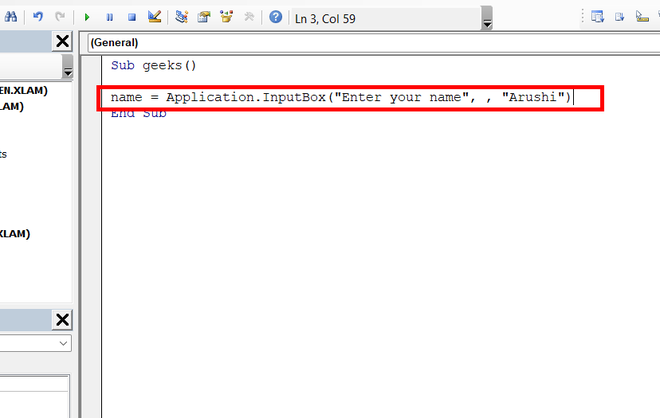
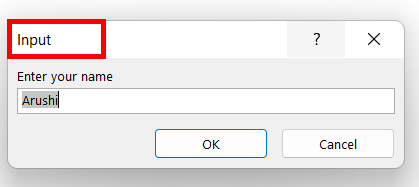
Step 2: Run your macro. You can see that the default title appears in the input box i.e., “Input”. You have successfully skipped the title argument.
Method 2: Specifying the argument name
You can mention the name-specific arguments. For example, you want to add the prompt “Enter your name” and default value “Arushi”, but want to skip the temporary argument title.
Following are the steps
Step 1: Open your VBA editor. Write Application.InputBox(Prompt := “Enter your name”, Default := “Arushi”), using argument_name := specifies the argument to be added in the input box.
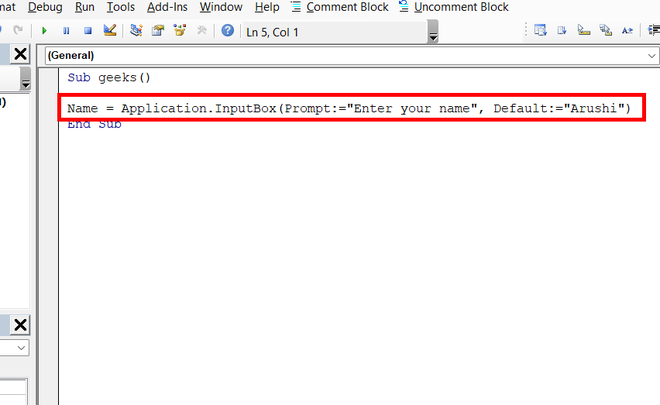
Step 2: Run your macro. The prompt “Enter your name”, with the default “Arushi”, is displayed in the input box.
 In this VBA Tutorial, you learn how to create input boxes with both the InputBox function and the Application.InputBox method. This includes:
- How to create an InputBox.
- How to create an InputBox with multiple lines.
- How to create an InputBox that works with a specific type of data.
- How to handle the cases where the user clicks the Cancel button of the InputBox.
This VBA InputBox Tutorial is accompanied by an Excel workbook containing the macros I use in the examples below. You can get immediate access to this example workbook by clicking the button below.

Related VBA and Macro Tutorials
The following VBA and Macro Tutorials may help you better understand and implement the contents below:
- General VBA constructs and structures:
- Read a Macro Tutorial for beginners here.
- Learn the definitions of several basic and important VBA terms here.
- Learn how to specify macro security settings here.
- Learn how to work with the Visual Basic Editor here.
- Learn about the Excel VBA Object Model here.
- Learn how to refer to cell ranges here.
- Learn how to create Sub procedures here.
- Learn how to work with object properties here.
- Learn how to work with object methods here.
- Learn how to declare and work with variables here.
- Learn how to work with data types here.
- Learn how to work with functions here.
- Learn how to work with loops here.
- Learn how to work with arrays here.
- Practical VBA applications and macro examples:
- Learn how to work with worksheets here.
- Learn how to convert strings to numbers here.
- Learn how to create message boxes here.
- Learn how to create UserForms here.
You can find additional VBA and Macro Tutorials in the Archives.
#1: Create InputBox with InputBox function
VBA code to create InputBox with InputBox function
To create a basic InputBox with the VBA InputBox function, use a statement with the following structure:
InputBoxVariable = InputBox(Prompt:=PromptString, Title:=TitleString, Default:=DefaultInputString)
Process to create InputBox with InputBox function
To create a basic InputBox with the VBA InputBox function, follow these steps:
- Create an input box with the InputBox function (InputBox(…)).
- Assign the value returned by the InputBox function to a variable (InputBoxVariable = InputBox(…)).
VBA statement explanation
Item: InputBoxVariable
InputBoxVariable is the variable you want to hold the value returned by the InputBox function.
The InputBox function returns a String.
Item: =
The = operator assigns a value to a variable or property.
Use the = operator to assign the value returned by the InputBox function (InputBox(…)) to InputBoxVariable.
Item: InputBox(…)
The InputBox function:
- Displays an input box;
- Waits for the user to either (i) input text and click the OK button (or press the Enter key), or (ii) click the Cancel button (or press the Esc key); and
- Returns a string with the contents of the text box in the input box (when the user clicks OK or presses Enter).
If you want to handle the cases where the user clicks on the Cancel button or presses Esc, please refer to the appropriate section of this Tutorial.
Item: Prompt:=PromptString
The Prompt argument of the InputBox function is a string displayed as the message in the input box. Prompt is a required argument.
You generally specify PromptString as a string expression.
The maximum length of PromptString is roughly 1024 characters. However, this maximum length may vary slightly depending on the width of the characters within PromptString.
PromptString can be composed of multiple lines. To create an input box with multiple lines, please refer to the appropriate section of this Tutorial.
Item: Title:=TitleString
The Title argument of the InputBox function is a string expression displayed as the title in the title bar of the input box.
Title is an optional argument. If you omit the Title argument, the title of the input box is “Microsoft Excel”.
You generally specify TitleString as a string expression.
Item: Default:=DefaultInputString
The Default argument of the InputBox function is a string expression displayed inside the text box of the input box. DefaultInputString is, therefore, the default response.
Default is an optional argument. If you omit the Default argument, the text box is empty.
Macro example to create InputBox with InputBox function
The following macro example:
- Creates a basic input box with the InputBox function.
- Assigns the value returned by the InputBox function to a variable (myInputBoxVariable = inputBox(…)).
- Displays a message box with the value held by the variable.
Sub CreateInputBoxFunction()
    'source: https://powerspreadsheets.com/
    'creates an input box with the InputBox function
    'for further information: https://powerspreadsheets.com/excel-vba-inputbox/

    'declare variable to hold value returned by InputBox
    Dim myInputBoxVariable As String

    '(1) create InputBox, and (2) assign value returned by InputBox function to variable
    myInputBoxVariable = inputBox(Prompt:="Create Excel VBA InputBox", Title:="This is an Excel VBA InputBox", Default:="Enter VBA InputBox value here")

    'display message box with value held by variable
    MsgBox "Your input was: " & myInputBoxVariable

End Sub
Effects of executing macro example to create InputBox with InputBox function
The following GIF illustrates the results of executing the macro example. As expected, Excel displays a basic input box using the InputBox function.

#2: Create InputBox with Application.InputBox method
VBA code to create InputBox with Application.InputBox method
To create a basic InputBox with the VBA Application.InputBox method, use a statement with the following structure:
InputBoxVariable = Application.InputBox(Prompt:=PromptString, Title:=TitleString, Default:=DefaultInput)
Process to create InputBox with Application.InputBox method
To create a basic InputBox with the VBA Application.InputBox method, follow these steps:
- Create an input box with the Application.InputBox method (Application.InputBox(…)).
- Assign the value returned by the Application.InputBox method to a variable (InputBoxVariable = Application.InputBox(…)).
VBA statement explanation
Item: InputBoxVariable
InputBoxVariable is the variable you want to hold the value returned by the Application.InputBox method.
The Application.InputBox method returns a Variant.
Item: =
The = operator assigns a value to a variable or property.
Use the = operator to assign the value returned by the InputBox function (InputBox(…)) to InputBoxVariable.
Item: Application.InputBox(…)
The Application.InputBox method:
- Displays an input box’
- Waits for the user to either (i) input information and click the OK button (or press the Enter key), or (ii) click the Cancel button (or press the Esc key); and
- Returns the information entered in the dialog box (if the user clicks OK or presses Enter) or the False Boolean value (if the user clicks Cancel).
Item: Prompt:=PromptString
The Prompt parameter of the Application.InputBox method is a string displayed as the message in the input box. Prompt is a required parameter.
You generally specify PromptString as a string expression.
You can also specify PromptString as a number, a date or a Boolean. In such cases, Excel coerces the number, date or Boolean to a string.
PromptString can be composed of multiple lines. To create an input box with multiple lines, please refer to the appropriate section of this Tutorial.
Item: Title:=TitleString
The Title parameter of the Application.InputBox method is the title displayed in the title bar of the input box.
Title is an optional parameter. If you omit the Title parameter, the title of the input box is “Input”.
The Title parameter is of the Variant data type.
Item: Default:=DefaultInput
The Default parameter of the Application.InputBox method is the value displayed inside the text box of the input box. DefaultInput is, therefore, the default response.
Default is an optional parameter. If you omit the Default parameter, the text box is empty.
The Default parameter is of the Variant data type.
Macro example to create InputBox with Application.InputBox method
The following macro example:
- Creates a basic input box with the Application.InputBox method.
- Assigns the value returned by the Application.InputBox method to a variable (myInputBoxVariable = Application.inputBox(…)).
- Displays a message box with the value held by the variable.
Sub CreateInputBoxMethod()
    'source: https://powerspreadsheets.com/
    'creates an input box with the Application.InputBox method
    'for further information: https://powerspreadsheets.com/excel-vba-inputbox/

    'declare variable to hold value returned by InputBox
    Dim myInputBoxVariable As Variant

    '(1) create InputBox, and (2) assign value returned by Application.InputBox method to variable
    myInputBoxVariable = Application.inputBox(Prompt:="Create Excel VBA InputBox", Title:="This is an Excel VBA InputBox", Default:="Enter VBA InputBox value here")

    'display message box with value held by variable
    MsgBox "Your input was: " & myInputBoxVariable

End Sub
Effects of executing macro example to create InputBox with Application.InputBox method
The following GIF illustrates the results of executing the macro example. As expected, Excel displays a basic input box using the Application.InputBox method.

#3: Create InputBox with multiple lines using InputBox function
VBA code to create InputBox with multiple lines using InputBox function
To create an InputBox containing multiple lines with the VBA InputBox function, use a statement with the following structure:
InputBoxMultipleLinesVariable = inputBox(Prompt:=PromptString1 & NewLineCharacter & PromptString2 & ... & NewLineCharacter & PromptString#)
Process to create InputBox with multiple lines using InputBox function
To create an InputBox containing multiple lines with the VBA InputBox function, follow these steps:
- Create an input box with the InputBox function (InputBox(…)).
- Specify the message displayed in the message box (Prompt:=PromptString1 & NewLineCharacter & PromptString2 & … & NewLineCharacter & PromptString#) as an appropriately concatenated (with the & character) combination of:
- Strings (PromptString1, PromptString2, …, PromptString#); and
- Characters that create a new line or line break (NewLineCharacter).
- Assign the value returned by the InputBox function to a variable (InputBoxMultipleLinesVariable = InputBox(…)).
VBA statement explanation
Item: InputBoxMultipleLinesVariable
InputBoxMultipleLinesVariable is the variable you want to hold the value returned by the InputBox function.
The InputBox function returns a String.
Item: =
The = operator assigns a value to a variable or property.
Use the = operator to assign the value returned by the InputBox function (InputBox(…)) to InputBoxVariable.
Item: inputBox(…)
The InputBox function:
- Displays an input box;
- Waits for the user to either (i) input text and click the OK button (or press the Enter key), or (ii) click the Cancel button (or press the Esc key); and
- Returns a string with the contents of the text box in the input box (when the user clicks OK or presses Enter).
If you want to handle the cases where the user clicks on the Cancel button or presses Esc, please refer to the appropriate section of this Tutorial.
Item: Prompt:=PromptString1 & NewLineCharacter & PromptString2 & … & NewLineCharacter & PromptString#
The Prompt argument of the InputBox function is a string displayed as the message in the input box. Prompt is a required argument.
You generally specify Prompt as a string expression.
The maximum length of Prompt is roughly 1024 characters. However, this maximum length may vary slightly depending on the width of the characters you work with.
To create an input box with multiple lines, you build the string expression assigned to Prompt by concatenating as many strings (PromptString1, PromptString2, …, PromptString#) and new line characters (NewLineCharacter) as required. For these purposes:
- PromptString1, PromptString2, …, PromptString# are the strings (excluding the new line characters) that determine the message in the input box.
- The & operator carries out string concatenation. Therefore, & concatenates the different strings and new line characters.
- NewLineCharacter is a character or character combination returning 1 of the following:
- Carriage return.
- Linefeed.
- Carriage return linefeed combination.
- New line (which is platform specific).
Specify NewLineCharacter using any of the constants or character codes (with the Chr function) listed below:
| Constant | Equivalent Chr function | General description |
| vbLf | Chr(10) | Linefeed |
| vbCr | Chr(13) | Carriage return |
| vbCrLf | Chr(13) & Chr(10) | Carriage return linefeed combination |
| vbNewLine | Chr(13) & Chr(10) in Excel for Windows or Chr(13) in Excel for Mac | New line character, which is platform specific |
Macro example to create InputBox with multiple lines using InputBox function
The following macro example:
- Creates an input box containing multiple lines (Create Excel VBA InputBox” & vbNewLine & “with multiple lines) with the InputBox function.
- Assigns the value returned by the InputBox function to a variable (myInputBoxMultipleLinesVariable = inputBox(…)).
- Displays a message box with the value held by the variable.
Sub CreateInputBoxFunctionMultipleLines()
    'source: https://powerspreadsheets.com/
    'creates an input box with multiple lines using the InputBox function
    'for further information: https://powerspreadsheets.com/excel-vba-inputbox/

    'declare variable to hold value returned by InputBox
    Dim myInputBoxMultipleLinesVariable As String

    '(1) create InputBox with multiple lines, and (2) assign value returned by InputBox function to variable
    myInputBoxMultipleLinesVariable = inputBox(Prompt:="Create Excel VBA InputBox" & vbNewLine & "with multiple lines")

    'display message box with value held by variable
    MsgBox "Your input was: " & myInputBoxMultipleLinesVariable

End Sub
Effects of executing macro example to create InputBox with multiple lines using InputBox function
The following GIF illustrates the results of executing the macro example. As expected, Excel displays an input box containing multiple lines using the InputBox function.

#4: Create InputBox with multiple lines using Application.InputBox method
VBA code to create InputBox with multiple lines using Application.InputBox method
To create an InputBox containing multiple lines with the VBA Application.InputBox method, use a statement with the following structure:
InputBoxMultipleLinesVariable = Application.InputBox(Prompt:=PromptString1 & NewLineCharacter & PromptString2 & ... & NewLineCharacter & PromptString#)
Process to create InputBox with multiple lines using Application.InputBox method
To create an InputBox containing multiple lines with the VBA Application.InputBox method, follow these steps:
- Create an input box with the Application.InputBox method (Application.InputBox(…)).
- Specify the message displayed in the message box (Prompt:=PromptString1 & NewLineCharacter & PromptString2 & … & NewLineCharacter & PromptString#) as an appropriately concatenated (with the & character) combination of:
- Strings (PromptString1, PromptString2, …, PromptString#); and
- Characters that create a new line or line break (NewLineCharacter).
- Assign the value returned by the Application.InputBox method to a variable (InputBoxMultipleLinesVariable = Application.InputBox(…)).
VBA statement explanation
Item: InputBoxMultipleLinesVariable
InputBoxMultipleLinesVariable is the variable you want to hold the value returned by the Application.InputBox method.
The Application.InputBox method returns a Variant.
Item: =
The = operator assigns a value to a variable or property.
Use the = operator to assign the value returned by the InputBox function (InputBox(…)) to InputBoxVariable.
Item: Application.InputBox(…)
The Application.InputBox method:
- Displays an input box’
- Waits for the user to either (i) input information and click the OK button (or press the Enter key), or (ii) click the Cancel button (or press the Esc key); and
- Returns the information entered in the dialog box (if the user clicks OK or presses Enter) or the False Boolean value (if the user clicks Cancel).
Item: Prompt:=PromptString1 & NewLineCharacter & PromptString2 & … & NewLineCharacter & PromptString#
The Prompt parameter of the Application.InputBox method is a string displayed as the message in the input box. Prompt is a required parameter.
You generally specify Prompt as a string expression. You can also specify Prompt as a number, a date or a Boolean. In such cases, Excel coerces the number, date or Boolean to a string.
To create an input box with multiple lines, you build the expression assigned to Prompt by concatenating as many strings (PromptString1, PromptString2, …, PromptString#) and new line characters (NewLineCharacter) as required. For these purposes:
- PromptString1, PromptString2, …, PromptString# are the strings (excluding the new line characters) that determine the message in the input box.
- The & operator carries out string concatenation. Therefore, & concatenates the different strings and new line characters.
- NewLineCharacter is a character or character combination returning 1 of the following:
- Carriage return.
- Linefeed.
- Carriage return linefeed combination.
- New line (which is platform specific).
Specify NewLineCharacter using any of the constants or character codes (with the Chr function) listed below:
| Constant | Equivalent Chr function | General description |
| vbLf | Chr(10) | Linefeed |
| vbCr | Chr(13) | Carriage return |
| vbCrLf | Chr(13) & Chr(10) | Carriage return linefeed combination |
| vbNewLine | Chr(13) & Chr(10) in Excel for Windows or Chr(13) in Excel for Mac | New line character, which is platform specific |
Macro example to create InputBox with multiple lines using Application.InputBox method
The following macro example:
- Creates an input box containing multiple lines (Create Excel VBA InputBox” & vbNewLine & “with multiple lines) with the Application.InputBox method.
- Assigns the value returned by the Application.InputBox method to a variable (myInputBoxMultipleLinesVariable = Application.inputBox(…)).
- Displays a message box with the value held by the variable.
Sub CreateInputBoxMethodMultipleLines()
    'source: https://powerspreadsheets.com/
    'creates an input box with multiple lines using the Application.InputBox method
    'for further information: https://powerspreadsheets.com/excel-vba-inputbox/

    'declare variable to hold value returned by InputBox
    Dim myInputBoxMultipleLinesVariable As Variant

    '(1) create InputBox with multiple lines, and (2) assign value returned by Application.InputBox method to variable
    myInputBoxMultipleLinesVariable = Application.inputBox(Prompt:="Create Excel VBA InputBox" & vbNewLine & "with multiple lines")

    'display message box with value held by variable
    MsgBox "Your input was: " & myInputBoxMultipleLinesVariable

End Sub
Effects of executing macro example to create InputBox with multiple lines using Application.InputBox method
The following GIF illustrates the results of executing the macro example. As expected, Excel displays an input box containing multiple lines using the Application.InputBox method.

#5: Create InputBox that works with a specific data type using InputBox function
VBA code to create InputBox that works with a specific data type using InputBox function
To create an InputBox that works with a specific data type with the VBA InputBox function, use a macro with the following statement structure:
InputBoxTypeVariable = InputBox(Prompt:=PromptString)
If IsFunction(InputBoxTypeVariable) Then
    StatementsIfInputIsType
Else
    StatementsIfInputIsNotType
End If
Process to create InputBox that works with a specific data type using InputBox function
To create an InputBox that works with a specific data type with the VBA InputBox function, follow these steps:
- Create an input box with the InputBox function (InputBox(…)).
- Assign the value returned by the InputBox function to a variable (InputBoxTypeVariable = InputBox(…)).
- Use an If… Then… Else statement for the following:
- Testing whether the type of data held by the variable is the one you want to work with (IsFunction(InputBoxTypeVariable)).
- Executing the appropriate group of statements depending on whether the type of data held by the variable is the one you want to work with (StatementsIfInputIsType) or not (StatementsIfInputIsNotType).
VBA statement explanation
Line #1: InputBoxTypeVariable = InputBox(Prompt:=PromptString)
Item: InputBoxTypeVariable
InputBoxTypeVariable is the variable you want to hold the value returned by the InputBox function.
The InputBox function returns a String.
Item: =
The = operator assigns a value to a variable or property.
Use the = operator to assign the value returned by the InputBox function (InputBox(…)) to InputBoxVariable.
Item: InputBox(…)
The InputBox function:
- Displays an input box;
- Waits for the user to either (i) input text and click the OK button (or press the Enter key), or (ii) click the Cancel button (or press the Esc key); and
- Returns a string with the contents of the text box in the input box (when the user clicks OK or presses Enter).
If you want to handle the cases where the user clicks on the Cancel button or presses Esc, please refer to the appropriate section of this Tutorial.
Item: Prompt:=PromptString
The Prompt argument of the InputBox function is a string displayed as the message in the input box. Prompt is a required argument.
You generally specify PromptString as a string expression.
The maximum length of PromptString is roughly 1024 characters. However, this maximum length may vary slightly depending on the width of the characters within PromptString.
PromptString can be composed of multiple lines. To create an input box with multiple lines, please refer to the appropriate section of this Tutorial.
Lines #2, #4 and #6: If IsFunction(InputBoxTypeVariable) Then | Else | End If
Item: If… Then… Else… End If
The If… Then… Else statement conditionally executes a group of statements (StatementsIfInputIsType or StatementsIfInputIsNotType) depending on the value of an expression (Isfunction(InputBoxTypeVariable)).
Item: IsFunction(InputBoxTypeVariable)
The condition of the If… Then… Else statement is an expression returning True or False.
When you work with an input box and a specific data type using this macro structure, you can check the type of data held by InputBoxTypeVariable by working with certain VBA built-in functions (an IsFunction), as appropriate. These include the following functions:
| Function | Returns True if InputBoxTypeVariable… | Returns False if InputBoxTypeVariable… |
| IsDate | Is a date or recognizable as a valid date | Isn’t date or isn’t recognizable as a valid date |
| IsError | Is an error value | Isn’t an error value |
| IsNumeric | Can be evaluated/recognized as a number | Can’t be evaluated/recognized as a number |
Line #3: StatementsIfInputIsType
Statements executed if the tested condition (IsFunction(InputBoxTypeVariable)) returns True. In other words, these statements are executed if the input entered by the user in the input box is of the appropriate type.
Line #5: StatementsIfInputIsNotType
Statements executed if the tested condition (IsFunction(InputBoxTypeVariable)) returns False. In other words, these statements are executed if the input entered by the user in the input box isn’t of the appropriate type.
Macro example to create InputBox that works with a specific data type using InputBox function
The following macro example:
- Creates an input box with the InputBox function.
- Assigns the value returned by the InputBox function to a variable (myInputBoxTypeVariable = inputBox(…)).
- Checks whether the value held by the variable is numeric (IsNumeric(myInputBoxTypeVariable)).
- If the value is numeric, displays a message box with the value held by the variable.
- If the value isn’t numeric, displays a message box asking the user to try again and enter a number.
Sub CreateInputBoxFunctionDataType()
    'source: https://powerspreadsheets.com/
    'creates an input box that works with a number using the InputBox function
    'for further information: https://powerspreadsheets.com/excel-vba-inputbox/

    'declare variable to hold value returned by InputBox
    Dim myInputBoxTypeVariable As String

    '(1) create InputBox that works with a number, and (2) assign value returned by InputBox function to variable
    myInputBoxTypeVariable = inputBox(Prompt:="Create Excel VBA InputBox that works with a number")

    'check if user entered a number and, if appropriate, execute statements
    If IsNumeric(myInputBoxTypeVariable) Then

        'display message box with value held by variable
        MsgBox "Your input was: " & myInputBoxTypeVariable

    'if user didn't enter a number, execute statements
    Else

        'display message box confirming that user didn't enter a number
        MsgBox "Please try again and enter a number"

    End If

End Sub
Effects of executing macro example to create InputBox that works with a specific data type using InputBox function
The following GIF illustrates the results of executing the macro example. As expected:
- Excel identifies whether the input box created with the InputBox function contains a number; and
- Displays the appropriate message box.

#6: Create InputBox that works with a specific data type using Application.InputBox method
VBA code to create InputBox that works with a specific data type using Application.InputBox method
To create an InputBox that works with a specific data type with the VBA Application.InputBox method, use a statement with the following structure:
InputBoxTypeVariable = Application.InputBox(Prompt:=PromptString, Type:=TypeValue)
Process to create InputBox that works with a specific data type using Application.InputBox method
To create an InputBox that works with a specific data type with the VBA Application.InputBox method, follow these steps:
- Create an input box with the Application.InputBox method (Application.InputBox(…)).
- Specify the data type you want to work with by working with the Type parameter of the Application.InputBox method (Type:=TypeValue).
- Assign the value returned by the Application.InputBox method to a variable (InputBoxTypeVariable = Application.InputBox(…)).
VBA statement explanation
Item: InputBoxTypeVariable
InputBoxTypeVariable is the variable you want to hold the value returned by the Application.InputBox method.
The Application.InputBox method returns a Variant.
Item: =
The = operator assigns a value to a variable or property.
Use the = operator to assign the value returned by the InputBox function (InputBox(…)) to InputBoxVariable.
Item: Application.InputBox(…)
The Application.InputBox method:
- Displays an input box’
- Waits for the user to either (i) input information and click the OK button (or press the Enter key), or (ii) click the Cancel button (or press the Esc key); and
- Returns the information entered in the dialog box (if the user clicks OK or presses Enter) or the False Boolean value (if the user clicks Cancel).
Item: Prompt:=PromptString
The Prompt parameter of the Application.InputBox method is a string displayed as the message in the input box. Prompt is a required parameter.
You generally specify PromptString as a string expression.
You can also specify PromptString as a number, a date or a Boolean. In such cases, Excel coerces the number, date or Boolean to a string.
PromptString can be composed of multiple lines. To create an input box with multiple lines, please refer to the appropriate section of this Tutorial.
Item: Type:=TypeValue
The Type parameter of the Application.InputBox method specifies the data type returned.
Set the Type parameter using the values listed below. If required, you can set the Type parameter to be a sum of several of these values.
| Value | Basic description | Additional comments |
| 0 | Formula | Application.InputBox returns the formula in the form of text. Cell references inside the formula are returned as A1-style references. |
| 1 | Number | |
| 2 | Text | |
| 4 | Boolean | |
| 8 | Range object | Use the Set statement to assign the Range object returned by Application.InputBox to an object variable. |
| 16 | Error | |
| 64 | Array of values |
Type is an optional parameter. If you omit the Type parameter, the Application.InputBox method returns text.
Macro example to create InputBox that works with a specific data type using Application.InputBox method
The following macro example:
- Creates an input box that returns a number (Type:=1) with the Application.InputBox method.
- Assigns the value returned by the Application.InputBox method to a variable (myInputBoxTypeVariable = Application.inputBox(…)).
- Displays a message box with the value held by the variable.
Sub CreateInputBoxMethodDataType()
    'source: https://powerspreadsheets.com/
    'creates an input box that works with a number using the Application.InputBox method
    'for further information: https://powerspreadsheets.com/excel-vba-inputbox/

    'declare variable to hold value returned by InputBox
    Dim myInputBoxTypeVariable As Variant

    '(1) create InputBox that works with a number, and (2) assign value returned by Application.InputBox method to variable
    myInputBoxTypeVariable = Application.inputBox(Prompt:="Create Excel VBA InputBox that works with a number", Type:=1)

    'display message box with value held by variable
    MsgBox "Your input was: " & myInputBoxTypeVariable

End Sub
Effects of executing macro example to create InputBox that works with a specific data type using Application.InputBox method
The following GIF illustrates the results of executing the macro example. As expected:
- Excel identifies whether the input box created with the Application.InputBox method contains a number; and
- If the entered input isn’t a number, displays a warning.

#7: Create InputBox and check if user clicks Cancel button with InputBox function
VBA code to create InputBox and check if user clicks Cancel button with InputBox function
To create an InputBox with the VBA InputBox function and check if the user clicks Cancel, use a macro with the following statement structure:
InputBoxCancelVariable = InputBox(Prompt:=PromptString)
If StrPtr(InputBoxCancelVariable) = 0 Then
    StatementsIfCancel
ElseIf InputBoxCancelVariable = "" Then
    StatementsIfNoInput
Else
    StatementsIfInputAndOK
End If
Process to create InputBox and check if user clicks Cancel button with InputBox function
To create an InputBox that works with a specific data type with the VBA InputBox function, follow these steps:
- Create an input box with the InputBox function (InputBox(…)).
- Assign the value returned by the InputBox function to a variable (InputBoxCancelVariable = InputBox(…)).
- Use an If… Then… Else statement for the following:
- Testing whether the user clicked Cancel (StrPtr(InputBoxCancelVariable) = 0) or entered no input prior to clicking OK (InputBoxCancelVariable = “”).
- Executing the appropriate group of statements depending on whether the user clicked Cancel (StatementsIfCancel), entered no input prior to clicking OK (StatementsIfNoInput) or entered input and clicked OK (StatementsIfInputAndOK).
VBA statement explanation
Line #1: InputBoxCancelVariable = InputBox(Prompt:=PromptString)
Item: InputBoxCancelVariable
InputBoxCancelVariable is the variable you want to hold the value returned by the InputBox function.
The InputBox function returns a String.
Item: =
The = operator assigns a value to a variable or property.
Use the = operator to assign the value returned by the InputBox function (InputBox(…)) to InputBoxVariable.
Item: InputBox(…)
The InputBox function:
- Displays an input box;
- Waits for the user to either (i) input text and click the OK button (or press the Enter key), or (ii) click the Cancel button (or press the Esc key); and
- Returns a string with the contents of the text box in the input box (when the user clicks OK or presses Enter).
According to the Microsoft Developer Network, the InputBox function returns a zero-length string (“”) when the user clicks Cancel (or presses Esc). When checking if the user clicks Cancel using this macro structure, you rely on a quirk of the InputBox function which allows you to work with StrPtr.
Item: Prompt:=PromptString
The Prompt argument of the InputBox function is a string displayed as the message in the input box. Prompt is a required argument.
You generally specify PromptString as a string expression.
The maximum length of PromptString is roughly 1024 characters. However, this maximum length may vary slightly depending on the width of the characters within PromptString.
PromptString can be composed of multiple lines. To create an input box with multiple lines, please refer to the appropriate section of this Tutorial.
Lines #2, #6 and #8: If StrPtr(InputBoxCancelVariable) = 0 Then | Else | End If
Item: If… Then… Else… End If
The If… Then… Else statement conditionally executes a group of statements (StatementsIfCancel, StatementsIfNoInput or StatementsIfInputAndOK) depending on the value of an expression (StrPtr(InputBoxCancelVariable) = 0 or InputBoxCancelVariable = “”).
Item: StrPtr(InputBoxCancelVariable) = 0
The condition of the If… Then… Else statement is an expression returning True or False.
When you check if the user clicks the Cancel button using this macro structure, you can work with the StrPtr function. StrPtr is an undocumented function. You can usually work with the StrPtr function to obtain the address of a variable.
When the user clicks Cancel, no string is assigned to InputBoxCancelVariable. Therefore, if the user clicks Cancel, StrPtr(InputBoxCancelVariable) = 0 returns True.
Line #3: StatementsIfCancel
Statements executed if the tested condition (StrPtr(InputBoxCancelVariable) = 0) returns True. In other words, these statements are executed if the user clicks Cancel.
Line #4: ElseIf InputBoxCancelVariable = “” Then
Item: ElseIf… Then
The If… Then… Else statement conditionally executes a group of statements (StatementsIfCancel, StatementsIfNoInput or StatementsIfInputAndOK) depending on the value of an expression (StrPtr(InputBoxCancelVariable) = 0 or InputBoxCancelVariable = “”).
Item: InputBoxCancelVariable = “”
The condition-n of the If… Then… Else statement is an expression returning True or False.
You can check if the user didn’t enter any input prior to clicking OK by testing whether InputBoxCancelVariable holds a zero-length string (“”). In other words, if the user doesn’t enter any input and clicks the OK button, InputBoxCancelVariable = 0 returns True.
Line #5: StatementsIfNoInput
Statements executed if the tested condition (InputBoxCancelVariable = “”) returns True. In other words, these statements are executed if the user doesn’t enter any input and clicks the OK button.
Line #7: StatementsIfInputAndOK
Statements executed if none of the tested conditions (StrPtr(InputBoxCancelVariable) = 0 or InputBoxCancelVariable = “”) return True. In other words, these statements are executed if the user enters an input and clicks the OK button.
Macro example to create InputBox and check if user clicks Cancel button with InputBox function
The following macro example:
- Creates an input box with the InputBox function.
- Assigns the value returned by the InputBox function to a variable (myInputBoxCancelVariable = inputBox(…)).
- Checks whether user clicked Cancel (StrPtr(myInputBoxCancelVariable) = 0). If the user clicked Cancel, displays a message box confirming this.
- If the user didn’t click Cancel, checks whether the user entered no input prior to clicking OK (myInputBoxCancelVariable = “”). If the user entered no input prior to clicking OK, displays a message box confirming this.
- If the user entered input and clicked OK, displays a message box with the value held by the variable.
Sub CreateInputBoxFunctionCancel()
    'source: https://powerspreadsheets.com/
    '(1) creates an input box with the InputBox function, and (2) handles case where user clicks Cancel button
    'for further information: https://powerspreadsheets.com/excel-vba-inputbox/

    'declare variable to hold value returned by InputBox
    Dim myInputBoxCancelVariable As String

    '(1) create InputBox, and (2) assign value returned by InputBox function to variable
    myInputBoxCancelVariable = inputBox(Prompt:="Create Excel VBA InputBox and work with Cancel button")

    'check if user clicked Cancel button and, if appropriate, execute statements
    If StrPtr(myInputBoxCancelVariable) = 0 Then

        'display message box confirming that user clicked Cancel button
        MsgBox "You clicked the Cancel button"

    'check if user entered no input and, if appropriate, execute statements
    ElseIf myInputBoxCancelVariable = "" Then

        'display message box confirming that user entered no input
        MsgBox "You didn't enter an input"

    'if user didn't click Cancel button and entered input, execute statements
    Else

        'display message box with value held by variable
    MsgBox "Your input was: " & myInputBoxCancelVariable

    End If

End Sub
Effects of executing macro example to create InputBox and check if user clicks Cancel button with InputBox function
The following GIF illustrates the results of executing the macro example. As expected:
- Excel displays an input box created with the InputBox function.
- The macro identifies whether the user:
- Clicks the Cancel button;
- Enters no input prior to clicking OK; or
- Enters input and clicks OK.
- Excel displays the appropriate message box depending on the actions taken by the user.

#8: Create InputBox and check if user clicks Cancel button with Application.InputBox method
VBA code to create InputBox and check if user clicks Cancel button with Application.InputBox method
To create an InputBox with the VBA Application.InputBox method and check if the user clicks Cancel, use a macro with the following statement structure:
InputBoxCancelVariable = Application.InputBox(Prompt:=PromptString)
If (TypeName(InputBoxCancelVariable) = "Boolean") And (InputBoxCancelVariable = "False") Then
    StatementsIfCancel
ElseIf InputBoxCancelVariable = "" Then
    StatementsIfNoInput
Else
    StatementsIfInputAndOK
End If
Process to create InputBox and check if user clicks Cancel button with Application.InputBox method
To create an InputBox with the VBA Application.InputBox method and check if the user clicks Cancel, follow these steps:
- Create an input box with the Application.InputBox method (Application.InputBox(…)).
- Assign the value returned by the Application.InputBox method to a variable (InputBoxCancelVariable = Application.InputBox(…)).
- Use an If… Then… Else statement for the following:
- Testing whether the user clicked Cancel ((TypeName(InputBoxCancelVariable) = “Boolean”) And (InputBoxCancelVariable = “False”)) or entered no input prior to clicking OK (InputBoxCancelVariable = “”).
- Executing the appropriate group of statements depending on whether the user clicked Cancel (StatementsIfCancel), entered no input prior to clicking OK (StatementsIfNoInput) or entered input and clicked OK (StatementsIfInputAndOK).
VBA statement explanation
Line #1: InputBoxCancelVariable = Application.InputBox(Prompt:=PromptString)
Item: InputBoxCancelVariable
InputBoxCancelVariable is the variable you want to hold the value returned by the Application.InputBox method.
The Application.InputBox method returns a Variant.
Item: =
The = operator assigns a value to a variable or property.
Use the = operator to assign the value returned by the InputBox function (InputBox(…)) to InputBoxVariable.
Item: Application.InputBox(…)
The Application.InputBox method:
- Displays an input box’
- Waits for the user to either (i) input information and click the OK button (or press the Enter key), or (ii) click the Cancel button (or press the Esc key); and
- Returns the information entered in the dialog box (if the user clicks OK or presses Enter) or the False Boolean value (if the user clicks Cancel).
Item: Prompt:=PromptString
The Prompt parameter of the Application.InputBox method is a string displayed as the message in the input box. Prompt is a required parameter.
You generally specify PromptString as a string expression.
You can also specify PromptString as a number, a date or a Boolean. In such cases, Excel coerces the number, date or Boolean to a string.
PromptString can be composed of multiple lines. To create an input box with multiple lines, please refer to the appropriate section of this Tutorial.
Lines #2, #6 and #8: If (TypeName(InputBoxCancelVariable) = “Boolean”) And (InputBoxCancelVariable = “False”) Then | Else | End If
Item: If… Then… Else… End If
The If… Then… Else statement conditionally executes a group of statements (StatementsIfCancel, StatementsIfNoInput or StatementsIfInputAndOK) depending on the value of an expression (((TypeName(InputBoxCancelVariable) = “Boolean”) And (InputBoxCancelVariable = “False”)) or InputBoxCancelVariable = “”).
Item: TypeName(InputBoxCancelVariable) = “Boolean” And InputBoxCancelVariable = “False”
The condition of the If… Then… Else statement is an expression returning True or False.
The Application.InputBox method returns the False Boolean value when the user clicks Cancel. Therefore, when you check if the user clicks the Cancel button using this macro structure, you test whether 2 conditions are met.
Condition #1: TypeName(InputBoxCancelVariable) = “Boolean”
TypeName(InputBoxCancelVariable) = “Boolean” checks whether InputBoxCancelVariable is a Boolean value.
For these purposes, work with the TypeName function, which returns a string with information about the variable passed as argument (InputBoxCancelVariable). Therefore, TypeName(InputBoxCancelVariable) = “Boolean”:
- Returns True if InputBoxCancelVariable is a Boolean. This occurs, among others, when the user clicks Cancel.
- Returns False if InputBoxCancelVariable isn’t a Boolean.
Condition #2: InputBoxCancelVariable = “False”
InputBoxCancelVariable = “False” checks whether InputBoxCancelVariable holds the string “False”. Therefore, InputBoxCancelVariable = “False”:
- Returns True if InputBoxCancelVariable holds “False”. This occurs, among others, when the user clicks Cancel.
- Returns False if InputBoxCancelVariable doesn’t hold “False”.
Condition #1 And Condition #2
When you check if the user clicks the Cancel button using this macro structure, both conditions #1 (TypeName(InputBoxCancelVariable) = “Boolean”) and #2 (InputBoxCancelVariable = “False”) must be met.
The And operator performs a logical conjunction. Therefore, the condition of the If… Then… else statement returns True if the user clicks Cancel.
Line #3: StatementsIfCancel
Statements executed if the tested condition ((TypeName(InputBoxCancelVariable) = “Boolean”) And (InputBoxCancelVariable = “False”)) returns True. In other words, these statements are executed if the user clicks Cancel.
Line #4: ElseIf InputBoxCancelVariable = “” Then
Item: ElseIf… Then
The If… Then… Else statement conditionally executes a group of statements (StatementsIfCancel, StatementsIfNoInput or StatementsIfInputAndOK) depending on the value of an expression (((TypeName(InputBoxCancelVariable) = “Boolean”) And (InputBoxCancelVariable = “False”)) or InputBoxCancelVariable = “”).
Item: InputBoxCancelVariable = “”
The condition-n of the If… Then… Else statement is an expression returning True or False.
You can check if the user didn’t enter any input prior to clicking OK by testing whether InputBoxCancelVariable holds a zero-length string (“”). In other words, if the user doesn’t enter any input and clicks the OK button, InputBoxCancelVariable = 0 returns True.
Line #5: StatementsIfNoInput
Statements executed if the tested condition (InputBoxCancelVariable = “”) returns True. In other words, these statements are executed if the user doesn’t enter any input and clicks the OK button.
Line #7: StatementsIfInputAndOK
Statements executed if none of the tested conditions (((TypeName(InputBoxCancelVariable) = “Boolean”) And (InputBoxCancelVariable = “False”)) or InputBoxCancelVariable = “”) return True. In other words, these statements are executed if the user enters an input and clicks the OK button.
Macro example to create InputBox and check if user clicks Cancel button with Application.InputBox method
The following macro example:
- Creates an input box with the Application.InputBox method.
- Assigns the value returned by the Application.InputBox method to a variable (myInputBoxCancelVariable = Application.inputBox(…)).
- Checks whether user clicked Cancel ((TypeName(myInputBoxCancelVariable) = “Boolean”) And (myInputBoxCancelVariable = “False”)). If the user clicked Cancel, displays a message box confirming this.
- If the user didn’t click Cancel, checks whether the user entered no input prior to clicking OK (myInputBoxCancelVariable = “”). If the user entered no input prior to clicking OK, displays a message box confirming this.
- If the user entered input and clicked OK, displays a message box with the value held by the variable.
Sub CreateInputBoxMethodCancel()
    'source: https://powerspreadsheets.com/
    '(1) creates an input box with the Application.InputBox method, and (2) handles case where user clicks Cancel button
    'for further information: https://powerspreadsheets.com/excel-vba-inputbox/

    'declare variable to hold value returned by InputBox
    Dim myInputBoxCancelVariable As Variant

    '(1) create InputBox, and (2) assign value returned by Application.InputBox method to variable
    myInputBoxCancelVariable = Application.inputBox(Prompt:="Create Excel VBA InputBox and work with Cancel button")

    'check if user clicked Cancel button and, if appropriate, execute statements
    If (TypeName(myInputBoxCancelVariable) = "Boolean") And (myInputBoxCancelVariable = "False") Then

        'display message box confirming that user clicked Cancel button
        MsgBox "You clicked the Cancel button"

    'check if user entered no input and, if appropriate, execute statements
    ElseIf myInputBoxCancelVariable = "" Then

        'display message box confirming that user entered no input
        MsgBox "You didn't enter an input"

    'if user didn't click Cancel button and entered input, execute statements
    Else

        'display message box with value held by variable
        MsgBox "Your input was: " & myInputBoxCancelVariable

    End If

End Sub
Effects of executing macro example to create InputBox and check if user clicks Cancel button with Application.InputBox method
The following GIF illustrates the results of executing the macro example. As expected:
- Excel displays an input box created with the Application.InputBox function.
- The macro identifies whether the user:
- Clicks the Cancel button;
- Enters no input prior to clicking OK; or
- Enters input and clicks OK.
- Excel displays the appropriate message box depending on the actions taken by the user.

#9: Create InputBox and check if user clicks Cancel button when working with cell range and Application.InputBox method
VBA code to create InputBox and check if user clicks Cancel button when working with cell range and Application.InputBox method
To create an InputBox that works with a cell range using the VBA Application.InputBox method and check if the user clicks Cancel, use a macro with the following statement structure:
Dim InputBoxRangeCancelVariable As Range
On Error Resume Next
Set InputBoxRangeCancelVariable = Application.InputBox(Prompt:=PromptString, Type:=8)
On Error GoTo 0
If InputBoxRangeCancelVariable Is Nothing Then
    StatementsIfCancel
Else
    StatementsIfRangeInput
End If
Process to create InputBox and check if user clicks Cancel button when working with cell range and Application.InputBox method
To create an InputBox that works with a cell range using the VBA Application.InputBox method and check if the user clicks Cancel, follow these steps:
- Explicitly declare an object variable to hold a reference to the Range object representing the cell range (Dim InputBoxRangeCancelVariable As Range).
- Enable error-handling with the On Error Resume Next statement.
- Create an input box with the Application.InputBox method (Application.InputBox(…)).
- Set the Type parameter of the Application.InputBox method to 8 (Type:=8), which results in Application.InputBox returning a Range object.
- Assign the value returned by the Application.InputBox method to the object variable (InputBoxRangeCancelVariable = Application.InputBox(…)).
- Disable error-handling withe the On Error GoTo 0 statement.
- Use an If… Then… Else statement for the following:
- Testing whether the user clicked Cancel (InputBoxRangeCancelVariable Is Nothing).
- Executing the appropriate group of statements depending on whether the user clicked Cancel (StatementsIfCancel) or not (StatementsIfRangeInput).
VBA statement explanation
Line #1: Dim InputBoxRangeCancelVariable As Range
The Dim statement declares the InputBoxRangeCancelVariable object variable as of the Range object data type and allocates storage space.
When you check if the user clicks the Cancel button while working with a cell range using this macro structure, you explicitly declare the object variable that holds the reference to the cell range returned by the Application.InputBox method.
Line #2: On Error Resume Next
The On Error Resume Next statement enables an error-handling routine and specifies that, when a run-time error occurs, control goes to the statement following that where the error occurred.
When you check if the user clicks the Cancel button while working with a cell range using this macro structure, On Error Resume Next handles the error caused by line #3 (Set InputBoxRangeCancelVariable = Application.InputBox(Prompt:=PromptString, Type:=8)) if the user clicks Cancel. This error is usually run-time error 424 (object required).
If you don’t declare the InputBoxRangeCancelVariable object variable explicitly, the behavior of the macro and the error caused when the user clicks Cancel usually differs from what I describe in this VBA Tutorial.
Line #3: Set InputBoxRangeCancelVariable = Application.InputBox(Prompt:=PromptString, Type:=8)
Item: Set… =…
The Set statement assigns the object reference returned by the Application.InputBox method (Application.InputBox(…)) to InputBoxRangeCancelVariable.
Item: InputBoxRangeCancelVariable
InputBoxRangeCancelVariable is the object variable you want to hold the Range object returned by the Application.InputBox method.
When working with a cell range and the Application.InputBox method, Application.InputBox usually returns a Range object, unless the user clicks on the Cancel button. The cases where the user clicks on the Cancel button are handled by the On Error Resume Next statement.
Therefore, if you explicitly declare InputBoxRangeCancelVariable when working with this macro structure, you can usually declare it as of the Range object data type.
Item: Application.InputBox(…)
The Application.InputBox method:
- Displays an input box;
- Waits for the user to either (i) input information and click the OK button (or press the Enter key), or (ii) click the Cancel button (or press the Esc key); and
- Returns the information entered in the dialog box (if the user clicks OK or presses Enter).
Item: Prompt:=PromptString
The Prompt parameter of the Application.InputBox method is a string displayed as the message in the input box. Prompt is a required parameter.
You generally specify PromptString as a string expression.
You can also specify PromptString as a number, a date or a Boolean. In such cases, Excel coerces the number, date or Boolean to a string.
PromptString can be composed of multiple lines. To create an input box with multiple lines, please refer to the appropriate section of this Tutorial.
Item: Type:=8
The Type parameter of the Application.InputBox method specifies the data type returned.
When working with a cell range, set Type to 8. In such case, Application.InputBox returns a Range object.
Line #4: On Error GoTo 0
The On Error GoTo 0 statement disables the error-handler enabled in line #2.
Lines #5, #7 and #9: If InputBoxRangeCancelVariable Is Nothing Then | Else | End If
Item: If… Then… Else… End If
The If… Then… Else statement conditionally executes a group of statements (StatementsIfCancel or StatementsIfRangeInput) depending on the value of an expression (InputBoxRangeCancelVariable Is Nothing).
Item: InputBoxRangeCancelVariable Is Nothing
The condition of the If… Then… Else statement is an expression returning True or False.
The Is operator compares InputBoxRangeCancelVariable and Nothing. This expression returns True if both refer to the same.
Nothing is the default value for an object variable. Therefore, if the user clicks Cancel, InputBoxRangeCancelVariable Is Nothing returns True.
Line #6: StatementsIfCancel
Statements executed if the tested condition (InputBoxRangeCancelVariable Is Nothing) returns True. In other words, these statements are executed if the user clicks Cancel.
Line #8: StatementsIfRangeInput
Statements executed if the tested condition (InputBoxRangeCancelVariable Is Nothing) returns False. In other words, these statements are executed if the user enters/selects a cell range as input.
Macro example to create InputBox and check if user clicks Cancel button when working with cell range and Application.InputBox method
The following macro example:
- Enables error-handling (On Error Resume Next).
- Creates an input box that returns a Range object (Type:=8) with the Application.InputBox method.
- Assigns the object reference returned by the Application.InputBox method to an object variable (Set myInputBoxRangeCancelVariable = Application.inputBox(…)).
- Disables error-handling (On Error GoTo 0).
- Checks whether user clicked Cancel (myInputBoxRangeCancelVariable Is Nothing).
- If the user clicked Cancel, displays a message box confirming this.
- If the user didn’t click Cancel, displays a message box with the range reference of the cell range represented by the variable (myInputBoxRangeCancelVariable.Address).
Sub CreateInputBoxMethodCellRangeCancel()
    'source: https://powerspreadsheets.com/
    '(1) creates an input box that works with cell ranges using the Application.InputBox method, and (2) handles case where user clicks Cancel button
    'for further information: https://powerspreadsheets.com/excel-vba-inputbox/

    'declare object variable to hold reference to Range object (cell range) returned by InputBox
    Dim myInputBoxRangeCancelVariable As Range

    'enable error-handling
    On Error Resume Next

    '(1) create InputBox that works with cell range, and (2) assign value returned by Application.InputBox method to variable
    Set myInputBoxRangeCancelVariable = Application.inputBox(Prompt:="Create Excel VBA InputBox that works with cell range and handles Cancel button", Type:=8)

    'disable error-handling
    On Error GoTo 0

    'check if user clicked Cancel button and, if appropriate, execute statements
    If myInputBoxRangeCancelVariable Is Nothing Then

        'display message box confirming that user clicked Cancel button
        MsgBox "You clicked the Cancel button"

    'if user didn't click Cancel button, execute statements
    Else

        'display message box with address of cell range represented by object variable
        MsgBox "Your input was: " & myInputBoxRangeCancelVariable.Address

    End If

End Sub
Effects of executing macro example to create InputBox and check if user clicks Cancel button when working with cell range and Application.InputBox method
The following GIF illustrates the results of executing the macro example. As expected:
- Excel displays an input box created with the Application.InputBox function. The InputBox allows the user to select a cell range.
- The macro identifies whether the user:
- Clicks the Cancel button; or
- Selects or otherwise enters an appropriate cell range.
- Excel displays the appropriate message box depending on the actions taken by the user.

Использование функции InputBox в VBA Excel, ее синтаксис и параметры. Значения, возвращаемые функцией InputBox. Примеры использования.
Функция InputBox предназначена в VBA Excel для вывода диалогового окна с приглашением ввести текст и возвращения введенного значения типа String с содержимым текстового поля.
Синтаксис функции
InputBox ( Prompt [, Title ] [, DefaultResponse ] [, X ] [, Y ])
Обязательным параметром функции InputBox является Prompt, если значения остальных параметров явно не указаны, используются их значения по умолчанию.
Параметры функции
| Параметр | Описание | Значение по умолчанию |
| Prompt | Обязательный параметр. Выражение типа String, отображаемое в диалоговом окне в виде сообщения, приглашающего ввести текст в текстовое поле. Разделить на строки сообщение можно с помощью константы vbNewLine. | Нет |
| Title | Необязательный параметр. Выражение типа String, отображаемое в заголовке диалогового окна. | Имя приложения* |
| DefaultResponse | Необязательный параметр. Выражение типа String, отображаемое в текстовом поле при открытии диалога. | Пустая строка |
| X | Необязательный параметр. Числовое выражение, определяющее в твипах** расстояние от левого края экрана до левого края диалогового окна. | Горизонтальное выравнивание по центру |
| Y | Необязательный параметр. Числовое выражение, определяющее в твипах** расстояние от верхнего края экрана до верхнего края диалогового окна. | Приблизительно равно 1/3 высоты экрана |
*В Excel по умолчанию в заголовке диалогового окна InputBox выводится строка: «Microsoft Excel».
**Твип (англ. twip) — типографская единица измерения, равная одной двадцатой пункта (point, отсюда и название: Twentieth of a Point). Твип равен 1/1440 дюйма (точно) или 1/567 сантиметра (приближенно).
Если X и Y задать равными нулю, диалоговое окно InputBox отобразится в левом верхнем углу экрана.
Возвращаемые значения
| Кнопка | Возвращаемое значение |
| OK | Значение типа String с содержимым текстового поля |
| Cancel | Пустая строка |
Примеры
Пример 1
Ознакомьтесь с работой функции InputBox на простом примере, написав в текстовом поле сообщение и закрывая диалоговое окно кнопками OK, Cancel и крестиком в правом верхнем углу:
|
Sub Test1() Dim a As String a = InputBox(«Напишите что-нибудь …») MsgBox a End Sub |
Пример 2
В этом примере добавим все основные параметры и посмотрим, что из этого получится:
|
Sub Test2() Dim a As String a = InputBox(«Напишите что-нибудь …», _ «Диалоговое окно функции InputBox», _ «Здесь можно что-нибудь написать», 5670 / 2, 5670 / 2) MsgBox a End Sub |
Обратите внимание, что вместо значений параметров X и Y используются выражения (5670 разделить на 2) и все работает. Диалоговое окно из примера 2 открывается приблизительно в 5 сантиметрах от верхней и левой границ экрана.
| title | keywords | f1_keywords | ms.prod | api_name | ms.assetid | ms.date | ms.localizationpriority |
|---|---|---|---|---|---|---|---|
|
Application.InputBox method (Excel) |
vbaxl10.chm133149 |
vbaxl10.chm133149 |
excel |
Excel.Application.InputBox |
d3bd2f3a-7fed-20fa-918d-a71e2a2a1d49 |
04/05/2019 |
high |
Application.InputBox method (Excel)
Displays a dialog box for user input. Returns the information entered in the dialog box.
Syntax
expression.InputBox (Prompt, Title, Default, Left, Top, HelpFile, HelpContextID, Type)
expression A variable that represents an Application object.
Parameters
| Name | Required/Optional | Data type | Description |
|---|---|---|---|
| Prompt | Required | String | The message to be displayed in the dialog box. This can be a string, a number, a date, or a Boolean value (Microsoft Excel automatically coerces the value to a String before it is displayed). Maximum length is 255 characters, otherwise there is no prompt, and Application’s method immediately returns Error 2015. |
| Title | Optional | Variant | The title for the input box. If this argument is omitted, the default title is Input. |
| Default | Optional | Variant | Specifies a value that will appear in the text box when the dialog box is initially displayed. If this argument is omitted, the text box is left empty. This value can be a Range object. |
| Left | Optional | Variant | Specifies an x position for the dialog box in relation to the upper-left corner of the screen, in points. |
| Top | Optional | Variant | Specifies a y position for the dialog box in relation to the upper-left corner of the screen, in points. |
| HelpFile | Optional | Variant | The name of the Help file for this input box. If the HelpFile and HelpContextID arguments are present, a Help button will appear in the dialog box. |
| HelpContextID | Optional | Variant | The context ID number of the Help topic in HelpFile. |
| Type | Optional | Variant | Specifies the return data type. If this argument is omitted, the dialog box returns text. |
Return value
Variant
Remarks
The following table lists the values that can be passed in the Type argument. Can be one or a sum of the values. For example, for an input box that can accept both text and numbers, set Type to 1 + 2.
| Value | Description |
|---|---|
| 0 | A formula |
| 1 | A number |
| 2 | Text (a string) |
| 4 | A logical value (True or False) |
| 8 | A cell reference, as a Range object |
| 16 | An error value, such as #N/A |
| 64 | An array of values |
Use InputBox to display a simple dialog box so that you can enter information to be used in a macro. The dialog box has an OK button and a Cancel button. If you select the OK button, InputBox returns the value entered in the dialog box. If you select the Cancel button, InputBox returns False.
If Type is 0, InputBox returns the formula in the form of text; for example, =2*PI()/360. If there are any references in the formula, they are returned as A1-style references. (Use ConvertFormula to convert between reference styles.)
If Type is 8, InputBox returns a Range object. You must use the Set statement to assign the result to a Range object, as shown in the following example.
Set myRange = Application.InputBox(prompt := "Sample", type := 8)
If you don’t use the Set statement, the variable is set to the value in the range, rather than the Range object itself.
If you use the InputBox method to ask the user for a formula, you must use the FormulaLocal property to assign the formula to a Range object. The input formula will be in the user’s language.
The InputBox method differs from the InputBox function in that it allows selective validation of the user’s input, and it can be used with Excel objects, error values, and formulas. Notice that Application.InputBox calls the InputBox method; InputBox with no object qualifier calls the InputBox function.
Example
This example prompts the user for a number.
myNum = Application.InputBox("Enter a number")
This example prompts the user to select a cell on Sheet1. The example uses the Type argument to ensure that the return value is a valid cell reference (a Range object).
Worksheets("Sheet1").Activate
Set myCell = Application.InputBox( _
    prompt:="Select a cell", Type:=8)
This example uses an InputBox for the user to select a range to pass to the user-defined function MyFunction, which multiplies three values in a range together and returns the result.
Sub Cbm_Value_Select()
   'Set up the variables.
   Dim rng As Range

   'Use the InputBox dialog to set the range for MyFunction, with some simple error handling.
   Set rng = Application.InputBox("Range:", Type:=8)
   If rng.Cells.Count <> 3 Then
     MsgBox "Length, width and height are needed -" & _
         vbLf & "please select three cells!"
      Exit Sub
   End If

   'Call MyFunction by value using the active cell.
   ActiveCell.Value = MyFunction(rng)
End Sub

Function MyFunction(rng As Range) As Double
   MyFunction = rng(1) * rng(2) * rng(3)
End Function
[!includeSupport and feedback]
The VBA Application.InputBox provides a dialog for you to get a response from the user.
You can specify the response type from the user. These include numbers, string, date and a range.
If you want to get a single piece of text or value from the user you can use the InputBox. The following code asks the user for a name and writes the user’s response to the Immediate Window(Ctrl + G to view)
' https://excelmacromastery.com/
Sub GetValue()

    Dim name As String
    name = Application.InputBox("Please enter your name")

    Debug.Print name

End Sub

Important
Confusingly there are two InputBoxes in Excel VBA.
- Application.InputBox
- InputBox(also calledVBA.InputBox)
They are almost the same except that:
- Application.InputBox allows you to specify the variable type of result e.g. String, integer, date, range.
- The Application.InputBox parameters Left and Top are not used by VBA.
In, the example below, the Application.InputBox allows you to specify the type but the VBA.InputBox doesn’t:
number = VBA.InputBox("Enter Number")

number = Application.InputBox("Enter number", Type:=1) ' The type is number
In this article, we will be dealing primarily with the Application.InputBox.
InputBox Syntax
InputBox Prompt, Title, default , Left, Top, Helpfile, Helpfilecontextid, Type
Note that Prompt is the only parameter that is required. The others are optional. See the next section for more info.
InputBox Parameters
Prompt – this is the text displayed by the InputBox e.g. “Please enter a number between one and ten”, “Please select a range”.
Title[optional] – this is the text that is displayed in the title bar of the InputBox.
Default[optional]– this will be the response if no response is entered by the user.
Left[optional] – not used. If you need to position the InputBox you need to use the VBA.InputBox.
Top[optional] – not used. If you need to position the InputBox you need to use the VBA.InputBox.
Helpfile[optional] – specifies a related help file if your application has one(hint: it probably doesn’t unless it is a legacy application.)
Helpfilecontextidl[optional] – specifies a position in the help file.
Type[optional] – specifies the type of value that will be returned. If this parameter is not used then the return type is text. See below for a list of options for this parameter.
What makes using the InputBox simple is that you really only need to use 4 of these parameters, namely prompt, title, default and type.
VBA Optional Parameters
As, we saw in the above section, VBA has a lot of optional parameters. Sometimes we want to use an optional parameter but don’t need the optional parameters before it. We can deal with this in two ways:
- Leave the other optional parameters blank.
- Use the name of the parameter.
Here are examples of each method:
' Method 1: Using blank parameters
Number = Application.InputBox("Enter number", , 99)
Number = Application.InputBox("Enter number", , 99, , , , , 1)

' Method 2: Naming the parameters
Number = Application.InputBox("Enter number", Default:=99)
Number = Application.InputBox("Enter number", Default:=99, Type:=Number)
You can see that naming the parameters is a better idea as it makes the code much more readable and understandable.
InputBox Title Parameter
The Title parameter simply allows you to see the Title of the InputBox dialog. The following examples shows this:
Dim year As Long
year = Application.InputBox("Enter the Year", Title:="Customer Report")

InputBox Default Parameter
The default value is simply the value that will be returned if the user does not enter a value. This value is displayed in the InputBox when it appears.
When the following code runs, the value Apple is displayed in the InputBox when it appears:
Dim fruit As Long
fruit = Application.InputBox("Please enter fruit", Default:="Apple")

InputBox Type Parameter Options
| Value | Type |
|---|---|
| 0 | Formula |
| 1 | Number |
| 2 | String |
| 4 | Boolean — True or False |
| 8 | Range |
| 16 | An error value like #N/A |
| 64 | Array of values |
You can create your own constants for the Type parameter if you want your code to be more readable:
Public Enum appInputBox
    IBFormula = 0
    IBNumber = 1
    IBString = 2
    IBBoolean = 4
    IBRange = 8
    IBError = 16
    IBArray = 64
End Enum
You can then use them like this:
year = Application.InputBox("Enter the Year", Type:=IBNumber)
year = Application.InputBox("Enter your name", Type:=IBString)
Getting the Range
To get a range from the user we set Type to 8.
If we set the return variable to be a range we must use the Set keyword like in this example:
Dim rg As Range
Set rg = Application.InputBox("Enter the Year", Type:=8)
If you leave out the Set keyword you will get the runtime error 91: “object variable or with block not set”.
In VBA we can declare the variable as a variant in VBA. This means that VBA will set the type at runtime:
' In both cases the variable will be a variant
Dim rg1 As Variant
Dim rg2
If we replace the Set keyword with a variant then the InputBox will return an array of values instead of the range object:
Dim rg As Variant

' Returns an array of values
rg = Application.InputBox("Enter the Year", Type:=8)

' Returns the range object
Set rg = Application.InputBox("Enter the Year", Type:=8)
Cancelling the Range
One problem with selecting the range is that if the user clicks cancel then VBA gives an error.
There is no nice way around this. We have to turn off errors and then check the return value. We can do it like this:
' https://excelmacromastery.com/
Sub UseInputBox()

    Dim rg As Range

    ' Turn off errors
    On Error Resume Next

    Set rg = Application.InputBox("Please enter Range", Type:=8)

    ' Turn on errors
    On Error Goto 0

    ' Display the result
    If rg Is Nothing Then
        MsgBox "The range was cancelled"
    Else
        MsgBox "The selected range is " & rg.Address
    End If

End Sub
Related Reading
VBA Message Box
VBA UserForm – A Guide for Everyone
VBA UserForm Controls – A Guide for Everyone
What’s Next?
Free VBA Tutorial If you are new to VBA or you want to sharpen your existing VBA skills then why not try out The Ultimate VBA Tutorial.
Related Training: Get full access to the Excel VBA training webinars.
(NOTE: Planning to build or manage a VBA Application? Learn how to build 10 Excel VBA applications from scratch.)
Excel VBA InputBox
VBA InputBox is an inbuilt function used to get a value from the user. This function has two major arguments: the heading for the input box and the question for the input box. The InputBox function can store only the data types input that its variable can hold.
Often in Excel, we use the data already in the Excel sheet. However, sometimes we need some input data from users as well. Especially in VBA, input from the user is required frequently.
Using InputBox, we can get the data from the user and use it for our purpose. An InputBox will ask the user to enter the value by displaying the InputBox.
Table of contents
- Excel VBA InputBox
- Syntax
- How to Create InputBox in VBA?
- Store the Value of InputBox to Cells
- Validation of Input from User
- Things to Remember
- Recommended Articles
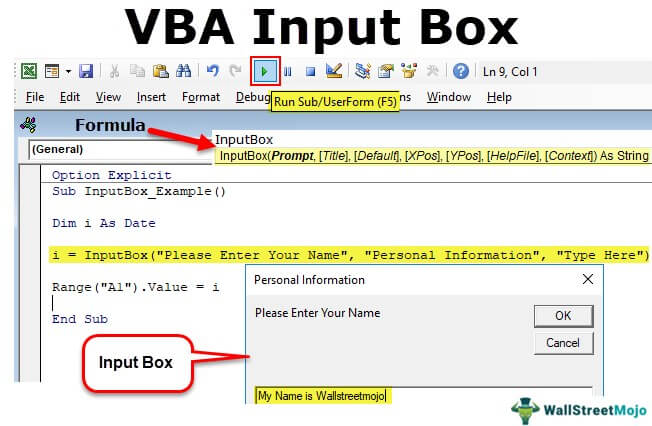
You are free to use this image on your website, templates, etc, Please provide us with an attribution linkArticle Link to be Hyperlinked
For eg:
Source: VBA InputBox (wallstreetmojo.com)
Syntax
![]()
- Prompt: This is nothing but the message to the user through an InputBox.
- Title: What is the title of the InputBox?
- Default: What is the default value of the InputBox? This value appears in the typing area of the InputBox.
These three parameters are good enough in Excel. Ignore the other four optional parameters. To understand this syntax, look at the below screenshot.

How to Create InputBox in VBA?
Let us jump straight to practicality. Follow the below steps to create your first ever InputBox.
You can download this VBA InputBox Excel Template here – VBA InputBox Excel Template
Step 1: Go to VBE (Visual Basic Editor), and insert a new module

Step 2: Double click on the inserted module and create a macro name.

Step 3: Start typing the word “InputBox” you will see related options.
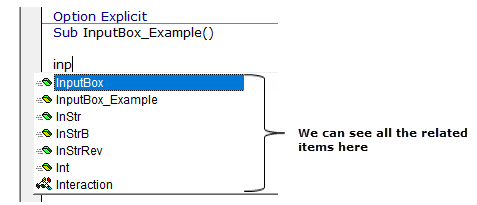
Step 4: Select the InputBox and give space, and you will see the syntax of the InputBox.

Step 5: Give the prompt “Please Enter Your Name.”

Step 6: Type the title of the InputBox as “Personal Information.”

Step 7: Type the default value as “Type here.”

Step 8: We have completed it now. Run this code and see your first InputBox.


Store the Value of InputBox to Cells
Now, we will go through the process of storing values in cells. Follow the below steps.
Step 1: Declaring the variable as Variant.
Code:
Sub InputBox_Example()

Dim i As Variant

End Sub
Step 2: For this variable, assign the value through the InputBox.
Code:
Sub InputBox_Example()

Dim i As Variant

i = InputBox("Please Enter Your Name", "Personal Information", "Type Here")

End Sub
Note: Once the InputBox comes to the right of the equal sign, we need to enter the arguments or syntax in brackets like our regular formulas.
Step 3: Now, whatever the value typed in the input box, we need to store it in cell A1. So for this, write the code as Range (“A1”).Value = i
Code:
Sub InputBox_Example()

Dim i As Variant

i = InputBox("Please Enter Your Name", "Personal Information", "Type Here")

Range("A1").Value = i

End Sub
We have completed it now. Let us run this code now by pressing the F5 key, or you can also run the code manually, as shown in the below screenshot.
As soon as you run this code, we will see the inputbox.

Type the name and click on “OK.”

As soon as you type the name and click “OK,” you will see the InputBox value in cell A1.

Note: We can store any value from the inputbox if the variable is defined properly. In the above example, we have defined the variable as a Variant that can hold all data types.
For example, now we have changed the variable type to Date.
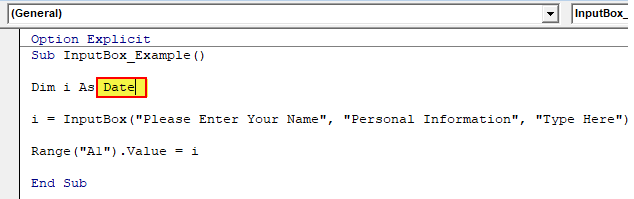
Now, run the code and type other than the date.

Click on “OK” and see what the response is.

We got the error value as Type mismatch. Since we have declared the variable data type DATE, we cannot store anything other than DATE with an InputBox.
Now, enter the date and see what happens.

As soon as you type the date, click on “OK” and see what the response is.

Since we entered the correct value, we got the result in the cell.
Validation of Input from User
You know what? We can allow users to enter only specific values, i.e., allow the user to enter only text, only numbers, only logical values, etc.
To perform this task, we need to use the method Application.InputBox.
Let us look at the syntax of the Application.InputBox.
![]()
- Prompt: This is nothing but the message to the user through an InputBox.
- Title: What is the title of the InputBox?
- Default: What is the default value of the InputBox? This value appears in the typing area of the InputBox.
- Left: What should be the x position of the InputBox in the current window?
- Top: What should be the y position of the InputBox in the current window?
For starting, the InputBox declares a variable and assigns the value to a variable.

Now, assign a value to start the word Application.

After the word “Application,” put a dot (.) and type “InputBox.”

Then, select the input box and open the bracket.

As usual, enter Prompt, Title, and Default Value.

Now ignore left, top, help file, and help context ID by typing 5 commas (,).

Here, “Type” means what should be the input string. Below are the validations available.

So, accordingly, select your type. We have selected 1 as the parameter, i.e., only numbers.

Now, run the code and type of text value.

Click on “OK” and see what happens.

It says the number is not valid. So, we can enter only numbers in this InputBox.
Things to Remember
- We need a variable to store the value given by the input box.
- If you are using InputBox without the Application method, you should be perfect about the variable data type.
- Use Variant data type, which can hold any data type and store it.
Recommended Articles
This article has been a guide to VBA InputBox Function. Here, we learn how to create a VBA InputBox and process the stored values, along with some practical examples and a downloadable Excel template. Below are some useful Excel articles related to VBA: –
- UBOUND VBAUBOUND, also known as Upper Bound, is a VBA function that is used in conjunction with its opposite function, LBOUND, also known as Lower Bound. This function is used to determine the length of an array in a code, and as the name suggests, UBOUND is used to define the array’s upper limit.read more
- VBA MsgBox ExamplesVBA MsgBox function is an output function which displays the generalized message provided by the developer. This statement has no arguments and the personalized messages in this function are written under the double quotes while for the values the variable reference is provided.read more
- What is Combo Box in Excel?Combo Box in Excel is a type of data validation tool that can create a dropdown list for the user to select from the pre-determined list. It is a form control which is available in the insert tab of the developer’s tab.read more
- VBA ComboBoxIn VBA, a ComboBox is a user form feature that restricts the user to the response type that is intended. As a result, the data is in a logical order. read more
- VBA Send Email from ExcelWe can use VBA to automate our mailing feature in Excel to send emails to multiple users at once. To use Outlook features, we must first enable outlook scripting in VBA, and then use the application method.read more
В этой заметке описываются методы создания пользовательских диалоговых окон, которые существенно расширяют стандартные возможности Excel. Диалоговые окна – это наиболее важный элемент пользовательского интерфейса в Windows. Они применяются практически в каждом приложении Windows, и большинство пользователей неплохо представляет, как они работают. Разработчики Excel создают пользовательские диалоговые окна с помощью пользовательских форм (UserForm). Кроме того, в VBA имеются средства, обеспечивающие создание типовых диалоговых окон.[1]

Рис. 1. Работа процедуры GetName
Скачать заметку в формате Word или pdf, примеры в архиве
Перед тем как приступить к изучению тонкостей создания диалоговых окон на основе пользовательских форм, следует научиться использовать некоторые встроенные инструменты Excel, предназначенные для вывода диалоговых окон.
Использование окон ввода данных
Окно ввода данных — это простое диалоговое окно, которое позволяет пользователю ввести одно значение. Например, можно применить окно ввода данных, чтобы предоставить пользователю возможность ввести текст, число или диапазон значений. Для создания окна ввода предназначены две функции InputBox: одна— в VBA, а вторая является методом объекта Application.
Функция InputBox в VBA
Функция имеет следующий синтаксис:
InputBox(запрос [, заголовок] [, по_умолчанию] [, xpos] [, ypos] [, справка, раздел])
- Запрос. Указывает текст, отображаемый в окне ввода (обязательный параметр).
- Заголовок. Определяет заголовок окна ввода (необязательный параметр).
- По_умолчанию. Задает значение, которое отображается в окне ввода по умолчанию (необязательный параметр).
- xpos, ypos. Определяют координаты верхнего левого угла окна ввода на экране (необязательные параметры).
- Справка, раздел. Указывают файл и раздел в справочной системе (необязательные параметры).
Функция InputBox запрашивает у пользователя одно значение. Она всегда возвращает строку, поэтому результат нужно будет преобразовать в числовое значение. Текст, отображаемый в окне ввода, может достигать 1024 символов (длину допускается изменять в зависимости от ширины используемых символов). Если определить раздел справочной системы, то в диалоговом окне будет отображена кнопка Справка.
Процедура GetName запрашивает у пользователя полное имя (имя и фамилию). Затем программа выделяет имя и отображает приветствие в окне сообщения (см. рис. 1; код функции можно найти в файле VBA inputbox.xlsm).
|
Sub GetName() Dim UserName As String Dim FirstSpace As Integer Do Until UserName <> «» UserName = InputBox(«Укажите имя и фамилию: «, _ «Назовите себя») Loop FirstSpace = InStr(UserName, » «) If FirstSpace <> 0 Then UserName = Left(UserName, FirstSpace — 1) End If MsgBox «Привет « & UserName End Sub |
Обратите внимание: функция InputBox вызывается в цикле Do Until. Это позволяет убедиться в том, что данные введены в окно. Если пользователь щелкнет на кнопке Отмена или не введет текст, то переменная UserName будет содержать пустую строку, а окно ввода данных появится повторно. Далее в процедуре будет предпринята попытка получить имя пользователя путем поиска первого символа пробела (для этого применяется функция InStr). Таким образом, можно воспользоваться функцией Left для получения всех символов, расположенных слева от символа пробела. Если символ пробела не найден, то используется все введенное имя.
Если строка, предоставленная в качестве результата выполнения функции InputBox, выглядит как число, ее можно преобразовать с помощью функции VBA Val.
В процедуре GetWord пользователю предлагается ввести пропущенное слово (рис. 2). Этот пример также иллюстрирует применение именованных аргументов (р и t). Текст запроса выбирается из ячейки А1 рабочего листа.
|
Sub GetWord() Dim TheWord As String Dim p As String Dim t As String p = Range(«A1») t = «Какое слово пропущено?» TheWord = InputBox(prompt:=p, Title:=t) If UCase(TheWord) = «ВОДОКАЧКУ» Then MsgBox «Верно.» Else MsgBox «Не верно.» End If End Sub |

Рис. 2. Использование функции VBA inputBox, отображающей запрос
Метод Excel InputBox
Метод Excel InputBox по сравнению с функцией VBA InputBox предоставляет три преимущества:
- возможность задать тип возвращаемого значения;
- возможность указать диапазон листа путем выделения с помощью мыши;
- автоматическая проверка правильности введенных данных.
Метод InputBox имеет следующий синтаксис.
InputBox(запрос, [, заголовок], [, по_умолчанию], [, слева], [, сверху], [, справка, раздел], [, тип])
- Запрос. Указывает текст, отображаемый в окне ввода (обязательный параметр).
- Заголовок. Определяет заголовок окна ввода (необязательный параметр).
- По_умолчанию. Задает значение, которое отображается в окне ввода по умолчанию (необязательный параметр).
- Слева, сверху. Определяют координаты верхнего левого угла окна ввода на экране (необязательные параметры).
- Справка, раздел. Указывают файл и раздел в справочной системе (необязательные параметры).
- Тип. Указывает код типа данных, который будет возвращаться методом (необязательный параметр; значения см. рис. 3).

Рис. 3. Коды типов данных, возвращаемые методом Excel InputBox
Используя сумму приведенных выше значений, можно возвратить несколько типов данных. Например, для отображения окна ввода, которое принимает текстовый или числовой тип данных, установите код равным 3 (1 + 2 или число + текст). Если в качестве кода типа данных применить значение 8, то пользователь сможет ввести в поле адрес ячейки или диапазона ячеек. Пользователь также можент выбрать диапазон на текущем рабочем листе.
В процедуре EraseRange используется метод InputBox. Пользователь может указать удаляемый диапазон (рис. 4). Адрес диапазона вводится в окно вручную, или выделяется мышью на листе. Метод InputBox с кодом 8 возвращает объект Range (обратите внимание на ключевое слово Set). После этого выбранный диапазон очищается (с помощью метода Clear). По умолчанию в поле окна ввода отображается адрес текущей выделенной ячейки. Если в окне ввода щелкнуть на кнопке Отмена, то оператор On Error завершит процедуру.
|
Sub EraseRange() Dim UserRange As Range On Error GoTo Canceled Set UserRange = Application.InputBox _ (Prompt:=«Удаляемый диапазон:», _ Title:=«Удаление диапазона», _ Default:=Selection.Address, _ Type:=8) UserRange.Clear UserRange.Select Canceled: End Sub |

Рис. 4. Пример использования метода InputBox для выбора диапазона
Если в процедуре EraseRange ввести не диапазон адресов, то Excel отобразит сообщение (рис. 5) и позволит пользователю повторить ввод данных.

Рис. 5. Метод InputBox автоматически проверяет вводимые данные
Функция VBA MsgBox
Функция VBA MsgBox служит для отображения сообщения. Также она передает результат щелчка на кнопке ОК или Отмена). Синтаксис функции:
MsgBox(запрос[, кнопки][, заголовок][, справка, раздел])
- Запрос. Определяет текст, который будет отображаться в окне сообщения (обязательный параметр).
- Кнопки. Содержит числовое выражение (или константу), которое определяет кнопки, отображаемые в окне сообщения (необязательный параметр; рис. 6). Также можно задать кнопку по умолчанию.
- Заголовок. Содержит заголовок окна сообщения (необязательный параметр).
- Справка, раздел. Указывают файл и раздел справочной системы (необязательные параметры).

Рис. 6. Константы и значения, используемые для выбора кнопок в функции MsgBox
Первая группа значений (0–5) описывает номер и тип кнопок в диалоговом окне. Вторая группа (16, 32, 48, 64) описывает стиль значка. Третья группа (0, 256, 512) определяет, какая кнопка назначена по умолчанию. Четвертая группа (0, 4096) определяет модальность окна сообщения. Пятая указывает, показывать ли окно сообщений поверх других окон, устанавливает выравнивание и направление текста. В процессе сложения чисел для получения окончательного значения аргумента Buttons следует использовать только одно число из каждой группы.
Можно использовать функцию MsgBox в качестве процедуры (для отображения сообщения), а также присвоить возвращаемое этой функцией значение переменной. Функция MsgBox возвращает результат, представляющий кнопку, на которой щелкнул пользователь. В следующем примере отображается сообщение и не возвращается результат (код функций, приведенных в этом разделе см. также в файле VBA msgbox.xlsm).
|
Sub MsgBoxDemo() MsgBox «При выполнении макроса ошибок не произошло.» End Sub |
Чтобы получить результат из окна сообщения, присвойте возвращаемое функцией MsgBox значение переменной. В следующем коде используется ряд встроенных констант (рис. 7), которые упрощают управление возвращаемыми функцией MsgBox значениями.
|
Sub GetAnswer() Dim Ans As Integer Ans = MsgBox(«Продолжать?», vbYesNo) Select Case Ans Case vbYes ‘ … [код при Ans равно Yes] Case vbNo ‘ ... [код при Ans равно No] End Select End Sub |

Рис. 7. Константы, возвращаемые MsgBox
Функция MsgBox возвращает переменную, имеющую тип Integer. Вам необязательно использовать переменную для хранения результата выполнения функции MsgBox. Следующая процедура представляет собой вариацию процедуры GetAnswer.
|
Sub GetAnswer2() If MsgBox(«Продолжать?», vbYesNo) = vbYes Then ‘ … [код при Ans равно Yes] Else ‘ ... [код при Ans равно No] End If End Sub |
В следующем примере функции используется комбинация констант для отображения окна сообщения с кнопками Да, Нет и знаком вопроса (рис. 8). Вторая кнопка (Нет) используется по умолчанию. Для простоты константы добавлены в переменную Config.
|
Private Function ContinueProcedure() As Boolean Dim Config As Integer Dim Ans As Integer Config = vbYesNo + vbQuestion + vbDefaultButton2 Ans = MsgBox(«Произошла ошибка. Продолжить?», Config) If Ans = vbYes Then ContinueProcedure = True _ Else ContinueProcedure = False End Function |

Рис. 8. Параметр Кнопки функции MsgBox определяет кнопки, которые отображаются в окне сообщения
В файле VBA msgbox.xlsm функция ContinueProcedure в демонстрационных целях представлена в виде процедуры. Функция ContinueProcedure может вызываться из другой процедуры. Например, оператор
If Not ContinueProcedure() Then Exit Sub
вызывает функцию ContinueProcedure (которая отображает окно сообщения). Если функция возвращает значение ЛОЖЬ (т.е. пользователь щелкнул на кнопке Нет), то процедура будет завершена. В противном случае выполняется следующий оператор.
Если в сообщении необходимо указать разрыв строки (рис. 9), воспользуйтесь константой vbCrLf (или vbNewLine):
|
Sub MultiLine() Dim Msg As String Msg = «Это первая строка.» & vbCrLf & vbNewLine Msg = Msg & «Вторая строка.» & vbCrLf Msg = Msg & «Третья строка.» MsgBox Msg End Sub |

Рис. 9. Разбиение сообщения на несколько строк
Для включения в сообщение символа табуляции применяется константа vbTab. В процедуре ShowRange окно сообщения используется для отображения диапазона значений размером 10 строк на 3 столбца — ячейки А1:С10 (рис. 10). В этом случае столбцы разделены с помощью константы vbTab. Новые строки вставляются с помощью константы vbCrLf. Функция MsgBox принимает в качестве параметра строку, длина которой не превышает 1023 символов. Такая длина задает ограничение на количество ячеек, которое можно отобразить в сообщении.
|
Sub ShowRange() Dim Msg As String Dim r As Integer, c As Integer Msg = «» For r = 1 To 10 For c = 1 To 3 Msg = Msg & Cells(r, c).Text If c <> 3 Then Msg = Msg & vbTab Next c Msg = Msg & vbCrLf Next r MsgBox Msg End Sub |

Рис. 10. Текст в этом окне сообщения содержит символы табуляции и разрыва строк
Метод Excel GetOpenFilename
Если приложению необходимо получить от пользователя имя файла, то можно воспользоваться функцией InputBox, но этот подход часто приводит к возникновению ошибок. Более надежным считается использование метода GetOpenFilename объекта Application, который позволяет удостовериться, что приложение получило корректное имя файла (а также его полный путь). Данный метод позволяет отобразить стандартное диалоговое окно Открытие документа, но при этом указанный файл не открывается. Вместо этого метод возвращает строку, которая содержит путь и имя файла, выбранные пользователем. По окончании данного процесса с именем файла можно делать все что угодно. Синтаксис (все параметры необязательные):
Application.GetOpenFilename(фильтр_файла, индекс_фильтра, заголовок, множественный_выбор)
- Фильтр_файла. Содержит строку, определяющую критерий фильтрации файлов (необязательный параметр).
- Индекс_фильтра. Указывает индексный номер того критерия фильтрации файлов, который используется по умолчанию (необязательный параметр).
- Заголовок. Содержит заголовок диалогового окна (необязательный параметр). Если этот параметр не указать, то будет использован заголовок Открытие документа.
- Множественный_выбор. Необязательный параметр. Если он имеет значение ИСТИНА, можно выбрать несколько имен файлов. Имя каждого файла заносится в массив. По умолчанию данный параметр имеет значение ЛОЖЬ.
Аргумент Фильтр_файла определяет содержимое раскрывающегося списка Тип файлов, находящегося в окне Открытие документа. Аргумент состоит из строки, определяющей отображаемое значение, а также строки действительной спецификации типа файлов, в которой находятся групповые символы. Оба элемента аргумента разделены запятыми. Если этот аргумент не указывать, то будет использовано значение, заданное по умолчанию: "Все файлы (*.*),*.*". Первая часть строки Все файлы (*.*) – то текст, отображаемый в раскрывающемся списке тип файлов. Вторая часть строки *.* указывает тип отображаемых файлов.
В следующих инструкциях переменной Filt присваивается строковое значение. Эта строка впоследствии используется в качестве аргумента фильтр_файла метода GetOpenFilename. В данном случае диалоговое окно предоставит пользователю возможность выбрать один из четырех типов файлов (кроме варианта Все файлы). Если задать значение переменной Filt, то будет использоваться оператор конкатенации строки VBA. Этот способ упрощает управление громоздкими и сложными аргументами.
|
Filt = «Текстовые файлы (*.txt),*.txt,» & _ «Файлы Lotus (*.prn),*.prn,» & _ «Файлы, разделенные запятой (*.csv),*.csv,» & _ «Файлы ASCII (*.asc),*.asc,» & _ «Все файлы (*.*),*.*» |
В следующем примере у пользователя запрашивается имя файла. При этом в поле типа файлов используются пять фильтров (код содержится в файле prompt for file.xlsm).
|
1 2 3 4 5 6 7 8 9 10 11 12 13 14 15 16 17 18 19 20 21 22 23 24 25 26 27 28 29 30 31 32 33 34 |
Sub GetImportFileName() Dim Filt As String Dim FilterIndex As Integer Dim FileName As Variant Dim Title As String ‘ Настройка списка фильтров Filt = «Text Files (*.txt),*.txt,» & _ «Lotus Files (*.prn),*.prn,» & _ «Comma Separated Files (*.csv),*.csv,» & _ «ASCII Files (*.asc),*.asc,» & _ «Все файлы (*.*),*.*» ‘ Отображает *.* по умолчанию FilterIndex = 3 ‘ Настройка заголовка диалогового окна Title = «Выберите файл для импорта» ‘ Получение имени файла FileName = Application.GetOpenFilename _ (FileFilter:=Filt, _ FilterIndex:=FilterIndex, _ Title:=Title) ‘ При отмене выйти из окна If FileName = False Then MsgBox «Файл не выбран.» Exit Sub End If ‘ Отображение полного имени и пути MsgBox «Вы выбрали « & FileName End Sub |
На рис. 11 показано диалоговое окно, которое выводится на экран после выполнения этой процедуры (по умолчанию предлагается фильтр *.csv).

Рис. 11. Метод GetOpenFilename отображает диалоговое окно, в котором выбирается файл
В следующем примере пользователь может, удерживая нажатыми клавиши <Shift> и <Ctrl>, выбрать в окне несколько файлов. Обратите внимание, что событие использования кнопки Отмена определяется по наличию переменной массива FileName. Если пользователь не щелкнул на кнопке Отмена, то результирующий массив будет состоять как минимум из одного элемента. В этом примере список выбранных файлов отображается в окне сообщения.
|
1 2 3 4 5 6 7 8 9 10 11 12 13 14 15 16 17 18 19 20 21 22 23 24 25 26 27 28 29 30 31 32 33 34 35 36 37 38 |
Sub GetImportFileName2() Dim Filt As String Dim FilterIndex As Integer Dim FileName As Variant Dim Title As String Dim i As Integer Dim Msg As String ‘ Установка списка фильтров файлов Filt = «Text Files (*.txt),*.txt,» & _ «Lotus Files (*.prn),*.prn,» & _ «Comma Separated Files (*.csv),*.csv,» & _ «ASCII Files (*.asc),*.asc,» & _ «All Files (*.*),*.*» ‘ Отображает *.* по умолчанию FilterIndex = 5 ‘ Настройка заголовка диалогового окна Title = «Выберите файл для импорта» ‘ Получение имени файла FileName = Application.GetOpenFilename _ (FileFilter:=Filt, _ FilterIndex:=FilterIndex, _ Title:=Title, _ MultiSelect:=True) ‘ Выход в случае отмены работы с диалоговым окном If Not IsArray(FileName) Then MsgBox «Файл не выбран.» Exit Sub End If ‘ Отображение полного пути и имени файлов For i = LBound(FileName) To UBound(FileName) Msg = Msg & FileName(i) & vbCrLf Next i MsgBox «Было выбрано:» & vbCrLf & Msg End Sub |
Обратите внимание: переменная FileName определена как массив переменного типа (а не как строка в предыдущем примере). Причина заключается в том, что потенциально FileName может содержать массив значений, а не только одну строку.
Метод Excel GetSaveAsFilename
Данный метод отображает диалоговое окно Сохранение документа и дает пользователю возможность выбрать (или указать) имя сохраняемого файла. В результате возвращается имя файла, но никакие действия не предпринимаются. Синтаксис (все параметры необязательные):
Application.GetSaveAsFilename(начальное_имя, фильтр_файла, индекс_фильтра, заголовок, текст_кнопки)
- Начальное_имя. Указывает предполагаемое имя файла.
- Фильтр_файла. Содержит критерий фильтрации отображаемых в окне файлов.
- Индекс_фильтра. Код критерия фильтрации файлов, который используется по умолчанию.
- Заголовок. Определяет текст заголовка диалогового окна.
Получение имени папки
Для того чтобы получить имя файла, проще всего воспользоваться описанным выше методом GetOpenFileName. Но если нужно получить лишь имя папки (без названия файла), лучше воспользоваться методом объекта Excel FileDialog. Следующая процедура отображает диалоговое окно, в котором можно выбрать папку (см. также файл get directory.xlsm). С помощью функции MsgBox отображается имя выбранной папки (или сообщение Отменено).
|
Sub GetAFolder() With Application.FileDialog(msoFileDialogFolderPicker) .InitialFileName = Application.DefaultFilePath & «» .Title = «Выберите местоположение резервной копии.« .Show If .SelectedItems.Count = 0 Then MsgBox «Отменено» Else MsgBox .SelectedItems(1) End If End With End Sub |
Объект FileDialog позволяет определить начальную папку путем указания значения свойства InitialFileName. В примере в качестве начальной папки применяется путь к файлам Excel, заданный по умолчанию.
Отображение диалоговых окон Excel
Создаваемый вами код VBA может вызывать на выполнение многие команды Excel, находящиеся на ленте. И если в результате выполнения команды открывается диалоговое окно, ваш код может делать выбор в диалоговом окне (даже если само диалоговое окно не отображается). Например, следующая инструкция VBA эквивалентна выбору команды Главная –> Редактирование –> Найти и выделить –> Перейти и указанию диапазона ячеек А1:СЗ с последующим щелчком на кнопке ОК. Но само диалоговое окно Переход при этом не отображается (именно это и нужно).
Application.Goto Reference:=Range("А1:СЗ")
Иногда же приходится отображать встроенные окна Excel, чтобы пользователь мог сделать свой выбор. Для этого используется коллекция Dialogs объекта Application. Учтите, что в настоящее время компания Microsoft прекратила поддержу этого свойства. В предыдущих версиях Excel пользовательские меню и панели инструментов создавались с помощью объекта CommandBar. В версиях Excel 2007 и Excel 2010 этот объект по-прежнему доступен, хотя и работает не так, как раньше. Начиная с версии Excel 2007 возможности объекта CommandBar были существенно расширены. В частности, объект CommandBar можно использовать для вызова команд ленты с помощью VBA. Многие из команд, доступ к которым открывается с помощью ленты, отображают диалоговое окно. Например, следующая инструкция отображает диалоговое окно Вывод на экран скрытого листа (рис. 12; см. также файл ribbon control names.xlsm):
Application.CommandBars.ExecuteMso("SheetUnhide")

Рис. 12. Диалоговое окно, отображаемое в результате выполнения указанного выше оператора
Метод ExecuteMso принимает лишь один аргумент, idMso, который представляет элемент управления ленты. К сожалению, сведения о многих параметрах в справочной системе отсутствуют.
В файле ribbon control names.xlsm описаны все названия параметров команд ленты Excel. Поэкспериментируйте с параметрами, перечисленными в этой рабочей книге. Многие из них вызывают команды немедленно (без промежуточных диалоговых окон). Но большинство из них генерирует ошибку при использовании в неправильном контексте. Например, Excel отображает сообщение об ошибке, если команда Functionwizard вызывается в случае выбора диаграммы.
В результате выполнения следующего оператора отображается вкладка Шрифт диалогового окна Формат ячеек:
Application.CommandBars.ExecuteMso("FormatCellsFontDialog")
На самом деле пользоваться объектами CommandBar не стоит, поскольку вряд ли они будут поддерживаться в будущих версиях Excel.
Отображение формы ввода данных
Многие пользователи применяют Excel для управления списками, информация в которых ранжирована по строкам. В Excel поддерживается простой способ работы с подобными типами данных с помощью встроенных форм ввода данных, которые могут создаваться автоматически. Подобная форма предназначена для работы как с обычным диапазоном, так и с диапазоном, оформленным в виде таблицы (с помощью команды Вставка –> Таблицы –> Таблица). Пример формы ввода данных показан на рис. 13 (см. также файл data form example.xlsm).

Рис. 13. Некоторые пользователи предпочитают применять встроенные формы ввода данных Excel для ввода сведений; чтобы увеличить изображение кликните на нем правой кнопкой мыши и выберите Открыть картинку в новой вкладке
В силу каких-то неизвестных причин на ленте Excel отсутствует команда, обеспечивающая доступ к форме ввода данных. Подобную команду можно добавить на панель быстрого доступа. Для этого выполните следующие действия.
- Щелкните правой кнопкой мыши на панели быстрого доступа и в контекстном меню выберите параметр Настройка панели быстрого доступа.
- На экране появится вкладка Панель быстрого доступа диалогового окна Параметры Excel.
- В раскрывающемся списке Выбрать команды из выберите параметр Команды не на ленте.
- В появившемся списке выберите параметр Форма.
- Щелкните на кнопке Добавить для добавления выбранной команды на панель быстрого доступа.
- Щелкните на кнопке ОК для закрытия диалогового окна Параметры Excel.
После выполнения перечисленных выше действий на панели быстрого доступа появится новый значок.
Для работы с формой ввода данных следует структурировать данные таким образом, чтобы Excel распознавал их в виде таблицы. Начните с указания заголовков столбцов в первой строке диапазона вводимых данных. Выделите любую ячейку в таблице и щелкните на кнопке Форма панели быстрого доступа. Excel отображает диалоговое окно, в котором будут вводиться данные. Для перемещения между текстовыми полями в целях ввода информации используйте клавишу <Tab>. Если ячейка содержит формулу, результат вычислений отображается в виде текста (а не в формате поля ввода данных). Другими словами, невозможно изменить формулы с помощью формы ввода данных.
По завершении ввода данных в форму щелкните на кнопке Создать. После этого Excel вводит данные в строку рабочего листа, а также очищает диалоговое окно для ввода следующей строки данных.
Используйте метод ShowDataForm для отображения формы ввода данных Excel. Единственное требование заключается в том, что активная ячейка должна находиться в диапазоне. Следующий код активизирует ячейку А1 (в таблице), а затем отображает форму ввода данных.
|
Sub DisplayDataForm() Range(«A1»).Select ActiveSheet.ShowDataForm End Sub |
[1] По материалам книги Джон Уокенбах. Excel 2010. Профессиональное программирование на VBA. – М: Диалектика, 2013. – С. 387–403.