
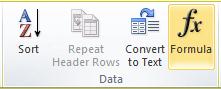
You can perform calculations and logical comparisons in a table by using formulas. The Formula command is found on the Table Tools, Layout tab, in the Data group.
A formula in Word automatically updates when you open the document that contains the formula. You can also update a formula result manually. For more information, see the section Update formula results.
Note: Formulas in Word or Outlook tables are a type of field code. For more information about field codes, see the See Also section.
In this article
-
Insert a formula in a table cell
-
Update formula results
-
Update the result of specific formulas
-
Update all the formula results in a table
-
Update all the formulas in a document
-
-
Examples: Sum numbers in a table by using positional arguments
-
Available functions
-
Use bookmarknames or cell references in a formula
-
RnCn references
-
A1 references
-
Insert a formula in a table cell
-
Select the table cell where you want your result. If the cell is not empty, delete its contents.
-
On the Table Tools, Layout tab, in the Data group, click Formula.
-
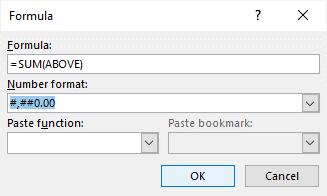
Use the Formula dialog box to create your formula. You can type in the Formula box, select a number format from the Number Format list, and paste in functions and bookmarks using the Paste Function and Paste Bookmark lists.
Update formula results
In Word, the result of a formula is calculated when it is inserted, and when the document containing the formula opens. In Outlook, the result of a formula is only calculated when it is inserted and won’t be available for the recipient of the email to edit.
You can also manually update:
-
The result of one or more specific formulas
-
The results of all formulas in a specific table
-
All the field codes in a document, including formulas
Update the result of specific formulas
-
Select the formulas that you want to update. You can select multiple formulas by holding down the CTRL key while you make selections.
-
Do one of the following:
-
Right-click the formula, then click Update field.
-
Press F9.
-
Update all the formula results in a table
-
Select the table that contains formula results that you want to update, and then press F9.
Update all the formulas in a document
Important: This procedure updates all the field codes in a document, not just formulas.
-
Press CTRL+A.
-
Press F9.
Examples: Sum numbers in a table by using positional arguments
You can use positional arguments (LEFT, RIGHT, ABOVE, BELOW) with these functions:
-
AVERAGE
-
COUNT
-
MAX
-
MIN
-
PRODUCT
-
SUM
As an example, consider the following procedure for adding numbers by using the SUM function and positional arguments.
Important: To avoid an error while summing in a table by using positional arguments, type a zero (0) in any empty cell that will be included in the calculation.
-
Select the table cell where you want your result. If the cell is not empty, delete its contents.
-
On the Table Tools, Layout tab, in the Data group, click Formula.
-
In the Formula dialog box, do one of the following:
|
To add the numbers… |
Type this in the Formula box |
|---|---|
|
Above the cell |
=SUM(ABOVE) |
|
Below the cell |
=SUM(BELOW) |
|
Above and below the cell |
=SUM(ABOVE,BELOW) |
|
Left of the cell |
=SUM(LEFT) |
|
Right of the cell |
=SUM(RIGHT) |
|
Left and right of the cell |
=SUM(LEFT,RIGHT) |
|
Left of and above the cell |
=SUM(LEFT,ABOVE) |
|
Right of and above the cell |
=SUM(RIGHT,ABOVE) |
|
Left of and below the cell |
=SUM(LEFT,BELOW) |
|
Right of and below the cell |
=SUM(RIGHT,BELOW) |
-
Click OK.
Available functions
Note: Formulas that use positional arguments (e.g., LEFT) do not include values in header rows.
The following functions are available for use in Word and Outlook table formulas:
|
Function |
What it does |
Example |
Returns |
|---|---|---|---|
|
ABS() |
Calculates the absolute value of the value inside the parentheses |
=ABS(-22) |
22 |
|
AND() |
Evaluates whether the arguments inside the parentheses are all TRUE. |
=AND(SUM(LEFT)<10,SUM(ABOVE)>=5) |
1, if the sum of the values to the left of the formula (in the same row) is less than 10 and the sum of the values above the formula (in the same column, excluding any header cell) is greater than or equal to 5; 0 otherwise. |
|
AVERAGE() |
Calculates the average of items identified inside the parentheses. |
=AVERAGE(RIGHT) |
The average of all values to the right of the formula cell, in the same row. |
|
COUNT() |
Calculates the count of items identified inside the parentheses. |
=COUNT(LEFT) |
The number of values to the left of the formula cell, in the same row. |
|
DEFINED() |
Evaluates whether the argument inside the parentheses is defined. Returns 1 if the argument has been defined and evaluates without error, 0 if the argument has not been defined or returns an error. |
=DEFINED(gross_income) |
1, if gross_income has been defined and evaluates without error; 0 otherwise. |
|
FALSE |
Takes no arguments. Always returns 0. |
=FALSE |
0 |
|
IF() |
Evaluates the first argument. Returns the second argument if the first argument is true; returns the third argument if the first argument is false. Note: Requires exactly three arguments. |
=IF(SUM(LEFT)>=10,10,0) |
10, if the sum of values to the left of the formula is at least 10; 0 otherwise. |
|
INT() |
Rounds the value inside the parentheses down to the nearest integer. |
=INT(5.67) |
5 |
|
MAX() |
Returns the maximum value of the items identified inside the parentheses. |
=MAX(ABOVE) |
The maximum value found in the cells above the formula (excluding any header rows). |
|
MIN() |
Returns the minimum value of the items identified inside the parentheses. |
=MIN(ABOVE) |
The minimum value found in the cells above the formula (excluding any header rows). |
|
MOD() |
Takes two arguments (must be numbers or evaluate to numbers). Returns the remainder after the second argument is divided by the first. If the remainder is 0 (zero), returns 0.0 |
=MOD(4,2) |
0.0 |
|
NOT() |
Takes one argument. Evaluates whether the argument is true. Returns 0 if the argument is true, 1 if the argument is false. Mostly used inside an IF formula. |
=NOT(1=1) |
0 |
|
OR() |
Takes two arguments. If either is true, returns 1. If both are false, returns 0. Mostly used inside an IF formula. |
=OR(1=1,1=5) |
1 |
|
PRODUCT() |
Calculates the product of items identified inside the parentheses. |
=PRODUCT(LEFT) |
The product of multiplying all the values found in the cells to the left of the formula. |
|
ROUND() |
Takes two arguments (first argument must be a number or evaluate to a number; second argument must be an integer or evaluate to an integer). Rounds the first argument to the number of digits specified by the second argument. If the second argument is greater than zero (0), first argument is rounded down to the specified number of digits. If second argument is zero (0), first argument is rounded down to the nearest integer. If second argument is negative, first argument is rounded down to the left of the decimal. |
=ROUND(123.456, 2) =ROUND(123.456, 0) =ROUND(123.456, -2) |
123.46 123 100 |
|
SIGN() |
Takes one argument that must either be a number or evaluate to a number. Evaluates whether the item identified inside the parentheses if greater than, equal to, or less than zero (0). Returns 1 if greater than zero, 0 if zero, -1 if less than zero. |
=SIGN(-11) |
-1 |
|
SUM() |
Calculates the sum of items identified inside the parentheses. |
=SUM(RIGHT) |
The sum of the values of the cells to the right of the formula. |
|
TRUE() |
Takes one argument. Evaluates whether the argument is true. Returns 1 if the argument is true, 0 if the argument is false. Mostly used inside an IF formula. |
=TRUE(1=0) |
0 |
Use bookmarknames or cell references in a formula
You can refer to a bookmarked cell by using its bookmarkname in a formula. For example, if you have bookmarked a cell that contains or evaluates to a number with the bookmarkname gross_income, the formula =ROUND(gross_income,0) rounds the value of that cell down to the nearest integer.
You can also use column and row references in a formula. There are two reference styles: RnCn and A1.
Note: The cell that contains the formula is not included in a calculation that uses a reference. If the cell is part of the reference, it is ignored.
RnCn references
You can refer to a table row, column, or cell in a formula by using the RnCn reference convention. In this convention, Rn refers to the nth row, and Cn refers to the nth column. For example, R1C2 refers to the cell that is in first row and the second column. The following table contains examples of this reference style.
|
To refer to… |
…use this reference style |
|---|---|
|
An entire column |
Cn |
|
An entire row |
Rn |
|
A specific cell |
RnCn |
|
The row that contains the formula |
R |
|
The column that contains the formula |
C |
|
All the cells between two specified cells |
RnCn:RnCn |
|
A cell in a bookmarked table |
Bookmarkname RnCn |
|
A range of cells in a bookmarked table |
Bookmarkname RnCn:RnCn |
A1 references
You can refer to a cell, a set of cells, or a range of cells by using the A1 reference convention. In this convention, the letter refers to the cell’s column and the number refers to the cell’s row. The first column in a table is column A; the first row is row 1. The following table contains examples of this reference style.
|
To refer to… |
…use this reference |
|---|---|
|
The cell in the first column and the second row |
A2 |
|
The first two cells in the first row |
A1,B1 |
|
All the cells in the first column and the first two cells in the second column |
A1:B2 |
Last updated 2015-8-29
See Also
Field codes in Word and Outlook
Create Calculations in Word Tables Using Formulas
by Avantix Learning Team | Updated October 9, 2021
Applies to: Microsoft® Word® 2013, 2016, 2019 or 365 (Windows)
You can insert formulas in Word tables to perform calculations. These formulas can include functions such as SUM or AVERAGE or basic operators. When you insert formulas in Word tables, you are really inserting fields so the fields will need to be updated if the data in the table changes. For more complex calculations, it’s usually best to create formulas in Excel where they will update automatically.
Formulas and functions in Word tables only work with numbers. You can’t perform text calculations or output text.
Recommended article: 3 Simple Ways to Copy or Import Excel Data into Word (Linked or Unlinked)
Note: Buttons and Ribbon tabs may display in a different way (with or without text) depending on your version of Word, the size of your screen and your Control Panel settings. For Word 365 users, Ribbon tabs may appear with different names. For example, the Table Tools Design tab may appear as Table Design.
To insert a formula in a cell in a Word table, you’ll need to use the Function command on the Table Tools Layout or Table Layout tab in the Ribbon:
Do you want to learn more about Microsoft Word? Check out our virtual classroom or live classroom Word courses >
Understanding formula syntax
When you insert a table in Word, each column and row are identified like cells in Excel worksheets and each cell is assigned a cell reference. In a Word table, the first column would be column A and the first row would be row 1 so the first cell would be identified as A1. Therefore, you can create calculations that refer to cells (such as =A1+A2).
In Word and Excel, you can use the same basic operators:
- addition (+)
- subtraction (-)
- multiplication (*)
- division (/)
Typically, formulas in Word tables are created using common functions such as SUM, AVERAGE, MIN, MAX or COUNT and refer to a range. They must start with an equal sign (=).
You can refer to ranges of cells using ABOVE, LEFT, RIGHT or BELOW as the arguments for functions. If you’re trying to sum the cells at the bottom of a column, the formula would be =SUM(ABOVE). You can also combine these arguments. For example, you could enter a formula =SUM(ABOVE,LEFT) and it would sum all cells that are above and to the left of that cell. Functions can also refer to cell references such as =SUM(C1:C10). You can also refer to individual cells such =SUM(B1,C1,D5).
Word tables can also perform more complex calculations using the IF function with the syntax =IF(test,true,false). For example, =IF(A5>=1000,0,50) could be used to calculate a shipping cost of 50 if orders are less than 1000. You can also use the AND and OR functions with the IF function.
Inserting a formula in a table
To insert a formula in a table:
- Click in the cell where you want to enter a formula.
- Click the Table Tools Layout or Table Layout tab in the Ribbon.
- Select Function (fx) in the Data group. A dialog box appears. Word will typically insert a function and arguments in the Formula box.
- If you want to accept the suggested formula, click OK. If you want to change the formula, click in the Formula box and enter a formula (starting with =). You can also choose other functions from the Paste Function drop-down menu.
- If necessary, select a format from the Format drop-down menu.
- Click OK. Word inserts the formula as a field and displays the results.
The Function dialog box appears as follows with a formula and a format selected:
Updating a formula
If the original data changes, you can right-click the Formula field and select Update from the drop-down menu or press F9. If you want to update all formulas in a table, select all of the cells in the table and press F9. To select the entire table, click the four arrows on the top left of the table.
Changing a formula
To change a formula in a table:
- Right-click the formula or error. A drop-down menu appears.
- Select Edit field.
- Make the desired changes.
- Click OK.
Updating all fields
To update all fields in all tables:
- Press Ctrl + A to select all.
- Press F9.
Formula fields are just one type of field you can use in Word. There are many other fields that can insert variable information in Word documents.
Subscribe to get more articles like this one
Did you find this article helpful? If you would like to receive new articles, join our email list.
More resources
4 Ways to Create a Table in Word
How to Insert Fields in Word (Built-in or Custom)
5 Ways to Insert the Division Symbol in Word (Type or Insert ÷)
How to Insert Reusable Text Snippets in Word with Quick Parts
10 Microsoft Word Tips, Tricks and Shortcuts for Selecting in Tables
Related courses
Microsoft Word: Intermediate / Advanced
Microsoft Excel: Intermediate / Advanced
Microsoft PowerPoint: Intermediate / Advanced
Microsoft Word: Long Documents Master Class
Microsoft Word: Styles, Templates and Tables of Contents
Microsoft Word: Designing Dynamic Word Documents Using Fields
VIEW MORE COURSES >
Our instructor-led courses are delivered in virtual classroom format or at our downtown Toronto location at 18 King Street East, Suite 1400, Toronto, Ontario, Canada (some in-person classroom courses may also be delivered at an alternate downtown Toronto location). Contact us at info@avantixlearning.ca if you’d like to arrange custom instructor-led virtual classroom or onsite training on a date that’s convenient for you.
Copyright 2023 Avantix® Learning
Microsoft, the Microsoft logo, Microsoft Office and related Microsoft applications and logos are registered trademarks of Microsoft Corporation in Canada, US and other countries. All other trademarks are the property of the registered owners.
Avantix Learning |18 King Street East, Suite 1400, Toronto, Ontario, Canada M5C 1C4 | Contact us at info@avantixlearning.ca
Many times we find ourselves creating a Table in Word, which represents values, and at the end of the column or row we want to illustrate the overall value of the corresponding column or row. What most people do is to start the Calculator, perform the math there, and then input the result to the corresponding cell of the table.
What happens though when the values in our table changes? Do we use the Calculator all over again?
In Word we have the advantage of creating a Formula, which will execute all the calculations in the cell of the table.
To create a formula in a table we must be sure that our cursor is in the cell that we want the result to appear.

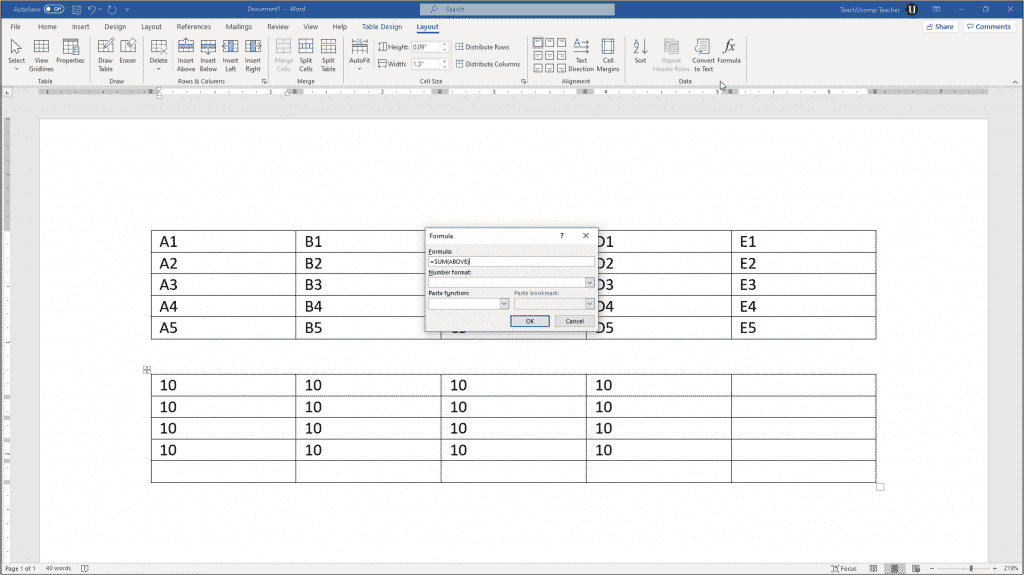
For example, the cursor is located in the last cell of the second column, and we want to sum the two cells that are located above of my cursor which involve data for Product A and Product B for the First Semester.
Since our cursor is located in the cell of the table, the Table Tools tab activates, where we select the Layout Tab. Then from the area of the ribbon named Data we select the command Formula as we can see in the image below.

The Formula window appears as we can see below. Word knows that our cursor is located in the last cell of the table, knows that there are values in the cells above, and assumes that we want to add the cells and that why it shows the formula =SUM(ABOVE).

If our cursor was located at the end of the row, it would had assumed that we want to add all the values from the left and would had shown the formula =SUM (LEFT), as we can see in the image below.
")
In the area of the Formula window named Number Format, if we expand the drop down menu at the right, we can select the sort of formatting that the result of the formula should have as shown in the image below.

In the area of the Formula window named Paste Function, we can define the sort of the formula that we want to use. The formulas that we can use in a Word Table are a few as we can see in the following images.


Since we have done all the adjustments, we press the OK button of the Formula window and the result appears straight away in the selected cell. Word inserts the field in the cell and executes the formula, in this case the sum and shows the result in the cell.
What happens though we change some values in our table?
Tables in Word may look like spreadsheets, but they don’t re-calculate the formulas when we edit the cells. We must update the fields every time we edit values in our table.
So this is what we must to in order to Update the Fields;
We must have our cursor inside the cell with the field by clicking on it, and then do a right click with our mouse in order for the shortcut menu to appear and from there to select the command Update Field as we can see in the image below. The field will be updated immediately.

We can also put our cursor inside the cell with the field and press the F9 button.
One way or the other the field will be updated according to the changes that have been made.

About Smart Office — philippospan
MVP:
Honored with the MVP (Most Valuable Professional) for OFFICE SYSTEM title for the years 2011, 2012, 2013, 2014 and 2015 by Microsoft, for my contribution and commitment to the technical communities worldwide.
Microsoft Master Specialist:
This certification provides skill-verification tools that not only help assess a person’s skills in using Microsoft Office programs but also the ability to quickly complete on-the-job tasks across multiple programs in the Microsoft Office system
Posted on January 19, 2012, in Microsoft Office 2010 English, Word 2010 English and tagged Autoexec.gr, Data, Edit Field, Formula, Functions in Table of Word, Layout, MVP Office System, Number Format, Office 2010 Greek, Paste Function, SUM(ABOVE), SystemPlus, Table Tools, Update Field, Word 2010. Bookmark the permalink. Comments Off on Functions In A Word Table.
Word provides some simple formulas and functions without need to embed Excel tables. It is easy
to insert and use formulas:
- In a Word
table:
- In a document body:

You can use simple formulas in Microsoft Word, such as addition (+), subtraction (-),
multiplication (*), or division (/). Also, you can calculate a power of (^):

See
How to reference a cell of a Word table
for more details.
All functions you can see in the Paste function drop-down list of the
Formula dialog box:

| Function | Description |
|---|---|
| ABS () | Calculates the absolute value of the value inside the parentheses. |
| AND () | Evaluates whether the arguments inside the parentheses are all TRUE. |
| AVERAGE () | Calculates the average of the elements identified inside the parentheses. |
| COUNT () | Calculates the number of elements identified inside the parentheses. |
| DEFINED () | Evaluates whether the argument inside parentheses is defined. Returns 1 if the argument has been defined and evaluates without error, 0 if the argument has not been defined or returns an error. |
| FALSE | Always returns 0 |
| IF () | Evaluates the first argument. Returns the second argument if the first argument is true; returns the third argument if the first argument is false. Note: Requires exactly three arguments. |
| INT () | Rounds the value inside the parentheses down to the nearest integer. |
| MAX () | Returns the maximum value of the items identified inside the parentheses. |
| MIN () | Returns the minimum value of the items identified inside the parentheses. |
| MOD () | Takes two arguments (must be numbers or evaluate to numbers). Returns the remainder after the second argument is divided by the first. If the remainder is 0 (zero), returns 0.0. |
| NOT | Evaluates whether the argument is true. Returns 0 if the argument is true, 1 if the argument is false. Mostly used inside an IF formula. |
| OR () | Takes two arguments. If both are false, returns 0, else returns 1. Mostly used inside an IF formula. |
| PRODUCT () | Calculates the product of items identified inside the parentheses. |
| ROUND () | Rounds the first argument to the number of digits specified by the second argument. If the second argument is greater than zero (0), first argument is rounded down to the specified number of digits. If second argument is zero (0), first argument is rounded down to the nearest integer. If second argument is negative, first argument is rounded down to the left of the decimal. |
| SIGN () | Takes one argument that must either be a number or evaluate to a number. Evaluates whether the item identified inside the parentheses if greater than, equal to, or less than zero (0). Returns 1 if greater than zero, 0 if zero, -1 if less than zero. |
| SUM () | Calculates the sum of items identified inside the parentheses. |
| TRUE | Always returns 1. |
The arguments can be:
| Argument | Description |
|---|---|
| ABOVE | Cells above the current. For example, = SUM(ABOVE) |
| BELOW | Cells below the current. For example, = SUM(BELOW) |
| LEFT | Cells on left of the current. For example, = SUM(LEFT) |
| RIGHT | Cells on right of the current. For example, = SUM(RIGHT) |
See also this tip in French:
Fonctions et formules dans Word.
Please, disable AdBlock and reload the page to continue
Today, 30% of our visitors use Ad-Block to block ads.We understand your pain with ads, but without ads, we won’t be able to provide you with free content soon. If you need our content for work or study, please support our efforts and disable AdBlock for our site. As you will see, we have a lot of helpful information to share.

Insert Table Formulas in Word: Overview
You can insert table formulas in Word tables to perform simple mathematical functions on data. To insert table formulas in Word that add, subtract, multiply, and divide numbers in the table cells, you insert formulas into cells where you want to show the answers to the mathematical operations performed by the formulas.
The Parts of Table Formulas in Word
When you insert table formulas in Word, you insert a field that performs calculations on values in other table cells. Formulas always start with an equal sign (=). They often refer to the cell addresses from which they gather the data for their calculations. These cell addresses can be linked together with standard mathematical operators. These include the plus sign (+), minus sign (-), multiplication sign (*), and division sign (/), among others. You can also perform functions, like SUM, on a cell range in a table. So, a formula might be expressed “=SUM(Above),” which adds the values of the cells above the cell into which you inserted this formula.
A cell address is a way of referring to a cell. A cell address is the relative location of a cell in a table. Imagine there are letters at the top of each column, starting with “A” at the far left and then continuing to increase one letter at a time to the right. In addition, imagine each row has a number assigned to it. The topmost row is row “1.” The row numbering then continues downward, increasing by one for each row. The cell address is the column letter, followed by the row number. For example, the top left cell is always cell A1. B1 is always to the right of A1. Here is a table with the cell addresses entered into the corresponding cells to help you see the cell address naming convention.
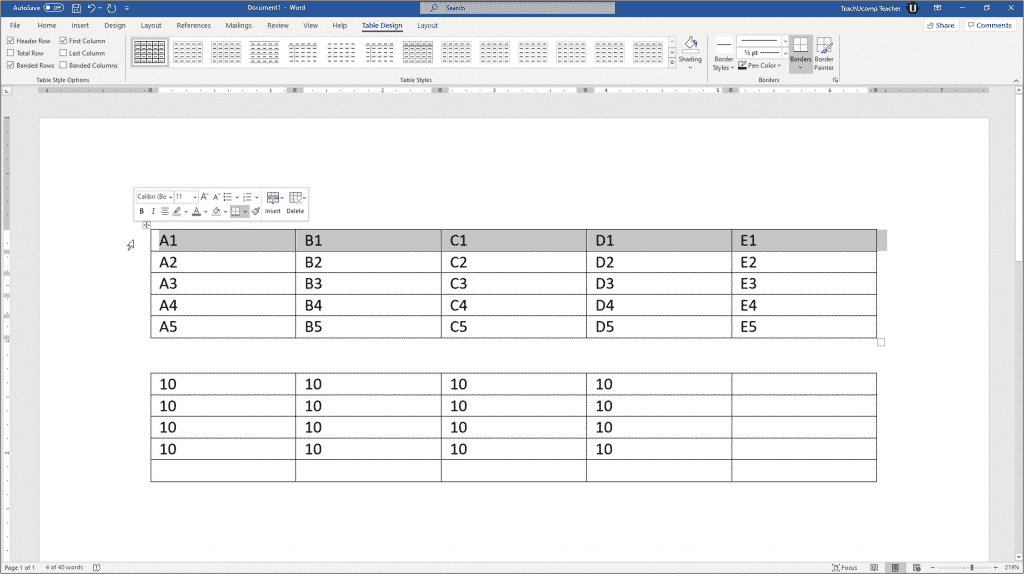
Insert Table Formulas in Word – Instructions: A picture of the cell addresses within a sample table, shown at the top of the Word document.
As stated previously, when you insert table formulas in Word, you are creating a formula field. A cell formula begins with an equal sign (=). It is often followed by the cell addresses of the cells upon which to perform the mathematical operations, joined together by standard mathematical operators. For example, to add the cells above cell A5 and show the formula result in cell A5, click into cell A5. Then insert a formula field that looks like either: =A1+A2+A3+A4 or =SUM(Above).
Instead of showing the formula itself in the cell, the cell shows the answer to the formula. Why? Because when you insert table formulas in Word in a cell, Word knows it should show the answer to the formula, not the formula itself. Formulas display their results by default, not their actual contents.
How to Insert Table Formulas in Word
To insert table formulas in Word into a table cell, click into the table cell where you want to show the answer. This is often the cell at the end of a continuous column or row of numbers. Next, click the table’s “Layout” contextual tab in the Ribbon. In older versions of Word, this appears as the “Layout” tab of the “Table Tools” contextual tab in the Ribbon. For all versions of Word, then click the “Formula” button in the “Data” button group to open the “Formula” dialog box. This dialog box lets you type the formulas used to insert table formulas in Word.
When the “Formula” dialog box first opens, Word tries to guess the formula you want. For example, if you insert table formulas in Word in a cell at the end of a column of continuous numbers, Word assumes you want to add the cell values in the column above the cell. Therefore, Word enters the formula =SUM(Above) as the default formula in the “Formula” dialog box.
Insert Table Formulas in Word – Instructions: A picture of the default table formula that Word suggests in the “Formula” dialog box.
If Word suggests the correct formula, then click “OK” at the bottom of the “Formula” dialog box to accept it and insert the cell formula. If incorrect, then click into the “Formula:” field and enter the correct formula.
After entering the formula into the “Formula:” field, you can then use the “Number format:” drop-down to select a numeric pattern. This helps show the result in a specific numeric format.
In Word, you can use the terms “LEFT,” “RIGHT,” “ABOVE,” and “BELOW” to refer to adjacent cells in the row or column to the left of, to the right of, above, or below the cell within which you insert table formulas in Word. This is a convenient way of selecting the cell range for the function. You can also enter a cell range by typing the cell address of the upper-left cell in the cell range, followed by a colon symbol (:), then followed by the cell address of the lower-right cell in the range. For example, you could also type =SUM(A1:A4) into the “Formula:” field to add the contents of cells A1 through A4.
The word SUM is a formula function. If want to perform one mathematical operation on a range of cells, you can use functions like SUM, AVERAGE, MAX, and MIN when you insert table formulas in Word, instead of individually writing the cell addresses and mathematical operators. Word provides many standard functions in the “Paste function:” drop-down. Selecting any function from the list of functions in the drop-down menu adds it to the formula in the “Formula:” field.
After creating the Word formula, click the “OK” button to insert the formula field into the selected cell. The results of the formula then appear in the cell.
Insert Table Formulas in Word: Instructions
Instructions on How to Insert Table Formulas in Word
- To insert table formulas in Word, click into the table cell where you want to show the answer to the formula.
- Then click the table’s “Layout” contextual tab in the Ribbon. In older versions of Word, this appears as the “Layout” tab of the “Table Tools” contextual tab in the Ribbon.
- For all versions of Word, then click the “Formula” button in the “Data” button group to open the “Formula” dialog box.
- If necessary, click into the “Formula:” field and enter the desired formula.
- Optionally, to select a function to add to the formula shown in the “Formula:” field, use the “Paste function:” drop-down.
- Optionally, to format the display of the numeric formula’s result, use the “Number format:” drop-down.
- Then click the “OK” button to insert the formula field into the selected cell.
Insert Table Formulas in Word: Video Lesson
The following video lesson, titled “Inserting Table Formulas,” shows how to insert table formulas in Word. It is from our complete Word tutorial, titled “Mastering Word Made Easy v.2019 and 365.”
Tagged under:
cell address, cell addresses, course, create, document, documents, formula, formulas, function, functions, help, how-to, insert, insert table formulas, Insert Table Formulas in Word, inserting, instructions, learn, lesson, make, microsoft word, number format, overview, paste function, table, tables, teach, training, tutorial, video, Word 2013, Word 2016, Word 2019, Word for Microsoft 365, word for Office 365, write