
Excel for Microsoft 365 Excel for Microsoft 365 for Mac Excel 2021 Excel 2021 for Mac Excel 2019 Excel 2019 for Mac Excel 2016 Excel 2016 for Mac Excel 2013 Excel 2010 Excel 2007 More…Less
You can use a Form control button or a command button (an ActiveX control) to run a macro that performs an action when a user clicks it. Both these buttons are also known as a push button, which can be set up to automate the printing of a worksheet, filtering data, or calculating numbers. In general, a Form control button and an ActiveX control command button are similar in appearance and function. However, they do have a few differences, which are explained in the following sections.
|
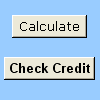
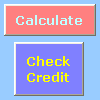
Button (Form control)
|
Command button (ActiveX control)
|
In the sections below, learn how to add a macro to a button in Excel—for Windows or the Mac.
Note: ActiveX controls are not supported on the Mac.
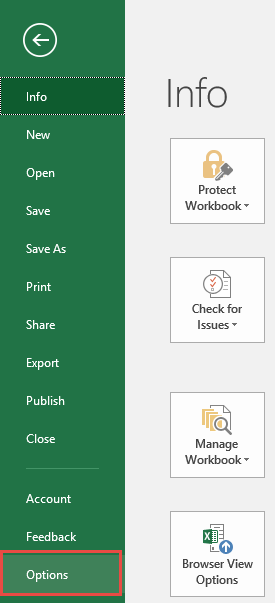
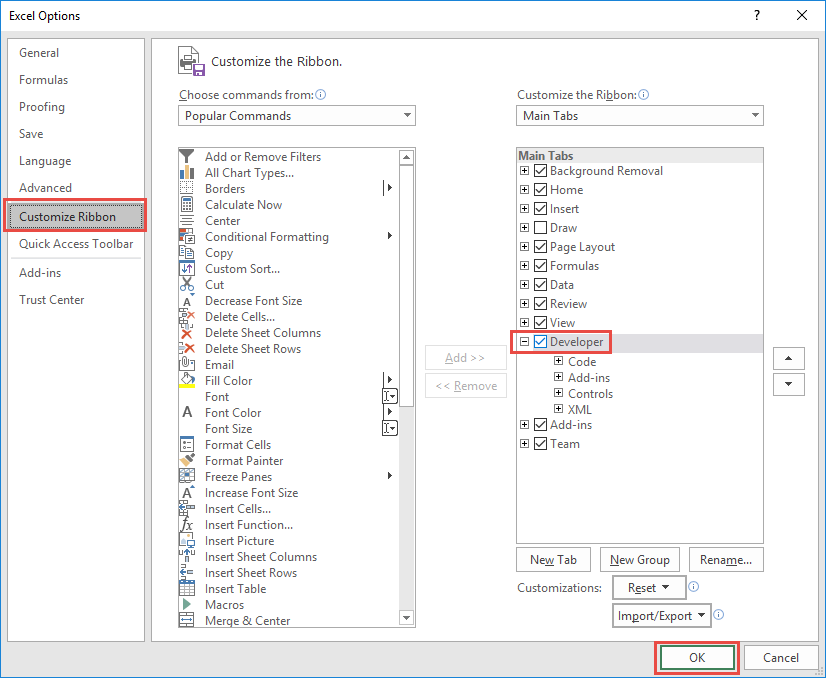
Macros and VBA tools can be found on the Developer tab, which is hidden by default.
The first step is to enable it. For more information, see the article: Show the Developer tab.

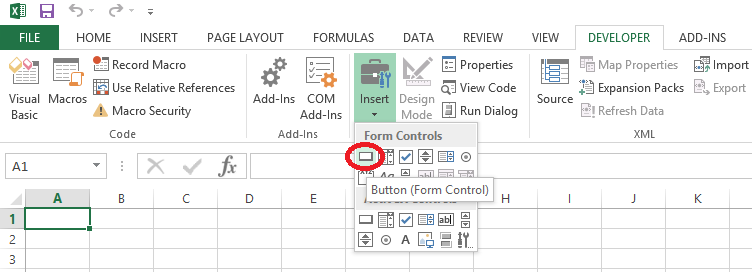
Add a button (Form control)
-
On the Developer tab, in the Controls group, click Insert, and then under Form Controls, click Button
 .
. -
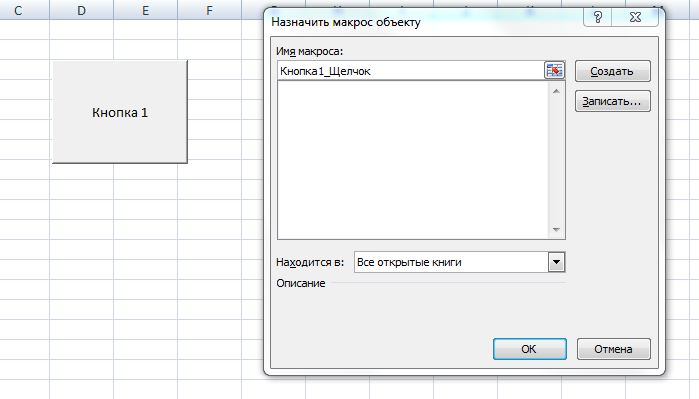
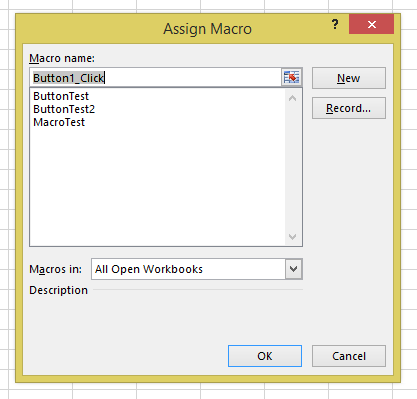
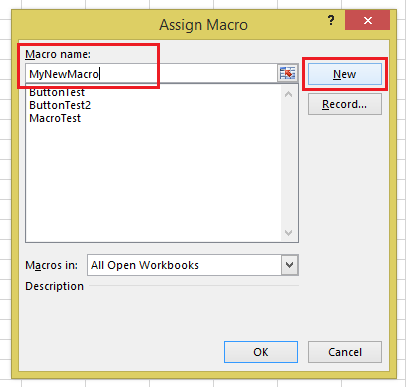
Click the worksheet location where you want the upper-left corner of the button to appear. The Assign Macro popup window appears.
-
Assign a macro to the button, and then click OK.
-
To specify the control properties of the button, right-click the button, and then click Format Control.
 .
.Add a command button (ActiveX control)
-
On the Developer tab, in the Controls group, click Insert, and then under ActiveX Controls, click Command Button
. -
Click the worksheet location at which you want the upper-left corner of the command button to appear.
-
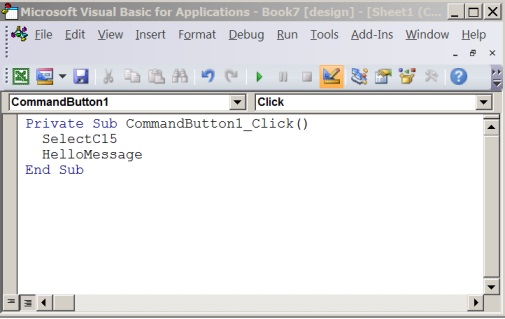
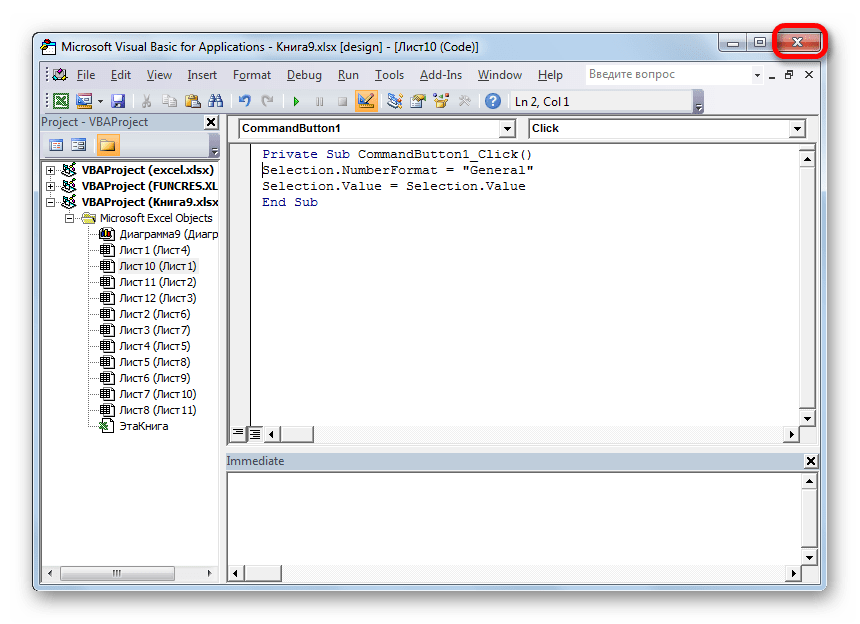
In the Controls group, click View Code. This launches the Visual Basic Editor. Ensure that Click is chose in the drop-down list on the right. The sub procedure CommandButton1_Click (see the figure below) runs these two macros when the button is clicked: SelectC15 and HelloMessage.
-
In the subprocedure for the command button, do either of the following:
-
Enter the name of an existing macro in the workbook. You can find macros by clicking Macros in the Code group. You can run multiple macros from a button by entering the macro names on separate lines inside the subprocedure.
-
As necessary, add your own VBA code.
-
-
Close the Visual Basic Editor, and click Design Mode
to ensure design mode is off. -
To run the VBA code that is now part of the button, click the ActiveX command button that you just created.
-
To edit the ActiveX control, make sure that you are in design mode. On the Developer tab, in the Controls group, turn on Design Mode.
-
To specify the control properties of the command button, on the Developer tab, in the Controls group, click Properties
. You can also right-click the command button, and then click Properties.Note: Before you click Properties, make sure that the object for which you want to examine or change properties is already selected.
The Properties box appears. For detailed information about each property, select the property, and then press F1 to display a Visual Basic Help topic. You can also type the property name in the Visual Basic Help Search box. The following table summarizes the properties that are available.
 to ensure design mode is off.
 . You can also right-click the command button, and then click Properties.
|
If you want to specify |
Use this property |
|---|---|
|
General: |
|
|
Whether the control is loaded when the workbook is opened. (Ignored for ActiveX controls.) |
AutoLoad (Excel) |
|
Whether the control can receive focus and respond to user-generated events. |
Enabled (Form) |
|
Whether the control can be edited. |
Locked (Form) |
|
The name of the control. |
Name (Form) |
|
The way the control is attached to the cells below it (free floating, move but do not size, or move and size). |
Placement (Excel) |
|
Whether the control can be printed. |
PrintObject (Excel) |
|
Whether the control is visible or hidden. |
Visible (Form) |
|
Text: |
|
|
Font attributes (bold, italic, size, strikethrough, underline, and weight). |
Bold, Italic, Size, StrikeThrough, Underline, Weight (Form) |
|
Descriptive text on the control that identifies or describes it. |
Caption (Form) |
|
Whether the contents of the control automatically wrap at the end of a line. |
WordWrap (Form) |
|
Size and Position: |
|
|
Whether the size of the control automatically adjusts to display all the contents. |
AutoSize (Form) |
|
The height or width in points. |
Height, Width (Form) |
|
The distance between the control and the left or top edge of the worksheet. |
Left, Top (Form) |
|
Formatting: |
|
|
The background color. |
BackColor (Form) |
|
The background style (transparent or opaque). |
BackStyle (Form) |
|
The foreground color. |
ForeColor (Form) |
|
Whether the control has a shadow. |
Shadow (Excel) |
|
Image: |
|
|
The bitmap to display in the control. |
Picture (Form) |
|
The location of the picture relative to its caption (left, top, right, and so on). |
PicturePosition (Form) |
|
Keyboard and Mouse: |
|
|
The shortcut key for the control. |
Accelerator (Form) |
|
A custom mouse icon. |
MouseIcon (Form) |
|
The type of pointer that is displayed when the user positions the mouse over a particular object (standard, arrow, I-beam, and so on). |
MousePointer (Form) |
|
Whether the control takes the focus when clicked. |
TakeFocusOnClick (Form) |
Macros and VBA tools can be found on the Developer tab, which is hidden by default, so the first step is to enable it
-
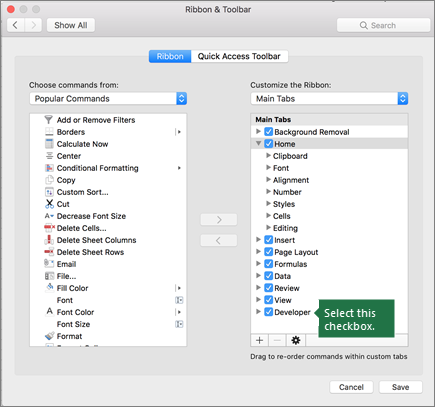
Go to Excel > Preferences… > Ribbon & Toolbar.
-
In the Customize the Ribbon category, in the Main Tabs list, select the Developer check box, and then click Save.
Add a button (Form control)
Follow these steps:
-
On the Developer tab, click Button
. -
Click the worksheet location where you want the upper-left corner of the button to appear. The Assign Macro popup window appears.
Note: If you have already inserted a button, you can right-click on it, and select Assign Macro.
-
Assign a macro to the button and click OK.
-
To specify the control properties of the button, right-click it, and then select Format Control….
Add a command button (Visual Basic control)
-
On the Developer tab, click Button
. -
Click the worksheet location where you want the upper-left corner of the command button to appear.
Note: If you have already inserted a button, you can right-click on it, and select Assign Macro.
-
In the Assign Macro dialog box, select New, which will open the Visual Basic Editor (VBE) to a pane with the following code:
  Sub ButtonX_Click()

  End Sub
-
In the subprocedure for the command button, between the Sub and End Sub lines, do either of the following:
-
Enter the name of an existing macro in the workbook. You can run multiple macros from a button by typing the macro names on separate lines inside the sub procedure
-
Add your own VBA code.
-
-
Click Design Mode
to ensure that design mode is off, then close the Visual Basic Editor window. -
To edit the button, right-click it and choose Visual Basic.
-
To specify the control properties of the button, right-click it, and then select Format Control….
Need more help?
You can always ask an expert in the Excel Tech Community or get support in the Answers community.
See Also
-
Add or edit a macro for a control on a worksheet
-
Enable or disable macros in Office files
-
Enable or disable ActiveX settings in Office files
Need more help?
Содержание
- Процедура создания
- Способ 1: автофигура
- Способ 2: стороннее изображение
- Способ 3: элемент ActiveX
- Способ 4: элементы управления формы
- Вопросы и ответы
Excel является комплексным табличным процессором, перед которым пользователи ставят самые разнообразные задачи. Одной из таких задач является создание кнопки на листе, нажатие на которую запускало бы определенный процесс. Данная проблема вполне решаема с помощью инструментария Эксель. Давайте разберемся, какими способами можно создать подобный объект в этой программе.
Процедура создания
Как правило, подобная кнопка призвана выступать в качестве ссылки, инструмента для запуска процесса, макроса и т.п. Хотя в некоторых случаях, данный объект может являться просто геометрической фигурой, и кроме визуальных целей не нести никакой пользы. Данный вариант, впрочем, встречается довольно редко.
Способ 1: автофигура
Прежде всего, рассмотрим, как создать кнопку из набора встроенных фигур Excel.
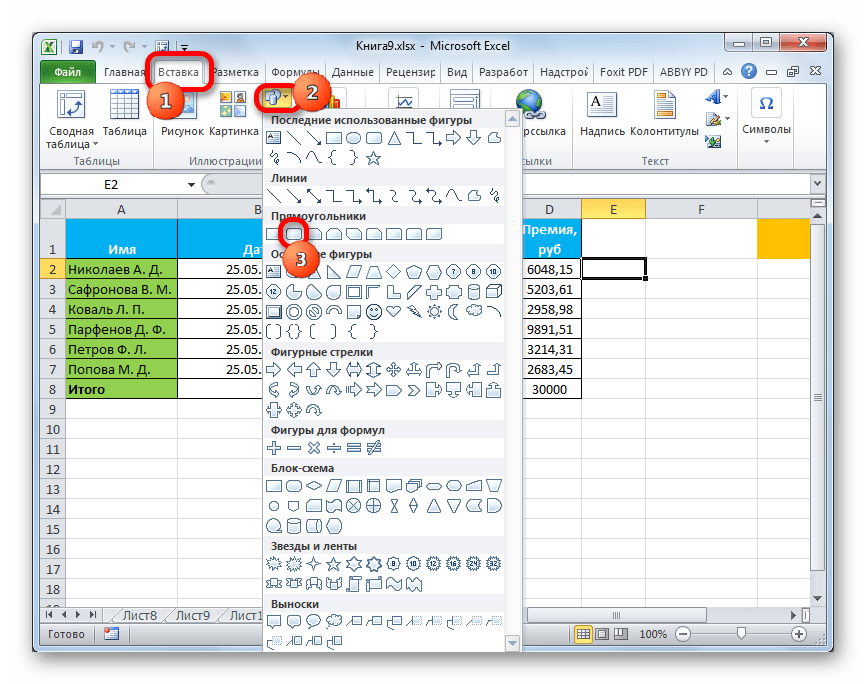
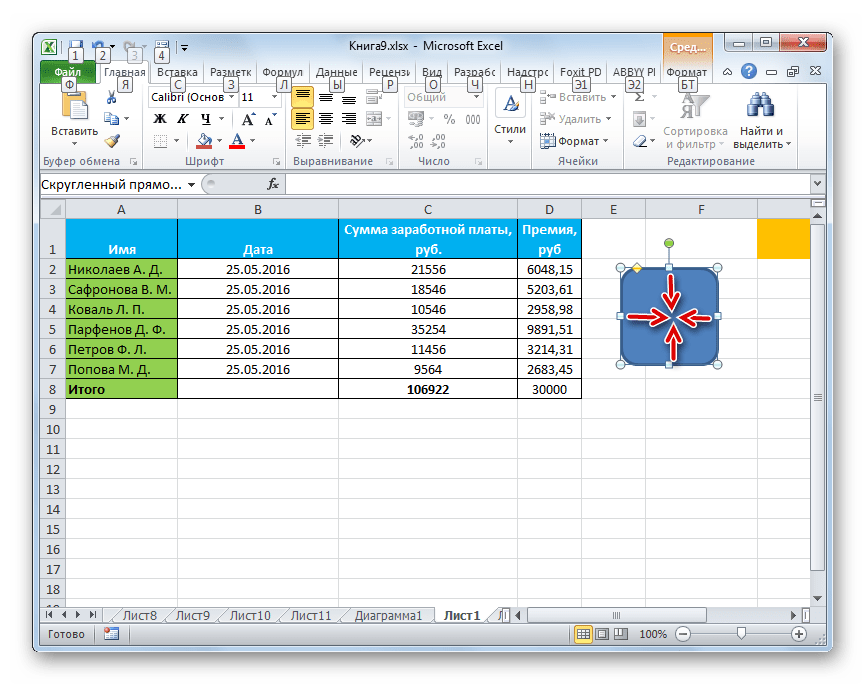
- Производим перемещение во вкладку «Вставка». Щелкаем по значку «Фигуры», который размещен на ленте в блоке инструментов «Иллюстрации». Раскрывается список всевозможных фигур. Выбираем ту фигуру, которая, как вы считаете, подойдет более всего на роль кнопки. Например, такой фигурой может быть прямоугольник со сглаженными углами.
- После того, как произвели нажатие, перемещаем его в ту область листа (ячейку), где желаем, чтобы находилась кнопка, и двигаем границы вглубь, чтобы объект принял нужный нам размер.
- Теперь следует добавить конкретное действие. Пусть это будет переход на другой лист при нажатии на кнопку. Для этого кликаем по ней правой кнопкой мыши. В контекстном меню, которое активируется вслед за этим, выбираем позицию «Гиперссылка».
- В открывшемся окне создания гиперссылки переходим во вкладку «Местом в документе». Выбираем тот лист, который считаем нужным, и жмем на кнопку «OK».
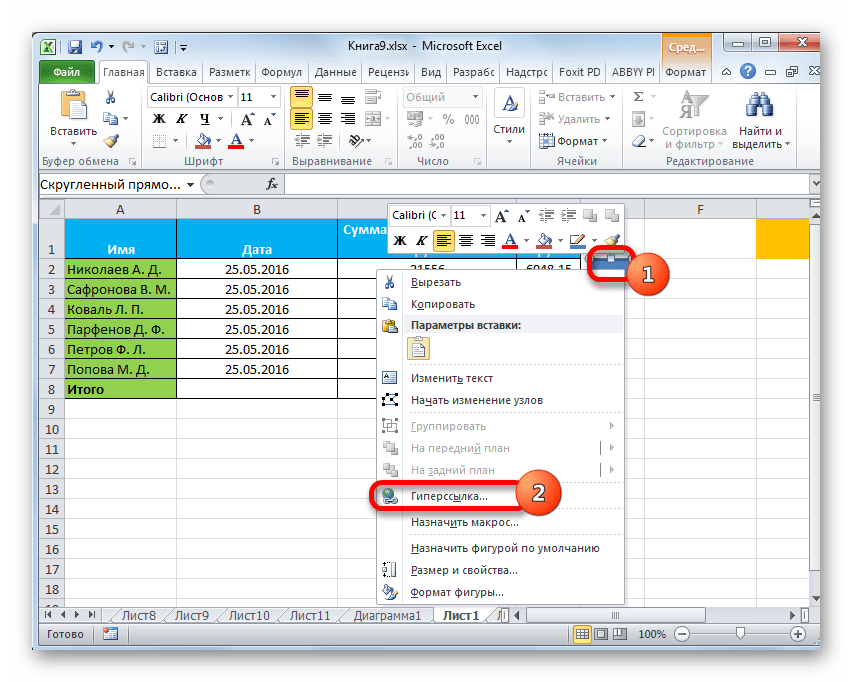
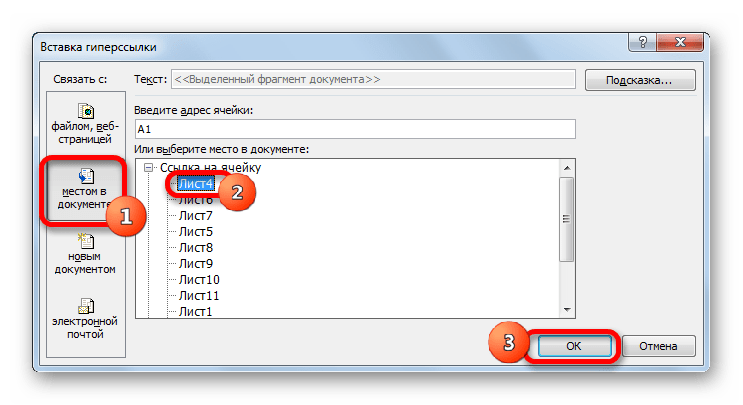
Теперь при клике по созданному нами объекту будет осуществляться перемещение на выбранный лист документа.
Урок: Как сделать или удалить гиперссылки в Excel
Способ 2: стороннее изображение
В качестве кнопки можно также использовать сторонний рисунок.
- Находим стороннее изображение, например, в интернете, и скачиваем его себе на компьютер.
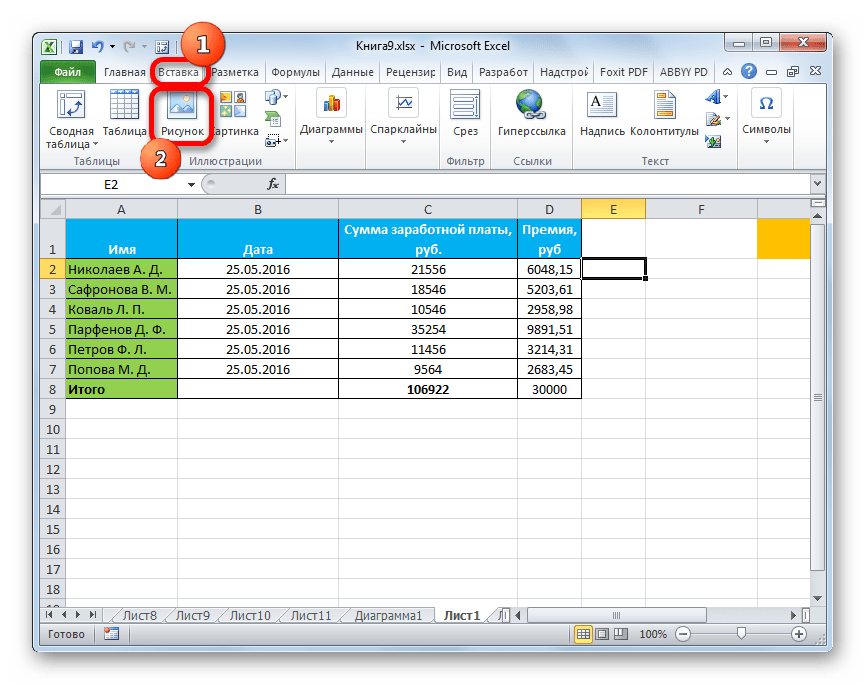
- Открываем документ Excel, в котором желаем расположить объект. Переходим во вкладку «Вставка» и кликаем по значку «Рисунок», который расположен на ленте в блоке инструментов «Иллюстрации».
- Открывается окно выбора изображения. Переходим с помощью него в ту директорию жесткого диска, где расположен рисунок, который предназначен выполнять роль кнопки. Выделяем его наименование и жмем на кнопку «Вставить» внизу окна.
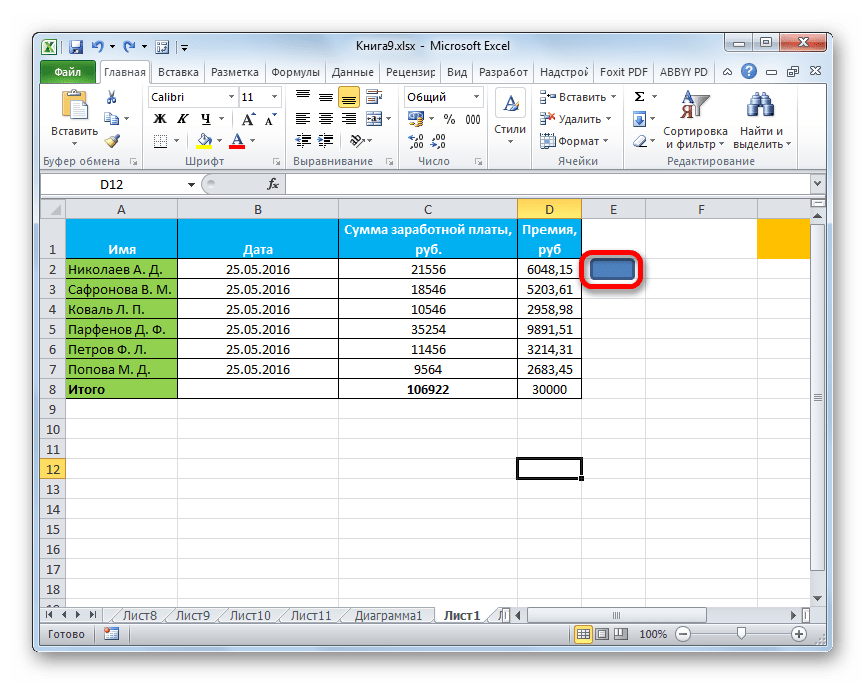
- После этого изображение добавляется на плоскость рабочего листа. Как и в предыдущем случае, его можно сжать, перетягивая границы. Перемещаем рисунок в ту область, где желаем, чтобы размещался объект.
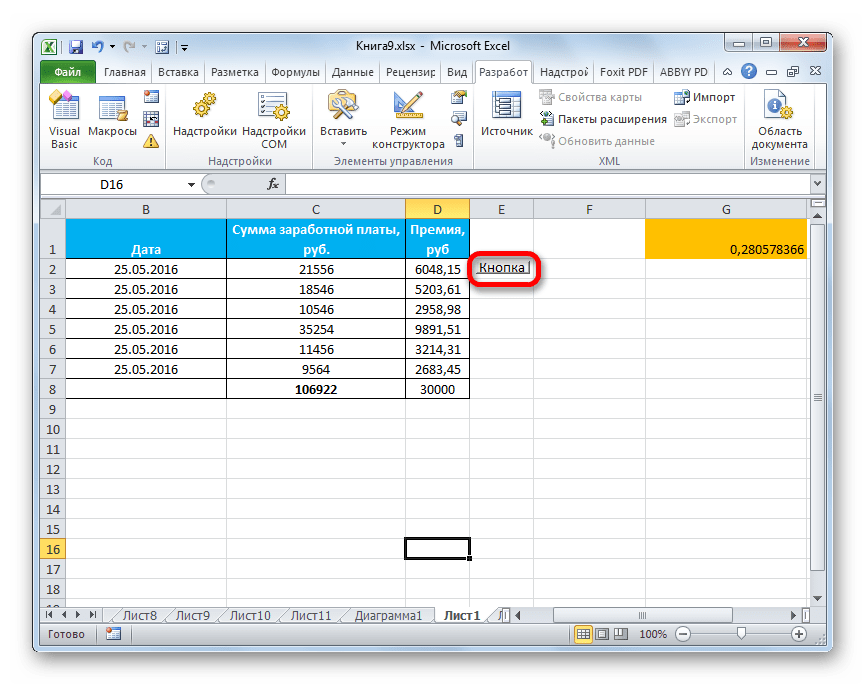
- После этого к копке можно привязать гиперссылку, таким же образом, как это было показано в предыдущем способе, а можно добавить макрос. В последнем случае кликаем правой кнопкой мыши по рисунку. В появившемся контекстном меню выбираем пункт «Назначить макрос…».
- Открывается окно управление макросами. В нем нужно выделить тот макрос, который вы желаете применять при нажатии кнопки. Этот макрос должен быть уже записан в книге. Следует выделить его наименование и нажать на кнопку «OK».


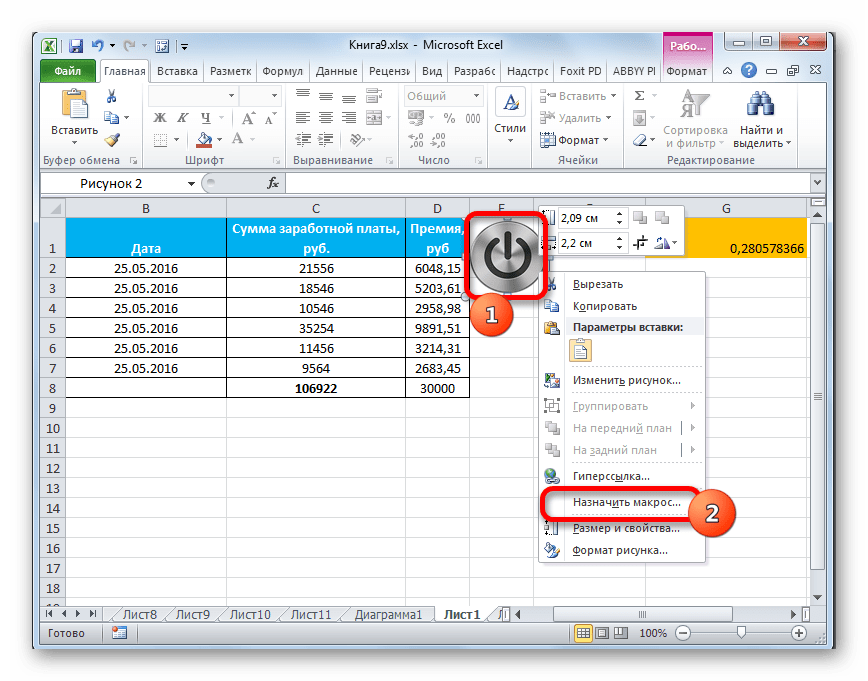
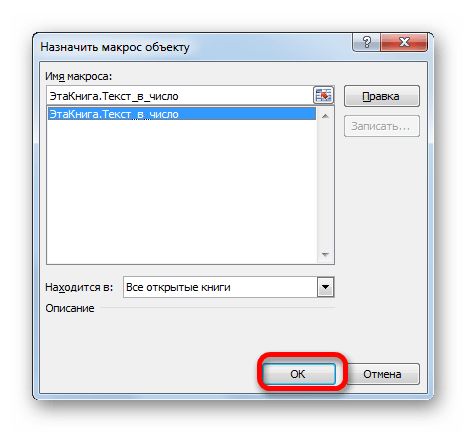
Теперь при нажатии на объект будет запускаться выбранный макрос.
Урок: Как создать макрос в Excel
Способ 3: элемент ActiveX
Наиболее функциональной кнопку получится создать в том случае, если за её первооснову брать элемент ActiveX. Посмотрим, как это делается на практике.
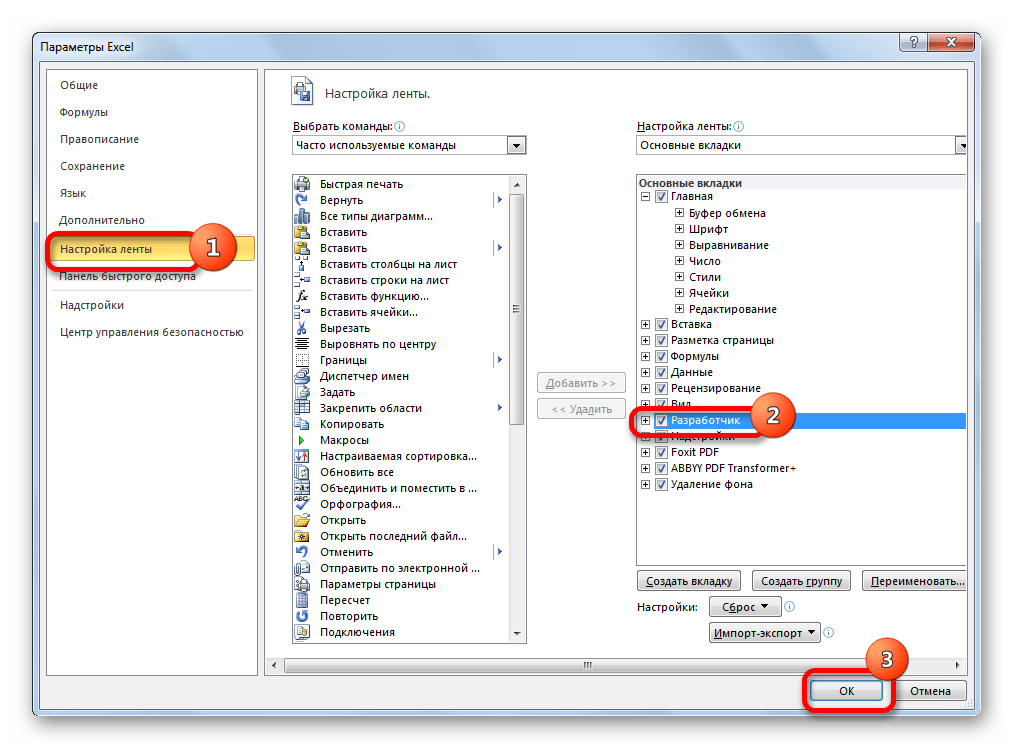
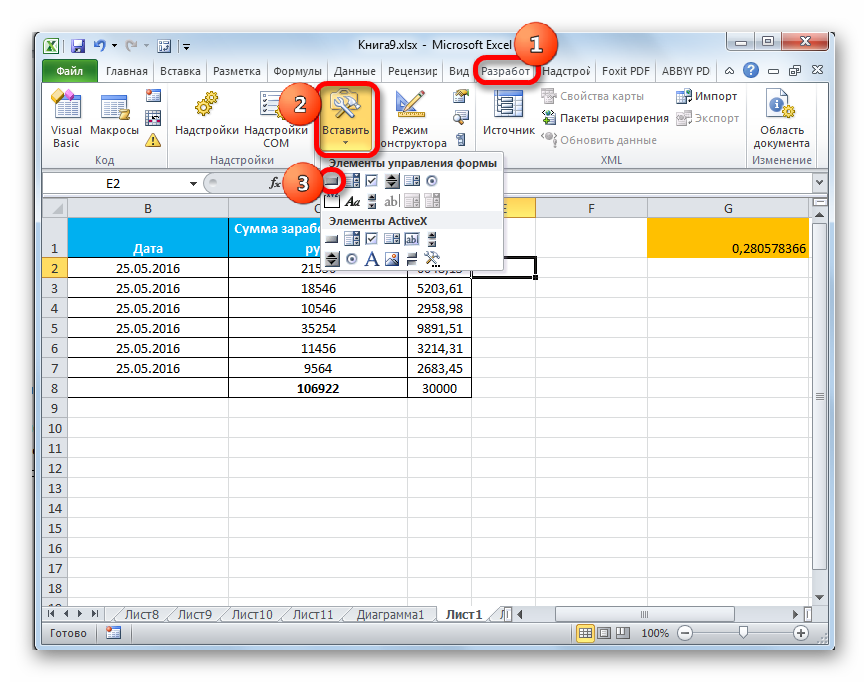
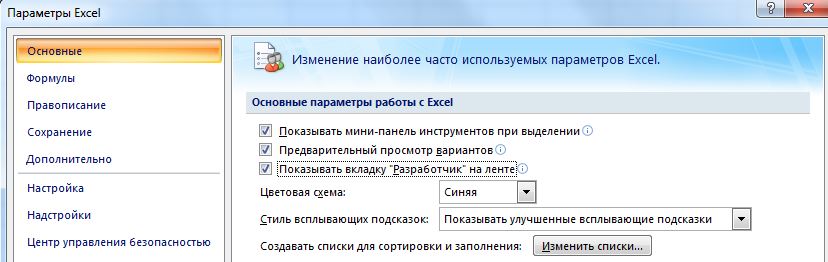
- Для того чтобы иметь возможность работать с элементами ActiveX, прежде всего, нужно активировать вкладку разработчика. Дело в том, что по умолчанию она отключена. Поэтому, если вы её до сих пор ещё не включили, то переходите во вкладку «Файл», а затем перемещайтесь в раздел «Параметры».
- В активировавшемся окне параметров перемещаемся в раздел «Настройка ленты». В правой части окна устанавливаем галочку около пункта «Разработчик», если она отсутствует. Далее выполняем щелчок по кнопке «OK» в нижней части окна. Теперь вкладка разработчика будет активирована в вашей версии Excel.
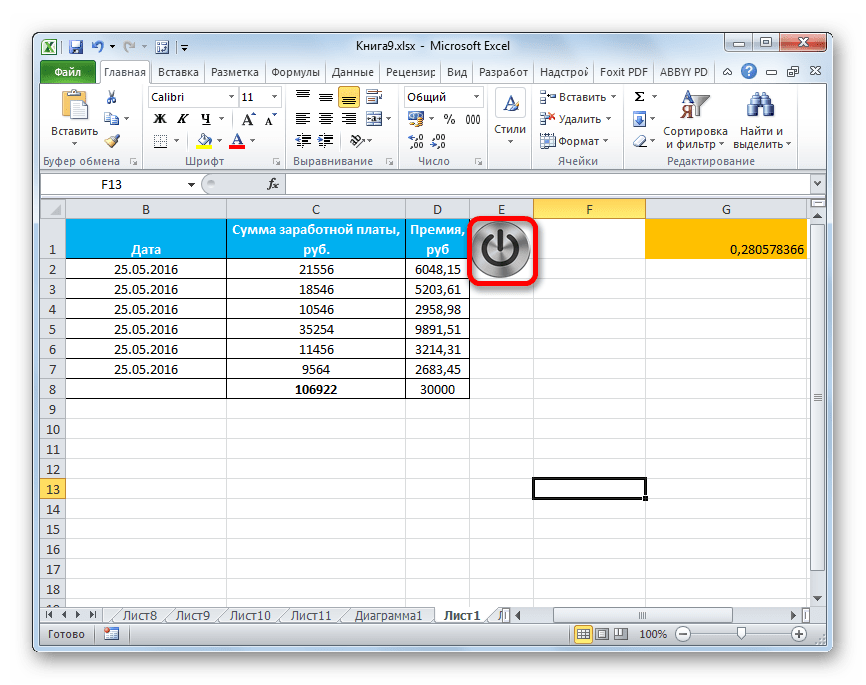
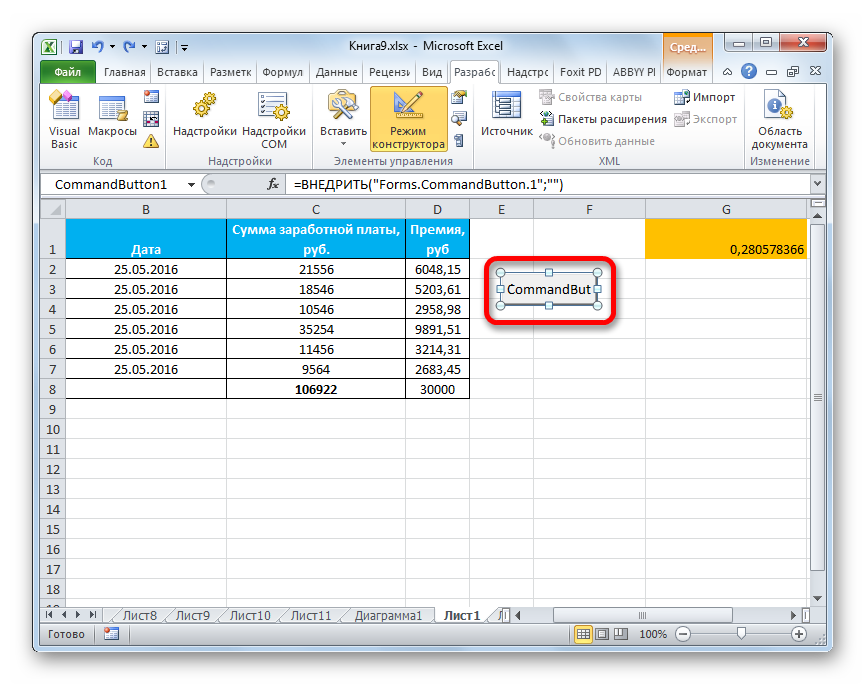
- После этого перемещаемся во вкладку «Разработчик». Щелкаем по кнопке «Вставить», расположенной на ленте в блоке инструментов «Элементы управления». В группе «Элементы ActiveX» кликаем по самому первому элементу, который имеет вид кнопки.
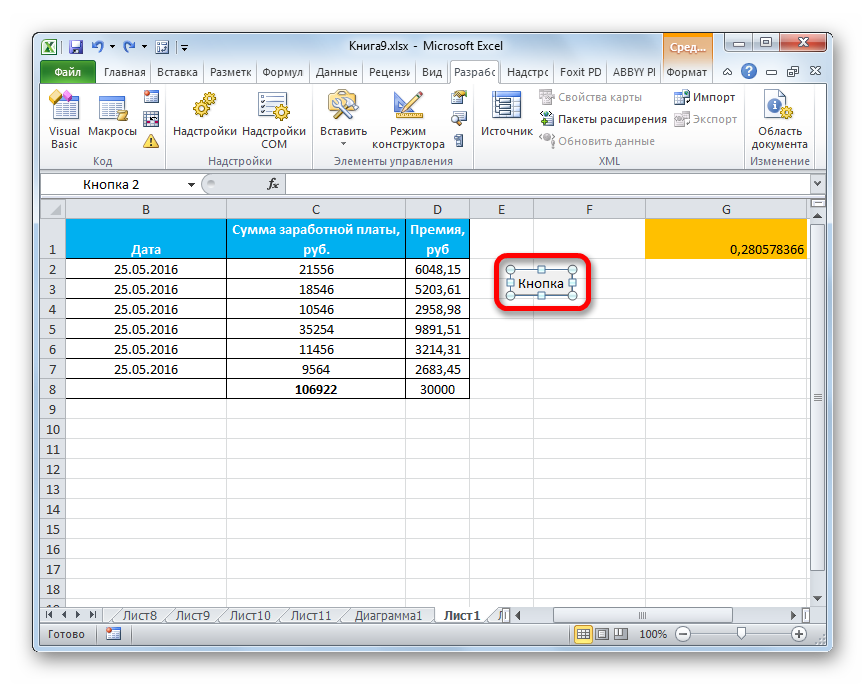
- После этого кликаем по любому месту на листе, которое считаем нужным. Сразу вслед за этим там отобразится элемент. Как и в предыдущих способах корректируем его местоположение и размеры.
- Кликаем по получившемуся элементу двойным щелчком левой кнопки мыши.
- Открывается окно редактора макросов. Сюда можно записать любой макрос, который вы хотите, чтобы исполнялся при нажатии на данный объект. Например, можно записать макрос преобразования текстового выражения в числовой формат, как на изображении ниже. После того, как макрос записан, жмем на кнопку закрытия окна в его правом верхнем углу.


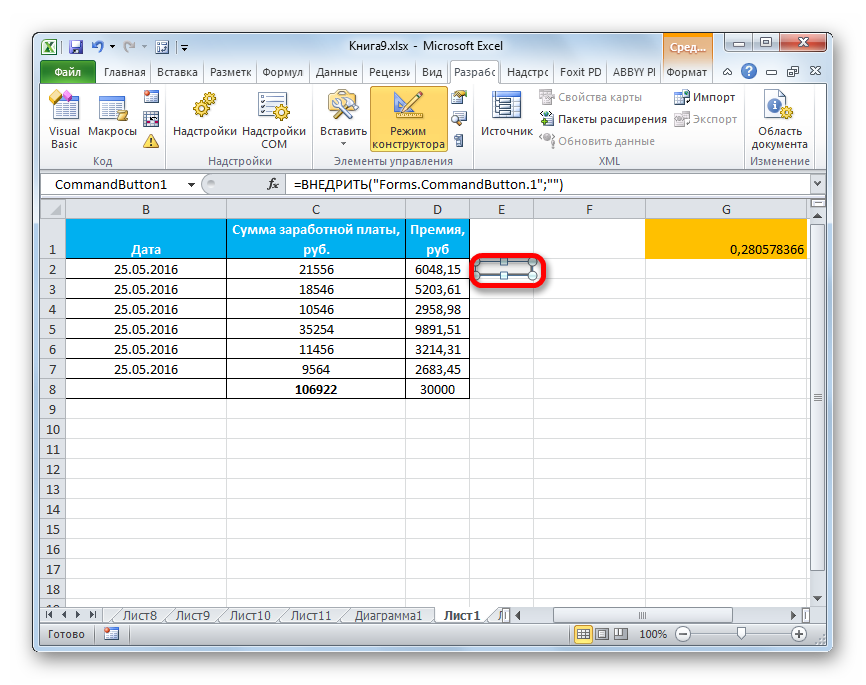
Теперь макрос будет привязан к объекту.
Способ 4: элементы управления формы
Следующий способ очень похож по технологии выполнения на предыдущий вариант. Он представляет собой добавление кнопки через элемент управления формы. Для использования этого метода также требуется включение режима разработчика.
- Переходим во вкладку «Разработчик» и кликаем по знакомой нам кнопке «Вставить», размещенной на ленте в группе «Элементы управления». Открывается список. В нем нужно выбрать первый же элемент, который размещен в группе «Элементы управления формы». Данный объект визуально выглядит точно так же, как и аналогичный элемент ActiveX, о котором мы говорили чуть выше.
- Объект появляется на листе. Корректируем его размеры и место расположения, как уже не раз делали ранее.
- После этого назначаем для созданного объекта макрос, как это было показано в Способе 2 или присваиваем гиперссылку, как было описано в Способе 1.
Как видим, в Экселе создать функциональную кнопку не так сложно, как это может показаться неопытному пользователю. К тому же данную процедуру можно выполнить с помощью четырех различных способов на свое усмотрение.
Еще статьи по данной теме:
Помогла ли Вам статья?
1 звезда
2 звезды
3 звезды
4 звезды
5 звезд

Кнопки в офисной программе Excel могут запускать макросы и выполнять разные функции. Как добавить такую кнопку, расскажем в нашей статье.


В двух шагах мы объясним, как создать кнопку в разных версиях Microsoft Office Excel.
Шаг 1: Делаем видимой вкладку разработчика
Если в верхнем меню Excel вы уже видите вкладку, которая называется «Разработчик», можете сразу перейти ко второму шагу данной инструкции.
- Для MS Office 2007: нажмите кнопку Microsoft Office (она выглядит как знак меню «Пуск») и выберите вкладку «Параметры Excel». В левом столбце откройте категорию «Основное» и поставьте галочку напротив пункта «Показывать вкладку «Разработчик» в ленте». Нажмите «ОК» — необходимая вкладка появится в верхнем меню документа.
- Для MS Office 2010, 2013, 2016: откройте вкадку «Файл», выберете «Параметры» — «Настроить ленту». В списке «Основные вкладки» установите флажок «Разработчик».
Шаг 2: Добавляем кнопку в Excel
- Выберите вкладку «Разработчик» и раздел «Вставить». В выпадающем списке будет меню «Элементы управления формы». Кликните на самый первый элемент, который напоминает кнопку.
- Нажав левую клавишу мыши, нарисуйте кнопку на рабочем листе документа Excel. После этого откроется окно для назначения макроса объекту. Здесь можно создать новый макрос или привязать к кнопке уже существующий. Нажмите «ОК» для завершения настройки.
- Левой кнопкой мыши можно перемещать и менять размеры элемента, а с помощью правой — дать ему название или изменить свойства, например, отредактировать макросы.
Читайте также:
- Как сделать сводную таблицу в Excel
- Excel: 10 формул для работы в офисе
- Как закрепить строку в Excel при прокрутке

Редактор направлений «Мобильные устройства» и «Техника для дома»
Была ли статья интересна?
F1 | F2 | F3 | F4 | F5 | F6 | F7 | F8 | F9 | F10 | F11 | F12
Функциональные клавиши позволяют задействовать клавиатуру вместо мыши, тем самым ускоряя вашу работу.
Содержание
- F1
- F2
- F3
- F4
- F5
- F6
- F7
- F8
- F9
- F10
- F11
- F12
F1
Открывает справку Excel, как и кнопка со знаком вопроса.
F2
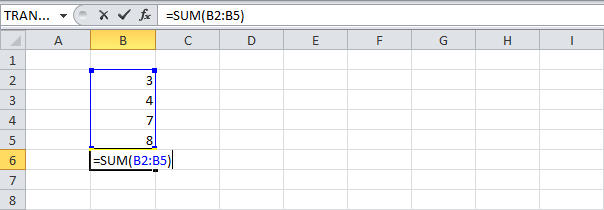
Перемещает курсор в конец содержимого активной ячейки. На рисунке ниже мы выбрали ячейку B6 и нажали клавишу F2.
Примечание: Снимите галочку с пункта Allow editing directly in cells (Разрешить редактирование в ячейках), который находится File > Options > Advanced > Editing Options (Файл > Параметры > Дополнительно > Параметры правки). После этого нажатие клавиши F2 будет перемещать курсор в строку формул.
F3
Открывает диалоговое окно Paste Name (Вставка имени). Для примера выберите ячейку Е2, как на рисунке ниже, введите «=SUM(» или «=СУММ(«, нажмите F3 и выберите имя.
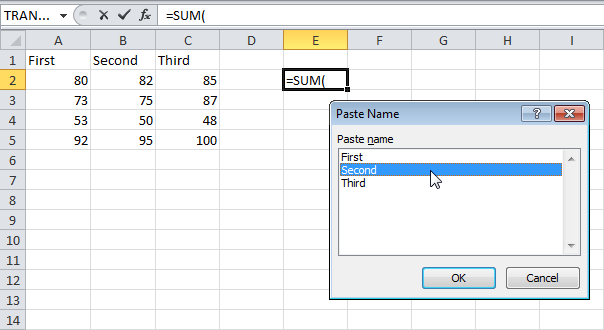
Примечание: Безусловно, сначала нужно создать по крайней мере один именованный диапазон.
F4
Переключает между всеми четырьмя типами ссылок на ячейки (абсолютная, смешанная двух видов и относительная). Для примера выберите ячейку B5, как на рисунке ниже, кликните по строке формул, поместите курсор слева, справа или внутрь «G2», и нажмите F4.
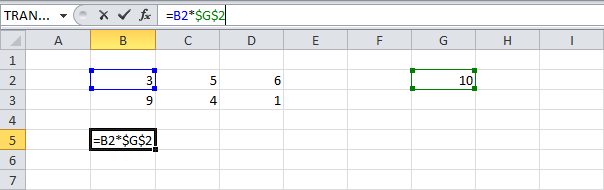
Примечание: Кроме этого, клавиша F4 повторяет последнее действие, если это возможно.
F5
Открывает диалоговое окно Go To (Переход). Например, чтобы перейти к ячейке C15, нужно ввести «C15» в поле Reference (Ссылка) диалогового окна Go To (Переход) и нажать ОК.
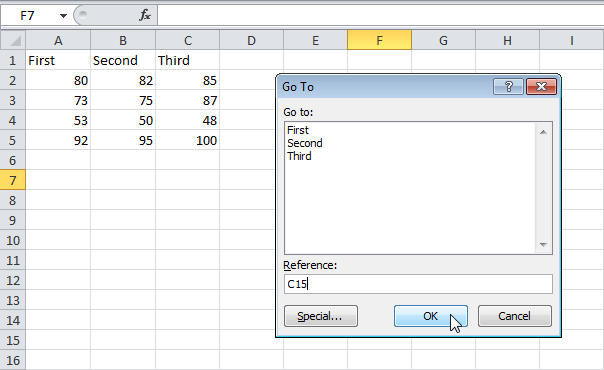
Примечание: Также можно выбрать именованный диапазон или нажать кнопку Special (Выделить), чтобы быстро выбрать все ячейки с формулами, комментариями, условным форматированием, константами, проверкой данных и т.д.
F6
Перемещает к следующему окну на разделённом листе.

F7
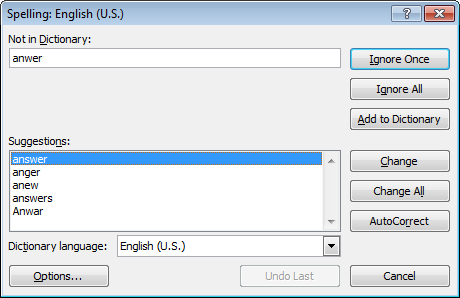
Открывает диалоговое окно Spelling (Орфография), как и кнопка Spelling (Орфография) на вкладке Review (Рецензирование).
F8
Включает/выключает режим расширения. Если режим расширения выделенного фрагмента включён, выберите ячейку A1 и нажмите → ↓ несколько раз.
Примечание: Если режим расширения выключен, зажмите клавишу Shift и нажмите → ↓ несколько раз.
F9
Производит пересчет в книге. По умолчанию каждый раз, когда вы меняете значение, Excel автоматически производит пересчет в книге. Активируйте ручной расчет, для этого включите опцию Manual (Вручную), которая находится на вкладке Formulas (Формулы) > группа Calculation (Вычисление) > Calculations Options (Параметры вычисления), и измените значение в ячейке A1 с 5 на 6.

Нажмите клавишу F9.

Примечание: Если в процессе редактирования ячейки нажать F9, формула в этой ячейке заменится результатом.
F10
Отображает подсказки клавиш. То же самое происходит при нажатии клавиши Alt.
F11
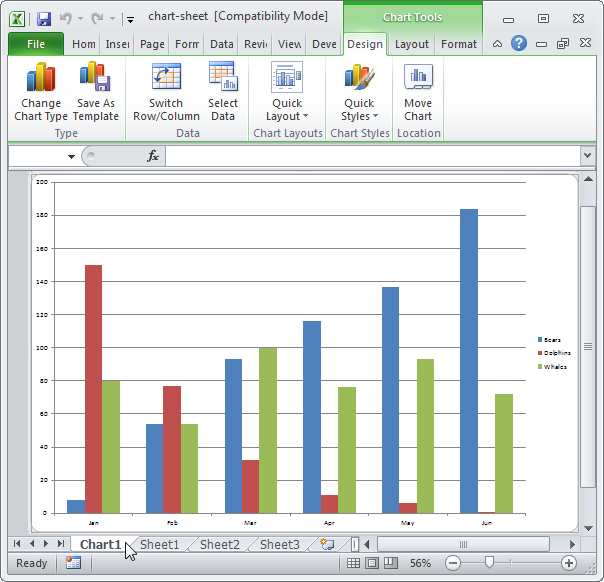
Создает лист диаграммы в выбранном диапазоне.
F12
Вызывает диалоговое окно Save As (Сохранение документа).
Примечание: Чтобы изменить место сохранения файлов по умолчанию, перейдите File (Файл) > Options (Параметры) > Save (Сохранение).
Оцените качество статьи. Нам важно ваше мнение:
Элемент управления пользовательской формы CommandButton, используемый в VBA Excel для запуска процедур и макросов. Свойства кнопки, примеры кода с ней.
UserForm.CommandButton – это элемент управления пользовательской формы, предназначенный исключительно для запуска процедур и макросов VBA Excel.

Для запуска процедур и макросов обычно используется событие кнопки – Click.
Свойства элемента CommandButton
| Свойство | Описание |
|---|---|
| AutoSize | Автоподбор размера кнопки. True – размер автоматически подстраивается под длину введенной надписи (заголовка). False – размер элемента управления определяется свойствами Width и Height. |
| BackColor | Цвет элемента управления CommandButton. |
| Caption | Надпись (заголовок) – текст, отображаемый на кнопке. |
| ControlTipText | Текст всплывающей подсказки при наведении курсора на кнопку. |
| Enabled | Возможность взаимодействия пользователя с элементом управления CommandButton. True – взаимодействие включено, False – отключено (цвет надписи становится серым). |
| Font | Шрифт, начертание и размер текста надписи. |
| Height | Высота элемента управления. |
| Left | Расстояние от левого края внутренней границы пользовательской формы до левого края элемента управления. |
| Picture | Добавление изображения вместо текста заголовка или дополнительно к нему. |
| PicturePosition | Выравнивание изображения и текста на кнопке. |
| TabIndex | Определяет позицию элемента управления в очереди на получение фокуса при табуляции, вызываемой нажатием клавиш «Tab», «Enter». Отсчет начинается с 0. |
| Top | Расстояние от верхнего края внутренней границы пользовательской формы до верхнего края элемента управления. |
| Visible | Видимость элемента управления CommandButton. True – элемент отображается на пользовательской форме, False – скрыт. |
| Width | Ширина элемента управления. |
| WordWrap | Перенос текста заголовка на новую строку при достижении ее границы. True – перенос включен, False – перенос выключен. |
В таблице перечислены только основные, часто используемые свойства кнопки. Все доступные свойства отображены в окне Properties элемента управления CommandButton.

Пример кнопки с надписью и изображением
Примеры кода VBA Excel с кнопкой
Изначально для реализации примеров на пользовательскую форму UserForm1 добавлена кнопка CommandButton1.
Пример 1
Изменение цвета и надписи кнопки при наведении на нее курсора.
Условие примера 1
- Действия при загрузке формы: замена заголовка формы по умолчанию на «Пример 1», замена надписи кнопки по умолчанию на «Кнопка», запись цвета кнопки по умолчанию в переменную уровня модуля.
- Сделать, чтобы при наведении курсора на кнопку, она изменяла цвет на зеленый, а надпись «Кнопка» менялась на надпись «Нажми!»
- Добавление кода VBA Excel, который будет при удалении курсора с кнопки возвращать ей первоначальные настройки: цвет по умолчанию и надпись «Кнопка».
Решение примера 1
1. Объявляем в разделе Declarations модуля пользовательской формы (в самом начале модуля, до процедур) переменную myColor:
2. Загружаем пользовательскую форму с заданными параметрами:
|
Private Sub UserForm_Initialize() Me.Caption = «Пример 1» With CommandButton1 myColor = .BackColor .Caption = «Кнопка» End With End Sub |
3. Меняем цвет и надпись кнопки при наведении на нее курсора мыши:
|
Private Sub CommandButton1_MouseMove(ByVal _ Button As Integer, ByVal Shift As Integer, _ ByVal X As Single, ByVal Y As Single) With CommandButton1 .BackColor = vbGreen .Caption = «Нажми!» End With End Sub |
4. Возвращаем цвет и надпись кнопки при удалении с нее курсора мыши:
|
Private Sub UserForm_MouseMove(ByVal _ Button As Integer, ByVal Shift As Integer, _ ByVal X As Single, ByVal Y As Single) With CommandButton1 .BackColor = myColor .Caption = «Кнопка» End With End Sub |

Все процедуры размещаются в модуле пользовательской формы. Переменная myColor объявляется на уровне модуля, так как она используется в двух процедурах.
Пример 2
Запуск кода, размещенного внутри процедуры обработки события Click элемента управления CommandButton:
|
Private Sub CommandButton1_Click() MsgBox «Код внутри обработки события Click» End Sub |
Пример 3
Запуск внешней процедуры из процедуры обработки события Click элемента управления CommandButton.
Внешняя процедура, размещенная в стандартном модуле проекта VBA Excel:
|
Sub Test() MsgBox «Запуск внешней процедуры» End Sub |
Вызов внешней процедуры из кода обработки события Click
- с ключевым словом Call:
|
Private Sub CommandButton1_Click() Call Test End Sub |
- без ключевого слова Call:
|
Private Sub CommandButton1_Click() Test End Sub |
Строки вызова внешней процедуры с ключевым словом Call и без него – равнозначны. На ключевое слово Call можно ориентироваться как на подсказку, которая указывает на то, что эта строка вызывает внешнюю процедуру.
Excel Buttons
In Excel, Buttons are used to call Macros. This tutorial will cover how to create Excel buttons, assign Macros to them, adjust their properties, and more.
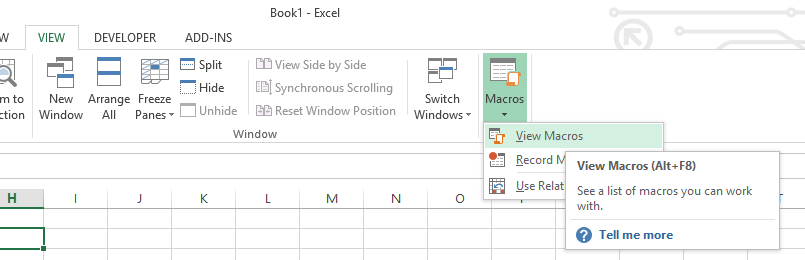
By default, Excel macros are accessible in a list via the “Macros” button on the View ribbon.
Often though, you’ll want to provide easy access to a particular macro directly on your worksheet. This can be achieved using a Button control.
A Button control looks like a Microsoft Windows button, and runs a macro when clicked. It’s a much handier way to access your most commonly used macros, and is an easy way to expose custom functionality to other users of your workbook.
Run a Macro From a Button
To run a Macro from a button in Excel, simply click the button:
The Excel Developer Tab
Buttons are accessible via the Developer Tab.

Unfortunately, Excel hides the Developer tab by default. If you don’t see the Developer Ribbon, follow these steps:
- Click File > Options in the list on the left-hand border
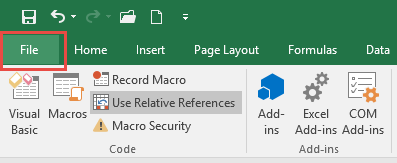
- In the Options dialog select Customize Ribbon > Customize the Ribbon > Main Tabs and add a check-mark in the box for “Developer”, and click OK.
Add a Macro Button
In Excel, select the Developer tab, then click on the “Insert” dropdown in the Controls section. There are several types of controls divided into two sections, “Form Controls” and “ActiveX Controls”.
For now, just click on the Button control under “Form Controls”. Next, move the mouse anywhere over the worksheet surface, then hold left-click and drag the mouse to draw the outline of a rectangle. When you release left-click, a new dialog will appear titled “Assign Macro”.

Assigning a Macro to a Button
Here you can assign an existing Macro to the button, record a new macro, create a new macro from scratch using VBA, or click “Cancel” and return to your button later.
Assign Existing Macro to a Button
To assign an existing Macro, you simply select the macro’s name in the list, then click OK.
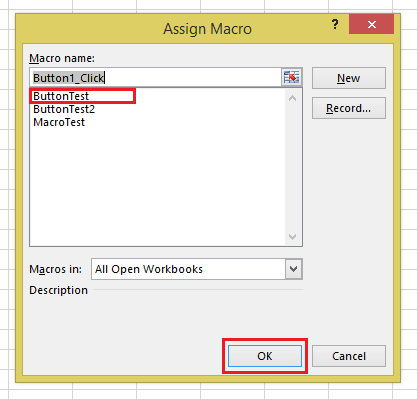
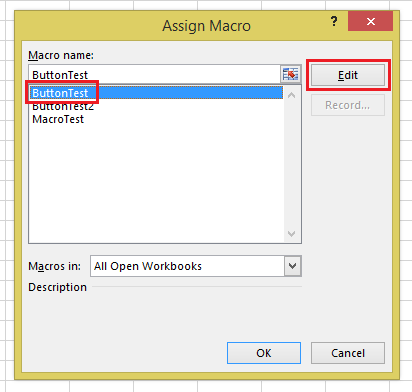
Edit an Existing Macro Before Assigning to a Button
To edit a macro before assigning it to the button, select the macro’s name in the list and click the “Edit” button (the “New” button text changes to “Edit”).
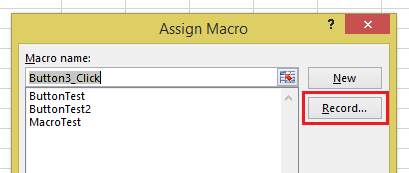
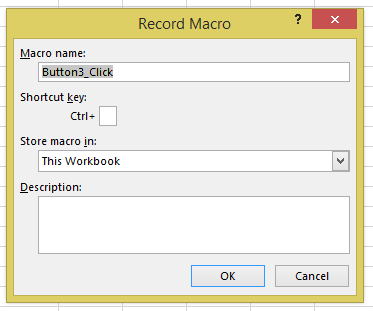
Record a Macro and Assign to Button
To record a new macro and assign it to the button, click “Record…”. This brings up the Record Macro dialog, where you specify a name and click “OK”. The button will be assigned that macro. Meanwhile, Excel will remain in a recording state until you click “Stop Recording” in the “Code” section of the Developer tab.
Write VBA Procedure and Assign to Button
To write a new macro for the button, type a new name for your macro in the textbox at the top of the dialog, then click “New”. Excel will bring up the VB Editor, in which you’ll see a new empty macro procedure with the name you entered. This procedure will be stored in a new module, visible in the Project window.
Change Macro Assigned to Button
To change the Macro that’s assigned to a button, simply right-click the button and select Assign Macro:
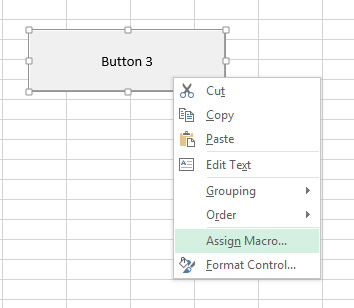
Here you can see the assigned Macro and make any desired changes.

How to Adjust Button Properties in Excel
Move or Resize Excel Button
After you’ve placed a button, you can easily move or resize it. To perform any of these actions, right-click on the button. Then you can left-click and drag the button to your desired location or resize it.
Rename Button
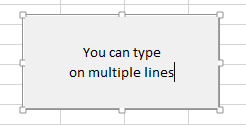
With the button selected, left-click on the button text to edit.
To add multiple lines, simple press the ENTER key.
Format Button
To format other button properties, Right-Click > Format Control
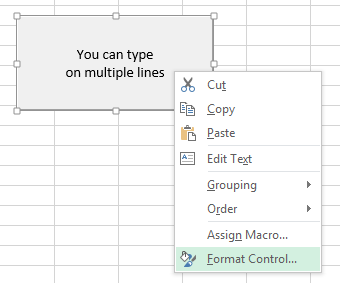
Here you can adjust font sizes, and many other button properties:

Of particular note is the “Properties” tab, which changes how the button behaves as surrounding rows and columns are inserted, deleted, resized, or hidden/unhidden.
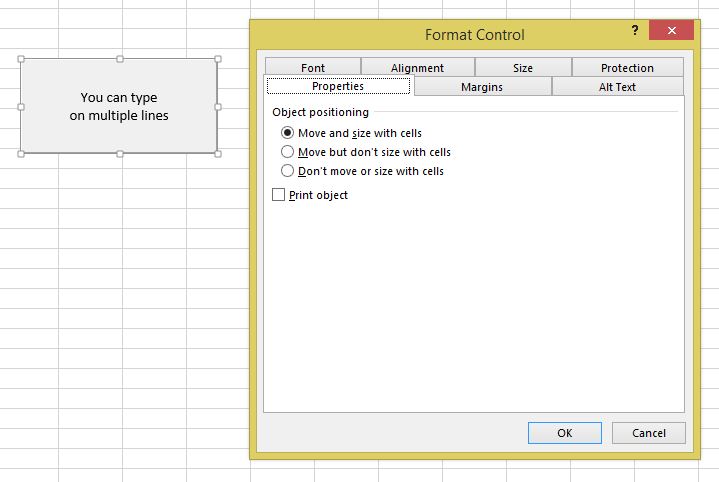
- Move and size with cells: The button will move and resize when rows and columns are changed.
- Move but don’t size with cells: The button will move, but not resize.
- Don’t move or size with cells: The button will not move or resize.
- Finally, Print Object can set the object to appear on printouts. This is unchecked by default, but can be toggled on if desired.
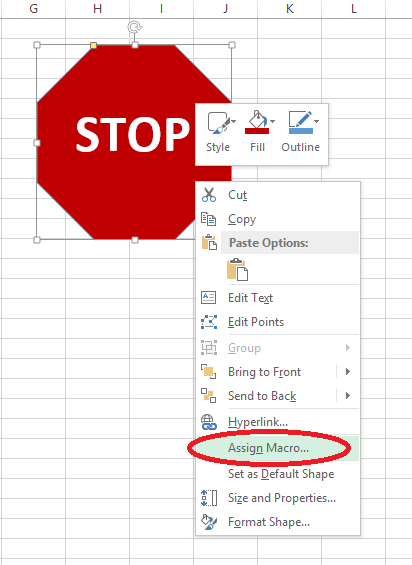
Assign a Macro to a Shape
Besides buttons, macros can assigned to other objects like Pictures, Textboxes, and Shapes. With a Picture or Shape, you can make a button that looks any way you like. Excel includes a wide variety of customizable Shapes including polygons, arrows, banners, and more that may be better suited to your worksheet than a regular button control.
Shapes are accessed from the Insert tab:
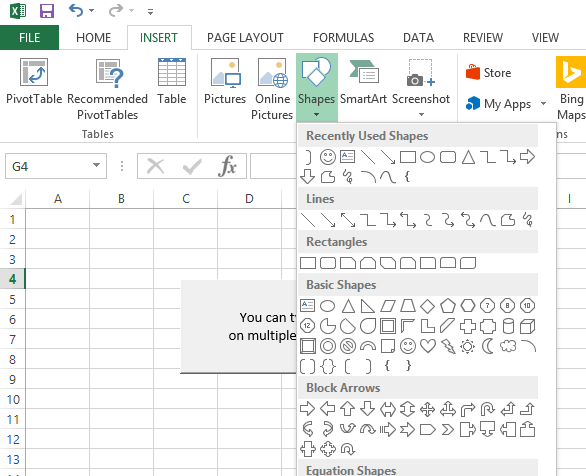
Select the shape you want from the Shape dropdown, draw it onto your worksheet as you would a button control, then right-click it and select “Assign Macro…” from the pop-up dialog. The options are the same as assigning a macro to a button.
Assign a Macro to a Hyperlink
Macros can also be assigned to hyperlinks by using VBA Events. Events are procedures that are triggered when certain actions are performed:
- Open/Close/Save Workbook
- Activate / Deactivate Worksheet
- Cell Values Change
- Click Hyperlink
- and more.
Events require knowledge of VBA. To learn more about events, visit our VBA Tutorial.
Home / Excel Basics / How to Add a Button in Excel
In Excel, users can add macro-enabled buttons on the worksheets and can run macros by just clicking on them.
Users can use these macro-enabled buttons to perform several different tasks like filtering data, selecting data, printing a worksheet, running formulas, and calculations just by clicking on the buttons.
Adding buttons and embedding the macros to them is easier. Excel has multiple ways to add the macro-enabled buttons to the worksheet. Below, we have some quick and easy ways mentioned for you to add the macro buttons in Excel.
Add Macro Buttons Using Shapes
Users can create buttons in excel using shapes. Creating buttons using shapes has more formatting options over the buttons created from Control buttons or ActiveX buttons. Users can change the design, color, font, and style of the button created using shapes.
- First, go to the “Insert” tab and then click on the “Illustrations” icon” then click on the “Shapes” option and select any rectangle button.

- After that, with the help of a mouse, draw the rectangular button on the worksheet.

- Now, to enter the text in the button, double-click on the button and insert the text.

- For formatting, go to the “Shape Format” tab and you will get multiple options for the formatting of the button.
- From here, you can format the font style, font color, button color, button effects, and much more.

- To edit the text, add the hyperlink, or add the macro, just right-click on the button and you will get the pop-up menu with multiple options.
- From here, you can edit the text, add the hyperlink, and can add the macro to the button.
- Now, select the “Assign Macro” option to add the macro to the button.

- Once you select the “Assign Macro” option, you will get the “Assign Macro” dialogue box opened.
- From here, select the macro and click OK.

- At this point, the button has become micro enabled, and when you move your cursor on the button, the cursor turns to the hand point cursor.
- To freeze the button movement, right-click on the button and select the “Format Shape” and select the option “Don’t move or size with cells”.


Add Macro Buttons Using Form Controls
- First, go to the “Developer” tab and click on the “Insert” icon under the “Control” group on the ribbon.

- After that, select the first button option from the “Form Controls” menu and draw a button on the worksheet.
- Now, select or type the macro name from the “Assign Macro” dialogue box and click OK.
- If you don’t have any macro created yet, you can click cancel to add the macro at a later stage.

- From here, right-click on the button and select “Assign Macro” to add the macro to the button if did not assign yet.
- To format the button font size, style, color, etc. select the “Format Control” option.

- Once you click on “Format Control”, you will get the “Format Control” window open and then can do the button font formatting.

- To freeze the button movement, select the “Properties” tab and select the option “Don’t move or size with cells” and click OK.


Add Macro Buttons Using ActiveX Controls
- First, go to the “Developer” tab and click on the “Insert” icon under the “Control” group on the ribbon.

- After that, select the first button option from the “ActiveX Controls” menu and draw a button on the worksheet.

- Now, to create and insert the macro to the button, click on the “View Code” icon to launch the VBA editor.

- Now, select the” CommandButton1” on the subprocedure and choose the “Click” option from the drop-down list on the right side of the editor.


