
Want to turn images that have table data into data that you can edit in Excel? With the Data from Picture feature, it’s a snap.
Windows: 2210 (Build 15723)
Web: introduced 9-Dec-2022
Mac: 16.38
iOS: 2.26
Android: 16.0.11500

With the Data from Picture feature, you can insert data from a screen capture on your clipboard, or an image file from your computer.
Important: Only the following character sets are supported: English, Bosnian, Croatian, Czech, Danish, Dutch, Finnish, French, German, Hungarian, Italian, Norwegian, Polish, Portuguese, Romanian, Serbian, Slovak, Slovenian, Spanish, Swedish, and Turkish.
Important: Data from Picture in Excel for Windows is only supported on Windows 11 or Windows 10 version >=1903 (must have Microsoft Edge WebView2 Runtime installed).
How it works
-
Capture your data from an image. There are two methods:
Method
Steps
Tips
Use an existing picture file
Click Data > From Picture > Picture From File.
-
The image should only depict the data you want to import. If necessary, crop the image.
-
Avoid images that depict data from an angle — the perspective should be head-on and focused.
Take a screenshot
Take a screenshot of the table, then click Data > From Picture > Picture From Clipboard.
-
Make sure your screenshot only includes the data you want to import.
-
-
After you have selected the picture, the Data from Picture dialog box shows Excel’s progress analyzing the image for data.
-
Review the results, make any data corrections necessary, and then click Insert Data.
Scenarios to try
-
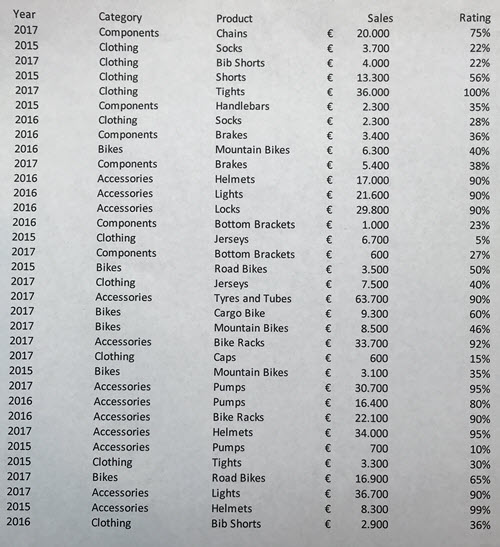
Import data from a sample image file Right-click the following image and «Save image as…» a local copy, then click Data > From Picture > Picture From File and follow the on-screen instructions to convert the picture to data.

-
Screen capture a table from a website If you’ve ever tried to copy and paste some data from a web site, you’ve likely noticed that the formatting looks different after you’ve pasted it than it did on the website. Instead, try to capture a screen clipping of the table (by pressing Windows log key + Shift + S), then select Data > From Picture > Picture From Clipboard. Then, follow the instructions on screen.
-
Take a picture of some printed data Maybe you’d like to get data from your previous tax returns into Excel and you only have printed copies. Just take a picture of each one, transfer the pictures to your computer (OneDrive is great for this). Then, click Data > From Picture > Picture From File and follow the on-screen instructions to convert picture to data.
With the Data from Picture feature, you can insert data from an image file from your computer.
Important: Only the following character sets are supported: English, Bosnian, Croatian, Czech, Danish, Dutch, Finnish, French, German, Hungarian, Italian, Norwegian, Polish, Portuguese, Romanian, Serbian, Slovak, Slovenian, Spanish, Swedish, and Turkish.
How it works
-
To capture your data from an image, do the following:
Method
Steps
Tips
Use an existing picture file
Click Data > Data From Picture > browse and select the picture file > Open.
-
The image should only depict the data you want to import. If necessary, crop the image.
-
Avoid images that depict data from an angle — the perspective should be head-on and focused.
-
-
After you have selected and opened the picture file, the Data from Picture dialog box shows Excel’s progress analyzing the image for data.
-
Review the results, make any data corrections necessary, and then click Insert Data.
Scenarios to try
-
Import data from a sample image file Right-click the following image and «Save image as…» a local copy, then click Data > Data From Picture and follow the on-screen instructions to convert the picture to data.
-
Take a picture of some printed data Maybe you’d like to get data from your previous tax returns into Excel and you only have printed copies. Just take a picture of each one, transfer the pictures to your computer (OneDrive is great for this). Then, click Data > Data From Picture and follow the on-screen instructions to convert picture to data.
With the Data from Picture feature, you can insert data from a screen clipping on your clipboard, an image file from your computer, or from your iPhone camera.
Important: Only the following character sets are supported: English, Bosnian, Croatian, Czech, Danish, Dutch, Finnish, French, German, Hungarian, Italian, Norwegian, Polish, Portuguese, Romanian, Serbian, Slovak, Slovenian, Spanish, Swedish, and Turkish.
How it works
-
Capture your data from an image. There are three methods:
Method
Steps
Tips
Use an existing picture file
Click Data > Data From Picture > Picture From File.
-
The image should only depict the data you want to import. If necessary, crop the image.
-
Avoid images that depict data from an angle — the perspective should be head-on and focused. If applicable, consider fixing the perspective using your iPhone controls.
Take a screenshot
Take a screenshot of the table, then click Data > Data From Picture > Picture From Clipboard.
-
Make sure your screenshot only includes the data you want to import.
Scan data using your iPhone (Requires iPhone configured to use Continuity Camera.)
-
In Excel, right-click a cell, then click Scan Documents.
-
Aim your iPhone camera at the data.
Adjust the lighting and focus, then tap the button to take a picture.
-
Make any further adjustments to the image, then tap Save.
-
The document you are scanning should be as well-lit as possible.
-
Make sure you scan only the data you want to import.
-
Don’t scan from an angle — aim directly at the data. If necessary, use your iPhone controls to make adjustments to the scanned image.
-
-
After you have captured the picture, the Data from Picture dialog box shows Excel’s progress analyzing the image for data.
-
Review the results, make any data corrections necessary, and then click Insert Data.
Scenarios to try
-
Import data from a sample image file Right-click the following image and «Save image as…» a local copy, then click Data > Data From Picture > Picture From File and follow the on-screen instructions to convert the picture to data.
-
Scan some data from a book or magazine If you see some interesting data in a book and want to use it in Excel, this is a great way to skip the typing. If you have an iPhone, right-click in Excel on your Mac and select Scan Documents. Your iPhone will light up. Then you can take a picture of the data, and follow the on-screen instructions to bring the data in Excel in no time.
-
Screen capture a table from a website If you’ve ever tried to copy and paste some data from a web site, you’ve likely noticed that the formatting looks different after you’ve pasted it than it did on the website. Instead, try to capture a screen clipping of the table (by pressing SHIFT+CTRL+CMD+4 on your Mac), then select Data > Data from Picture > Picture From Clipboard. Then, follow the instructions on screen.
-
Take a picture of some printed data Maybe you’d like to get data from your previous tax returns into Excel and you only have printed copies. Just take a picture of each one, transfer the pictures to your Mac (OneDrive is great for this). Then, click Data > Data From Picture > Picture From File and follow the on-screen instructions to convert picture to data.
Get Started
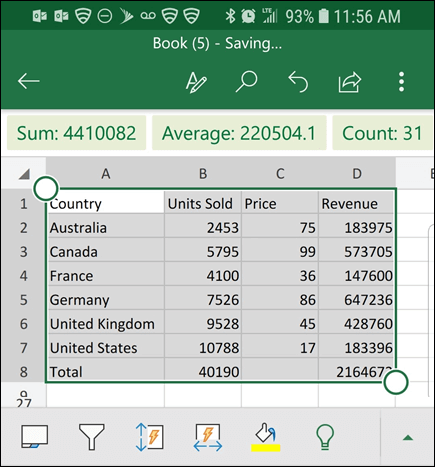
Open Excel on your phone or tablet and tap the Insert data from picture button to get started

Next, narrow in on your data until you see it surrounded by a red border, then tap the capture button. If needed, you can use the sizing handles around the edges of the image to crop it to size first.

Excel’s powerful AI engine will process the image and convert it to a table. When it first imports your data, it will give you a chance to correct any issues it discovered during the conversion process. Tap Ignore to move on to the next issue, or Edit to correct the issue.

Press Insert when you’re done, and Excel will finish the conversion process, and display your data.
Use the Microsoft 365 app
If you like using the Microsoft 365 app, you can do the same thing from there.
-
Open the Microsoft 365 app on your phone and select Actions > Image to Table.
-
Point the camera at the table you need and tap the capture button. The app automatically crops the picture so that only the table is included. If necessary, adjust the crop with the sizing handles around the edges of the image. Select Confirm when you are done. The app extracts the data from the picture and displays a preview of the table.
-
Select Open to open the table in Excel. If the Microsoft 365 app found any issues in the table, such as typos caused by the extraction process, it asks how you want to handle them. Do one of the following:
-
Select Open Anyway to open the table in Excel and fix any issues there.
-
Select Review to fix issues in the Microsoft 365 app. For each issue, select Ignore to move on to the next issue, or use the on-screen keyboard to correct the problem. After you have dealt with every issue, the table opens in Excel.
-
-
After editing the table to your liking, remember to save it.
Important: Only the following character sets are supported: English, Bosnian, Croatian, Czech, Danish, Dutch, Finnish, French, German, Hungarian, Italian, Norwegian, Polish, Portuguese, Romanian, Serbian, Slovak, Slovenian, Spanish, Swedish, and Turkish.
See Also
Get Office for Android
Video: Getting started with Excel for Android
Excel for Android help
Can you scan printed spreadsheets into Excel?—Quora
How does one scan Excel Spreadsheets, selectively pick and process data?—Quora
…
We need to scan a PDF document or receipt to Excel for data extraction into a report or financial documents sometimes. Scanning to Excel is the process to create editable/searchable Excel spreadsheet from image-based files scanned from a scanner or a camera, in which OCR is required. Here in this post, 5 ways to scan documents into Excel with OCR on Mac or Windows PC are listed with complete steps.
- The Easiest and Affordable Way to Scan to Excel(Mac and Windows)
- If You Have Installed Adobe Acrobat (Mac and Windows)
- Scan to Excel with ABBYY FineReader (Mac and Windows)
- Scan to Excel for Free (Mac and Windows)
- Scan to Excel Online Free
#1 The Easiest Way to Scan to Excel with OCR (Mac and Windows)
You may have noticed that there are 2 steps involved in the process to scan documents into Excel, you need to turn printed files to scans first, then OCR the scans to Excel format. But, with today’s pervasiveness of mobile devices that carry a camera, it is very easy for us to scan documents by using a camera. In the case that you don’t have a scanner, you can use the camera on your mobile photo to scan, then find a OCR program to turn scans to Excel spreadsheet.
Cisdem PDF Converter OCR is a mac program to turn scanned PDF and image into Excel, Word, PowerPoint, Keynote, Pages, ePub, HTML, RTFD and Text with original formatting retained. It enables users to scan documents to Excel in high quality and in batches.
Why Cisdem PDF Converter OCR?
- Turn scans in PDF and Image to Excel, Word, PowerPoint and other editable formats
- Highly maintain original file formatting
- Advanced OCR settings: export specific part as Text, Table or Image
Batch OCR scans - Recognize 200+ file languages: English, Chinese, Japanese, Arabic, Russian, etc.
- Convert native PDF to 16 formats
- Create, protect and compress PDFs
 Free Download
  Free Download
How to Scan to Excel with the Best Converter?
- Capture the printed files and save them in scanned PDF or Image;
- Download and install Cisdem PDF Converter OCR onto your PC;
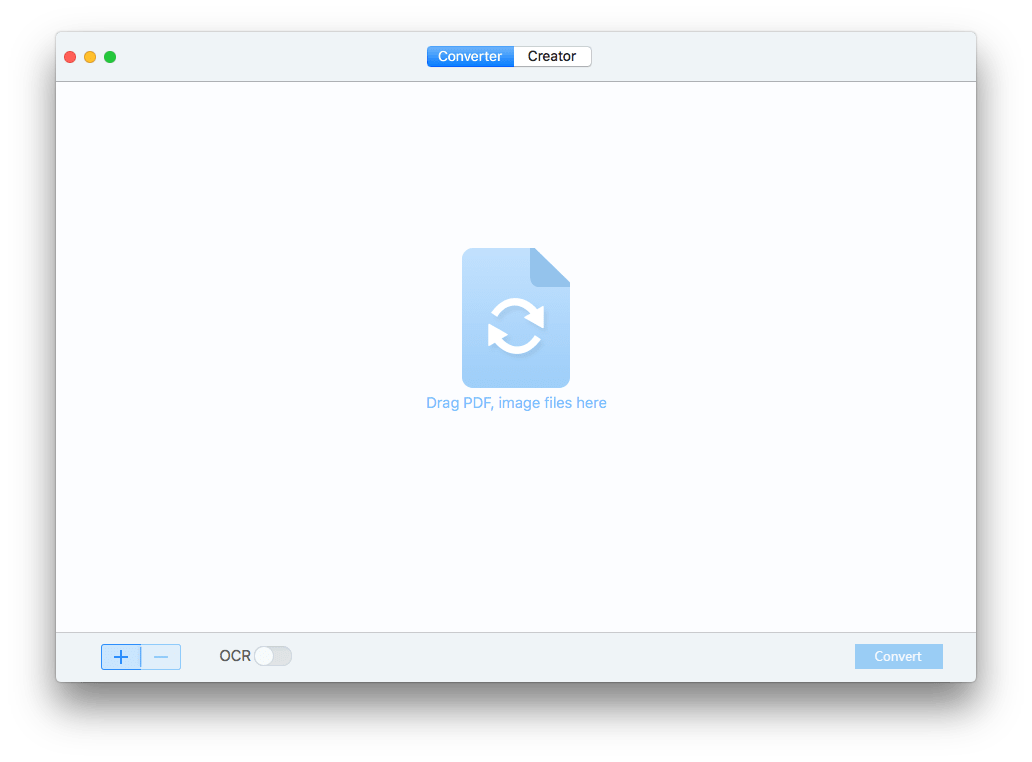
Free Download Free Download - Launch the program, drag and drop scans into the program;
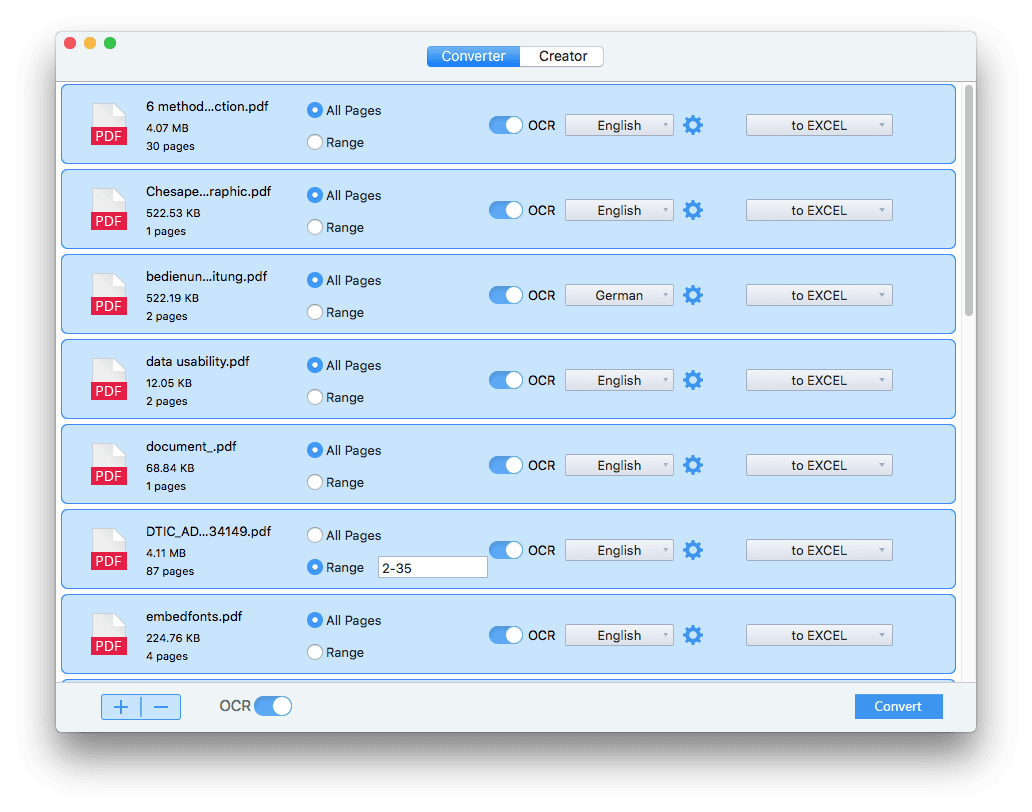
- Adjust the settings for scanning to Excel with OCR;
When importing scanned PDF files, turn OCR button ON;
When importing scanned images, the OCR button is ON by default;
Then choose page range, select file language and set output format as Excel; - Scan to Excel with OCR;
Then click Convert button to scan your documents into Excel. The status bar will indicate a complete OCR process, check the Excel output then.
#2 If You Have Installed Adobe Acrobat (Mac and Windows)
For users who have installed Adobe Acrobat, Adobe offers a comprehensive solution to scan, OCR, edit and convert your documents. It allows to users to create scans from files in the scanner, then OCR to Excel spreadsheet. You can use this method to scan to Excel both on Mac or Windows, since Adobe offers both versions.
The greatest benefit of using Adobe Acrobat to scan to Excel is capability to edit the file in Adobe before OCR to Excel, also, it allows users to fix OCR errors smartly, which will substantially save your time and effort to work on the scans.
How to Scan to Excel with Adobe Acrobat on Mac or Windows?
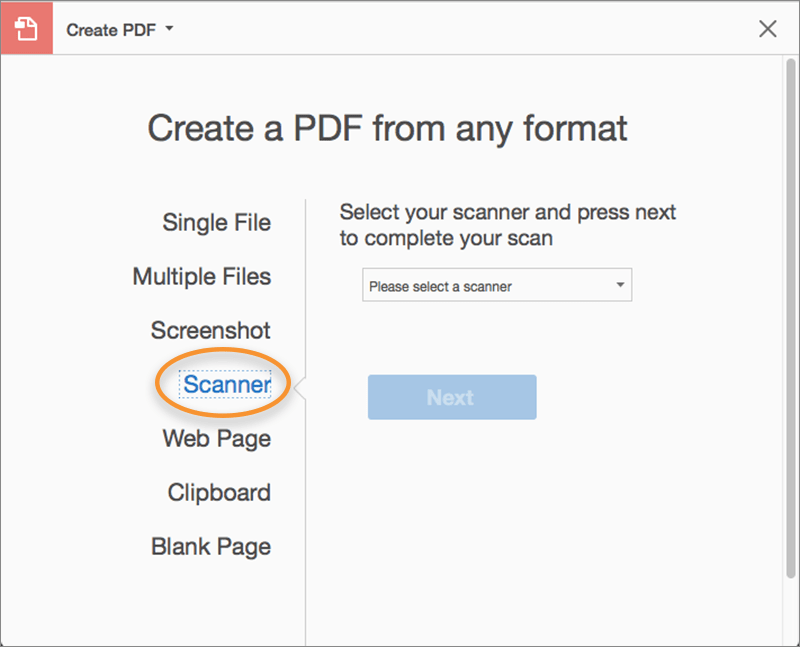
- Run Adobe Acrobat, connect scanner to your Mac or Windows PC
- Go to Tools>Create PDF>Scanner;
- Then OCR the scans by going to Tools>Scan & OCR>Recognize Text;
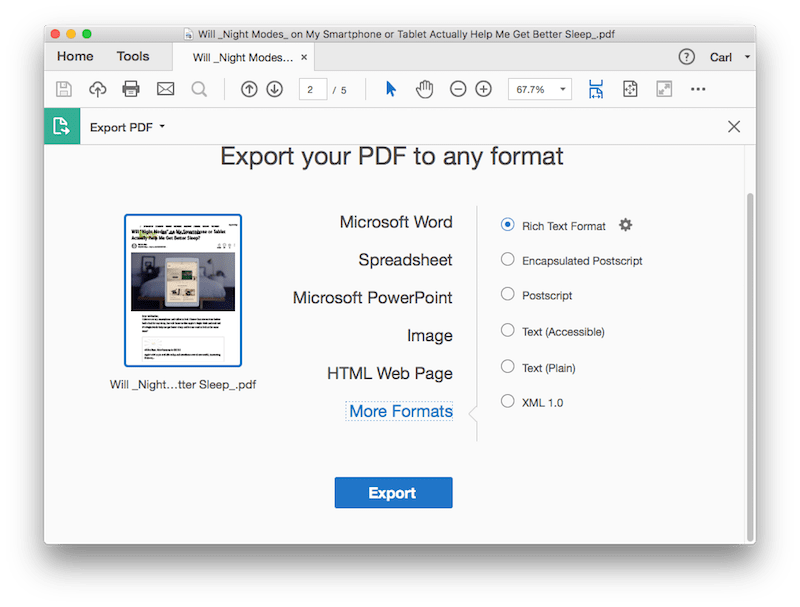
- Once ready, go to Tools>Export PDF, choose Spreadsheet as the output format.

#3 Scan to Excel with ABBYY FineReader (Mac and Windows)
If you are looking for an Adobe Acrobat alternative to scan to Excel, ABBYY FineReader PDF 15 is worth a try, it is as powerful as Adobe Acrobat, but gives a better performance on OCR files with a lower price (Standard Version priced at $165.83 for onetime). It supports scanning, editing, protecting, collaborating, creating, converting and doing OCR on PDF files.
Also it supports more output formats than Adobe, including PDF, PDF/A, DOCX, RTF, XLSX, PPTX, ODT, HTML,TXT,CSV,EPUB,FBS.
How to Scan to Excel with ABBYY FineReader?
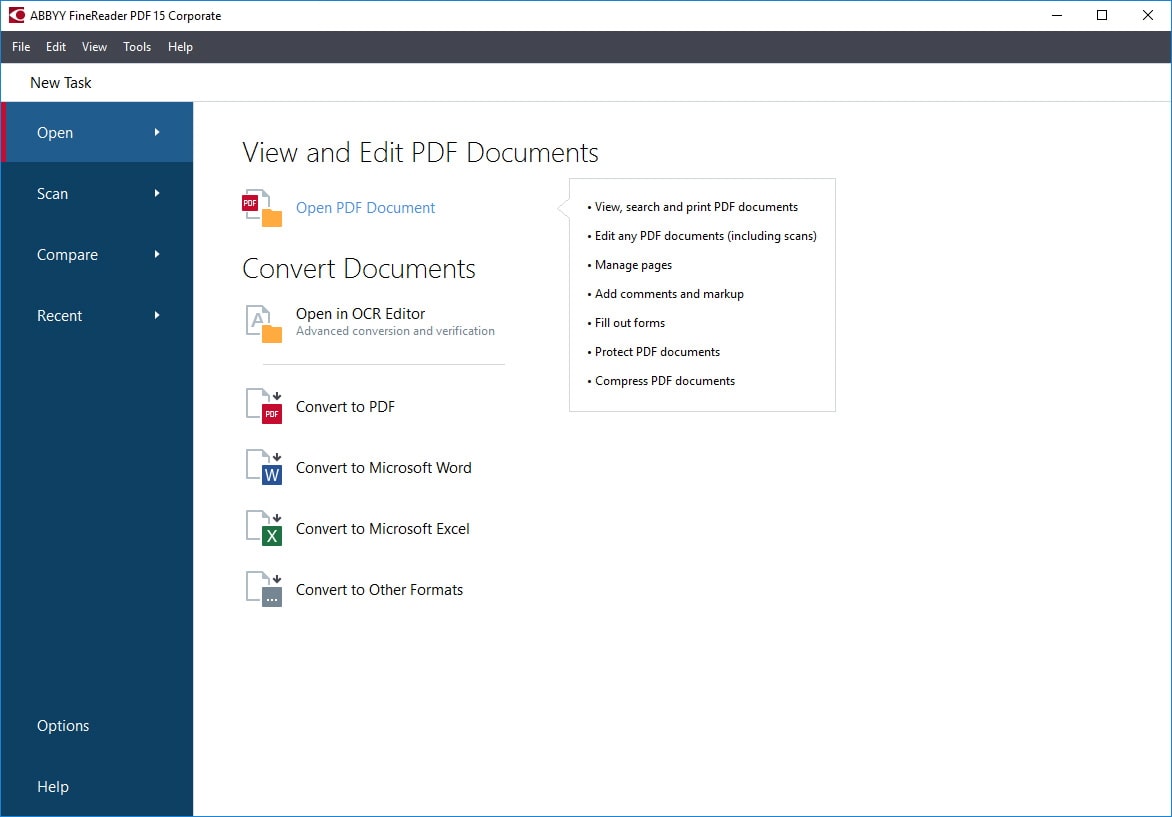
- Download and install ABBYY FineReader to your computer, connect the scanner to your computer;
- Run the program, go to Scan and create scans from files in your scanner;
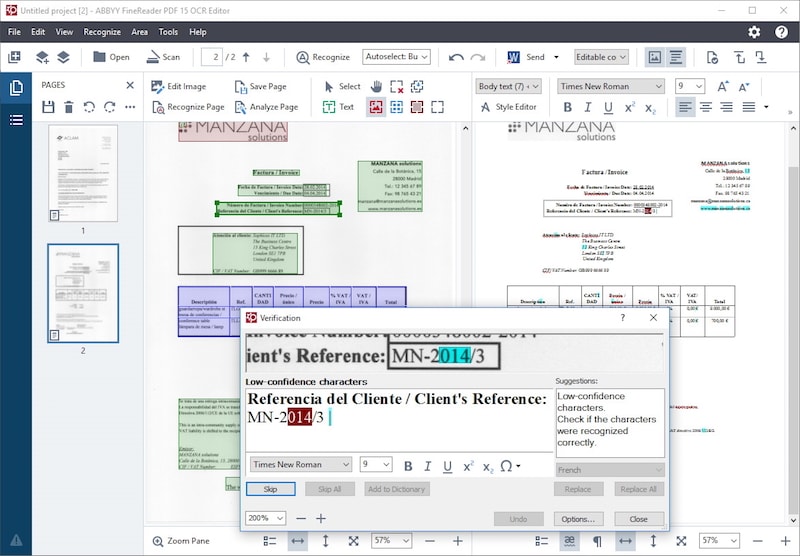
- Then go to Recognize, revise or edit the file if needed;
- Choose output as Excel, you will be able to scan document to Excel with ABBYY FineReader.
#4 Scan to Excel for Free (Mac and Windows)
Actually, there is a free method to scan to excel offline, using Microsoft OneNote. It is note-taking program available on macOS, Windows, Android and iOS, it builds in the OCR feature, allowing users to copy and paste texts from image or screenshot. Though it doesn’t allow exporting scans as Excel directly, its copying & pasting feature won’t disappoint you.
However, you should be aware of that, OneNote OCR doesn’t maintain formatting, if you want to scan well-formatted documents to Excel, OneNote is not recommended to you, just try other solutions.
How to Scan to Excel for Free with Microsoft OneNote?
- Download and install Microsoft OneNote to your Mac or Windows PC, connect the scanner to your computer if you have one;
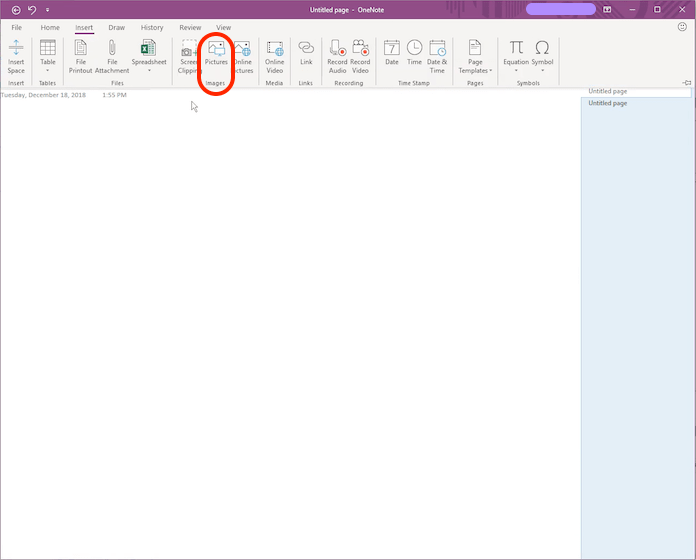
- Run the program, go to Insert>Pictures>From Scanner or Camera, import the scans;
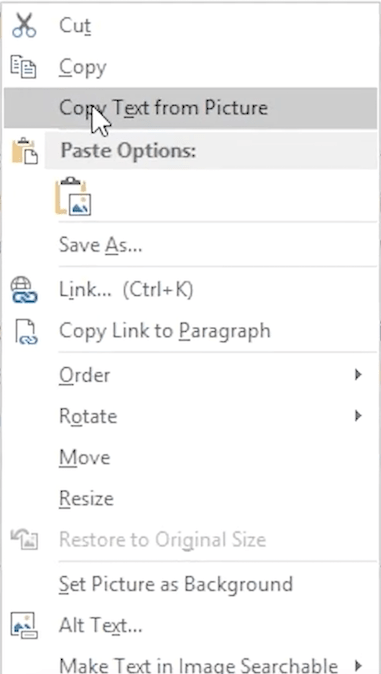
- Once the scanned image is displayed in Microsoft OneNote, right click on the picture to choose “Copy Text from Picture”;
- Then paste the text to a Excel spreadsheet. Done.
#5 Scan to Excel Online Free
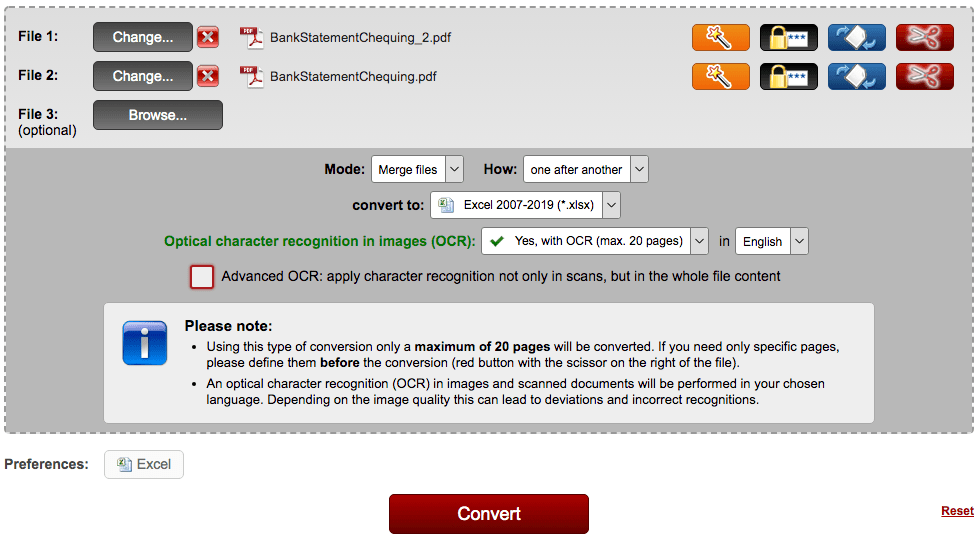
You can also scan documents into Excel with online free OCR tools, but you will need to create scans from paper files using your mobile device camera first, then prepare the scans in image format and upload online for OCR. Here we recommend scanning to Excel with Online2PDF, it is great platform to create, convert, merge, split, edit, compress, protect and unlock PDF for free. With its OCR feature, users can convert scanned documents to Excel, Word, PowerPoint, searchable PDF, Text and ePub format. It supports batch OCR too.
However, the formatting won’t be fully maintained in the Excel output, you need to check and manually revise to make sure there is no OCR errors or formatting mess.
How to Scan to Excel Online Free?
- Scan documents with a camera, save the files in image format and transfer to your computer;
- Go to Online2PDF;
- Upload scans to the program;
- Choose output as Excel and select OCR feature. Also, choose the file language;
- Then click Convert to scan to Excel;
- Finally, download the editable Excel spreadsheet to your computer and manually revise if necessary;
Conclusion
Today, it is not required to scan files with a scanner, you can use your camera or mobile device to create scans. And it become quite easier to scan to Excel, as long as you have found a professional OCR program to turn digitized scans to editable Excel format, just like Cisdem PDF Converter OCR, ABBYY FineReader. Both of them bring highly accurate OCR result, also enable users to convert scans to various output formats that you use very often.
Optical character recognition (OCR) refers to the process of electronically or mechanically converting images of printed, handwritten, or typed text into machine-encoded text. This can be done by scanning a document, taking a photo of it, capturing text from a scene-photo (such as a picture of a sign or billboard), or extracting text from subtitle overlays on images (such as those used in television broadcasts).
OCR, or optical character recognition, is a popular technology used for digitizing printed text records, such as invoices, bank statements, passport documents, business cards, and mail. It converts images of typed, printed, or handwritten text into machine-encoded text, making it easier to edit, search, store, and display electronically. OCR is widely used for data entry and machine processes such as text-to-speech, machine translation, cognitive computing, and text and data mining. OCR is a subject of research in the fields of artificial intelligence, pattern recognition, and computer vision.
In the past, early versions of OCR required individual training with images of each character and could only recognize one font at a time. However, more advanced systems are now widely available that can achieve high levels of accuracy in recognizing most fonts, and can accept a variety of digital image file formats as input. Some of these systems can even reproduce the original page’s format, including images, columns, and other non-textual components.
PDF to Excel
Some of your files contain scanned pages. To extract all text from your files, OCR is needed.
Looks like you are trying to process a PDF containing some scanned pages. To extract all text from your file, OCR is needed.
-
No OCR
Converts PDFs with selectable text to editable Excel files.
-
OCR Premium
Converts scanned PDFs with non-selectable text to editable Excel files.
![]() Getting files from Drive
Getting files from Drive
![]() Getting files from Dropbox
Getting files from Dropbox
Uploading file 0 of 0
Time left — seconds —
Upload speed — MB/S
Converting PDF to EXCEL…
![]()
PDF to Excel converter
PDF is a popular format for scanned documents and is often the default in scanners and copiers. It is widely used to digitize financial reports, invoices, and other tabular data. However, the size of scanned PDF files is significant and their content cannot be searched, indexed, edited, or imported into databases.
This free online application allows you to convert single-page and multi-page PDF files into Excel workbooks – the most popular format for finance, statistics, science, government organizations all across the world. Advanced machine-learning algorithms accurately detect the structure of tables, extract the text from cells and arrange it into searchable and editable spreadsheets. You can easily enrich the recognized content with charts, analyze it with pivot tables, and import it into databases and financial software. The application can recognize PDF files hosted on websites without downloading them to your computer. The app works on any device, including smartphones.
This free app provided by
Aspose OCR

How to convert scanned PDF to Excel workbook
Step 1
Provide a PDF file
Upload a scanned PDF, or simply enter its web address.
Step 2
Start recognition
Click Recognize button to extract the text from the document.
Step 3
Wait a few seconds
Wait until the recognition result is displayed.
Step 4
Get result
Download the Excel workbook or just open it in Office 365.
FAQ
Can I edit the resulting Excel?
Yes, the application accurately extracts text from cells, creating an editable Excel workbook. However, most systems open downloaded Excel files in read-only mode. You must manually enable editing to change the content.
How to get the best result?
Good image quality is the cornerstone for accurate recognition. Make sure the scan quality of the original PDF file is sufficient.
Can I use the app from mobile devices?
Yes, the application works in all popular web browsers on any device and platform, including smartphones.
I store PDFs on a website. Do I need to download them?
No, simply provide a link to the PDF file on URL tab. The application will do the rest.
Can I work with PDF files from cloud storages?
Yes. The application can process the files from Google Drive and Dropbox.
Is this app free?
Yes, the application provides full capabilities of Aspose.OCR for free, for as long as you need.
The features you will like
Versatile document archival
Compress a scanned PDF file ten times or more without losing the readability of the content.
Edit and import scanned reports
Digitize financial reports and invoices into indexable, searchable and editable workbooks that can be imported into databases and financial software.
Zero system load
Recognition is carried out by high-performance Aspose Cloud. The application has minimum hardware or operating system requirements — you can use it even on entry-level systems and mobile devices without loss of accuracy and performance.
Recognize PDF files from the Internet
There is no need to upload PDF files to the application. Just paste the web address or choose a file from the cloud storage to get the text.
Top recognition quality
Years of development resulted in a state-of-art optical character recognition engine with superior speed and accuracy. Aspose products are used by most Fortune 100 companies across 114 countries.
No cost
The application can recognize any number of PDF documents for free, for as long as you need.