
Actually — there IS a way to get the data from your HTML form exported into an Excel spreadsheet.
In your HTML form you’ll have to create a separate table (it can be hidden).
And the BIG SECRET IS:
In the put id tags and then use a JavaScript to replace the innerHTML with the value of the fields on your form which collect the data you want.
Check out the JSFiddle here: http://jsfiddle.net/MitchinThailand/589C4/
<!DOCTYPE html>
<html>
<head>
<script type="text/javascript">
function fillHidTable(){
    var htqf; //-- hidden field
    var rf; //-- retrieved field
    for ( var i = 1; i < 5; i++ ) {
        rf = "htqf"+i;
        document.getElementById(rf).innerHTML = document.getElementById("Q"+i+"CALC").value;
    }
    tableToExcel('hidTable', 'Analysis Results');
}

var tableToExcel = (function() {
    var uri = 'data:application/vnd.ms-excel;base64,'
            , template = '<html xmlns:o="urn:schemas-microsoft-com:office:office" xmlns:x="urn:schemas-microsoft-com:office:excel" xmlns="http://www.w3.org/TR/REC-html40"><head><!--[if gte mso 9]><xml><x:ExcelWorkbook><x:ExcelWorksheets><x:ExcelWorksheet><x:Name>{worksheet}</x:Name><x:WorksheetOptions><x:DisplayGridlines/></x:WorksheetOptions></x:ExcelWorksheet></x:ExcelWorksheets></x:ExcelWorkbook></xml><![endif]--></head><body><table>{table}</table></body></html>'
            , base64 = function(s) { return window.btoa(unescape(encodeURIComponent(s))) }
            , format = function(s, c) { return s.replace(/{(w+)}/g, function(m, p) { return c[p]; }) }
    return function(table, name) {
        if (!table.nodeType) table = document.getElementById(table)
        var ctx = {worksheet: name || 'Worksheet', table: table.innerHTML}
        window.location.href = uri + base64(format(template, ctx))
    }
})()
</script>

<title>HTML Form Data to Excel</title>

<style type="text/css" media="screen">
    .divCenMid{font-family:Arial,sans-serif;font-size:14pt;font-style:normal;font-weight:700;text-align:center;vertical-align:middle;margin:0;}
    .allbdrCenMid{border:.75pt solid windowtext;color:#000;font-family:Arial,sans-serif;font-size:10pt;font-style:normal;font-weight:400;text-align:center;vertical-align:middle;margin:0;}
    .allbdrCenTop{border:.75pt solid windowtext;color:#000;font-family:Arial,sans-serif;font-size:10pt;font-style:normal;font-weight:400;text-align:center;vertical-align:top;margin:0;}
    .allbdrLtMid{border:.75pt solid windowtext;color:#000;font-family:Arial,sans-serif;font-size:10pt;font-style:normal;font-weight:400;text-align:left;vertical-align:middle;margin:0;}
    .allbdrLtTop{border:.75pt solid windowtext;color:#000;font-family:Arial,sans-serif;font-size:10pt;font-style:normal;font-weight:400;text-align:left;vertical-align:top;margin:0;}

</style>

</head>

<body>

<table width= "565px" cellspacing="0" cellpadding="0" style="border-spacing:0;" id="QMSTable">
    <col width="25px"/>
    <col width="120px"/>
    <col width="360px"/>
    <col width="60px"/>
    <tr>
        <td class="divCenMid" colspan = "4"> QMS Assessment</td>
    </tr>
    <tr>
        <td class="allbdrCenMid"> No</td>
        <td class="allbdrCenMid"> Criteria</td>
        <td class="allbdrLtMid"> Question</td>
        <td class="allbdrCenMid"> Score</td>
    </tr>
    <tr>
        <td class="allbdrCenTop"> Q1</td>
        <td class="allbdrLtTop"> Quality Unit Independency</td>
        <td class="allbdrLtTop"> Do you have the Quality Unit?</td>
        <td class="allbdrCenMid">
            <input id="Q1CALC" type="text" value="" class="nobdrCenMid" style="overflow:hidden; width:93% " name="Q1CALC"/>
        </td>
    </tr>
    <tr>
        <td class="allbdrCenTop"> Q2</td>
        <td class="allbdrLtTop"> Apply PICS GMP</td>
        <td class="allbdrLtTop"> Which GMP regulation do you use?</td>
        <td class="allbdrCenMid">
            <input id="Q2CALC" type="text" value="" class="nobdrCenMid" style="overflow:hidden; width:93% " name="Q2CALC"/>
        </td>
    </tr>
    <tr>
        <td class="allbdrCenTop"> Q3</td>
        <td class="allbdrLtTop"> Deviation or Non-conformance</td>
        <td class="allbdrLtTop"> Do you have a deviation or non-conformance procedure?</td>
        <td class="allbdrCenMid">
            <input id="Q3CALC" type="text" value="" class="nobdrCenMid" style="overflow:hidden; width:93% " name="Q3CALC"/>
        </td>
    </tr>
    <tr>
        <td class="allbdrCenTop"> Q4</td>
        <td class="allbdrLtTop"> Complaint</td>
        <td class="allbdrLtTop"> Do you have a customer complaint procedure?</td>
        <td class="allbdrCenMid">
            <input id="Q4CALC" type="text" value="" class="nobdrCenMid" style="overflow:hidden; width:93% " name="Q4CALC"/>
        </td>
    </tr>
</table>

<div id="hidTable" style="display: none">
    <table id="testTable">
        <caption>Supplier Risk Analysis</caption>
        <colgroup></colgroup>
        <colgroup></colgroup>
        <colgroup></colgroup>
        <thead>
        <tr>
            <th>No.</th>
            <th>Question</th>
            <th>Score</th>
        </tr>
        </thead>
        <tbody>
        <tr>
            <td>Q1</td>
            <td>Do you have the Quality Unit?</td>
            <td id="htqf1">-</td>
        </tr>
        <tr>
            <td>Q2</td>
            <td>Apply PICS GMP?</td>
            <td id="htqf2">-</td>
        </tr>
        <tr>
            <td>Q3</td>
            <td>Do you have a deviation or non-conformance procedure?</td>
            <td id="htqf3">-</td>
        </tr>
        <tr>
            <td>Q4</td>
            <td>Do you have a customer complaint procedure?</td>
            <td id="htqf4">-</td>
        </tr>
        </tbody>
    </table>
</div>

<input type="button" onclick="fillHidTable()" value="Export Data to Excel">
</body>
</html>
If you can’t figure out the details of how to apply it contact me.
Содержание
- store data from a form using just HTML
- 5 Answers 5
- How to export an HTML table as a .xlsx file
- 5 Answers 5
- Install
- Usage
- Documentation
- Sample apps to get you started
- How to export html table to excel using javascript
- 12 Answers 12
- How to Import Data from HTML into Excel
- How to Export an HTML Table to Excel in WordPress
- How to export an HTML table to Excel with Formidable Forms
- 1. Create a table View
- 2. Configure export functionality and add download link
- Other options to export a table to Excel
- Start exporting tables to Excel today
store data from a form using just HTML
I want to create a form (will be filled by users) and store the data in excel stylesheet without using php just HTML ,is that possible?
I dont want to store data an a database.
I have tried to use google doc but it’s not that good because the validation messages are generated depending on the browser language.
5 Answers 5
The unqualified response of «You can’t write a file from HTML» is inaccurate. While you may need to add some «hidden» fields in your HTML (in order to simplify the exporting of only the data requested and not the questions or other text) it is ABSOLUTELY possible to do this. I’ve done JUST THAT in the code below — and all I use is JavaScript. No Server required, No Database required, No PHP required.
Below is the code and a link to the JSFiddle page where you can see it in action:
if you want more details feel free to holler.
No, HTML pages cannot write files. You need a server to do this.
The best you can do is generate CSV data in a textarea that the user could then copy and paste to a local file, then load that into Excel.
As it is not possible to save html form data to a file using javascript because of some security reason so for my solution i just use the TCPDF for this.

You can generate a data: URL with the download attribute:
You’ll need to use JavaScript to build such URL from form data and insert/update appropriate link in the document.
To do what you want to do simply it will not be possible without php or some advanced HTML5 local storage.
I’ve done this by using simple PHP script to have form data get saved to a .txt file and then open the resulting .txt file in Excel and use the text to columns feature.
I have a HTML form which collects a field where people enter their email address. I want the form to post the email address to a text file. Please help! Will award maximum points to the one who will answer me correctly! 2 years ago Report Abuse Additional Details Please paste entire code to do this! 2 years ago
Form:
PHP:
Create a new page saved as .php with this code. All you need is the form and the PHP script on the server for this to work 🙂
Источник
How to export an HTML table as a .xlsx file
I have a question about exporting an HTML table as an xlsx file. I did some work and now I can export it as an xls, but I need to export it as an xlsx.
Here is my HTML:
Here is my JavaScript code:

5 Answers 5
A great client-side tool for exporting html tables to xlsx , xls , csv , or txt is TableExport by clarketm (me). It is a simple, easy-to-implement, full-featured library with a bunch of configurable properties and methods.
Install
Usage
Documentation
Sample apps to get you started
Check out the compendious docs or just head over to TableExport on Github for a full list of features.

You can use this plug-in for exporting table to .xlsx
You won’t be able to export it as XLSX without going back to the server. A XLSX file is a collection of XML files, zipped together. This means you do need to create multiple files. This is impossible to do with JS, client-side.
Instead, you should create a function retrieving the data from your HTML table and send that to you server. The server can then create the XLSX file for you (there are a bunch of libs available for that!) and send it back to the client for download.
If you expect to have a huge dataset, the XLSX creation on the server should be done as an async process, where you notify the user when it’s done (instead of having the user waiting for the file to be created).
Let us know which language you use on your server, and we’ll be able to recommend you some good libraries.
Источник
How to export html table to excel using javascript
My table is in format
I found the following code online. But it doesn’t work if i use «thead» and «tbody» tags

12 Answers 12
Check https://github.com/linways/table-to-excel. Its a wrapper for exceljs/exceljs to export html tables to xlsx.
This creates valid xlsx on the client side. Also supports some basic styling. Check https://codepen.io/rohithb/pen/YdjVbb for a working example.
Only works in Mozilla, Chrome and Safari..


The reason the solution you found on the internet is no working is because of the line that starts var colCount . The variable mytable only has two elements being
and . The var colCount line is looking for all the elements within mytable that are . The best thing you can do is give an id to your and and then grab all the values based on that. Say you had :
and then do the same thing for the
tag.
EDIT: I would also highly recommend using jQuery. It would shorten this up to:
Now, of course, this is going to give you some formatting issues but you can work out how you want it formatted in Excel.
EDIT: To answer your question about how to do this for n number of tables, the jQuery will do this already. To do it in raw Javascript, grab all the tables and then alter the function to be able to pass in the table as a parameter. For instance:
Источник
How to Import Data from HTML into Excel
If you have some brilliant tables on your computer but not in Excel format, can you import the data from them to Excel directly? In one of my previous post I’ve introduced how to convert TXT to Excel. Here I’d like to share the tip of importing the data from HTML to Excel as well.
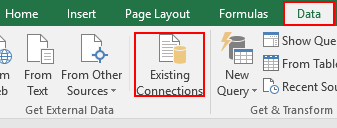
1. Open an Excel file. Switch to Data tab and click Existing Connections in Get External Data section.
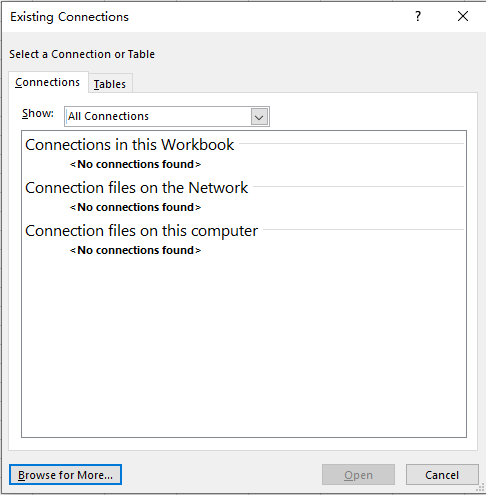
2. Click Browse for More… in the lower-left corner of the popping out window.
3. Find the HTML file you want to import in the folder, then double-click it or hit Open.

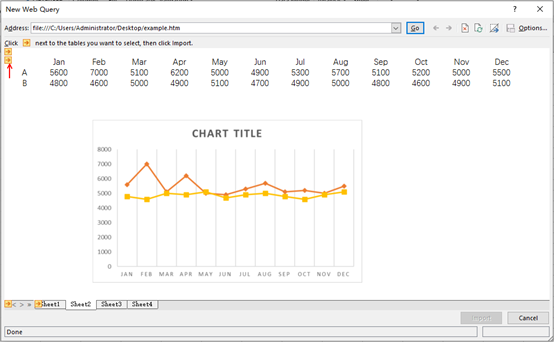
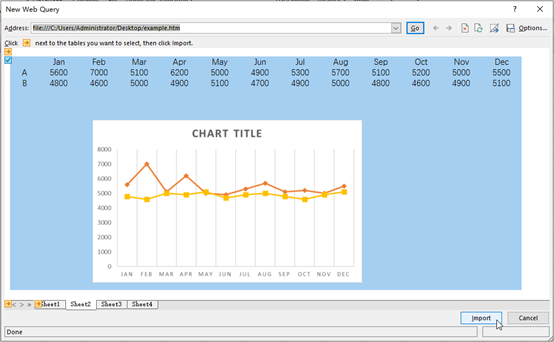
4. As suggested by the tip, click the arrow icon to select the area of data then hit Import in the lower-right corner of the window.
5. You can locate the new table at an existing worksheet or a new worksheet. Choose the location to put the data, then click OK.
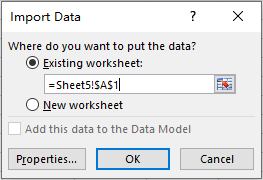
6. The table in the HTML file has been imported into the Excel sheet. You can adjust it freely now.
Источник
How to Export an HTML Table to Excel in WordPress
Want a more targeted, accessible way to export a table from WordPress? This tutorial will help you create a link or shortcode to export a table from HTML to Excel for use on WordPress websites, blog posts, and in emails in no time!

The ability to import and export important website data is essential to businesses that rely heavily on databases. But exporting a WordPress file without the tools or know-how can be incredibly frustrating.
Fortunately, in this post, you’ll learn how to effortlessly export form entry data from any Formidable Forms View to Excel by just ticking a few boxes. You won’t need to use complicated third-party plugins that kind of work, nor will you need to code your own solution to convert an HTML table to excel.
Better yet, you’ll be able to add a download link on the front end of your web page so that people can download their own Excel-compatible file from anywhere on your site.
Ready to learn how it works? Let’s dig in.
How to export an HTML table to Excel with Formidable Forms
By the end of this tutorial, you’ll be able to:
- Add a download link underneath any Formidable View that lets people export the HTML table to Excel.
- Use a shortcode to generate a download link for a View’s data anywhere on your site.
- Automatically export any Formidable View on a custom schedule and store the exported CSV file in a custom location on your server.
To set this up, all you will need is:
Here’s your step-by-step guide.
1. Create a table View
To control what data gets exported to Excel, you can create a regular Formidable table View.
We’ll assume you’ve already created a form with Formidable Forms that has data you want to export. If you haven’t, you can follow these instructions.
Fortunately, it only takes a few simple clicks to set up a Table with Views.
To create a table View, go to Formidable → View → Add New.
Then, you’ll need to choose the form you want the data pulled from.
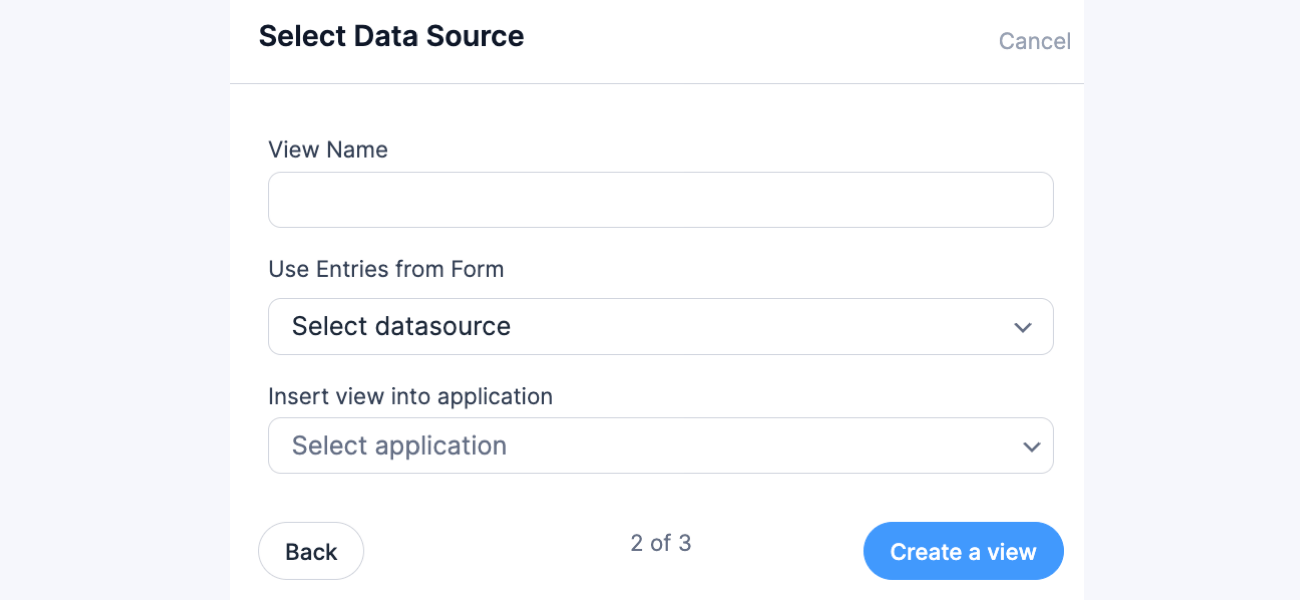
Next, look for the Basic Settings box and check the boxes you want included for your custom fields:

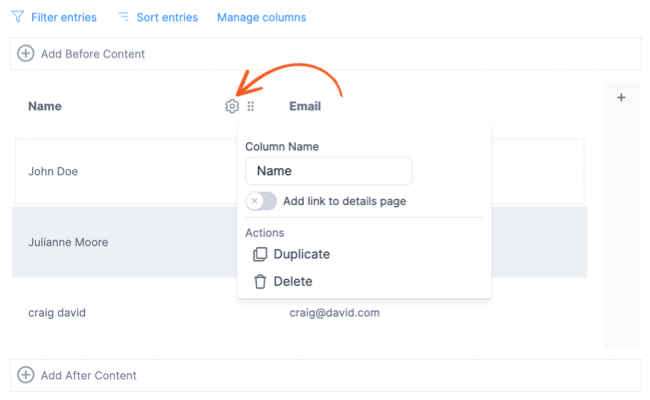
You can then rename columns and rows and use the drag-and-drop feature to customize how they will be displayed on your page.
Finally, click the Create a View button. The Table View will be automatically generated.
Now, you’re ready to add the ability to export that data as an Excel file.
2. Configure export functionality and add download link
Next, you’ll scroll down to the Metabox → Export View Settings section in View Settings. Click the Show Export Link with View to add a link to export the table to CSV. This link will appear directly after the View as an export button in the form of hyperlinked text.
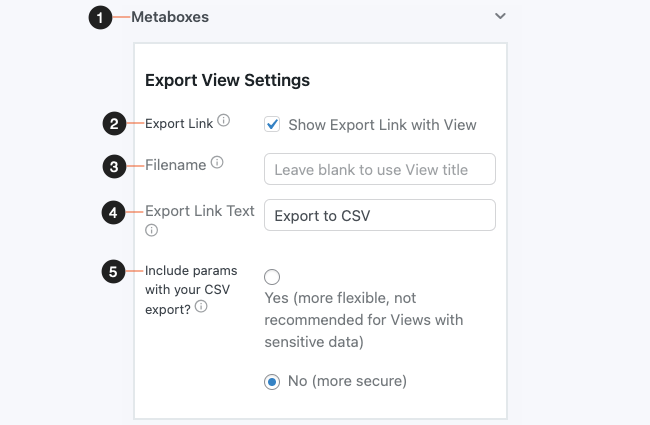
Now, when users click the link you created, a file download will automatically start and all the data from your View will be there when opened in Excel:

Other options to export a table to Excel
Looking for other ways to access the WordPress database file you exported? The Formidable Forms WordPress plugin also lets you link to exported data with shortcodes you can insert on any page of your website.
If you’d prefer this approach, you can use the following shortcode:
[frm-export-view view=25 label=»Download This Data in Excel»]
Make sure to replace the number (25) with the actual ID for your View. You can also customize the text by editing the label so it flows as text.
Here’s an example of what it might look like:

Finally, you can also automatically export your table data on a frequency that you specify and then store the exported CSV files on your WordPress site’s server. This is great for backups, daily digests, and anything else where having a snapshot of your data comes in handy.
To set this up, go to Formidable → Global Settings → Export View and:
- Choose the View(s) that you want to automatically export.
- Pick your export frequency, either in days or months.
- Configure basic formatting choices, like the character format and column separators.
- Enter a custom directory on your WordPress site’s server (if desired).

Start exporting tables to Excel today
With Formidable Forms and the Table View to CSV Converter add-on, you can easily export tables to Excel and create a simpler workflow for yourself, members of your organization, and/or visitors to your website.
The Table View to CSV Converter add-on is available on the Formidable Forms Business plans and above. You can download the add-on from your Formidable Forms dashboard or by visiting Formidable → Add-ons in your WordPress dashboard.
If you’re not on the Formidable Forms Business plan yet, check out all the helpful form builder features to learn why Formidable Forms is the best WordPress form builder plugin to have in your toolbelt.
Источник
The current time you mostly work on MS -Excel (Microsft Excel ) to save and alignment your data in a file.
but you have to work hard for it. If you want to just type text and create it in excel file then it will be so grateful.
. How good would you be to have to fill up a form and just click on a button and generate an Excel file?. You can convert the form data into an excel file (CSV) and It’s very simple or you can import CSV(excel data ) into database import CSV(excel data ) into a database.
Here we will convert HTML form data into CSV file using PHP .
The HTML form is to collect the data from the user side. Here we create the various form fields.
1. Name.
2.Address.
3. Mobile Number.
4. Email Id.
When the user clicks the button the form data will convert into CSV(excel format) File.
Make an HTML form to convert form data into excel file
Now ,we create an HTML form.We create form fileds and a button. When user fills the form and clicks on submit button,the form data converts into excel file.The post method handles the form data.
Let’s create an HTML form.
HTML Form Code
Name


Address


Mobile No.


Email
Create a PHP script code to collect information and convert into CSV(Excel) file
We use PHP script code to handle the form data. The form of data is handled by the PHP post method.
1.First of set form fields on the button using if condition. If the button is pressed, the form data is to be converted into an excel file.
2. Set fields for excel file(CSV format) .
3. User header function and define the content type.
4. At the last fill the form and click on the button. After clicking on the button, you will be got to download a CSV file.
PHP code Here
<?php
if(isset($_POST['submit'])){
//collect form data
$name = $_POST['name'];
$address = $_POST['address'];
$mobileno = $_POST['mobileno'];
$email = $_POST['email'];
//if no errors carry on
if(!isset($error)){
// Title of the CSV
$Content = "Name,Address,Mobile,Emailn";
//set the data of the CSV
$Content .= "$name,$address,$mobileno,$emailn";
//set the file name and create CSV file
$FileName = $name."-".date("d-m-y-h:i:s").".csv";
header('Content-Type: application/csv');
header('Content-Disposition: attachment; filename="' . $FileName . '"');
echo $Content;
exit();
}
}
//if their are errors display them
if(isset($error)){
foreach($error as $error){
echo '$error
';
}
}
?>
Now this time to implement. The final code . Click on Run to execute the script and conver HTML form data into excel file .
Final Code
<?php
if(isset($_POST['submit'])){
//collect form data
$name = $_POST['name'];
$address = $_POST['address'];
$mobileno = $_POST['mobileno'];
$email = $_POST['email'];
//if no errors carry on
if(!isset($error)){
// Title of the CSV
$Content = "Name,Address,Mobile,Emailn";
//set the data of the CSV
$Content .= "$name,$address,$mobileno,$emailn";
//set the file name and create CSV file
$FileName = $name."-".date("d-m-y-h:i:s").".csv";
header('Content-Type: application/csv');
header('Content-Disposition: attachment; filename="' . $FileName . '"');
echo $Content;
exit();
}
}
//if their are errors display them
if(isset($error)){
foreach($error as $error){
echo '$error
';
}
}
?>
Name
Address
Mobile No.
Email
<input type="submit" name="submit" value="Get CSV File">
Run
Recommended Posts:-
Export form data to Excel (CSV) in PHP
In this tutorial you are going to learn how to download an excel report after filling a HTML form.
MySQL is not used in this tutorial, just a simple example showing how to generate Excel file using core PHP functions.
Lets see the basic code here:
<?php

//give a filename
$filename = "myexcel.csv";


//set headers to download the file
header( 'Content-Type: text/csv' );
header( 'Content-Disposition: attachment;filename='.$filename);

//set an array
$cells = array("Column1", "Column2", "Column3");

$file = fopen('php://output', 'w');

fputcsv($file,$cells);

fclose($file);


?>
When you run this code on a web browser, a CSV (myexcel.csv) file will immediately download with the values given in the array $cells[].
I have used php://output stream which sends the output from Apache server to the browser.
fputcsv() – this function plays the main role in the above script, it helps us to create the CSV file from the array $cells[].
Now, lets move to the dynamic part,
Create a form in HTML, see the below (index.html):
<html> <body> <form action="excel.php" method="post"> <table> <tr><td>Name</td><td><input type="text" name="name" /></td></tr> <tr><td>Email</td><td><input type="text" name="email" /></td></tr> <tr><td>Location</td><td><input type="text" name="location" /></td></tr> <tr><td> </td><td><input type="submit" /></td></tr> </table> </form> </body> </html>
PHP script – slightly modified from the first script (excel.php):
<?php

//give a filename
$filename = "myexcel.csv";


//set headers to download file
header( 'Content-Type: text/csv' );
header( 'Content-Disposition: attachment;filename='.$filename);

$file = fopen('php://output', 'w');

//set the column names
$cells[] = array('Name', 'Email', 'Location');

//pass all the form values
$cells[] = array($_POST['name'], $_POST['email'], $_POST['location']);

foreach($cells as $cell){
	fputcsv($file,$cell);
}


fclose($file);


?>
if you compare the first script and this one above, you can see there is a difference in $cells[] variable which became multi-dimensional array and also I’m looping through each array using foreach()
Basically first iteration will pass the column names which is hard coded, the second iteration will pass the dynamic values from $_POST.
See the demo and download the script here:


Post Views: 692
Loading
In this tutorial you can find the solution of How to Export or Download the HTML Table Data in Excel Sheet by using JavaScript. Exporting Data to Excel is required feature in our web application. Because by export data functionality will helps to download data from web application to different file format for offline use of data and for this excel format is an ideal for exporting data in file for offline use. There many tutorial we have published for export data to excel at server side scripting using PHP. But if we can perform at client-side for export data into Excel sheet, so it will reduce load on server. So for this for export data to excel , here we will use JavaScript for perform client-side export data to excel sheet.
The client-side export feature will makes our web application more user-friendly. So with the help of JavaScript, we can export HTML table data to Excel format without refresh of web page. Under this tutorial, you can learn How to export HTML table data to excel using JavaScript. In this tutorial, we will use SheetJS JavaScript Library for export HTML table data to Excel.

- HTML Table Data:
- JavaScript Code:
1. HTML Table Data
For Export HTML data to Excel, here first we have to load some data in HTML table. So here we have make fetch employee table data and load in HTML table with table column like name, address, gender, designation and age. Here we have create HTML table with id employee_data. So this id we will use for fetch this HTML table data in JavaScript code. Under this HTML code we have make one button tag with id export_button, so when use has click on this button, then HTML table data will be download in Excel file format without refresh of web page using JavaScript.
<?php

$connect = new PDO("mysql:host=localhost;dbname=testing", "root", "");

$query = "SELECT * FROM tbl_employee ORDER BY name ASC";

$result = $connect->query($query);

?>

<!DOCTYPE HTML>
<html>
<head>
	<meta charset="utf-8" />
	<title>Export HTML table data to excel using JavaScript</title>
	<meta name="viewport" content="width=device-width, initial-scale=1" />
    <link rel="stylesheet" href="https://maxcdn.bootstrapcdn.com/bootstrap/4.0.0/css/bootstrap.min.css" integrity="sha384-Gn5384xqQ1aoWXA+058RXPxPg6fy4IWvTNh0E263XmFcJlSAwiGgFAW/dAiS6JXm" crossorigin="anonymous">

    <script type="text/javascript" src="https://unpkg.com/xlsx@0.15.1/dist/xlsx.full.min.js"></script>
</head>
<body>
    <div class="container">
    	<h2 class="text-center mt-4 mb-4">Export HTML table data to excel using JavaScript</h2>
    	<div class="card">
    		<div class="card-header">
    			<div class="row">
    				<div class="col col-md-6">Sample Data</div>
    				<div class="col col-md-6 text-right">
    					<button type="button" id="export_button" class="btn btn-success btn-sm">Export</button>
    				</div>
    			</div>
    		</div>
    		<div class="card-body">
    			<table id="employee_data" class="table table-striped table-bordered">
                    <tr>
                        <th>Name</th>
                        <th>Address</th>
                        <th>Gender</th>
                        <th>Designation</th>
                        <th>Age</th>
                    </tr>
                    <?php
                    foreach($result as $row)
                    {
                        echo '
                        <tr>
                            <td>'.$row["name"].'</td>
                            <td>'.$row["address"].'</td>
                            <td>'.$row["gender"].'</td>
                            <td>'.$row["designation"].'</td>
                            <td>'.$row["age"].'</td>
                        </tr>
                        ';
                    }
                    ?>
                </table>
    		</div>
    	</div>
    </div>
</body>
</html>
2. JavaScript Code
In this tutorial, we have use SheetJS JavaScript Library for export HTML table data to Excel using JavaScript. So first we have to include following SheetJS library link at header of this HTML web page.
<script type="text/javascript" src="https://unpkg.com/xlsx@0.15.1/dist/xlsx.full.min.js"></script>
In JavaScript code part, first we have make html_table_to_excel(type) function. This function has use SheetJS Library function and convert or Write HTML table data to Excel format and download in browser without refresh of web page.
Once function is ready then we have to called html_table_to_excel(type) function on button click event, so for trigger button click event, we have use addEventListener method. So when user has click on button then html_table_to_excel(type) function has been called with xlsx file type. So it will download HTML table data in .xlsx format Excel file in browser without refresh of web page at client-side.
function html_table_to_excel(type)
    {
        var data = document.getElementById('employee_data');

        var file = XLSX.utils.table_to_book(data, {sheet: "sheet1"});

        XLSX.write(file, { bookType: type, bookSST: true, type: 'base64' });

        XLSX.writeFile(file, 'file.' + type);
    }

    const export_button = document.getElementById('export_button');

    export_button.addEventListener('click', () =>  {
        html_table_to_excel('xlsx');
    });
Conclusion
This tutorial will helps you to add export feature of download HTML table data in Excel sheet without using third-party jQuery plugin or any server-side script. By follow this tutorial you can easily export HTML table data to Excel using minimal JavaScript code.
If you want to get complete source with .sql file, so please write your email address in comment box. We will send you complete source code file at your define email address.