
Содержание
- Конвертер XLS (EXCEL) в DOC (WORD)
- Сконвертируйте ваши xls-файлы в doc онлайн и бесплатно
- Лист Microsoft Excel (97-2003)
- Документ Microsoft Word
- Как сконвертировать XLS в DOC
- Загрузите xls-файл(ы)
- Выберите «в doc»
- Загрузите ваш doc-файл
- Save a file in Office for Mac
- Save a file
- Related tasks
- Save a file
- Related tasks
Конвертер XLS (EXCEL) в DOC (WORD)
Сконвертируйте ваши xls-файлы в doc онлайн и бесплатно
- Image
- Document
- Ebook
- Audio
- Archive
- Video
- Presentation
- Font
- Vector
- CAD
- abc
- abw
- csv
- dbk
- djvu
- dng
- doc
- docm
- docx
- erf
- ebm
- ewm
- emw
- gzip
- kwd
- odt
- oxps
- ppt
- pptx
- rtf
- rar
- txt
- wps
- xls
- xlsx
- zip
- Image
- Document
- Ebook
- Audio
- Archive
- Video
- Presentation
- Font
- Vector
- CAD
- abc
- abw
- csv
- dbk
- djvu
- dng
- doc
- docm
- docx
- erf
- ebm
- ewm
- emw
- gzip
- kwd
- odt
- oxps
- ppt
- pptx
- rtf
- rar
- txt
- wps
- xls
- xlsx
- zip
Лист Microsoft Excel (97-2003)
Документ Microsoft Word
Как сконвертировать XLS в DOC
Загрузите xls-файл(ы)
Выберите файлы с компьютера, Google Диска, Dropbox, по ссылке или перетащив их на страницу.
Выберите «в doc»
Выберите doc или любой другой формат, который вам нужен (более 200 поддерживаемых форматов)
Загрузите ваш doc-файл
Позвольте файлу сконвертироваться и вы сразу сможете скачать ваш doc-файл
Источник
Save a file in Office for Mac
You can save a file to a location on your computer, like a hard disk drive or a flash drive, or on an online service, like OneDrive. You can also export files to different file formats and save them to different file names.
Important: Even if you have AutoRecover enabled, you should save a file frequently while you are working on it to avoid losing data due to an unexpected power failure or some other problem. AutoRecover is described later in the topic «Save AutoRecover information automatically.»
When you save a file, you can usually change its name, storage location, and file format all at the same time, if you want to do so. However, you might not want to do all of those things, and the instructions in this topic describe each option individually.
Save a file
By default, Office saves a file in a default working folder.
On the File menu, click Save, or press  + S.
+ S.
Tip: Alternatively, you can click the Save icon  in the upper left corner of the window.
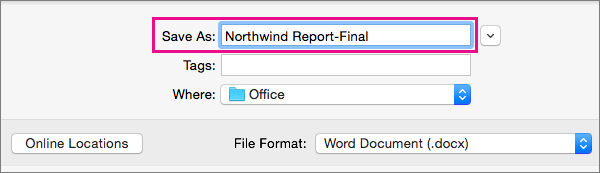
If you are saving the document for the first time, you must enter a file name.
To save the document that you currently have open to a new or different file name than it currently has, use Save as.
On the File menu, click Save as, or press + Shift + S.
If you want to save the file in a folder other than the current folder, navigate to that folder.
In the Save As box, enter a different file name.
If you want to save a file to a location on your computer other than the default folder, use Save as.
On the File menu, click Save as, or press + Shift + S.
If the dialog box does not show a folder or folders on your computer, click On My Mac.

If you see the Online Locations button, the dialog box is currently displaying a folder on your computer.
Navigate to the folder on your computer where you want to save the file.
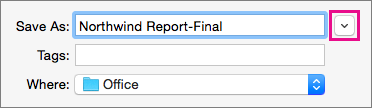
Tip: To show the favorites and display options for folders that are available in Finder, click the downward pointing arrow next to the Save As box.
If you want to create a new folder in the folder that you are currently viewing, click New Folder, and then enter a name for the folder.
In the Save As box, enter a different file name if you want.
Office allows you to save files in online folders provided by OneDrive and SharePoint. If you have accounts that give you access to these services, you can save and access files stored on these services much like files stored on your computer.
SharePoint services and OneDrive for work or school are typically offered by an employer or organization, but you can use OneDrive on your own. For more information about these services, see the related topics in See Also.
To save a file to an online location other than the default folder, use Save as. You can save files from Word, Excel, or PowerPoint directly to folders on OneDrive and SharePoint services.
On the File menu, click Save as, or press + Shift + S.
If the dialog box shows a folder on your computer rather than on an online service, click Online Locations.

If you see the On My Mac button, the dialog box is currently displaying an online location.
Navigate to the folder where you want to save your file.
You might need to click the name of a service on the left before you can access the folder you want. If you do not see the service that you need to access, click the plus sign to add a service.
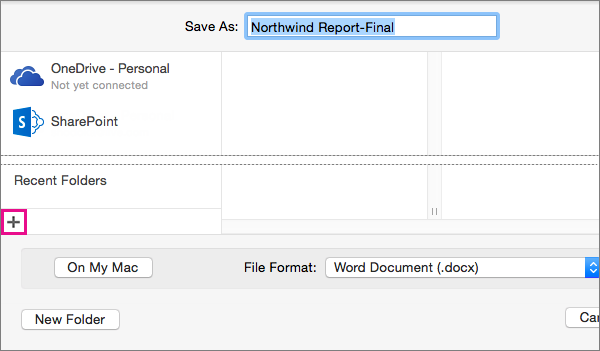
If you want to create a new folder in the folder that you are currently viewing, click New Folder, and then enter a name for the folder.
In the Save As box, enter a different file name if you want.
If you need to share a file with someone who does not have Office for Mac or who has an older version, you can save your document in a file format that a different or older application can read. You can also export a document as a PDF file or an HTML file, among other choices.
On the File menu, click Save As.
If you want to change the file name, change the name in the Save As box.
In the File Format list, click the file format that you want to use.
For example, click Word 97-2004 document (.doc) to create a file that is compatible with Word 97 and later versions of Word that do not use the XML-based file format (.docx).
AutoRecover can help you recover a file that you were editing after a power failure or other problem that interrupts you while you are editing the file. The more frequently that AutoRecover saves files information, the more complete recovery can be after a failure.
However, using AutoRecover does not replace saving your files at regular intervals or when you are done editing the file. You may also find it helpful to save multiple versions of a file to different file names (for example, after each significant change) so that you can review or return to an earlier version, if necessary.
If after a failure, you choose not to save the recovered version of a file after you open it, the file is deleted, and your unsaved changes are lost. If you save the recovery file, it replaces the original file, unless you specify a new file name.
On the Word, PowerPoint, or Excel menu, click Preferences.
Under Output and Sharing, click Save.
Select Save AutoRecover info.
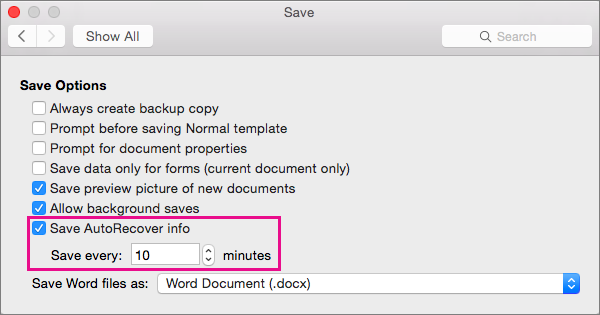
In the Save every box, enter the number of minutes you want as the interval between saving AutoRecover information.
Each time that the application saves AutoRecover information, it waits for the number of minutes that you specify here to pass before saving AutoRecover information again.
Save a file
By default, Office saves a file in a default working folder.
On the File menu, click Save, or press + S.
Tip: Alternatively, you can click the Save icon in the upper left corner of the window.
If you are saving the document for the first time, you must enter a file name.
To save the document that you currently have open to a new or different file name than it currently has, use Save as.
On the File menu, click Save as.
If you want to save the file in a folder other than the current folder, navigate to that folder.
In the Save As box, enter a different file name.
Office allows you to save files in online folders provided by OneDrive and SharePoint. If you have accounts that give you access to these services, you can save and access files stored on these services much like files stored on your computer.
SharePoint services and OneDrive for work or school are typically offered by an employer or organization, but you can use OneDrive on your own. For more information about these services, see the related topics.
To save a file to an online location other than the default folder, use Share. You can save files from Word, Excel, or PowerPoint directly to folders on OneDrive and SharePoint services.
Note: If you’re having trouble saving to an online location, make sure you’re connected to the Internet and that you are signed in to either SharePoint or OneDrive. If you’re on a corporate network, verify that your network connection is working.
Save to OneDrive
From your computer, click File > Share > Save to OneDrive.
If this is the first time that you have tried to access OneDrive, type your Microsoft account and Password, and then click Sign In.
In the Save As box, enter the name of your document.
Under Personal Folders or Shared Folders, click the folder where you want to save the document, and then click Save.
Save to SharePoint
From your computer, click File > Share > Save to SharePoint.
To add a SharePoint site, click Add a location  , enter the URL to the SharePoint library, and then click Add.
In the Save As box, enter the name of your document.
Under Recent Locations or Saved Locations, click the SharePoint library where you want to save the document, and then click Save.
When you create and save a workbook, Word, Excel, and PowerPoint automatically save the file in the Open XML format. However, you can save the file in another format or change the default file format.
Save a file in the Open XML Format (the default file format for Office for Mac 2011)
Create a file, or open the file that you want to save.
On the File menu, click Save As.
In the Save As box, type a name for the file.
On the Format pop-up menu, make sure Word Document (.docx), PowerPoint Presentation (.pptx), or Excel Workbook (.xlsx) is selected, depending on the Office program you’re using.
Save a file in the Office 2004 for Mac file format
Important: Some items that were created by using features in Office for Mac 2011 might behave differently when the document is saved in the file format that is used by Office 2004 for Mac or earlier. Use the Compatibility Report to avoid using new Office features that might behave differently with earlier versions of Office.
Create a file, or open the file that you want to save.
On the File menu, click Save As.
In the Save As box, type a name for the file.
On the Format pop-up menu, click Word 97-2004 Document (.doc), PowerPoint 97-2004 Presentation (.ppt), or Excel 97-2004 Workbook (.xls), depending on the Office program you’re using.
Note: If you open and then save a copy of a file that was created in Office 2004 for Mac or earlier, the application automatically saves the file in the correct file format.
Save a file as PDF
You can save your document as PDF, to preserve document formatting and make the document readable but not editable. You need to use Adobe Reader to view documents after you save them in this file format.
Note: PDF files created from Office 2011 are limited to printable content. In other words, if the content does not appear in print, it will not appear in the PDF.
Create a file, or open the file that you want to save.
On the File menu, click Save As.
In the Save As box, type a name for the file.
On the Format pop-up menu, click PDF.
Change the default file format that files are saved in
You can change the file format that Office for Mac always saves documents in. For example, if you usually share documents with other people who use an earlier version of Office for Mac, you might want to always save documents in the file format that is used in that version.
In Word and PowerPoint:
Open any file or create a new file.
On the File menu, click Save As.
Click Options, and then on the Save [Program] files as pop-up menu, click the file format that you want.
Open any file or create a new file.
On the Excel menu, click Preferences.
Under Sharing and Privacy, click Compatibility  .
.
Under Transition, on the Save files in this format pop-up menu, click the file format that you want.
If you want to change the default file format to work with Office 2004 for Mac or earlier, click Excel 97-2004 Workbook (.xls).
Save a file as a webpage (Word and Excel only)
You can save a file as a webpage, which converts the file into a file format that’s readable by web browsers. However, the results of the conversion depend on the kind of content in your file. Office for Mac converts the file’s formatting to the closest equivalent web formatting. Therefore, the webpage might look very different from the original file. For example, many text effects, such as animated, embossed, or outlined text, become plain or shaded text.
Note: We recommend that you preview the file in a web browser to make sure that the results are what you want. To do this, on the File menu, click Web Page Preview.
Create a file, or open the file that you want to save.
On the File menu, click Save as Web Page.
In the Save As box, type a name for the file.
Save a file as plain text (Word only)
You can save a document as plain text so that the document can be opened by a number of text editing programs. However, saving a document in plain text does not reliably preserve the formatting, layout, or other features of the document.
Create a file, or open the file that you want to save.
On the File menu, click Save As.
In the Save As box, type a name for the file.
On the Format pop-up menu, click Plain Text (.txt).
Save a file as JPEG (PowerPoint only)
When you save a presentation as a JPEG, each slide becomes a picture. Then, if you post the presentation on a Web site, the presentation is easier to view.
Create a file, or open the file that you want to save.
On the File menu, click Save as Pictures.
In the Save As box, type a name for the file.
Save a file as a movie (PowerPoint only)
To run your presentation on a computer that doesn’t have PowerPoint installed, you can save your presentation as a movie (.mov) file. You can then play the movie in any application that supports QuickTime movies.
Create a file, or open the file that you want to save.
On the File menu, click Save as Movie.
In the Save As box, type a name for the file.
AutoRecover can help you recover a file that you were editing after a power failure or other problem that interrupts you while you are editing the file. The more frequently that AutoRecover saves files information, the more complete recovery can be after a failure.
However, using AutoRecover does not replace saving your files at regular intervals or when you are done editing the file. You may also find it helpful to save multiple versions of a file to different file names (for example, after each significant change) so that you can review or return to an earlier version, if necessary.
If after a failure, you choose not to save the recovered version of a file after you open it, the file is deleted, and your unsaved changes are lost. If you save the recovery file, it replaces the original file, unless you specify a new file name.
On the Word, PowerPoint, or Excel menu, click Preferences.
In the AutoRecover box, enter the number of minutes you want as the interval between saving AutoRecover information.
Each time that the application saves AutoRecover information, it waits for the number of minutes that you specify here to pass before saving AutoRecover information again.
When you open a document in Word for Mac 2011 that was created in an earlier version of Word, either Word for Mac or Word for Windows, compatibility mode is turned on. [Compatibility Mode] shows in the title bar of the document window. Compatibility mode indicates that the document was created in an earlier version of Word or was saved in an earlier file format. In compatibility mode, no new or improved features in Word 2011 are available. However, users can still edit the document by using features that are compatible with the earlier file format.
You can work in compatibility mode or you can convert your document to the Word 2011 file format. When you save in the Word 2011 format, the document layout appears as if it were created in Word 2011 and the file format changes from .doc to .docx. In this format, you can access the new and improved features in Word 2011. However, anyone who uses an earlier version of Word may be prevented from or have problems editing parts of the document that were created by using new or enhanced features.
Document elements that behave differently in compatibility mode
The elements listed in the following table might change permanently when you work in compatibility mode. You can’t convert them back to Word 2011 elements even if you convert your document to Word 2011 later.
Word 2011 element
Behavior in compatibility mode
Converted to static text.
Information about where other authors were editing the document will be lost permanently.
Converted to static text.
Advanced typography features
All font-supported advanced typography features, for example, ligatures, are removed when the document is saved in the .doc file format.
Open XML embedded objects
Permanently converted to static content.
Placeholder text in content controls
Converted to static text.
Relative text box positioning
Converted to absolute positions.
Text box text alignment
All text that is not already top-aligned is converted to top-aligned text.
Text effects such as Reflection, Glow, 3-D Format, and 3-D Rotation are lost.
Alternative text on tables
Alternative text on tables is permanently removed.
Themes, theme colors, theme fonts, and theme effects
Permanently converted to styles. If the file is later opened in Word 2011, you can’t automatically change the style by using themes.
Converted to deletions and insertions.
Converted to static text.
The document elements listed in the following table change when you work in compatibility mode. However, you can convert them to Word 2011 elements if you convert your document to Word 2011 later.
Word 2011 element
Behavior in compatibility mode
Converted to images and cannot be edited.
Diagrams and charts
Converted to images and cannot be edited.
Shapes and text boxes
Converted to effects that are available in the .doc file format.
For documents in compatibility mode, presented as images that cannot be edited. Equations can be edited when the document is saved in a Word 2011 file format.
Turn on compatibility mode
You can create new documents that are compatible with earlier versions of Word by using compatibility mode.
Open a new document.
On the File menu, click Save As.
In the Save As box, type a name for the document.
In the Format pop-up menu, select Word 97-2004 Document (.doc), and then click Save.
[Compatibility Mode] appears in the title bar after the document name.
Convert a document from compatibility mode
The Convert Document command clears the compatibility options so that the document layout appears as if it were created in Word 2011. If the file is in .doc format, the Convert Document command also upgrades the file to the .docx format. After you convert the document, you can access the new and enhanced features in Word 2011. However, people who are using earlier versions of Word may be prevented from or have problems editing certain parts of the document that were created by using new or enhanced features in Word 2011.
On the File menu, click Convert Document.
Источник
![]()
Download Article
A simple guide to converting Microsoft Excel projects to Word projects
![]()
Download Article
- Inserting an Excel Chart into Word
- Embedding an Excel Worksheet
- Copying and Pasting Excel Data into Word
- Q&A
- Tips
|
|
|
|
Do you want to export an Excel document into a Microsoft Word document? While Excel can’t directly convert files into Word files, you can insert the Excel file as an Object in Word. You can also copy and paste Excel data into a Word document. After doing so, you can save the Word document. You can also copy and paste an entire Excel chart into Word. This wikiHow will show you how to insert Excel data into a Word document on your Windows or Mac computer.
Things You Should Know
- In Word, click the Insert tab, then Object. Click Create from File, locate your Excel project, then Insert.
- Copy Excel data with CTRL + C (Windows) or CMD + C (Mac). Paste it into a Word document using the Paste icon in the Home tab.
- Right-click an Excel chart, then click Copy. Paste it into a Word document using the Paste icon in the Home tab.
-

1
Open a project in Microsoft Excel. You can use an existing project or create a new one.
- Microsoft Excel is available on Windows and Mac. You can also use the online web version at the Microsoft 365 website.
-
2
Copy the Excel chart. Click the chart you want to copy, then press CTRL + C (Windows) or Command + C.
- You can also right-click the chart and click Copy.
Advertisement
-
3
Open Microsoft Word. You can use the web version of Word or the desktop application.
- You’ll need to open a new or existing project.
-
4
Click Paste. This is the clipboard icon in the Home tab. This will paste the Excel chart into Word.
- You can also move the cursor to the location you’d like your data, and then press CTRL + V (Windows) or Command + V (Mac). The chart will be pasted into Word.[1]
- To select different paste options, click the arrow underneath Paste.
- If you want to link to the original Excel chart so updates are reflected in the destination file, select Use Destination Theme & Link Data.
- If you want to embed the original chart to edit it in Word, select Use Designation Theme & Embed Workbook.
- If you want the chart to act as a picture element, select Picture.
- You can also move the cursor to the location you’d like your data, and then press CTRL + V (Windows) or Command + V (Mac). The chart will be pasted into Word.[1]
-
5
Edit your chart. Click your chart to open the Format Chart Area window on the right panel. You can adjust the Fill and Border.
- You can also click the chart to adjust the Layout Options, Chart Elements, Style, and Values.
-
6
Save your Word document. Click File in the top right corner, then Save As. Choose a name and save location for your document.


Advertisement
-
1
-
2
Place your cursor where you want the Excel data. You can move this around later, but be sure to enter your data in an empty space for easy editing.
-
3
Click Insert tab in the top toolbar. This is located between the Home and Draw tab.
-
4
Click Object. This will be in the Text section of the Insert tab. You can find this next to the Symbols section.
- The Object window will open.
-
5
Click Create from File. This allows you to embed an existing Excel file into your Word document.
- You can also choose Create New then select your Object type. This allows you to embed a new object where you can input data.
-
6
Click Browse. This will open the File Explorer (Windows) or the Finder (Mac). You’ll be able to browse your computer for your file.
-
7
Click your file and click Insert. You may have to search for your file depending on its location.
- The file name and path will be displayed in the File name field.
-
8
Click the box next to Link to file. This will embed the content of the file into your Word document and create a link to the original file. If the original Excel document is updated, the changes will transfer over to the data in your Word document.
- You can check the box next to Display as icon if you only want a quick link to your Excel document from Word. This will override Link to file.
-
9
Save your Word document. Click File in the top right corner, then Save As. Choose a name and save location for your document.
- Your Excel data will be embedded in your Word document. Since the data is linked, you can double-click the Excel chart to open the project in Excel or edit directly in Word.


Advertisement
-
1
-
2
Copy the Excel data. In Excel, click and drag to select the content you’d like to put in the Word document, and then press CTRL + C (Windows) or Command + C.[2]
- On Windows, press CTRL + A to select all the data in a chart, and then press CTRL + C to copy.
- On Mac, press CMD + A to select all the data in a chart, and then press Command +C to copy.
-
3
Open Microsoft Word. You can use the web version of Word or the desktop application.
- You’ll need to open a new or existing project.
-
4
Click Paste. This is the clipboard icon in the Home tab. This will paste the Excel data into Word.
- You can also move the cursor to the location you’d like your data, and then press CTRL + V (Windows) or Command + V (Mac). The table will be pasted into Word.
- To select different paste options, click the arrow underneath Paste. You can choose Keep Original Table Formatting, Merge Table, or Keep Text Only.
- If you don’t see the Paste Options button, you don’t have it enabled. To enable it, go to Word Options and click Advanced. Under Cut, Copy, and Paste, check the Show Paste Options buttons box.[3]
-
5


Advertisement
Our Most Loved Articles & Quizzes
Add New Question
-
Question
Can I do this if I don’t have Word?

Yes. Just search for «free online excel to word converter» and use one of the websites that shows up. You could also download OpenOffice for free, which you can use the same way as Word and where you can save documents in Word format.
-
Question
I copied my Excel cells into Word as a picture. How can I remove the cell border lines in this process?
I assume you are using a screen clipping tool to copy the Excel cells into Word. I would recommend either copying the cells (dragging to select) and pasting as a table into Word, or embedding the spreadsheet into Word. Method one works perfectly for basic Excel content and allows you to further format it to suit the structure and styling of your Word document. Method two allows complicated Excel content such as graphs to appear in Word without making screen clippings. It also can be used to preserve all formulas in the embedded sheet so that you can access them directly in Word. Either of these methods should help your Excel cells appear correctly in your Word document.
Ask a Question
200 characters left
Include your email address to get a message when this question is answered.
Submit
Advertisement
-
Looking for money-saving deals on Microsoft Office products? Check out our coupon site for tons of coupons and promo codes on your next subscription.
Thanks for submitting a tip for review!
Advertisement
About This Article
Article SummaryX
1. Select the data to convert.
2. Press Ctrl + C to copy.
3. Open a document in Word.
4. Click the desired location.
5. Click the Paste menu on the Home tab.
6. Select a paste option.
Did this summary help you?
Thanks to all authors for creating a page that has been read 1,447,753 times.
Is this article up to date?
How to Convert Excel to Word
There are a few ways to copy From Excel to Word
Updated on November 16, 2021
What to Know
- Highlight content in Excel you’d like to copy, press Ctrl+C to copy it, and press Ctrl+V within Word to paste your content.
- In Word, go to Insert > Object > Object, select Create from File, choose your Excel file, and select Insert.
- To convert entire files, use an online conversion tool to directly convert an Excel spreadsheet into a Word document.
With Excel’s spreadsheet power and Word’s processing magic, they’re a power duo for creating projects. Even though a direct conversion method doesn’t exist, if you need to convert from Excel to a Word document, there are a few ways you can do so in Excel and Word 2019, 2016, and Excel and Word for Microsoft 365.
The first method is the simplest, and you’re probably already aware of the it. You can easily convert your work from Excel to Word by copying and pasting.
While Excel does have an Export option, there’s no built-in way to export to Word from within Excel. Instead, you need to use one of the methods described here to move data from an Excel document into a Word Document.
-
To start, open the Excel document you want to copy from.
-
Open the Word document you’re pasting to.
-
In the Excel document, select the content you want to copy. If you want the entire page, select the triangle icon in the upper left of your work.
-
With the content selected, press Ctrl+C on your keyboard (Cmd+C for Mac users) to copy it.
-
In the Word document, place your cursor where you want to paste your work. Use Ctrl+V (Cmd+V for Mac users) to paste.
You can also use copy and paste to create a new table in Word. Simply create a Word table, select the data in Excel and then copy it directly into the new table you created.
How to Convert Excel to Word Using Insert Object
In contrast to copy and paste, inserting Excel as an object inserts a miniature version of your Excel document in Word, complete with multiple sheets and other features. With Excel and Word open, proceed to the steps to start converting.
How to Convert Excel to Word Using Insert Object on Mac
-
In Word, select Insert from the ribbon.
-
Select the Insert tab and choose the Object icon in the toolbar.
-
Select Text from File in the dialog box and locate your Excel file.
Want your object to automatically update if you change the Excel spreadsheet? Select Options > Link to File.
-
Select Insert in the bottom right corner of the dialog box to place the content.
How to Convert Excel to Word Using Insert Object in Windows
-
In Word, select Insert > Object > Object.
-
Select the Create from File tab > Browse. Locate the file you want to insert.
-
Select Insert. If you want to link it to a file, select the Link to File check box.
-
Select OK.
Convert Excel to Word Using an Online Converter
You can also use an online converter to convert Excel to Word. Locate an online converter by conducting a quick online search. Then upload your two separate documents and allow the converter to do the heavy lifting. When the process is complete, you can download your new document.
Thanks for letting us know!
Get the Latest Tech News Delivered Every Day
Subscribe
Hi everyone,
I am trying to link information in an excel file to a word document which I then want to be automatically updated in the word document for when I make changes in the Excel document as is covered in this link: https://www.howtogeek.com/358380/how-to-link-or-embed-an-excel-worksheet-in-a-powerpoint-or-word-document/
Is this possibly using office for Mac? I have copied the relevant area in the excel document and pasted in the word document (highlighted the relevant area in Excel, opened up the paste special box in word, and selected «paste as Microsoft Excel Worksheet Object», but when i make changes in the excel document it is not being reflected in the word document.
Please assist.
You can save a file to a location on your computer, like a hard disk drive or a flash drive, or on an online service, like OneDrive. You can also export files to different file formats and save them to different file names.
Important: Even if you have AutoRecover enabled, you should save a file frequently while you are working on it to avoid losing data due to an unexpected power failure or some other problem. AutoRecover is described later in the topic «Save AutoRecover information automatically.»
When you save a file, you can usually change its name, storage location, and file format all at the same time, if you want to do so. However, you might not want to do all of those things, and the instructions in this topic describe each option individually.
Save a file
By default, Office saves a file in a default working folder.
-
On the File menu, click Save, or press
+ S.Tip: Alternatively, you can click the Save icon
in the upper left corner of the window. -
If you are saving the document for the first time, you must enter a file name.
Related tasks
To save the document that you currently have open to a new or different file name than it currently has, use Save as.
-
On the File menu, click Save as, or press
+ Shift + S. -
If you want to save the file in a folder other than the current folder, navigate to that folder.
-
In the Save As box, enter a different file name.
-
Click Save.
If you want to save a file to a location on your computer other than the default folder, use Save as.
-
On the File menu, click Save as, or press
+ Shift + S. -
If the dialog box does not show a folder or folders on your computer, click On My Mac.
If you see the Online Locations button, the dialog box is currently displaying a folder on your computer.
-
Navigate to the folder on your computer where you want to save the file.
Tip: To show the favorites and display options for folders that are available in Finder, click the downward pointing arrow next to the Save As box.
-
If you want to create a new folder in the folder that you are currently viewing, click New Folder, and then enter a name for the folder.
-
In the Save As box, enter a different file name if you want.
-
Click Save.
Office allows you to save files in online folders provided by OneDrive and SharePoint. If you have accounts that give you access to these services, you can save and access files stored on these services much like files stored on your computer.
SharePoint services and OneDrive for work or school are typically offered by an employer or organization, but you can use OneDrive on your own. For more information about these services, see the related topics in See Also.
To save a file to an online location other than the default folder, use Save as. You can save files from Word, Excel, or PowerPoint directly to folders on OneDrive and SharePoint services.
-
On the File menu, click Save as, or press
+ Shift + S. -
If the dialog box shows a folder on your computer rather than on an online service, click Online Locations.
If you see the On My Mac button, the dialog box is currently displaying an online location.
-
Navigate to the folder where you want to save your file.
You might need to click the name of a service on the left before you can access the folder you want. If you do not see the service that you need to access, click the plus sign to add a service.
-
If you want to create a new folder in the folder that you are currently viewing, click New Folder, and then enter a name for the folder.
-
In the Save As box, enter a different file name if you want.
-
Click Save.
If you need to share a file with someone who does not have Office for Mac or who has an older version, you can save your document in a file format that a different or older application can read. You can also export a document as a PDF file or an HTML file, among other choices.
-
On the File menu, click Save As.
-
If you want to change the file name, change the name in the Save As box.
-
In the File Format list, click the file format that you want to use.
For example, click Word 97-2004 document (.doc) to create a file that is compatible with Word 97 and later versions of Word that do not use the XML-based file format (.docx).
-
Click Save.
AutoRecover can help you recover a file that you were editing after a power failure or other problem that interrupts you while you are editing the file. The more frequently that AutoRecover saves files information, the more complete recovery can be after a failure.
However, using AutoRecover does not replace saving your files at regular intervals or when you are done editing the file. You may also find it helpful to save multiple versions of a file to different file names (for example, after each significant change) so that you can review or return to an earlier version, if necessary.
If after a failure, you choose not to save the recovered version of a file after you open it, the file is deleted, and your unsaved changes are lost. If you save the recovery file, it replaces the original file, unless you specify a new file name.
-
On the Word, PowerPoint, or Excel menu, click Preferences.
-
Under Output and Sharing, click Save.
-
Select Save AutoRecover info.
-
In the Save every box, enter the number of minutes you want as the interval between saving AutoRecover information.
Each time that the application saves AutoRecover information, it waits for the number of minutes that you specify here to pass before saving AutoRecover information again.
Save a file
By default, Office saves a file in a default working folder.
-
On the File menu, click Save, or press
+ S.Tip: Alternatively, you can click the Save icon in the upper left corner of the window.
-
If you are saving the document for the first time, you must enter a file name.
Related tasks
To save the document that you currently have open to a new or different file name than it currently has, use Save as.
-
On the File menu, click Save as.
-
If you want to save the file in a folder other than the current folder, navigate to that folder.
-
In the Save As box, enter a different file name.
-
Click Save.
Office allows you to save files in online folders provided by OneDrive and SharePoint. If you have accounts that give you access to these services, you can save and access files stored on these services much like files stored on your computer.
SharePoint services and OneDrive for work or school are typically offered by an employer or organization, but you can use OneDrive on your own. For more information about these services, see the related topics.
To save a file to an online location other than the default folder, use Share. You can save files from Word, Excel, or PowerPoint directly to folders on OneDrive and SharePoint services.
Note: If you’re having trouble saving to an online location, make sure you’re connected to the Internet and that you are signed in to either SharePoint or OneDrive. If you’re on a corporate network, verify that your network connection is working.
Save to OneDrive
-
From your computer, click File > Share > Save to OneDrive.
-
If this is the first time that you have tried to access OneDrive, type your Microsoft account and Password, and then click Sign In.
-
In the Save As box, enter the name of your document.
-
Under Personal Folders or Shared Folders, click the folder where you want to save the document, and then click Save.
Save to SharePoint
-
From your computer, click File > Share > Save to SharePoint.
-
To add a SharePoint site, click Add a location
, enter the URL to the SharePoint library, and then click Add. -
In the Save As box, enter the name of your document.
-
Under Recent Locations or Saved Locations, click the SharePoint library where you want to save the document, and then click Save.
When you create and save a workbook, Word, Excel, and PowerPoint automatically save the file in the Open XML format. However, you can save the file in another format or change the default file format.
Save a file in the Open XML Format (default)
Save a file in the Office 2004 for Mac file format
Save a file as PDF
Change the default file format that files are saved in
Save a file as a webpage (Word and Excel only)
Save a file as plain text (Word only)
Save a file as JPEG (PowerPoint only)
Save a file as a movie (PowerPoint only)
Save a file in the Open XML Format (the default file format for Office for Mac 2011)
-
Create a file, or open the file that you want to save.
-
On the File menu, click Save As.
-
In the Save As box, type a name for the file.
-
On the Format pop-up menu, make sure Word Document (.docx), PowerPoint Presentation (.pptx), or Excel Workbook (.xlsx) is selected, depending on the Office program you’re using.
-
Click Save.
Save a file in the Office 2004 for Mac file format
Important: Some items that were created by using features in Office for Mac 2011 might behave differently when the document is saved in the file format that is used by Office 2004 for Mac or earlier. Use the Compatibility Report to avoid using new Office features that might behave differently with earlier versions of Office.
-
Create a file, or open the file that you want to save.
-
On the File menu, click Save As.
-
In the Save As box, type a name for the file.
-
On the Format pop-up menu, click Word 97-2004 Document (.doc), PowerPoint 97-2004 Presentation (.ppt), or Excel 97-2004 Workbook (.xls), depending on the Office program you’re using.
Note: If you open and then save a copy of a file that was created in Office 2004 for Mac or earlier, the application automatically saves the file in the correct file format.
-
Click Save.
Save a file as PDF
You can save your document as PDF, to preserve document formatting and make the document readable but not editable. You need to use Adobe Reader to view documents after you save them in this file format.
Note: PDF files created from Office 2011 are limited to printable content. In other words, if the content does not appear in print, it will not appear in the PDF.
-
Create a file, or open the file that you want to save.
-
On the File menu, click Save As.
-
In the Save As box, type a name for the file.
-
On the Format pop-up menu, click PDF.
-
Click Save.
Change the default file format that files are saved in
You can change the file format that Office for Mac always saves documents in. For example, if you usually share documents with other people who use an earlier version of Office for Mac, you might want to always save documents in the file format that is used in that version.
In Word and PowerPoint:
-
Open any file or create a new file.
-
On the File menu, click Save As.
-
Click Options, and then on the Save [Program] files as pop-up menu, click the file format that you want.
In Excel:
-
Open any file or create a new file.
-
On the Excel menu, click Preferences.
-
Under Sharing and Privacy, click Compatibility
. -
Under Transition, on the Save files in this format pop-up menu, click the file format that you want.
If you want to change the default file format to work with Office 2004 for Mac or earlier, click Excel 97-2004 Workbook (.xls).
Save a file as a webpage (Word and Excel only)
You can save a file as a webpage, which converts the file into a file format that’s readable by web browsers. However, the results of the conversion depend on the kind of content in your file. Office for Mac converts the file’s formatting to the closest equivalent web formatting. Therefore, the webpage might look very different from the original file. For example, many text effects, such as animated, embossed, or outlined text, become plain or shaded text.
Note: We recommend that you preview the file in a web browser to make sure that the results are what you want. To do this, on the File menu, click Web Page Preview.
-
Create a file, or open the file that you want to save.
-
On the File menu, click Save as Web Page.
-
In the Save As box, type a name for the file.
-
Click Save.
Save a file as plain text (Word only)
You can save a document as plain text so that the document can be opened by a number of text editing programs. However, saving a document in plain text does not reliably preserve the formatting, layout, or other features of the document.
-
Create a file, or open the file that you want to save.
-
On the File menu, click Save As.
-
In the Save As box, type a name for the file.
-
On the Format pop-up menu, click Plain Text (.txt).
-
Click Save.
Save a file as JPEG (PowerPoint only)
When you save a presentation as a JPEG, each slide becomes a picture. Then, if you post the presentation on a Web site, the presentation is easier to view.
-
Create a file, or open the file that you want to save.
-
On the File menu, click Save as Pictures.
-
In the Save As box, type a name for the file.
-
Click Save.
Save a file as a movie (PowerPoint only)
To run your presentation on a computer that doesn’t have PowerPoint installed, you can save your presentation as a movie (.mov) file. You can then play the movie in any application that supports QuickTime movies.
-
Create a file, or open the file that you want to save.
-
On the File menu, click Save as Movie.
-
In the Save As box, type a name for the file.
-
Click Save.
AutoRecover can help you recover a file that you were editing after a power failure or other problem that interrupts you while you are editing the file. The more frequently that AutoRecover saves files information, the more complete recovery can be after a failure.
However, using AutoRecover does not replace saving your files at regular intervals or when you are done editing the file. You may also find it helpful to save multiple versions of a file to different file names (for example, after each significant change) so that you can review or return to an earlier version, if necessary.
If after a failure, you choose not to save the recovered version of a file after you open it, the file is deleted, and your unsaved changes are lost. If you save the recovery file, it replaces the original file, unless you specify a new file name.
-
On the Word, PowerPoint, or Excel menu, click Preferences.
-
Click Save.
-
In the AutoRecover box, enter the number of minutes you want as the interval between saving AutoRecover information.
Each time that the application saves AutoRecover information, it waits for the number of minutes that you specify here to pass before saving AutoRecover information again.
When you open a document in Word for Mac 2011 that was created in an earlier version of Word, either Word for Mac or Word for Windows, compatibility mode is turned on. [Compatibility Mode] shows in the title bar of the document window. Compatibility mode indicates that the document was created in an earlier version of Word or was saved in an earlier file format. In compatibility mode, no new or improved features in Word 2011 are available. However, users can still edit the document by using features that are compatible with the earlier file format.
You can work in compatibility mode or you can convert your document to the Word 2011 file format. When you save in the Word 2011 format, the document layout appears as if it were created in Word 2011 and the file format changes from .doc to .docx. In this format, you can access the new and improved features in Word 2011. However, anyone who uses an earlier version of Word may be prevented from or have problems editing parts of the document that were created by using new or enhanced features.
Document elements that behave differently in compatibility mode
The elements listed in the following table might change permanently when you work in compatibility mode. You can’t convert them back to Word 2011 elements even if you convert your document to Word 2011 later.
|
Word 2011 element |
Behavior in compatibility mode |
|---|---|
|
Bibliography |
Converted to static text. |
|
Blocked authors |
Information about where other authors were editing the document will be lost permanently. |
|
Citations |
Converted to static text. |
|
Advanced typography features |
All font-supported advanced typography features, for example, ligatures, are removed when the document is saved in the .doc file format. |
|
Open XML embedded objects |
Permanently converted to static content. |
|
Placeholder text in content controls |
Converted to static text. |
|
Relative text box positioning |
Converted to absolute positions. |
|
Text box text alignment |
All text that is not already top-aligned is converted to top-aligned text. |
|
Text effects |
Text effects such as Reflection, Glow, 3-D Format, and 3-D Rotation are lost. |
|
Alternative text on tables |
Alternative text on tables is permanently removed. |
|
Themes, theme colors, theme fonts, and theme effects |
Permanently converted to styles. If the file is later opened in Word 2011, you can’t automatically change the style by using themes. |
|
Tracked moves |
Converted to deletions and insertions. |
|
WordArt |
Converted to static text. |
The document elements listed in the following table change when you work in compatibility mode. However, you can convert them to Word 2011 elements if you convert your document to Word 2011 later.
|
Word 2011 element |
Behavior in compatibility mode |
|---|---|
|
SmartArt graphics |
Converted to images and cannot be edited. |
|
Diagrams and charts |
Converted to images and cannot be edited. |
|
Shapes and text boxes |
Converted to effects that are available in the .doc file format. |
|
Equations |
For documents in compatibility mode, presented as images that cannot be edited. Equations can be edited when the document is saved in a Word 2011 file format. |
Turn on compatibility mode
You can create new documents that are compatible with earlier versions of Word by using compatibility mode.
-
Open a new document.
-
On the File menu, click Save As.
-
In the Save As box, type a name for the document.
-
In the Format pop-up menu, select Word 97-2004 Document (.doc), and then click Save.
[Compatibility Mode] appears in the title bar after the document name.
Convert a document from compatibility mode
The Convert Document command clears the compatibility options so that the document layout appears as if it were created in Word 2011. If the file is in .doc format, the Convert Document command also upgrades the file to the .docx format. After you convert the document, you can access the new and enhanced features in Word 2011. However, people who are using earlier versions of Word may be prevented from or have problems editing certain parts of the document that were created by using new or enhanced features in Word 2011.
-
On the File menu, click Convert Document.
See also
What is OneDrive?
What is OneDrive for Business?
What is SharePoint?
When working with data in Excel, you would often have a need to copy some tables from Excel into an MS Word document.
While there is no built-in option in Excel to convert an entire Excel file to Word, you can easily copy and paste the data from an Excel document to Word.
In this tutorial, I will show you multiple ways to copy data from an Excel Worksheet into a Word document.
Copy Paste Excel Table as Plain Text in MS Word
If all you want is to copy and paste a table from Excel to Word, you can do that with a simple copy paste.
It allows you to get the static table in Word, where you can then format it (and change it if you want).
The downside of this method is that in case there are any formulas in the data, that won’t work. And since this is static table, any changes you make in Excel will not get reflected in the table you copied to Word.
But in most cases, this is exactly what you want.
Let’s see how to do this.
Suppose you have a dataset as shown below and you want to copy this data from Excel and insert it into Word.

Below are the steps to do this:
- Select the data in Excel that you want to copy to Word
- Right-click and then click on Copy (or use the keyboard shortcut Control + C in Windows or Command + C in Mac)

- Open the Word document where you want to insert this data
- Place the cursor where you want this data in the Word document
- Go to the Home tab in Word and click on Paste (or use the keyboard shortcut Control + V)

The above steps would copy the data from Excel and paste it as a static table in the Word document.

Once you have the table in Word, you can format and work with it just like any other table that you insert in Word.
A couple of things to note when using this method:
- If there are any formulas in the table in Excel, they won’t be copied. In my example, I have the formulas in the Total row, but when copied to Word, these are static values. If you make any changes to any data, you will have to manually adjust the formula values as well
- If you don’t want to get copy the formatting from Excel and would rather want to use the formatting of the Word document, you can use the option Use Destination Style option. It shows up when you click on the Paste Options icon after you have pasted the table in Word.
Embed Excel Table into Word (as a Linked Object)
In the above method, we copied the data from Excel and inserted it as a static table into Word.
Another option that you can use is to copy and paste the table into a Word document and keep the two tables linked.
This way, if you make any changes in the Excel table that you copied, you will see that these are reflected in real-time in the table in Word as well.
This is quite useful when there is a possibility that you may have to update the data in Excel and it would also need to be updated in Word. By having the linked table, you only need to make changes in Excel data and these would automatically get reflected in the table you copied to Word.
Let me show you how this works.
Suppose you have a table as shown below and you want to copy it from Excel to MS Word and keep this linked.
Below are the steps to do this:
- Select the data in Excel that you want to copy to Word
- Right-click and then click on Copy (or use the keyboard shortcut Control + C)
- Open the Word document where you want to insert this data
- Place the cursor where you want this data in the Word document
- Go to the Home tab in Word and click on Paste drop-down (click on the small inverted arrow below the Paste Special icon)

- In the options that show up, click on Paste Special

- In the Paste Special dialog box, select the ‘Paste link’ option

- Select Microsoft Excel Worksheet Object from the listed options

- Click OK
The above steps would insert the copied table in Word, where it’s still linked to the original table in Excel.
Now, if you go and make any changes in the table in Excel, you will see that the same is reflected in the table in Word (in real-time).
If for some reason your data doesn’t update in real-time, right-click on the table and click on the ‘Update Link’ option
Here are some things you need to know about this method:
- Since the two files are linked to each other, you will have to keep these together. If you’re sending the Word file to someone, you will also have to send them the Excel file, or the link would be broken and the data in Word would not update.
- Whenever the Word file opens, it will check for any updates in the Excel table. This works even if the Excel file is closed.
This method is best suited for situations where you have a large Excel file that has a lot of calculations/data/dashboards. By using this method, you can only copy a small part of the Excel file, while still being able to update the table when values change in Excel.
Embed Excel Table into Word
This is a really useful feature that MS Word offers. It allows you to embed an Excel document as a part of the Word document.
In the above method, I showed you how to keep the Excel and Word files together and keep them linked.
In this section, I will show you how to embed the Excel file within the Word document, so you won’t have to keep both the files (and only keep the Word file).
In layman terms, it’s as if you can open and work on an Excel worksheet from within the Word Document.
Let me show you what I mean.
Suppose you have a table in Excel as shown below that you want to copy to Word.
Below are the steps to insert this as an Embedded Excel object in Word:
- Select the data in Excel that you want to copy to Word
- Right-click and then click on Copy (or use the keyboard shortcut Control + C)
- Open the Word document where you want to insert this data
- Place the cursor where you want this data in the Word document
- Go to the Home tab in Word and click on Paste drop-down (click on the small inverted arrow below the Paste Special icon)
- In the options that show up, click on Paste Special
- In the Paste Special dialog box, make sure the ‘Paste’ option is selected

- Select Microsoft Excel Worksheet Object from the listed options

- Click OK
The above steps would insert the copied data from Excel to MS Word.
But what actually happnes in the backend in MS Word is that it creates a new Excel file (which is a part of the Word document itself) and shows you the table from that file.
If you double click on the table, you will notice that it opens the Excel file (from within the Word document). You get to see the familiar Excel interface while still being in the Word document.
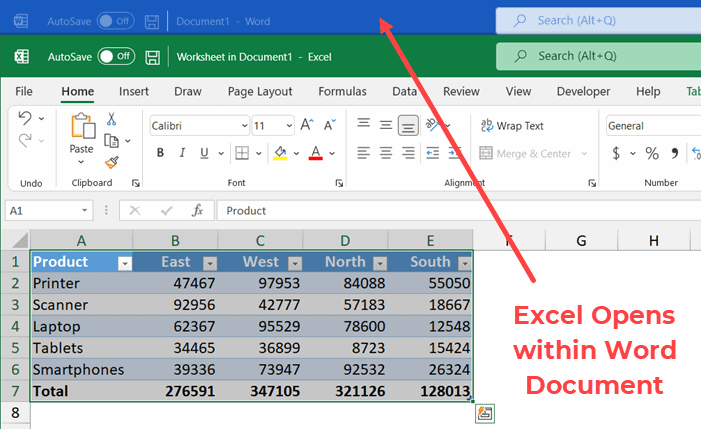
You can make any change and also use functionality such as conditional formatting, and that would be reflected in the table. Also, any formulas you have in place would continue to work.
The biggest benefit of using this method is that you don’t have to worry about two separate files. Unlike the previous method, in this method, the Excel file is a part of the Word document.
So, if you save the Word file or share it with someone else, the Excel file would remain with it and the data would remain intact.
On the downside, if you use multiple such tables or if the data is large, it will lead to a heavy Word document (as it has to also bear the weight of the embedded Excel file).
Copy Excel Table as a Satic Image
If you’re preparing a report and all you want is a really easy way to show some table (without any need to change the data), you can insert that data as an image.
Doing this is really easy and images are also easier to manage in Word (such as placement and resizing).
With copying an images, you also have an option to link the image to the table in Excel. This way, if you make any changes in Excel table, it would be reflected in the table image in Word.
Inserting Copied Table as a Static Image in Word
Suppose you have a table as shown below in Excel:
Below are the steps to copy this table and insert it as an image in MS Word:
- Select the data in Excel that you want to copy to Word
- Right-click and then click on Copy (or use the keyboard shortcut Control + C)
- Open the Word document where you want to insert this data
- Place the cursor where you want this data in the Word document
- Go to the Home tab in Word and click on Paste drop-down (click on the small inverted arrow below the Paste Special icon)
- In the options that show up, click on Paste Special
- In the Paste Special dialog box, make sure the ‘Paste’ option is selected

- Select ‘Picture’ from the listed options

- Click OK
The above steps would insert an image of the table in the Word document.
This is just like any other image and you can resize and format it.
Inserting Copied Table as a Linked Image in Word
If you like the flexibility of managing images in Word, and still want the table to be connected to the original Excel file, you can do that as well.
Suppose you have a table as shown below in Excel:
Below are the steps to copy this table and insert it as a linked image in MS Word:
- Select the table in Excel
- Right-click and then click on Copy (or use the keyboard shortcut Control + C)
- Open the Word document where you want to insert this data
- Place the cursor where you want this data in the Word document
- Go to the Home tab in Word and click on Paste Special
- In the Paste Special dialog box, select the ‘Paste Link’ option

- Select ‘Picture’ from the listed options

- Click OK
The above steps would again give you an image that you can easily resize and format.
But since this is linked to the original table in Excel, if you make any changes in the original table, these would also be reflected in the image.
Also, remember that since this image is linked to the original data, if you plan to share this Word document with someone else, you should also share the Excel File (in case you want the link to remain as is)
In case the excel file is not available or the name is changed, the image would be just like any other regular image.
So these are some of the ways you can use to copy a table for Excel and insert it into Word. In most cases, I prefer copying and pasting Excel tables as images, as these are easier to manage. In some cases, I also prefer the embed method which allows me to open the Excel file from within Word itself.
I hope you found this tutorial useful!
Other Excel tutorials you may also like:
- How to Save Excel Charts as Images (save as PNG, JPG, BMP)
- Microsoft Excel Won’t Open – How to Fix it! (6 Possible Solutions)
- How to Quickly Copy Chart (Graph) Format in Excel
- How to Copy Conditional Formatting to Another Cell in Excel
- How to Copy and Paste Formulas in Excel without Changing Cell References
- Copy and Paste Multiple Cells in Excel (Adjacent & Non-Adjacent)
Снимки экрана
С легкостью конвертируйте ваши файлы в практически любой формат документа!
1. Перетащите необходимый файл.
2. Выберите формат выходного файла (DOCX, PDF, JPG, TXT и т. д.).
3. Конвертируйте! Это займет всего несколько секунд.
4. Готово! Открывайте или делитесь конвертированным файлом.
Вы можете выбрать следующие форматы выходных файлов:
DOC, DOCX, HTML, ODT, PDF, RTF, TXT, JPG, PNG, JPEG, PNG.
Вы можете конвертировать файлы десятков форматов, вот некоторые самые популярные форматы, которые мы поддерживаем.
• Документы: ABW, DJVY, DOC, DOCM, DOCX, DOT, DOTX, HTML, HWP, LWP, MD, ODT, PAGES, PDF, RST, RTF, SDW, TEXT, TXT, WPD, WPS, ZABW и другие!
• Электронные книги: AZW, AZW3, AZW4, CBC, CBR, CBZ, CHM, EPUB, FB2, HTM, HTMLZ, LIT, LRF, MOBI, PDB, PML, PRC, RB, SNB, TCR, TXTZ и другие!
• Изображения: HEIC, JPG, JPEG, PNG, ICO, SVG, EPS, BMP, GIF, NEF, TIFF и другие!
• Таблицы: CSV, XLS, XLSX и другие!
• Презентации: PPT, PPTX, KEY, PDF и другие!
Моментально сохраняйте, открывайте и делитесь конвертированными файлами в любимых приложениях. Все ваши конвертированные файлы сохраняются в папку «Загрузки».
Конвертация обычно занимает менее 15 секунд!
Конвертирование выполняется на безопасном облачном сервере, благодаря чему оно проходит легче, быстрее и более щадяще для батареи. Для использования данного приложения вам необходимо подключение к интернету. Файлы немедленно будут удалены с сервера после конвертации. Так как файлы будут немедленно удалены после конвертирования или отмены, приносим к вашему сведению, что при использовании данного приложения вы соглашаетесь на пересылку ваших файлов по интернету из приложения на сервер конвертации.
Мы также недавно добавили поддержку локальных преобразований для многих популярных типов преобразований. Эти преобразования не требуют использования сервера и обычно выполняются почти мгновенно! Мы продолжаем добавлять поддержку большего количества локальных преобразований в каждом обновлении.
This app includes an optional auto-renewable subscription (Premium Pass): Premium Pass beings with a free trial period, then an auto-renewable monthly subscription when trial ends. Payment will be charged to your Apple account at confirmation of purchase and will automatically renew (at the duration/price selected) unless auto-renew is turned off at least 24 hrs before the end of the current period. Account will be charged for renewal within 24-hours prior to the end of the current period. Current subscription may not be cancelled during the active subscription period; however, you can manage your subscription and/or turn off auto-renewal by visiting your Apple Account Settings after purchase. Any unused portion of the free initial period will be forfeited when you purchase a subscription.
Privacy Policy: https://float.support/the-document-converter-mac/privacy
Terms of Use: https://float.support/the-document-converter-mac/terms
Что нового
11 апр. 2022 г.
Версия 12.5.0
Improved support for local conversions
Оценки и отзывы
Небесплатное приложениие
После нескольких раз беслатных конвертаций, требует покуки приложения.
Деньги на ветер
Скачал данную программу, хотел преобразовать файл pdf в docx. Так как файл был большой предложено было купить полную версию, купил — итог файл был преобразован в pdf но сам текст в виде вставок картинок в формате jpeg.))) Короче говоря, надувательство и развод!!!
лохотрон
Заявленная конвертация в doc docx отсутствует в бесплатной версии. потерянное время. как оштрафовать разработчика за вранье??????
Конфиденциальность приложения
Разработчик Float Tech, LLC указал, что в соответствии с политикой конфиденциальности приложения данные могут обрабатываться так, как описано ниже. Подробные сведения доступны в политике конфиденциальности разработчика.
Не связанные
с пользователем данные
Может вестись сбор следующих данных, которые не связаны с личностью пользователя:
-
Пользовательский контент
-
Данные об использовании
-
Диагностика
Конфиденциальные данные могут использоваться по-разному в зависимости от вашего возраста, задействованных функций или других факторов. Подробнее
Информация
- Провайдер
- Float Tech, LLC
- Размер
- 35,2 МБ
- Категория
-
Утилиты
- Совместимость
-
- Mac
- Требуется macOS 10.12 или новее.
- Языки
-
русский, английский, вьетнамский, голландский, греческий, датский, индонезийский, испанский, итальянский, корейский, малайский, немецкий, норвежский нюнорск, португальский, тайский, традиционный китайский, турецкий, упрощенный китайский, финский, французский, хинди, шведский, японский
- Возраст
- 4+
- Copyright
- © 2022 Float Tech LLC
- Цена
- Бесплатно
- Встроенные покупки
-
-
Пропуск премиум
349,00 ₽ -
Пожизненный пропуск
899,00 ₽ -
Пожизненный пропуск промо
0,00 ₽
-
Пропуск премиум
-
Поддержка приложения
-
Политика конфиденциальности
-
Поддержка приложения
-
Политика конфиденциальности
Другие приложения этого разработчика
Best Free Online Excel to Word Converter
Quick and easy
Excel to Word Converter is a service for online file conversion from one type to another. We support many popular formats for work, all possible image formats, multimedia file formats, etc. Our Excel to Word conversion tool is easy to use: select the desired file type, then define the output format of your document, upload the file and click ‘Upload’.
Security guaranteed
We guarantee secure and private. We do not get the right to your file and there will be no manual checking. We care about your privacy and your files. In this regard, we will also not share your data with other parties. It is essential that you have the opportunity to immediately delete the files you have uploaded from our server. If you forget to do this, they will be automatically deleted from our server after 24 hours. We completely secure your information.
Universal conversion
You can convert files to Excel to Word from any OS or device with an internet connection. Our service works on any OS including Windows, Mac, and Linux.
Most popular conversions
We support the most common conversion options for work and study. Use our Free application to decrease your workload, when dealing with both document and image files.
Fast and Easy Conversion
Upload your document, choose the save format type and click on “Convert” button. You will get the download link as soon as the file is converted.
Convert from Anywhere
It works from all platforms including Windows, Mac, Android and iOS. All files are processed on our servers. No plugin or software installation required for you.
Conversion Quality
. All files are processed using Aspose APIs, which are being used by many Fortune 100 companies across 114 countries.
Сконвертируйте ваши xls-файлы в doc онлайн и бесплатно
Перетащите файлы сюда. 100 MB максимальный размер файла или Регистрация
Конвертировать в XLS
xls
Лист Microsoft Excel (97-2003)
Формат XLS используется для описания документов программы Microsoft Excel. Этот файл представляет собой электронную таблицу. Все данные в документе распределены по ячейкам и хранятся в них. Каждая ячейка имеет уникальный адрес, обозначаемый буквами и арабскими цифрами. Ячейка может содержать неизменяемые данные и данные в виде формул, которые связывают несколько ячеек.
Конвертер DOC
doc
Документ Microsoft Word
DOC ― это расширение файлов для документов текстового редактора. Оно связано преимущественно с приложением Microsoft Word. Файлы DOC также могут содержать графики, таблицы, видео, изображения, звуки и диаграммы. Этот формат поддерживается почти всеми операционными системами.
Как сконвертировать XLS в DOC
Шаг 1
Загрузите xls-файл(ы)
Выберите файлы с компьютера, Google Диска, Dropbox, по ссылке или перетащив их на страницу.
Шаг 2
Выберите «в doc»
Выберите doc или любой другой формат, который вам нужен (более 200 поддерживаемых форматов)
Шаг 3
Загрузите ваш doc-файл
Позвольте файлу сконвертироваться и вы сразу сможете скачать ваш doc-файл
Рейтинг XLS в DOC
4.1 (21,856 голосов)
Вам необходимо сконвертировать и скачать любой файл, чтобы оценить конвертацию!