Contents
- 1 Import data using Teradata SQL Assistant
- 2 Set the required import option in SQL assistant
- 3 Import the excel data into Teradata
Import data using Teradata SQL Assistant
Teradata SQL assistant is providing the import data option which is used to bring the data into Teradata table from the excel or notepad files.If we want to do any analytics on the excel data, we can use this option to simplify our work.
Set the required import option in SQL assistant
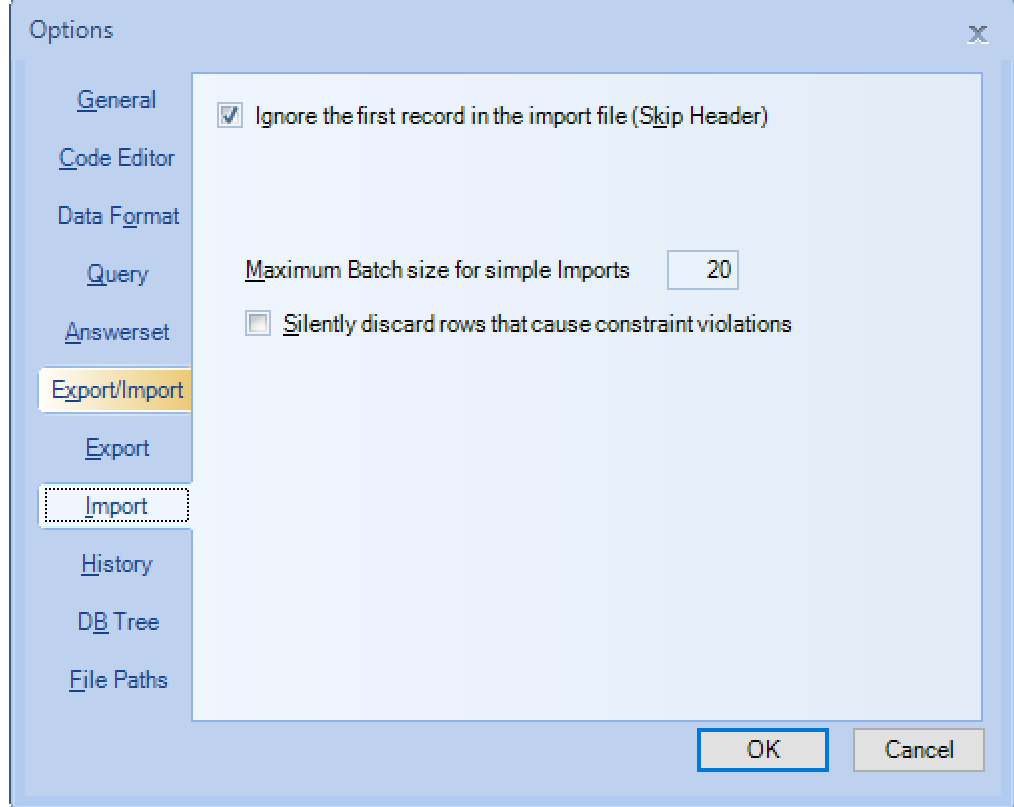
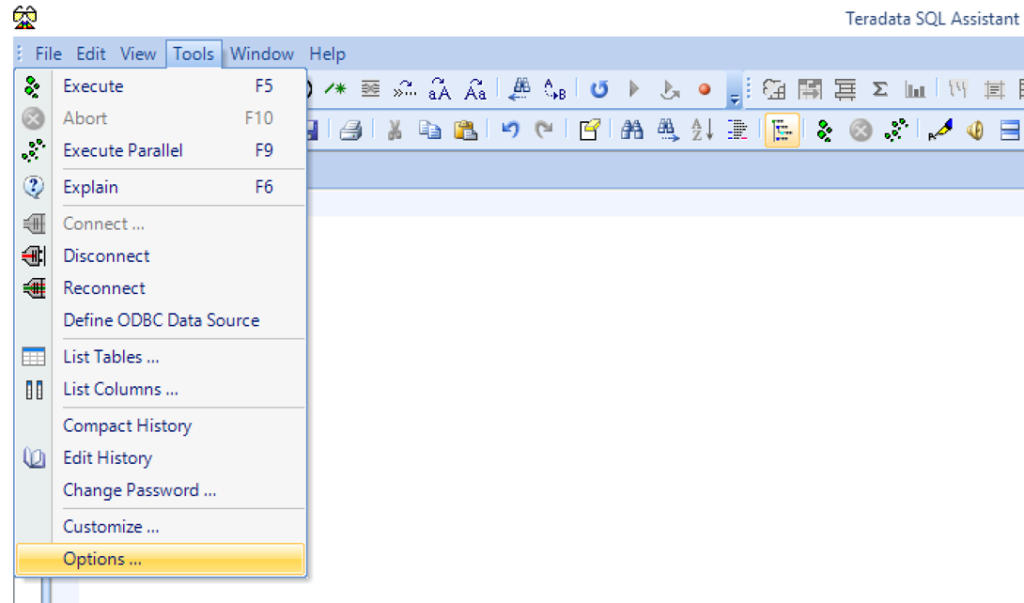
- Go to Tools in menu bar -> Click Options -> Export/Import
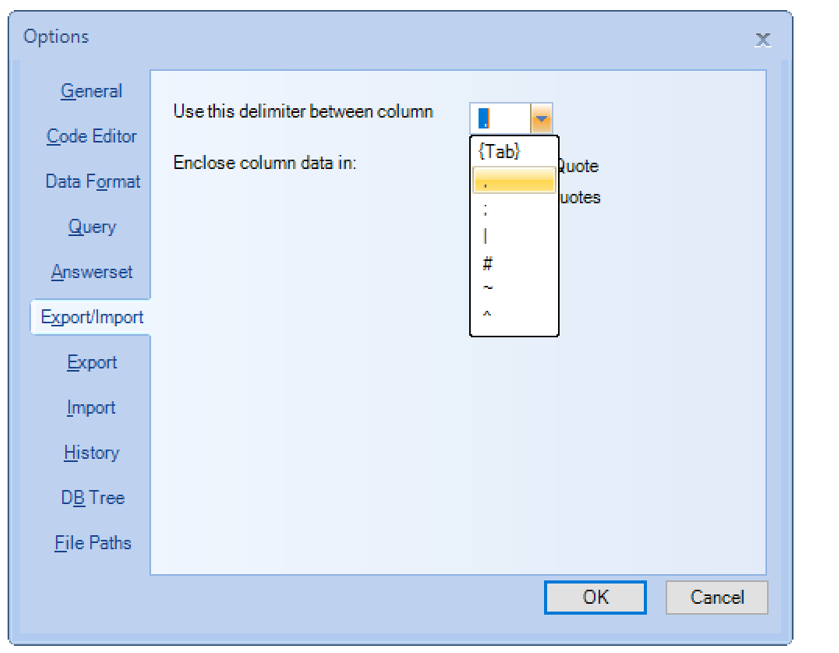
- The importing excel file should have the delimiter to split the column values. We have to select that delimiter character in the drop down option. Here we have selected the comma(,) as a delimiter for importing file.
- Select Import option to set the Skip header option if you have header record in the importing file.
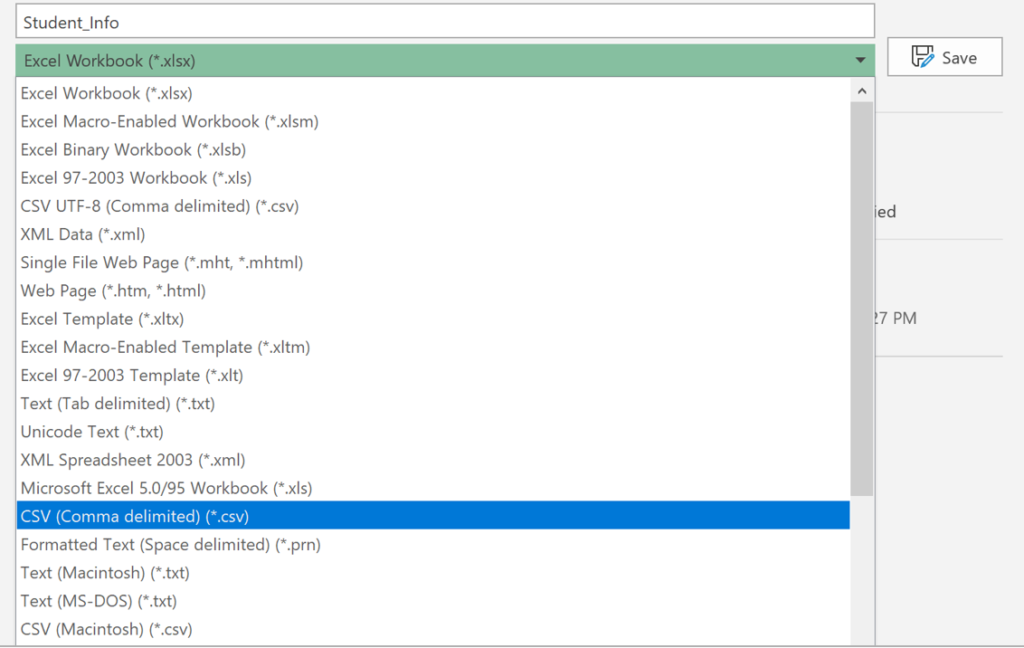
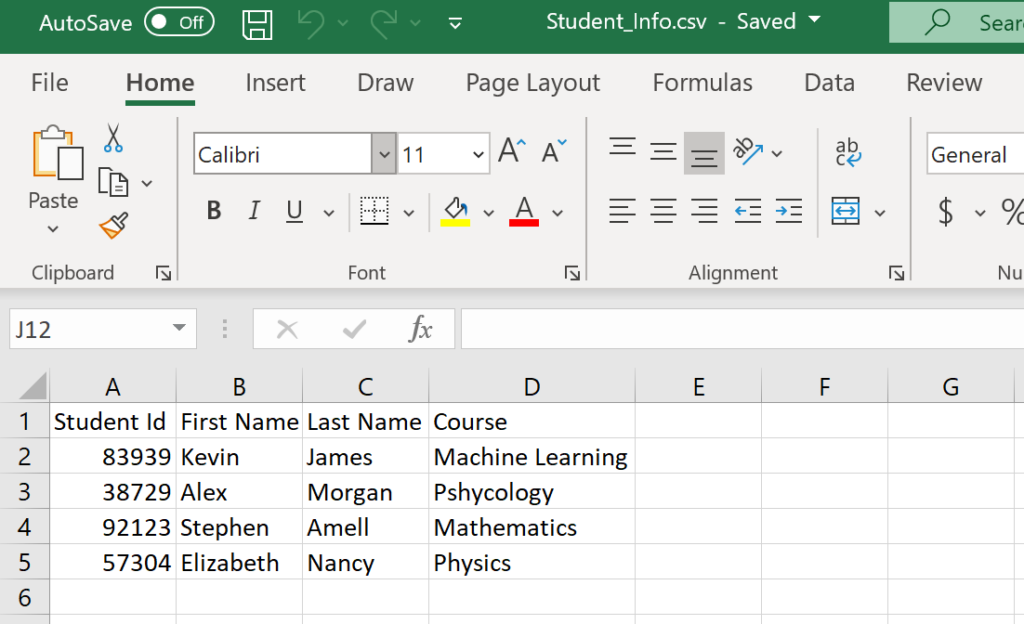
Step 1 – The excel file should be in the format of .csv to begin the import operation. To do that, Just open your excel file and click “Sava as” in the File menu. Then Select the CSV (Comma delimited) (*.csv) from the drop down and save that file.
- Step 2 – Create the Teradata table with the required columns in Sql assistant so that we can import the excel data into that table.
|
CREATE SET TABLE College_DB.Student_Details, FALLBACK ( StudentId INTEGER, FirstName VARCHAR(30), LastName VARCHAR(30), Course VARCHAR(40) ) UNIQUE PRIMARY INDEX ( StudentId ); |
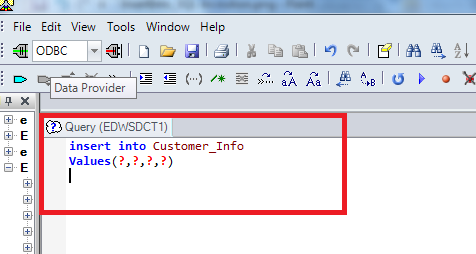
- Step 3 – Prepare the insert query with the question marks in the position of column name. While we run the query using import option in sql assistant, the question marks will be replaced with the values.
|
Insert into College_DB.Student_Details values (?,?,?,?); |
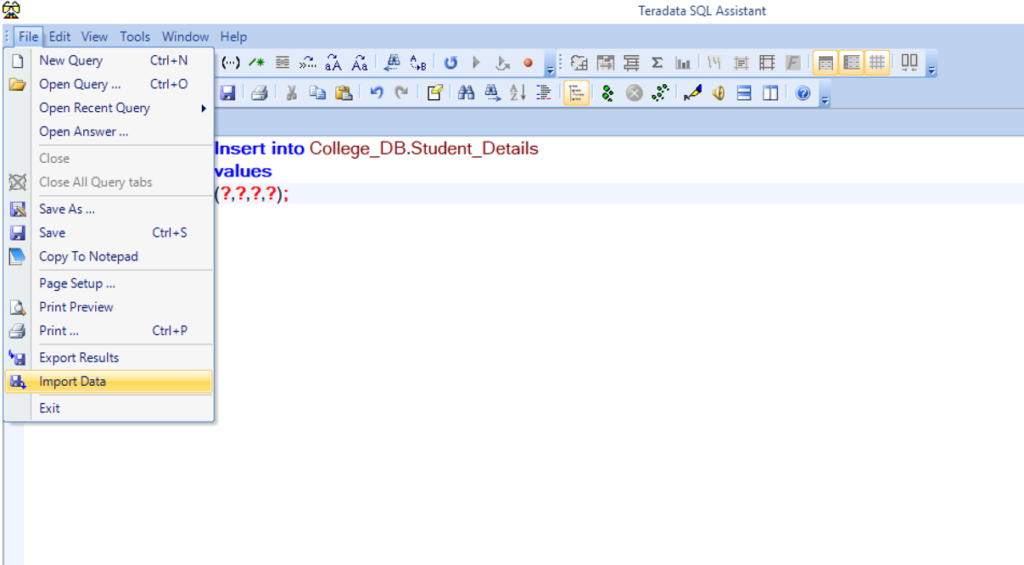
- Step 4 – In the SQL assistant, select the Import Data option from the File Menu which will make the application in Ready for Import operation state.
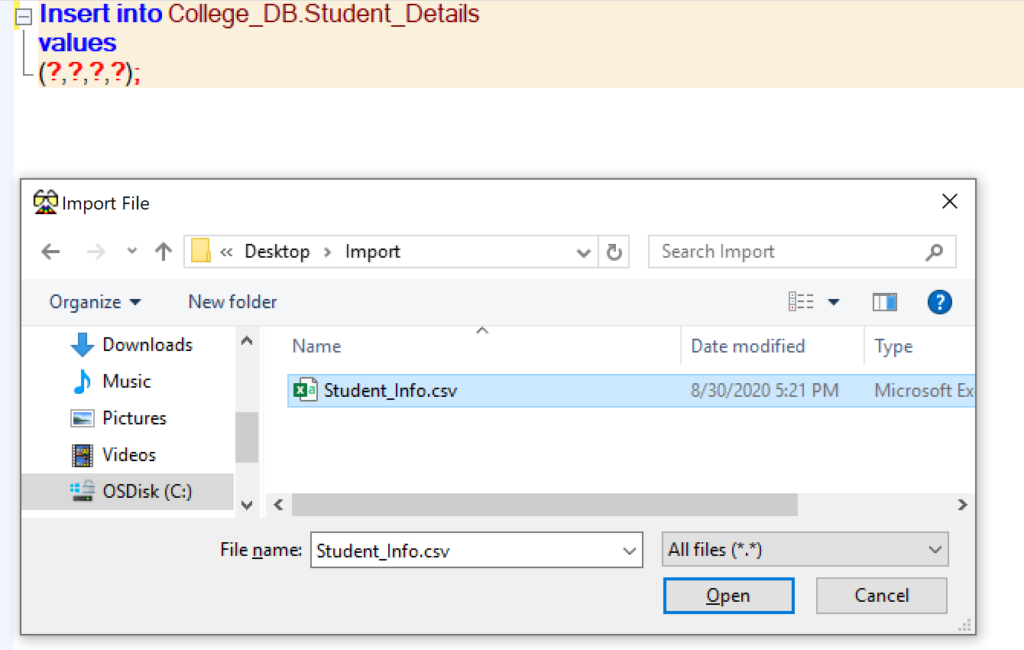
- Step 5 – Execute the Insert query by pressing F5 or tool bar option which will ask the location of the Import File to begin the loading. Just select the .csv file that has the required data. Here we are selecting the “Student_Info.csv” file to import the excel data into Teradata table.
- Step 6 – Then the importing will begin in the sql assistant and we can see the successful message as ” Import complete. <number> records imported” at the bottom. If something wrong in the insert query or file, it will throw an error message.
- Step 7 – Finally we have to stop the Import operation by clicking Import data from the File menu. Otherwise the sql assistant will be in the import state only.
Lets look at the Student_Details table to see the imported records. As you can see below, we have successfully imported all the records from the excel (.csv) file into Teradata Table.
Recommended Articles
Export Teradata table to a file using BTEQ
Full Convert migration in 4 easy steps
Excel
We will choose Excel from the list of available database formats. Full Convert supports all versions of Excel documents from Excel 97 to Excel 2007. XLS and XLSX files are read flawlesly. Formulas will be calculated during the conversions, so target database will have formula results stored, not the formula expression texts.
Just type-in the folder containing your Excel documents, or click the ellipsis button on the right and Full Convert will display Browse for Folder dialog.
You don’t even need to have Excel installed to be able to convert your Excel documents. We directly read your Excel files.
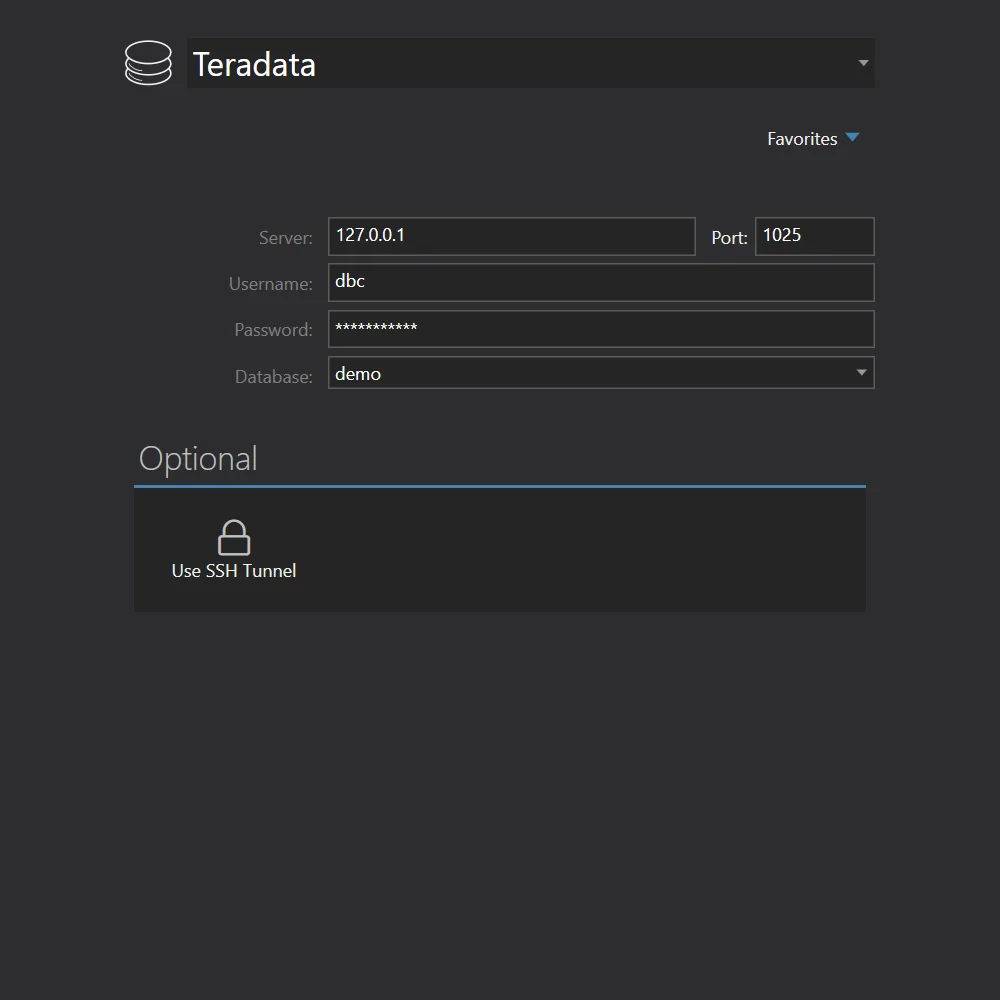
Teradata
We will select Teradata from the drop down and fill out the connection parameters.
Start the conversion
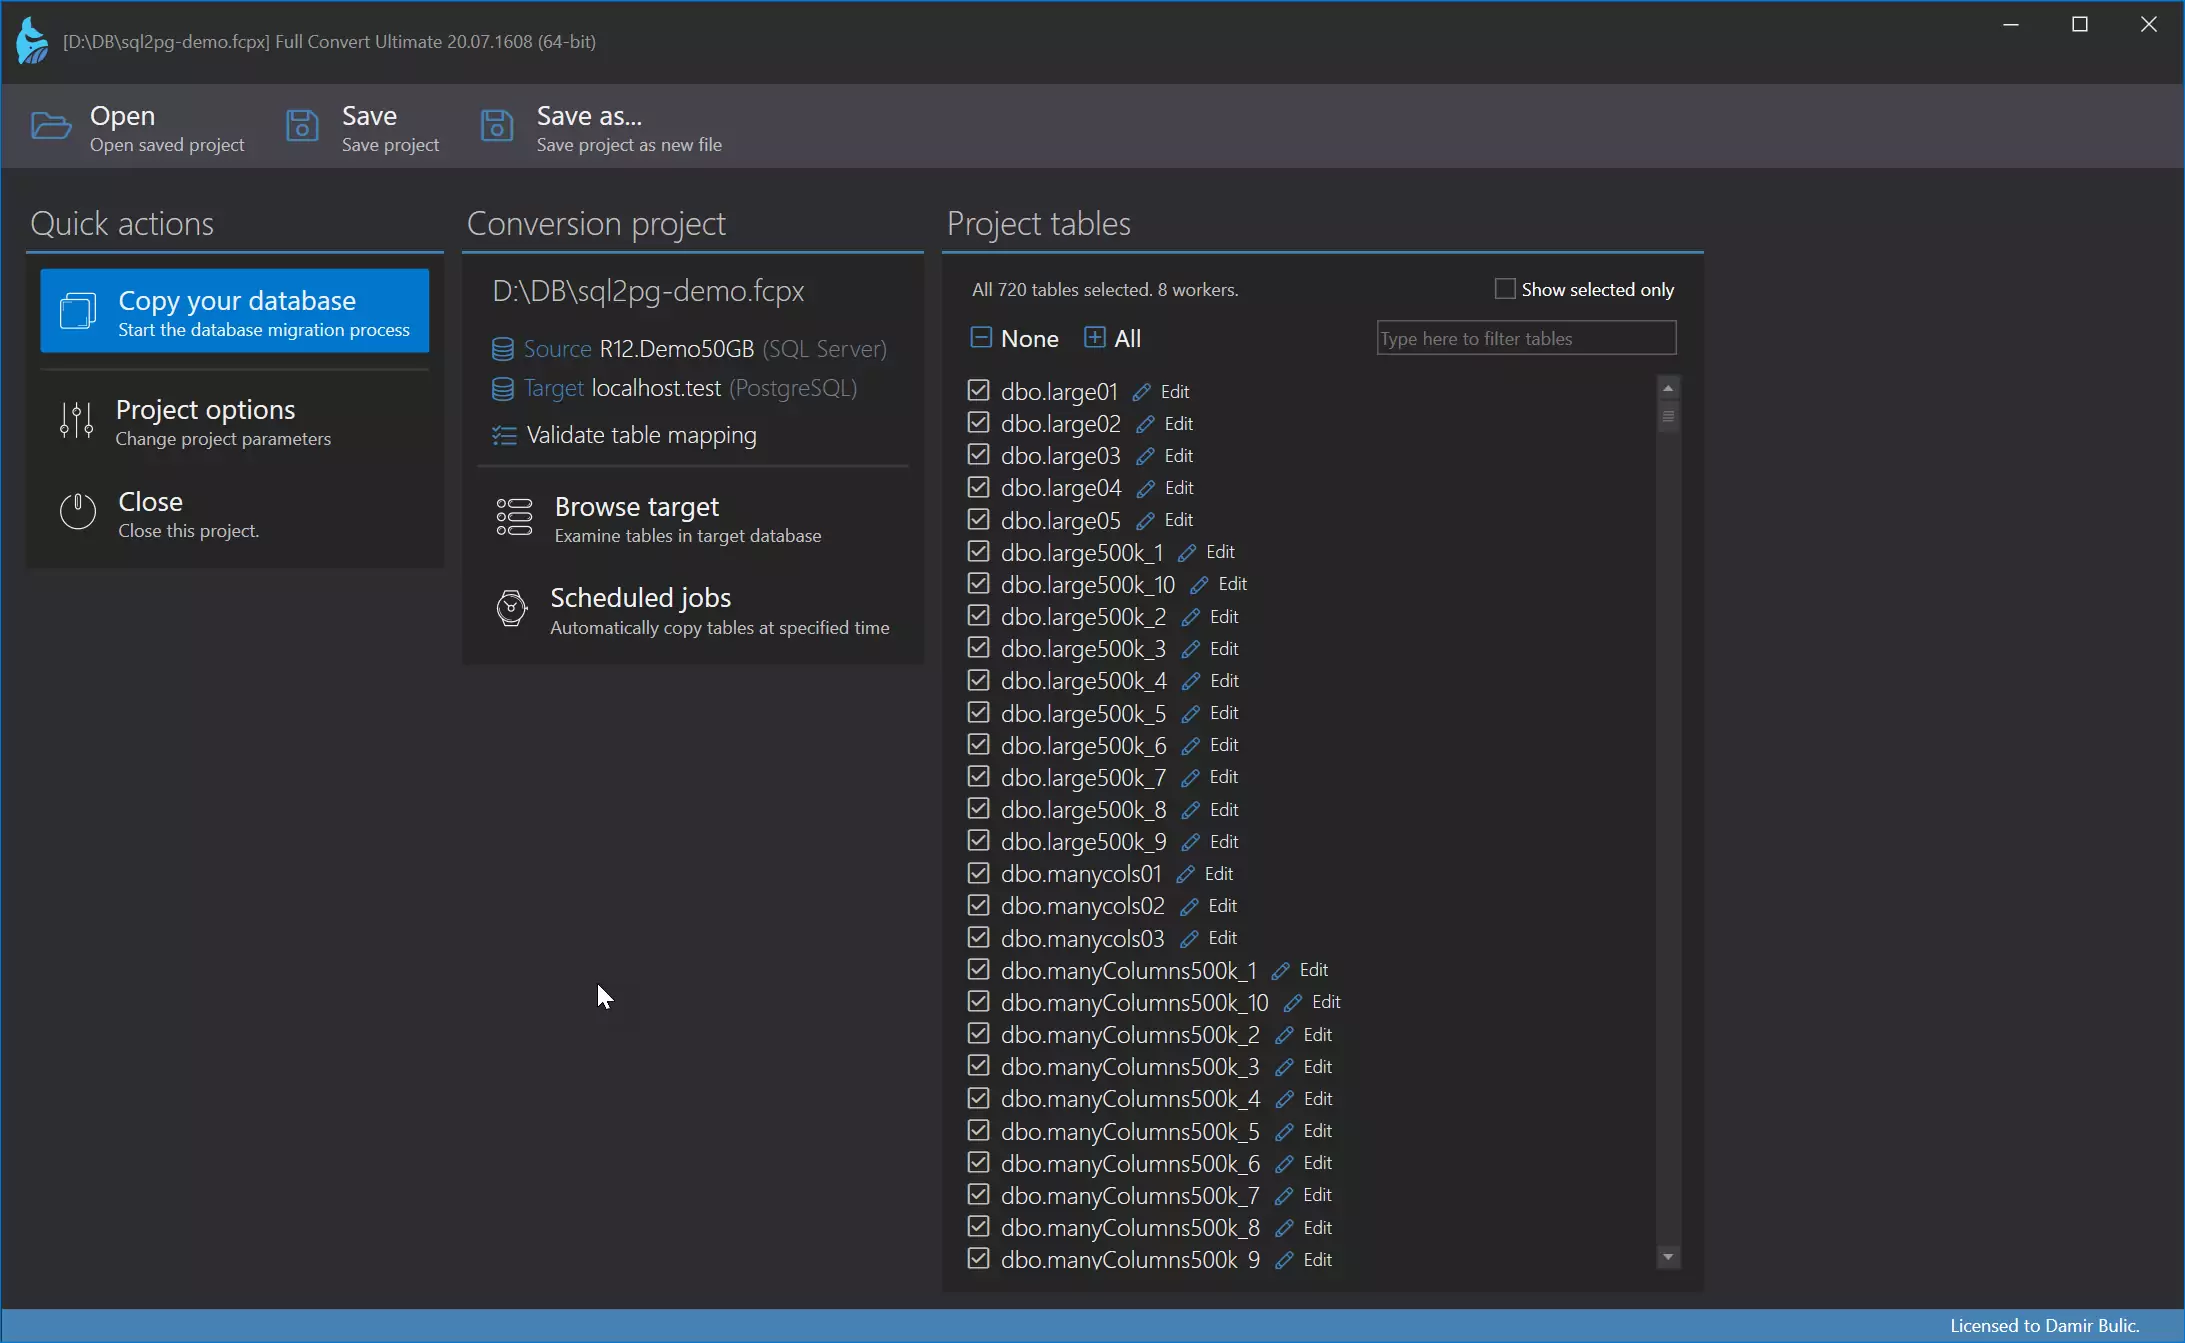
All source tables are selected for conversion by default. In case you only need some tables, simply deselect the ones you don’t need — or deselect all, then select just the tables you do need.
Click the Copy your database button to get started.
Conversion
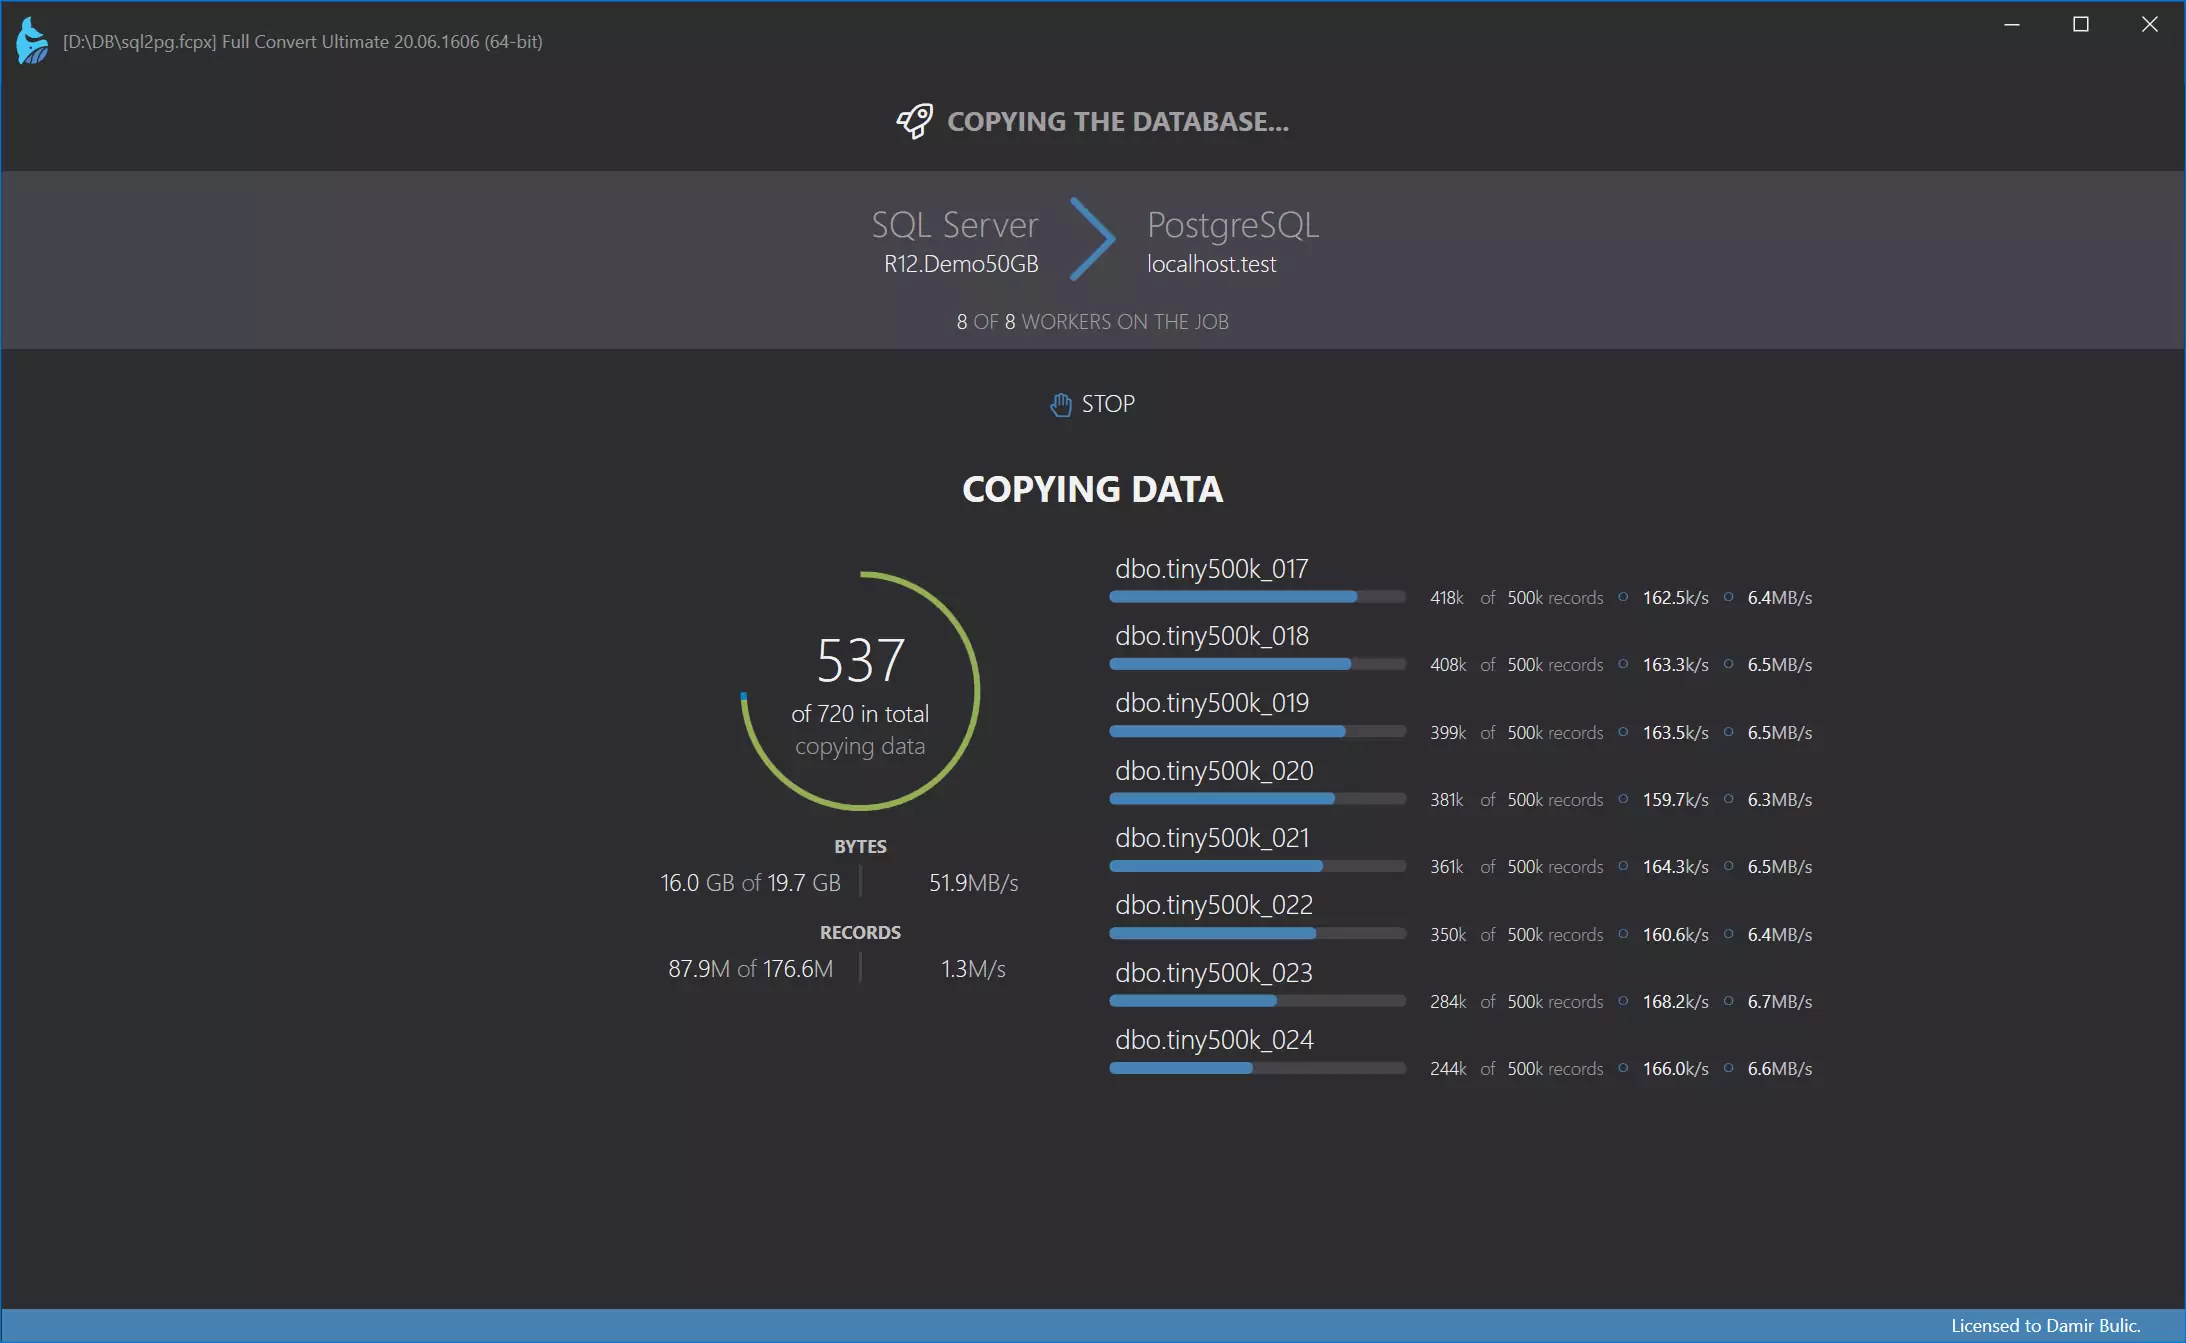
Conversion is highly-optimized to run as fast as possible, yet provides top-notch reliability. Huge tables are converted in small chunks at a time, preserving memory and ensuring that your computer stays fast and responsive.
Sometimes you need to get data from excel to Teradata table. There are a few ways you can import data from excel to Teradata; one of them is using Teradata SQL assistant. I am going to explain step by step process of inserting data into Teradata table from an excel data sheet.
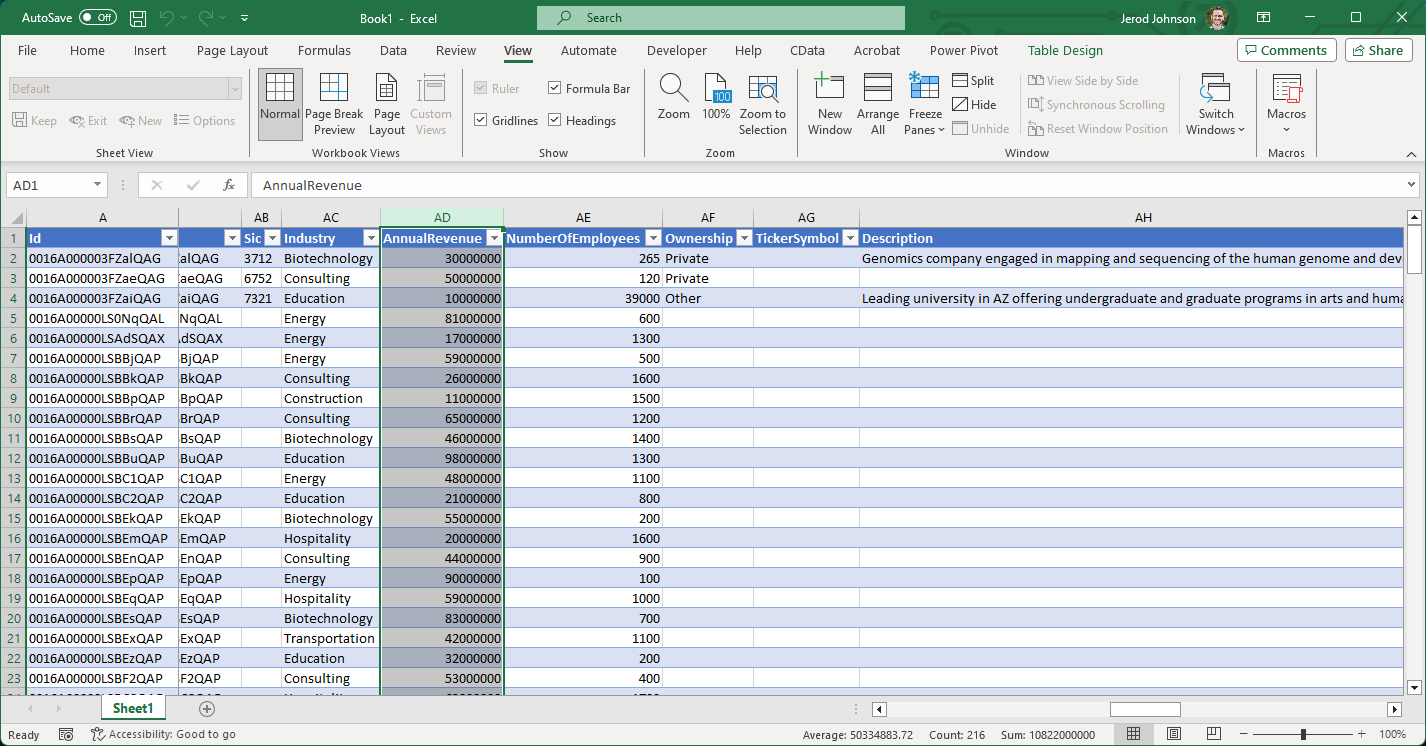
For example, you have customer information in the excel (Fig 1) and want to import the excel data to the teradata table.
Fig 1: Data in Excel
Step 1: Save excel as .csv file
First you need to save the excel file as .CSV
Fig 2: Save as .CSV
Step 2: Remove cloumn names from the excel
You can edit the .csv file like below (Fig:3 )
Fig 3: Edit .csv file
Then remove the column name from the .csv file. (See fig:4)
Fig 4: remove column names
Step 3: Create a temp table to insert the data from Excel
Create a volatile table in teradata (see fig: 5), SQL Code for creating the volatile table:
create volatile table Customer_Info
(Customer_no int,
Cutomer_First_Name varchar(30),
Customer_LastName varchar(30),
Phone int)
on commit preserve rows;
Fig 5: Create table to store data from excel
And there are no records in the table.
Fig 6: Newly created table, waiting to get data from .csv
Step 4: Choose ‘Import Data’ from SQL Assistant
From Teradata SQL Assistant, go to File->Import data and click at Import data
Fig 7: Import data from Teradata SQL assistant.
And then you will see message «Ready for Import operation» at the above of SQL editor in teradata SQL assistant. (see Fig:8)
Fig 8: Message ‘Ready for Import operation’
Step 5: Execute insert statement
Now you need to write below SQL statment and press F5
Fig 9: SQL syntax for inserting data
When you press F5 then you will find option to select your .csv file that you have completed in step 1 and step 2. (See figure 10)
Fig 10: Choose .csv file to get data into the table
When you select the .csv file SQL assistant import functionality will start taking the data from .csv and will insert records into the table ‘Customer_Info’, you will find message at the bottom of the windows (see fig;11)
Fig 11: data imported to the table
Now you can select the table to test if the table is filled by the data from the excel.
Note: Please click again ‘Import data’ from File->Import data to disable import mode in SQL assistant.
We will choose Excel from the list of available database formats. Full Convert supports all versions of Excel documents from Excel 97 to Excel 2007. XLS and XLSX files are read flawlesly. Formulas will be calculated during the conversions, so target database will have formula results stored, not the formula expression texts.
Just type-in the folder containing your Excel documents, or click the ellipsis button on the right and Full Convert will display Browse for Folder dialog.
You don’t even need to have Excel installed to be able to convert your Excel documents. We directly read your Excel files.
We will select Teradata from the drop down and fill out the connection parameters.


All source tables are selected for conversion by default. In case you only need some tables, simply deselect the ones you don’t need — or deselect all, then select just the tables you do need.
Click the Copy your database button to get started.
Conversion is highly-optimized to run as fast as possible, yet provides top-notch reliability. Huge tables are converted in small chunks at a time, preserving memory and ensuring that your computer stays fast and responsive.


Use our built-in database browser to examine the copied data.
Of course, you can also examine the conversion in detail and see in-depth information for each table.
Ready to dive in?
Run Full Convert today.
We offer unconditional 60 day money-back guarantee.
You will be helped directly by people who created this technology.
Содержание
- It’s all about Data
- Pages
- Sunday, February 15, 2015
- Insert data from Excel to Terdata table via SQL assistant.
- Import excel file into teradata using tpt
- 1 Answer 1
- Share your knowledge with other Developers in REVISIT CLASS.
- How to import excel data into Teradata table?
- Import data using Teradata SQL Assistant
- Set the required import option in SQL assistant
- Import the excel data into Teradata
- Transfer Data from Excel to Teradata
- Ready to get started?
- Establish a Connection
- Retrieve Data from Teradata
- Insert Rows to Teradata
- Using Microsoft Query in Excel to Connect to Teradata
- Ready to get started?
It’s all about Data
What I am passionate about!
Pages
Sunday, February 15, 2015
Insert data from Excel to Terdata table via SQL assistant.
Sometimes you need to get data from excel to Teradata table. There are a few ways you can import data from excel to Teradata; one of them is using Teradata SQL assistant. I am going to explain step by step process of inserting data into Teradata table from an excel data sheet.
For example, you have customer information in the excel (Fig 1) and want to import the excel data to the teradata table.
Step 2: Remove cloumn names from the excel
You can edit the .csv file like below (Fig:3 )
Step 3: Create a temp table to insert the data from Excel
Create a volatile table in teradata (see fig: 5), SQL Code for creating the volatile table:
create volatile table Customer_Info
(Customer_no int,
Cutomer_First_Name varchar(30),
Customer_LastName varchar(30),
Phone int)
on commit preserve rows;
And there are no records in the table.
Step 4: Choose ‘Import Data’ from SQL Assistant
From Teradata SQL Assistant, go to File->Import data and click at Import data
And then you will see message «Ready for Import operation» at the above of SQL editor in teradata SQL assistant. (see Fig:8)
Fig 8: Message ‘Ready for Import operation’
Step 5: Execute insert statement
Now you need to write below SQL statment and press F5
Now you can select the table to test if the table is filled by the data from the excel.
Note: Please click again ‘Import data’ from File->Import data to disable import mode in SQL assistant.
Источник
Import excel file into teradata using tpt
I am required to load an excel file to a teradata table which already has data in it. I have used TPT Inserter operator to load data with CSV files. I am not sure how to directly load an excel file using TPT Inserter. When I tried providing the excel file with TextDelimiter=’TAB’, the parser threw an error
data_connector: TPT19134 !ERROR! Fatal data error processing file ‘d:sample_dat a.csv’. Delimited Data Parsing error: Too few columns in row 1.
1) Could someone explain what are the options required while directly importing excel file to teradata
2) How to load a TAB delimited file in teradata using tptLoad / tptInserter
the script that I have used is:
1 Answer 1
The scripts actually seems fine by the looks besides for the fact the the error is related to delimited data and a .xlsx extension file is specified in the script. Are you sure that the specified file is Tab delimited?
Formats supported by TPT Dataconnector operator are:
- Binary — Binary data fitting exactly in the defined Schema plus indicator bytes
- Delimited — Easier for multiple column human readable files, limited to all varchar schema
- Formatted — For working with data exported by Teradata TTUs
- Text — For text files containing fixed width columns, also human readable, limited to all varchar schema
- Unformatted — For working with data exported by Teradata TTUs
The original excel data (in true xls or xlsx format) is not directly supported by native TPT operators. But if your data is really Tab delimited then this shouldn’t be a problem; you should be able to load this. An obvious point to consider in loading a delimited file is that Char or Varchar fields must not contain delimiter within data. You can escape delimiter characters in data by using a ‘’. A more subtle point is that you cannot specify TAB delimiter in lower case, i.e. varchar textdelimiter=’TAB’ works but varchar textdelimiter=’tab’ doesn’t. Also, any other control characters (besides TAB) cannot be specified as delimiters.
If you truly need to load excel files then you may need to pre-process it into a loadable format such as delimited or binary or text data. You can write separate code in any language to achieve this.
Источник
Launched new portal to write and publish your article. Check it out!
How to import excel data into Teradata table?
Import data using Teradata SQL Assistant
Teradata SQL assistant is providing the import data option which is used to bring the data into Teradata table from the excel or notepad files.If we want to do any analytics on the excel data, we can use this option to simplify our work.
Set the required import option in SQL assistant
- Go to Tools in menu bar -> Click Options -> Export/Import
- The importing excel file should have the delimiter to split the column values. We have to select that delimiter character in the drop down option. Here we have selected the comma(,) as a delimiter for importing file.
- Select Import option to set the Skip header option if you have header record in the importing file.
Import the excel data into Teradata
Step 1 – The excel file should be in the format of .csv to begin the import operation. To do that, Just open your excel file and click “Sava as” in the File menu. Then Select the CSV (Comma delimited) (*.csv) from the drop down and save that file.
- Step 3 – Prepare the insert query with the question marks in the position of column name. While we run the query using import option in sql assistant, the question marks will be replaced with the values.
- Step 4 – In the SQL assistant, select the Import Data option from the File Menu which will make the application in Ready for Import operation state.
- Step 5 – Execute the Insert query by pressing F5 or tool bar option which will ask the location of the Import File to begin the loading. Just select the .csv file that has the required data. Here we are selecting the “Student_Info.csv” file to import the excel data into Teradata table.
- Step 6 – Then the importing will begin in the sql assistant and we can see the successful message as ” Import complete. records imported” at the bottom. If something wrong in the insert query or file, it will throw an error message.
- Step 7 – Finally we have to stop the Import operation by clicking Import data from the File menu. Otherwise the sql assistant will be in the import state only.
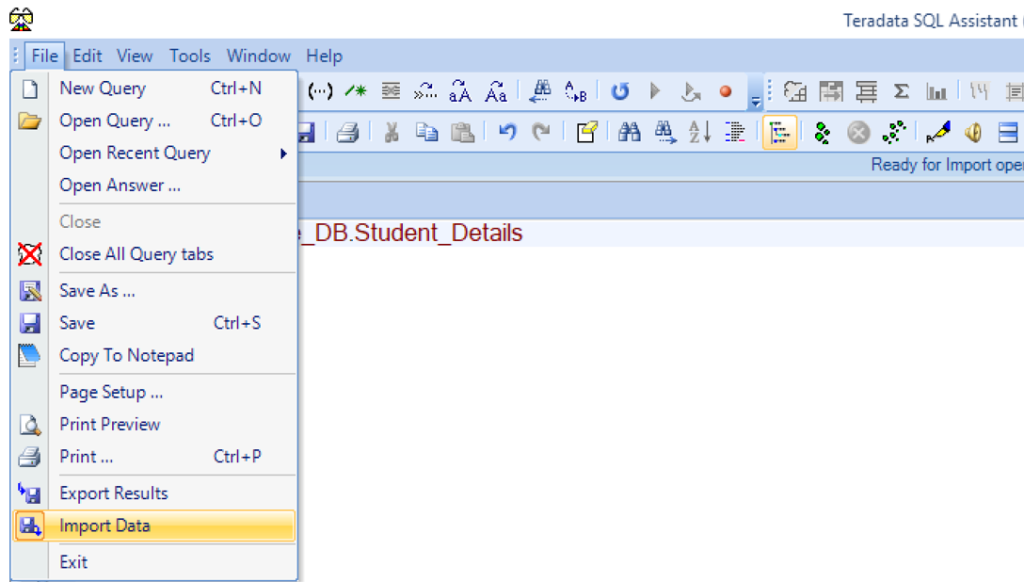
Lets look at the Student_Details table to see the imported records. As you can see below, we have successfully imported all the records from the excel (.csv) file into Teradata Table.

Источник
Transfer Data from Excel to Teradata
Ready to get started?
Download for a free trial:
The Teradata Excel Add-In is a powerful tool that allows you to connect with live data from Teradata databases, directly from Microsoft Excel.
Use Excel to read, write, and update Teradata. Perfect for mass imports / exports / updates, data cleansing & de-duplication, Excel based data analysis, and more!
This article explains how to transfer data from Excel to Teradata using the Excel Add-In for Teradata.
The CData Excel Add-In for Teradata enables you to edit and save Teradata data directly from Excel. This article explains how to transfer data from Excel to Teradata. This technique is useful if you want to work on Teradata data in Excel and update changes, or if you have a whole spreadsheet you want to import into Teradata. In this example, you will use the NorthwindProducts table; however, the same process will work for any table that can be retrieved by the CData Excel Add-In.
Establish a Connection
If you have not already done so, create a new Teradata connection by clicking From Teradata on the ribbon.
To connect to Teradata, provide authentication information and specify the database server name.
- User: Set this to the username of a Teradata user.
- Password: Set this to the password of the Teradata user.
- DataSource: Specify the Teradata server name, DBC Name, or TDPID.
- Port: Specify the port the server is running on.
- Database: Specify the database name. If not specified, the default database is used.
Retrieve Data from Teradata
To insert data into Teradata, you will first need to retrieve data from the Teradata table you want to add to. This links the Excel spreadsheet to the Teradata table selected: After you retrieve data, any changes you make to the data are highlighted in red.
- Click the From Teradata button on the CData ribbon. The Data Selection wizard is displayed.
- In the Table or View menu, select the NorthwindProducts table.
- In the Maximum Rows menu, select the number of rows you want to retrieve. If you want to insert rows, you need to retrieve only one row. The Query box will then display the SQL query that corresponds to your request.
- In the Sheet Name box, enter the name for the sheet that will be populated. By default the add-in will create a new sheet with the name of the table.
Insert Rows to Teradata
After retrieving data, you can add data from an existing spreadsheet in Excel.
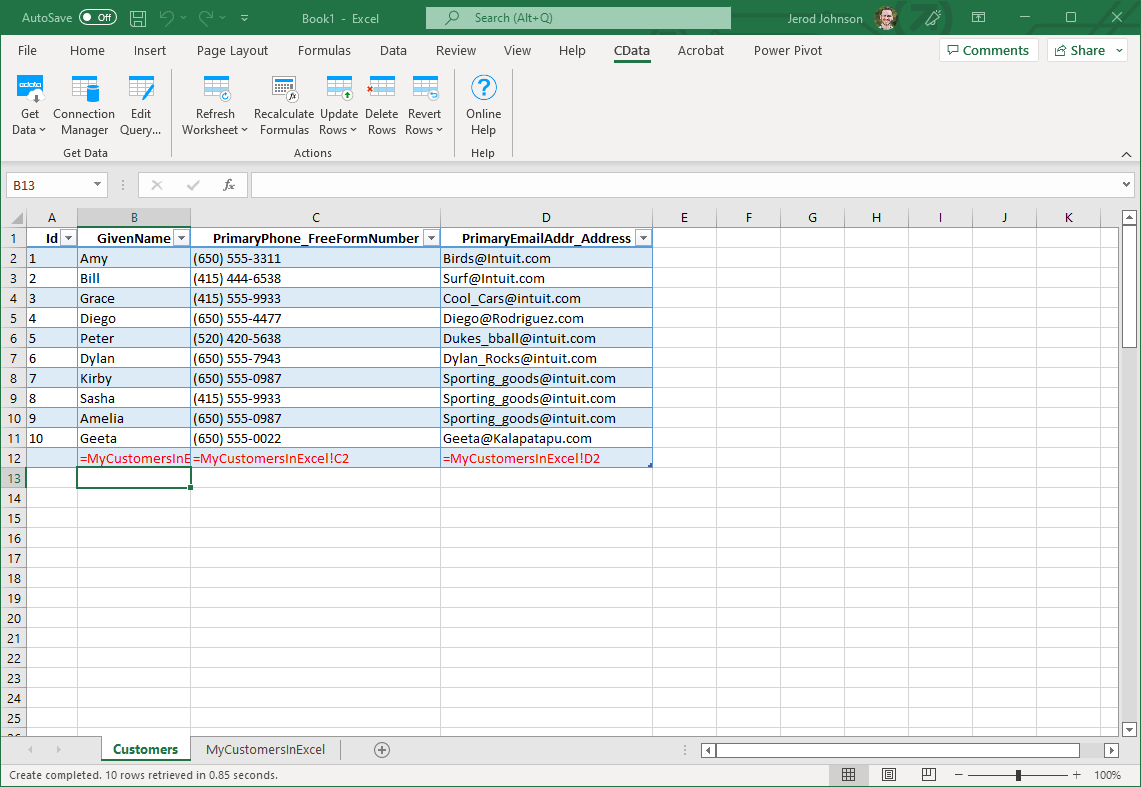
- In a cell after the last row, enter a formula referencing the corresponding cell from the other spreadsheet; for example, =MyNorthwindProductsSheetInExcel!A1.
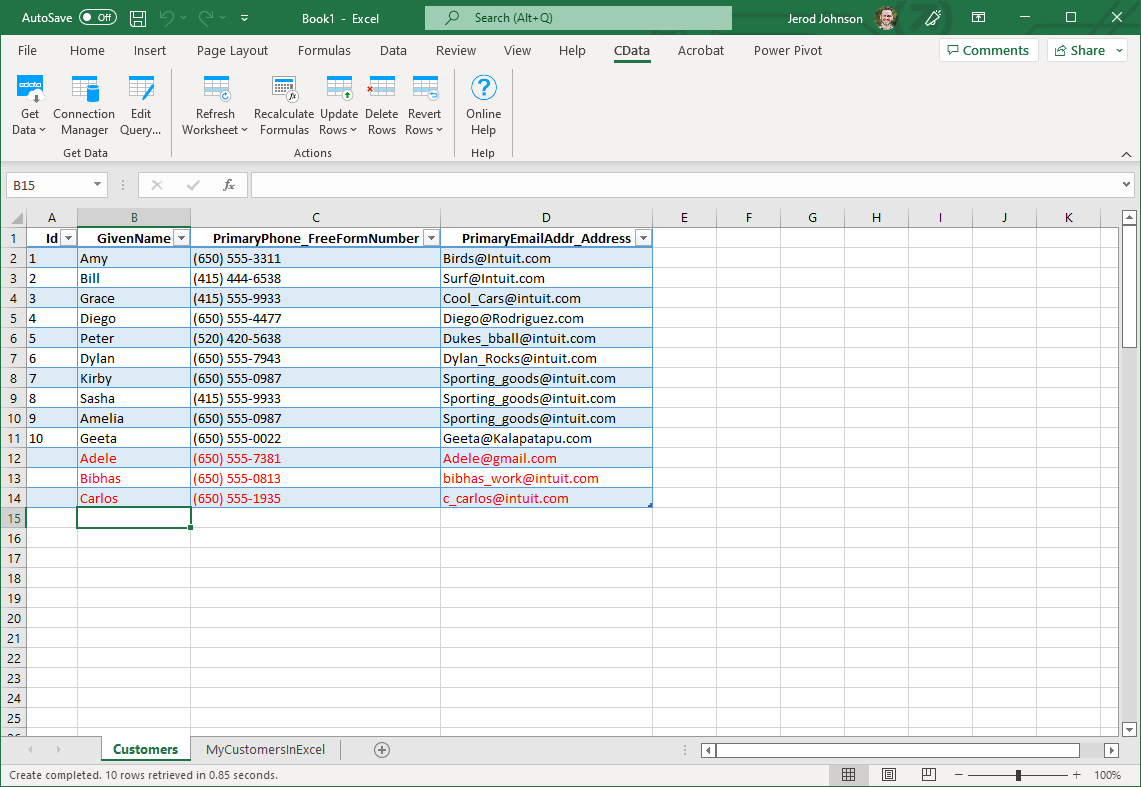
- After using a formula to reference the cells you want to add to Teradata, select the cells that you are inserting data into and drag the formula down as far as needed. The referenced values you want to add will be displayed on the NorthwindProducts sheet.
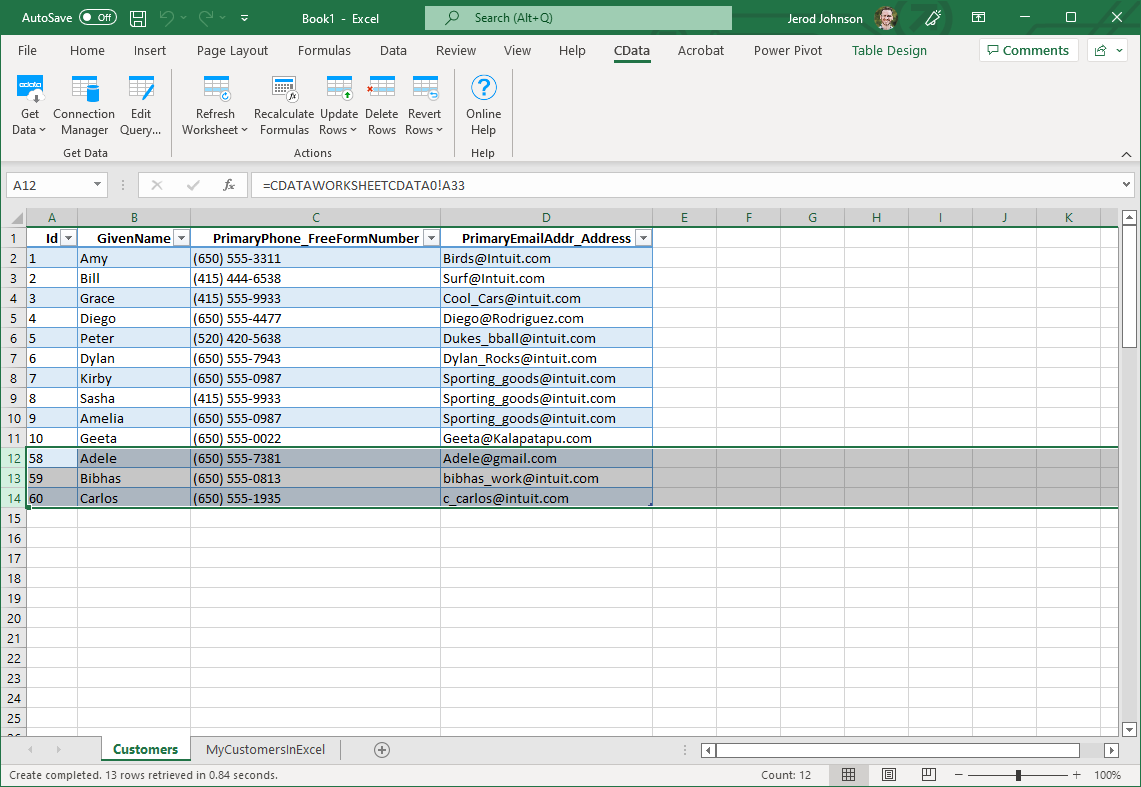
- Highlight the rows you want to insert and click the Update Rows button.
As each row is inserted, the Id value will appear in the Id column and the row’s text will change to black, indicating that the record has been inserted.
CData Software is a leading provider of data access and connectivity solutions. Our standards-based connectors streamline data access and insulate customers from the complexities of integrating with on-premise or cloud databases, SaaS, APIs, NoSQL, and Big Data.
Источник
Using Microsoft Query in Excel to Connect to Teradata
Ready to get started?
Download for a free trial:
The Teradata ODBC Driver is a powerful tool that allows you to connect with Teradata, directly from any applications that support ODBC connectivity.
Access Teradata databases from virtually anywhere through a standard ODBC Driver interface.
This article uses the CData ODBC driver for Teradata to import data in Excel with Microsoft Query. This article also demonstrates how to use parameters with Microsoft Query.
The CData ODBC driver for Teradata uses the standard ODBC interface to link Teradata data with applications like Microsoft Access and Excel. Follow the steps below to use Microsoft Query to import Teradata data into a spreadsheet and provide values to a parameterized query from cells in a spreadsheet.
If you have not already, first specify connection properties in an ODBC DSN (data source name). This is the last step of the driver installation. You can use the Microsoft ODBC Data Source Administrator to create and configure ODBC DSNs.
To connect to Teradata, provide authentication information and specify the database server name.
- User: Set this to the username of a Teradata user.
- Password: Set this to the password of the Teradata user.
- DataSource: Specify the Teradata server name, DBC Name, or TDPID.
- Port: Specify the port the server is running on.
- Database: Specify the database name. If not specified, the default database is used.
You can then work with live Teradata data in Excel.
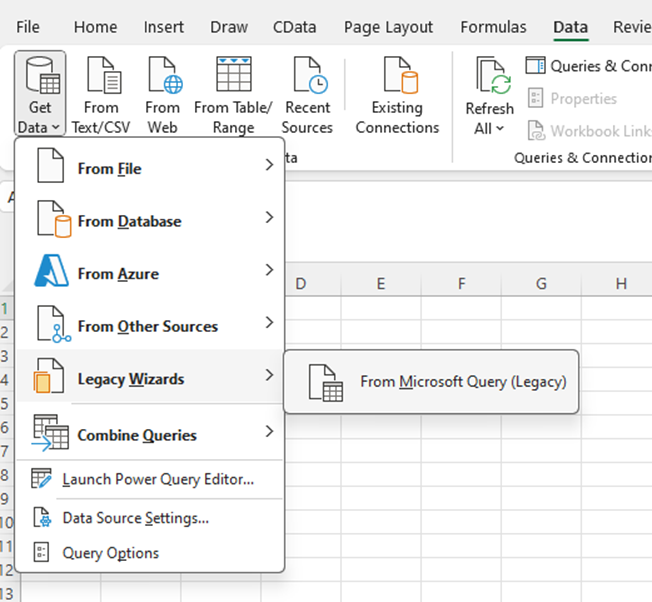
- In Excel, open the Data tab and choose From Other Sources -> From Microsoft Query.
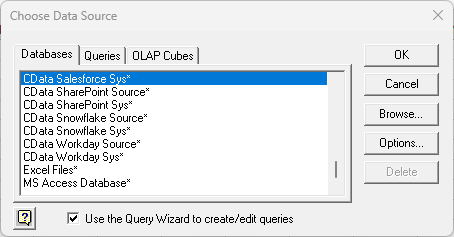
- Choose the Teradata DSN. Select the option to use Query Wizard to create/edit queries.
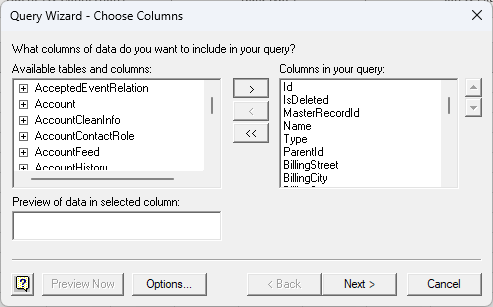
- In the Query Wizard, expand the node for the table you would like to import into your spreadsheet. Select the columns you want to import and click the arrow to add them to your query. Alternatively, select the table name to add all columns for that table.
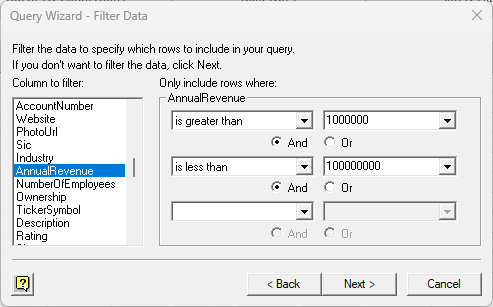
- The Filter Data page allows you to specify criteria. For example, you can limit results by setting a date range.
- If you want to use parameters in your query, select the option to edit the query in Microsoft Query.
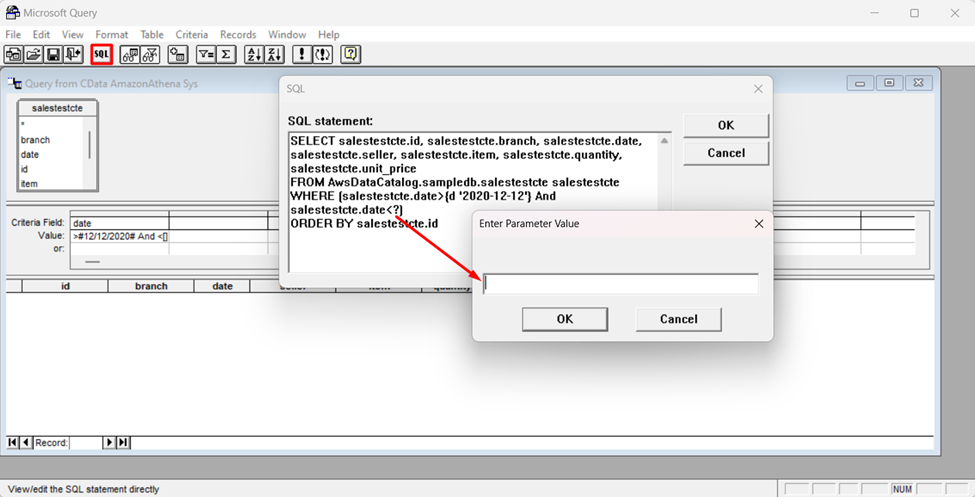
To set a parameter in the query, you will need to modify the SQL statement directly. To do this, click the SQL button in the Query Editor. If you set filter criteria earlier, you should have a WHERE clause already in the query.
To use a parameter, use a «?» character as the wildcard character for a field’s value in the WHERE clause. For example, if you are importing the NorthwindProducts, you can set «CategoryId=?».
Close the SQL dialog when you are finished editing the SQL statement. You will be prompted to enter a parameter value. In the next step, you will select a cell to provide this value. So, leave the box in the dialog blank.
Close Microsoft Query. The Import Data dialog is displayed. Enter a cell where results should be imported. 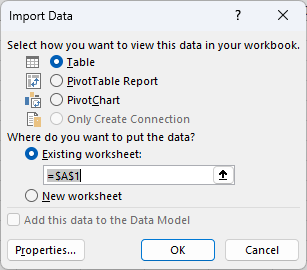
The data is now imported into Excel. When you change the value in cell B1, the data will be filtered by the specified search criteria.
CData Software is a leading provider of data access and connectivity solutions. Our standards-based connectors streamline data access and insulate customers from the complexities of integrating with on-premise or cloud databases, SaaS, APIs, NoSQL, and Big Data.
Источник

