
In this article, we will discuss 3 methods to import an Excel file into SAS.
You can import an Excel file with the PROC IMPORT procedure, the LIBNAME statement, or the Import Data wizard in SAS University Edition. It is not possible to import an Excel with a SAS Data Step.
Sample Data
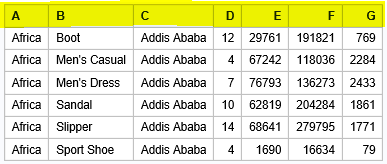
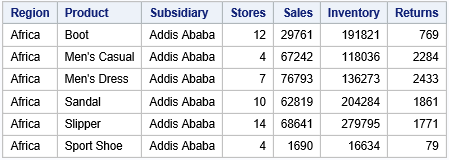
In the examples in this article, we will import the file “shoes.xlsx“. This file has 395 rows (excluding the header) and 7 columns.
Below we show the first 10 rows.
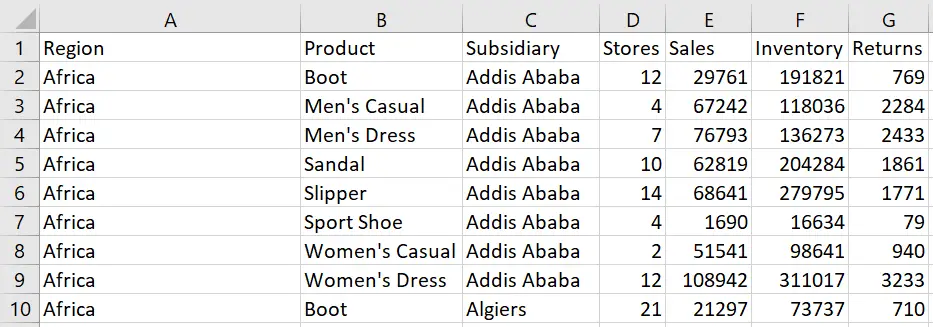
The file above is based on the SHOES dataset from the SASHELP library. To follow the examples in this article, you could export this dataset as an Excel file first and save it as “shoes.xlsx“.
The easiest method to import an Excel File into SAS is with PROC IMPORT. The PROC IMPORT procedure provides you great flexibility. For example, you can specify the sheet you want to import and start the import from the second row.
How to Import an Excel File into SAS with PROC IMPORT
These are the steps to import an Excel File in SAS:
1. Define the location, file name, and file extension
The first argument of the PROC IMPORT procedure is the FILE=-argument. This argument specifies the location, file name, and file extension of the Excel file. This information must be enclosed in double-quotes.
2. Specify the SAS output dataset
The second argument of the PROC IMPORT procedure is the OUT=-argument. This argument identifies the name of the SAS output dataset.
3. Specify the type of data to import
The third argument of the PROC IMPORT procedure is the DBMS=-argument. DBMS stands for Database Management Systems and specifies the file type of data to import. For example, CSV, XLSX, or TXT.
The code below shows how to import the shoes.xlsx file and create the SAS dataset work.shoes with PROC IMPORT.
proc import file="/folders/myfolders/import/shoes.xlsx"
    out=work.shoes
    dbms=xlsx;
run;

proc print data=work.shoes (obs=6) noobs;
run;
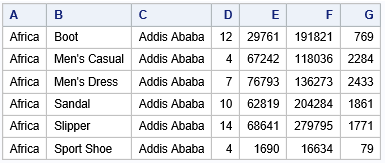
If you run the code above, SAS writes a message to the log indicating how many rows and columns were imported.
The image below shows the data that SAS imported.
How to Override an Existing Data Set
By default, the PROC IMPORT procedure doesn’t overwrite existing datasets. For example, if you re-run the code above, SAS writes a note to the log and cancels the import.
proc import file="/folders/myfolders/import/shoes.xlsx"
    out=work.shoes
    dbms=xlsx;
run;
So, how can you overwrite an existing SAS dataset while reading an Excel file? You can add the REPLACE option to the PROC IMPORT procedure to overwrite a SAS dataset.
The REPLACE option must be placed after the DBMS=-argument.
proc import file="/folders/myfolders/import/shoes.xlsx"
    out=work.shoes
    dbms=xlsx
    replace;
run;
How to Import an Excel File without Header
The PROC IMPORT procedure expects that the first row of your file contains a header. But, how do you import an Excel file into SAS without a header?
The file shoes_no_header.xlsx contains the data of the SHOES dataset from the SASHELP library, but without a header.
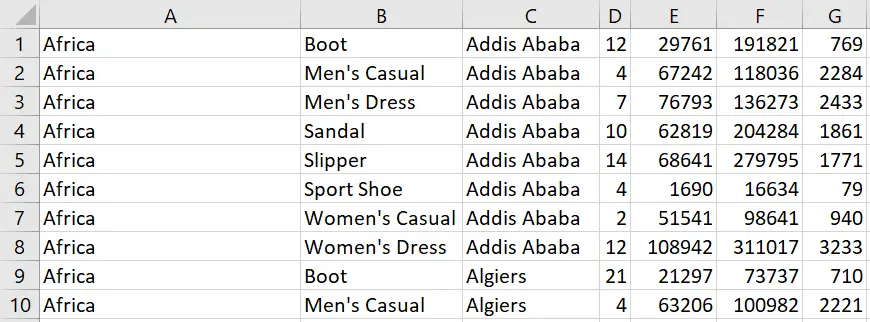
If you use the standard code to import an Excel file, SAS converts the first row into the column names of the new dataset.
proc import file="/folders/myfolders/import/shoes_no_header.xlsx"
    out=work.shoes
    dbms=xlsx
    replace;
run;

proc print data=work.shoes (obs=6) noobs;
run;
To import an Excel file without a header, you need the GETNAMES=-option. This option lets the PROC IMPORT procedure know that the CSV file has column names or not.
By default, the value of the GETNAMES=-option is YES. However, if the import file doesn’t have a header, you need to use GETNAMES=NO.
The code below shows how to use the GETNAMES=-option.
proc import file="/folders/myfolders/import/shoes_no_header.xlsx"
    out=work.shoes
    dbms=xlsx
    replace;
    getnames=no;
run;

proc print data=work.shoes (obs=6) noobs;
run;
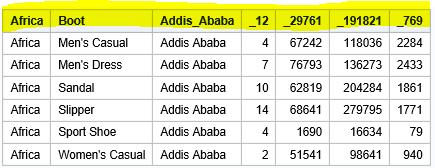
If you use the GETNAMES=NO option, then SAS sets the variables names to A, B, C, etc. Moreover, the first row of the Excel file is the first row of the data set.
The image below shows the result of importing an Excel file with the GETNAMES=NO options.
After importing the file, you can change the column names with the RENAME=-option.
Do you know? How to Rename Variables in SAS
How to Define the Start Row of an Excel File
Normally, the data of an Excel file starts on the first row. But, how do you import an Excel file with data not starting at the first row?
For example, the shoes_startrow.xlsx file contains the data of the SHOES dataset from the SASHELP library. However, in contrast to previous examples, the data starts in the fourth row.
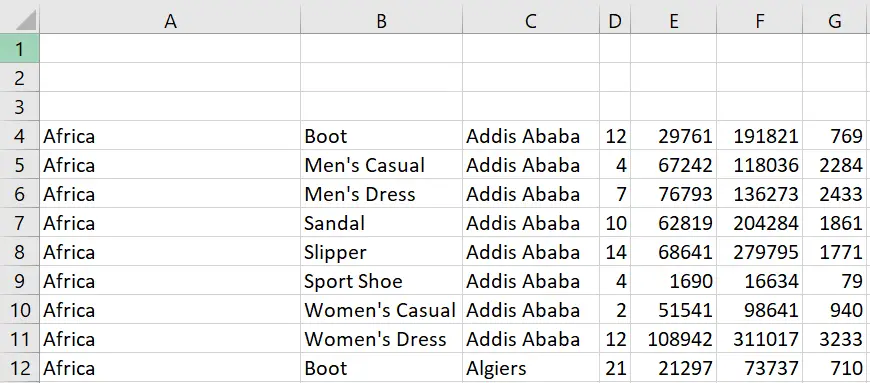
If you would run the standard code of the PROC IMPORT procedure, SAS creates a dataset where the first rows are completely blank.
proc import file="/folders/myfolders/import/shoes_startrow.xlsx"
    out=work.shoes
    dbms=xlsx
    replace;
run;

proc print data=work.shoes (obs=6) noobs;
run;
You could use a filter to remove the blank rows. Obviously, this is not an optimal solution. So, how do you select a starting row when you import an Excel file?
You can use the DATAROW=-option to start the import of an Excel file from a specified row. If you use this option, the GETNAMES=-option won’t work. The GETNAMES=-option only works if the variable names are in the first row.
In the example below, we use the DATAROW=-option to read an Excel file where the data starts at the 4th row.
proc import file="/folders/myfolders/import/shoes_startrow.xlsx"
    out=work.shoes
    dbms=xlsx
    replace;
    datarow=4;
run;

proc print data=work.shoes (obs=6) noobs;
run;
After importing the file, you need the RENAME=-option to change the column names.
So, you can use the DATAROW=-option to define the first row with data in your Excel file. However, a similar option to define the first column with data doesn’t exist.
If your Excel file has empty columns, you can still import it and remove the empty columns afterward.
How to Import a Range of an Excel File
Normally, when you read an Excel file into SAS, you want the entire sheet. However, it might happen that you are interested in just a selection of the data. So, how to import a specific range of data into SAS?
You read a specific range from an Excel file into SAS with the RANGE=-option of the PROC IMPORT procedure. This option specifies the Excel sheet and the cells that SAS will import. The range must be written between (double) quotes.
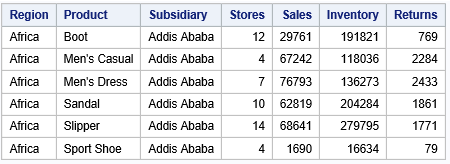
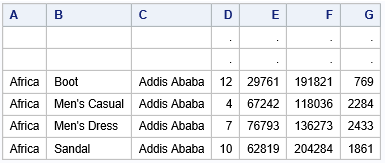
For example, we would like to import the range of cells highlighted in blue from the sheet “Sheet1“.
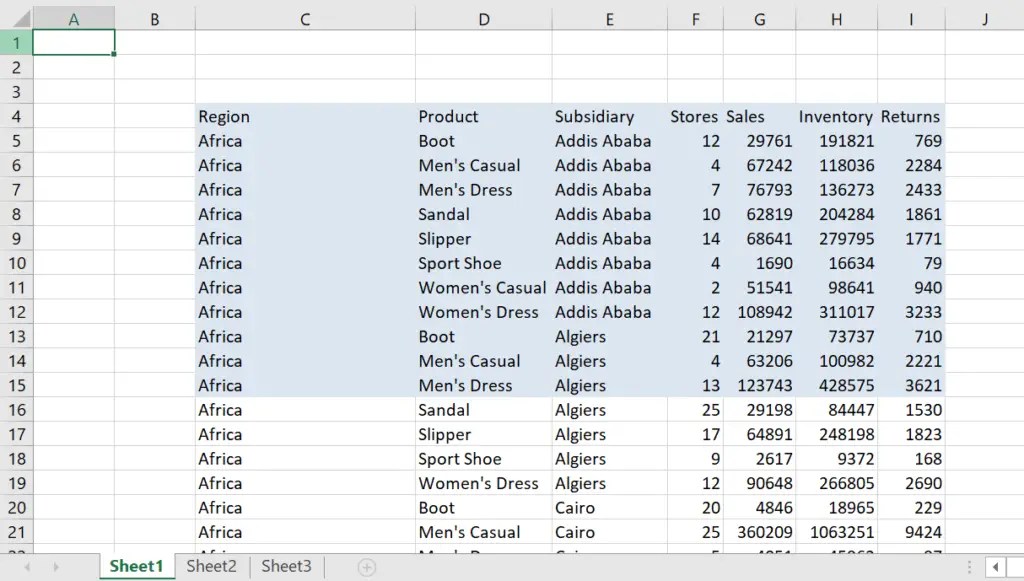
We can use the RANGE=-option to specify the range we want to import into SAS. To read only the blue cells, we use RANGE=”Sheet1$C4:I15″.
proc import file="/folders/myfolders/import/shoes_range"
    out=work.shoes
    dbms=xlsx
    replace;
    range="Sheet1$C4:I15";
run;
When you use the RANGE=-option to import a selection of an Excel file, SAS assumes that the first row contains the column names.
How to Import a Specific Sheet of an Excel File
An Excel file can contain one or more sheets. By default, SAS imports the first sheet. However, how to import a specific sheet from an Excel file into SAS?
The SHEET=-option of the PROC IMPORT procedure lets you specify the sheet you want to import. You must write the name of the sheet between (double) quotes. With the SHEET=-option you can also import sheets with spaces in their names.
In the example below, our Excel file has three sheets. We want to import the sheet “Sheet2“.

The following SAS code shows an example of how to import a specific sheet. To import “Sheet2“, we use SHEET=”Sheet2″.
proc import file="/folders/myfolders/import/shoes_sheet"
    out=work.shoes
    dbms=xlsx
    replace;
    sheet="Sheet2";
run;

proc print data=work.shoes (obs=6) noobs;
run;
If you want to import all the sheets of an Excel file, you can use the LIBNAME statement.
Import an Excel File into SAS with a LIBNAME Statement
The PROC IMPORT procedure is a convenient way to import an Excel file. However, you can also use the LIBNAME statement.
In this section, we demonstrate how to read Excel data with a LIBNAME statement into SAS.
How to Import an Excel File into SAS with a LIBNAME Statement
With the LIBNAME statement you can import Excel files. The statement starts with the LIBNAME keyword, followed by the library name, the XLSX keyword, and the location of the Excel file.
The name of the library can be up to 8 characters long and must start with an alphabetical character or an underscore.
The XLSX keyword lets SAS know to treat the file as an Excel file. Instead of XLSX, you can also use the Excel keyword.
The location of the file contains both the path and the name of the file. You write them between (double) quotes.
libname myfile XLSX "/folders/myfolders/import/shoes.xlsx";
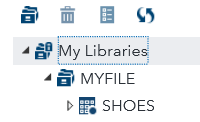
If you run the code above, SAS will create the library “myfile” and write a message to the log.

The image below shows the contents of the library.
How to Import Multiple Excel Sheets into SAS
In a previous section we showed how to import a specific sheet from an Excel file. This method works fine, but requires a lot of code if your file as many sheets. So, how to import all sheet from an Excel file into SAS?
The LIBNAME statement imports all sheets of an Excel file into SAS. It creates a library where each sheets is saved as a SAS dataset. The statement start with the LIBNAME keyword, followed by the name of the library, the XLSX keyword, and the location of the Excel file.
Hence, the LIBNAME statement provides a convenient and efficient way to import at once all sheets of an Excel file. However, it lacks the flexibility of the PROC IMPORT procedure to define the header, the first row with data, or the range you want to import.
Below we demonstrate how to import all sheets from the “shoes_sheet.xslx” file.
libname myfile XLSX "/folders/myfolders/import/shoes_sheet.xlsx";
If you run the code above (and refresh the Libraries), you will see that SAS created the library “myfile” with one dataset for each Excel sheet.
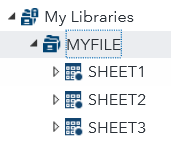
Once imported all the sheets, you can use the two-level name to access each dataset. For example, below we create a report of the first six rows of Sheet1.
proc print data=myfile.sheet1 (obs=6) noobs;
run;
Note that, you can use the LIBNAME statement also to export a SAS dataset to Excel.
Import an Excel File into SAS University Edition
So far, we’ve shown how to import Excel files with PROC IMPORT and the LIBNAME statement. However, if you work with SAS University Edition (or SAS Studio), you can read Excel data without writing code.
These are the steps to import an Excel file with the Import Data wizard of SAS University Edition
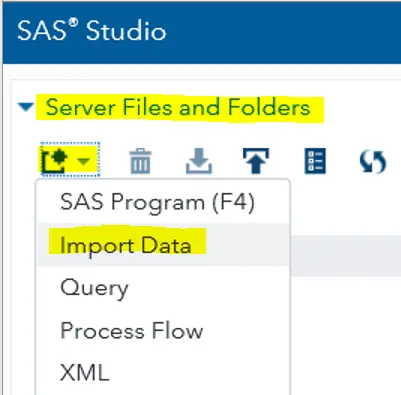
- Open the Import Data wizard.
You can find the Import Data wizard under the Server Files and Folders section. Click on New to open the Import Data wizard.

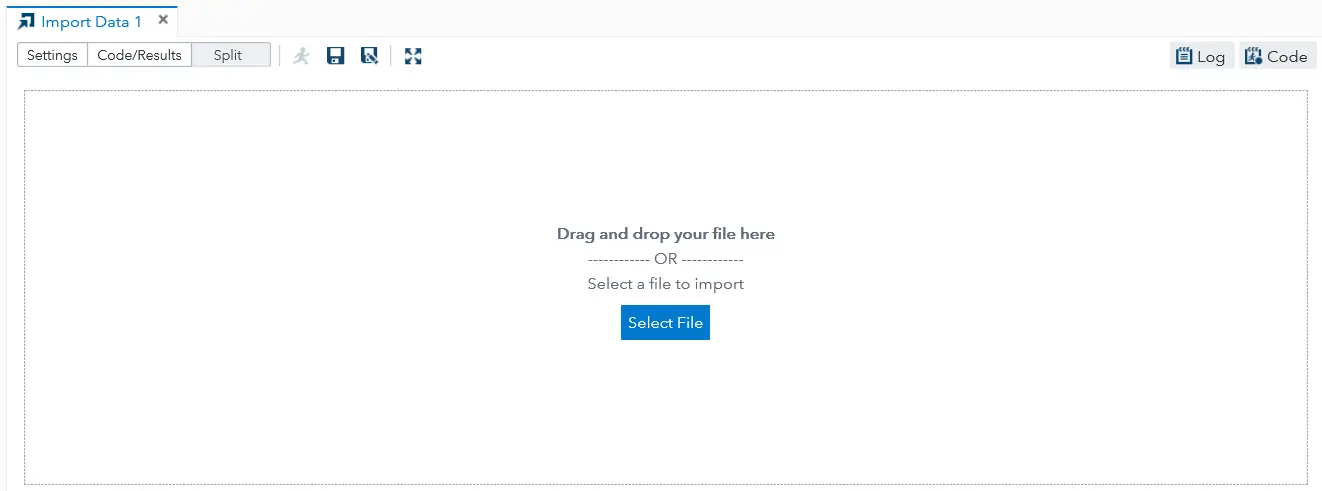
- Select the Excel file.
The second step is to select the Excel file you want to import. You can either drag-and-drop the file, or browse in your folders.

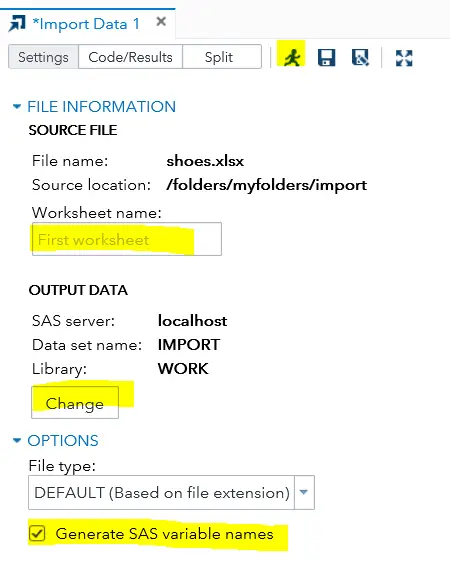
- Specify the Sheet you want to import
By default, SAS imports the first sheet. However, you can specify another sheet if needed
- Specify the name of the output dataset
You can specify where SAS saves the imported data, as well as the name of the dataset. SAS automatically overwrites existing datasets.
- Specify the header
The last option is to specify if the Excel file contains a header. If your file doesn’t contain a header, you need to uncheck the option “Generate SAS variable names”.

- Run the Import Data wizard
Import the Excel file by running the Import Data wizard.
Although, the Import Data wizard is convenient to import data without writining code, it has also its drawbacks. For example, you can’t import a range of data, or start reading data from a specified row.
Import an Excel File into SAS with a DATA STEP
In this article, we have demonstrated three methods to import an Excel file into SAS. Nevertheless, a common question is how to import an Excel file with a Data Step?
In contrast to a CSV file, you can’t import an Excel file with a SAS data step. To import an Excel file into SAS you need to use the PROC IMPORT procedure or the LIBNAME statement.
PROC IMPORT is the SAS procedure used to read data from excel into SAS. This tutorial covers how to import excel data to SAS with PROC IMPORT. Loading excel data to SAS is one of the most common task of a SAS programmer / analyst. Most of the raw data files are saved in MS Excel so we need to take it to SAS for further analysis.
 |
| SAS : PROC IMPORT Excel |
PROC IMPORT Syntax:
1. DATAFILE= option tells SAS where to find the Excel file that you want to import
(Complete filename path).
For example : DATAFILE = «C:Desktopage.xls»
If you are using SAS University Edition
You need to find shared folder which is generally available as Folders > My Folders
In SAS University edition, file location would be
DATAFILE = "/folders/myfolders/Boards.xls"
 |
| Import Excel file in University Edition |
2. OUT= option tells SAS to create a dataset with any name of your choice. By default, the imported dataset is saved on WORK library (temporary library)
Examples :
i. OUT = Age .
In this statement, PROC IMPORT uses the WORK library. This implies OUT = Age is equivalent to OUT = Work.Age .
ii. OUT = Input.Age.
In this statement, PROC IMPORT uses the Input library (Permanent library).
3. DBMS= option tells SAS the type of file to read.
Examples :
i. DBMS = XLS for Excel 97-2003 workbooks
ii.DBMS = XLSX for Excel 2007 — 2013 workbooks
4. REPLACE is used to overwrite the existing SAS dataset (If any) mentioned in the OUT= option.
5. SHEET= option is used to specify which sheet SAS would import.
Examples :
i. SHEET = «Sheet1» — To import data from worksheet named sheet1.
ii. SHEET = «Goal» — To import data from worksheet named Goal.
6. GETNAMES= YES tells SAS to use the first row of data as variable names.
By default, PROC IMPORT uses GETNAMES= YES. If you type GETNAMES= NO, SAS would not read variable names from first row of the sheet.
7. DATAROW= option is used to specify starting row from where SAS would import the data.
For example : DATAROW =5 tells SAS to start reading data from row number 5.
Note :
i. When GETNAMES=YES, DATAROW must be greater than or equal to 2.
ii. When GETNAMES=NO, DATAROW must be greater than or equal to 1
8. RANGE= option is used to specify which range SAS would import.
Examples :
i. RANGE=»Sheet1$B2:D10″
This would tell SAS to import data from range B2:D10 from sheet1
ii. RANGE=»Information»
This would tell SAS to import data from excel defined name range. In the example shown above, it is Information.
Importing an XLS (MS Excel 97-2003) format file into SAS
- DATAFILE= «C:age.xls» tells SAS where to find the Excel file that you want to import.
- OUT= WORK.age tells SAS to create a dataset named age stored in WORK library
- DBMS= XLS tells SAS the XLS (Excel 97-2003) format file to read.
- REPLACE is used to overwrite the age dataset if it exists already.
- SHEET= «Sheet1» tells SAS to import data from Sheet1.
- GETNAMES=»YES» tells SAS to use the first row of data as variable names.
In University Edition, DATAFILE = «/folders/myfolders/age.xls»
Importing an XLSX (MS Excel 2007-2013) format file into SAS
DBMS=XLSX tells SAS the XLSX (Excel 2007-2013) format file to read.
Important Note —
Earlier SAS Versions before SAS9.2 does not support XLSX formatted file (Excel 2007 or later files). If your XLSX file contains records fewer than 65000 rows and 255 columns, you can save the file in XLS format by clicking on SAVE AS >> Excel 97-2003 Workbook. Later you can import the converted XLS file into SAS.
Importing an excel file from specified row
DATAROW=5 tells SAS to start reading data from row number 5. In this case, variable (column) names would be pulled from first row but column values would be extracted from row 5.
Importing variable name from other than first row
Suppose variable names are placed at second row in excel sheet.
PROC IMPORT DATAFILE= «E:SAS Code RepositoryBook1.xls»
DBMS=XLS
OUT= TEMP REPLACE;
NAMEROW=2;
STARTROW=3; GETNAMES=YES;
RUN;
NAMEROW=2 tells SAS to extract variable names from second row and STARTROW=3 is used to pull values from third row. NAMEROW only works with XLS but not with XLSX.
Importing only specified columns from excel file
The OUT = filename followed by KEEP= statement is used to retain the desired variables. In the example shown above, we retained four variables ID,X,Y and Z.
In the same way, you can use DROP= statement to remove the variables that you don’t want to retain.
For example : You don’t want to import three variables say A, B and C.
PROC IMPORT OUT= WORK.want (DROP=A B C) DATAFILE= «C:DesktopFile1.xls» DBMS=XLS REPLACE; GETNAMES=YES;RUN;
Importing only rows that have non-missing data for all the variables
In the example shown above, WHERE= statement is used to delete all the rows that have only missing data on variables x,y and z.
Importing data from excel using specified range
RANGE=»Sheet1$B4:E100″ tells SAS to import data from range B4:E100 from sheet1.
Importing data from excel using named range
Range Name: In MS Excel, it is a name that represents a cell, range of cells. You
can create your own defined name.
Creating a range name is very simple. Select a cell or range of cells and Click on the Name box above Column A and Tye any name you want and Press Enter.
In the example below, Range A1:C10 is selected and then type Info in the name box and Press Enter.
 |
| SAS : Using Excel Named Range |
RANGE=»Info» tells SAS to import data from excel using user defined named range Info.
Rename columns while Importing
The variable names can be renamed using RENAME= option next to OUT= option.
PROC IMPORT DATAFILE= «E:SAS Code RepositoryBook1.xlsx»
DBMS=XLSX
OUT= TEMP (RENAME=(Score=TotalScore)) REPLACE;
GETNAMES=YES;
RUN;
Importing an excel file from website into SAS
filename test temp;
proc http
url=»https://www2.census.gov/acs2005/GEORES.xls»
method=»GET»
out=test;
run;proc import file=test
out=readin replace
dbms=xls ;
NAMEROW=3;
STARTROW=4;
run;
SAS provides a method for extracting data from web pages by procedure named PROC HTTP. This method makes it easy to read data from web pages. In this case, variable name starts from row number 3 in datafile and data values start from row4 onwards. To import CSV file from website, you just need to change the DBMS=XLS to DBMS=CSV.
About Author:

Deepanshu founded ListenData with a simple objective — Make analytics easy to understand and follow. He has over 10 years of experience in data science. During his tenure, he has worked with global clients in various domains like Banking, Insurance, Private Equity, Telecom and Human Resource.
I resolved a similar problem in SAS 9.2 importing in two strokes, one to explore the sheet and one to extract the data.
This is a generalisation of what I did there, but excuse me for posting source I did not test : I do not have SAS installed on my PC.
Let us asume your data could looks like this (when saved as tab delimited file):
            Some title that does not interust us
Author  Dirk Horsten
Date    01-Jan-15
Other   Irrelevant thing

        Bar Foo     Val Remark
        A   Alfa    1   This is the first line
        B   Beta    2   This is the second line
        C   Gamma   3   This is the last line
So the actual data starts at cell C6 with the column header «Bar». Let us also assume we know to find columns «Foo», «Bar» and «Val» and probably some other columns that do not interest us, in an unknown order, and we do not know upfront how many data lines there are.
Now, we naively import the sheet a first time and query sasHelp to find out what was read:;
/** First stroke import, to explore the content of the sheet **/
proc import datafile="&file_name" out=temp_out dbms=excelcs replace;
    sheet="&sheet_name";
run;

/** Find out what SAS read in **/
proc sql;
    select couint(*) into :nrColstempCos separ by ' '
    from sashelp.vcolumn where libName = 'WORK' and memName = 'TEMP_OUT';

    select name into :tempCos separated by ' '
    from sashelp.vcolumn where libName = 'WORK' and memName = 'TEMP_OUT';
quit;
Next we look for the headers and the data, so we know how to read it properly.;
This works if all columns were interpreated as character values, but unfortunately Excel can not be forced to do so.
data _null_;
    set temp_out end=last;
    array temp {*} &tempCols.;

    retain foo_col bar_col val_col range_bottom 0;
    if not (foo_col and bar_col and val_col) then do;
        range_left = 0;
        range_right = 0;

        /* Find out if we finally found the headers */
        do col = 1 to &nrCols.;
            select (upcase(temp(col));
                when ('FOO') do;
                    foo_col = col;
                    if not range_left then range_left = col;
                    rang_right = col;
                end;
                when ('BAR') do;
                    bar_col = col;
                    if not range_left then range_left = col;
                    rang_right = col;
                end;
                when ('VALUE') do;
                    val_col = col;
                    if not range_left then range_left = col;
                    rang_right = col;
                end;
                otherwise;
            end;
        end;
        if (foo_col and bar_col and val_col) then do;
            /** remember where the headers were found **/
            range_top = _N_ + 1;
            call symput ('rangeTop', range_top);

            rangeLeft = byte(rank('A') + range_left - 1);
            call symput ('rangeLeft', rangeLeft);

            rangeRight = byte(rank('A') + range_right - 1);
            call symput ('rangeRight', rangeRight);
        end;
    end;
    else do;
        /** find out if there is data on this line **/
        if (temp(foo_col) ne '' and temp(bar_col) ne '' and temp(val_col) ne '')
            then range_bottom = _N_ + 1;
    end;

    /** remember where the last data was found **/
    if last then call symput ('rangeBottom', range_bottom);
run;
To calculate rangeTop and rangeBottom, we take into account that the _N_th observation in SAS comes from the N+1th line in excel, because the first excel row is interpreted as the headers.
To calculate rangeLeft and rangeRight, we must find the relative position to the left columen in the range we will read and translate that into letters
Now we read in the relevant data only;
/** Second stroke import, to read in the actual data **/
proc import datafile="&file_name" out=&out_ds dbms=excelcs replace;
    sheet="&heet_name";
    range="&rangeLeft.&rangeTop.&rangeRight.&rangeBottom.";
run;
Success. Feel free to test this code, if your have SAS on your computer and correct it.
A jargon-free, easy-to-learn SAS base course that is tailor-made for students with no prior knowledge of SAS.
- 90+ Lessons
- 150+ Practice Exercises
- 5 Coding Projects
- 1000+ Satisfied Students
Excel files or Workbooks are one of the most common file types to import into SAS that you will encounter.
While SAS does provide a few different methods for importing Excel files into SAS, it is worth noting that converting your Excel file(s) to a text file(s) before importing to SAS often provides greater flexibility and produces more desirable results than importing directly from Excel to SAS.
Most versions of Microsoft Excel can easily output different types of text files by using the “Save As” feature within Excel. The tips and tricks associated with importing CSV and other text files are described in the other SASCrunch importing data articles.
This article will provide a walkthrough of 3 different methods for importing Excel files into SAS, including:
- PROC IMPORT to import a simple Excel file into SAS
- PROC IMPORT to import an Excel file with multiple sheets into SAS
- SAS Studio Point-and-click to import an Excel file into SAS
Software
Before we continue, make sure you have access to SAS Studio. It’s free!

Data Sets
Before running any of the examples below, you will need to replace the path ‘/home/your_username/SASCrunch’ with a directory that you have read/write access to in your environment.
This can vary depending on the machine you are running SAS on, the version of SAS you are running and the Operating System (OS) you are using.
If you are using SAS OnDemand for Academics, you must first upload the files to the SAS server.
Please visit here for instruction if you are not sure how to do this.
1. Importing a Simple Excel file with PROC IMPORT
Before importing an Excel file into SAS, you will need to know which version of Excel the file was created in, and also which Operating System (OS) you are running SAS on. Depending on the Excel version used and the OS system you are running, the parameters specified for PROC IMPORT may vary.
If you are using SAS in Microsoft Windows, you can use DBMS = Excel for all versions of Excel. However, if you are running UNIX or Linux (which is the case for SAS Studio) and trying to import an Excel file created in Excel 2007 or greater with the extension “.xlsx”, you need to use DBMS = XLSX instead of DBMS = Excel.
In this example, we are importing cars_excel.xlsx into SAS using PROC IMPORT within SAS Studio. Since the extension is “.xlsx”, we know the file was was created in Excel 2007 or later. Since SAS Studio is running Linux in the backend, we use DBMS = XLSX. The replace option is used so that SAS will allow WORK.CARS_EXCEL to be overwritten each time we run the code below:
proc import datafile = ‘/home/your_username/cars_excel.xlsx’
out = cars_excel
dbms = xlsx
replace
;
run;
You should now see the complete CARS_EXCEL dataset that was created in the WORK directory, shown partially here:

One of the major downsides of importing Excel files directly into SAS is that the GUESSINGROWS option cannot be used with DBMS = EXCEL or DBMS = XLSX. In cases where values in your data being imported into SAS are truncated, you are better off exporting your data from Excel into a delimited text file and then importing it into SAS with the GUESSINGROWS option and DBMS=DLM.
Do you have a hard time learning SAS?
Take our Practical SAS Training Course for Absolute Beginners and learn how to write your first SAS program!
2. Importing a Multiple Sheet Excel Workbook with PROC IMPORT
If you have a large Excel Workbook with many Worksheets inside, you can also import specific sheets into SAS, one at a time.
In the Excel file multi_sheet.xlsx, there are 2 sheets which contain data, Sheet1 and Sheet2. Sheet2 contains the Baseball data which will import into a SAS dataset called BASEBALL_SHEET2, and save it to the SAS WORK library. To do this with PROC IMPORT, you simply need to add the SHEET option to your PROC IMPORT call. Note that the name of the sheet, “Sheet2”, is case sensitive.
proc import datafile = ‘/home/your_username/SASCrunch/multi_sheet.xlsx’
out = baseball_sheet2
dbms = xlsx
replace
;
sheet = «Sheet2»;
run;
You should now see the output data, WORK.BASEBALL_SHEET2 , shown partially below:

If you needed to import subsequent sheets, you can simply modify the value for the sheet parameter to point to the desired sheet, and re-run the code.
3. Importing an Excel File with SAS Studio
Excel files can also be imported into SAS using the built-in import data tool inside of SAS studio, without actually writing any code. The same options that you specified in PROC IMPORT can be customized using the point and click utility within SAS studio.
This section will also show you how the tool can be used to generate the PROC IMPORT code that you can later modify and run on your own.
Here is how you can use the point-and-click tool to import an Excel file into SAS:
1. Click on the Server Files and Folders Pane on the left hand side of the screen:

2. Navigate to the folder where your Excel file is stored:

3. Right click on the file which you would like to import and select Import Data:

4. Click on the Settings tab and review the current settings:
By default, SAS will try to choose the most appropriate options but you do have a few options to pick from specify.
Using the Worksheet name box, you can change which Worksheet you would like to import by typing in a specific Worksheet name. If your Excel file only contains 1 worksheet, then you can leave the default “First worksheet” in the box and that worksheet will be imported.
The output dataset name and library can be changed using the Change button.
Finally, the Generate SAS variable names checkbox should be used if the first row of your Excel file contains the names of the columns which will be used for the SAS variable names in your output dataset.
In this example, we will use the default Options, but will change the name of the output dataset to something more informative, cars_excel:

5. To change the name of the output dataset, click Change:

Become a Certified SAS Specialist
Get access to two SAS base certification prep courses and 150+ practice exercises
6. Type in the data set name cars_excel and click Save:

7. For convenience, SAS also generates and displays the PROC IMPORT syntax which will be used to execute the import.
If you prefer, you can modify the import settings using the generated syntax as a starting point. You can also copy, paste and modify this code as needed. To see the PROC IMPORT syntax SAS generates, simply click the Code/Results tab:

Note that the new Data Set name specified in the Settings window has also been updated in the Code tab automatically to reflect this change.
8. The Split tab also provides a convenient view of both the Settings point-and-click window and the corresponding generated code window, all in one screen:

9. Once you have finished reviewing the settings and making any necessary changes, click the Run button to complete the import.
Note that no custom settings are required in this example to import the CARS_EXCEL.XLSX file into a SAS dataset.

10. After running the import utility, you can click on the Code/Results tab again to explore the contents and view the newly created dataset (WORK.CARS_EXCEL):

Master SAS in 30 Days
Inline Feedbacks
View all comments

Get latest articles from SASCrunch
SAS Base Certification Exam Prep Course

Two Certificate Prep Courses and 300+ Practice Exercises
17 авг. 2022 г.
читать 1 мин
Вы можете использовать proc import для быстрого импорта данных из файла Excel в SAS.
В этой процедуре используется следующий базовый синтаксис:
/*import data from Excel file called my_data.xlsx*/
proc import out =my_data
 datafile ="/home/u13181/my_data.xlsx"
 dbms =xlsx
 replace ;
 getnames =YES;
run ;
Вот что делает каждая строка:
- out : имя, которое будет присвоено набору данных после импорта в SAS.
- datafile : расположение файла Excel для импорта
- dmbs : Формат импортируемого файла
- replace : заменить файл, если он уже существует
- getnames : использовать первую строку в качестве имен переменных (установите значение NO, если первая строка не содержит имен переменных)
В следующем примере показано, как использовать эту функцию на практике.
Пример: импорт данных из файла Excel в SAS
Предположим, у нас есть следующий набор данных в Excel:
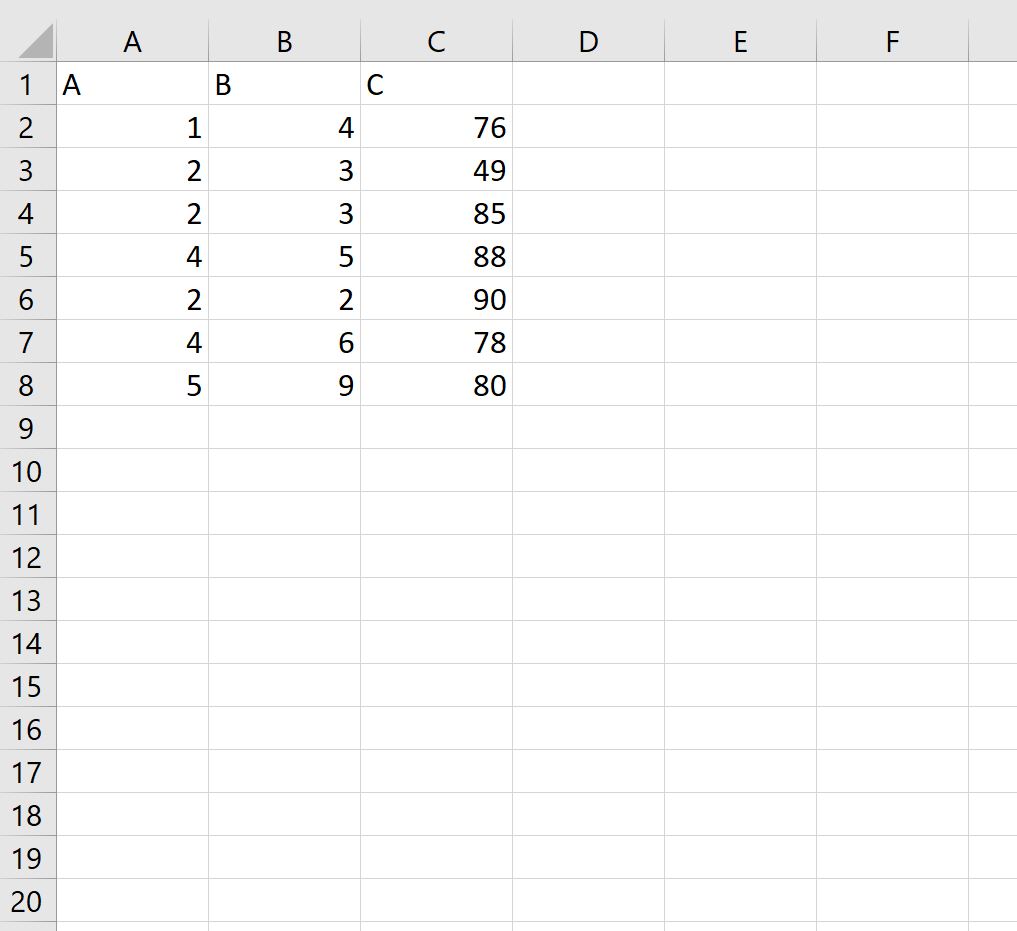
Мы можем использовать следующий код, чтобы импортировать этот набор данных в SAS и назвать его new_data :
/*import data from Excel file called my_data.xlsx*/
proc import out =new_data
 datafile ="/home/u13181/my_data.xlsx"
 dbms =xlsx
 replace ;
 getnames =YES;
run ;

/*view dataset*/
proc print data =new_data;
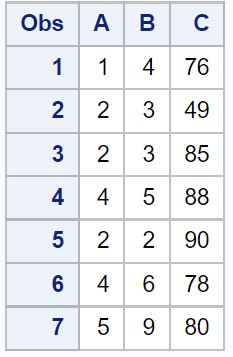
Данные, отображаемые в выходных данных SAS, совпадают с данными, отображаемыми в файле Excel.
Примечание.Мы использовали getnames=YES при импорте файла, поскольку первая строка файла Excel содержала имена переменных.
Дополнительные ресурсы
В следующих руководствах объясняется, как выполнять другие распространенные задачи в SAS:
Как экспортировать данные из SAS в файл Excel
Как экспортировать данные из SAS в файл CSV
Написано
![]()
Замечательно! Вы успешно подписались.
Добро пожаловать обратно! Вы успешно вошли
Вы успешно подписались на кодкамп.
Срок действия вашей ссылки истек.
Ура! Проверьте свою электронную почту на наличие волшебной ссылки для входа.
Успех! Ваша платежная информация обновлена.
Ваша платежная информация не была обновлена.