It is sometimes easier to work on some data in Excel, before importing in a MySQL database.
It is sometimes easier to work on some data in Excel, before importing in a MySQL database.
In order to do so, here are a few simple steps.
In short : export the Excel file to CSV, and import the CSV in a new table using the PHPMyAdmininterface.
Starting with an Excel, in below example one sheet containing some data:
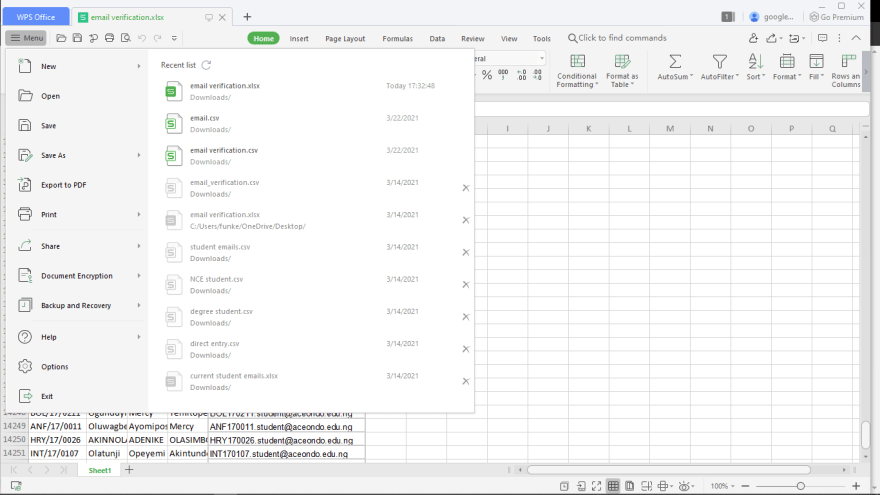
Select Save As to be able to select another format.
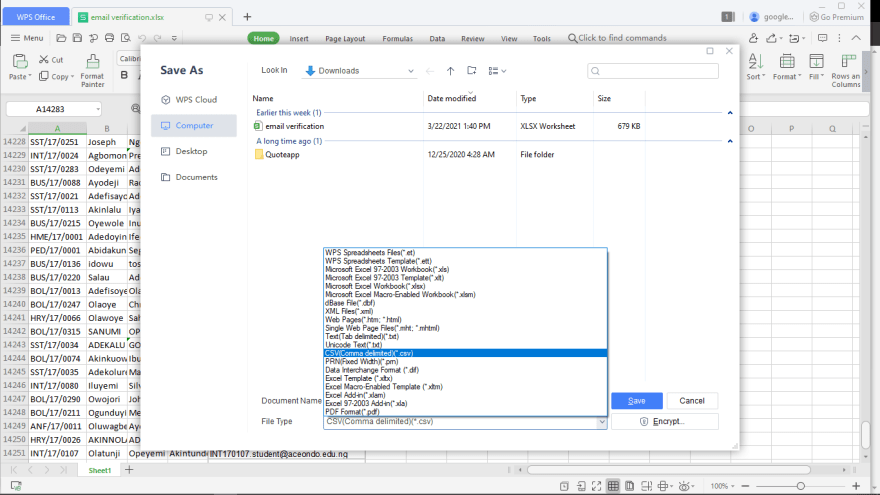
Scroll down to the CSV (Comma delimited) (*.csv) format.
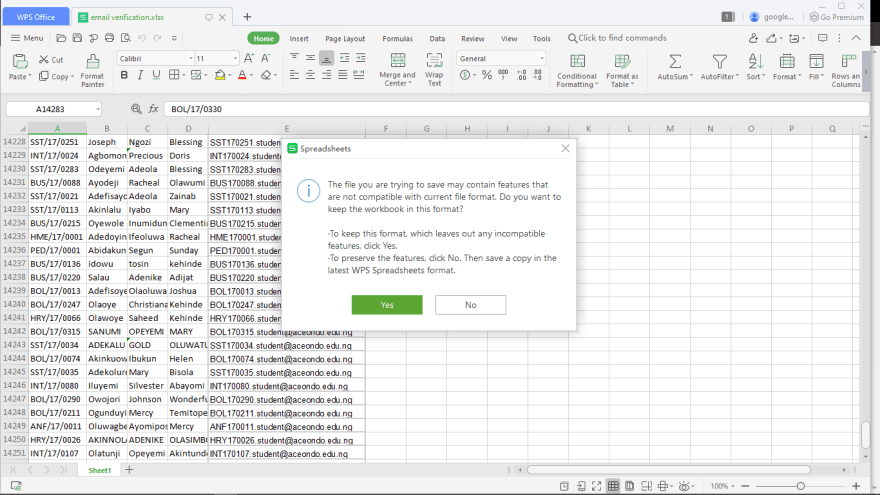
Confirm that some features will be lost – CSV being a text format, no Excel specifics will be exported (functions, programs, …).
How to import Excel to PHPMyAdmin
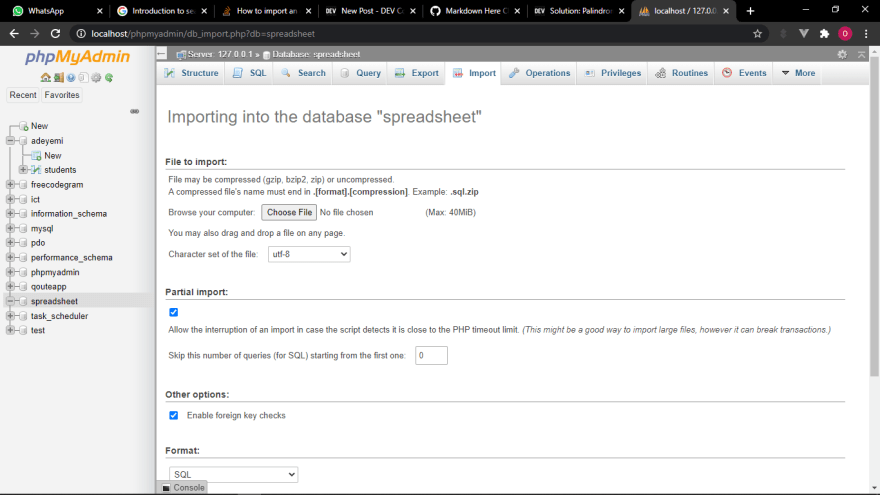
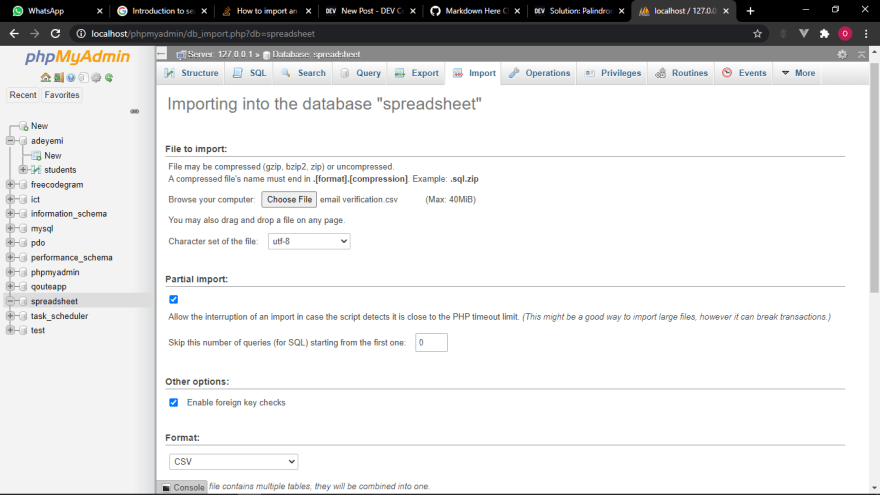
In PHPMyAdmin, go to the Import menu.
Browse for the CSV file recently saved, and select the appropriate format:
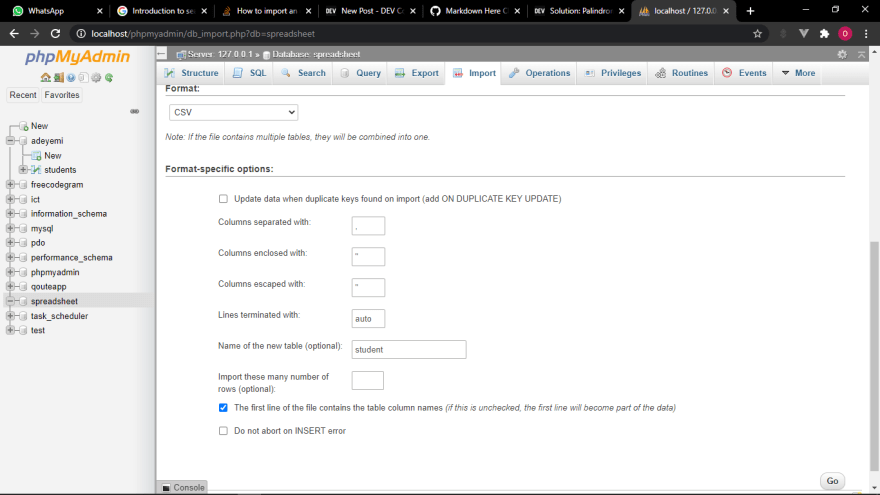
Look for other options that might apply, for example, if columns have names, check the corresponding option “The first line of the file contains the table column names“, and click Go
Import confirmation should be displayed, and links to the resulting database and table will be shown.
It is now possible to browse through the table !
Using the diverse options, it is also possible to work on the table structure, content, or to move it to another database:
PHPMyAdmin import CSV to MySQL
In PHPMyAdmin, import a CSV file to MySQL is pretty easy.
Once the data has been prepared in CSV, following the table structure, open the table in PHPMyAdmin, go to the tab import, browse for the CSV file to import on your computer, make sure that the CSV format has been selected in file format option, and import the CSV file to MySQL in PHPMyAdmin.
How to import Excel to MySQL PHP MyAdmin
To import Excel to MySQL PHP MyAdmin, export the Excel file to a CSV file. Then, import it in PHP MyAdmin using the CSV data file option.
When importing a file into MySQL from Excel, scroll down to the Format options, and select a CSV file. This will allow to important Excel to MySQL in PHP MyAdmin, without the need to program anything, and simply by using the graphical user interface.
Learn how to import Excel data into a MySQL database
Creating a database in DirectAdmin
If your web server does not have a database yet, regardless of the server management software used, such as cPanel or DirectAdmin, you will first have to create a database before being able to import any data in it.
Simply go to your web user dashboard, and find the MySQL management screen. There, you should be able to create both a database and an user that can access that database – both are needed in order to have a functional database for your website! Simply create it, and use the username and password select to connect to your database and import an export, CSV or Excel into your database.
Frequently Asked Questions
- How to import Excel file in PHPMyAdmin ?
- In PHPMyAdmin, go to the Import menu, select the appropriate format: Look for other options that may apply and click Go. Next, an import confirmation will appear, as well as links to the resulting database and table.
Complete 2019 Excel for Beginners in video
Microsoft Excel has been a traditional choice as a spreadsheet application for organizations across the world. The ease of access, power formulas, and the ability to make visually stunning reports has made Microsoft Excel is widely used tool. However, managing thousands of sheets can be a time-consuming and resource-intensive task that may also lead to some errors. A good solution is to import your Excel files to a scalable, reliable, and fast relational database management system like MySQL.
You can Import Excel into MySQL either by using simple SQL commands like LOAD DATA or opt for third-party tools. By importing your Excel files to MySQL, you can leverage the powerful MySQL engine to quickly query data and perform complex data manipulations.
In this article, you will learn how to effectively Import Excel into MySQL using 4 different methods.
What is Microsoft Excel?
Microsoft Excel is a spreadsheet application developed by Microsoft to organize and record data in a tabular format. Launched in 1985, Microsoft Excel is a widely used Spreadsheet software in businesses worldwide allowing you to organize and manipulate data through formulas in columns and rows. MS Excel is loaded with functionalities to perform several operations such as calculations, pivot tables, graph tools, etc.
Compatible with Microsoft Windows, macOS, Android, and iOS, MS Excel is included with the MS Office Suite. It is typically used by firms to record, organize and analyze financial data. MS Excel also offers VBA programming that can assist you in automating repetitive tasks.
Key Features of Microsoft Excel
- Conditional Formatting: MS Excel allows you to apply formats to a cell or range of cells, and have that formatting change depending on the value of the cell or the value of a formula.
- Built-in Formulae: MS Excel provides you with basic and advanced built-in formulae for sum, average, minimum, etc. You can use formula auditing to graph or trace the relationship between cells and formulas with blue arrows. You can track precedents (cells that provide data for a particular cell) or the cells that depend on the value of a particular cell.
- Data Protection: Excel spreadsheets can be password protected on your laptop or PC. MS Excel also provides a robust system to recover data.
- Data Sorting & Filtering: You can easily perform the basic data sorting and filtering operation on your data in excel. MS Excel also provides Advanced filtering options for complex criteria.
What is MySQL?
MySQL is a popular Open-Source Relational Database Management System. MySQL data is stored in tables consisting of rows and columns. Introduced in 1995, MySQL is completely developed, distributed, and maintained by Oracle Corporation. Looking over the technical side, MySQL is written in the C and C ++ languages.
MySQL is compatible with multiple platforms such as Microsoft Windows, Oracle Solaris, AIX, Symbian, Linux, and macOS. You can use SQL commands to retrieve, change or add data from your MySQL tables. MySQL is also a vital component of the Modern LAMP stack, which consists of a Linux-based Operating System, Apache Web Server, MySQL Database, and PHP for processing.
SQL can also be used to define the table schema or even configure the relationship between the tables in the database. Client-Side Graphical User Interfaces such as MySQL WorkBench, SequelPro, or DBVisualizer can be used to type the SQL commands and the server will respond with the requested information. MySQL also offers a paid Enterprise version which includes premium support services and several extensions that can be installed as Server Plugins.
Key Features of MySQL
MySQL is widely used by organizations like Facebook, Flickr, Twitter, Wikipedia, and YouTube. This is due to the following set of MySQL’s eye-catching features:
- Ease of Operation: With MySQL, you can work with a diverse set of programming languages such as PHP, PERL, C, C ++, and JAVA. It also provides a set of intuitive tools to simplify time-consuming tasks such as Server Management, Reporting, and Data Analysis.
- Support for Several Data Structures: Allowing you to work with a broader range of datasets, MySQL offers full support for several Data structures like JSON and Geospatial data, as well as Logical, Numeric, Alphanumeric, Date, and Time data types.
- First-rate Performance: MySQL delivers best-in-class query performance across a variety of clustered servers. It provides a fast-loading utility with a separate memory cache and table index partitioning. MySQL can also efficiently handle fluctuating workloads and process large volumes of data at optimal speeds. This allows you to store more than 50 million rows of data in a table with a table’s default file size limit of 4 GB which can be increased to a theoretical limit of 8 million terabytes (TB).
- Open-Source: MySQL is under the GNU General Public License (GPL), which means it will always be freely available. It provides you the freedom to customize it on Oracle’s Open-Source MySQL codebase based on your needs.
- Localization: To make it user-friendly, MySQL supports multiple character sets, including latin1 (cp1252), german, big5, ujis, and more. You can also set the error message language that the server provides to the client.
- Data Security: MySQL provides full control over the Data Access Control settings. Robust mechanisms such as Access Privilege Systems and User Account Management allow you to regulate who can view or use your MySQL data. MySQL sets the highest standard with Host-based Verification and Password Encryption.
Why should you import Excel into MySQL?
Microsoft Excel is an easy-to-use spreadsheet application that allows you to directly access data and perform a combination of operations on this data. As you collect data and store it in your separate excel files, it becomes a huge task to track each sheet with millions of records in it. To simplify this, you can import Excel into MySQL. MySQL is a scalable, fast, and reliable database management system that allows you to store and query millions of rows of data using simple SQL commands.
Using MYSQL, you can also connect your Excel tables with one another tables using primary and foreign keys. MySQL can easily handle large datasets and allows you to manipulate data, filter data, update data and combine it. You can import Excel into MySQL and enjoy better speed, accuracy, & consistency for your ever-growing data needs.
MySQL is a popular Open-Source Relational Database Management system that allows you to effectively store your Excel file data and manage it using simple SQL commands or via its simple user interface MySQL Workbench. To import Excel into MySQL, check out the following four methods:
Method 1: Using Hevo Data to Import Excel into MySQL
Hevo Data, an Automated Data Pipeline, provides you a hassle-free solution to easily load data from 150+ data sources (including 40+ free sources like Google Sheets) to your desired destination such as MySQL, Data Warehouses, or BI tools in a completely hassle-free & automated manner. Using Hevo you can easily upload your Excel files present on your Google Drive to your MySQL Database in just a few clicks.
Get Started with Hevo for Free
Hevo is fully managed and completely automates the process of not only loading data from 150+ data sources but also enriching the data and transforming it into an analysis-ready form without having to write a single line of code.
Method 2: Using Sqlizer.io to Import Excel into MySQL
This method requires you to upload your Excel files that will be converted into SQL commands. You need to copy the SQL statements and execute them on MySQL Workbench. This method is only effective if you’re dealing with small Excel files with a few records that requires zero data transformation.
Method 3: Using the Load Data Statement to Import Excel into MySQL
This method would be time-consuming and somewhat tedious to implement. Users will have to write custom SQL statements & use the MySQL Workbench to import excel into MySQL. This method is suitable for users with a technical background.
Method 4: Import Excel into MySQL using phpMyAdmin
This method would require you to install the phpMyAdmin database administration tool to import Excel into MySQL. This tool is a good option if you require to perform data transfer once in a while with little to no data transformation.
- Method 1: Using Hevo Data to import Excel into MySQL
- Method 2: Using Sqlizer.io to Import Excel into MySQL
- Method 3: Using the Load Data Statement to Import Excel into MySQL
- Method 4: Import Excel into MySQL using phpMyAdmin
Method 1: Using Hevo Data to import Excel into MySQL
Hevo Data is a No-code Data Pipeline solution that can help you move data from 150+ data sources (including 40+ free sources like Google Drive & Google Sheets) to your desired destination such as MySQL, Data Warehouses, or BI tools in a completely hassle-free & automated manner. Using Hevo you can easily upload your Excel files present on your Google Drive to your MySQL Database.
Hevo also supports MySQL as a Source for loading data to a destination of your choice. Hevo is fully managed and completely automates the process of not only loading data from 150+ data sources but also enriching the data and transforming it into an analysis-ready form without having to write a single line of code. Its fault-tolerant architecture ensures that the data is handled in a secure, consistent manner with zero data loss.
Hevo Data takes care of all your data preprocessing needs and lets you focus on key business activities and draw a more powerful insight on how to generate more leads, retain customers, and take your business to new heights of profitability. It provides a consistent & reliable solution to manage data in real-time and always have analysis-ready data in your desired destination.
Take a look at some of the salient features of Hevo:
- Blazing-fast Setup: Straightforward interface for new customers to work on, with minimal setup time.
- Reliability at Scale – With Hevo, you get a world-class fault-tolerant architecture that scales with zero data loss and low latency.
- Monitoring and Observability – Monitor pipeline health with intuitive dashboards that reveal every stat of pipeline and data flow. Bring real-time visibility into your ELT with Alerts and Activity Logs
- Stay in Total Control – When automation isn’t enough, Hevo offers flexibility – data ingestion modes, ingestion, and load frequency, JSON parsing, destination workbench, custom schema management, and much more – for you to have total control.
- Transparent Pricing – Say goodbye to complex and hidden pricing models. Hevo’s Transparent Pricing brings complete visibility to your ELT spend. Choose a plan based on your business needs. Stay in control with spend alerts and configurable credit limits for unforeseen spikes in data flow.
- Auto-Schema Management – Correcting improper schema after the data is loaded into your warehouse is challenging. Hevo automatically maps source schema with destination warehouse so that you don’t face the pain of schema errors.
- 24×7 Customer Support – With Hevo you get more than just a platform, you get a partner for your pipelines. Discover peace with round the clock “Live Chat” within the platform. What’s more, you get 24×7 support even during the 14-day full-feature free trial.
Sign up here for a 14-Day Free Trial!
Without the need for converting your .xlsx file to .csv, you effortlessly import Excel into MySQL using Hevo by following the simple steps given below:
- Step 1: Upload your Excel files into your Google Drive.
- Step 2: Login to Hevo and naviagte to Pipleines > + Create. Select Google Drive as your Source and configure your Drive account by selecting the authentication method for connecting to Google Drive.
- Step 3: Finally, provide a name for your Pipeline and select all the folders whose Excel files you want to import to MySQL. Then, click on the Continue button.
- Step 4: For completing the process to import Excel into MySQL, you can start by providing your MySQL database credentials such as your authorized Username and Password, along with information about your Host IP Address and Port Number value. You will also need to provide a name for your database and a unique name for this destination.
Method 2: Using Sqlizer.io to Import Excel into MySQL
To import Excel into MySQL, you can use Sqlizer.io to convert your Excel files into SQL commands. You can achieve this by following the simple instructions given below:
- Step 1: Click on the Browse button and select the Excel file you want to import to MySQL.
- Step 2: Select MySQL as your desired database. According to your excel file, check or uncheck My File has a Header Row.
- Step 3: Based on your Excel file, check Use CHECK IF TABLE EXISTS. For using the active worksheet, check the Use the active worksheet box.
- Step 4: You can also choose to enter the Worksheet name. For this example, the worksheet name Students is mentioned.
- Step 5: To import Excel into MySQL, you can either provide the data cell range or check the Convert the whole worksheet box to import the whole data.
- Step 6: Finally, name the table in which to import excel into MySQL. Then, click on the Convert My File button.
- Step 7: After your file is converted, you will get the following message. Now, download the queries or you can even copy the queries to execute them on MySQL.
After the queries have been executed, you can view your data in MySQL using the SELECT command.
Method 3: Using the Load Data Statement to Import Excel into MySQL
Using the LOAD DATA Statement, you can import Excel data into MySQL. To do that, follow the simple steps given below:
- Step 1: You have to first convert your .xlsx file to .csv file. For that, open up the excel file that you need to import.
- Step 2: Navigate to File > Save As. Select CSV (Comma delimited)(*.csv) as your file type and click on the Save button.
- Step 3: Now, enter the LOAD DATA command shown below in your MySQL Workbench import Excel into MySQL.
# MySQL Version 8.0.27
LOAD DATA INFILE
'C:/ProgramFiles/MySQLExcel/import excel into mysql.csv'
INTO TABLE new_file
FIELDS TERMINATED BY ','
ENCLOSED BY '"'
LINES TERMINATED BY 'n'
IGNORE 1 ROWS;
In the above process to import an excel file in MySQL workbench, the .csv file data will be added to the new_file table in your MySQL database without the first row as it contains the row headers. For this example, the .csv file uses a comma as the delimiter to separate 2 fields. You can also use FIELDS TERMINATED BY ‘t’ or FIELDS TERMINATED BY ‘ ‘ if your file’s fields are separated using a tab or a single space respectively.
Alternatively, you can use the LOAD DATA command directly from the Command Line (CMD).
Method 4: Import Excel into MySQL using phpMyAdmin
You can also import excel into MySQL using phpMyAdmin by first converting your .xlsx files to .csv files. For that, you have to first download and phpMyAdmin tool on your system. For this example, a new table named tb_students_phpmyadmin has been created in the MySQL Database. To import excel into MySQL, you can follow the simple steps given below:
- Step 1: In phpMyAdmin, click on the Import tab and choose your desired .csv file.
- Step 2: Now, enter the format-specific options and once you are done, click on the Go button present in the bottom right corner of your screen.
After clicking on the Go button, you will observe the data import confirmation messages for all your rows.
- Step 3: Using the SELECT statement, you can check if the process to import excel into MySQL was successful or not.
Conclusion
In this article, you have learned how to effectively import Excel into MySQL using 4 different methods. Using Method 2, you convert your Excel file rows into SQL queries via sqlizer.io which you, later on, execute on your MySQL Workbench or Command-Line. Though this can be a time-consuming process if you are dealing with excel files containing thousands of rows. You can also use the LOAD DATA statement or a database administration tool like phpMyAdmin, though these require you to first convert the Excel files into CSV files.
These 3 methods are a good option if you only need to rarely import Excel into MySQL with no requirement for processes like Data Cleaning & Data Standardisation. However, when you need to frequently import excel files with millions of rows of data in real-time that require complex data transformation, then you can opt for a No-Code Automated Data Integration platform like Hevo Data!
Visit our Website to Explore Hevo
Hevo Data is a No-code Data Pipeline solution that can help you import data from a vast sea of sources like Google Drive to your desired destination such as MySQL, Data Warehouses, or BI tools. Using Hevo you can easily upload your Excel files present on your Google Drive to your MySQL Database. Hevo also supports MySQL as a Source for loading data to a destination of your choice. It is a reliable, completely automated, and secure service that doesn’t require you to write any code!
If you are using MySQL as your Database Management System and searching for a no-fuss alternative to manual data integration, then Hevo can effortlessly automate this for you. Hevo, with its strong integration with 150+ sources (Including 40+ Free Sources like Google Drive & Google Sheets), allows you to not only export & load data but also transform & enrich your data & make it analysis-ready in a jiffy.
Want to take Hevo for a ride? Sign Up for a 14-day free trial and simplify your Data Integration process. Do check out the pricing details to understand which plan fulfills all your business needs.
Tell us about your experience of completing the process to Import Excel into MySQL! Share your thoughts with us in the comments section below.
Excel tables must not have blank cells — these will be skipped when CSV file is created giving the wrong number of fields in the row(s) concerned. Also Excel cells must not contain any symbols used as delimiters (typically doublequote" and comma,. The delimiters may vary according to excel version/language.
Excel 2016 CSV looks like:
22,Fred,Bloggs,22,Acacia Avenue
…but phpMyAdmin requires:
"22","Fred","Bloggs","22","Acacia Avenue"
My tip — add extra columns before and after your excel table and fill each column with something unique like ZZ. Then create CSV. Use a text editor with Find/Replace to change each comma to ",". This gives you ZZ","22","Fred","Bloggs","22","Acacia Avenue","ZZ. Then Find/Replace ZZ"," with " and then ","ZZ with «.
Now your CSV matches what phpMyAdmin needs.
Have you ever encountered a situation where you had to import records from an Excel file to your database in MySQL?
Once, I found myself at this point, I was confused for a few minutes😢 but then I decided to consult my knowledgeable friend, Google😉.
Here I’ll describe a step-by-step process to achieve this successfully.
SECTION 1
(Saving the file as a CSV document).
-
Open the Excel file and then select ‘File’, a dropdown will appear and then you click ‘SaveAs’.
-
Fill in the name of the document and for the document type, Save it as (comma separated) or (comma delimited) which must have an extension of ‘.csv’.
-
You will get a prompt like this, Select Yes.
SECTION 2
(Importing the CSV file to the database).
-
Go to your PHPMyAdmin and create a new database.
-
At the top navigation bar of your page, select Import.
-
Select the .csv file that you saved at ‘Choose File’.
-
It is optional to fill in the table name and if you don’t, the name of the file will be the table name.
If the first line of the file contains the table column names check that box (if it is unchecked, the first line will become part of the data).
Leave every other setting at the default unless there is a need to change it.
-
At the bottom right corner, Select Go. Then your import is successful if your output is similar to this without any query error.
NB: If you had multiple sheets that you saved as CSV documents you import each of them repeating the above process. They will constitute the different tables in your database.
Hurray!😊 It’s simple and awesome right!
Conclusion
These tips are in my own opinion, so if you have a conflicting view or a better approach, kindly drop them in the comment box, I really enjoy learning.
Thanks for reading.🤝
Import
To import data, go to the “Import” tab in phpMyAdmin. To import data into a
specific database or table, open the database or table before going to the
“Import” tab.
In addition to the standard Import and Export tab, you can also import an SQL
file directly by dragging and dropping it from your local file manager to the
phpMyAdmin interface in your web browser.
If you are having troubles importing big files, please consult 1.16 I cannot upload big dump files (memory, HTTP or timeout problems)..
You can import using following methods:
Form based upload
Can be used with any supported format, also (b|g)zipped files, e.g., mydump.sql.gz .
Form based SQL Query
Can be used with valid SQL dumps.
Using upload directory
You can specify an upload directory on your web server where phpMyAdmin is installed, after uploading your file into this directory you can select this file in the import dialog of phpMyAdmin, see
$cfg['UploadDir'].
phpMyAdmin can import from several various commonly used formats.
CSV
Comma separated values format which is often used by spreadsheets or various other programs for export/import.
Note
When importing data into a table from a CSV file where the table has an
‘auto_increment’ field, make the ‘auto_increment’ value for each record in
the CSV field to be ‘0’ (zero). This allows the ‘auto_increment’ field to
populate correctly.
It is now possible to import a CSV file at the server or database level.
Instead of having to create a table to import the CSV file into, a best-fit
structure will be determined for you and the data imported into it, instead.
All other features, requirements, and limitations are as before.
CSV using LOAD DATA
Similar to CSV, only using the internal MySQL parser and not the phpMyAdmin one.
ESRI Shape File
The ESRI shapefile or simply a shapefile is a popular geospatial vector data
format for geographic information systems software. It is developed and
regulated by Esri as a (mostly) open specification for data interoperability
among Esri and other software products.
Open Document Spreadsheet (ODS)
OpenDocument workbooks containing one or more spreadsheets can now be directly imported.
When importing an ODS spreadsheet, the spreadsheet must be named in a specific way in order to make the
import as simple as possible.
Table name
During import, phpMyAdmin uses the sheet name as the table name; you should rename the
sheet in your spreadsheet program in order to match your existing table name (or the table you wish to create,
though this is less of a concern since you could quickly rename the new table from the Operations tab).
Column names
You should also make the first row of your spreadsheet a header with the names of the columns (this can be
accomplished by inserting a new row at the top of your spreadsheet). When on the Import screen, select the
checkbox for “The first line of the file contains the table column names;” this way your newly imported
data will go to the proper columns.
Note
Formulas and calculations will NOT be evaluated, rather, their value from
the most recent save will be loaded. Please ensure that all values in the
spreadsheet are as needed before importing it.
SQL
SQL can be used to make any manipulation on data, it is also useful for restoring backed up data.
XML
XML files exported by phpMyAdmin (version 3.3.0 or later) can now be imported.
Structures (databases, tables, views, triggers, etc.) and/or data will be
created depending on the contents of the file.
The supported xml schemas are not yet documented in this wiki.
Export
phpMyAdmin can export into text files (even compressed) on your local disk (or
a special the webserver $cfg['SaveDir'] folder) in various
commonly used formats:
CodeGen
NHibernate file format. Planned
versions: Java, Hibernate, PHP PDO, JSON, etc. So the preliminary name is
codegen.
CSV
Comma separated values format which is often used by spreadsheets or various
other programs for export/import.
CSV for Microsoft Excel
This is just preconfigured version of CSV export which can be imported into
most English versions of Microsoft Excel. Some localised versions (like
“Danish”) are expecting “;” instead of “,” as field separator.
Microsoft Word 2000
If you’re using Microsoft Word 2000 or newer (or compatible such as
OpenOffice.org), you can use this export.
JSON
JSON (JavaScript Object Notation) is a lightweight data-interchange format. It
is easy for humans to read and write and it is easy for machines to parse and
generate.
Changed in version 4.7.0: The generated JSON structure has been changed in phpMyAdmin 4.7.0 to
produce valid JSON data.
The generated JSON is list of objects with following attributes:
-
type¶ -
Type of given object, can be one of:
header- Export header containing comment and phpMyAdmin version.
database- Start of a database marker, containing name of database.
table- Table data export.
-
version¶ -
Used in
headertypeand indicates phpMyAdmin version.
-
Optional textual comment.
-
name¶ -
Object name — either table or database based on
type.
-
database¶ -
Database name for
tabletype.
-
data¶ -
Table content for
tabletype.
Sample output:
[
    {
        "comment": "Export to JSON plugin for PHPMyAdmin",
        "type": "header",
        "version": "4.7.0-dev"
    },
    {
        "name": "cars",
        "type": "database"
    },
    {
        "data": [
            {
                "car_id": "1",
                "description": "Green Chrysler 300",
                "make_id": "5",
                "mileage": "113688",
                "price": "13545.00",
                "transmission": "automatic",
                "yearmade": "2007"
            }
        ],
        "database": "cars",
        "name": "cars",
        "type": "table"
    },
    {
        "data": [
            {
                "make": "Chrysler",
                "make_id": "5"
            }
        ],
        "database": "cars",
        "name": "makes",
        "type": "table"
    }
]
LaTeX
If you want to embed table data or structure in LaTeX, this is right choice for you.
LaTeX is a typesetting system that is very suitable for producing scientific
and mathematical documents of high typographical quality. It is also suitable
for producing all sorts of other documents, from simple letters to complete
books. LaTeX uses TeX as its formatting engine. Learn more about TeX and
LaTeX on the Comprehensive TeX Archive Network
also see the short description od TeX.
The output needs to be embedded into a LaTeX document before it can be
rendered, for example in following document:
documentclass{article}
title{phpMyAdmin SQL output}
author{}
usepackage{longtable,lscape}
date{}
setlength{parindent}{0pt}
usepackage[left=2cm,top=2cm,right=2cm,nohead,nofoot]{geometry}
pdfpagewidth 210mm
pdfpageheight 297mm
begin{document}
maketitle

% insert phpMyAdmin LaTeX Dump here

end{document}
OpenDocument Spreadsheet
Open standard for spreadsheet data, which is being widely adopted. Many recent
spreadsheet programs, such as LibreOffice, OpenOffice, Microsoft Office or
Google Docs can handle this format.
OpenDocument Text
New standard for text data which is being widely adopted. Most recent word
processors (such as LibreOffice, OpenOffice, Microsoft Word, AbiWord or KWord)
can handle this.
PDF
For presentation purposes, non editable PDF might be best choice for you.
PHP Array
You can generate a php file which will declare a multidimensional array with
the contents of the selected table or database.
SQL
Export in SQL can be used to restore your database, thus it is useful for
backing up.
The option ‘Maximal length of created query’ seems to be undocumented. But
experiments has shown that it splits large extended INSERTS so each one is no
bigger than the given number of bytes (or characters?). Thus when importing the
file, for large tables you avoid the error “Got a packet bigger than
‘max_allowed_packet’ bytes”.
Data Options
Complete inserts adds the column names to the SQL dump. This parameter
improves the readability and reliability of the dump. Adding the column names
increases the size of the dump, but when combined with Extended inserts it’s
negligible.
Extended inserts combines multiple rows of data into a single INSERT query.
This will significantly decrease filesize for large SQL dumps, increases the
INSERT speed when imported, and is generally recommended.
XML
Easily parsable export for use with custom scripts.
Changed in version 3.3.0: The XML schema used has changed as of version 3.3.0
YAML
YAML is a data serialization format which is both human readable and
computationally powerful ( <https://yaml.org> ).


