
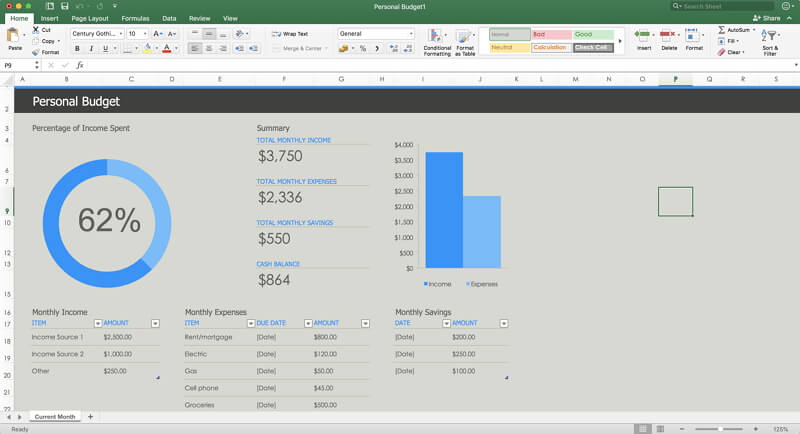
Excel, MAC OS
How to Convert XLSX to PDF on Mac Computer?
Summary- If you are looking for a way to convert XLSX to PDF on Mac OS, then this blog is the right for you. Here in this blog, we are going to discuss the most effective way to export Excel contacts to PDF Mac. So stick with the blog till the last to know the complete conversion process.
Basically, XLSX file format is related to MS Excel which is one of the most popular software for editing and creating spreadsheets on both Mac and Windows environments. But is not that handy or portable file format for data sharing.
On the other hand, PDF is a universally acceptable file format and it is one of the most preferable file formats for data sharing. Basically, the main reason behind its popularity is platform independence it one can assess it on any device. Also, it offers security features so by using the security feature one can restrict the users for any kind of data modification.
Why Users Prefer to Convert Excel to PDF Mac?
Due to PDF popularity, there are many reasons that force users for this conversion on a Mac desktop. In this section, we cover some important and major ones.
- The first thing is that to open any Excel file you need particular software, hence, it’s a software-dependent file format. On the other hand, PDF is universally supported and also it is an independent document file.
- In a PDF file, one can easily add a password to their documents for security purposes. But in an Excel file, anyone can modify your data it means there are no security features.
Manual Solution to Convert XLSX to PDF on Mac
If you are seeking for a free method to complete this XLSX file to PDF. Then, you can do this task by using the predefined option to get your any Excel spreadsheet in PDF file format. Now, to know how to do that, follow the below steps carefully.
- First, launch Microsoft Excel on your any Mac machine
- Now, click on the Open option from the left Menu Bar and browse the file which you want to Save As a PDF
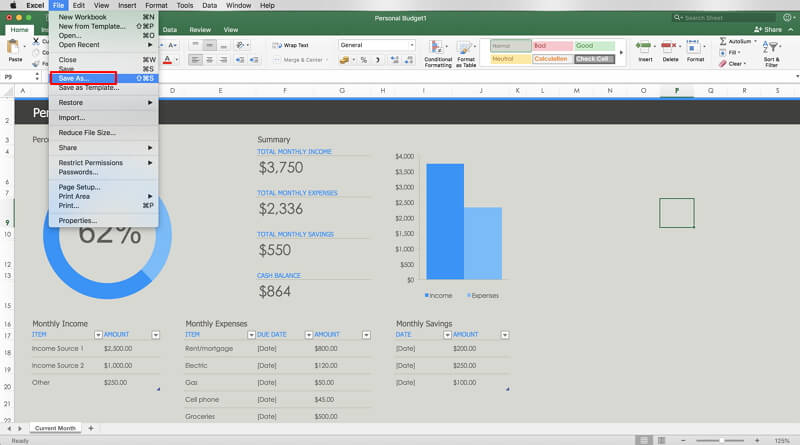
- Once the file is opened in Excel go to the File option
- Now, from the File option choose the Print option
- Next, from the Print windows choose the Save As PDF option
- Select the destination path to save the Excel XLSX file as a PDF
- At last, click on the Save to preserve the file as one PDF on Mac desktop.
Limitation of the Manual Method
There is no doubt that you can export Excel file to PDF on Mac. But while doing this you will notice that you can only save one Sheet or Workbook at a time. You are not able to print multiple Excel files at once, due that it is only feasible for those users who have a fewer Excel contacts list to convert. Now, if the above method is not enough for you, then keep reading the blog because you are close to knowing how to convert multiple XLSX files to PDF on Mac without any data loss.
Professional Solution to Convert XLSX to PDF on Mac
As we said earlier, the manual method is not worthwhile for every user. So, in this situation of multiple Excel sheet conversion, you can try Mac Excel Contacts Converter Tool. This tool gives you an option to convert all your Excel contacts files into PDF, MSG, TXT, and other file formats without losing data integrity.
By using this software, users can save unlimited Excel XLS / XLSX / XLSM to PDF on Mac within a few clicks. Also, the utility offers a filed mapping option for no data loss during the process. Along with PDF this software also convert XLS contacts to vCard of all versions.
In fact, this is one of the best tool to transfer Excel contacts to iPhone, android phone or Google account and any email client. If required, you can even take the help of this software to convert Excel to WhatsApp.
Working Steps to Convert Excel XLSX Contacts to PDF Mac
- Download and install the software on your Mac machine
- Once the installation is done launch to tool on any version of Mac machine
- Now, click on “Add File(s)” to add Excel XLSX files into the software pane and then Next

- Select the PDF radio button from the Select Export Type option

- After that choose to Create Single PDF Per File to create a single PDF file and Enable Mapping option to map the Excel fields

- Once the mapping is completed Press on the Change button to select the destination path

- At last Pick on the Export button to convert XLSX to PDF on Mac.

Why Choose this Mac Excel Converter Software
In the case of multiple conversions, the manual method becomes very hectic for you. But this tool comes with various features that make the conversion process very smooth. Some of the prominent features of this tool is mentioned below:
- Capable to convert all types of Excel files such as XLSX, XLS, XLSM in five different file formats.
- Facilitated option to auto-map and manual mapping for Excel fields.
- Option to convert Excel contacts files into all versions of vCard such as v2.1, v3.0, and v4.0
- Support all versions of Mac OS 10.8 and all the above versions of Mac OS.
Conclusion
There are various users who want to convert Excel to PDF because it universally accepted file format hence, many uses have asked a query on how to convert XLSX to PDF on Mac. So, after considering the user’s requirement here in this blog we have discussed two methods to complete this task. Now, it up to you to choose the right one for you. However, we would recommend you to go with a professional solution as it can perform the task safely.
Содержание
- Save or convert to PDF on your Mac
- Save your document as a tagged PDF
- Email a PDF copy of your document from Word
- See also
- Как Конвертировать Excel в PDF на Mac
- Wondershare PDFelement
- Конвертировать Excel в PDF на Mac
- Шаг 1. Откройте и Импортируйте Файлы
- Шаг 2. Создайте PDF из Excel
- Шаг 3. Редактируйте PDF так, как надо Вам
- Wondershare PDFelement
- Как Сохранить Excel как PDF на Mac
- Шаг 1. Откройте Excel Файл
- Шаг 2. Экспортируйте Excel в PDF
- Конвертируйте Excel в PDF с помощью PDF Creator для Mac
- Шаг 1. Откройте и Импортируйте Файлы
- Шаг 2. Создайте PDF из Excel
- Шаг 3. Предварительный просмотр файлов
- Top 12 PDF Converter for Mac
- PDF for Mac
- 12 Best PDF Converter Tools for macOS (Including macOS 11)
- 1. PDFelement
- 2. Adobe В® Acrobat В® DC Pro
- 3. Adobe В® Acrobat В® XI Pro for Mac
- 4. Nuance PDF Converter for Mac
- 5. PDF Expert
- 6. Foxit Phantom
- 7. Preview for Mac
- 8. deskUNPDF for Mac
- 9. Enolsoft PDF to Text for Mac
- 10. Solid PDF Converter
- 11. Aiseesoft Mac PDF Converter Ultimate
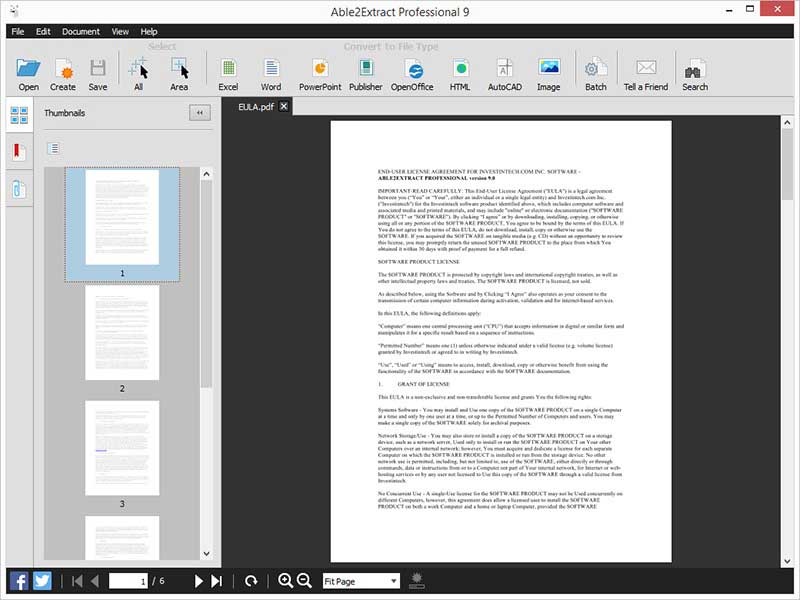
- 12. Able2Extract PDF Converter
- How to Use One of the Best PDF Converter for Mac
- Step 1. Open Your PDF in the Program
- Step 2. Edit PDF per Your Needs (Optional)
- Step 3. Change PDF into Other Format
- Free and Online Tools to Convert PDF
- Solution 1: HiPDF
- Solution 2: SmallPDF.com
- Solution 3: Solid PDF Converter
- Solution 4: FreePDFconverter.com
Save or convert to PDF on your Mac
If you want your document to be read but not edited, you can save it as a PDF file. When you do, the PDF will retain your formatting and often be a smaller file than the original document. Tagged PDF files make it easier for screen readers and other assistive technologies to determine a logical reading order and navigation for the file, as well as allowing for content reflow when using large type displays, personal digital assistants (PDAs), and mobile phones. This tagging can be done automatically when you save a file as PDF format.
Save your document as a tagged PDF
On the File menu, click Save As. Or, you can also save a file by clicking the Save icon in the ribbon.

In the Save As box, type a name for the file.
Give the PDF a different name than the original document. That way, you’ll have two files: a Word document you can continue to edit and a PDF file you can share.
If you don’t change the name, your document will be converted to a PDF and you won’t be able to change it back without using specialized software or a third-party add-in.
In the File Format box, click PDF.
Email a PDF copy of your document from Word
You can send a PDF copy of your document directly from Word.
On the File menu, click Share > Send PDF. Word will create a PDF file and attach it to a new email message.
See also
For information about saving documents as PDFs in other versions of Microsoft Word, go to Save as PDF.
Create accessible PDFs to learn more about tagged PDFs
Источник
Как Конвертировать Excel в PDF на Mac

Василий Лебедев
2022-11-04 11:50:33 • Опубликовано : Советы по работе в PDFelement для Mac • Проверенные решения
Люди всегда спрашивают: «Как мне сохранить электронную таблицу Excel в формате PDF на Mac?», ответ прост. С помощью Wondershare PDFelement — Редактор PDF-файлов Вы можете конвертировать Excel в PDF на Mac просто перетащив файлы. Microsoft Excel — это стандартное приложение для работы с электронными таблицами, используемое для выполнения вычислений и создания динамических таблиц и графиков. Оно широко используется в деловом мире на ежедневной основе.
Wondershare PDFelement
PDF приложение для самой удобной работы.
Конвертировать Excel в PDF на Mac
Шаг 1. Откройте и Импортируйте Файлы
После запуска PDFelement, Вы с легкостью можете перетащить свои файлы в окно программы.
Шаг 2. Создайте PDF из Excel
После того как Вы открыли свой Excel файл, будет успешно создан и PDF файл. Нажмите на кнопку «Файл»>»Сохранить как» в верхнем меню, чтобы напрямую сохранить созданный PDF на Вашем Mac.
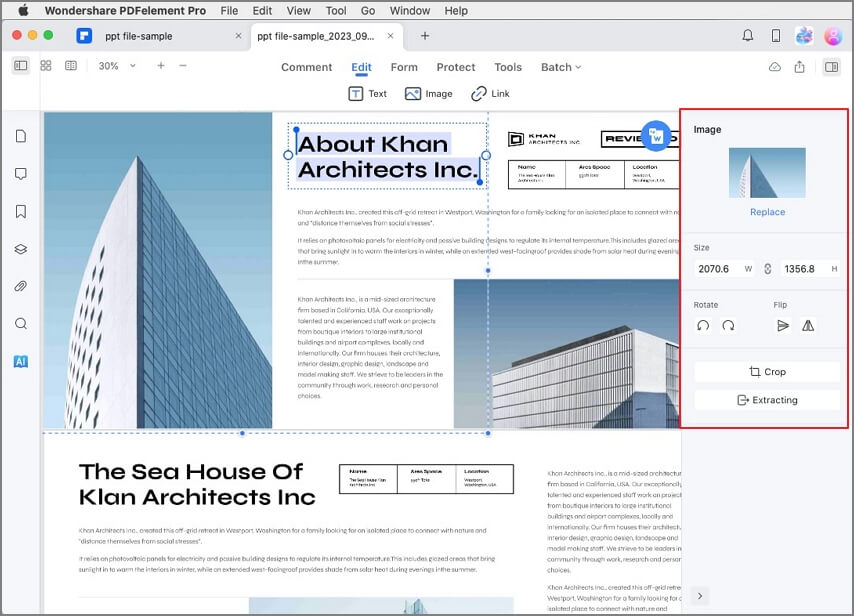
Шаг 3. Редактируйте PDF так, как надо Вам
PDFelement также может помочь Вам просматривать, редактировать и печатать PDF файлы так, чтобы они выглядели безупречно и профессионально. Если Вам нужно добавить таблицы или данные из других файлов Excel, PDFelement позволит сделать это очень просто. Он совместим с macOS 10.12, 10.13, 10.14, а также с последней версией macOS Catalina 10.15. Вот как отредактировать текст PDF на Mac для Вашего сведения.
Wondershare PDFelement
PDF приложение для самой удобной работы.
PDF файлами обычно проще управлять, делиться и представлять их в профессиональной среде. Многие типы документов Microsoft Office лучше представлены в формате PDF, и итоговые пользователи с меньшей вероятностью будут их изменять. Это одна из причин, почему многие официальные публикации часто представлены в формате PDF. Как и другие файлы, файлы Excel также выглядят более профессионально, если представлены в формате PDF. Вот почему часто необходимо сохранить Excel в формате PDF на Mac.
Как Сохранить Excel как PDF на Mac
Шаг 1. Откройте Excel Файл
Откройте свой файл в Excel. Если Вы хотите, чтобы в формате PDF была сохранена только часть электронной таблицы, выберите только ту область, которую Вы хотите преобразовать. В противном случае весь лист будет сохранен как файл PDF.
Шаг 2. Экспортируйте Excel в PDF
Затем нажмите кнопку «Файл» > «Сохранить как. » в верхнем меню. В новом всплывающем окне выберите PDF в опции «Сохранить как», чтобы сохранить файл.
Конвертируйте Excel в PDF с помощью PDF Creator для Mac
PDF Creator для Mac позволяет конвертировать документы Microsoft Office, включая Excel, Word, PPT и другие в PDF. Его могут использовать даже новички, поскольку у него простой и интуитивно понятный интерфейс. Кроме того, PDF Creator для Mac позволяет конвертировать все документы, созданные с помощью Microsoft Office, в PDF на той же платформе без необходимости загрузки дополнительных инструментов.
Шаг 1. Откройте и Импортируйте Файлы
После запуска PDF Creator для Mac Вы увидите простой интерфейс, позволяющий загружать файлы Excel для преобразования. Вы можете просто перетащить файлы в окно программы, чтобы загрузить их. Или Вы можете импортировать файлы, нажав кнопку «Добавить файлы» в верхней части кнопки «Добавить папку», если у Вас есть более одного файла для загрузки.

Шаг 2. Создайте PDF из Excel
Нажмите внизу «Создать» и выберите папку назначения для файлов, которые Вы конвертируете. Обязательно выберите папку, которую Вы можете легко найти, иначе Вы можете потерять недавно преобразованный файл PDF.
Шаг 3. Предварительный просмотр файлов
Когда Вы нажимаете «Сохранить» в предыдущем окне, PDF Creator для Mac переходит к преобразованию файла Excel в PDF. Вы можете нажать «Предварительный просмотр» в следующем окне, чтобы быстро просмотреть преобразованный файл. Вы также можете нажать «Показать в Finder», чтобы просмотреть файл PDF.
Источник
Top 12 PDF Converter for Mac
PDF for Mac
Annotate PDF
Convert PDF
Open PDF
Compress PDF
Protect PDF
Edit PDF
Combine PDF
PDF Form
OCR PDF
Create PDF
View PDF
PDF Page
Tips for PDF
PDF Software
Tips for Mac


Audrey Goodwin
2022-11-11 14:43:51 • Filed to: Right Mac Software • Proven solutions
The PDF format is designed for sharing data. What makes PDF files so special is that they can be protected. PDF is now the standard document format for business. However, many people still want to edit documents using more familiar programs like Office or other software, which can be a problem with PDFs. That is why many people feel the need to convert PDF files, and are seeking the best PDF converter for Mac. In this article, we review, research, and list the top 12 PDF converters for Mac.
1. PDFelement
One of the best PDF converters for Mac is PDFelement for Mac. It helps you maximize your productivity and is trusted by more than 350,000 business professionals worldwide. For document conversion, PDFelement allows you to convert PDFs to many other file types, including Microsoft Office formats, Images, Text, HTML, and so on.


Some of the benefits include flexible volume licensing options, special discounts for education and non-profit organizations, and reliable tech support that is dedicated to providing assistance 24×7. Also, it supports the latest macOS 11 Big Sur. PDFelement comes with a number of features that are specially designed to simplify your tasks. The Pro version comes with even more PDF editing tools, including OCR technology, and batch processing capabilities. It also includes text/image redaction and some advanced form creation tools.
Benefits of using PDFelement:
- It includes a straightforward menu and easy access for modification. You can manage pages easily.
- PDF conversion for Mac for almost all MS Office applications.
- Fast conversion process with almost 100 pages per minute conversion rate.
- A similar editing experience to Microsoft Word.
- Protection with password and signatures to secure your PDF files.
- Allows for e-signatures and password encryption of files.
- Includes a clean interface and numerous support options that will make the software extremely easy to learn and use.
2. Adobe В® Acrobat В® DC Pro
Adobe was a founder of the PDF format, and it is the best PDF converter for Mac. Adobe В® Acrobat В® DC Pro comes with a touch-enabled interface and a new document cloud online service that gives you access to files through mobile apps and web browsers.
The new version might be simple to understand, but the subscription service is more complicated. Basically, if you have an existing Creative Cloud subscription, you will get the DC at no extra charge. You can buy the subscription, and there is a Perpetual licensing option.
- It includes many advanced features.
- Creating and merging PDFs has never been easier.
- You can remove or add pages to an existing PDF.
- The list window that pops up when you open the program or close a PDF can be frustrating.
- OCR starts up automatically, even if you do not want to perform OCR on your file.
- You cannot replace an image in Edit PDF mode to appear on the same spot and location.
- Adobe customer support is disappointing.
Price: $155.88 per year for Standard, or $179.88 per year for Pro
Get the best Adobe Acrobat DC Pro alternative at a much lower price:
3. Adobe В® Acrobat В® XI Pro for Mac
Adobe В® Acrobat В® XI is another PDF converter for Mac from Adobe, but it has been ended support. This means that the company will no longer provide security updates or bug fixes. Because of this, Adobe Acrobat Pro XI can feel a bit outdated, since it’s now become much more than just a PDF conversion tool. Click here to choose the best alternatives to Adobe Acrobat.
- It has great merging abilities, with the ability to preview most documents and rearrange them.
- Adobe Acrobat Pro XI allows you to create digital signatures.
- The price is very high compared to other options.
- Adobe customer support is not ideal.
Price: ВЈ453, Upgrade from ВЈ194
4. Nuance PDF Converter for Mac
Nuance PDF Converter for Mac provides a host of affordable features regarding PDF conversion for Mac users. This PDF Converter for Mac is designed for increased productivity and effortless conversion of various formats into PDF. Also, it is embedded with lots of other practical features for paperless work.
- Convert PDF files to Microsoft Office documents which will fully be supported by iWork.
- Also enables PDF conversions to editable format using OCR.
- Allows editing and sharing of PDF documents an insecure environment.
- Does not offer innovative editing options.
5. PDF Expert
This is one of the fastest PDF converter for Mac on the market. However, PDF Expert is not overloaded with features, even though it can easily get the job done. You can search for something with just one click without having to dig through a ton of features. This program is excellent for syncing PDF with Dropbox and other cloud services. You can even store files offline. It’s nearly perfect as a PDF program, but one of its biggest flaws is the lack of a conversion feature.
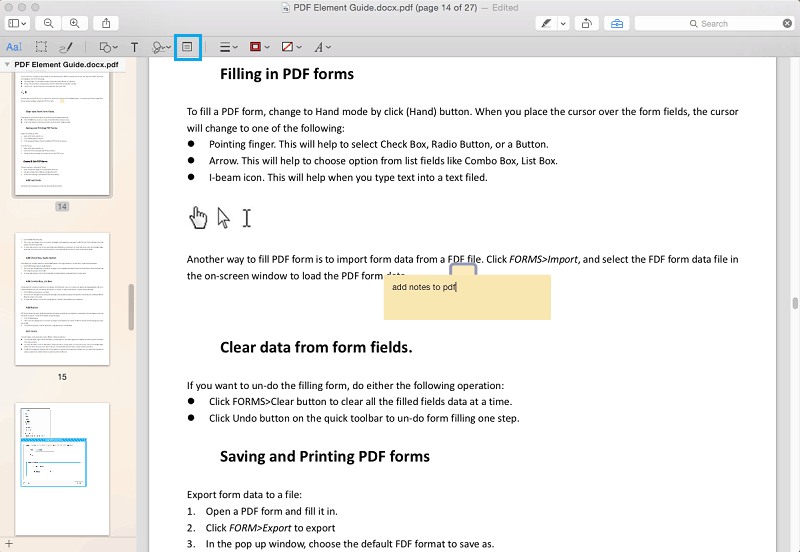
- It comes at a relatively cheap price when compared to other products.
- Has all the basic features you need on a simple interface.
- Includes indexing for faster and easier searching.
- Lack of a conversion feature.
- Using Apple Pencil is not as sleek as some would like it to be. You need an extra step (screen tap) for the app to recognize you want to draw or write.
Get the best PDF Expert alternative with the same features:
6. Foxit Phantom
Foxit Phantom PDF is a great PDF conversion software that can handle multiple languages. Foxit Phantom PDF lets you edit, annotate, and convert PDFs. The familiar interface makes it easy for people to learn how to use it. And because of its multilingual capabilities, Foxit is perfect for international businesses.
- Has a wide palette of editing features available.
- You can combine multiple PDF documents into one and rearrange the pages.
- There is a bit of a learning curve.
- The support has a slow response time.
- Lack of a comprehensive support network.
- You must download a module for OCR technology.
Price: $9 per month or $139 one time
7. Preview for Mac
This is the PDF converter Apple has installed in the macOS as a default application. With Preview, you can edit and view images in addition to PDF files. It is a basic PDF editor but has much more advanced features. For example, you can also use the program to digitally sign documents and add and edit hyperlinks in a PDF file. One of the unique features is the ability to sign documents with your webcam.
- The preview is extremely quick. Compared with other PDF editors, Preview will get the job done faster.
- The ability to fill out forms is impressive.
- The webcam signing process is very good. You can sign a piece of paper, hold it up to the webcam, and it will turn into a high-quality signature you can use for any form.
- You can save multiple signatures.
- Only supports converting from PDF to image files like PNG and TIFF, but not Office File and so on.
- There is no option to sign documents with your trackpad.
- Lack of advanced features like OCR technology.
8. deskUNPDF for Mac
deskUNPDF for Mac is an extremely user-friendly free PDF Converter for Mac OS X, which employs a host of state-of-the-art techniques to convert PDF documents with reliability and accuracy. It lets you read, edit, and convert PDF files, plus more.
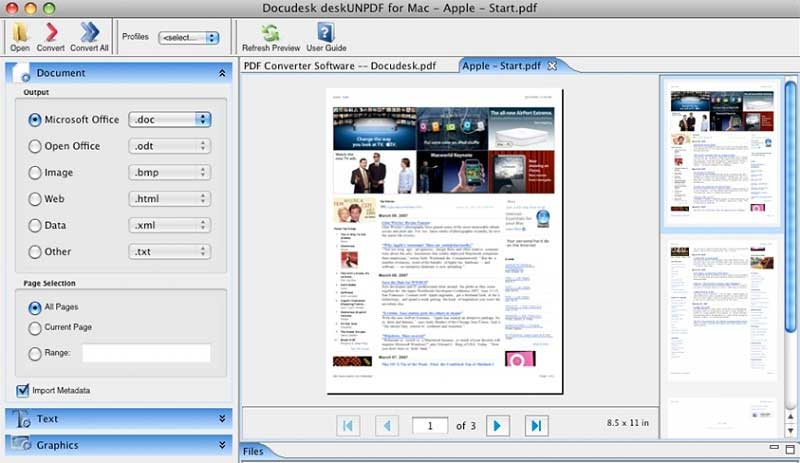
- Converts PDF file formats into MS Office extensions e.g. Excel, Word, PowerPoint, etc.
- OCR technology is incorporated.
- Enables conversion of many PDF files at the same time.
- Enables conversion of PDF documents to plain text documents.
- May give you some strange formatting results.
9. Enolsoft PDF to Text for Mac
Enolsoft PDF to Text for Mac is a powerful Mac PDF Converter that allows the users to convert PDF documents into Word, Excel, PPT, Epub, Image, etc. This Mac PDF Converter uses OCR technology to transform scanned PDF documents into editable text files, thus saving you from manually having to type in the text again.

- Optical Character Recognition (OCR) is used for accurate transformation of scanned PDF documents to Word, Excel, PPT, Epub, Image, etc.
- Quick conversion of PDF pages into text documents.
- The option of selecting page range within PDF document for conversion.
- Allows batch conversion of PDF documents.
- Cannot edit PDF documents.
- Does not support the ability to preview PDF documents before converting.
10. Solid PDF Converter
The main focus of this program is on bulky conversions. Solid PDF Converter can convert the PDF files in batches from one format to another. It is considered a very powerful PDF converter for macOS.
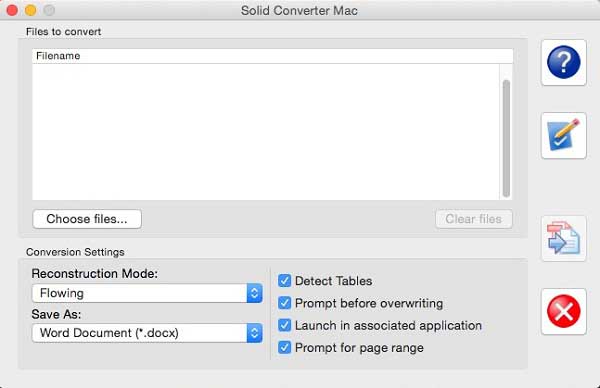
- Ideal for batch conversions
- User-friendly Interface
- There aren’t many options to manage PDF files.
11. Aiseesoft Mac PDF Converter Ultimate
Using Aiseesoft Mac PDF Converter Ultimate, you can convert PDF files into Text, Word, Excel, ePub, and HTML documents. It also provides a scanning option that converts scanned images into PDF files.
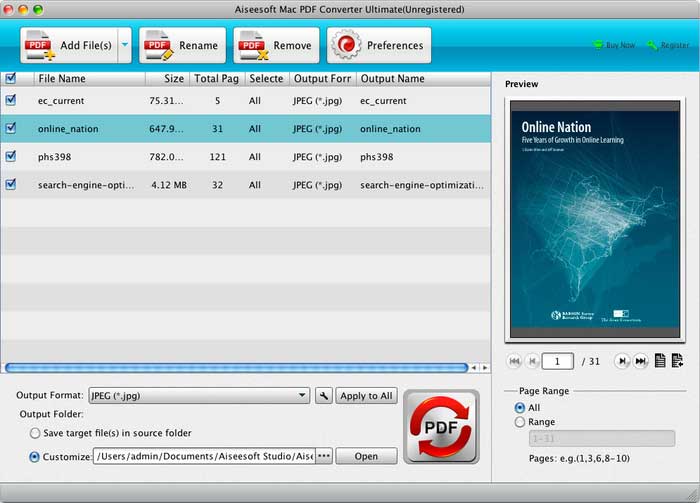
- Has quick conversions using batch processing
- Scanned images can be saved as PDF files
- Fully compatible with Mac systems
- A free version is not available
This software can convert PDFs to Word, Excel, and PPT formats. It is fully compatible with all Mac systems. It is easy to use and manage PDF files using this application. It is also available for Windows.
- Compatible with Mac
- Is a quick and easy way to convert PDFs into Word files
How to Use One of the Best PDF Converter for Mac
Step 1. Open Your PDF in the Program
First, download the latest version of PDFelement on your Mac and launch the program. Click on the «Open File» button and browse to select the file you want to convert into other formats.
Step 2. Edit PDF per Your Needs (Optional)
There are many options to edit text and images in PDFelement. Simply click the «Text» button on the left toolbar and then select the text or the image that you want to edit and double tap on it. You can also add text and images into the PDF file.
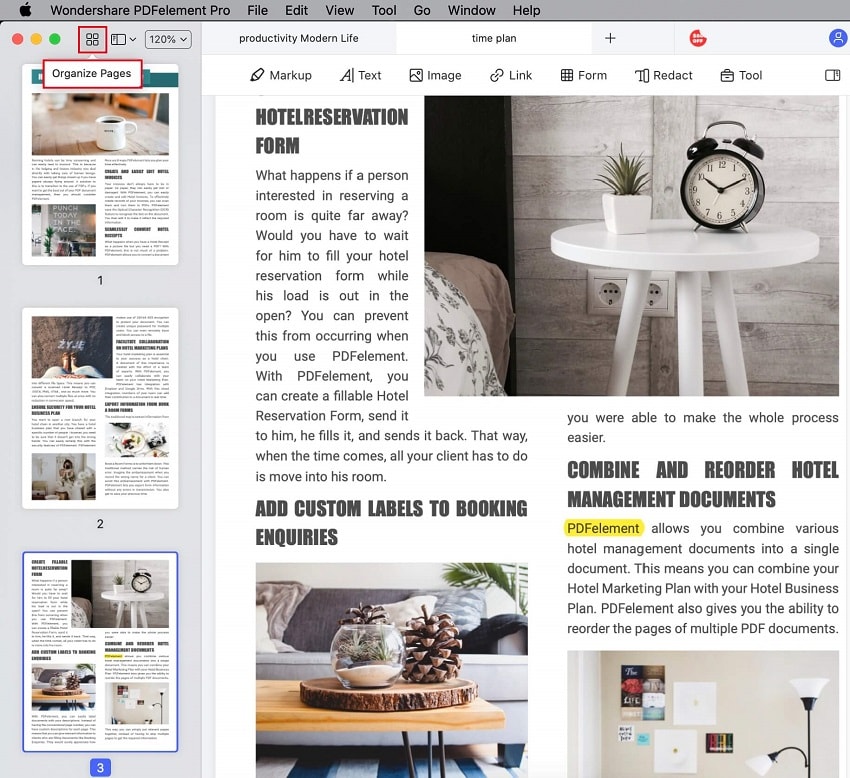
To make changes to pages, go to the right side column, and click the «Organize Pages» option for editing PDF pages.
Step 3. Change PDF into Other Format
Converting a PDF file is an easy task with PDFelement. Once you have finished editing your PDF file, click on the «File» > «Export To» button and select the format you need.
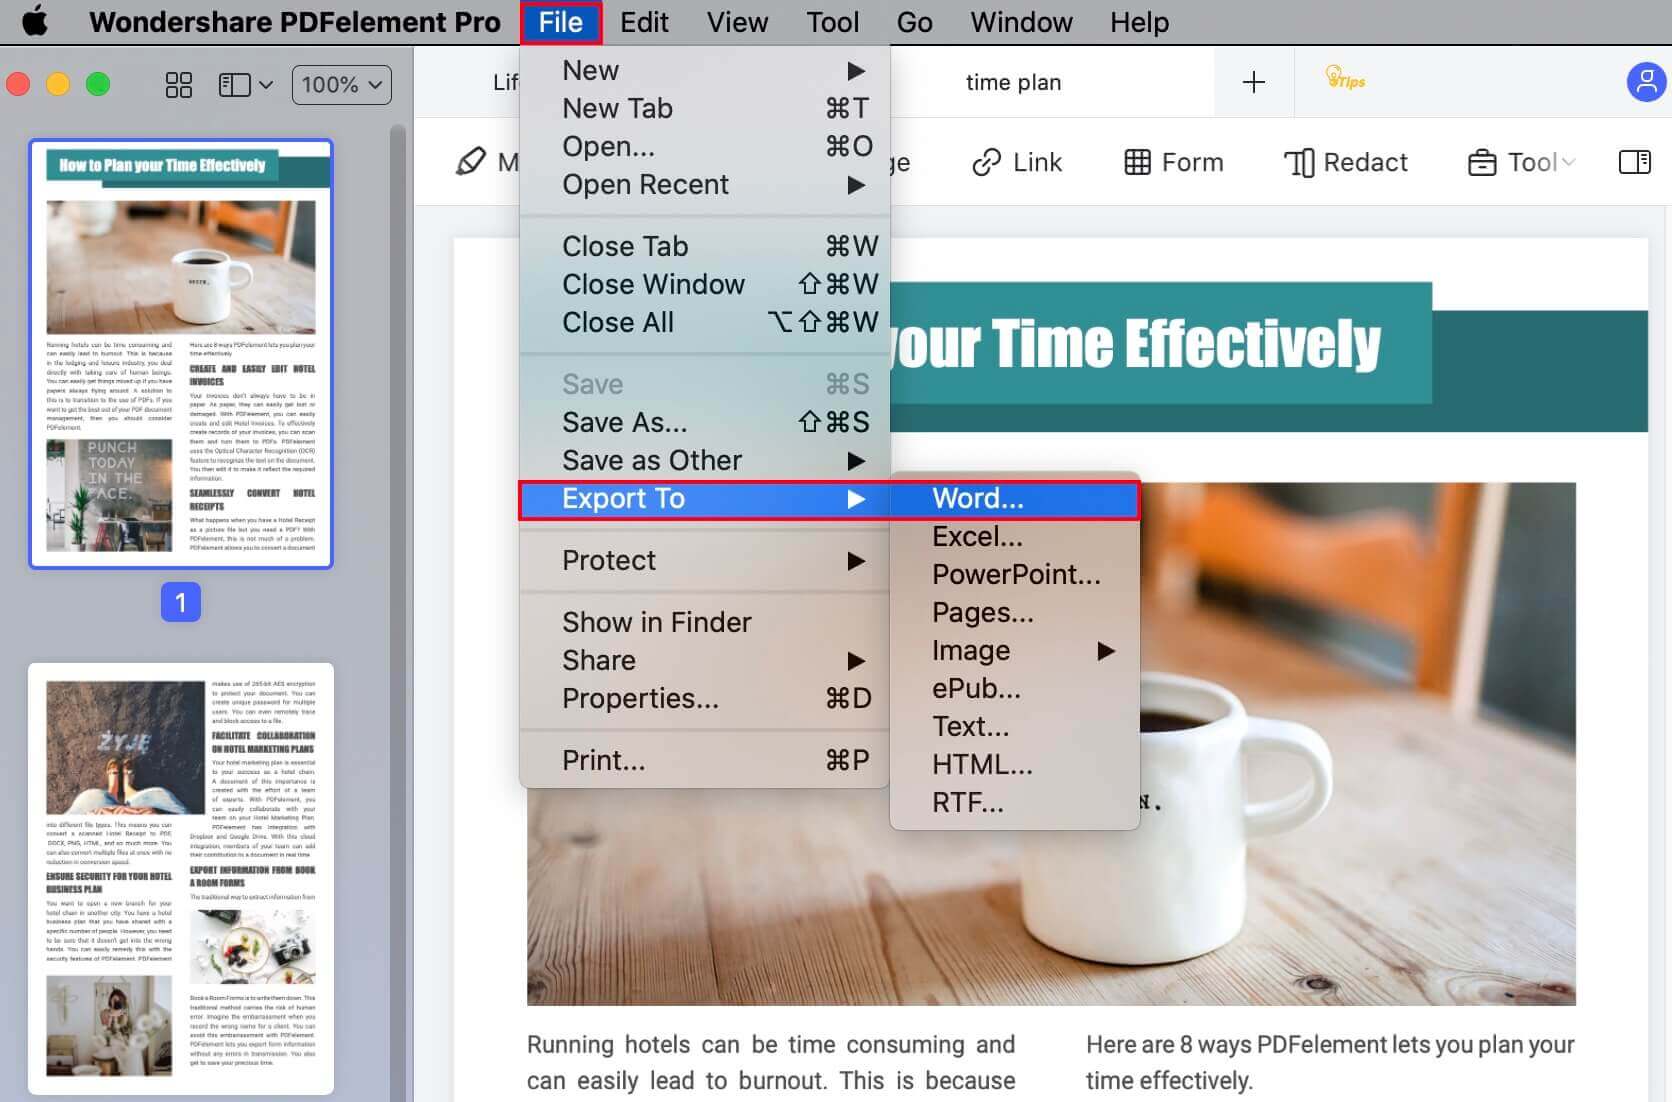
Tips: If a batch of files needs to be converted, try PDFelement for Mac. Then you can click on «Tool» > «Batch Process» on the home page. Add the files you want to convert in the pop-up dialog box. Once you are done with that, click on the «Apply» button to start the process.
Do you often deal with pdf documents and are looking for pdf converter for mac online? Nothing to worry about, there are a number of pdf converter professional for mac. Here is the list of free and online tools to convert pdf.
Solution 1: HiPDF
Standing top of the list, HiPDF is one of the top-ranking pdf editors. Like all the other services by Wondershare, it also has a facile interface with numerous features for the users. No matter you want to convert, compress, or edit pdf document, it’s the best. You can convert pdf document into multiple formats. Here are the steps to do so;
Step 1: Open the website of All-in-one online pdf solution HiPDF.
Step 2: Now, choose the format you need to convert the pdf document into and you will have the option to upload the pdf document.
Step 3: Once uploaded, press the option “Convert” and later download.
Solution 2: SmallPDF.com
A product of Switzerland, SmallPDF is one of the most visited online services to deal with pdf documents. It is an award-winning company that easily allows the users to convert pdf into multiple formats using these steps;
Step 1: Open the website of SmallPDF and choose the particular format.
Step 2: Click on the blue button that says “Choose files” and upload the pdf document.
Step 3: Furthermore, click on “Convert” and then download the converted document.
Solution 3: Solid PDF Converter
For swift conversion and procession solutions, you are always advised to visit Solid PDF Converter. It allows you to convert pdf document into multiple formats and even edit the documents. Here are the steps to do so;
Step 1: Open the website of Solid PDF Converter or download the software. Later, choose the format.
Step 2: Upload the pdf document on the software and click “Convert” and wait.
Step 3: Once the pdf is converted into the desired format, verify it and save it at the desired location.
Solution 4: FreePDFconverter.com
It is considered one of the best free pdf converters with remarkable security features. The online service has the feature of universal conversion. To keep the confidentiality of your information, the software automatically deletes your files. No matter if you want mac pages to pdf converter online, it’s the best solution for you. Here are the steps to convert pdf document;
Step 1: Open the FreePDFconverter.com and choose the files.
Step 2: Upload your file from desktop or any other online platform such as Google Drive, OneDrive, or any other. Click on the red button “Choose file.”
Step 3: Once uploaded, click “Convert” and wait for a while. Later, download the converted file.
Источник
![]()
Download Article
Easy ways to convert Excel to PDF
![]()
Download Article
Converting an Excel file to a PDF makes it easier for people to open the and view the file on various platforms—even if they don’t have Microsoft Office. PDFs are also easier to print and distribute than Excel spreadsheets. If you have Microsoft Excel, you can easily convert your spreadsheet to a PDF by saving or exporting it within the app. If you don’t have Excel, you can use Google Sheets, a tool on Google Drive, to make the conversion for free.
-

1
Select the part of the Excel spreadsheet you want to convert to PDF (optional). If there’s only a certain part of the Excel file that you want to turn into PDF format, select it now. Otherwise, move on to the next step.
- Note that PDF conversions cannot be easily reverted back into an Excel sheet, but this method will preserve your original copy.
-
2
Click the File menu. It’s at the top-left corner.
Advertisement
-
3
Click Export on the menu. This opens the Export panel.
-
4
Click Create PDF/XPS. Look for the icon that looks like a sheet of paper wearing a belt.
-
5
Click the Options… button. This will allow you to adjust the settings for the PDF file you are about to create.
-
6
Choose your PDF options and click OK.
- If you selected an area of your spreadsheet to save as a PDF, choose Selection under «Publish what.» This ensures that only that selected area is saved as a PDF.
- If you’d rather save the entire visible worksheet as a PDF, choose Active sheet(s) instead.
- If you want to choose specific pages from the workbook to save as a PDF, use the «Page(s)» drop-down menus to define the first and last pages.
- Click OK to continue.
-
7
Choose your optimization (optional). Above the «Options» button, you can select how you want to optimize the PDF. Most people can stick with «Standard» unless the spreadsheet is very large. «Minimum size» will reduce the size of a larger file to something more manageable.
- If you want to change the location to which you’re saving the file, you can navigate to that folder in the window now.
-
8
Name the file and click Publish. This exports the selected information to a new PDF file with the name you’ve entered.
-
9
Review the PDF. By default, the PDF file will open automatically for your review. If it doesn’t open by automatically, just double-click the name of the file in the folder to which you saved it..
- It’s not really possible to edit the PDF now, so if you need to make changes you’ll want to make them in the Excel document and then create a new PDF.


Advertisement
-
1
Go to https://drive.google.com. If you need to convert an Excel spreadsheet to PDF but don’t have Excel, don’t fret—you can use tools built in to your Google account to do the conversion for free.
- If you’re not already signed in to your Google account, sign in when prompted.
-
2
Click +New. It’s at the top-left corner of your Google Drive.
-
3
Click File upload. This opens your computer’s file browser.
-
4
Select your Excel spreadsheet and click Open. This uploads the spreadsheet to your Google Drive.
-
5
Click the Excel spreadsheet in your Google Drive. This opens the spreadsheet in Google Sheets, Google’s free spreadsheet editor.
-
6
Click the File menu and select Download. A list of download options will expand.
-
7
Click PDF document (.pdf). This displays a preview of your PDF in the Google Sheets printing window.
-
8
Adjust the layout of your PDF. If the print preview doesn’t look the way you want, use the right panel to make any changes you need before you continue.
- The PDF will save in the same orientation as the spreadsheet (usually landscape mode). If you’d rather it be in portrait (vertical) mode, select Portrait under «Page orientation.»
- Change the scale (the size/fit on the page) and margin size if necessary.
- Click Formatting to choose whether to display gridlines and/or notes, adjust the page order, and change the alignment.
- To add headers and footers to the tops and bottoms of pages, click Headers & footers, and then check the boxes to choose which information to display.
- If your spreadsheet contains a lot of data and cuts off in odd places, click SET CUSTOM PAGE BREAKS in the right panel. Here, you can drag the blue lines to adjust where each page begins and ends. Click CONFIRM BREAKS at the top-right to save your changes.
-
9
Click EXPORT. It’s the blue button at the top-right. This prompts you to save your new PDF to your computer.
- If the download doesn’t begin automatically, choose a location to which you’ll save the PDF, and then click Save to download it.


Advertisement
-
1
Ensure that the headers and footers on all of your sheets are the same (optional). If you’re using Excel 2011 and want to save multiple worksheets in a single PDF, each worksheet will need to have identical headers and footers. If they aren’t, each sheet will be created as a separate PDF document, but you can also easily merge these afterwards.
- Select all of the worksheets in your entire workbook. To do this, click the tab for the first sheet at the bottom of excel, hold down the Shift key, and then click the last sheet’s tab to select all.
- Click the Layout tab and then click Header & Footer.
- Click the Customize Header… and Customize Footer… buttons to edit the headers and footers for all of the sheets.
-
2
Select the part of the Excel spreadsheet you want to convert to PDF (optional). If there’s only a certain part of the spreadsheet that you want to turn into a PDF, select it now. Otherwise, go to the next step.
- PDF conversions cannot be easily converted back into an Excel sheet, but this method will preserve your original copy.
-
3
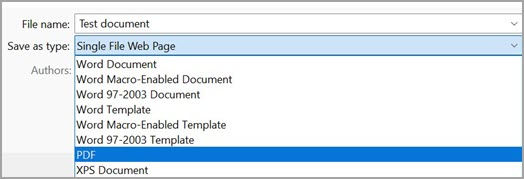
Click the File menu and select Save As. You could also press Command + Shift + S to open the Save As option.[1]
- If you want to save the PDF to a new folder, you can select that folder now. # Type a different name for the file. The name of the current Excel file appears in the «Save As» field. You will need to enter a different name (even if it’s just slightly different) to avoid accidentally overwriting the spreadsheet file.[2]
- If you want to save the PDF to a new folder, you can select that folder now. # Type a different name for the file. The name of the current Excel file appears in the «Save As» field. You will need to enter a different name (even if it’s just slightly different) to avoid accidentally overwriting the spreadsheet file.[2]
-
4
Click the «Format» or «File Format» menu and select PDF. This menu may have a slightly different name depending on your version of Excel.
-
5
Select what gets included in the PDF. At the bottom of the window, you can select Workbook (to convert the entire workbook), Sheet (to save only the active sheet as a PDF), or Selection (to save just the selected area as a PDF).
-
6
Click Save or Export. You’ll see a different option depending on your version of Excel.
- If the headers don’t match on a multi-sheet file, a separate file will be created for each sheet.
-
7
Join the separate PDF files (if necessary). If saving the Excel file as a PDF resulted in multiple PDF files, you can quickly join them together using Preview. Here’s how:
- Open the first PDF file by double-clicking its name in its folder.
- Click the View menu and select Thumbnails.[3]
- Click the last thumbnail to select it. This tells Preview to add the next PDF to the end of the current document.
- Click the Edit menu and select Insert > Page from File.
- Select the next PDF in the range and click Open.
- Repeat this process until you’ve added all PDFs.
- Click File and select Export as PDF.


Advertisement
Add New Question
-
Question
How can I send a large Excel spreadsheet if I don’t want to convert it to a PDF?

Luigi Oppido is the Owner and Operator of Pleasure Point Computers in Santa Cruz, California. Luigi has over 25 years of experience in general computer repair, data recovery, virus removal, and upgrades. He is also the host of the Computer Man Show! broadcasted on KSQD covering central California for over two years.
Computer & Tech Specialist
Expert Answer
If you’re sending a large Excel sheet, or if you want to send multiple files at once, you can compress the files as a zip folder. Then, the other person can unzip the folder and see all of the original files.
-
Question
How do I get a one-page worksheet as a one-page PDF? It keeps trying to save as several pages.
In Excel go to Page Layout. In the Scale to Fit section, make sure Width and Height are both set to one page, then save the Excel document as a PDF.
-
Question
How can I get full xlsx worksheets to convert to PDF?
In Microsoft Office Suite 2016. There’s an option to export under File. From there, you can choose the Export to PDF option.

See more answers
Ask a Question
200 characters left
Include your email address to get a message when this question is answered.
Submit
Advertisement
-
If you’re sending a large Excel sheet to someone who also has Microsoft Excel, or if you need to send multiple files, try compressing the files instead of converting them to a PDF.
Advertisement
About This Article
Article SummaryX
1. Click the File menu and select Export.
2. Click Create PDF/XPS.
3. Click Options.
4. Choose your options and select OK.
5. Select an optimization level.
6. Name the file and click Publish.
Did this summary help you?
Thanks to all authors for creating a page that has been read 1,553,124 times.
Is this article up to date?
What to Know
- In Windows: Choose File > Export > Create PDF/XPS. Confirm PDF is selected next to Save as type.
- On a Mac: Go to File > Save As. Next to File Format, select PDF.
- In Google Sheets: Use the file picker to open the Excel file. Go to File > Download > PDF > Export.
This article explains methods for converting Excel documents to PDF format, including exporting from Windows or Mac Excel, using Google Sheets, using an online converter, and printing to the PDF format. Information applies to Excel versions 2021, 2019, 2016, 2013, 2010, and Excel for Microsoft 365.
Export to PDF in Excel
There are many ways to convert an Excel file to the PDF format so that it is easier to open and read on other devices, without having a spreadsheet program or app installed. If you have Excel on your Windows or Mac computer, you can easily convert Excel XLSX or XLS format files to PDFs.
Export to PDF On a Windows PC
If you’re using Windows, make a PDF from an Excel file with the Export menu item.
-
Open the File > Export menu.
-
Choose Create PDF/XPS.
-
Double-check that PDF (*.pdf) is selected next to Save as type. The other option is for making an XPS file.
You can optionally use this time before making the PDF to enable or disable some advanced options. Go into Options in the save dialog box to do things like export only specific pages to PDF, export all the worksheets, and more.
-
Choose where the PDF should be saved, and then select Publish.
Export to PDF On a Mac
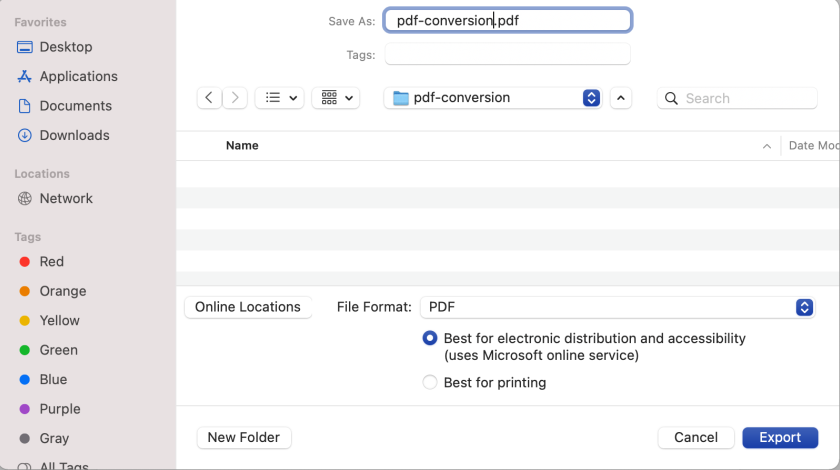
If you’re on a Mac computer, making a PDF from an Excel file can be completed through the Save As menu item.
-
Go to File > Save As to open a pop-up box for saving the Excel document.
-
Next to File Format, at the bottom of that window, choose PDF.
Take note of the options just below the format selection drop-down box. You can choose Workbook or Sheet to convert either the whole workbook to PDF (all the sheets that have data in them) or just the sheet that’s open right now.
-
Select Save to convert the Excel file to PDF on your Mac.
Export to PDF With Google Sheets
Sheets is Google’s online spreadsheet creator and editor. Since you can upload Excel files to Google Sheets, and because Sheets can export documents to the PDF format, it serves as a great way to convert XLSX/XLS to PDF on any computer.
-
Open Google Sheets, and use the file picker button off to the right to browse for and open your Excel file.
-
Go to File > Download > PDF (.pdf) to see a preview of the document as a PDF. You can edit what should be exported and some other settings.
-
Select EXPORT to save the spreadsheet as a PDF.
Use Online Converters
Another option is to use a file converter. Since XLS and XLSX files are documents, you can use a free document file converter.
There are even some online Excel to PDF converters that make this even easier, and since they work with any web browser, they can convert Excel to PDF on any operating system.
A few of our favorites include Smallpdf, iLovePDF, Soda PDF, Online2PDF, and PDNob.
Another one we like, shown below, is FileZigZag. Upload your Excel file there and choose PDF as the target format. Select Start Converting to convert the Excel file to PDF and get the download link.
‘Print’ to PDF
If you don’t have Excel installed, you can still save the XLSX or XLS file to PDF with Microsoft’s free Excel Viewer program. However, since that tool is only a viewer (not editor), you have to install another program along with it to make it support the PDF conversion.
One way is with a free PDF printer. PDF printers work by having you ‘print’ the document to PDF, which is an easy way to send the Excel file to the PDF converter, after which the program will save it to the PDF format.
-
Open Excel Viewer and select the Excel file you want to convert to PDF.
-
Use the button at the upper left-hand side of the program to select Print.
-
Change the printer from the drop-down menu next to Name to be the PDF printer you installed.
In our example, we can choose Foxit Reader PDF Printer from the drop-down menu.
-
Make any other changes you want to the print preferences, like to print a certain number of pages, and then select OK to launch the PDF printer software, Foxit PDF Reader in this case.
Some PDF printers will open the program with further instructions, and others will save the PDF without any other prompts.
-
That’s it! You’ve created a PDF file from the Excel document!
Why Use the PDF Format
Excel files require a specific program to read and edit them, so it can be hard to share such documents with people who don’t have the needed software. However, the PDF format is much more ubiquitous, so as long as there’s a PDF viewer installed on the computer, you can view the file without the need for a spreadsheet viewer/editor.
Excel files that remain in the XLSX or XLS format are 100 percent editable with Excel or another similar spreadsheet program (e.g., OpenOffice Calc and LibreOffice Calc), but PDFs are not. While there are PDF editors available, they don’t usually work as well as editing the raw file.
Thanks for letting us know!
Get the Latest Tech News Delivered Every Day
Subscribe
Excel for Microsoft 365 Word for Microsoft 365 Access for Microsoft 365 Project Online Desktop Client Publisher for Microsoft 365 Word for the web OneNote for the web PowerPoint for the web Excel 2021 Word 2021 Access 2021 Project Professional 2021 Project Standard 2021 Publisher 2021 OneNote 2021 Excel 2019 Word 2019 Access 2019 Project Professional 2019 Project Standard 2019 Publisher 2019 Excel 2016 Word 2016 Access 2016 OneNote 2016 Project Professional 2016 Project Standard 2016 Publisher 2016 Office 2016 for Mac Excel 2013 Word 2013 Access 2013 OneNote 2013 Project Professional 2013 Project Standard 2013 Publisher 2013 Project Online Excel 2010 Word 2010 Access 2010 OneNote 2010 Project 2010 Project Standard 2010 Publisher 2010 Office 2010 Excel Starter 2010 More…Less
You can use the Office programs to save or convert your files to PDFs so that you can share them or print them using commercial printers. And you won’t need any other software or add-ins.
Use PDF format when you want a file that:
-
Looks the same on most computers.
-
Has a smaller file size.
-
Complies with an industry format.
Examples include resumes, legal documents, newsletters, files that are intended to be read (not edited) and printed, and files that are intended for professional printing.
Important: Many programs, including Microsoft Word, have the ability to open and edit PDF files. Simply sharing something as a PDF is not sufficient to guarantee the recipient can’t edit the file.
To see step-by-step instructions, select an Office program from the drop-down list.
-
Open the table or report you want to publish as a PDF.
-
On the External Data tab, in the Export group, select PDF or XPS.
-
In the File Name field, type or select a name for the document.
-
In the Save as type list, select PDF (*.pdf) .
-
If the document requires high print quality, select Standard (publishing online and printing) .
-
If file size is more important than print quality, select Minimum size (publishing online).
-
-
Select Options to set the page to be printed, to choose whether markup should be printed, and to select output options. Select OK .
-
Select Publish.

Note: You can’t save Power View sheets as PDF files.
-
Select the File tab.
-
Select Save As .
To see the Save As dialog box in Excel 2013 or Excel 2016, you have to choose a location and folder. -
In the File Name box, enter a name for the file, if you haven’t already.
-
In the Save as type list, select PDF (*.pdf) .
-
If you want the file to open in the selected format after saving, select the Open file after publishing check box .
-
If the document requires high print quality, select Standard (publishing online and printing) .
-
If file size is more important than print quality, select Minimum size (publishing online) .
-
-
Select Options to set the page to be printed, to choose whether markup should be printed, and to select output options. For more information on the Options dialog box in Excel, see More about PDF options . Select OK when finished.
-
Select Save .
-
Select the File tab.
-
Select Export .
-
Under Export Current , select what part of the notebook you want to save as PDF.
-
Under Select Format , select PDF (*.pdf) , and then select Export .
-
In the Save As dialog box, in the File Name field, enter a name for the notebook.
-
Select Save .
-
Select the File tab.
-
Select Save As .
To see the Save As dialog box in PowerPoint 2013 or PowerPoint 2016 , you have to choose a location and folder. -
In the File Name box, enter a name for the file, if you haven’t already.
-
In the Save as type list, select PDF (*.pdf) .
-
If you want the file to open in the selected format after saving, select the Open file after publishing check box.
-
If the document requires high print quality, select Standard (publishing online and printing) .
-
If the file size is more important than print quality, select Minimum size (publishing online) .
-
-
Select Options to set the page to be printed, to choose whether markup should be printed, and to select output options. Select OK when finished.
-
Select Save .
-
On the File tab, choose Save As .
To see the Save As dialog box in Project 2013 or Project 2016, you have to choose a location and folder. -
In the File Name box, enter a name for the file, if you haven’t already.
-
In the Save as type list, select PDF Files (*.pdf) or XPS Files (*.xps) , and then choose Save .
-
In the Document Export Options dialog box, select a Publish Range , whether to Include Non-printing Information , and ISO 19500-1 compliance (PDF only).
Formatting tips
Project doesn’t support every PDF or XPS formatting feature, but you can still use some print options to change the look of the final doc.
Choose File > Print , and then change any of these options:
-
Dates
-
Orientation
-
Paper Size
-
Page Setup
In the Page Setup dialog box, you can change options on these tabs:
-
Margins
-
Legend
-
View
-
Select the File tab.
-
Select Save As .
To see the Save As dialog box in Publisher 2013 or Publisher 2016, you have to choose a location and folder. -
In the File Name box, enter a name for the file, if you haven’t already.
-
In the Save as type list, select PDF (*.pdf) .
-
If you want to change how the document is optimized, select Change . (Select Options in Publisher 2013 or Publisher 2016.)
-
Make any changes you want to the picture resolution and non-printing information.
-
Select Print Options to make changes to the printing options for the document.
-
Select OK when finished.
-
-
If you want the file to open in the selected format after saving, select the Open file after publishing check box.
-
Select Save .
-
Select the File tab.
-
Select Save As .
To see the Save As dialog box in Visio 2013 or Visio 2016, you have to choose a location and folder. -
In the File Name box, enter a name for the file, if you haven’t already.
-
In the Save as type list, select PDF (*.pdf) .
-
If you want the file to open in the selected format after saving, select the Automatically view file after saving check box.
-
If the document requires high print quality, select Standard (publishing online and printing) .
-
If file size is more important than print quality, select Minimum size (publishing online) .
-
-
Select Options to set the page to be printed, to choose whether markup should be printed, and to select output options. Select OK .
-
Select Save .
-
If the file was previously saved, select File > Save a Copy.
If the file is unsaved, select File > Save As. -
Select Browse to choose the location on your computer where you want to save the file.
-
In the drop-down list, select PDF.
-
Select Save.
Select More Options > Options to customize your PDF.
-
To make a PDF file from only some of the pages in your document, choose an option under Page range.
-
To include tracked changes in the PDF, under Publish what, select Document showing markup. Otherwise, make sure Document is selected.
-
To create a set of bookmarks in the PDF file, select Create bookmarks using. Then, choose Headings or, if you added bookmarks to your document, Word Bookmarks.
-
If you want to include document properties in the PDF, make sure Document properties is selected.
-
To make the document easier for screen-reading software to read, select Document structure tags for accessibility.
-
ISO 19005-1 compliant (PDF/A) This option outputs the PDF document as version 1.7 PDF, which is an archiving standard. PDF/A helps to insure that a document will look the same when it’s opened later on a different computer.
-
Bitmap text when fonts may not be embedded If fonts can’t be embedded into the document, the PDF uses bitmap images of the text so that the PDF looks the same as the original document. If this option isn’t selected and the file uses a font that can’t be embedded, then the PDF reader might substitute another font.
-
Encrypt the document with a password To restrict access so only people with the password can open the PDF, select this option. When you select OK, Word opens the Encrypt PDF Document box, where you can type and re-enter a password.
Open and copy content from a PDF with Word
You can copy any content you want from a PDF by opening it in Word.
Go to File > Open and browse to the PDF file. Word opens the PDF content in a new file. You can copy any content you want from it, including images and diagrams.
To save your file as a PDF in Office for Mac, follow these easy steps:
-
Select File.
-
Choose Save As.
-
Select File Format at the bottom of the window.
-
Choose PDF from the list of available file formats.
-
Give your file a name, if it doesn’t already have one, then select Export.
Note: When using Best for printing, the hyperlinks may not convert correctly. This is a known issue in Word for Mac.
Important:
-
When using Online Service , only font that Microsoft has the legal rights to can be used. If the documentation contains custom font, it will be substituted and may cause problems. This can be avoided by embedding the fonts into the document.
-
Learn more about embedding fonts by visiting:
-
Benefits of embedding custom fonts
-
Some of your fonts can’t be saved with the presentation
You can use Word, PowerPoint, and OneNote for the Web to convert your doc into a PDF.
-
Select File > Print > Print (in PowerPoint you will select one of three formats).
-
In the dropdown menu under Printer , select Save as PDF and then select Save.
-
Then in the Explorer menu that opens you can name the PDF and choose where to save it and then select Save.
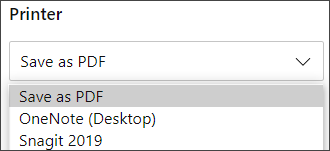
This will generate a basic PDF that preserves the layout and format of your original document.
If you need more control over the options for your PDF, such as adding bookmarks, use the desktop app to convert your doc to a PDF. Select Open in Desktop App in the toolbar of PowerPoint and OneNote to start using the desktop app, and in Word select the Editing dropdown first and then select Open in Desktop App .

If you don’t own the desktop app, you can try or buy Microsoft 365.
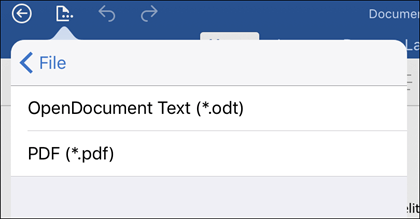
To export your Word document or Excel workbook to PDF format on iOS tap the File button at the top left, choose Export and then PDF.
Portable Document Format (PDF) preserves document formatting and enables file sharing. When the PDF format file is viewed online or printed, it retains the format that you intended. The PDF format is also useful for documents that will be reproduced using commercial printing methods. PDF is accepted as a valid format by many agencies and organizations, and viewers are available on a wider variety of platforms than XPS.
XML Paper Specification (XPS) is an electronic file format that preserves document formatting and enables file sharing. The XPS format ensures that when the file is viewed online or printed, it retains exactly the format that you intended, and that data in the file cannot be easily changed.
Important: Most modern web browsers can open and display a PDF file. If you have an older operating system, however, you may need a PDF reader installed on your device such as the Acrobat Reader, available from Adobe Systems.
See also
-
Edit or make changes to a PDF file
-
Create accessible PDFs