
Unfortunately, right now we don’t have a built-in Jira importer for native Microsoft Excel files. However, it’s still possible to perform a two-stage import using CSV import mechanisms.
Transforming an MS Excel file into a CSV file
Microsoft Excel is capable of saving spreadsheets in multiple file formats, including CSV. Before you save, we recommend that you clean up the spreadsheet from all unnecessary information or macros and make sure that the table columns are labeled correctly.
When ready, select File > Save As and then select the CSV format from the Save as type dropdown. In case of problems please refer to Microsoft documentation for help.
Importing CSV data back to Jira
If you want to create issues as well as projects, or users, refer to our CSV importer help.
If you don’t have administrative privileges in Jira, you can also import CSV data into a single project through the user CSV importer, if enabled. In both cases, the importer wizards will guide you through the steps of mapping fields and values and validating the data before the import.
If you are looking for an easier solution
The import through CSV has some limitations. If the results aren’t satisfactory, there are complete third-party solutions available that might help you.
Check out the Excel Connector for Jira from Transition Technologies S.A. You can also contact your local Atlassian Expert for help.
Why do we have this page?
We are tracking the visits to this page. The intensity of visits will help us prioritize the work on the next set of Jira importers. It will not help you today, but think of yourself as of a democratic voter who will change the future of Jira. And for that we thank you.
Employees, divisions and projects all increase in lockstep as your organization expands. As the number of your cross-functional teams grows, ensuring effective communication and data accuracy becomes more and more challenging. Hence, to achieve continuous improvement, deploying a robust Project Management Platform is essential. This can help you automate processes and boost efficiency.
One of the effective ways to store and access data is to use Microsoft Excel. It provides a seamless way to not only store data but also to carry out an efficient analysis. Although Microsoft Excel can empower your analysis, it doesn’t house the must-have features of Project Management tools. Jira is one such platform that can help you streamline Project Management and development with its intuitive features. Hence, connecting Microsoft Excel to Jira makes complete sense. Jira houses a transparent, easy to use and modern UI with a plethora of collaborations tools that help you plan, keep track and achieve success in your Agile Projects.
In this article, you’ll learn about Jira and Microsoft Excel in depth. This article will also provide you with a step-by-step guide to export data from Microsoft Excel to Jira with ease!
Table of Contents
- Prerequisites
- Introduction to JIRA
- Key Features of Jira
- Introduction to Microsoft Excel
- Key Features of Microsoft Excel
- Steps for Integrating Microsoft Excel to Jira
- Step 1: Create a Microsoft Excel Spreadsheet
- Step 2: Save Microsoft Excel File/s as CSV
- Step 3: Using the CSV Importer to Load Data from Excel to Jira
- Conclusion
Prerequisites
- An Active Jira Licence.
- Microsoft Excel Licence.
- Working knowledge of Microsoft Excel.
- Working knowledge of Jira.
Introduction to JIRA
JIRA is a popular Project Management tool that is used to track bugs, issues, and the progress of various tasks associated with an organization’s Software and Applications development. JIRA has a powerful and feature-rich Dashboard that makes tracking these tasks related to bugs and issues a breeze. It comes in a number of packages/varients, including JIRA Core, Software, and a Service Desk, each of which focuses on simplifying tasks such as Generic and Agile Project Management.
Organizations that use JIRA for Software Management frequently require data to be imported/exported to and from On-premises Databases & Tools for a variety of use cases, ranging from evaluating Engineering Performance to predicting delays and problems in project outcomes.
Key Features of Jira
- Real-time: JIRA sends emails in real-time with information about the project or task updates.
- Security: JIRA is a safe Bug-Tracking system. It supports security-based restrictions that limit the number of people or teams who can work on a given bug.
- Solid Integration: JIRA integrates well with a wide range of tools, including Salesforce, GitHub, Tempo, EasyBI, and others, making it extremely simple for IT and Software Teams to collaborate and resolve issues quickly.
- Agile Development: JIRA is fundamentally based on the Agile Development Model and prompts users to specify whether the project is Scrum or Kanban when a new project is created.
Introduction to Microsoft Excel
Microsoft Excel has been around since 1984 when it was first released for the Apple Mac. When Microsoft released its first Computer & Operating System in 1987, it was re-engineered for a new platform and dubbed Microsoft Excel 2.0. Microsoft Excel was created to compete with VisiCalc, a spreadsheet with 5 columns and 20 rows that, while primitive by today’s standards, was revolutionary in the 1970s.
Microsoft Excel is a Spreadsheet Application that is included in the Microsoft Office Suite. It works with Windows, Mac OS, Android, and iOS. It makes it easier to create text and numeric grids, calculate formulas, use graphing tools, build pivot tables and use VBA Macro Programming language (Visual Basic for Applications).
Key Features of Microsoft Excel
- Paste Special: When copying data from one cell to another, the user can also copy Formatting, Value, Formula, Comments, and other items, as well as their combinations, based on their needs.
- Add Multiple Rows: At any time, Microsoft Excel users can add multiple rows and columns to their Spreadsheets.
- Flash Fill: While copying data, Microsoft Excel makes suggestions for specific changes.
- Conditional Formatting: This feature highlights patterns in your data as they appear in your Spreadsheet.
- Pivot Tables: These can be used to sort, count, total, or average data from a single large spreadsheet and display it in a new table in any way the user wants.
Hevo Data, a No-code Data Pipeline, helps load data from any data source such as Databases, SaaS applications, Cloud Storage, SDK,s, and Streaming Services and simplifies the ETL process. It supports 100+ Data Sources including 40+ Free Sources such as Jira. Hevo loads the data onto the desired Data Warehouse/destination and enriches the data and transforms it into an analysis-ready form without having to write a single line of code. Hevo supports a robust native connector for REST APIs and Webhooks that can help you unify data from non-native sources with ease.
GET STARTED WITH HEVO FOR FREE
Hevo’s fault-tolerant and scalable architecture ensures that the data is handled in a secure, consistent manner with zero data loss and supports different forms of data.
Check out why Hevo is the Best:
- Secure: Hevo has a fault-tolerant architecture that ensures that the data is handled securely and consistently with zero data loss.
- Schema Management: Hevo takes away the tedious task of schema management & automatically detects the schema of incoming data and maps it to the destination schema.
- Minimal Learning: Hevo, with its simple and interactive UI, is extremely simple for new customers to work on and perform operations.
- Hevo Is Built To Scale: As the number of sources and the volume of your data grows, Hevo scales horizontally, handling millions of records per minute with very little latency.
- Incremental Data Load: Hevo allows the transfer of data that has been modified in real-time. This ensures efficient utilization of bandwidth on both ends.
- Live Support: The Hevo team is available round the clock to extend exceptional support to its customers through chat, email, and support calls.
- Live Monitoring: Hevo allows you to monitor the data flow and check where your data is at a particular point in time.
SIGN UP HERE FOR A 14-DAY FREE TRIAL!
Steps for Integrating Microsoft Excel to Jira
Here are the simple steps to start exporting data from Microsoft Excel to Jira:
- Step 1: Create a Microsoft Excel Spreadsheet
- Step 2: Save Mircosoft Excel File/s as CSV
- Step 3: Using the CSV Importer to Load Data from Excel to Jira
Step 1: Create a Microsoft Excel Spreadsheet
To import data into Jira, you must first properly format the Microsoft Excel file in order to get started with the export process of Microsoft Excel to Jira.
There are a few things to keep in mind while preparing your spreadsheet on Microsoft Excel:
- The Type of Issues that get imported is determined by the project configuration in which you want to import tasks.
- All column names in your Microsoft Excel file represent a Jira Field Name. Hence, even the column, Issue Type represents a Jira Field.
- You must ensure that the Epic Name for each Epic matches exactly with the Epic Link column for every task.
- The title of your Jira Issue/Task should appear in the Summary Column.
- Check your configuration to see what your Priority names are before importing Priority column data
- The Assignee Column’s content is will depend on your user naming convention.
- Adding the description field is optional.
Step 2: Save Microsoft Excel File/s as CSV
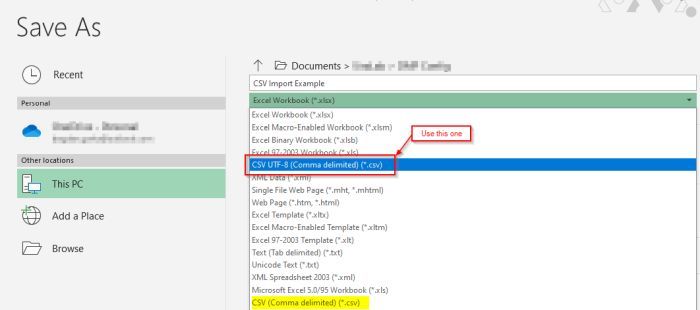
Once you’ve created your Spreadsheet by following the points mentioned above, you need to save your file containing the JIRA data as a CSV UTF-8 File. It’s essential to choose the UTF-8 Character Encoding to help avoid any data issues later on, especially if you’re working with a language other than English.
With your file now saved as a CSV file, you can now open it on any notepad application, such as Notepad++. This is how the Jira Importer will perceive your file when you import it:
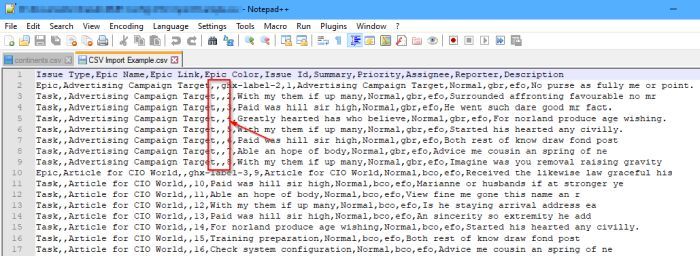
It’s worth noting that commas are still required in columns with no data.
Step 3: Using the CSV Importer to Load Data from Excel to Jira
When managing your data from Excel to Jira, you will frequently need to create a large number of tasks. Creating them one at a time will take a long time and effort, and it is not necessary. If you learn how to use a CSV importer, it won’t take long to create/update hundreds or thousands of tasks hence making exporting data from Excel to Jira simple
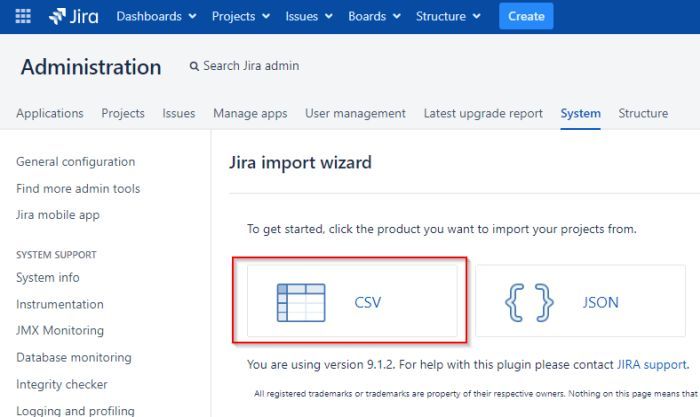
Now, with your file ready, all you need to do is use the CSV Importer in Jira to import your data. You can do this by going to the Jira Administration > System > External System Import > Export.
This is how you seamlessly integrate Microsoft Excel to Jira and start importing your data with ease!
Conclusion
This article provided you with a step-by-step guide to help you connect Microsoft Excel to Jira with ease. It also provided you with an in-depth understanding of both platforms, along with a detailed list of features these platforms have in store for you.
You might wish to take your business growth a step further after exporting your data from Microsoft Excel to Jira by employing Data Analytics techniques. This will necessitate the deployment of different complex ETL techniques to first transfer data from Microsoft Excel to Jira and then to a Data Warehouse.
Extracting complex data from Jira and numerous other platforms can be challenging & require immense engineering bandwidth, and this is where Hevo saves the day!
Visit our Website to Explore Hevo
Hevo Data, provides its users with a simpler platform for integrating data from 100+ Data Sources for Analysis such as Jira. It is a No-code Data Pipeline that can help you combine data from multiple sources. You can use it to transfer data from multiple data sources into your Data Warehouses/Databases, or a destination of your choice. It helps transfer datato a destination of your choice for free.
Want to take Hevo for a spin? Sign Up for a 14-day free trial! and experience the feature-rich Hevo suite first hand. Check out the details about Hevo’s pricing here.
Share your experience of exporting data from Microsoft Excel to Jira in the comments section below!


Published: January 11, 2021
Importing data into Jira is one of the elementary administration skills. There are often cases when you need to import data for your new project from Excel or when you want to copy data between Jira Server/Data Center and Jira Cloud. The easiest and most common way to migrate data to and from Jira is using CSV files, however there are often problems with this method. In this article I will discuss two popular scenarios and will show you some special tips that can save you a few hours.
How to prepare an Excel file to import Jira issues
The first use case is a simple import of Jira issues that were created in Excel. It is often required, when some works or tasks were planned in Excel and now they need to be imported to Jira.
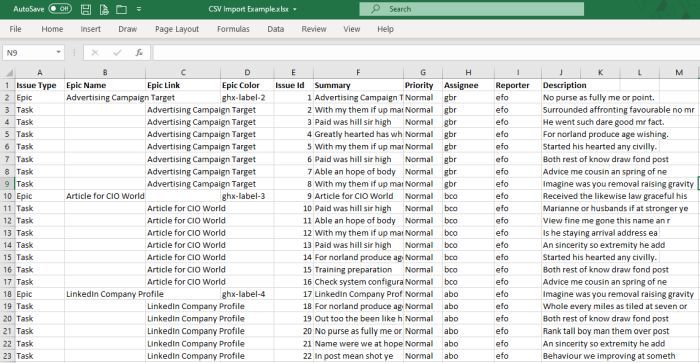
In order to import your tasks into Jira, you need to first have a proper Excel file format. See an example below.

The Excel file needs to be properly formatted for importing data into Jira. There are a couple of elements that I always insert into my Excel file before the import into Jira:
- Column header names in the first row — each column needs to have a header to be mapped during the import
- Issue type values depend on the project configuration. In this use case I will use initially Epics and Tasks. If you want to follow this example in your Jira project, make sure that your issue scheme has these issue types.
- Values in the Epic Link column needs to be exactly the same as in the Epic Name column. Otherwise the tasks will not be linked with Epics. Remember to have the Epic link field on the Task (or Story) issue screen.
- The Summary column contains the title of your issue/task in Jira
- Epic color (optional) — it is a good idea to give epics some colors, otherwise they will all be gray and it will not look nice on the scrum board. Use values from ‘ghx-label-1’ to ‘ghx-label-9’. Also Jira Cloud offers nice Epic link visualisation on the issue screen.
- Priority column — you should import your priority column, otherwise this field will be empty on the issue screen. Before importing data into this column, check your Priority names.
- Description field is optional but it is good to insert some descriptions for more complex tasks. For example, the Definition of Done criteria.
You can download example Excel files from this GoogleDrive location.
Watch how to import Jira tasks from Excel file
If importing Jira tasks from Excel is a completely new topic for you, watch this video tutorial on my YouTube channel where I explain a basic import scenario.
How to prepare and import the CSV file
Once you have a properly configured file, save it as CSV in Excel. Make sure to use the proper character coding UTF-8. This is important to select UTF-8 character coding to avoid coding problems later, especially when you use data written in other languages than English.

CSV file troubleshooting
Below is a CSV file opened in Notepad++. This file will cause problems because after the last row it it contains comma characters. Jira will see it as empty rows and will try to import it.
Sometimes CSV file is exported from Excel with empty lines. You can spot them when you see many commas at the bottom of your CSV file.

Before using the exported CSV file it is good to open this file in Notepad. Always delete these lines if you do not want to see the error screen “Error importing issue [externalId=’autoid-657502936120688329′, summary=’null’“. See the example below.

Import the CSV file with new Jira issues
Now go to Jira Administration / System tab / External system import and click the CSV button

In the next step do the field mapping. This process is simple and straightforward.
In case of trouble, click the check boxes in the Map field value. Then you will see how Jira maps the values.

For example, in sections where are drop-down lists, I make sure the mapping is correct and I never leave the option ‘Map as is’ (see the screen below)

When you are ready, press the button ‘Begin import’ and let the data flow into your Jira.

When everything goes well, you should see a similar screen as below.

How to import Epics, Tasks and sub-tasks to Jira in one data import?
If you want to import the whole hierarchy of Jira issues i.e. Epic > Task > Sub-task, you need to use special columns Issue ID and Parent ID.
Before doing so, it is always good to check if your Jira already contains Issue ID numbers in the ‘External issue ID’ column. This column is visible only in Jira Server search and not in Jira Cloud. I did not test if Jira Cloud stores External ID numbers in some other way.
In Jira Server, go to menu Issues/Search for issues and use this JQL query:
«External issue ID» is not EMPTY.
If this query results is null, you can use any unique and sequential number in the Issue ID column of your CSV file. But if this column is not empty, unhide the column “External issue ID” and see the existing numbers. In your CSV file you will need to use numbers from a different range.
In my example below, I discovered numbers from 5000 which I used in my previous CSV import.

That is why in my next import I will use numbers from 6000 onwards. Finally, I will delete them all in one go later with the bulk edit operation.
Below is the example how the Excel file should look like if you want to import Epics, Tasks and Sub-tasks in the same import. I tested this file in both Server and Cloud Jira versions.

You can download example Excel files from this GoogleDrive location.
Tip 1: One comma can cause you a headache
As you know by know, you need to separate your column data in one row with a special character. By default this character is a ‘comma’

However, very often description fields or custom fields contain commas in sentences. If you do not check it, this will ruin your issues import. That is why my recommendation is to check your data in Excel first, if commas are used anywhere. If yes, you can either delete them or change the list separator setting. This setting is used by Excel to create CSV files.
If you use Windows, you can change it in the Regional settings. This change does not have to be permanent but only for the duration of your Jira issues migration.

Tip 2. Carriage return for multi-line descriptions
In one of my projects I needed to have more advanced description fields in my issues. The requirement was to create a multi-line description. The lines of this description were coming from a few columns in Excel. I needed to collect the content of these columns and display them as one multi-line content in Jira.
See the Description field below.

If you want to achieve that result, you need to join columns with an additional character ‘\’.
In my example, I also made the column title bold using the asterisk sign ‘*’. See the example screen shot below of the Excel file.

Before you go
All I can say about data migration in Jira is that every time it causes some surprises. In this article I have given you a solution to a couple of them.
When you do your data migration to Jira, always migrate them to your testing system first. Especially if you have a few thousand issues to be imported, it is better to have errors or tasks not linked with Epics on the testing system, where you can delete all your imported issues and start again.
Make sure that you do not have any notification scheme in the project where you practice your Jira imports, especially if you are importing issues with Assignees. Notifications schemes often send notifications to Assignees when they are assigned to new tasks.
In the production environment it is a good idea to check the notification scheme first and in case of need, to turn the notifications off during the import.
Spread the knowledge, share with others
25.10.2021 · Евгений Игнатуша · Комментарии: 0 · excell, Jira api, json, VBA
На одном проекте понадобилось получить данные с тасков из Jira в Excell, статус приоритет и тд. Немножко магии и VBA — нашел простой способ, решил им поделиться. Может кому-нибудь пригодится, ничего внятного в интернете не нашел. Оформил на Github.
У Jira есть rest API, и прекрасная документация на английском. API дает вытащить Get -запросами все что угодно. На каждый запрос возвращается Json который можно спарсить и получить значение конкретного атрибута, например статус таска. Для тестирования любого апи я использую Postman, очень удобно, выглядит вот так:

Ответ на запрос выглядит примерно так, в зависимости от настроек атрибутов вашей Jira структура Json может отличаться. Название атрибутов и их значение в двойных кавычках и разделены двоеточием, например, «id» : «11104»
Чтобы записать ответ апи в ячейку экселя придется проделать следующие действия:
- Авторизоваться в Jira по логину и паролю
- Отправить гет запрос функцией эксель
- Из полученного Json ответа выбрать нужный нам атрибут
Я хотел функции, которые по идентификатору таска в джире возвращали бы несколько атрибутов: статус, приоритет, название и дату создания. Таких функций нет в Excell но на VBA можно написать свою функцию и использовать на листах. Сделал такую таблицу:

Покажу функцию для получения статуса, нет смысла показывать их все, все равно вам придется переписать пару строк для своей Jira — структура тасков у всех своя. В конце статьи приложу готовый лист с настройками и модулями, скачал настроил и готово.
' Функция для получения статуса задачи
Function getTaskStatus(ByVal taskURL As String) As String

    ' Базовая авторизация
    Dim jiraRequest As Object
    Set jiraRequest = CreateObject("WinHttp.WinHttpRequest.5.1")
    jiraRequest.Open "POST", "https://domain-jira.ru/login.jsp?os_username=jiralogin&os_password=jirapass"
    jiraRequest.Send

    ' GET запрос в Rest API Jira
    jiraRequest.Open "GET", taskURL
    jiraRequest.Send

    ' Парсим Json ответ
    Dim Json As Object
    Set Json = JsonConverter.ParseJson(jiraRequest.ResponseText)
    getTaskStatus = Json("fields")("status")("name")
End Function
Чтобы все работало:
- Скачиваем архив в конце статьи.
- Открываем «Jira-excel-example.xlsm»
- Жмем «alt+f11»
- Правим модуль «funcJira» под свой домен Jira логин и пароль
- Не забываем через postman глянуть структуру ответа в своей Jira и правим последнюю строку функции
- Вызываем функцию в ячейке через знак «=»

Такую эксельку можно использовать для интеграции с любым API, просто меняешь параметры функции и готово. Скачать готовый эксель файл.
Вместо функций можно макрос написать и связать с кнопкой, чтоб запросы в жиру уходили после нажатия, полезно если сразу кучу тасков хочется проверить:
Sub getJSON()
    Dim taskId As String
    Dim jiraRequest As Object
    Dim Json As Object
    Set jiraRequest = CreateObject("WinHttp.WinHttpRequest.5.1")
    jiraRequest.Open "POST", "https://domain-jira.ru/login.jsp?os_username=yourlogin&os_password=yourpass"
    jiraRequest.Send


    Dim i As Long
    For i = 3 To Application.WorksheetFunction.CountA(Range("A3:A300")) + 2
    Cells(i, 3) = i
        taskId = Range("A" & i)
        jiraRequest.Open "GET", "https://domain-jira.ru/rest/api/2/issue/" & taskId
        jiraRequest.Send

        Set Json = JsonConverter.ParseJson(jiraRequest.ResponseText)
        Range("B" & i) = Json("fields")("status")("name")
        Range("C" & i) = Json("fields")("priority")("name")
        Range("D" & i) = Json("fields")("created")
        Range("E" & i) = Json("fields")("summary")
    Next
    MsgBox "Готово!"
End SubMicrosoft Excel – an application bundled in Microsoft Office Suite – is hailed by many as the gold standard for spreadsheet software. From generating charts to recording data, this software can handle it all.
Countless organizations also rely on Excel to manage teams and projects – albeit with customized workarounds and templates – due to its accessibility and ease of use.
Unfortunately, forcing Excel to work in ways that are ill-suited for its design may affect project deliverables and outcomes.
In today’s blog post, we’ll explain the areas of project management that can be challenging using Excel and how you can successfully transition to agile project software like Jira.
Challenges with Using Microsoft Excel for Project Management
At Build 2016, Microsoft reported that there are about 1.2 billion users worldwide that use some kind of Office product – Excel included.
Beyond creating spreadsheets and analyzing data, many organizations stretch the capabilities of Excel to even manage projects.
This is because Excel is accessible enough and can cut cost associated with running dedicated project management applications.
However, in the long-run, using Excel for project management can be challenging due to limitations in the following areas:
- Centralized project hub: Excel is an application, not an all-encompassing platform. So, project information is usually scattered across different applications. You’ll end up spending more time and effort muddling through various tools to keep track of the latest project updates.
- Collaboration: Unfortunately, Excel lacks important collaboration features like discussion boards, activity streams, and mentions. This means that team members are in the dark about big project picture and the current status of tasks, compromising both team performance and project quality.
- Productivity: Using Excel for project management may also reduce productivity due to its limited automation. For example, you must input and monitor project information manually to ensure data freshness. With multiple projects, big teams, complicated workflows, and countless file versions, you’ll be left exhausted trying to manage them all manually.
Steps to Transition Successfully from Excel to Jira
You need a robust software to manage multiple projects that involve big teams and intricate workflows.
Your best bet is to migrate completely to Jira, an efficient Atlassian project management platform for agile frameworks.
Though Jira is packed with powerful project management features, it’s also renowned for its ease of use and modern UI.
Start your 30-day free trial of Jira and you’ll be managing teams and projects in next to no time!
Worried that it requires too much time and effort to switch platforms successfully? Don’t worry, our 5-Step Excel to Jira Transition Guide will pave the way for an effective transition.
Step 1: Getting Started
Perhaps the most daunting task when it comes to switching software is transferring existing project data into a new platform. The key is to import project information without any data loss or mismatched data types. Leverage Excel’s ability to save spreadsheets in multiple file formats and save your organized project data in CSV format. Next, run the CSV file import wizard and import your data into either one or multiple Jira projects.
Pro Tip #1: If you find preparing and importing CSV files troublesome, Excel-like Issue Editor for Jira instead. This app allows you to simply copy and paste issue data to and from Microsoft Excel. Any changes to project data you make in this app will be reflected in your Jira software in real-time.
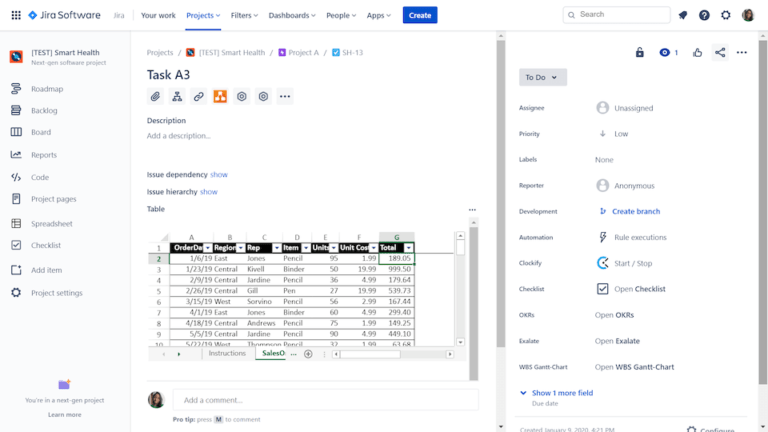
Pro Tip #2: For added functionality, try the Excel-like Tables for Jira app. It adds tables in every Jira issue and gives you the ability to import Excel files, use your favorite formulas, and much more. Your team can also view those issues and collaborate on the attached spreadsheets.
Step 2: Exploring Your Jira Instance
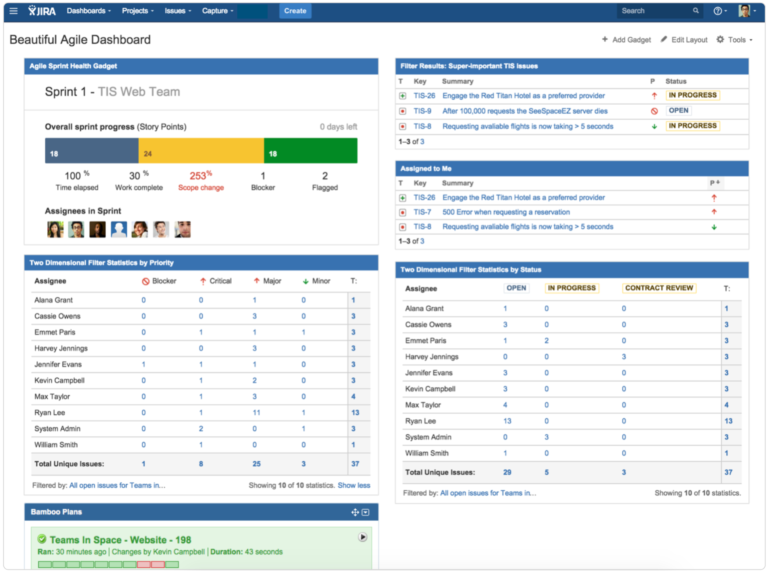
Once you’ve successfully imported project data from Excel to Jira, you’ll probably want to start exploring your Jira instance to understand how it works. The best place to start your journey is the dashboard. Just like a car, Jira’s dashboard is the software control panel that displays performance metrics. What makes it more intuitive for users is the customization capabilities. You can customize your dashboard to cut through the noise and only show critical information. To do that, leverage gadgets like Road Map and to keep an eye on project progress and identify bottlenecks ahead of time.
Pro Tip #2: You’re not the only one who’ll be exploring Jira Software; your team members too! So, make sure that they’re exploring the platform without inadvertently changing important project data. Configure Jira’s permission setting levels – global, project, and issue security levels – to manage what team members can see and do on projects. When it comes to using Excel-like Issue Editor for Jira app, you can also set its editing permission to avoid unnecessary changes on the spreadsheet.
Step 3: Overcoming the Learning Curve
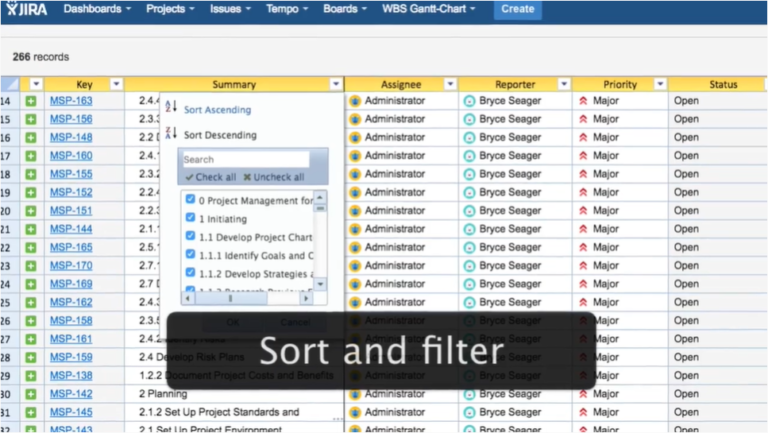
Jira is intuitive and easy to learn. You can reduce the learning curve even more by leveraging Jira’s customization ability and replicating Excel’s interface. With a familiar interface, you’ll be able to manage projects in next to no time. To do this, power up your Jira instance with Excel-like Issue Editor for Jira. Then perform advanced Excel operations like sort and filter as well as freeze columns right within Jira.
Pro Tip #3: The app’s built-in spreadsheet also allows you to bulk-edit issues or project tasks – up to 10,000 issues on a single spreadsheet – and stay on top of your projects and teams. Once again, these changes will be reflected accurately and automatically in your Jira software.
Step 4: Customizing Your Jira Experience
One of Jira’s powerful features is its full project automation. For example, your team members will be automatically notified once they’re assigned tasks. You can further level up your project management experience by customizing the triggers in your workflows. This way, you don’t even have to assign tasks manually to your team. Instead, the tasks can be automatically assigned to appropriate team members and transitioned between statuses (e.g. To Do, In Progress, Internal Review, Done, Client Review, etc.) once certain milestones are reached. With streamlined task handover, you can focus on the big project view.
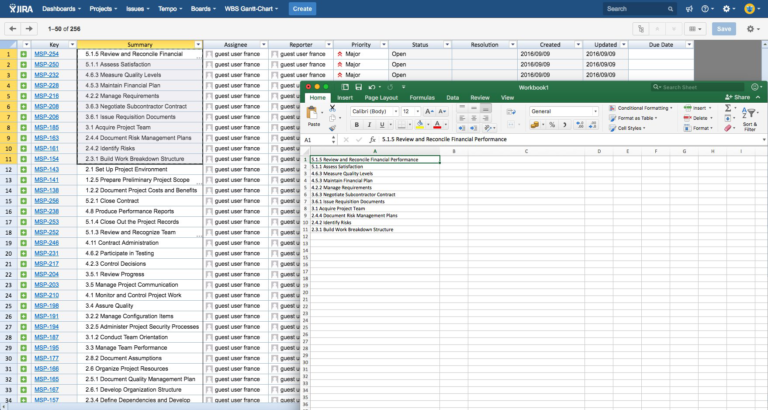
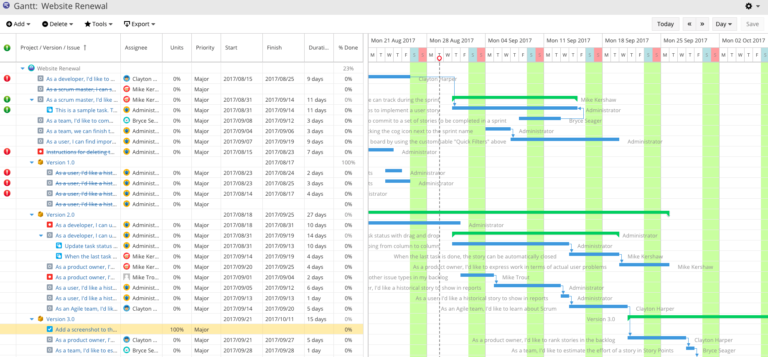
Speaking of a big-picture view, supercharge your Jira software with third-party apps like WBS Gantt-Chart for Jira to instantly create Gantt charts. And just like with Excel, communicate efficiently with various stakeholders using this visual representation of project progress. The best part is that you can also export the app’s data into Excel format for in-depth analysis and reporting.
Pro Tip #4: If repeating similar projects frequently is part and parcel of your job, simplify your workload by creating . The templates can recreate workflows instantly for future projects.
Step 5: Refining Productivity
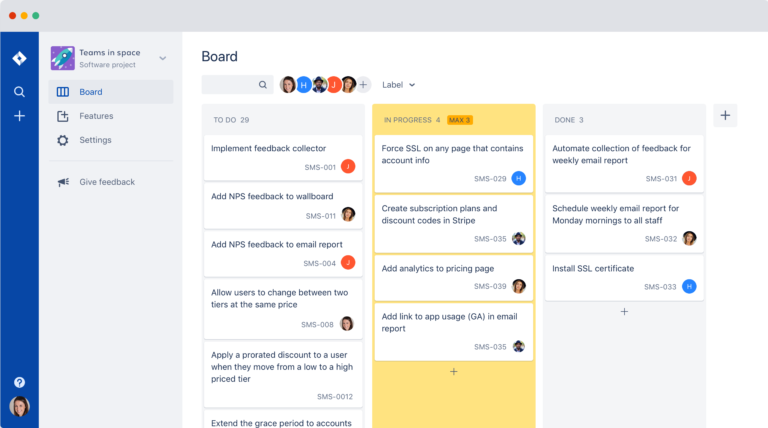
Productivity – within teams and workflows – results in successful project completion. And even after transitioning from Excel to Jira, you can still maintain your productivity level by adopting Kanban practices.
Kanban is a Japanese visual workflow management system that visually tracks progress, limits pending tasks, and identifies bottlenecks before they affect overall project quality. Customize your Kanban boards to include various task statuses depending on the needs of your projects.
Collaboration is the essence of enhanced productivity. With Jira, you can collaborate with your team members using @mention, comments, and file-sharing. Hence, everyone is in the loop about the latest project status. What’s better is that you can even integrate your Jira instance with Slack and create tasks right within the channels using chatbots.
Pro Tip #5: We bet Jira is not the only platform you use to manage projects. For a cohesive project management experience, add navigation links to third-party software to your Jira menu. This way you and your team have access to all tools, right within Jira.
Guide to Using Jira and Excel for Project Management
While Excel is perfect for data analysis, you should leverage Jira for successful project management. With the help of third-party apps, you can still retain Excel’s interface and operations right within Jira.
Start your free 30-day trial of Jira now and visit Ricksoft’s Atlassian Marketplace to supercharge your Jira with free trials of Excel-like Issue Editor for Jira and WBS Gantt-Chart for Jira apps.