
 Have you tried importing from Excel into InDesign? In Book Design Made Simple we walk you through importing tables from Word, but importing a spreadsheet from Excel is a bit different so we’ll walk you through it here. And, because spreadsheets and tables rarely import into InDesign looking like they did in Excel and Word, we’ll give you a few tips on the easiest way to get started.
Get started importing from Excel into InDesign
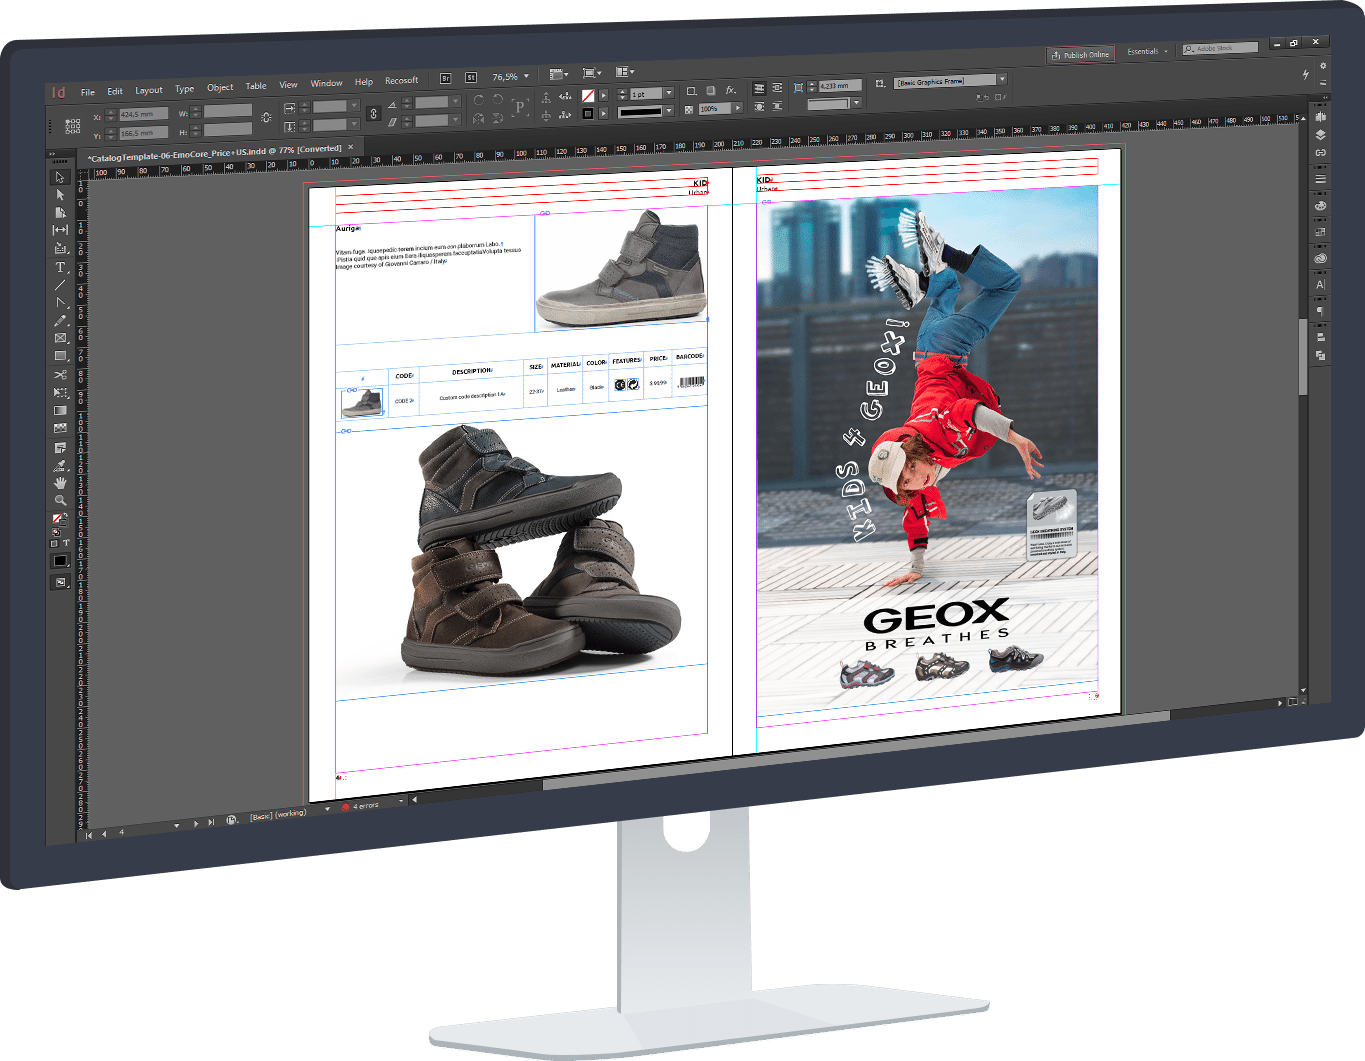
To import your Excel spreadsheet into an InDesign document, first open your InDesign document and choose the Selection Tool. Click anywhere outside of any existing text or image frames to make sure nothing is currently selected. Choose File>Place (or use the keyboard shortcut Ctrl/Cmd+D), then browse to select your Excel file. Make sure the Show Import Options box is checked, then click Open.

Next you’ll see the Microsoft Excel Import Options dialog box. The settings shown below are the default settings, and they are fine. Your Cell Range will be different than shown below, but no need to worry about it. Click OK.

Now your mouse pointer will be loaded with your Excel spreadsheet. You want the spreadsheet to be separate from your other text frames for the time being, so click anywhere on a blank page or on your pasteboard to place the spreadsheet. Voila! You’ve successfully placed your Excel spreadsheet in InDesign. Note that your spreadsheet has now become an InDesign table. That’s right, whether you placed a table from Word or a spreadsheet from Excel, it is converted into a table in your InDesign document.
So … you’re done, right? Well, not exactly.
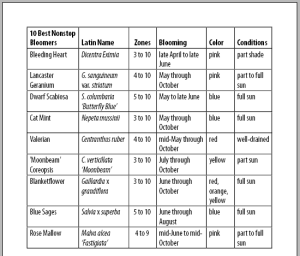
Don’t be discouraged if your table looks like a disaster in InDesign! We’ve imported a very simple Excel spreadsheet as an example, and you’ll see below that all of our bold and italic formatting has been lost, the columns are different widths than they were in Excel, the text frame is a different size than the table, and there is overset text (some rows at the bottom that don’t show). So, what to do?

How to format a simple table in InDesign
We’ve explained how to lay out and typeset tables in Book Design Made Simple (pages 342 through 347), but if you don’t have the book in front of you, you can use these steps to format a simple table.
First, get the text frame lined up on your page by dragging the whole frame onto your page and then adjusting the edges of the text frame to line up on your margins. You’ll notice that changing the size of your text frame doesn’t change your table at all; it simply aligns the frame on the page.

Navigating in the table
Next you’ll work on the table itself, to get it looking just right. You might assume that you’ll use the Selection Tool to resize your table, but actually you’ll use your Type Tool for absolutely everything to do with your table from now on. So switch to your Type Tool and spend a few moments experimenting with selecting rows, columns, and the whole table, as this will be useful later on.
Start by hovering your Type Tool at the top left corner of your table, and you’ll see a black arrow pointing diagonally down to the right. Click with the diagonal arrow showing, and you’ll select the whole table (it’ll look black). Next run the Type Tool along the top edge of the table, and you’ll see a black arrow pointing down. Click with the down arrow showing, and you’ll select a column (or click and drag to the left or right, and you’ll select a number of columns). And finally, run the Type Tool along the left edge of the table, and you’ll see a black arrow pointing right. Click with the right arrow showing, and you’ll select a row (or click and drag up or down, and you’ll select a number of rows).
Now try changing the width of a column by hovering your Type Tool over a vertical line between two columns. When the small double arrow appears, click and drag to the left or right to change the width of that column. The first adjustment you can make to your table is to get the columns to fit within the page margins. So go ahead and make all your columns a suitable width for the text they contain, and bear in mind that you’ll be fine-tuning the fonts later so no need to be too fussy. Below you’ll see more suitable column widths in our example table, and that all the columns now fit into the page margins.

Creating a header row
Next create a header row for your table. If your table happens to flow onto more than one page down the road, the header row will appear at the top of the table on each and every page. Do this now by opening your Table panel (click Window>Type & Tables>Table). Click the fly-out menu on the Table panel and choose Table Options>Headers and Footers. Change Header Rows to 1, choose Once per Page in the Repeat Header drop-down menu, then click OK.

You’ll see that InDesign has created a new blank row at the top of your table, and this is your new header row. You’ll need to select the row that was at the top a second ago (now your second row, with all your column heads in it), copy that row (Ctrl/Cmd+C), then select the new header row and paste the text in (Ctrl/Cmd+V). Now delete the second row by selecting it again and pressing Ctrl/Cmd+Backspace. It seems like a lot of extra work to create a header row, but now is the easiest time to set it up, and it’s done!
Setting up paragraph styles
Next create two new paragraph styles, one for table body text (tb) and one for table column heads (tch) (see BDMS, page 344). The tb style can be a point size or two smaller than the main narrative in your book, and the tch style can be the same font size as tb in bold. Just start by creating those two paragraph styles and apply them to the text in your table. To apply them, select the top row of the table (the “header” row) as explained above, then apply your tch paragraph style to it. Then select all the remaining rows in your table, and apply the tb paragraph style to them.
Once that’s done, you can adjust the fonts and font sizes within those two paragraph styles to find the perfect size for your table text (open a paragraph style and make sure the Preview box at the bottom left is checked so you can see changes in real time). If you have a lot of text to fit in a narrow width, consider using a condensed font. You might also consider using a sans serif font for your tables, to contrast with a serif font in the main narrative of your book. In the example below, we’ve used Myriad Condensed for body text and Myriad Bold Condensed for column heads, and the text fits much better.

Now that you’ve settled on a font and type size, you can fine-tune your column widths (as explained above), fix any typos, and apply italics or any other formatting that was lost. To change the text in any table cell, simply select the text with your Type Tool and make the changes needed. Below you’ll see we’ve applied italics, fixed a typo, and fine-tuned our column widths.

 Using the Table panel to polish your table
 Using the Table panel to polish your table
You’ll need your Table panel to really polish your table, so open that now by clicking Window>Type & Tables>Table. The top half of this panel controls the number and sizes of your rows and columns, and the bottom half controls what’s going on in the cells (and that’s the useful part for you at this stage).
By default, all the text in your table cells is aligned to the left and top of the cells. You may not always want that! In our example, one of the column heads runs to two lines, so all the other heads have a blank line underneath. It’ll look nicer to align the column heads to the bottom of their cells, rather than the top. To change this, first select your header row, then click the Align Bottom icon in the Table panel (it’s to the right of the Align Top icon which is currently selected, and the names of the icons will appear while you’re hovering over them).
Also, some columns look nicer when the text is centered horizontally or right aligned in the table cells, rather than left aligned. To make this change, select the cells you want to adjust by dragging the Type Tool over them, then choose Align Center or Align Right from Control panel at the top of your screen (as shown below). Note that your Control panel also contains many of the same icons as your Table panel, so feel free to use whichever suits you best.

In our example below, we’ve adjusted the header rows so they align at the bottom of their cells, and centered the whole “Zones” column. The table is starting to look better!

Next change from Normal mode to Preview mode (switch to your Selection Tool and then press W), to see what your table will actually look like in print. You’ll probably find your cells have a black stroke applied to all four sides, as that is InDesign’s default setting:

If you’re satisfied with how your table looks, then you’re good to go! You may want to add your table into your main narrative’s flow of text and, if so, simply select the whole table with your Type Tool and copy it (Ctrl/Cmd+C), then click your Type Tool in an appropriate place in your main narrative so your cursor is flashing there, and finally, paste the table in (Ctrl/Cmd+V). If your table has more rows than will fit on one page, or if you’ve placed it near the bottom of a page, the table will break at the closest row to the bottom of the page, and continue at the top of the following page.
3 blog posts to help you with tables
We hope our set of three blog posts about setting up tables in InDesign will help you get started with your own tables.
This blog post explains:
- importing a spreadsheet from Excel into InDesign
- changing widths of columns to fit a book page
- adding a header row that repeats from page to page
- creating paragraph styles for columns heads and text
- aligning text within table cells
- copying and pasting a table into main narrative flow of text
Making tables look good in InDesign explains:
- creating and applying cell styles for header and text rows
- creating and applying a table style
- setting up alternating row colors for a modern-looking table
- adding color to table cells and text
Adding images and numbers to tables in InDesign explains:
- adding a second header row to include a table title
- adding images to table cells
- aligning numbers in columns
- creating new cell styles for use in other tables
Tables can be tricky at first, but we hope this helps to simplify importing Excel spreadsheets and working with tables.
Read more: Combining serif and sans serif fonts » This helps for designing tables too!
And more: How to fix layout and typesetting issues in InDesign » For full book pages.
Book Design Made Simple. You can do it yourself.
HOW CAN I LINK AN EXCEL TO INDESIGN?
There are three approaches used widely to import Excel into InDesign. And then there is Pagination.
Let’s see their differences and how to use them.
Features
Media Assets (jpg, png, ai, psd)
Place Command Options
Pro
The Place command is a method of importing data from a Microsoft Excel spreadsheet to an Adobe InDesign document. It can be used with Excel and InDesign tables to paginate documents such as simple price lists and business cards. However, Place command options are best used in the population and updating of product sheet tables, since one of the features that this method offers is the creation and maintenance of the links between spreadsheet files and the InDesign document.
Cons
The Place command has a relatively limited feature set. This restricts its application to projects with only the most simple requirements. Check how Pagination combines the Place command’s ease of use with a much broader range of possibilities.
Check out the tutorials:
- Price Lists with the InDesign Place Command
- How to Insert and Link an Excel Table in InDesign: Create Product Sheets
InDesign Data Merge
Pro
InDesign Data Merge is the most common method to import Excel into InDesign.
It can be used for paginating spreadsheets into business card batches, yearbooks, certificates, price lists and product sheets.
Cons
One of InDesign Data Merge’s main weaknesses is the need to prepare spreadsheets to InDesign’s exact import specifications. Only .csv and .txt files can be imported, and the conversion process can be daunting, complex, and prone to errors. Check how Pagination offers solutions that eliminate the need for conversion and significantly extend the Data Merge tool’s overall feature set.
Check out the tutorial:
- Catalog with the InDesign Data Merge
Pro
Another method to import Excel into InDesign is InDesign XML Import. It requires you previously converted your Excel file to XML format. Importing XML files into InDesign enables you to automate almost any kind of layout. Text, graphics, attributes, and tables can all be used to create complex documents such as calendars, multi-hierarchy price lists, and technical catalogs. Pairing an XML import with JavaScript provides even more layout and automation possibilities.
Cons
InDesign XML Import requires a steep learning curve, and a dedicated team can be required to establish, maintain and troubleshoot the logic behind even relatively simple operations. This high barrier to entry and long-term resource commitment should be considered before using XML on any challenging database publishing or variable data printing project. Discover how Pagination offers the same high customization levels as XML but with far greater ease of use.
Check out the tutorial:
- Catalog with the InDesign XML Import
- Export Excel to XML
Pagination
Pro
Pagination is a cloud database publishing service that allows you to create, within seconds, documents in PDF and InDesign from any kind of data source, such as Excel, CSV, MySQL, XML, or exports from corporate databases. The speed and ease of use (you do not need any kind of initial training) have made it one of the world’s most popular tools, used by marketing teams and advertising agencies to develop their own publishing projects. Pagination does not require installation; you can access it from any device, any browser or operating system anywhere and at any time. It’s commonly used to create catalogs, price lists, circulars, product sheets, and look books from all types of documents whose information resides in a database or in one or more spreadsheets.
Check out the tutorials:
- Price list or catalog with Pagination
Create your automated document!
Use one of our free InDesign Templates or upload your own layout. Create documents anytime and from anywhere.
Как вставить таблицу Microsoft Excel в Adobe InDesign
- Перейдите в меню «Файл» и выберите «Поместить» .
- В диалоговом окне «Поместить» установите флажок «Показать параметры импорта» и выберите таблицу.
- Параметры импорта Microsoft Excel позволяют выбрать лист и диапазон ячеек размещаемой таблицы, а также предоставить параметры для сохранения или отмены форматирования Excel. …
- Нажмите на страницу, чтобы разместить стол.
- Как импортировать таблицу в InDesign?
- Как импортировать таблицу из Word в InDesign?
- Как экспортировать таблицу из Excel?
- Как сделать таблицу в InDesign 2020?
- Как сделать строки таблицы невидимыми в InDesign?
- Как преобразовать таблицу Excel в Word?
- Как объединить данные Excel в шаблон Word?
- Как экспортировать таблицу из Excel в PowerPoint?
- Сколько таблиц Access можно импортировать в Excel за раз?
- Как сделать хороший стол в InDesign?
- Что позволяет применять режим наложения в InDesign?
- Можете ли вы сделать диаграмму в InDesign?
Как импортировать таблицу в InDesign?
Нажмите «Файл» в строке главного меню и нажмите «Поместить»… Установите флажок «Показать параметры импорта» в окне импорта, выберите файл и нажмите «Открыть», чтобы импортировать файл Excel в InDesign. При импорте вы можете выбрать множество различных переменных, например лист для импорта, диапазон ячеек, форматирование таблицы и т. Д.
Как импортировать таблицу из Word в InDesign?
Импорт таблиц
- Выбрать файл > Место.
- В диалоговом окне «Поместить» перейдите к Word (. …
- Установите флажок Показать параметры импорта.
- Нажмите «Открыть». …
- Для файлов Word убедитесь, что в области «Форматирование» диалогового окна «Параметры импорта Microsoft Word» установлен флажок «Сохранить форматирование из текста и таблиц». …
- Нажмите ОК.
Как экспортировать таблицу из Excel?
Пожалуйста, сделайте следующее:
- В Excel выберите таблицу и скопируйте ее, нажав клавиши Ctrl + C.
- Запустите программу Paint, вставьте таблицу, нажав клавиши Ctrl + V, а затем нажмите Home > Обрезать. …
- Щелкните Файл > Сохранить.
Как сделать таблицу в InDesign 2020?
Использование опции Create Table
- Выбрать стол > Создать таблицу. …
- Укажите количество строк и столбцов.
- Если содержимое вашей таблицы будет продолжаться более чем в одном столбце или фрейме, укажите количество строк верхнего или нижнего колонтитула, в которых вы хотите, чтобы информация повторялась.
- (Необязательно) Укажите стиль таблицы.
- Нажмите ОК.
Как сделать строки таблицы невидимыми в InDesign?
Выбрав таблицу, перейдите к таблице > Параметры ячейки > Обводки и заливки и убедитесь, что все стороны обводки ячеек выделены, затем Цвет: Нет.
Как преобразовать таблицу Excel в Word?
Откройте файл Excel и с помощью мыши выберите данные, которые вы хотите импортировать. Щелкните правой кнопкой мыши выделенный диапазон ячеек и выберите «Копировать.»Вернитесь в Word и выделите ячейки таблицы, в которые вы хотите импортировать данные Excel.
Как объединить данные Excel в шаблон Word?
В документе Word выделите поле, которое вы хотите заполнить данными из Excel. На вкладке «Рассылки» нажмите кнопку «Вставить поле слияния», откроется список заголовков столбцов в сохраненном документе Excel (i.е. Название компании и т. Д.). Выберите соответствующее поле, которое вы хотите объединить, и нажмите «Вставить».
Как экспортировать таблицу из Excel в PowerPoint?
Копирование и вставка (несвязанных) данных Excel в PowerPoint
- В Excel откройте книгу с данными, которые вы хотите скопировать.
- Перетащите курсор на область данных, которые вы хотите скопировать, и на вкладке «Главная» щелкните или коснитесь «Копировать».
- В PowerPoint щелкните слайд, на который вы хотите вставить скопированные данные листа.
Сколько таблиц Access можно импортировать в Excel за раз?
Помните, что вы можете импортировать только один лист за раз во время операции импорта. Чтобы импортировать данные с нескольких листов, повторите операцию импорта для каждого листа.
Как сделать хороший стол в InDesign?
Использование опции Create Table
- Выбрать стол > Создать таблицу. …
- Укажите количество строк и столбцов.
- Если содержимое вашей таблицы будет продолжаться более чем в одном столбце или фрейме, укажите количество строк верхнего или нижнего колонтитула, в которых вы хотите, чтобы информация повторялась.
- (Необязательно) Укажите стиль таблицы.
- Нажмите ОК.
Что позволяет применять режим наложения в InDesign?
Параметры режима наложения. Режимы наложения управляют тем, как основной цвет, основной цвет в иллюстрации, взаимодействует с цветом наложения, цветом выбранного объекта или группы объектов. Результирующий цвет — это цвет, полученный в результате смешивания.
Можете ли вы сделать диаграмму в InDesign?
Графики — один из самых сложных визуальных эффектов для создания в InDesign. Большинство людей пытаются импортировать диаграммы, созданные в Excel или другой программе, в InDesign. Другие используют для этого скрипт, например Claquos. Но один из самых крутых способов создавать диаграммы в InDesign — использовать шрифт Chartwell.
![]()
![]()
Community Expert
,
/t5/indesign-discussions/copy-paste-excel-table-into-indesign/m-p/9717719#M90707
Feb 01, 2018
Feb 01, 2018
Copy link to clipboard
Copied
Nothing has changed in the way tables work.
But I have a hunch you may have forgotten an important point: When you’re replacing cell data in an InDesign table, first select the cells that need to be replaced, then paste the exact same number of cells from Excel/Word that you’re replacing them with.
- Follow
- Report
Community guidelines
Be kind and respectful, give credit to the original source of content, and search for duplicates before posting.
Learn more


New Here
,
/t5/indesign-discussions/copy-paste-excel-table-into-indesign/m-p/9717720#M90708
Feb 01, 2018
Feb 01, 2018
Copy link to clipboard
Copied
In Response To Steve Werner
Hi Steve, thanks for your reply.
I know this is how it works, I’ve been doing some intensive copy/pasting of tables over the last years 
The excel files are on a shared server and I open them on Citrix in a Windows environment. I then copy/paste them to InDesign which is running locally on my macbook in iOS. I now found when I first copy paste the tables to a local excel file in iOS, the copy/paste works… At least this is a way around that might already save me some time!
But until recently, the copy/paste also worked directly from excels in a Citrix environment (my colleague is having the same issue). Strange but probably it has nothing to do with InDesign then.
- Follow
- Report
Community guidelines
Be kind and respectful, give credit to the original source of content, and search for duplicates before posting.
Learn more
![]()
![]()
Community Expert
,
/t5/indesign-discussions/copy-paste-excel-table-into-indesign/m-p/9717721#M90709
Feb 01, 2018
Feb 01, 2018
Copy link to clipboard
Copied
In Response To steffenm32535037
Yes, I don’t work in those fancy server-based environments. It adds whole new ways for things to screw up!
- Follow
- Report
Community guidelines
Be kind and respectful, give credit to the original source of content, and search for duplicates before posting.
Learn more

New Here
,
/t5/indesign-discussions/copy-paste-excel-table-into-indesign/m-p/9717722#M90710
Dec 19, 2018
Dec 19, 2018
Copy link to clipboard
Copied
In Response To Steve Werner
these are pretty lame responses to be honest.
I’ve seen several threads where this has been blown off as a user error — most def isn’t!
Reality is. Copying from excel to InDesign used to paste into text areas as Tabs and Paragraph Breaks, now it pastes only with paragraph breaks.
nothing may have changed in the way tables work, but indesign (or OSX?) has certainly changed how it pastes copied (command + C) data from excel spreadsheets. bit of a hassle when you don’t want to «place» a whole excel doc, just a few cells, and then have to spend a bunch of time formatting it again in indesign.
- Follow
- Report
Community guidelines
Be kind and respectful, give credit to the original source of content, and search for duplicates before posting.
Learn more

New Here
,
/t5/indesign-discussions/copy-paste-excel-table-into-indesign/m-p/9717723#M90711
Feb 05, 2019
Feb 05, 2019
Copy link to clipboard
Copied
In Response To leond22801685
So I am trying to do the exact same thing. Very experienced InDesign user here. I’m copying and pasting a very large excel document into a table and even the hard returns (and tabs) are not formatting into proper rows in the table! I have to go in one by one!
- Follow
- Report
Community guidelines
Be kind and respectful, give credit to the original source of content, and search for duplicates before posting.
Learn more
![]()
![]()
Community Expert
,
/t5/indesign-discussions/copy-paste-excel-table-into-indesign/m-p/9717724#M90712
Feb 05, 2019
Feb 05, 2019
Copy link to clipboard
Copied
In Response To Sandi_S_
Check your settings in Clipboard Handling Preferences > When Pasting Text and Tables from Other Applications: there are two choices
* All information (Index Markers, Swatches, Styles, etc.)
* Text only
- Follow
- Report
Community guidelines
Be kind and respectful, give credit to the original source of content, and search for duplicates before posting.
Learn more
Community Beginner
,
/t5/indesign-discussions/copy-paste-excel-table-into-indesign/m-p/10714136#M159168
Nov 05, 2019
Nov 05, 2019
Copy link to clipboard
Copied
In Response To Steve Werner
Dear Steve, this two choices nothing solves when you want to update old table e.x. pricelist, tech specs etc.
I have the same problem. Copy table from excel and than paste it to InDD — it pastes all data in the same column. But, when copy table from excel to word, and than to InDD — it works. But, this way with word is very harsh and timewasting.
Same problem when I use local Numbers, it paste in one same column.
- Follow
- Report
Community guidelines
Be kind and respectful, give credit to the original source of content, and search for duplicates before posting.
Learn more

![]()
Community Expert
,
/t5/indesign-discussions/copy-paste-excel-table-into-indesign/m-p/10714305#M159183
Nov 05, 2019
Nov 05, 2019
Copy link to clipboard
Copied
Hi Lukas,
I came accross something similar weeks ago on an updated Mac OS X system.
Usually I could select some tab delimited text with InDesign, copy it to the clipboard, select one cell in Excel and paste all the contents in so that every tab delimited contents landed in its own cell. Not so with a recent version of Excel. I had to convert the text to a table in InDesign, select all cells in the table, copy to the clipboard, select one single cell in Excel and paste it.
I still can copy tab delimited text from InDesign to Excel on Windows 10 and every delimited contents is transferred to its own cell.
Maybe something changed with OS X or with the latest version of Excel on Mac OS X ?
Regards,
Uwe Laubender
( ACP )
- Follow
- Report
Community guidelines
Be kind and respectful, give credit to the original source of content, and search for duplicates before posting.
Learn more
Community Beginner
,
/t5/indesign-discussions/copy-paste-excel-table-into-indesign/m-p/10714314#M159185
Nov 05, 2019
Nov 05, 2019
Copy link to clipboard
Copied
In Response To Laubender
Hi Uwe,
OK, I understand your case. You describe way from InDD to Excel.
But I have problem with opposite way — from Excel (or Numbers) to InDD. steffenm32535037 in first post it described — table with more collumn is pasting to InDD to one column.
- Follow
- Report
Community guidelines
Be kind and respectful, give credit to the original source of content, and search for duplicates before posting.
Learn more
![]()
Community Expert
,
/t5/indesign-discussions/copy-paste-excel-table-into-indesign/m-p/10714379#M159191
Nov 05, 2019
Nov 05, 2019
Copy link to clipboard
Copied
Hi Lukas,
yes, but I wonder if my issue and your issue shares the same reason.
Did you try the following:
Just select only one cell in your InDesign table before pasting.
On Windows 10 this is still working; just tested that.
I suspect a Mac OS X issue.
Regards,
Uwe Laubender
( ACP )
- Follow
- Report
Community guidelines
Be kind and respectful, give credit to the original source of content, and search for duplicates before posting.
Learn more
Community Beginner
,
/t5/indesign-discussions/copy-paste-excel-table-into-indesign/m-p/10717909#M159427
Nov 06, 2019
Nov 06, 2019
Copy link to clipboard
Copied
In Response To Laubender
Dear,
I solved problem. Problem was in Citrix Workspace and in version of Office. I have had version 2010. After upgrade to 2016 version is problem solved.
I think, that very big problem is in constantly new updations with Adobe CC, updations with MacOS etc.
Thanks
- Follow
- Report
Community guidelines
Be kind and respectful, give credit to the original source of content, and search for duplicates before posting.
Learn more
![]()
Community Expert
,
/t5/indesign-discussions/copy-paste-excel-table-into-indesign/m-p/10718086#M159448
Nov 06, 2019
Nov 06, 2019
Copy link to clipboard
Copied
Hi Lukas,
thank you for sharing your experience.
So now you are working with Office 2016.
What’s your exact OS X version?
Regards,
Uwe Laubender
( ACP )
- Follow
- Report
Community guidelines
Be kind and respectful, give credit to the original source of content, and search for duplicates before posting.
Learn more
Community Beginner
,
/t5/indesign-discussions/copy-paste-excel-table-into-indesign/m-p/10718185#M159457
Nov 06, 2019
Nov 06, 2019
Copy link to clipboard
Copied
In Response To Laubender
- Follow
- Report
Community guidelines
Be kind and respectful, give credit to the original source of content, and search for duplicates before posting.
Learn more
Community Beginner
,
/t5/indesign-discussions/copy-paste-excel-table-into-indesign/m-p/10748181#M164262
Nov 19, 2019
Nov 19, 2019
Copy link to clipboard
Copied
In Response To Lukas4
Hey guys, my problem with copy/paste is back. It function about one week. No update system MAC, no update citrix, no update adobe cc.
- Follow
- Report
Community guidelines
Be kind and respectful, give credit to the original source of content, and search for duplicates before posting.
Learn more

New Here
,
/t5/indesign-discussions/copy-paste-excel-table-into-indesign/m-p/11420536#M395343
Sep 09, 2020
Sep 09, 2020
Copy link to clipboard
Copied
I found a quick fix for this today guys which might be useful for you. If you paste the content from Excel or Numbers into TextEdit first (or WordPad for Windows I guess) then copy it again from there and it keeps the tabs so you can paste it into your InDesign table. I only tried this with one column so can’t say for sure if it works across multiple columns. Hope this helps!
- Follow
- Report
Community guidelines
Be kind and respectful, give credit to the original source of content, and search for duplicates before posting.
Learn more
Community Beginner
,
/t5/indesign-discussions/copy-paste-excel-table-into-indesign/m-p/11687739#M408209
Dec 17, 2020
Dec 17, 2020
Copy link to clipboard
Copied
In Response To tomrootstudio
Worked like a dream. Pasted multiple columns and rows from Numbers into TextEdit as plain text and then copied and pasted into formatted tables in InDesign. Copy pasted perfectly respecting all the styles set-up in the InDesign file.
- Follow
- Report
Community guidelines
Be kind and respectful, give credit to the original source of content, and search for duplicates before posting.
Learn more

Community Beginner
,
/t5/indesign-discussions/copy-paste-excel-table-into-indesign/m-p/12354811#M443346
Aug 31, 2021
Aug 31, 2021
Copy link to clipboard
Copied
In Response To tomrootstudio
Worked beautifully here on Windows, but using the Notepad (not Wordpad).
Also, worked with multiple columns.
- Follow
- Report
Community guidelines
Be kind and respectful, give credit to the original source of content, and search for duplicates before posting.
Learn more

New Here
,
/t5/indesign-discussions/copy-paste-excel-table-into-indesign/m-p/11772589#M411456
Jan 21, 2021
Jan 21, 2021
Copy link to clipboard
Copied
Printscreen key on your keyboard.
It takes a picture of your screen and keeps it in your clipboard.
All you have to do is ctrl+v (paste) and crop it
- Follow
- Report
Community guidelines
Be kind and respectful, give credit to the original source of content, and search for duplicates before posting.
Learn more
![]()
Community Expert
,
/t5/indesign-discussions/copy-paste-excel-table-into-indesign/m-p/11774014#M411511
Jan 22, 2021
Jan 22, 2021
Copy link to clipboard
Copied
Hi steffenm32535037,
did you mark Nina5F88’s solution as the «Correct Answer» here?
I do not think, that this answer is correct at all, because a printscreen is just an image, a bunch of pixels.
And if you paste it inside from the clipboard you even cannot tell with InDesign’s functionality what effective resolution is used when scaling it. ( Unless you trigger InDesign’s Preflight in a special way. )
For now I will unmark this answer as the correct one.
Of course you could convince me otherwise, but one need some very good reasons using a screen shot of an Excel table instead of an InDesign table with editable table cells.
Regards,
Uwe Laubender
( ACP )
- Follow
- Report
Community guidelines
Be kind and respectful, give credit to the original source of content, and search for duplicates before posting.
Learn more

Community Beginner
,
/t5/indesign-discussions/copy-paste-excel-table-into-indesign/m-p/12456680#M449174
Oct 18, 2021
Oct 18, 2021
Copy link to clipboard
Copied
The solution for me, on Windows Excel 365 -> InDesign, was to change InDesign’s clipboard handling to text only. After that, copying and pasting directly multiple rows and columns works as intended, preserving all preset styles in InDesign, without the need to use in intermediary application.
- Follow
- Report
Community guidelines
Be kind and respectful, give credit to the original source of content, and search for duplicates before posting.
Learn more

New Here
,
/t5/indesign-discussions/copy-paste-excel-table-into-indesign/m-p/13581107#M515719
Feb 15, 2023
Feb 15, 2023
Copy link to clipboard
Copied
When I copy and paste from Excel into an existing table in InDesign, it causes an extra empty row between every existing row, which is frustrating to clean up. I found that if I copy from Excel -> Word -> InDesign, then the entire table is pasted correctly in InDesign with no extra rows/spaces.
I guess InDesign doesn’t correctly interpret the data and formatting from Excel, but when copied from Word, which is an actual table, InDesign has no problem pasting it correctly.
- Follow
- Report
Community guidelines
Be kind and respectful, give credit to the original source of content, and search for duplicates before posting.
Learn more
![]()
Community Expert
,
/t5/indesign-discussions/copy-paste-excel-table-into-indesign/m-p/13581438#M515735
Feb 15, 2023
Feb 15, 2023
Copy link to clipboard
Copied
In Response To Jeppe27002532ayuh
Hi @Jeppe27002532ayuh ,
just a guess: perhaps every other row in the Excel table is a hidden row?
( And Word consolidates the table? )
Currently I have no Excel at hand to test this…
Regards,
Uwe Laubender
( Adobe Community Expert )
- Follow
- Report
Community guidelines
Be kind and respectful, give credit to the original source of content, and search for duplicates before posting.
Learn more
New Here
,
/t5/indesign-discussions/copy-paste-excel-table-into-indesign/m-p/13581465#M515737
Feb 15, 2023
Feb 15, 2023
Copy link to clipboard
Copied
In Response To Laubender
Hi @Laubender
No hidden rows. It’s just a simple Excel sheet.
But — I just did a test, and have discovered the problem now. If I copy from an Excel sheet that is opened in Sharepoint in the browser, then the additional empty rows are added. If I open the same document in the desktop app, then I can copy and paste just fine. So the clipboard input from Excel in the browser probably contain some additional hidden data, that InDesign then create rows for. That just a guess on my part.
- Follow
- Report
Community guidelines
Be kind and respectful, give credit to the original source of content, and search for duplicates before posting.
Learn more

Explorer
,
/t5/indesign-discussions/copy-paste-excel-table-into-indesign/m-p/13581566#M515744
Feb 15, 2023
Feb 15, 2023
Copy link to clipboard
Copied
LATEST
In Response To Jeppe27002532ayuh
I would like to add that: if you want to keep excel formatting, the best way, imo, is to place the excel.

Turn on: Show import options

and place as a Formatted Table.

- Follow
- Report
Community guidelines
Be kind and respectful, give credit to the original source of content, and search for duplicates before posting.
Learn more
Manual Import Process
First, head to the main menu and click Choose File, followed by Place to open a dialogue box. Locate the Excel file within the box and click on the file to generate the options for import. Choose the Formatted Table options and click OK to import the table.
Therefore, Can you link an Excel spreadsheet to InDesign?
Set InDesign to create links when placing Excel files:
1. From InDesign’s “Preferences” select “File Handling”. 2. Mark the option “Create Links When Placing Text and Spread- sheet Files” (See image to the right.)
As well, Can I add graphs in InDesign?
Furthermore, How do you convert data from Excel to graphs?
How to Make a Graph in Excel
- Enter your data into Excel.
- Choose one of nine graph and chart options to make.
- Highlight your data and click ‘Insert’ your desired graph.
- Switch the data on each axis, if necessary.
- Adjust your data’s layout and colors.
- Change the size of your chart’s legend and axis labels.
How do you use Chartwell lines? It’s really easy to use; you just type a simple series of numbers like: ’10+13+37+40′, turn on Stylistic Alternates, Stylistic Set 1 or Dis- cretionary Ligatures, and a graph is automatically created. To see the original data all you need to do is turn o the feature again. Chartwell Polar Series.
Can I make a table in InDesign?
When you create a table in InDesign, you have the option to create the table within an existing text frame (Using the Insert Table option). Alternatively, you can create a table and allow InDesign to create the enclosing text frame (Using the Create Table option).
How do I use Chartwell font in InDesign?
How do you create a flowchart in InDesign?
How to Create Flowcharts in InDesign
- Select the “Rectangle” tool and draw a square for your first box. Create a new Object style. …
- Select the “Type” tool and enter the first step in the box. Center the text inside the box. …
- Select the “Line” tool. …
- Create the remaining boxes, text and lines for the flowchart.
How do you make a pie chart in InDesign?
How do you create a grid in InDesign?
Set up a baseline grid
- Choose Edit > Preferences > Grids (Windows) or InDesign > Preferences > Grids (Mac OS).
- Specify a baseline grid color by choosing a color in the Color menu. …
- For Relative To, specify whether you want the grid to start at the top of the page or the top margin.
How do I format a table in InDesign?
Select cells in the columns and rows you want to resize. Do one of the following: In the Table panel, specify Column Width and Row Height settings. Choose Table > Cell Options > Rows And Columns, specify Row Height and Column Width options, and then click OK.
How do I add a tab in InDesign?
How to Make a Tab on InDesign
- Select the “Type” tool.
- Select the paragraphs where you want to make the tab settings if you have already created text.
- Click on the “Type” menu and select “Tabs.”
- Select desired tab-alignment button at the top left corner of the Tabs panel.
How do I use the story editor in InDesign?
You can edit text in InDesign either on the layout page or in the story editor window.
…
In Story Editor, do one of the following:
- Choose Edit > Edit In Layout. …
- Click in the layout window. …
- Close the story editor window.
- Choose the document name from the bottom of the Window menu.
How do you use the graph tool in Illustrator?
Creating graphs in Illustrator is as simple as selecting the Graph Tool (from the Tools panel), clicking on your Artboard and dragging and thus forming the area size of the graph. It is also possible to type in the width and height of the graph, which is useful if you want to create graphs with specific dimensions.
How do you create a pie chart in Illustrator?
How to Make a Pie Graph in Illustrator. To make a pie graph in Illustrator choose the “Pie Graph Tool” located on the toolbar. Click and drag to draw a rectangle with it and fill the graph data into the “Pie Graph” menu box. You can create one or multiple graphs (= one graph per row).
Is InDesign good for flowcharts?
Your InDesign flowchart can help you plan and refine the design of a website, a manufacturing procedure or a troubleshooting workflow. The simplest flowcharts use three basic geometric shapes to represent specific types of steps in a set of events and you can easily create these with InDesign.
What is the best Adobe program to create a flowchart?
Get organized with flowcharts by Adobe Creative Cloud Express. Design customized and streamlined flowcharts with the help of Creative Cloud Express. Whether you’re designing flowcharts for work, school, infographic materials, or just to get yourself organized, Creative Cloud Express has the tools you need.
What Adobe program is best for diagrams?
Design professional charts and graphs | Adobe Illustrator.
How do I make a pie chart in Adobe?
How to make a pie chart.
- Start with the data. Get started with the “Content” tab. …
- Customize your pie chart. Next, choose the “Design” tab to play with color options for your chart. …
- Download and share. Once you’ve double-checked all your information, you’ll be ready to share your chart.
How do you make a color wheel in InDesign?
Double-click either the Fill icon or the Stroke icon in the Tools panel to open the Color Picker. Use the RGB, LAB, or CMYK fields to define the color. Click the Add [RGB, LAB, or CMYK] Swatch button to add the color to the Swatches panel. Click ok to close the Color Picker.
How do I make a chart in Illustrator?
How to Build Charts in Illustrator
- Click on the “Object” menu, hover over “Graph” and select “Type.”
- Click on the icon for the desired chart type. …
- Click on the “Value Axis” drop-down menu. …
- Click on the check box for any styles you want to add to the graph.
- Select the desired options for the selected chart type.
How do I put a grid on all pages in InDesign?
Open the Page drop-down menu and double-click on the Master. This will set up your grid on the Master page, which will ensure your grid appears on every page in the document. 3. Select “Margins and Columns” in the Layout drop-down menu.
How do you make a multi column grid in InDesign?
Grid Methods
- When you launch InDesign, you’ll be prompted to create a new document or open an existing one. …
- In the Preset Details on the right side of the screen, type in the number of columns you’d like for your document. …
- Click on the “CREATE” button.
- The document will automatically have 4 vertical grids.
What is a document grid in InDesign?
The document grid supplements margin and column guides and creates a grid across the entire document—like an enormous piece of graph paper. The grid makes it possible to align elements vertically and horizontally without having to build individual ruler guides.
- Reference 1
- Reference 2
- Reference 3
- Reference 4
- Reference 5