
The weird characters you got from reading the Excel file from the FileReader API comes from the structure of the file that differs a lot from a text file.
So reading it as text with the FileReader API will give those weirds character as a result.
What you can do is to use the FileReader API to read it as a binary string.
At this point if you try to log that binary string you will also get weirds characters.
In order to get your file content you need to parse that binary string to extract the data it contains. This can be done quite easily using SheetJS.
import { read, writeFileXLSX, utils } from "https://cdn.sheetjs.com/xlsx-0.18.7/package/xlsx.mjs";

const workbook = read(data, {
       type:'binary',
});
data is the binary string resulting from reading an Excel file as a binary string with the FileReader API.
workbook is an object that contains all the data of your file.
The workbook.Sheets instruction will give you access to all the sheets that are in the file.
workbook.Sheets.sheet1 will give you access to the content of the first sheet of the file.
All the related arrays are from the {key:value} type.
The content of a sheet accessed this way is a single dimension object array wich contains all the cells of the sheet starting from the first cell of the header to the last cell wich contains data.
Each of those cells has a key like this 'A1', 'B250', 'J3'
This array also have two more entries with those keys '!margin' and '!ref':
'!margin' refers to cells margins so it may not represent any interest.
'!ref' is more interesting as it contains the plage of cells containing data wich is a string
like this 'A1:J215' from it you could get the amount of lines or the char of the last column.
If you want more informations you could check the SheetJS documentation and there is a more detailed example here : How to read an excel file contents on client side?
Note :
If you want to use this import statement in an html page you’ll need to do it inside those scripts tags : <script type="module" defer> ... </script>
Here is a codepen where you can test this method. There’s only the most basic method. There are some shorter ways to do the same by using the SheetJS utils functions to convert directly the sheet content to another format.
In previous tutorial, we’ve talked about SheetJS and how to convert html table to excel file. For this tutorial, we’re going to do it backward. I’m going to show you how to convert excel file that user uploaded back to html table and show it on the webpage using SheetJS. As always – No server side script or AJAX involved. Let’s go check it out!
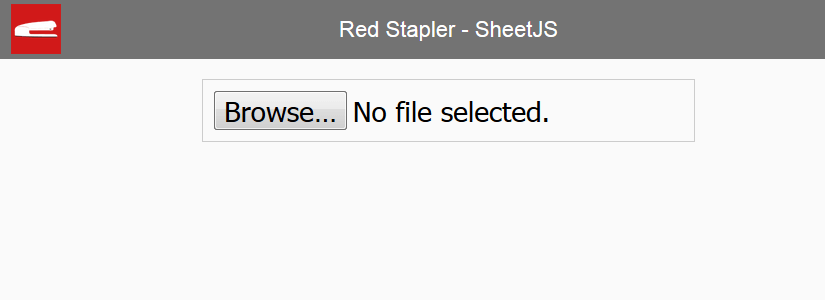
Here is our sample page, with input tag for user to upload the excel file.
First, let’s read the file using FileReader in change event handler. We’ll read it as ArrayBuffer and pass the file object using event.target.files[0].
var reader = new FileReader();
reader.readAsArrayBuffer(e.target.files[0]);
However, since the content type of the excel is in octet stream so we need to convert what we’ve got from FileReader to UInt8Array. We can do that by passing FileReader result into UInt8Array constructor.
var data = new Uint8Array(reader.result);
Then pass the array into SheetJS read() function and let it know we’re sending in array which we’ll get the workbook object in return.
var wb = XLSX.read(data,{type:'array'});
Now we have imported the excel file as SheetJS workbook object. Next we will use write() function to convert the it into html string. you’ll need to pass the sheet name and set the output type as binary and bookType as html.
var htmlstr = XLSX.write(wb,{sheet:"sheet no1", type:'binary',bookType:'html'});
and finally we append that html string to wherever you want to show the table!
$('#wrapper')[0].innerHTML += htmlstr;
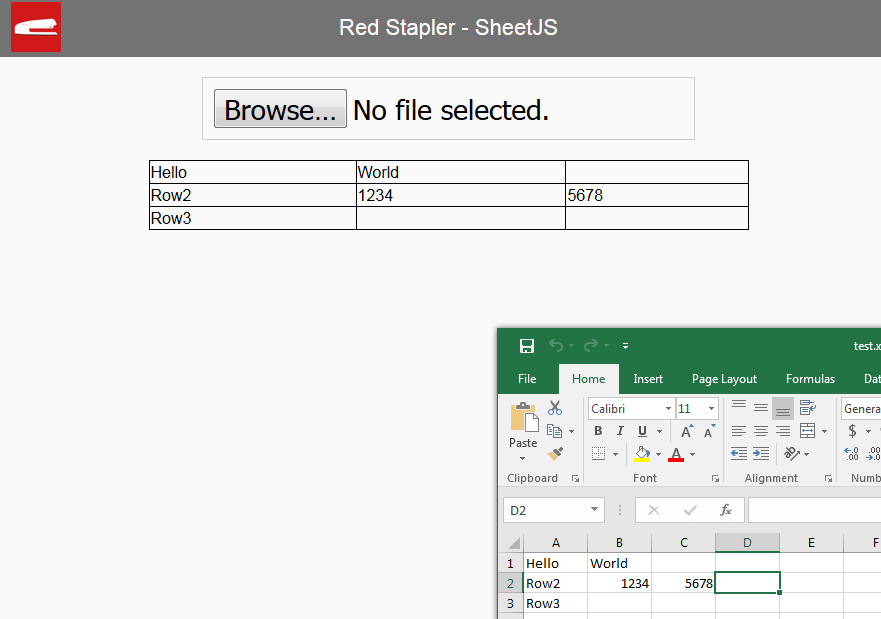
Now, we’re ready. Here is our test excel file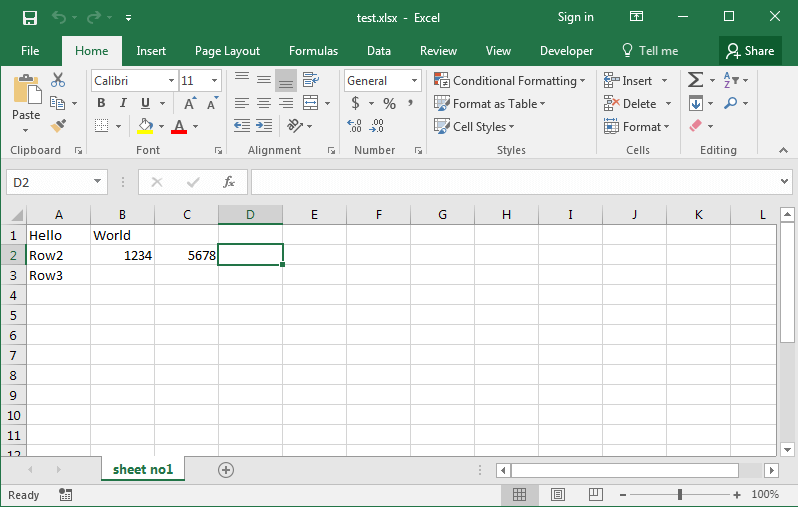
Once I pick the excel file with browse button, the excel was immediately converted into HTML table and displayed to the webpage
So that’s it! Hope you guys love the tutorial. You can find full source code below. Don’t forget to subscribe our Youtube Channel for more interesting javascript library and other tutorials!
Full Source Code
<html>
<head>
<script src="jquery-2.1.4.js"></script>
<script lang="javascript" src="xlsx.full.min.js"></script>
<link rel="stylesheet" type="text/css" href="styles.css">

</head>
<body>
<div id="navbar"><span>Red Stapler - SheetJS </span></div>
<div id="wrapper">

        <input type="file" id="input-excel" />

</div>
<script>
        $('#input-excel').change(function(e){
                var reader = new FileReader();
                reader.readAsArrayBuffer(e.target.files[0]);

                reader.onload = function(e) {
                        var data = new Uint8Array(reader.result);
                        var wb = XLSX.read(data,{type:'array'});

                        var htmlstr = XLSX.write(wb,{sheet:"sheet no1", type:'binary',bookType:'html'});
                        $('#wrapper')[0].innerHTML += htmlstr;
                }
        });

</script>
</body>
</html>
Written By
This article shows you how you display the Excel data in an HTML table using SheetJS in Javascript. SheetJS is a javascript library used to work with various spreadsheet formats. In another article, we explained Converting Excel file data to JSON using the SheetJS library in Javascript. Today in this article, we will explain how to display Excel spreadsheet data in an HTML table using javascript.
Here first we convert the Excel data into JSON format then JSON data will be shown in HTML tabular format. Let’s see how it can be done.
SheetJS Library
SheetJS is a powerful library written in pure Javascript. It is a Parser and writer for various spreadsheet formats.
How to use SheetJS?
As it is a javascript library, we have to include it in the HTML document to use this library. There are various CDN links that can be used to include it. Let’s see one of the CDN links below:
Now let’s see the below script that we have to include in the <head> tag of the HTML document,
<script src="https://cdnjs.cloudflare.com/ajax/libs/xlsx/0.17.5/xlsx.min.js"></script>
Follow the below steps to display excel data in the HTML table:
- Define HTML
- Includes the SheetJS library
- Write the Javascript logic to upload and validate the Excel file
- Read the Excel data into JSON format
- Convert JSON data to the HTML table
1. Define HTML
First, we will define the HTML to allow users to upload an Excel file and display it in tabular format. We will define an HTML <input> tag with type=”file” to choose an Excel file. And a <button> tag to upload the file and an HTML <table> tag to display the data.
Let’s define the below HTML code in an HTML document file:
<h1>Upload an excel file to display in HTML Table</h1>
<!-- Input element to upload an excel file -->
<input type="file" id="file_upload" />
<button onclick="upload()">Upload</button>
<br><br>
<!-- table to display the excel data -->
<table id="display_excel_data"></table>
2. Includes the SheetJS library
Include the CDN link of library xlsx.min.js in the <head> tag of an HTML file as follows:
<head>
   <script src="https://cdnjs.cloudflare.com/ajax/libs/xlsx/0.17.5/xlsx.min.js"></script>
</head>
3. Write the Javascript logic to upload and validate the Excel file
We will define a javascript upload() method to upload and validate the Excel file. The upload() method will allow users to upload a valid Excel file only. Let’s see the below logic that we have to write in <script> tag:
// Method to upload a valid excel file
function upload() {
  var files = document.getElementById('file_upload').files;
  if(files.length==0){
    alert("Please choose any file...");
    return;
  }
  var filename = files[0].name;
  var extension = filename.substring(filename.lastIndexOf(".")).toUpperCase();
  if (extension == '.XLS' || extension == '.XLSX') {
      //Here calling another method to read excel file into json
      excelFileToJSON(files[0]);
  }else{
      alert("Please select a valid excel file.");
  }
}
4. Read Excel file in Javascript and convert it into JSON format
We have defined a javascript method excelFileToJSON() that will read the Excel file and convert the data into JSON format. Inside excelFileToJSON(), we have read the data of the Excel file by using a file reader as a binary string using readAsBinaryString() method. After that, we used XLSX which has a built-in facility to convert our binary string into a JSON object. And the XLSX.utils.sheet_to_json() method is used to read sheet data in JSON.
Let’s see the code below:
//Method to read excel file and convert it into JSON
function excelFileToJSON(file){
		  try {
			var reader = new FileReader();
			reader.readAsBinaryString(file);
			reader.onload = function(e) {

				var data = e.target.result;
				var workbook = XLSX.read(data, {
					type : 'binary'
				});
				var result = {};
				var firstSheetName = workbook.SheetNames[0];
                //reading only first sheet data
				var jsonData = XLSX.utils.sheet_to_json(workbook.Sheets[firstSheetName]);
				alert(JSON.stringify(jsonData));
				//displaying the json result into HTML table
				displayJsonToHtmlTable(jsonData);
				}
			}catch(e){
				console.error(e);
			}
}
5. Convert JSON data to the HTML Table using Javascript
Now we have defined a javascript method displayJsonToHtmlTable() to display the JSON data in an HTML table.
Let’s see the code:
//Method to display the data in HTML Table
function displayJsonToHtmlTable(jsonData){
		var table=document.getElementById("display_excel_data");
		if(jsonData.length>0){
			var htmlData='<tr><th>Student Name</th><th>Address</th><th>Email ID</th><th>Age</th></tr>';
			for(var i=0;i<jsonData.length;i++){
				var row=jsonData[i];
				htmlData+='<tr><td>'+row["Student Name"]+'</td><td>'+row["Address"]
				      +'</td><td>'+row["Email ID"]+'</td><td>'+row["Age"]+'</td></tr>';
			}
			table.innerHTML=htmlData;
		}else{
			table.innerHTML='There is no data in Excel';
		}
}
Display Excel data in HTML Table [complete example]
This example shows you Excel to HTML table Conversion. Let’s see the complete code below (putting all the above code in a single HTML file):
<!DOCTYPE html>
<html>
  <head>
    <meta name="viewport" content="width=device-width, initial-scale=1">
	<title>Excel to HTML Table | Javacodepoint</title>
    <script src="https://cdnjs.cloudflare.com/ajax/libs/xlsx/0.17.5/xlsx.min.js"></script>
  </head>
  <body>
  	<h1>Upload an excel file to display in HTML Table</h1>
	<!-- Input element to upload an excel file -->
    <input type="file" id="file_upload" />
    <button onclick="upload()">Upload</button>
    <br>
    <br>
	<!-- table to display the excel data -->
	<table id="display_excel_data" border="1"></table>
    <script>

      // Method to upload a valid excel file
	  function upload() {
		var files = document.getElementById('file_upload').files;
		if(files.length==0){
		  alert("Please choose any file...");
		  return;
		}
		var filename = files[0].name;
		var extension = filename.substring(filename.lastIndexOf(".")).toUpperCase();
		if (extension == '.XLS' || extension == '.XLSX') {
			//Here calling another method to read excel file into json
			excelFileToJSON(files[0]);
		}else{
			alert("Please select a valid excel file.");
		}
	  }

	  //Method to read excel file and convert it into JSON
	  function excelFileToJSON(file){
		  try {
			var reader = new FileReader();
			reader.readAsBinaryString(file);
			reader.onload = function(e) {

				var data = e.target.result;
				var workbook = XLSX.read(data, {
					type : 'binary'
				});
				var result = {};
				var firstSheetName = workbook.SheetNames[0];
				//reading only first sheet data
				var jsonData = XLSX.utils.sheet_to_json(workbook.Sheets[firstSheetName]);
				//displaying the json result into HTML table
				displayJsonToHtmlTable(jsonData);
				}
			}catch(e){
				console.error(e);
			}
	  }

	  //Method to display the data in HTML Table
	  function displayJsonToHtmlTable(jsonData){
		var table=document.getElementById("display_excel_data");
		if(jsonData.length>0){
			var htmlData='<tr><th>Student Name</th><th>Address</th><th>Email ID</th><th>Age</th></tr>';
			for(var i=0;i<jsonData.length;i++){
				var row=jsonData[i];
				htmlData+='<tr><td>'+row["Student Name"]+'</td><td>'+row["Address"]
				      +'</td><td>'+row["Email ID"]+'</td><td>'+row["Age"]+'</td></tr>';
			}
			table.innerHTML=htmlData;
		}else{
			table.innerHTML='There is no data in Excel';
		}
	  }
    </script>
  </body>
</html>
Test and Live Demo
Let’s assume a sample Excel file(students.xlsx) that we are going to upload. As you can see in the below image this Excel file contains the student’s data(name, address, email id, and age).

Let’s see the result once we upload the above Excel file to this application.

Conclusion
In this tutorial, you have seen how you display the Excel file data in an HTML Table using Javascript. You have seen here, that can be easily done by using the SheetJS library. As you have seen this library has the capability to convert binary strings to JSON format that is used here to display in an HTML table.
Related articles:
- Convert JSON data into HTML table using jquery
- Convert Excel file data to JSON in Javascript
- How to read Excel files in Java using Apache POI?
- How to create password-protected Excel in Java?
- How to write data to an existing Excel file in Java?
You may also like:
How to create a Stopwatch in JavaScript?
File upload validations in javascript
Drag & Drop or Browse – File upload Feature in JavaScript
Preview an image before uploading using Javascript
Preview an image before uploading using jQuery
Welcome to a tutorial on how to display an Excel file in an HTML table in Javascript. Need to open an Excel file and “convert” it into an HTML table? Yes, that is possible with modern Javascript. No server-side scripts, no uploading involved. Read on for the example!
ⓘ I have included a zip file with all the source code at the start of this tutorial, so you don’t have to copy-paste everything… Or if you just want to dive straight in.
TABLE OF CONTENTS
DOWNLOAD & NOTES

Firstly, here is the download link to the example code as promised.
QUICK NOTES
- Download and unzip into your HTTP folder.
- Acces
2-excel-table.htmlin the browser. Captain Obvious, usehttp://, notfile://.
If you spot a bug, feel free to comment below. I try to answer short questions too, but it is one person versus the entire world… If you need answers urgently, please check out my list of websites to get help with programming.
EXAMPLE CODE DOWNLOAD
Click here to download all the example source code, I have released it under the MIT license, so feel free to build on top of it or use it in your own project.

All right, let us now get into the example of reading an Excel file in Javascript, and generating an HTML table with it.
PART 1) DUMMY EXCEL FILE
| NAME | |
| Jo Doe | jo@doe.com |
| Job Doe | job@doe.com |
| Joe Doe | joe@doe.com |
| Jog Doe | jog@doe.com |
| Joh Doe | joh@doe.com |
| Joi Doe | joi@doe.com |
| Jol Doe | jol@doe.com |
| Jon Doe | jon@doe.com |
| Jou Doe | jou@doe.com |
| Joy Doe | joy@doe.com |
First, let us start with the Excel file… There is nothing “special” here, this is just a list of dummy users.
PART 2) HTML PAGE
2-excel-table.html
<!-- (A) JAVASCRIPT -->
<!-- https://sheetjs.com/ -->
<script src="https://cdnjs.cloudflare.com/ajax/libs/xlsx/0.18.5/xlsx.full.min.js"></script>
<script defer src="3-excel-table.js"></script>

<!-- (B) FILE PICKER -->
<input type="file" id="demoA" accept=".xls,.xlsx">

<!-- (C) EMPTY TABLE -->
<table id="demoB"></table>
Next, the HTML page itself should be pretty self-explanatory too.
- Javascript does not have native functions to read Excel files, so we using a library called “SheetJS” here. Links to their full documentation are in the extras section below.
- Just a normal
<input type="file">file input field, restricted to accept Excel files only. But take note, SheetJS can actually open CSV and ODT files too. - An empty
<table>to display the Excel file.
PART 3) EXCEL TO HTML TABLE
3-excel-table.js
document.getElementById("demoA").onchange = (evt) => {
  // (A) NEW FILE READER
  var reader = new FileReader();

  // (B) ON FINISH LOADING
  reader.addEventListener("loadend", (evt) => {
    // (B1) GET HTML TABLE
    var table = document.getElementById("demoB");
    table.innerHTML = "";

    // (B2) GET THE FIRST WORKSHEET
    var workbook = XLSX.read(evt.target.result, {type: "binary"}),
        worksheet = workbook.Sheets[workbook.SheetNames[0]],
        range = XLSX.utils.decode_range(worksheet["!ref"]);

    // (B3) READ EXCEL CELLS & INSERT ROWS/COLUMNS
    for (let row=range.s.r; row<=range.e.r; row++) {
      let r = table.insertRow();
      for (let col=range.s.c; col<=range.e.c; col++) {
        let c = r.insertCell(),
        xcell = worksheet[XLSX.utils.encode_cell({r:row, c:col})];
        c.innerHTML = xcell.v;
      }
    }
  });

  // (C) START - READ SELECTED EXCEL FILE
  reader.readAsArrayBuffer(evt.target.files[0]);
};
Lastly, not going to explain this line-by-line. But when the user picks a file with <input type="file">:
- We create a
new FileReader()to read the selected Excel file. - Use SheetJS to loop through the rows and columns, and generate the HTML table.
- Read the selected Excel file as an array buffer. This effectively starts (B).
COMPATIBILITY CHECKS
- Arrow Functions – CanIUse
- File Reader – CanIUse
This example works on all modern “Grade A” browsers.
LINKS & REFERENCES
- SheetJS – GitHub
- Javascript Read Excel File Into Array/JSON – Code Boxx
- How To Read Files In Javascript – Code Boxx
THE END

Thank you for reading, and we have come to the end. I hope that it has helped you to better understand, and if you want to share anything with this guide, please feel free to comment below. Good luck and happy coding!
Post Views: 116
In this tutorial, you can find how to read excel files using javascript and display excel sheet data on web pages in HTML table format using javascript. In the previous, one of our tutorials, in which we have already seen how to convert HTML table data to Excel files using the SheetJS library. Now in this tutorial also we will be using the SheetJS JavaScript library and by using the JavaScript library, we will convert the Excel file data into an HTML table and display it on the web page.
First, we have to include the Bootstrap Stylesheet and SheetJS library link at the header of our HTML page.
After this under this HTML page, we have to create one file tag for select file excel from the local computer.
And below this file, we have to create one division tag to display excel sheet data on the web page in HTML table format.
Next, we have to move on to writing JavaScript code, so first store file tag property under one variable.
Next, we need to write the JavaScript code on the change event, so when the user has selected a file from the local computer using the file tag, the JavaScript code should be executed.
excel_file.addEventListener(‘change’, (event) => {
});
Under this change event code first, we want to check the selected file format .xls or .xlsx. If the selected file is not an Excel file then it will display an error on the web page, and if the selected file is Excel then it will proceed to display the Excel file data on the web page.
After a check, the validation error, now read the file using the FileReader object. Here file must be read ads ArrayBuffer bypassing the file object using event.target.files[0].
IF the selected file is a proper excel file then we need to convert what we have got from the FileReader object to Unit8Array object by passing Filereader result into Unit8Array constructor.
Next, we have pass this Unit8Array data in SheetJS read() function, and it will return the selected excel workbook object.
After getting the workbook object, next we have to get the sheet name of the selected excel file. So here SheetNames variable will return sheet name in array format.
Once we have to get the sheet name, now we want to get the first sheet data in JSON format, so we can get by SheetJS sheet_to_json() function by passing the workbook first sheet name.
Once we have to get the first sheet data in JSON format, next we have to simply write JavaScript code and convert that JSON data into an HTML format and display it under division tag with id excel_data. So it will display excel file data on the web page in HTML table format.
So once you have followed all the above steps then you can check output in the browser. So when we have selected an excel file then it will display excel sheet data on the web page in HTML table format without a refresh of the web page. So in this tutorial, we have seen how to convert Excel files to HTML tables at the client-side by using the SheetJS JavaScript library at the client-side. You can find the complete source code here.
- Author
- Recent Posts

Tagged : Excel data / HTML / Javascript / SheetJS