
The Excel Importer allows importing structured Excel files into available content types.
- Structured: Each Sheet in the Excel file should have the same name as the Content Type into which its contents will be imported. Additionally, the columns names of the sheet should be identical to the machine names of the Content Type fields.
- Entity References: The name/title of Entity Reference fields (mostly Taxonomy Terms), should be used. This is actually the pain point that this module solves as compared to CSV Importer module.
Usage
- Navigate Excel Import page, i.e.
/excel-import - Read the introductory text there to make sure the structure of the document is what is expected.
- Select your Excel file and upload it.
- Click on Save button.
Administer Settings
- Navigate Excel Importer Settings page, i.e.
/admin/config/content/excel_importer - Add in the introductory text; this can include links to template files or documentation page.
- Choose the Content Types that should be available for importing Excel Data into.
- Remember, the template Excel file should have at least one of these content types as a sheet.
- Click on Save Configuration button.
Dependencies
This module requires the phpoffice/phpspreadsheet library. This is handled as a composer dependency.
Observation
- there should be no column with the name «type»
- does not allow creation of taxonomy terms on the fly
- does not handle multi-value fields
- Google SpreadSheets and Numbers exported XLSX files have issues with empty rows
Resources
Here is a Sample Excel file for the base Article Content Type to get started with.
Project information
Releases
1.1.10
released 23 September 2021
Works with Drupal: ^8.8 || ^9
✓ Recommended by the project’s maintainer.
Improve CT Mapping Error Message
1.0.5
released 13 November 2020
Works with Drupal: ^8.8 || ^9
- View all releases

As a Drupal developer, you might have come with a situation where you have to integrate Drupal websites with other third-party system. So here third party systems provide data in a CSV or excel format that we have to show in the Drupal website.
In this case, we have to import this data to one or more content type in Drupal.
There are excel import modules available that will do the job. But in these modules, you can use for direct import to content types. But most of the cases you have to work on each row to clean the data and also various validations on each data and assign to various content type based on conditions in cell values. For these purpose you have to write your own custom code.
So here I am going to explain how we can write our own excel import functionality in our custom module in Drupal 8.
before starting project. Install php spreadsheet library using the below command in your project folder.
composer require phpoffice/phpspreadsheet
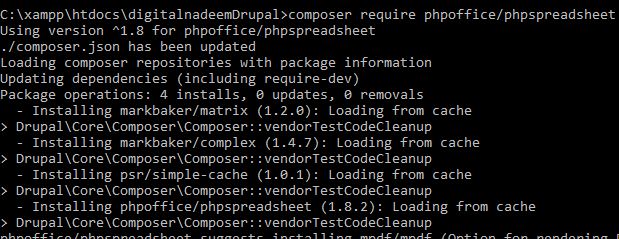
this will place phpspreadsheet library in your vendors directory and adds below entry in your project composer.json.
“phpoffice/phpspreadsheet”: “^1.8”
You can see library in phpoffice folder inside your project vendors directory.
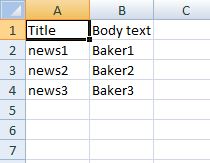
Here I have content type called news and trying to upload below sheet into the news content.
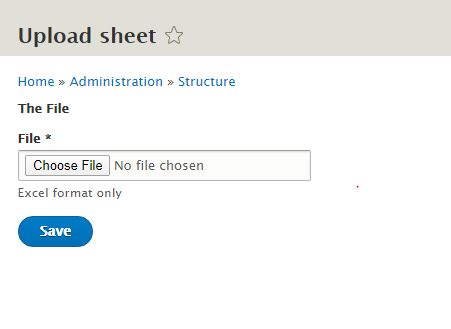
Now we are going to create form in our custom module to import csv file and create content programmatically using phpspreadsheet library. Here my custom module name is digitalnadeem_importexcel
First, we are creating custom form to import CSV or excel sheet.
For this, I have created a new entry in routing .yml file in my module.
|
digitalnadeem_importexcel.import_excel: path: ‘/admin/structure/digitalnadeem_importexcel/sheet/import’ defaults: _title: ‘Upload sheet’ _form: ‘Drupaldigitalnadeem_importexcelFormImportexcelForm’ requirements: _permission: ‘Import form’ |
Next I have created a form ImportExcelForm.php in my module path.
srcFormImportexcelForm.php
First, you have to include spread sheet library classes as shown below .
|
use PhpOfficePhpSpreadsheetSpreadsheet; use PhpOfficePhpSpreadsheetIOFactory; use PhpOfficePhpSpreadsheetStyleFill; use PhpOfficePhpSpreadsheetCellDataType; use PhpOfficePhpSpreadsheetStyleAlignment; use PhpOfficePhpSpreadsheetStyleBorder; |
in buildForm function include the below code to create upload form.
|
1 2 3 4 5 6 7 8 9 10 11 12 13 14 15 16 17 18 19 20 21 22 23 24 25 26 27 28 29 30 31 32 33 |
public function buildForm(array $form, FormStateInterface $form_state) { $form = array( ‘#attributes’ => array(‘enctype’ => ‘multipart/form-data’), ); $form[‘file_upload_details’] = array( ‘#markup’ => t(‘<b>The File</b>’), ); $validators = array( ‘file_validate_extensions’ => array(‘csv’), ); $form[‘excel_file’] = array( ‘#type’ => ‘managed_file’, ‘#name’ => ‘excel_file’, ‘#title’ => t(‘File *’), ‘#size’ => 20, ‘#description’ => t(‘Excel format only’), ‘#upload_validators’ => $validators, ‘#upload_location’ => ‘public://content/excel_files/’, ); $form[‘actions’][‘#type’] = ‘actions’; $form[‘actions’][‘submit’] = array( ‘#type’ => ‘submit’, ‘#value’ => $this—>t(‘Save’), ‘#button_type’ => ‘primary’, ); return $form; } |
Below the upload location, you have to create in your project directory.
‘#upload_location’ => ‘public://content/excel_files/
In my case I have created in folder in below path.
sitesdefaultfilescontentexcel_files
So uploaded files will be stored in this path for processing.
As mentioned in form configuration I have provided csv format only allowed in validation. You can provide xlsx in an array if you are uploading a normal excel sheet.
Also added below validation function.
|
public function validateForm(array &$form, FormStateInterface $form_state) { if ($form_state->getValue(‘excel_file’) == NULL) { $form_state->setErrorByName(‘excel_file’, $this->t(‘upload proper File’)); } } |
Now we are going to implement import functionality in our submit form handler.
In submit first we are getting file name that uploaded. And generating path to file uploaded directory .
|
$file = Drupal::entityTypeManager()—>getStorage(‘file’) —>load($form_state—>getValue(‘excel_file’)[0]); $full_path = $file—>get(‘uri’)—>value; $file_name = basename($full_path); |
Next we are using phpspreadsheet functions to get extract cell values from uploaded document.
The below code will iterate through each row and cells and store values in an array say variable $rows.
|
1 2 3 4 5 6 7 8 9 10 11 12 13 14 15 16 17 18 19 20 |
$inputFileName = Drupal::service(‘file_system’)—>realpath(‘public://content/excel_files/’.$file_name); $spreadsheet = IOFactory::load($inputFileName); $sheetData = $spreadsheet—>getActiveSheet(); $rows = array(); foreach ($sheetData—>getRowIterator() as $row) { //echo «<pre>»;print_r($row);exit; $cellIterator = $row—>getCellIterator(); $cellIterator—>setIterateOnlyExistingCells(FALSE); $cells = []; foreach ($cellIterator as $cell) { $cells[] = $cell—>getValue(); } $rows[] = $cells; } |
Here out put of $rows array will be as shown below.
|
1 2 3 4 5 6 7 8 9 10 11 12 13 14 15 16 17 18 19 20 21 22 23 24 25 26 27 |
Array ( [0] => Array ( [0] => Title [1] => Body text ) [1] => Array ( [0] => news1 [1] => Baker1 ) [2] => Array ( [0] => news2 [1] => Baker2 ) [3] => Array ( [0] => news3 [1] => Baker3 ) ) |
Here I used below sheet to import.
Here first row is header row . this we don’t want to import to the news content .So for removing first row use below array_shift function.
array_shift($rows);
Next we are iterating through $rows array to insert rows to news content.
So first we will check wether node exists by comparing title fields.
Se below code to create and update node from excel data.
|
1 2 3 4 5 6 7 8 9 10 11 12 13 14 15 16 17 18 19 20 21 22 23 24 |
foreach($rows as $row){ $values = Drupal::entityQuery(‘node’)—>condition(‘title’, $row[0])—>execute(); $node_not_exists = empty($values); if($node_not_exists){ /*if node does not exist create new node*/ $node = Drupal::entityTypeManager()—>getStorage(‘node’)—>create([ ‘type’ => ‘news’, //===here news is the content type mechine name ‘title’ => $row[0], ‘body’ => ‘body content updated’ ]); $node—>save(); }else{ /*if node exist update the node*/ $nid = reset($values); $node = DrupalnodeEntityNode::load($nid); $node—>setTitle($row[0]); $node—>set(«body», $row[1]); //$node->set(«field_name», ‘New value’); $node—>save(); } } Drupal::messenger()—>addMessage(‘imported successfully’); |
Now you are done with the implementation. Flush the cache you can see below form while accessing URL – http://your-site.com/admin/structure/digitalnadeem_importexcel/sheet/import
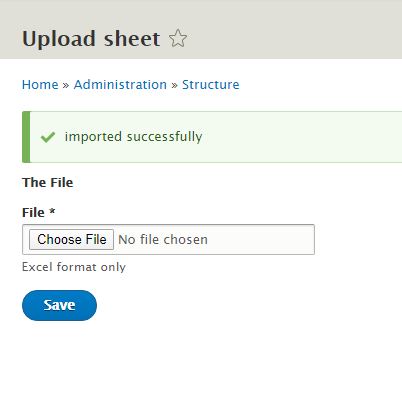
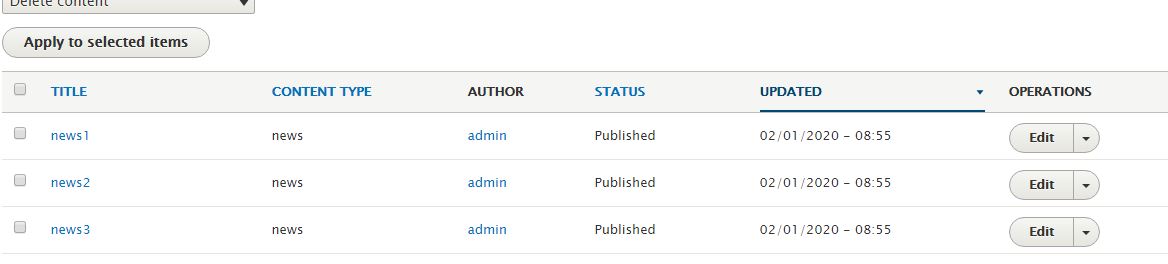
See imported contents in the admin content page.
Conclusion
Here I explained how we can import a single excel/csv sheet to Drupal. Most of the third party system can have API ‘s which can place excel/csv data sheet in a directory in a regular interval of time. In that case, follow the same approach that I explained above and a create crone job to take the file from a specific location. So cron job will insert content from excel in regular intervals. This way you can automate the whole process.
Click here to download the full source code of the custom module explained in this article.
Today we will learn how to migrate content from Microsoft Excel and LibreOffice Calc files into Drupal using the Migrate Spreadsheet module. We will give instructions on getting the module and its dependencies. Then, we will present how to configure the module for spreadsheets with or without a header row. There are two example migrations: images and paragraphs. Let’s get started.
Getting the code
You can get the full code example at https://github.com/dinarcon/ud_migrations The module to enable is `UD Google Sheets, Microsoft Excel, and LibreOffice Calc source migration` whose machine name is `ud_migrations_sheets_sources`. It comes with four migrations: `udm_google_sheets_source_node.yml`, `udm_libreoffice_calc_source_paragraph.yml`, `udm_microsoft_excel_source_image.yml`, and `udm_backup_csv_source_node.yml`. The image migration uses a Microsoft Excel file as source. The paragraph migration uses a LibreOffice Calc file as source. The CSV migration is a backup in case the Google Sheet is not available. To execute the last one you would need the Migrate Source CSV module.
You can get the Migrate Google Sheets module using composer: `composer require ‘drupal/migrate_spreadsheet:^1.0’. This module depends on the `PHPOffice/PhpSpreadsheet` library and many PHP extensions including `ext-zip`. Check this page for a full list of dependencies. If any required extension is missing the installation will fail. If your Drupal site is not composer-based, you will not be able to use Migrate Spreadsheet, unless you go around a lot of hoops.
Understanding the example set up
This migration will reuse the same configuration from the introduction to paragraph migrations example. Refer to that article for details on the configuration. The destinations will be the same content type, paragraph type, and fields. The source will be changed in today’s example, as we use it to explain Microsoft Excel and LibreOffice Calc migrations. The end result will again be nodes containing an image and a paragraph with information about someone’s favorite book. The major difference is that we are going to read from different sources.
Note: You can literally swap migration sources without changing any other part of the migration. This is a powerful feature of ETL frameworks like Drupal’s Migrate API. Although possible, the example includes slight changes to demonstrate various plugin configuration options. Also, some machine names had to be changed to avoid conflicts with other examples in the demo repository.
Understanding the source document and plugin configuration
In any migration project, understanding the source is very important. For Microsoft Excel and LibreOffice Calc migrations, the primary thing to consider is whether or not the file contains a row of headers. Also, a workbook (file) might contain several worksheets (tabs). You can only migrate from one worksheet at a time. The example documents have two worksheets: `UD Example Sheet` and `Do not peek in here`. We are going to be working with the first one.
The `spreadsheet` source plugin exposes seven configuration options. The values to use might change depending on the presence of a header row, but all of them apply for both types of document. Here is a summary of the available configurations:
- `file` is required. It stores the path to the document to process. You can use a relative path from the Drupal root, an absolute path, or stream wrappers.
- `worksheet` is required. It contains the name of the one worksheet to process.
- `header_row` is optional. This number indicates which row contains the headers. Contrary to CSV migrations, the row number is not zero-based. So, set this value to `1` if headers are on the first row, `2` if they are on the second, and so on.
- `origin` is optional and defaults to `A2`. It indicates which non-header cell contains the first value you want to import. It assumes a grid layout and you only need to indicate the position of the top-left cell value.
- `columns` is optional. It is the list of columns you want to make available for the migration. In case of files with a header row, use those header values in this list. Otherwise, use the default title for columns: `A`, `B`, `C`, etc. If this setting is missing, the plugin will return all columns. This is not ideal, especially for very large files containing more columns than needed for the migration.
- `row_index_column` is optional. This is a special column that contains the row number for each record. This can be used as a unique identifier for the records in case your dataset does not provide a suitable value. Exposing this special column in the migration is up to you. If so, you can come up with any name as long as it does not conflict with header row names set in the `columns` configuration. Important: this is an autogenerated column, not any of the columns that comes with your dataset.
- `keys` is optional and, if not set, it defaults to the value of `row_index_column`. It contains an array of column names that uniquely identify each record. For files with a header row, you can use the values set in the `columns` configuration. Otherwise, use default column titles like `A`, `B`, `C`, etc. In both cases, you can use the `row_index_column` column if it was set. Each value in the array will contain database storage details for the column.
Note that nowhere in the plugin configuration you specify the file type. The same setup applies for both Microsoft Excel and LibreOffice Calc files. The library will take care of detecting and validating the proper type.
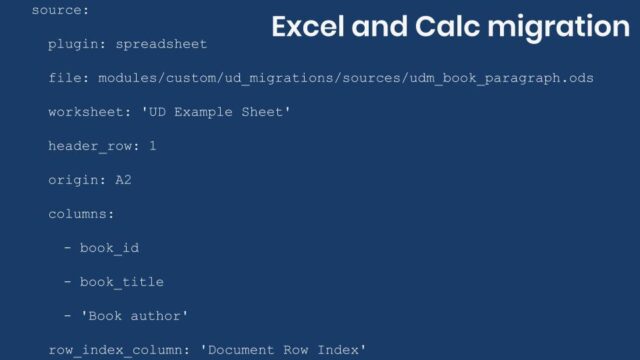
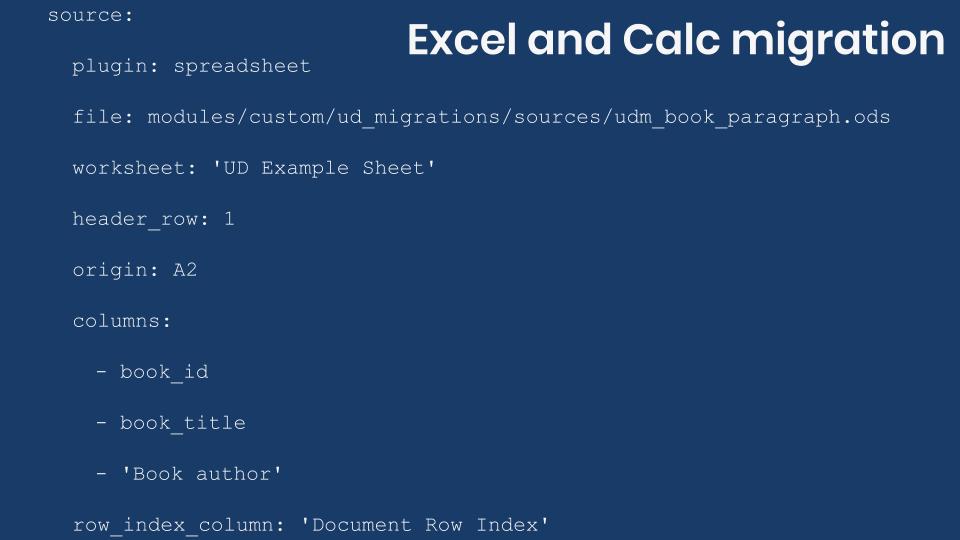
This example is for the paragraph migration and uses a LibreOffice Calc file. The following snippets shows the `UD Example Sheet` worksheet and the configuration of the source plugin:
book_id, book_title, Book author
B10, The definite guide to Drupal 7, Benjamin Melançon et al.
B20, Understanding Drupal Views, Carlos Dinarte
B30, Understanding Drupal Migrations, Mauricio Dinarte
source:
  plugin: spreadsheet
  file: modules/custom/ud_migrations/ud_migrations_sheets_sources/sources/udm_book_paragraph.ods
  worksheet: 'UD Example Sheet'
  header_row: 1
  origin: A2
  columns:
    - book_id
    - book_title
    - 'Book author'
  row_index_column: 'Document Row Index'
  keys:
    book_id:
      type: string
The name of the plugin is `spreadsheet`. Then you use the `file` configuration to indicate the path to the file. In this case, it is relative to the Drupal root. The `UD Example Sheet` is set as the `worksheet` to process. Because the first row of the file contains the header rows, then `header_row` is set to `1` and `origin` to `A2`.
Then specify which `columns` to make available to the migration. In this case, we listed all of them so this setting could have been left unassigned. It is better to get into the habit of being explicit about what you import. If the file were to change and more columns were added, you would not have to update the file to prevent unneeded data to be fetched. The `row_index_column` is not actually used in the migration, but it is set to show all the configuration options in the example. The values will be `1`, `2`, `3`, etc. Finally, the `keys` is set the column that serves as unique identifiers for the records.
The rest of the migration is almost identical to the CSV example. Small changes were made to prevent machine name conflicts with other examples in the demo repository. For reference, the following snippet shows the process and destination sections for the LibreOffice Calc paragraph migration.
process:
  field_ud_book_paragraph_title: book_title
  field_ud_book_paragraph_author: 'Book author'
destination:
  plugin: 'entity_reference_revisions:paragraph'
  default_bundle: ud_book_paragraph
Now let’s consider an example of a spreadsheet file that does not have a header row. This example is for the image migration and uses a Microsoft Excel file. The following snippets shows the `UD Example Sheet` worksheet and the configuration of the source plugin:
P01, https://agaric.coop/sites/default/files/pictures/picture-15-1421176712.jpg
P02, https://agaric.coop/sites/default/files/pictures/picture-3-1421176784.jpg
P03, https://agaric.coop/sites/default/files/pictures/picture-2-1421176752.jpg
source:
  plugin: spreadsheet
  file: modules/custom/ud_migrations/ud_migrations_sheets_sources/sources/udm_photos.xlsx
  worksheet: 'UD Example Sheet'
  # The file does not have a headers row.
  header_row: null
  origin: A1
  # If no header row is available, you use the spreadsheet's column names: A, B, C, etc.
  # If you do not manually add a list of columns, all columns that contain data in the worksheet would be returned.
  # The same names need to used in the process section.
  columns:
    - A # This column contains the photo ID. Example: 'P01'.
    - B # This column contains the photo URL.
  row_index_column: null
  keys:
    A:
      type: string
The `plugin`, `file`, amd `worksheet` configurations follow the same pattern as the paragraph migration. The difference for files with no header row is reflected in the other parameters. `header_row` is set to `null` to indicate the lack of headers and `origin` is to `A1`. Because there are no column names to use, you have to use the ones provided by the spreadsheet. In this case, we want to use the first two columns: `A` and `B`. Contrary to CSV migrations, the `spreadsheet` plugin does not allow you to define aliases for unnamed columns. That means that you would have to use `A`, `B` in the process section to refer to this columns.
`row_index_column` is set to `null` because it will not be used. And finally, in the `keys` section, we use the `A` column as the primary key. This might seem like an odd choice. Why use that value if you could use the `row_index_column` as the unique identifier for each row? If this were an isolated migration, that would be a valid option. But this migration is referenced from the node migration explained in the previous example. The lookup is made based on the values stored in the `A` column. If we used the index of the row as the unique identifier, we would have to update the other migration or the lookup would fail. In many cases, that is not feasible nor desirable.
Except for the name of the columns, the rest of the migration is almost identical to the CSV example. Small changes were made to prevent machine name conflicts with other examples in the demo repository. For reference, the following snippet shows part of the process and destination section for the Microsoft Excel image migration.
process:
  psf_destination_filename:
    plugin: callback
    callable: basename
    source: B # This is the photo URL column.
destination:
  plugin: 'entity:file'
Refer to this entry to know how to run migrations that depend on others. In this case, you can execute them all by running: `drush migrate:import –tag=’UD Sheets Source’`. And that is how you can use Microsoft Excel and LibreOffice Calc files as the source of your migrations. This example is very interesting because each of the migration uses a different source type. The node migration explained in the previous post uses a Google Sheet. This is a great example of how powerful and flexible the Migrate API is.
What did you learn in today’s blog post? Have you migrated from Microsoft Excel and LibreOffice Calc files before? If so, what challenges have you found? Did you know the source plugin configuration is not dependent on the file type? Share your answers in the comments. Also, I would be grateful if you shared this blog post with others.
Today we will learn how to migrate content from Microsoft Excel and LibreOffice Calc files into Drupal using the Migrate Spreadsheet module. We will give instructions on getting the module and its dependencies. Then, we will present how to configure the module for spreadsheets with or without a header row. There are two example migrations: images and paragraphs. Let’s get started.
Getting the code
You can get the full code example at https://github.com/dinarcon/ud_migrations.
The module to enable, as in yesterday’s post in which we imported Google Sheets, is UD Google Sheets, Microsoft Excel, and LibreOffice Calc source migration whose machine name is ud_migrations_sheets_sources. It comes with four migrations: udm_google_sheets_source_node.yml, udm_libreoffice_calc_source_paragraph.yml, udm_microsoft_excel_source_image.yml, and udm_backup_csv_source_node.yml. The image migration uses a Microsoft Excel file as source. The paragraph migration uses a LibreOffice Calc file as source. The CSV migration is a backup in case the Google Sheet is not available. To execute the last one you would need the Migrate Source CSV module.
You can get the Migrate Spreadsheets module using composer: composer require drupal/migrate_spreadsheet:^1.0. This module depends on the PHPOffice/PhpSpreadsheet library and many PHP extensions including ext-zip. Check this page for a full list of dependencies. If any required extension is missing the installation will fail. If your Drupal site is not composer-based, you will not be able to use Migrate Spreadsheet, unless you jump through a lot of hoops.
Understanding the example set up
This migration will reuse the same configuration from the introduction to paragraph migrations example. Refer to that article for details on the configuration. The destinations will be the same content type, paragraph type, and fields. The source will be changed in today’s example, as we use it to explain Microsoft Excel and LibreOffice Calc migrations. The end result will again be nodes containing an image and a paragraph with information about someone’s favorite book. The major difference is that we are going to read from different sources.
Note: You can literally swap migration sources without changing any other part of the migration. This is a powerful feature of ETL frameworks like Drupal’s Migrate API. Although possible, the example includes slight changes to demonstrate various plugin configuration options. Also, some machine names had to be changed to avoid conflicts with other examples in the demo repository.
Understanding the source document and plugin configuration
In any migration project, understanding the source is very important. For Microsoft Excel and LibreOffice Calc migrations, the primary thing to consider is whether or not the file contains a row of headers. Also, a workbook (file) might contain several worksheets (tabs). You can only migrate from one worksheet at a time. The example documents have two worksheets: UD Example Sheet and Do not peek in here. We are going to be working with the first one.
The spreadsheet source plugin exposes seven configuration options. The values to use might change depending on the presence of a header row, but all of them apply for both types of document. Here is a summary of the available configurations:
fileis required. It stores the path to the document to process. You can use a relative path from the Drupal root, an absolute path, or stream wrappers.worksheetis required. It contains the name of the one worksheet to process.header_rowis optional. This number indicates which row containing the headers. Contrary to CSV migrations, the row number is not zero-based. So, set this value to1if headers are on the first row,2if they are on the second, and so on.originis optional and defaults toA2. It indicates which non-header cell contains the first value you want to import. It assumes a grid layout and you only need to indicate the position of the top-left cell value.columnsis optional. It is the list of columns you want to make available for the migration. In case of files with a header row, use those header values in this list. Otherwise, use the default title for columns:A,B,C, etc. If this setting is missing, the plugin will return all columns. This is not ideal, especially for very large files containing more columns than needed for the migration.row_index_columnis optional. This is a special column that contains the row number for each record. This can be used as unique identifier for the records in case your dataset does not provide a suitable value. Exposing this special column in the migration is up to you. If so, you can come up with any name as long as it does not conflict with header row names set in thecolumnsconfiguration. Important: this is an autogenerated column, not any of the columns that come with your dataset.keysis optional and, if not set, it defaults to the value ofrow_index_column. It contains an array of column names that uniquely identify each record. For files with a header row, you can use the values set in thecolumnsconfiguration. Otherwise, use default column titles likeA,B,C, etc. In both cases, you can use therow_index_columncolumn if it was set. Each value in the array will contain database storage details for the column.
Note that nowhere in the plugin configuration you specify the file type. The same setup applies for both Microsoft Excel and LibreOffice Calc files. The library will take care of detecting and validating the proper type.
Migrating spreadsheet files with a header row
This example is for the paragraph migration and uses a LibreOffice Calc file. The following snippets shows the UD Example Sheet worksheet and the configuration of the source plugin:
book_id, book_title, Book author
B10, The definitive guide to Drupal 7, Benjamin Melançon et al.
B20, Understanding Drupal Views, Carlos Dinarte
B30, Understanding Drupal Migrations, Mauricio Dinarte
source:
plugin: spreadsheet
file: modules/custom/ud_migrations/ud_migrations_sheets_sources/sources/udm_book_paragraph.ods
worksheet: 'UD Example Sheet'
header_row: 1
origin: A2
columns:
- book_id
- book_title
- 'Book author'
row_index_column: 'Document Row Index'
keys:
book_id:
type: stringThe name of the plugin is spreadsheet. Then you use the file configuration to indicate the path to the file. In this case, it is relative to the Drupal root. The UD Example Sheet is set as the worksheet to process. Because the first row of the file contains the header rows, then header_row is set to 1 and origin to A2.
Then specify which columns to make available to the migration. In this case, we listed all of them so this setting could have been left unassigned. It is better to get into the habit of being explicit about what you import. If the file were to change and more columns were added, you would not have to update the file to prevent unneeded data to be fetched. The row_index_column is not actually used in the migration, but it is set to show all the configuration options in the example. The values will be 1, 2, 3, etc. Finally, the keys is set the column that serves as unique identifiers for the records.
The rest of the migration is almost identical to the CSV example. Small changes were made to prevent machine name conflicts with other examples in the demo repository. For reference, the following snippet shows the process and destination sections for the LibreOffice Calc paragraph migration.
process:
  field_ud_book_paragraph_title: book_title
  field_ud_book_paragraph_author: 'Book author'
destination:
  plugin: 'entity_reference_revisions:paragraph'
  default_bundle: ud_book_paragraph
Migrating spreadsheet files without a header row
Now let’s consider an example of a spreadsheet file that does not have a header row. This example is for the image migration and uses a Microsoft Excel file. The following snippets shows the UD Example Sheet worksheet and the configuration of the source plugin:
P01, https://agaric.coop/sites/default/files/pictures/picture-15-1421176712.jpg
P02, https://agaric.coop/sites/default/files/pictures/picture-3-1421176784.jpg
P03, https://agaric.coop/sites/default/files/pictures/picture-2-1421176752.jpg
source:
plugin: spreadsheet
file: modules/custom/ud_migrations/ud_migrations_sheets_sources/sources/udm_book_paragraph.ods
worksheet: 'UD Example Sheet'
header_row: 1
origin: A2
columns:
- book_id
- book_title
- 'Book author'
row_index_column: 'Document Row Index'
keys:
book_id:
type: stringThe plugin, file, amd worksheet configurations follow the same pattern as the paragraph migration. The difference for files with no header row is reflected in the other parameters. header_row is set to null to indicate the lack of headers and origin is to A1. Because there are no column names to use, you have to use the ones provided by the spreadsheet. In this case, we want to use the first two columns: A and B. Contrary to CSV migrations, the spreadsheet plugin does not allow you to define aliases for unnamed columns. That means that you would have to use A, B in the process section to refer to these columns.
row_index_column is set to null because it will not be used. And finally, in the keys section, we use the A column as the primary key. This might seem like an odd choice. Why use that value if you could use the row_index_column as the unique identifier for each row? If this were an isolated migration, that would be a valid option. But this migration is referenced from the node migration explained in the previous example. The lookup is made based on the values stored in the A column. If we used the index of the row as the unique identifier, we would have to update the other migration or the lookup would fail. In many cases, that is not feasible nor desirable.
Except for the name of the columns, the rest of the migration is almost identical to the CSV example. Small changes were made to prevent machine name conflicts with other examples in the demo repository. For reference, the following snippet shows part of the process and destination section for the Microsoft Excel image migration.
process:
  psf_destination_filename:
    plugin: callback
    callable: basename
    source: B # This is the photo URL column.
destination:
  plugin: 'entity:file'
Refer to this entry to know how to run migrations that depend on others. In this case, you can execute them all by running: drush migrate:import --tag='UD Sheets Source'. And that is how you can use Microsoft Excel and LibreOffice Calc files as the source of your migrations. This example is very interesting because each of the migration uses a different source type. The node migration explained in the previous post uses a Google Sheet. This is a great example of how powerful and flexible the Migrate API is.
What did you learn in today’s blog post? Have you migrated from Microsoft Excel and LibreOffice Calc files before? If so, what challenges have you found? Did you know the source plugin configuration is not dependent on the file type? Share your answers in the comments. Also, I would be grateful if you shared this blog post with others.
Next: Defining Drupal migrations as configuration entities with the Migrate Plus module
This blog post series, cross-posted at UnderstandDrupal.com as well as here on Agaric.coop, is made possible thanks to these generous sponsors. Contact Understand Drupal if your organization would like to support this documentation project, whether it is the migration series or other topics.
Sign up to be notified when Agaric gives an online or in-person migration training:
I want to extract the contents of a excel file and populate them in a new post( page) . I’d like to maintain the row-column relationship.
Ex:
sample.xls
Name | Age | Sex
A | 20 | M
B | 30 | F
C | 40 | M
In Drupal (the one which i want)
Name | Age | Sex
A | 20 | M
B | 30 | F
C | 40 | M
Is there any module in Drupal to do that or should I create a new one for it? I wish some drupaler came across this situation 
![]()
Cœur
36.7k25 gold badges191 silver badges259 bronze badges
asked Feb 3, 2010 at 7:51
![]()
2
There’s no module for what you want to do based on your comment below the question that I’m aware of. Unfortunately when you export an Excel spreadsheet to HTML Excel will attach all kinds of formatting to the result and you probably don’t want that. One trick would be to save the spreadsheet as a .csv file (comma-separated values) and then use a utility to convert the CSV file into an HTML table that you can paste into your node content. I haven’t used any of the utilities in this set of Google search results but there’s no shortage of ones you can try, anyway.
answered Feb 4, 2010 at 12:57
![]()
alxpalxp
6,1031 gold badge22 silver badges19 bronze badges
1
Try the FeedAPI module, it is able to parse CSV files, and you can assign data to specific fields, should do exactly what you need.
answered Feb 8, 2010 at 2:47
![]()
DecipherDecipher
5163 silver badges5 bronze badges
I think this old discussion contains the resource you need.
![]()
answered Feb 12, 2010 at 10:59
![]()
I’m sure there’s a better way to use this library, but in a pinch I downloaded http://code.google.com/p/php-excel-reader
and then used the php filter in a regular drupal node and wrote
<?php
error_reporting(E_ALL ^ E_NOTICE);
require_once 'path/to/excel/library/excel_reader2.php';
$data = new Spreadsheet_Excel_Reader("path/to/uploaded/spreadsheet/myexcelsheet.xls");
echo $data->dump($row_numbers=false,$col_letters=false,$sheet=0,$table_class='excel');
?>
There are other options at http://code.google.com/p/php-excel-reader/wiki/Documentation
answered Dec 28, 2011 at 21:41
![]()
I’m using Importer for uploads… The Importer module provides this tip:
*To enable the support for .xls files download the «excel_reader2.inc» file from here and place in the module directory.*
The «here» in the above points to: http://code.google.com/p/php-excel-reader/
Rename the file from excel_reader2.php to excel_reader2.inc and drag it into the modules/importer folder. That’s it.. it’ll let you upload xls files directly and convert them to cvs for you. The rest of the formula is just CSS or whatever you’re using to display it like you require.
answered May 22, 2012 at 10:59
![]()
1