
Instructions
- Word 2007: Click on the Office icon and select “Word Options.”
- Word 2010/2013/2016: Click on the File ribbon and select “Options.”
- Click on “Add-ins.”
- Change the “Manage” options to “Disabled Items.”
- Click Go.
- Highlight any EndNote item(s) and click “Enable.”
- Click OK/Enable.
- Restart Word.
Contents
- 1 How do I link EndNote X9 with word?
- 2 How do I link EndNote to word 365?
- 3 How do I connect EndNote 20 to Word?
- 4 How do I link EndNote to Word 2021?
- 5 Why is my EndNote not connecting to Word?
- 6 How do I add EndNote to Word 365 for Mac?
- 7 How do I add EndNote toolbar to Word for Mac?
- 8 Why is my EndNote greyed out in Word?
- 9 How do I add EndNote to Word for Mac online?
- 10 Why EndNote is not active in Word Mac?
- 11 Can I use EndNote with word?
- 12 Why is EndNote not inserting citation properly?
- 13 How do I add EndNote X6 to Word 2016?
- 14 Can you use EndNote on Microsoft Word online?
- 15 Can I use EndNote online with Word?
How do I link EndNote X9 with word?
Please follow the steps below to enable EndNote tools in COM Add-Ins: Word: File > Options > Add-ins. Choose COM Add-ins in the Manage drop-down menu, and then click the Go button. Select EndNote Cite While You Write (If it is unchecked), and then click OK.
Is EndNote X8, X9 or EndNote 20 CWYW compatible with MS Office 365 / MS Word 365?
- Browse to the EndNote Program Files folder:
- Run the ‘Configure EndNote.exe’ utility.
- Make sure ‘Configure EndNote components’ is selected and click Next.
- Select Cite While You Write add-in for Microsoft Office and click Next.
- Click Finish.
How do I connect EndNote 20 to Word?
- Run the “Configure EndNote.exe” utility.
- Make sure “Configure EndNote components” is selected and click Next.
- Select Cite While You Write add-in for Microsoft Office and click Next.
- Click Finish.
- Open Microsoft Word and look for the EndNote X7/X8/X9/20 tools in the ribbon.
How do I link EndNote to Word 2021?
Open Word and click on the File ribbon and select “Options.” Click on “Add-ins.” Click Go. Select EndNote Cite While You Write (If it is unchecked).
Why is my EndNote not connecting to Word?
Under the heading Active Application Add-ins, check whether you have the EndNote Cite While You Write COM Add-in (see the Type column). If it is not listed, then go down to the bottom of the window to the Manage drop-down list. With COM Add-ins showing, click Go…The EndNote ribbon should appear immediately in Word.
How do I add EndNote to Word 365 for Mac?
Information
- Open a Word document.
- Go to “Tools > Templates and Add-Ins”.
- You should see the below EndNote files listed under “Global Templates and Add-ins” EndNote CWYW Word 2016.dotm. and. EndNote CWYW Word 2016.bundle. or. EndNote CWYW Word 16.bundle.
- If any of these file(s) is unchecked, check it, and click OK.
How do I add EndNote toolbar to Word for Mac?
Check the box in front of the “Cite While You Write” option. Click next until the Customizer is finished. Open a library. You should now see the EndNote tab in the Ribbon of Word 2016/2019/365.
Why is my EndNote greyed out in Word?
Since Protected mode does not support any kind of macros, the EndNote tools will appear grayed out.You may need to either Unprotect the document, or make sure to open the document so protected mode is not triggered. The solution to this issue is to check the document itself, to make sure it is not in Protected Mode.
How do I add EndNote to Word for Mac online?
EndNote Online with MS Word
- In Microsoft Word, go to the EndNote tab.
- Click the Insert Citations button.
- Enter some search terms and click the Find button.
- Select the reference(s) you wish to use.
- Click the Insert button.
Why EndNote is not active in Word Mac?
D.
Mac OS Mojave and higher versions include new Security & Privacy functions which can prevent EndNote from being able to correctly automate.Here, make sure that both “Microsoft Word” and “EndNote X#” are both turned on. With this automation turned off, the Cite While You Write functions will not work.
Can I use EndNote with word?
EndNote works with Microsoft Word and Open Office Writer to insert citations into documents. EndNote will format citations and bibliographies into a nominated style. Styles can include footnotes and numbering.
Why is EndNote not inserting citation properly?
If EndNote is not formatting your citation correctly, first check that the correct ‘Reference Type’ for the record is selected in EndNote. If the citation is still incorrect, you will need to either edit it manually by converting to Plain text, or edit the output style.You can now edit citations as needed.
How do I add EndNote X6 to Word 2016?
64-bit Machine with 32-bit Version of Word:
- Browse to this EndNote folder: EndNote X6: C:Program Files (x86)EndNote X6Product-SupportCWYW.
- Copy these files: EndNote Cwyw.dot.
- Browse to this destination folder:
- Paste the files.
- Follow the installation steps above.
Can you use EndNote on Microsoft Word online?
EndNote Online Basic is adequate for most student needs. It is for use with web browsers in conjunction with Microsoft Word (for Mac or Windows). Go to myendnoteweb.com to register and set up your online access, or see the Creating an Account tutorial below.
Can I use EndNote online with Word?
Both EndNote Desktop and EndNote Online can work with Word to create bibliographies or insert references from your library into a Word document. You can then format the document into a citation style of your choice, e.g. Harvard, Vancouver.
Working with references in Word
EndNote works with Microsoft Word and Open Office Writer to insert citations into documents. EndNote will format citations and bibliographies into a nominated style. Styles can include footnotes and numbering.
Setting the Style
- In Word, select the EndNote tab.
- Click the drop down Style menu and select your chosen style from the list or Select Another Style… (e.g. Author-Date)

Inserting citations
There are various methods to insert citations into documents. The Insert Citation toolbar option can be used in Word to find a citation or insert a selected citation. You can also directly insert a citation from EndNote or copy and paste citations from EndNote to Word.
This is one method to insert citations.
- Open your Word document. Click into the text where you would like to place the citation.
- From the EndNote tab click Go to EndNote.
- Highlight the reference(s) that you wish to place in the document. Use the control key and mouse together to select more than one reference.
- Click on the Insert Citation toolbar button (keyboard shortcut : Alt-2 ).
Using APA 6th as an example, formatted citations appear as (Wu, Chan, & Ma, 2005). Unformatted citations have curly brackets and exposed record numbers {Wu, 2005 #34}. To format these citations, click Update Citations and Bibliography. Also do this if you edit the reference in EndNote after entering it in Word to make your edits appear. To unformat citations, click Convert Citations and Bibliography and select Convert to Unformatted Citations. This might be done to check that you selected the appropriate references from your EndNote library.
EndNote will generate a reference list/bibliography in the chosen style at the end of the document.
Editing citations and bibliographies
Editing Citations in Your Document
It is not possible to edit citations by typing over the citation as the edits are lost each time EndNote reformats the reference list.
Citations can be edited by clicking on a citation and selecting Edit & Manage Citation(s) from the EndNote tab. The citations will be selected in the Citations in document window. Make any of the following changes to the highlighted citation.
- Use the Prefix field to enter text to be displayed immediately before the citation text. Spaces are significant. e.g. Johnston (cited in Coles, 2005)
- Use the Suffix field for text after the citation text and for page numbers, e.g.(Coles, 2005, p.45)
- The Pages field does not operate for many styles as it does not display numbers, so use Suffix.
- Alter formatting to Exclude Author or Exclude Year. Other options are also available.
Editing Bibliography Layout in Your Document
Bibliography layout changes made using Word are replaced each time EndNote reformats the bibliography.
Edit the bibliography layout by clicking on the arrow next to Bibliography on the EndNote tab. Select the Layout tab. This provides options for changing the font, font size, indents, line spacing, and spacing between bibliography entries.
Instant Formatting
Instant formatting enables you to watch the reference list (bibliography) appear as you insert citations. If you are writing a long or complex document such as a thesis, it is recommended that instant formatting is turned off as it can be time-consuming to reformat each time a new citation is inserted. When finished writing the document or if you want to see a draft, click on Update Citations and Bibliography to format the citations and reference list. To continue work on the document, unformat the citations using the Convert Citations and Bibliography option.
It is essential to have unformatted citations when compiling a master document from separate documents, in order to create a single reference list at the end of the document.
To disable or enable Instant Formatting in the current document:
- Open a Word document. On the EndNote tab, select Go to EndNote and open your EndNote library.
- Return to Word and on the EndNote tab, click on the arrow next to Bibliography.
- Select the Instant Formatting tab.
- Select Turn Off or Turn On as appropriate. Click OK.
To disable or enable Instant Formatting for all documents:
- On the EndNote tab, select Preferences.
- Check or uncheck the Enable Instant Formatting on new Word documents option. This can be changed at any time.
Combine multiple Word documents
You can combine multiple Word documents which contain EndNote citations into a single document.
For example you may have created one document for each of the chapters of your thesis.
Note: you must use one EndNote library for all the documents or chapters you wish to combine.
To create a single bibliography at the end of the document:
- First create a backup copy of each of your documents.
- Open your EndNote library and leave it open.
- Open your first document, unformat the citations, and save the document with a new name: this will become your new combined document.
- Open the next document, unformat the citations, and copy and paste the text into the new combined document.
- Repeat this until you have unformatted and copied and pasted the text from all of your documents into the combined document.
- In Word select: Update citations and bibliography, and a single bibliography will be generated at the end of the document
To create a bibliography for each section or chapter:
- Combine your documents as specified above.
- At the end of each chapter or section in the combined document, select: Page Layout > Breaks and select one of the four options under Section Breaks: Next Page, Continuous, Even Page, or Odd Page. Next.
- Select a predefined style that creates bibliographies at the end of each section, such as APA 6th (sections), or Chicago 15th B (sections), etc…
If the style that you wish to use does not have a version for sections, you can modify an existing style, see the information on editing styles below.
Add a separate bibliography
A formatted reference list can be added to your document without using EndNote to insert citations.
- Open a Word Document.
- Go to the EndNote tab. Click Go to EndNote.
- Select references for your list using the mouse and holding down the Ctrl key while multiple references are selected.
- Click on Edit > Copy Formatted.
- Click the Return to Word Processor toolbar icon and select the place in the document where the references should be inserted.
- Click on the Paste icon.
Add subheadings to your bibliography
You can add subheadings to your bibliography in Microsoft Word using your own categories or predefined by an output style.
- In Word, in the EndNote X9 toolbar, select: Categorize References > Configure Categories.
- Create a category by clicking the Category Headings (+) button and enter a category name, e.g. enter Journals
- Drag-and-drop references into the appropriate categories.
- Click the OK button.
 button and enter a category name, e.g. enter Journals Drag-and-drop references into the appropriate categories. Click the OK button.")
Add subheadings to your bibliography
If the Endnote toolbar in Word doesn’t appear when you install Endnote for Windows, check the Clarivate Knowledge Base for instructions.
If the Endnote toolbar in Word doesn’t appear when you install Endnote for Mac, check the Clarivate Knowledge Base for instructions.
If you had the toolbar and it disappeared, have a look at the troubleshooting advice from Clarivate.
You can convert an individual endnote into a footnote or restore all your endnotes to footnotes simultaneously.
This might be because you did not read your instructions clearly, or the endnotes are few enough to fit on a few pages.
This is straightforward and won’t take more than a couple of minutes.
Converting individual endnotes into footnotes
1. Open your Word document
Open the document with the endnotes that you want to convert to footnotes.
Ensure that your document is in the print layout view.

If your document is short, you can scroll to the endnote that you want to convert and leave the clicker there.
2. Go to the references ribbon
Select ‘show notes’ in the notes group.
A dialog box will pop up, and from it, select ‘view endnote area.’
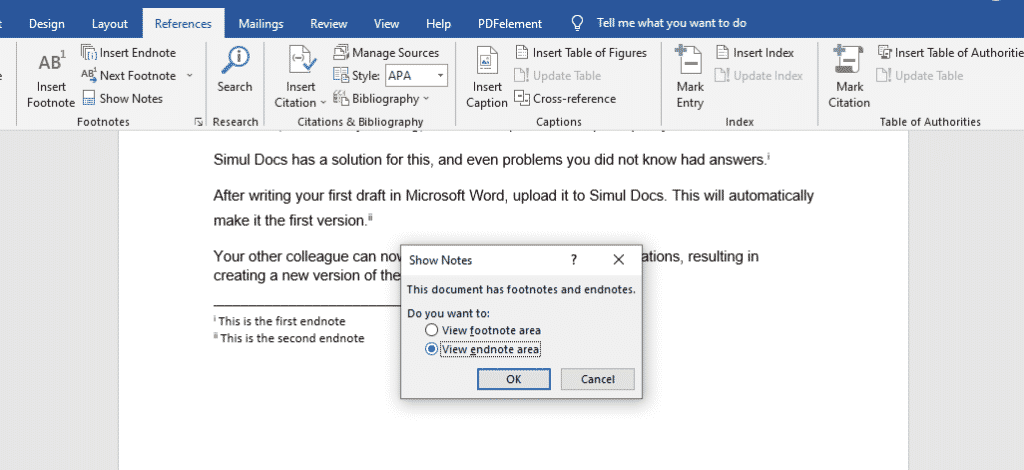
Click OK
Note: You will not see this dialog box if your document has only footnotes or only endnotes.
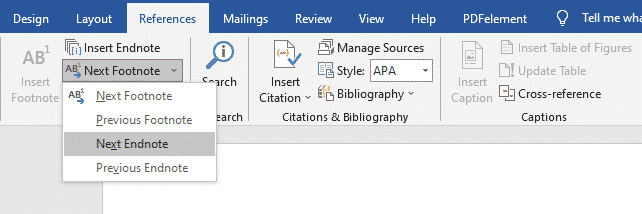
3. Go back to the references bar
In the show notes column, click the drop-down arrow next to ‘next endnote’. From it, click ‘next endnote’ until you come to the desired endnote.
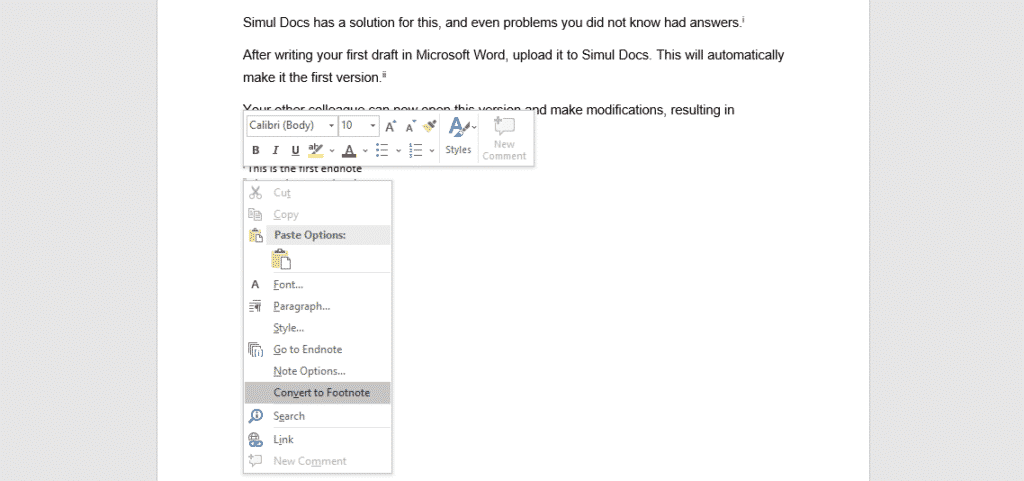
Once you have arrived at the note, right-click on it and select ‘convert to footnote’ from the list that appears.
Your endnote will move from the end of the document to the bottom of the page as a footnote.
Before
After

Converting all endnotes to footnotes simultaneously
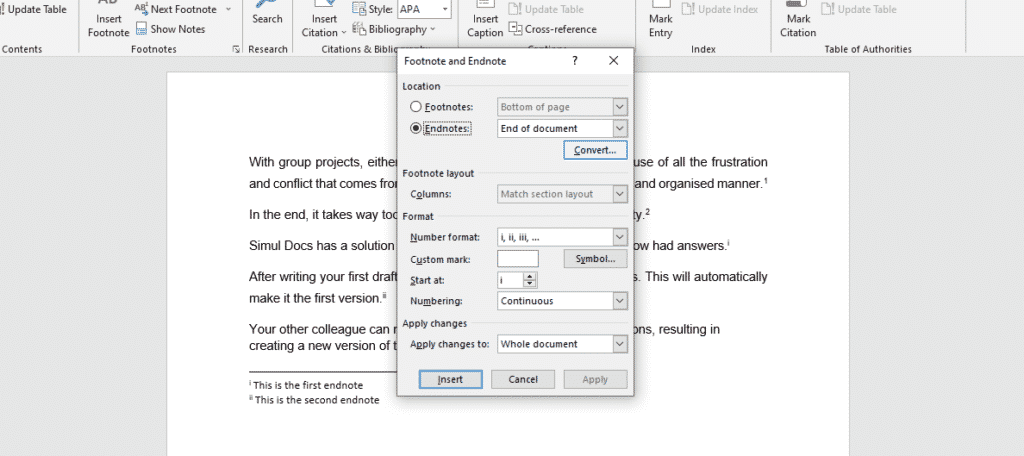
1. Go to the references ribbon at the top of the screen
Select the footnote and endnote dialog box launcher. It is the arrow in the bottom left corner of the second column.
2. Select convert
A dialog box will show up after clicking on the dialog box launcher. From it, select ‘convert.’
3. Convert all endnotes to footnotes
Another dialog box will pop up called the convert notes dialog box. From it, select ‘convert all endnotes to footnotes.’
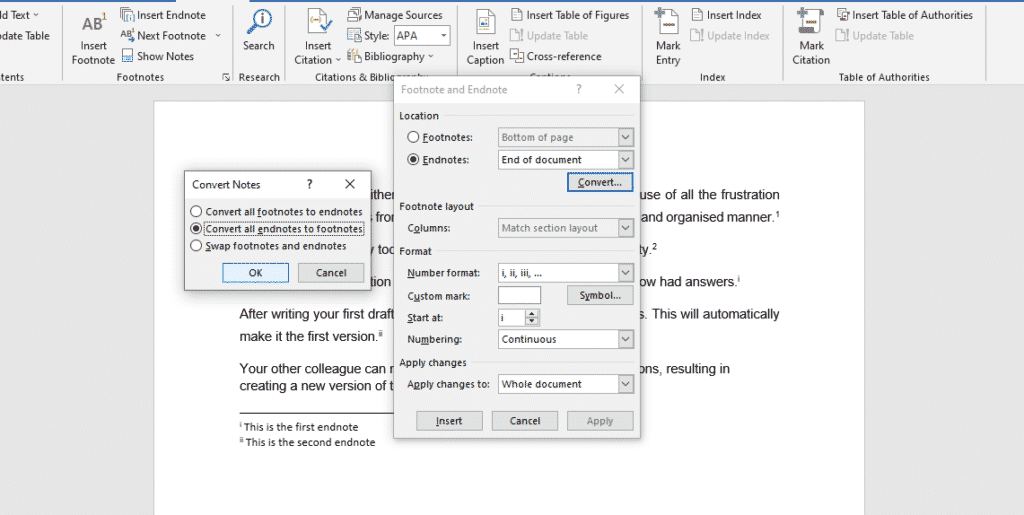
Click OK
All your endnotes will automatically be converted into footnotes.
Before
After

Are you a professor who usually prepares written group projects during the semester or term but can’t quite get students to warm up to them because one person ends up doing the bulk of the work?
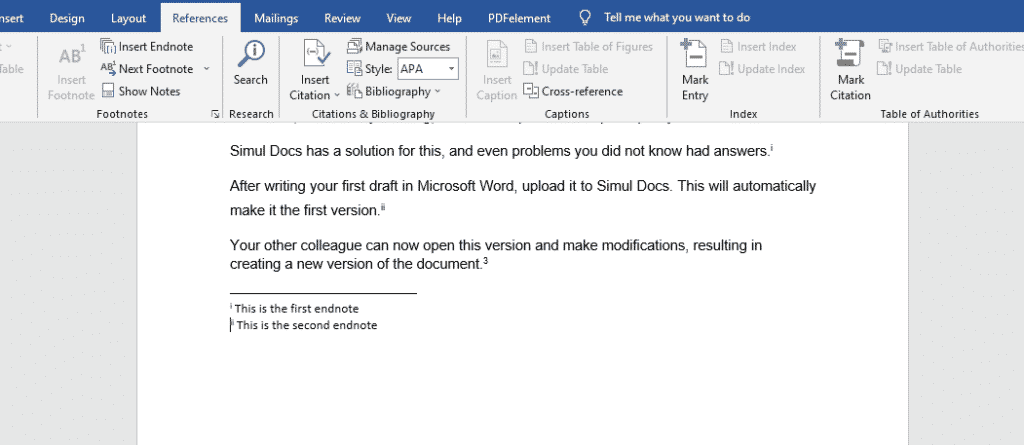
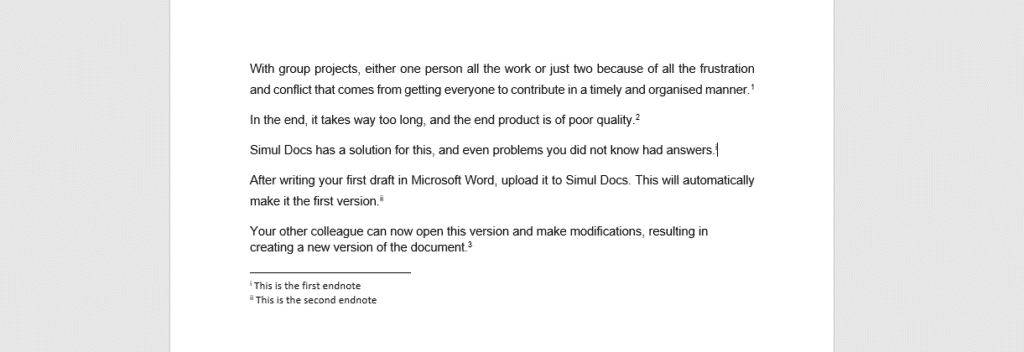
Simul Docs is the solution for you.
With Simul Docs, students can simultaneously work on a paper or document.
The best part is, their corrections and submissions can be tracked from the moment they upload the draft and start working on it.
After writing their first draft in Microsoft Word, they can upload it to Simul Docs. This will automatically make it the first version.
Their other groupmates can now open this version and make modifications, creating a new version of the document.
This document displays all the tracked changes, allowing everyone to see where alterations were made and if they should be rejected or accepted.
All versions are retained, so if you want to see the original copy or follow the flow of changes, the records are readily available.
Simul Docs recognises that sometimes, you might be in a rush and forget to turn on tracked changes. These are automatically updated regardless of your online or offline status. As long as you are working on the document, Simul Docs will document the changes.
Additionally, Simul Docs allows you to leave comments in the document. Instead of convening with your group members on a call to discuss changes that need to be made, deadlines that need to be made, or general pointers, you can add these comments to your document and edit them out when the final copy is ready.
You can also make these adjustments at the same time; this is not a one-login-at-a-time issue. This means that you do not have to wait your turn to make edits, which is quite risky considering we all have different productivity levels and other external factors that could delay submission.
Even if one group member doesn’t have Simul Docs but is required to make modifications, the document can be downloaded, emailed, or shared to any cloud storage software such as One Drive. They can email it once they’ve finished making corrections, and you can add it to Simul again, which will create a new version.
You can merge the modified versions to make one full document when everyone has submitted their input and edits.
Centralising your writing process reduces confusion on which is the final copy or most recently updated.
Simul Docs is a practical and convenient addition if preparing group documents is part of your work or school life.
Visit simuldocs.com and work on your group projects with ease.
Use footnotes and endnotes to explain, comment on, or provide references to something in a document. Usually, footnotes appear at the bottom of the page, while endnotes come at the end of the document or section.
If you’re in Reading View, switch to Editing View by clicking Edit Document > Edit in Word for the web.

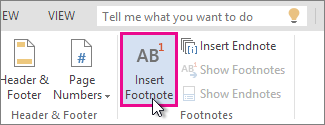
Add a footnote
-
Click where you want to add the footnote.
-
Click Insert > Insert Footnote.

Word inserts a reference mark in the text and adds the footnote mark at the bottom of the page.
-
Type the footnote text.
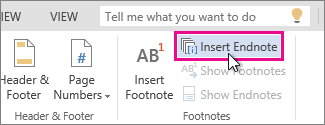
Add an endnote
-
Click where you want to add the endnote.
-
Click Insert > Insert Endnote.
Word inserts a reference mark in the text and adds the endnote mark at the end of the document.
-
Type the endnote text.
Customize your footnotes and endnotes
To customize a footnote or endnote:
-
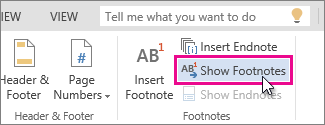
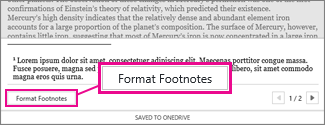
Click the reference number or mark in the body of the text or click Insert > Show Footnotes(for endnotes, click Insert > Show Endnotes).
-
In the footnote/endnote view, click Format Footnotes or Format Endnotes to display the Format Options dialog, where you can change the size, font, and indentation of one or all of your footnotes or endnotes.

Note: If you want to convert footnotes to endnotes or the other way around, use the Open in Word command and convert them there. When you save the doc in Word, it’s saved where you opened it in Word for the web.
Need more help?
Posted on February 7, 2013 by Yingting Zhang
February 7, 2013 – Yingting
Question: Is it possible to insert a figure from EndNote to a document in Word?
Answer: Yes, it is possible. Below are the steps for you to follow to insert images from your EndNote library to your manuscript in Word:
- First of all, you need to create a Figure reference for the image by choosing New Reference under the Reference menu in EndNote, choosing Figure as reference type and filling out the appropriate fields in the record. Make sure the image is attached to the reference in the Figure field.
- In Word, place the cursor where you would like to insert the image.
- Click EndNote X6 tab in Word. Under the magnifying glass, click on the little down arrow below “Insert Citation”.
- Click “Insert Figure”. At the popup window, find the figure reference you created previously.
- After selecting the Figure reference, click the Insert button.
- “(Figure 1)” should appear where you would like to insert the image in Word. You may repeat the procedure to insert additional images / figures.
- Whether the figures are placed after the paragraph where cited or in a list at the end of the Word document, it depends on what output style you chose. You may change the style at any time.
Hope this helps.
Filed under: CWYW, EndNote & Figures / Images, EndNote & Word, FAQs | Tagged: EndNote Figure |