
Open a Word document that has text boxes. Click the “Review” tab, then click the “Restrict Editing” button in the Protect group. Word displays a pane allowing you to manage editing permissions for specific parts of the document, including text boxes.
Contents
- 1 How do I freeze text so it doesn’t move in Word?
- 2 How do I keep text from moving in Word?
- 3 Can you freeze cells in Word?
- 4 How do I anchor text in Word?
- 5 How do I keep text in place in Word?
- 6 How do I lock certain cells in Word?
- 7 How do you wrap text in a table in Word?
- 8 What are anchors in Word?
- 9 How do I lock an anchor in Word?
- 10 How do I anchor text and an image in Word?
- 11 How do you keep text next?
- 12 How do you make words stay together in Word?
- 13 How do I stop words breaking onto new lines?
- 14 How do you write over in Word?
- 15 How do I lock a text field in Word 2010?
- 16 Can you lock images in Word?
- 17 What are the text wrapping options?
- 18 What is the wrap text?
- 19 What does little anchor mean in Word?
- 20 How do I move the anchor point in Word?
How do I freeze text so it doesn’t move in Word?
Stop Graphics and Text from Jumping Around
- Display the File tab of the ribbon, then click Options.
- Click Display at the left side of the dialog box.
- Select the Object Anchors check box.
- Click on OK.
- In Print Layout view, select the shape (the block arrow).
How do I keep text from moving in Word?
Stopping Text from Jumping Around
- Choose Options from the Tools menu.
- Make sure the View tab is selected.
- Select the Object Anchors check box.
- Click on OK.
- In Print Layout view, select the AutoShape (the block arrow).
Can you freeze cells in Word?
Open the Word file containing the table for which you want to freeze the size of the cells and find the table in the document.On the “Table Options” dialog box, in the “Options” section, click the “Automatically resize to fit contents” check box so there is NO check mark in the box. Click “OK”.
How do I anchor text in Word?
Step-by-step guide: How to insert anchors
- Place your cursor in the text editor where you’d like to insert the anchor. You can click a word or place your cursor immediately before it.
- Click Insert / Remove anchor in the Links section of the Insert ribbon tab.
- After you assign a name to the anchor, click OK.
How do I keep text in place in Word?
To keep the whole paragraph on the same page, follow these steps.
- Right-click the paragraph that you want to keep together. In the box that opens, select Paragraph.
- In the Paragraph dialog box, click the Line and Page Breaks tab.
- In the Pagination section, select the Keep lines together check box, and click OK.
How do I lock certain cells in Word?
In the Controls group, click the Legacy Tools option and choose Text Form Field. In Word 2003, display the Forms toolbar and click Text Form Field. Continue to select input cells and insert controls until you’re done. Click Restrict Editing in the Protect group.
How do you wrap text in a table in Word?
Wrapping text around a Word 2019 table
- On the (Table Tools) Layout tab, click the Cell Size group button.
- On the Table tab, under Text Wrapping, select the Around option.
- Click the Positioning button.
- Select the Move with Text check box and click OK.
- Click OK in the Table Properties dialog box.
What are anchors in Word?
The anchor is a symbol that sometimes appears when you insert an image, or a SmartArt, or a drawing into a Word document. By default, the anchor will only appear when you insert a picture, clipart, or SmartArt and then ‘Wrap text. ‘ In Word say 2013, you have the option of wrapping text in a specific way.
How do I lock an anchor in Word?
Follow these steps to anchor an object in Word:
- Select an object.
- On the Ribbon’s Format tab, go to the Arrange group and choose Position→More Layout Options.
- Click the Position tab.
- (Optional) Set the position of an object precisely using controls in this dialog.
- Under Options, select the Lock Anchor check box.
How do I anchor text and an image in Word?
Here are the steps to accomplish this.
- Step 1: Find and open the document that contains the image you will anchor.
- Step 2: Enable the Object Anchors option.
- Step 3: Change the layout of the selected image through text wrapping.
- Step 4: Position the selected image to your desired area on the page.
How do you keep text next?
Keeping a paragraph with the next paragraph
Click the dialog box launcher on the bottom right of the Paragraph group. The Paragraph dialog box appears. Select the Line and Page breaks tab. Check Keep with next.
How do you make words stay together in Word?
Non-Breaking Paragraphs and Lines
- Select the paragraph or section of text you want to keep together.
- On the Home tab in Word, click the Paragraph group’s dialog launcher (the small arrow at the bottom-right of the group).
- Pick the Line and Page Breaks.
- Check the Keep lines together option and click OK.
How do I stop words breaking onto new lines?
To stop words from splitting across lines in a paragraph or paragraphs by turning off automatic hyphenation:
- Select the paragraph or paragraphs.
- Click the Home tab in the Ribbon.
- Click the dialog box launcher on the bottom right corner of the Paragraph group.
- Click Line and Page Breaks.
- Select or check Don’t Hyphenate.
How do you write over in Word?
Type over text in Word for Windows
- In Word, choose File > Options.
- In the Word Options dialog box, choose Advanced.
- Under Editing options, do one of the following: To use Insert key to control Overtype mode, select the Use Insert key to control overtype check box.
How do I lock a text field in Word 2010?
Open the form that you want to lock or protect. Select Developer > Restrict Editing. After selecting restrictions, select Yes, Start Enforcing Protection.
Can you lock images in Word?
A: What you need to do is right-click on the picture and select Format Picture. Click on the Layout tab. Click on the Advanced button.Also, click on the checkbox that says “Lock anchor.” Now, your pictures won’t move around the page.
What are the text wrapping options?
What are the Text Wrapping Options?
- Square, Tight, and Through: These three options are all variations on the same thing.
- Top and Bottom: This option keeps the text above and below the object, but not to its sides.
- Behind Text and In Front Of Text: These two options don’t affect the text at all.
What is the wrap text?
“Wrapping text” means displaying the cell contents on multiple lines, rather than one long line. This will allow you to avoid the “truncated column” effect, make the text easier to read and better fit for printing. In addition, it will help you keep the column width consistent throughout the entire worksheet.
What does little anchor mean in Word?
Well, the symbolism of an Anchor explains it. When you insert an object into a Word document, you see the little Anchor in the left upper corner. If you hover with the cursor over the Anchor, it will tell you that the object in question is Anchored to the text in that location in the document.
How do I move the anchor point in Word?
Click once on the object whose anchor you want to move. You should be able to see the object anchor icon as well. Click on the object anchor icon and drag it either up (towards the beginning of the document) or down (towards the end of the document).
A simple trick in Microsoft Word enables you to freeze and work with two sections of the same document at the same time.

Bouncing back and forth between two or more parts of a large Microsoft Word document involves a lot of vertical scrolls—and it isn’t fun. Anyone working on a large Microsoft Word document will find it annoying, especially when one part of the document is needed as a frequent reference while you work.
So what do you do? Do you open two instances of the same document and Alt + Tab between them? Or is there a feature in Microsoft Word that makes it easier?
Actually, yes, such a feature exists. Everyone knows you can freeze rows and columns in Microsoft Excel, but did you know that Microsoft Word has its own ability to freeze sections of a document? Quite useful for comparing sections of the same document, or comparing multiple documents at the same time.
How to Freeze Part of a Word Document
Here’s a common scenario: You are writing a lengthy professional report in Word with many different sections. Some sections refer to a previous part, which makes you scroll up and down repeatedly. You may also need to copy-and-paste text or graphics between sections.
Microsoft Word can split the window and allow you to view different parts of the same document without scrolling too much.
- Open your document in Word.
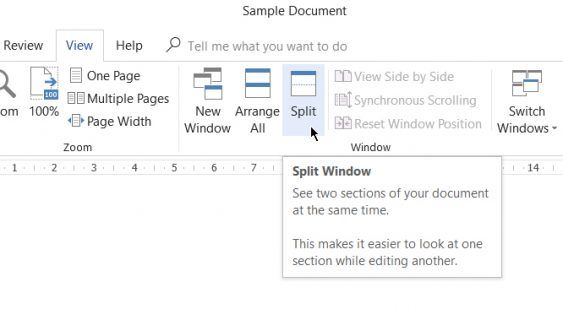
- Go to the Ribbon> View tab > click on Split.

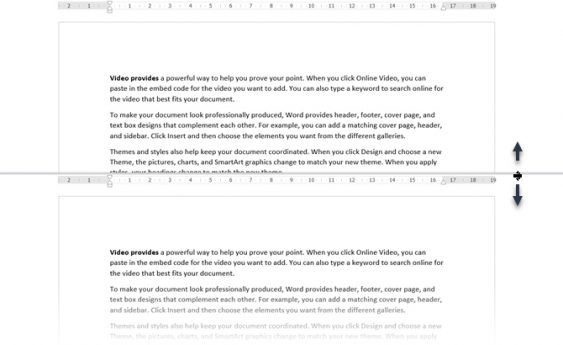
- The document is now divided into two panes with a movable dividing line in between. Adjust the relative sizes of the panes with the mouse. Move the mouse pointer to the dividing line, and when you see the split pointer, click and drag the dividing line to a new position.

- To activate a split copy, just click anywhere inside it. With the document split into two panes, you can work on one pane while keeping the other pane static or «frozen» for easy reference. In the above figure, the top pane is kept static while the bottom pane becomes the work area.
- The Split can be removed by: clicking on View > Remove Split, dragging the dividing line to the top or bottom edge of the window, or double-clicking on the divider line.
Working With Split Documents in Microsoft Word
Here are a few important points to remember when you have split the document screen into two parts:
- After creating the split, click in the pane that you want to change, and then select a different layout on the View tab.You can treat the two panes as two separate windows and use the different View commands to change the layout of the sections. For instance, you can keep the top pane in the Print layout, while working on the Web layout in the bottom pane. Or keep the top pane in the Outline view and the bottom one in the normal Print layout.
- It’s the same document, so any layout or formatting changes will affect both the copies. For example, if you make some text bold in the upper copy, the same text will automatically become bold in the lower copy too.
- You can set different zoom levels for the split sections. This is helpful for the elderly or even if you want to zoom into charts and tables.
- You can use the bottom split like a Print Preview screen. Arrange the bottom screen to show multiple pages (View > Multiple Pages) to get a nice overview of how your document is designed.
What If You Want to Split a Word Document Vertically?
In short, you are out of luck because Word only allows the horizontal split in the same document. But there’s a quick and dirty workaround you can use.
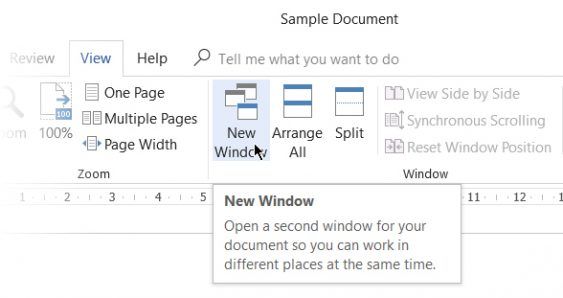
- Open two separate instances of the same document. In Microsoft Word 2016, open the first document. Then, go to File > View > New Window.

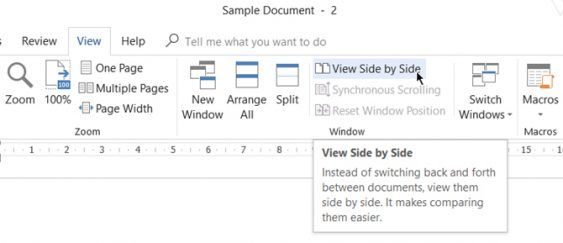
- Select View > View Side by Side. The same document will open in an adjacent window and allow you to work side-by-side mimicking a vertical split.

- If you scroll up or down, the other scrolls as well. If you want to freeze one and just scroll the other select Synchronous Scrolling to turn it off.
Improve Your Microsoft Word Experience
The Split button can make life a lot easier when you have a wordy document on your hands. Try this button the next time you decide to make a table of contents in Word. You don’t have to drag the scrollbar up and down to refer to each part of it. Or open and switch windows. Use the features in the View tab to make your reading and proofreading job easier.
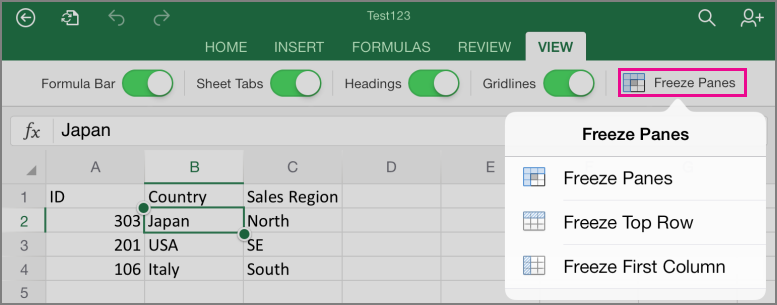
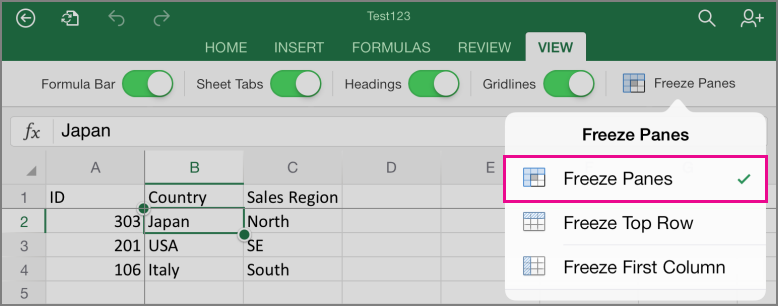
If you want the row and column headers always visible when you scroll through your worksheet, you can lock the top row and/or first column. Tap View > Freeze Panes, and then tap the option you need.
Freeze multiple rows or columns
-
Select the row below the last row you want to freeze.

-
On your iPad, tap View > Freeze Panes > Freeze Panes.
On your iPhone, tap the Edit button
, and then tap View > Freeze Panes.
 , and then tap View > Freeze Panes.
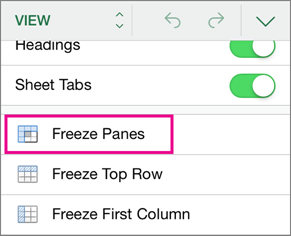
To freeze multiple columns (starting with column A), select the column to the right of the last column you want to freeze, and then tap View > Freeze Panes > Freeze Panes.
Unfreeze panes
To unfreeze panes, tap View > Freeze Panes, and then clear all the selected options.
Top of Page
Need more help?
 Please Note:
This article is written for users of the following Microsoft Word versions: 2007, 2010, and 2013. If you are using an earlier version (Word 2003 or earlier), this tip may not work for you. For a version of this tip written specifically for earlier versions of Word, click here: Freezing a Table.
![]()
Written by Allen Wyatt (last updated July 30, 2020)
This tip applies to Word 2007, 2010, and 2013
Word allows you to easily create tables, modify them, and place data in them. Word can even automatically adjust the dimensions of cells in your table to reflect the data that is in them. There may be times, however, when you want to «freeze» the size of cells in a table. For instance, you might want the cells to be a certain size, and never change?even when you place a large amount of data in the cell.
The first step is to adjust column width so that the columns in your table are the way you want them. Then, follow these steps:
- Right-click the table and choose Table Properties from the Context menu. Word displays the Table Properties dialog box.
- Make sure the Row tab is selected. (See Figure 1.)
- Select the Specify Height check box, and then enter a height for the rows.
- Use the Row Height Is drop-down list to choose Exactly.
- Display the Table tab. (See Figure 2.)
- Click on the Options button. Word displays the Table Options dialog box. (See Figure 3.)
- Make sure the Automatically Resize to Fit Contents check box is cleared.
- Click on OK to close the Table Options dialog box.
- Click on OK to close the Table Properties dialog box.
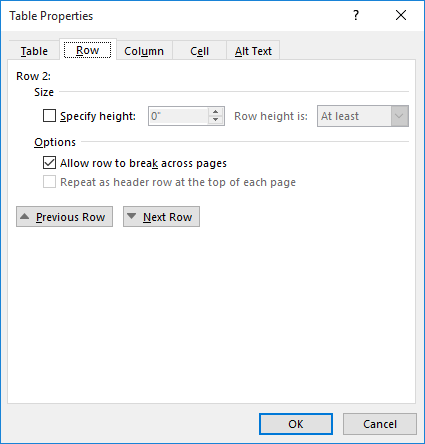
Figure 1. The Row tab of the Table Properties dialog box.

Figure 2. The Table tab of the Table Properties dialog box.
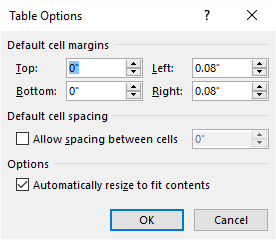
Figure 3. The Table Options dialog box.
These last steps (5 through 9) are particularly important. If you don’t clear the Automatically Resize to Fit Contents check box, Word can and will readjust the column width to display the most data possible in the table.
WordTips is your source for cost-effective Microsoft Word training.
(Microsoft Word is the most popular word processing software in the world.)
This tip (9570) applies to Microsoft Word 2007, 2010, and 2013. You can find a version of this tip for the older menu interface of Word here: Freezing a Table.
Author Bio
With more than 50 non-fiction books and numerous magazine articles to his credit, Allen Wyatt is an internationally recognized author. He is president of Sharon Parq Associates, a computer and publishing services company. Learn more about Allen…
MORE FROM ALLEN
Turning Off the Check for Repeated Words
If your work involves the usage of repeated words, you may be interested in configuring Word so it doesn’t flag those …
Discover More
Replacing an Image Filename with the Actual Image
Want to insert a whole bunch of images in your document all at once? The macro in this tip shows you how easy it is to …
Discover More
Cannot Combine Two Tables
When working with tables, a common editing task is to combine two tables into one. Sometimes, though, you may run into …
Discover More
More WordTips (ribbon)
Adjusting Column Width from the Keyboard
It’s easy to adjust the width of table columns using the mouse, but what if you don’t want to use the mouse? Adjusting …
Discover More
Splitting Table Cells
When formatting tables, you can both merge and split cells. Here’s a couple of ways you can easily perform the latter …
Discover More
Expanding Width of All Tables
If you have a lot of tables in your documents, you might want to change the width of all of them. You can take forever …
Discover More

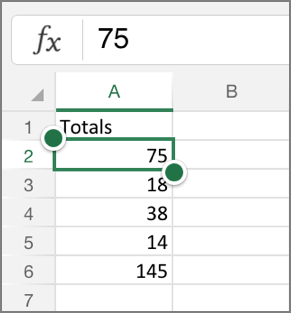
When you create a table in Word, you can have the table automatically resized to fit the contents. However, sometimes you may want to freeze the size of the cells in the rows and columns so they will not change. This is easy to accomplish.
Open the Word file containing the table for which you want to freeze the size of the cells and find the table in the document. If you want to freeze the size of all the cells in the table, which is what we did in our example, move your mouse over the crosshair box in the upper-left corner of the table until it becomes a cursor with a crosshair icon.

Click on the crosshair box to select the entire table, if desired. Right-click on the crosshair box and select “Table Properties” from the popup menu.
NOTE: If you don’t want to freeze all the cells in the table, select the rows, columns, or cells you want to freeze, right-click on the the selected cells, and select “Table Properties” from the popup menu.
On the “Table Properties” dialog box, click the “Row” tab.
Enter the size you want for the height of the row(s) in the “Specify height” edit box and then select “Exactly” from the “Row height is” drop-down list.
Click on the “Table” tab.
Click the “Options” button.
On the “Table Options” dialog box, in the “Options” section, click the “Automatically resize to fit contents” check box so there is NO check mark in the box. Click “OK”.
Click “OK” on the “Table Properties” dialog box to close it.
If you don’t turn off the “Automatically resize to fit contents” option, Word will adjust the column width of your tables to display your data in the best way possible.
READ NEXT
- › How to Nest a Table Within a Table in Word
- › How to Automatically Resize a Table in Microsoft Word
- › How to Wrap Text Around a Table in Microsoft Word
- › HoloLens Now Has Windows 11 and Incredible 3D Ink Features
- › How to Adjust and Change Discord Fonts
- › This New Google TV Streaming Device Costs Just $20
- › The New NVIDIA GeForce RTX 4070 Is Like an RTX 3080 for $599
- › Google Chrome Is Getting Faster
How-To Geek is where you turn when you want experts to explain technology. Since we launched in 2006, our articles have been read billions of times. Want to know more?
Microsoft Word is the programming par excellence for the creation and edition of texts. This offers you very versatile functions. One of them is to place images in the document. However, these move when the writing is modified. To avoid this, it is possible to freeze or lock the position of an image in Word .
The possibility of inserting images to the document is one of the most used tools of this program. Despite this, not everyone knows how to get the most out of it. What can be frustrating when making use of it.
Today it is possible to download and install Microsoft Office in Google Chrome for free and enjoy Word. Even compressing a Word document with images so that it weighs less , similar to the function that will be studied next.
Freeze or lock the position of a picture in Word
As mentioned previously, a recurring problem that many users complain about is that, when inserting an image into a Word document, unlike creating a macro document in Word , it changes as the text changes.
Repositioning the image every time there is a change can be cumbersome. For this there is a solution. Freezing or locking the position of an image in Word will stop the image from moving, even though the text is constantly changing.
Steps to follow to freeze or lock an image in Word 2007 and 2010
The first thing you should do to benefit from this tool is go to the “Insert” tab located in the top menu of the screen. There select the option ” Image “. After having carried out this action, a file search window will open. There, look for the image you want to use in your document.
Once you have finished doing this action. With the image selected, go to the ” Format ” section of the top menu. There, locate and click the option “Adjust text”.
In this drop-down menu you can choose between different text settings. You can make use of all of them except “In line with the text”, since selecting this option would hinder all the work.
To freeze or block the position of an image in Word you must, in the ” Format ” section, click on the ” Position ” option . Another series of options will appear, choose the one that says “More design options.”
After having done this, it will open the conceptual menu. Go to the ” Position ” section. There you must configure where you want to place the image with respect to the margins of the document.
Keep in mind that for this procedure to work you must click on the “Block delimiter” box that is located in the lower left part of the conceptual menu. To finish, click on ” OK ” and that’s it. Now you can only move the image by dragging it with the mouse.
It must be emphasized that this procedure only works in the 2007 and 2010 versions of the Office program, so if you want to freeze or block an image in Word 2003 you must follow the following steps.
Steps to follow to freeze an image in Word 2003
As explained above, you must add the image you want to work with from the ” Insert ” menu and define the position you want it to have according to the “text adjustment” section . Remember not to select the option “In line with the text”.
To continue with the procedure, you must go to the image toolbar and select the “Image format” option , in the conceptual menu that will appear click on ” Design ” and then on the ” Advanced ” option .
As before, you must configure the position you want the image to have according to the margins of the document. You will do this from the “Image position” section found within the advanced design settings.
When you have the necessary settings, select the ” Block delimiter ” box and press ” OK “. Ready, that’s how easy it is to freeze or lock the position of an image in Word.
INTELLIGENT WORK FORUMS
FOR COMPUTER PROFESSIONALS
Contact US
Thanks. We have received your request and will respond promptly.
Log In
Come Join Us!
Are you a
Computer / IT professional?
Join Tek-Tips Forums!
- Talk With Other Members
- Be Notified Of Responses
To Your Posts - Keyword Search
- One-Click Access To Your
Favorite Forums - Automated Signatures
On Your Posts - Best Of All, It’s Free!
*Tek-Tips’s functionality depends on members receiving e-mail. By joining you are opting in to receive e-mail.
Posting Guidelines
Promoting, selling, recruiting, coursework and thesis posting is forbidden.
Students Click Here
In Word, freeze panes like Excel?In Word, freeze panes like Excel?(OP) 16 Jul 03 10:00 Word 2000 Is their a tidier way to freeze panes in Word than the «Window-Split»? I have a long table in Microsoft Word 2000 that is not printed, only viewed. (Has hyperlinks to other documents.) The top row of cells is the header row, and I would like it to be visible even when I scroll down, or right, or left. Window-split takes so much screen space and can scroll differently (does not stay syncronized with the other window) so that the headings are over the wrong columns. Red Flag SubmittedThank you for helping keep Tek-Tips Forums free from inappropriate posts. |
Join Tek-Tips® Today!
Join your peers on the Internet’s largest technical computer professional community.
It’s easy to join and it’s free.
Here’s Why Members Love Tek-Tips Forums:
- Talk To Other Members
- Notification Of Responses To Questions
- Favorite Forums One Click Access
- Keyword Search Of All Posts, And More…
 Talk To Other Members
Register now while it’s still free!
Already a member? Close this window and log in.
Join Us Close
![]()
![]()
 MS Word has great table features and tools. You can create and modify tables and place data in them.
You can even have Word automatically adjust the dimensions of the cells in your table.
There are times, however, when you may want to freeze the size of cells in your table to a certain size that will not change. What? Not change? Even if you put lots and lots of text in your cell? That’s right! It can be done!
Follow the steps below to learn how:
- Adjust the column width in your table so that you have them exactly the way you want.
- Right-click your table and select Table Properties from the Context menu that is displayed and the Table Properties dialog box appears.
- Be certain the Row tab is selected.
- Select the Specify Height check box and enter a height for the rows.
- Use the Row Height Is drop-down to choose Exactly.
- Click on the Table tab.
- Click on the Options button to display the dialog box.
- Be certain the Automatically Resize to Fit contents check box is deselected.
- Click OK to close the Table Options dialog box.
- Click OK to close the Table Properties dialog box.
If you do not deselect the automatically Resize to Fit Contents box, Word will adjust the column width to display the most data possible in your table.
Version 2007 – 2010
|
How to «freeze» the page in Word? Thread poster: Juan Jacob |
||||||||
|---|---|---|---|---|---|---|---|---|
|
Juan Jacob
|
||||||||
|
Eugenia Sánchez
|
||||||||
|
Ara Mkrtchyan (X)
|
||||||||
|
Trevor Butcher
|
||||||||
|
Juan Jacob TOPIC STARTER
|


To report site rules violations or get help, contact a site moderator:
You can also contact site staff by submitting a support request »
How to «freeze» the page in Word?
|
||
|


Microsoft Word is the programming par excellence for the creation and editing of texts. This offers you very versatile functions. One of them is to place images in the document. However, these move when the writing is modified. To avoid this You can freeze or lock the position of an image in Word.
The possibility of inserting images to the document is one of the most used tools of this program. Despite this, not everyone knows how to get the most out of it. What can be frustrating when making use of it.
Today it is possible to download and install Microsoft Office in Google Chrome for free and enjoy Word. Even compressing a Word document with images so that it weighs less, similar to the function that will be studied next.
Freeze or lock the position of a picture in Word
As mentioned above, a recurring problem that many users complain about is that, when inserting an image into a Word document, unlike creating a macro document in Word, it changes as the text changes.
You may also be interested in:
Repositioning the image every time there is a change can be cumbersome. For this there is a solution. Freezing or locking the position of an image in Word will stop the image from moving, even though the text is constantly changing.
Steps to follow to freeze or lock an image in Word 2007 and 2010
The first thing you should do to benefit from this tool is go to the «Insert» tab located in the top menu of the screen. There select the option «Picture”. After having carried out this action, a file search window will open. There, look for the image you want to use in your document.
 1")
Once you have finished doing this action. With the image selected go to the section “Format”From the top menu. There locate and click the option «Adjust text».
In this drop-down menu you can choose between different text settings. You can use all of them except for «In line with the text», since, selecting this option would hinder all the work.
To immobilize or block the position of an image in Word you must, in the section «Format«, Click on the option»Position”. Another series of options will appear, choose the one that says «More design options.»
After having done this, it will open the conceptual menu. Go to the section «Position”. There you must configure where you want to place the image with respect to the margins of the document.
Keep in mind that for this procedure to work you must click on the box «Lock delimiter» which is located in the lower left part of the concept menu. To finish click on «To accept» and ready. Now you can only move the image by dragging it with the mouse.
It should be emphasized that this procedure only works in the 2007 and 2010 versions of the Office program, so if you want to freeze or block an image in Word 2003 you must follow the following steps.
Steps to follow to freeze an image in Word 2003
As in what was explained above, you must add the image you want to work with from the menu «Insert”And define the position you want it to have according to the section «text wrap». Remember not to select the option «In line with the text.»
 2")
To continue with the procedure, you must go to the image toolbar and select the option «Image format», in the conceptual menu that will appear, click on «Design«And then on the option»Advanced”.
As before, you must configure the position you want the image to have according to the margins of the document. You will do this from the section «Image position» found within the advanced layout settings.
When you have the necessary settings, select the box «Lock delimiter«And press»To accept”. Ready, that’s how easy it is to freeze or lock the position of an image in Word.
Source by
You may also be interested in: