
Word for Microsoft 365 Word for the web Word 2021 Word 2019 Word 2016 Word 2013 More…Less
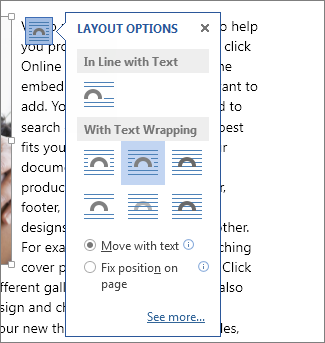
Moving or repositioning a picture on page in Word is as simple as dragging it with your mouse. But sometimes it doesn’t work. The key to getting the results you want is to select Layout Options.

-
Select a picture.
-
Select the Layout Options icon.
-
Choose the layout options you want:

-
To bring your picture in front of the text and set it so it stays at a certain spot on the page, select In Front of Text (under With Text Wrapping), and then select Fix position on page.
-
To wrap text around the picture but have the picture move up or down as text is added or deleted, select Square (under With Text Wrapping), and then select Move with text.
-
For or more information and examples of text wrapping, see Wrap text around pictures in Word
The picture is probably behind another object, like a block of text:
To select the picture, use the Selection pane:
-
Select Home > Select > Selection Pane.
-
In the Selection pane, select the picture.
To move a picture a tiny amount, select the picture, then hold down the Ctrl key and press an arrow key.
To move several objects at the same time, group them together:
-
Select the first object.
-
Hold down the Ctrl key and select the other objects.
-
Right-click one of the objects, point to Group, and then select Group.
Tip: If you are unable to group or multi-select pictures, it’s possible that the layout of your picture is inline with text. If so, please refer to Open Layout Options to change the picture layout to any option under With Text Wrapping.
For absolute control over the alignment and positioning of a picture, use the Layout box to set alignment relative to margins or columns, absolute position in inches, or relative position by percentage. This comes in handy when you want to place a picture a certain distance from something else, like a page margin.
-
Select the picture.
-
Select the Layout Options icon.
-
Select See more, and then make alignment and position adjustments on the Position tab.
If you can’t select any of the position options on the Position tab, select the Text Wrapping tab, and then select any option except the In line with text option.
If you have more than one picture that you want to overlap on a page, you can enable this in the Layout box.
-
Select a picture.
-
Select the Layout Options icon.
-
Select See more.
-
On the Position tab, in the Options group at the bottom, select the Allow overlap check box.
-
Repeat for each picture for which you want to enable overlapping.
In addition to aligning and positioning pictures on a page, you can also align pictures to each other, or to other objects on the page. Although picture-to-picture alignment is not available from the Layout Options icon or the Layout dialog box, it’s a common task that you might do while working with picture positioning and alignment.
-
Hold down the Ctrl key and select each object that you want to align.
-
Go to Picture Format or Picture Tools Format > Align, and then choose an option, such as Center, Top, or Bottom.
An object anchor  indicates where a picture or object is located in relation to the text in your document. Anchors do not appear for inline pictures; inline objects are tied to the place within the text where they were inserted and are treated like any text character—»in line with text.»
All other wrapping options (Square, Tight, Through, Top and Bottom, Behind Text, In Front of Text) are anchored to a particular place in the document; the anchor indicates the paragraph with which the object is associated. Select a picture, and then select the Layout Options icon to find out how your picture is inserted.
Notes: If you select a picture and it’s not inline with text, but you don’t see an object anchor, you can ensure that anchors are shown in two ways:
-
Show formatting marks On the Home tab, in the Paragraph group, select Show/Hide ¶.
-
Always show anchors Select File > Options > Display, and then select Object anchors.
Because anchors are simply a visual indication of a picture’s relative position on a page, they cannot be removed. However, by trying different text wrapping options, you should find all the flexibility you need in positioning a picture, regardless of its anchor.
For or more information and examples of text wrapping, see Wrap text around pictures in Word.
If you want to ensure that an image stays put even if the text around it is deleted, you can lock its anchor:
-
Select the picture.
-
Select the Layout Options icon.
-
Select See more, and then select Lock anchor.
Note: Because anchors are not used for pictures placed In Line with Text, anchor locking and all other positioning options are unavailable for inline images.
See also
Wrap text around pictures in Word
Rotate a text box, shape, WordArt, or picture in Word
Group or ungroup shapes, pictures, or other objects
If you inserted a picture into your document while using Word for the web, you can cut and paste it to move it within a document, and you can apply paragraph formatting, like vertical spacing and centering, to it. However, you cannot move a picture that was inserted while using the desktop version of Word if the picture has text wrapping or a fixed position on the page.
If you find that you cannot make changes to a picture, and you have the desktop version of Word, select Open in Word to open your document in Word and make changes to its layout.
When you are done, press Ctrl+S to save your document to its original location. You can then open the document again in Word for the web, and continue editing. Word for the web will retain the layout settings that you applied in the desktop version of Word.
Need more help?
Want more options?
Explore subscription benefits, browse training courses, learn how to secure your device, and more.
Communities help you ask and answer questions, give feedback, and hear from experts with rich knowledge.
Microsoft Office, especially PowerPoint and Word, have simple and easy ways to ‘jazz up’ a simple image, flag or logo with one of the many framing options.
Instead of just copying a graphic into a document or slide, try one of these variations. They retain the original image but give it a different look.

Note: some of our examples are corporate logos. They come with rules about how they are supposed to be used. Some of the things we’ll be doing break, or at least severely bend, those limitations.
Quick Styles
Picture Format | Picture Styles | Quick Styles are the easy way to apply a little touch to any picture or graphic. Live Preview is available, so just hover over each style to see how it looks in the slide or document.

Quick Styles are a mashup of various picture effects, some are intended to show off what Office can do more than be useful in docs or slides.
Some Quick Styles will crop the original image. That might be OK for some pictures but usually unacceptable for logos or flags.
Like other ‘quick’ and in-built options in Office, they tend to be overused, showing up over and over again in presentations and documents.
Let’s look at the more detailed framing options available which make your documents look professional and you an Office expert!
Picture Border
Picture Format | Picture Styles | Picture Border is a lot more than a simple line around the logo. Start by selecting a color.

Weight
Choose a thickness or weight of the line. Weight can be combined with the Sketched and Dashes options.

Sketched
Sketched is relatively new in Office 365. It adds some ‘wriggly’ border options.

Sketchy or wriggly lines in Icons and SVG graphics
Now … Sketchy Shapes the video!
Dashes
Short or Long dashes in various combinations.

Format Picture | Fill & Line
Open the Format Picture pane then Fill & Line to see all the border / framing options. Make sure you choose options under the ‘Line’ heading not the similar ‘Fill’ choices above it.
The pane shows options not on the menus like Transparency, Dash Type, Cap type and Join type.

Transparency
Transparency, as you’d expect, lets the border color fade into the document or slide background.
![]()
Two line borders aka Compound Type
Compound Type gives you choices for multi-line borders with thin and thick lines, inner or outer. Plus one triple-line option.

Corner Shape aka Join Type
Join Type defines the corner shape – Round, Bevel or Miter (Square).

Line ends aka Cap Type
For broken border e.g. dashes, join type controls the ends of each mark – Square, Round or Flat.

Gradient Line
Gradient line isn’t on the menu, it’s on the side-pane Format Picture | Fill & Line.
Choose Gradient Line for some two-tone effects. There are Preset Gradients plus individual options.

Two ways to add Gradient or Rainbow text or background effects in Word
Add the US Flag into Word, Excel or PowerPoint
Converting SVG into JPG, PNG or other raster image format
Change image color to a custom color in Office
Apple’s new image format HEIC and Microsoft Office
British Library images for your PowerPoint presentations
Unique image source for your PowerPoint or Word documents
Public Domain images from ‘The Met’.
Download PC Repair Tool to quickly find & fix Windows errors automatically
Have you ever considered adding a color frame to your pictures in order to make them more appealing for print? This is possible via the many image editing tools out there, but it can also be done via Microsoft Word if you know what you’re doing.
How to put a border around an image
What were going to do here, is use the page border feature in Word since it will allow you to create a frame that best fits your photo. If you’ve had experience with using page borders before, then chances are you might already know of what to do.
For those who are still in the dark, then we urge all of you to continue reading in order to learn more.
- Open a Word document
- Add a picture the document
- Resize the image
- Add a border
- Change the color of the frame
Let us talk about this in more detail, shall we? Good.
1] Open a Word document
Before getting started, you must first open a document in Microsoft Word. You either begin by opening the document via Microsoft Word or open it directly from the file saved on your computer. Whichever option you choose, it doesn’t matter just as long as the document is up and ready for editing.
If you do not have a Word file saved, then create a new one by clicking on Blank Document, or CTRL + N.
2] Add a picture the document

You will now want to go ahead and add a picture to your document. You can do this by clicking on the Insert tab located on the Ribbon, and from there, select Pictures to add a photo from your hard drive, or Online to download and insert one from the web.
3] Resize the image

You may want to resize the image, and thankfully, this is super easy to get done. Just drag the lines around the photo to the desired spot to make the image smaller.
Read: Microsoft Word tutorial for beginners.
4] Add a border
When it comes down to adding a frame or border to the image, make sure the Picture Format tab is selected. When that is done, go to Picture Styles on the Ribbon then click on any of the icons there to install a frame.
Read: How to download Page Borders for Microsoft Word free.
5] Change the color of the frame
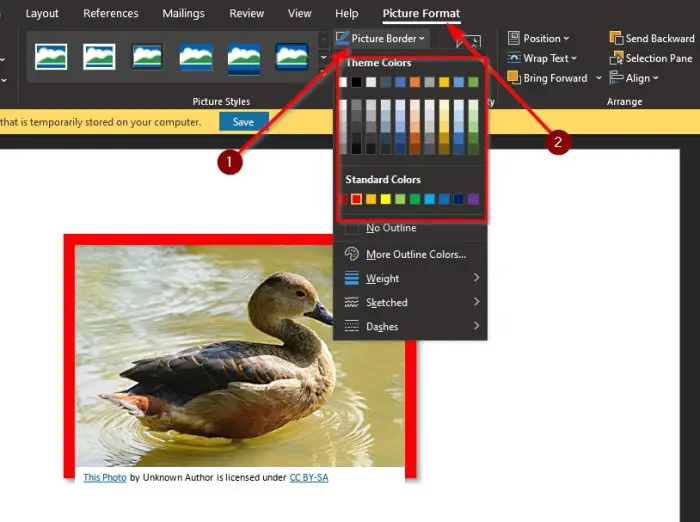
Yes, it is possible to change the color of the frame instead of having to stick with the default option. We can do this by clicking on Picture Format, then select Picture Border, then from there, select a color from the many options available to you.
The changes should happen in real-time, so you will have an idea of what things will look like before you complete the task.
Now read: How to convert Table to Text and Text to Table in Word.

Vamien has studied Computer Information Services and Web Design. He has over 10 years of experience in building desktop computers, fixing problems relating to Windows, and Python coding.
More than ever, pictures are critical to the effectiveness of your communication materials. With the image formatting and layout tools in Microsoft Word, it’s possible to add and manipulate pictures in your document—even if you’re a beginner.


Starting with a Microsoft Word template makes it even easier. With a well-designed Word template, the positioning and formatting of pictures have already been done for you. All you’ve got to do is to drag your pictures into the image placeholders.
Even if you’re using a template for Word, it’s good to know how to format pictures so you can make your document look exactly the way you want it to.
In this article, you’re going to see, step-by-step, how to work with pictures in Microsoft Word.
(Note: The screenshots below show Microsoft Word for Mac. The screens and steps may be slightly different if you’re using a different version of Word.)
How to Insert a Picture in Word
To add a picture to a Word document, click Insert > Pictures. From here, you’ve got three options:
1. Photo Browser
If you choose this option, you’ll be able to select an image from the existing photo sets on your computer. On a Mac, that includes photos in iPhoto and Photo Booth. When you find the picture you want to use, click on it, then drag it into the document.


2. Picture From File
This option lets you insert an image from another location on your computer. Find the image file, select it, then click Insert.


3. Online Pictures
Insert pictures in Word from the web by selecting Online Pictures…. This opens a Bing image search right inside your document. Type a keyword or phrase in the search bar.


By default, the Creative Commons only filter is checked. Keep this selected to make sure you don’t violate any copyright laws. Click on the filter icon to filter the image results by other parameters.


Select an image by clicking on it, then click Insert. You can select several images before clicking the Insert button.


Microsoft Word automatically includes the image attribution and license details as a caption.


Note: While you can import many image formats into Word, the ones that work best are JPG and PNG.
How to Format Pictures in Word
After importing pictures into Word, you can apply different formatting settings to each Microsoft Word picture and control its appearance. Below are some of the most basic image formatting you can apply in Word:
1. Resize an Image
Resize a picture in two ways:
Resizing Method 1
Click on the picture. Press and hold the Shift key, then click and drag one of the sizing handles either towards or away from the center.


Holding the Shift key ensures that the proportion of the picture is retained. Otherwise, it would become distorted and your entire document will look amateurish.
Resizing Method 2
This method allows you to resize the picture to a specific length or width. Click on the picture, then click on the Picture Format tab. Type the length or width you wish the image to have.


By default, the original proportion of the image is retained even when you change either the length or width of the image. Keep this checked to avoid distorting the image.
2. Rotate or Flip Images
To rotate an image, do so either manually or by a specific amount.
Manual Image Rotation
To rotate an image manually, click on the image to select it. Click on the rotation handle and drag it in the direction you want.


Flip or Rotate an Image By a Specific Amount
Rotate a picture by a specific amount. Click on the picture, then go to Picture Format > Rotate. From here, you’ve got the option to:
- Rotate Right 90°
- Rotate Left 90°
- Flip Vertical
- Flip Horizontal
- Select More Rotation Options
To rotate a picture to an exact angle, choose Select More Rotation Options.


Type in the amount you wish to rotate the object, then click OK.


How to Crop Photos in Word
If you’re wondering how to crop a picture in Microsoft Word, it’s not difficult. Follow the steps below to not only crop an image, but also to dress it up by cropping it to a shape or adding decorative borders:
1. Basic Image Cropping
To crop a picture, select the picture, then go to Picture Format > Crop > Crop.
Black cropping handles appear on the sides of the picture. From here:
- Crop one side. Drag one side handle inward.
- Crop two adjacent sides at the same time. Drag one corner inward.
Click outside the image to apply the crop.
2. Crop Image to a Shape
To crop the picture to a specific shape, select the picture. Go to Picture Format > Crop > Crop to Shape. Select a shape from the selection that appears.


Click away from the picture to apply the new shape.


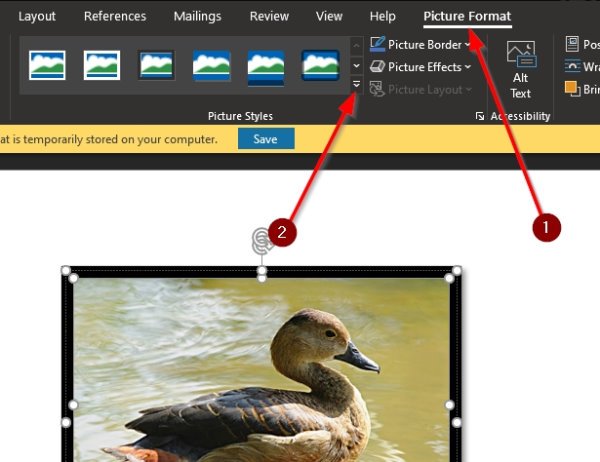
3. Frames and Borders
Borders are an easy way to dress up a picture in Microsoft Word. To add a border, select the picture, go to Picture Format. Click on the Picture Border button on the ribbon to reveal the border options.


From here, choose the color, weight, and dash style you wish to use for the border.


To add a frame, click on the picture, then go to Picture Format. Click on the Picture Quick Styles button on the ribbon. Select the border you want to use.


How to Use Image Editing Tools
There are many Word image editing tools. Learn how to format pictures in Word by removing the background or adjusting the brightness. Here’s how:
1. Remove Background
Microsoft Word allows you to remove the background from your pictures. This feature works best if the color of the background is distinct from the colors on the main subject of the picture.
To remove the background, select the image. Go to Picture Format > Remove Background.


Use the tools provided to select which parts of the image you wish to keep and which parts you want to remove.


The parts that’ll be removed are colored pink.
When you’re happy with the selection, click Keep Changes.


2. Sharpness and Brightness Corrections
Improve the sharpness and brightness of your pictures in Microsoft Word. To adjust these, select the picture. Go to Picture Format > Corrections. Select the sharpness and brightness/contrast settings you wish to use.


To more finely control these settings, go to Picture Format > Corrections > Picture Corrections Options. The Format Picture sidebar appears. It allows you to provide specific settings for sharpness, brightness, and contrast.


3. Picture Color
Microsoft Word also allows you to control the color saturation and tone of your picture. And you can recolor the entire picture for special effects. Select the picture, go to Picture Format > Color. Select any of the options that appear.


From here choose:
- More Variations. Recolors the image with a different color from the options provided.
- Set Transparent Color. Makes certain colors transparent so that the color of the background shows through.
- Picture Color Options. Opens the Format Picture sidebar, where you can fine-tune the settings for color saturation, tone, and recolor.
How to Use Layout Options
Microsoft Word’s layout options for images lets you control how photos are displayed alongside text.
By default, a picture is set to be «In line with text.» This means the picture is treated as an object that moves with the text. This means whatever formatting is applied to the text applies to the picture as well, which may not be how you want it to appear. When a picture is in line with text, you won’t be able to drag and drop it to a different part of the document.
To set up a picture’s layout options, select the image, then go to Picture Format > Position. Select one of the pre-configured layout options to position your picture on the page.


Gain more control by going to Picture Format > Wrap Text.


Select one of the text wrapping options:
- Square — wraps text around the picture in a square shape


- Tight — wraps text following the shape of the picture


- Through — shows text through all the “open” parts of the picture (may only be visible with certain picture shapes)


- Top and Bottom — wraps text only above and below the picture


These text wrapping options allow you to overlay pictures in Word or merge them together into a collage-type layout.
You’ve got other options:
- Behind text. Overlays the text in front of the picture
- In Front of Text. Places text behind the picture, covering it
- Edit Wrap Boundary. Lets you fine-tune how text wraps around the picture, which is especially useful if it’s irregularly shaped
- Move with text. Keeps the picture anchored to the text
- Fix position on page. Keeps the picture on the same position relative to the page, even if the text moves
- More Layout Options …. Gives you precise control over the picture layout
How to Move Pictures in Word and Arrange them on the Page
You may be wondering how to move a picture in Microsoft Word. The easiest way to move a picture is by clicking and dragging it. If this doesn’t work, the picture is probably set to be inline with text. Follow the instructions above to select a different text wrapping option.
To move multiple images, hold the shift key down as you click on each picture. Then, drag and drop them into place.
You can also move images using precise measurements. Select the image, go to Picture Format > Position > More Layout Options …. Specify the horizontal and vertical position of the picture relative to an element of the page.


Get Creative With Pictures in Word
Use the skills you learned above to add pictures in your Word documents and display them exactly the way you envision. As you’ve seen, it’s easy to control the appearance and placement of images on the page. By following the steps above, you can produce professional-looking documents all by yourself. However, we’ve only scratched the surface of the many ways you can work with pictures in Word!
Of course, if you prefer to have these design choices made for you, you’ve got the option to start with a Microsoft Word template. If you make a lot of Word documents, then you’ll like the cost-effectiveness of Envato Elements. You get unlimited downloads of templates as well as fonts, stock photos, and more for one low subscription price. On the other hand, GraphicRiver may be a better option if you only need the one-off template.
This gives you the ultimate convenience because professionally-designed Word templates have image placeholders. All you’ve got to do is to drag and drop your own pictures into the placeholders. The picture formatting steps in this article will help you fine-tune the image settings as you wish.
Now you, too, can get more creative—and effective—with pictures in Microsoft Word. But first, get your head start by downloading your favorite MS Word Template from Envato Elements or GraphicRiver.
Многим пользователям во время редактирования документа может потребоваться оформить обтекание текстом изображения или другого объекта в Ворде. Благодаря этому, вы сможете по своему усмотрению изменить стиль оформления иллюстрированного документа Word.
Обтекание текстом — это результат взаимодействия текста на странице с внедренным объектом: изображением, таблицей, надписью или другим элементом. Вы можете выполнить в Word обтекание картинки текстом, разместив текст перед, за, после или вокруг изображения.
Содержание:
- Как сделать обтекание картинки текстом в Word — 1 способ
- Как сделать обтекание текстом в Ворде — 2 способ
- Как сделать обтекание картинки текстом в Ворде — 3 способ
- Как задать параметры для обтекания
- Как изменить контур обтекания текста
- Обтекание текстом таблицы в Ворде
- Выводы статьи
Часто необходимо расположить изображение в определенном месте, чтобы текст обтекал его в заданном порядке. В программе Word обтекание текстом объекта в любой момент можно изменить, добавить или убрать.
В этом руководстве вы найдете инструкции о том, как сделать обтекание картинки текстом в разных версиях программы Microsoft Word: Word для Microsoft 365, Word 2021, Word 2019, Word 2016, Word 2013, Word 2010, Word 2007. В указанных версиях Word обтекание рисунка текстом выполняется одинаково.
Как сделать обтекание картинки текстом в Word — 1 способ
По умолчанию, вставленный объект воспринимается программой как новый символ текста. После добавления нового текста в документ, рисунок будет перемещаться вместе с остальным текстом, потому что объект привязан к абзацу.
Вы можете вручную перенести изображение в нужное место на странице документа с помощью зажатой клавиши мыши.
Пройдите шаги:
- Вставьте нужное изображение в текст документа или используйте ранее вставленный рисунок.
- Щелкните левой кнопкой мыши по картинке.
- Подведите курсор мыши к одному из углов объекта, чтобы изменить масштаб изображения до необходимого размера.

- Кликните по изображению левой кнопкой мыши, в правом верхнем углу около рисунка появится значок «Параметры разметки».
- Нажмите на значок, чтобы выбрать подходящий вариант в опции «Обтекание текстом».

- Выберите нужный макет, нажимая на соответствующие значки, чтобы выполнить обтекание изображения текстом.
По умолчанию, вставленный объект имеет параметр «В тексте». Это значит, что этот элемент находится внутри абзаца, как будто это текст. Если добавить или удалить часть текста, положение изображения изменится.
В параметрах разметки имеются две настройки для перемещения или фиксации положения объекта на странице:
- Перемещать с текстом — после добавления или удаления текста, изображение перемещается по странице.
- Зафиксировать положение на странице — рисунок останется на своем месте, несмотря на перемещение текста в документе, после его добавления или удаления.
Как сделать обтекание текстом в Ворде — 2 способ
Вы можете воспользоваться похожим способом, используя при редактировании меню правой кнопки мыши.
Выполните следующие действия:
- Щелкните правой кнопкой мыши по изображению.
- В контекстном меню нажмите на пункт «Обтекание текстом».

- В открытом подменю выберите обтекание рисунка текстом, которое вам подходит.

Вам доступны следующие варианты выбора макета:
- В тексте — объект вставлен как новый абзац, текст располагается выше и ниже картинки.
- Квадрат (Вокруг рамки — название макета в некоторых предыдущих версиях MS Word) — текст размещается вокруг прямоугольной квадратной области на одинаковом расстоянии.
- По контуру — текст располагается вокруг контура объекта, размер и вид которого можно изменить разными способами.
- Сквозное — текст находится вокруг рисунка и внутри.
- Сверху и снизу — текст находится только выше и ниже объекта, соприкасаясь с ним.
- За текстом — текст страницы располагается за изображением, но он отображается на фоне объекта как водяной знак.
- Перед текстом — картинка закрывает часть текста, который находится за элементом.
В контекстном меню имеется параметр «Сделать макетом по умолчанию». Это значит, что вы можете задать выбранный способ обтекания текстом для всех последующих вставок объектов на страницы документов Word.
- После завершения редактирования сохраните файл Word на компьютере.
Как сделать обтекание картинки текстом в Ворде — 3 способ
Переходим к следующему способу изменения положения текста около изображения.
Проделайте следующие действия:
- Откройте документ Word.
- Наведите указатель мыши на место, куда вы хотите вставить изображение.
- В меню откройте вкладку «Вставка».
- Щелкните по значку «Рисунки», затем в выпадающем меню нажмите на «Это устройство…» или «Изображения в Интернете…».
- Добавьте изображение в текст документа.
- В меню откроется вкладка «Формат рисунка» (Формат).
- Кликните по значку «Положение», расположенному в группе «Упорядочить».

- Выберите подходящий вариант размещения объекта из предложенных, чтобы сделать обтекание картинки текстом в Ворде по заданным параметрам в опции «Обтекание текстом».

Как задать параметры для обтекания
Вы можете дополнительно отрегулировать параметры обтекания текстом объекта на странице документа Word.
Пройдите несколько шагов:
- При выборе способа обтекания, в контекстном меню имеется пункт «Дополнительные параметры разметки…», на который нужно нажать.
- В окне «Макет», во вкладке «Обтекание текстом» задайте необходимую опцию для каждой группе параметров.

В группе «Обтекание» укажите подходящий метод реализации.
В группе «Текст» выберите размещение текста:
- вокруг — текст расположен с любой стороны;
- слева — текст находится только слева;
- справа — текст располагается только справа;
- по большей стороне — текст размещен только с большей стороны.
В группе «Расстояние до текста» с помощью регуляторов «сверху», «снизу», «слева» и «справа» задаем расстояние от изображения до ближайшего текста.
В зависимости от выбранного способа обтекания, разнятся доступные настройки параметров в группах «Текст» и «Расстояние до текста».
- Для применения настроек нажмите на кнопку «ОК».
Во вкладке «Положение» настраивается позиция изображения или другого объекта в различных положениях.
Во вкладке «Размер» устанавливается высота, ширина, поворот и масштаб рисунка.
Как изменить контур обтекания текста
В обычном случае контур обтекания и само изображение совпадают по размеру и по форме. Вы можете придать контуру иную форму по своему смотрению.
Сделайте следующее:
- В окне открытого документа выделите изображение.
- Перейдите во вкладку «Формат рисунка» (Формат).
- В группе «Упорядочить» нажмите на кнопку «Обтекание текстом».
- В выпадающем меню выберите один из параметров обтекания, кроме исходного варианта — «В тексте».
- Щелкните по пункту «Изменить контур обтекания».

- Наведите курсор мыши на край выделенной красным рамки или на одну из угловых узловых точек.
- При зажатой левой кнопке мыши растащите контур обтекания до нужной формы.

- Сохраните изменения в документе Microsoft Word.
Обтекание текстом таблицы в Ворде
В некоторых случаях, нужно сделать обтекание текстом вокруг таблицы, созданной в документе Word.
Вам понадобится выполнить следующее:
- Щелкните правой кнопкой мыши по таблице.
- В открывшемся контекстном меню нажмите на пункт «Свойства таблицы…».

- В окне «Свойства таблицы», во вкладке «Таблица», в группе «Обтекание» нажмите на параметр «вокруг».
- Подтвердите изменения нажав на кнопку «ОК».

- Перетяните таблицу в нужное место документа, текст будет размещаться вокруг таблицы.

Выводы статьи
Во время работы в текстовом редакторе пользователю может понадобиться изменить разметку документа, в частности, сделать обтекание рисунка текстом в Ворде. Это необходимо для изменения внешнего вида страницы после вставки туда объекта. Вы можете выбрать положение изображения на странице документа и способ обтекания текстом по своему усмотрению, используя настройки приложения.
Похожие публикации:
- Как вставить видео в Word — 3 способа
- Как вставить PDF в документ Word — 6 способов
- PDF24 Creator — инструменты для работы с PDF файлами
- Как сделать список литературы в Word
- Озвучивание текста в Ворде — «Прочесть вслух» или «Проговорить»