
Создавайте рамки документов и документы в Word, которые используются многими людьми для создания красивых сочинений, планов уроков или документов, впечатляющих зрителей. Пользователи могут выбирать различные типы текстовых фреймов, от сплошного, пунктирного или даже добавлять текстуры во фрейм документа. Это одна из основных операций при обработке документов в Word. В версиях Word способ создания рамок документа требует нескольких различных шагов, в отличие от того, как создать точку в Word, так же в версиях. В следующей статье рассказывается, как создавать фреймы в Word 2007, 2010, 2013 и 2016.
Обратите внимание, что следующий способ будет использовать инструмент «Фигура» для создания фреймов в Word. Таким образом, вы должны создать переднюю рамку, а затем ввести текст. Если вам нужно создать рамку для обложки, ознакомьтесь со статьей Как создать титульную страницу в Word.
- Автоматическое создание списка таблиц в Word
- Как активировать Microsoft Office 2019 Professional Plus
- Исправить ошибки залипания слов в Word 2007
- 1. Создание фреймов в Word 2013, 2016.
- 2. Обрамление в Word 2010, Word 2007, Word 2003
- 3. Как добавить текст в рамки Word
- 4. Как вставить рамку в созданную рамку.
1. Создавайте фреймы в Word 2013, 2016.
Операции в этом разделе выполняются в версии Word 2016. Скачать Microsoft Office 2016
Шаг 1:
Откройте файл, который вы хотите создать в рамке> Вставить> Фигуры> выберите форму рамки, которую вы хотите создать, обычно прямоугольник.
Шаг 2:
Щелкните правой кнопкой мыши только что вставленный фрейм, выберите «Стиль», «Заливка» или «Контур», чтобы быстро настроить фрейм.
Опции для быстрой настройки рамок
Шаг 3:
Щелкните правой кнопкой мыши фрейм, выберите «Форматировать фигуру», чтобы иметь несколько параметров форматирования для фреймов и текста во фрейме.
2. Обрамление в Word 2010, Word 2007, Word 2003
1. Откройте рабочий документ, выберите Вставить в разделе Фигуры, щелкните прямоугольный значок.
2. После того, как рамка появится, как показано ниже, мы можем выровнять ее, щелкнув границу рамки.
3. Щелкните правой кнопкой мыши границу и выберите «Формат автофигур», чтобы настроить яркость границы.
4. Откройте настраиваемую панель, выберите «Цвета и линии со стилем», чтобы выбрать стиль рамки и «Толщина» ее яркости.
3. Как добавить текст в рамки Word
Шаг 1:
После создания фрейма описанным выше способом щелкните правой кнопкой мыши интерфейс во фрейме и выберите «Добавить текст».
Шаг 2:
Затем пользователь, как обычно, вводит контент во фрейм. Мы все еще можем изменить формат текста во фрейме, как обычно.
Или, если хотите, пользователь также может вставить в рамку художественное слово в Word. Щелкните элемент «Вставить», а затем щелкните WordArt.
Шаг 3:
Выберите художественный шрифт, который хотите использовать, и введите текст в поле «Редактировать текст WordAre».
Вскоре после этого отобразится текст в рамке с выбранным шрифтом. Шаги пользовательского ввода и ввода текста такие же, как при написании текста в обычном Word.
4. Как вставить рамку в созданную рамку
Если пользователь создал первый кадр и хочет вставить другой кадр, сделайте то же самое, щелкните фигуру и перетащите новый кадр внутри созданного кадра. Затем щелкните правой кнопкой мыши и выберите «Форматировать автофигуры», чтобы создать дизайн для кадра.
Если внешняя рамка сплошная, то мы можем изменить стиль для второй рамки в разделе «Пунктир». Размер, который вы также выбираете в разделе «Вес и цвета» в разделе «Цвет».
Результатом будут 2 кадра в документе, как показано ниже.
Фреймы с инструментом «Фигура» в Word относительно просты: просто сплошные стили или пунктирные линии, а затем выберите цвета. Если пользователь хочет добавить текстуры во фрейм, используйте инструмент «Граница страницы», как при создании обложки в Word.
Узнать больше:
- Как вставить формат даты и времени в Word 2013?
- Как отключить гиперссылку в Word 2013?
- Советы по копированию быстрого и эффективного форматирования абзацев в Word
Желаю всем успехов!
In MS Word, there are only two ways to box your content: textboxes and frames.
You might not have ever heard of frames. This is because they preceded textboxes. Newer versions of Word now use text boxes. Although, one can activate and use frames.
Both frames and text boxes have their attributes. However, the capabilities of textboxes exceed those of frames.
Why may textboxes be preferred?
- They look more organized because you can create links allowing text to flow from one textbox to another.
- They have an extensive selection of text-wrapping options
- You can change the alignment and orientation of text in a textbox.
Why may frames be preferred?
Frames can be part of a paragraph-style definition. In addition, they accommodate comments, automatic numbering, endnotes and footnotes.
Similarities
- Both hold text.
- Both can have a border (you can add color to it)
- Both can contain images and other graphical features.
- Both can have a background fill.
- Both can be placed within a page margin.
MS Word does not show the Frame feature on the ribbon by design. Therefore, you must first add the Frame functionality to the ribbon to integrate frames into a document. This article will teach you how to activate the Frame feature and insert frames into your document.
- Open the document where you want to insert the frame.
- Go to the ‘File’ tab on the ribbon.
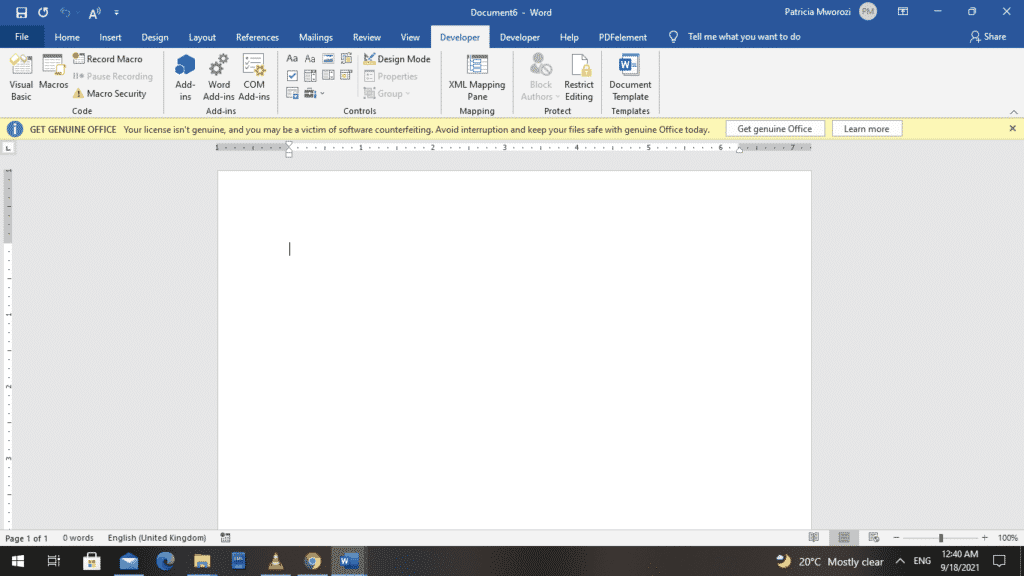
- From the backstage view, select ‘Options.’
- Word displays a ‘Word Options’ dialog box.
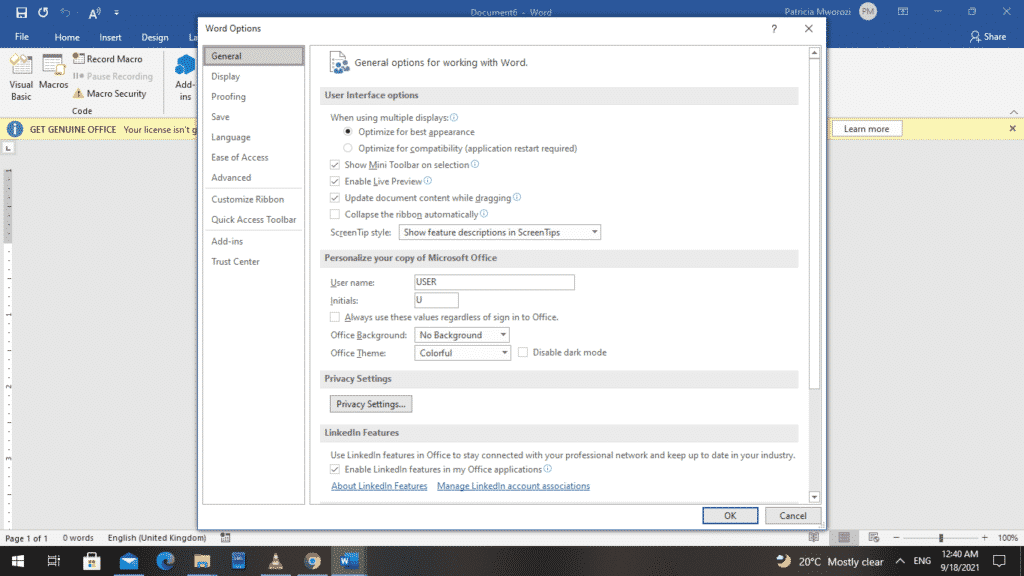
- From the left pane, choose ‘Customize Ribbon.’

- Another dialog box opens up when you do this: ‘Customize the Ribbon and keyboard shortcuts.’
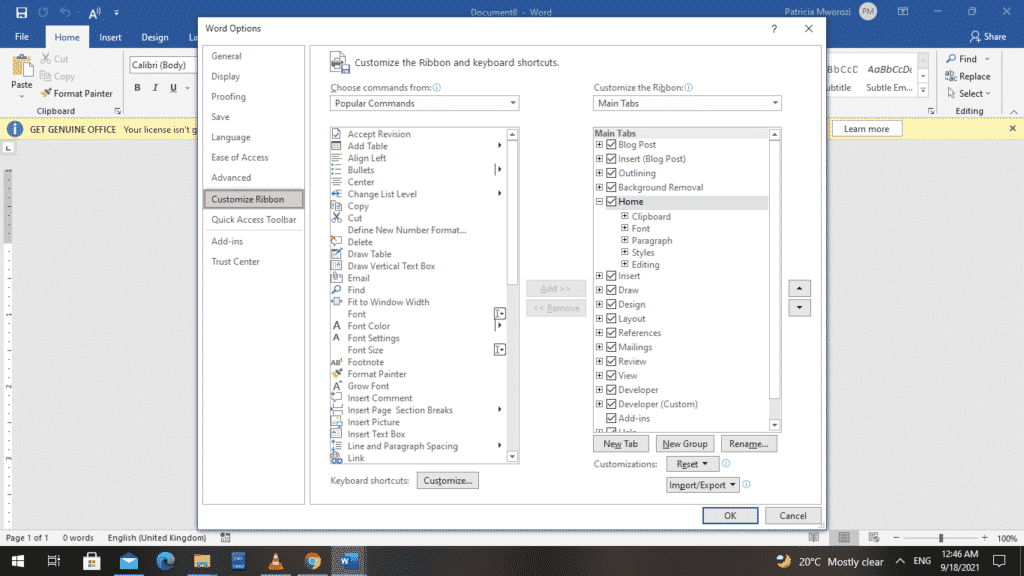
- On your left, under the ‘Main Tabs’ section, check ‘Developer.’ If it is already selected, leave it.
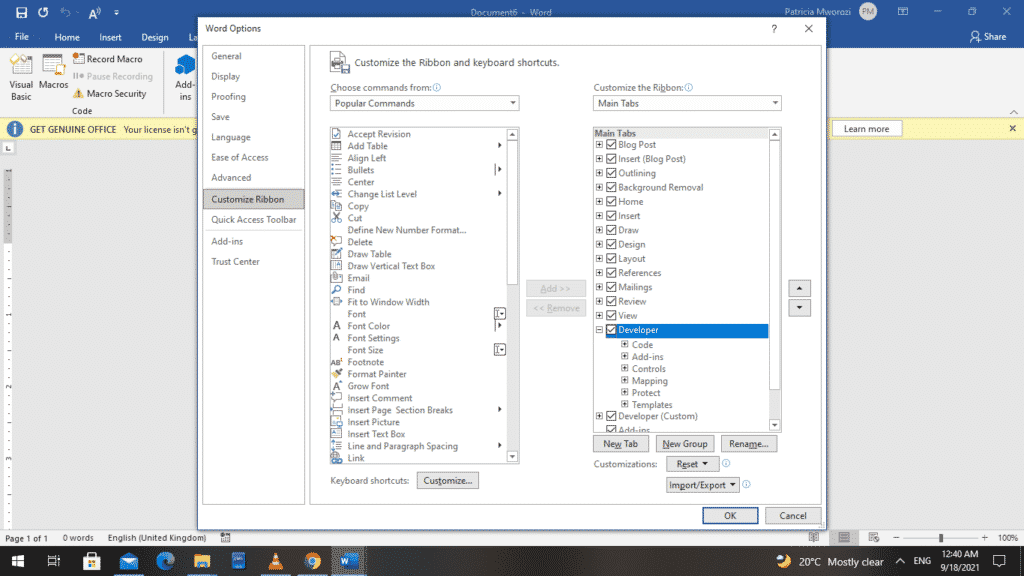
- Click OK.
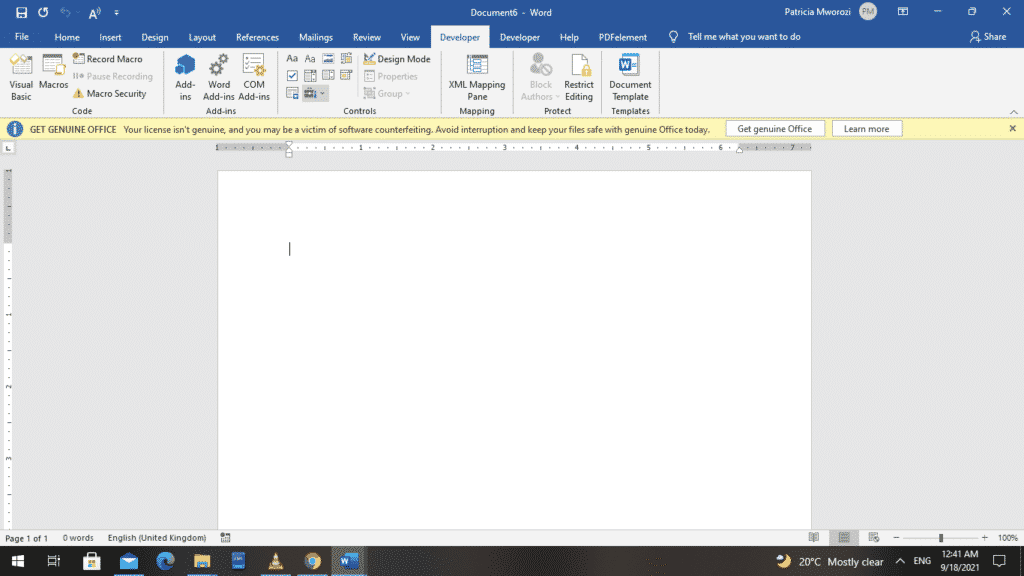
- Go back to the ribbon and select the ‘Developer’ tab.

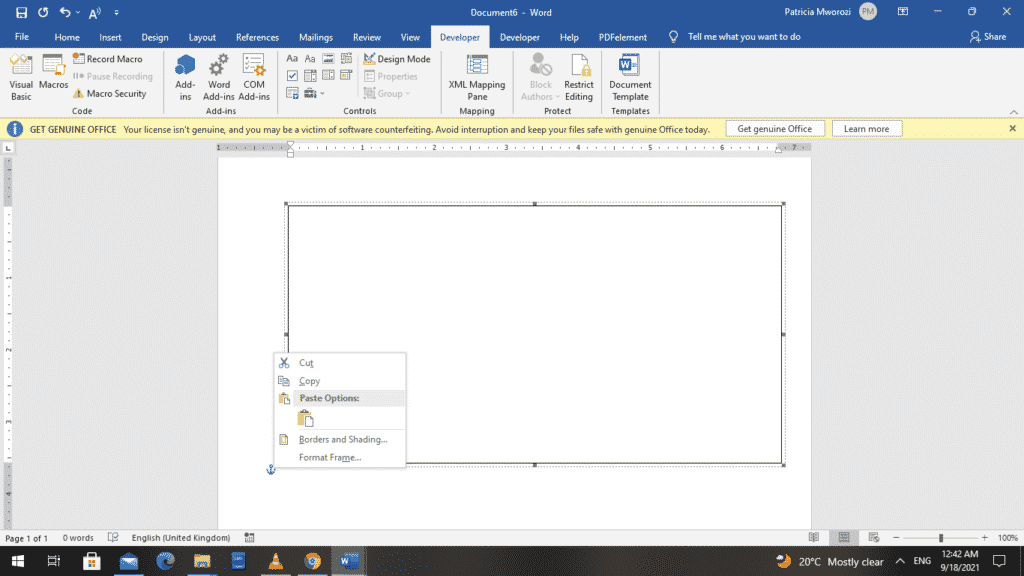
- Under the ‘Controls’ section, choose ‘Legacy Forms.’ The option itself is not written words if you think your Word version does not have this function. Instead, a small briefcase represents it.
- When you choose ‘Legacy Forms,’ another box appears on your screen. From it, select ‘Insert Frame.’ It is the fourth symbol from your left.
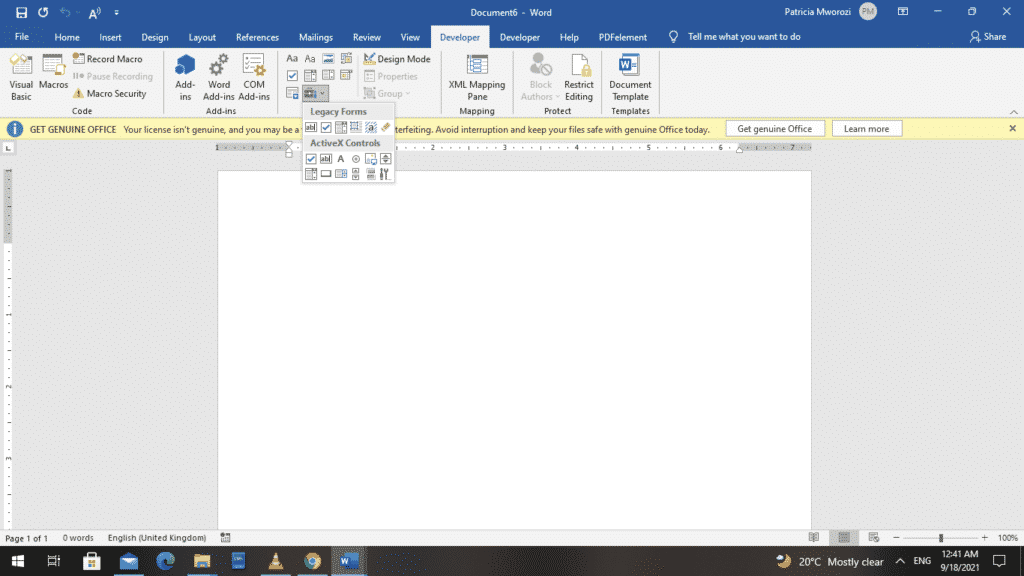
- You will notice that your pointer now appears as a cross. This is to allow you to draw the frame and adjust it to your preferred size.
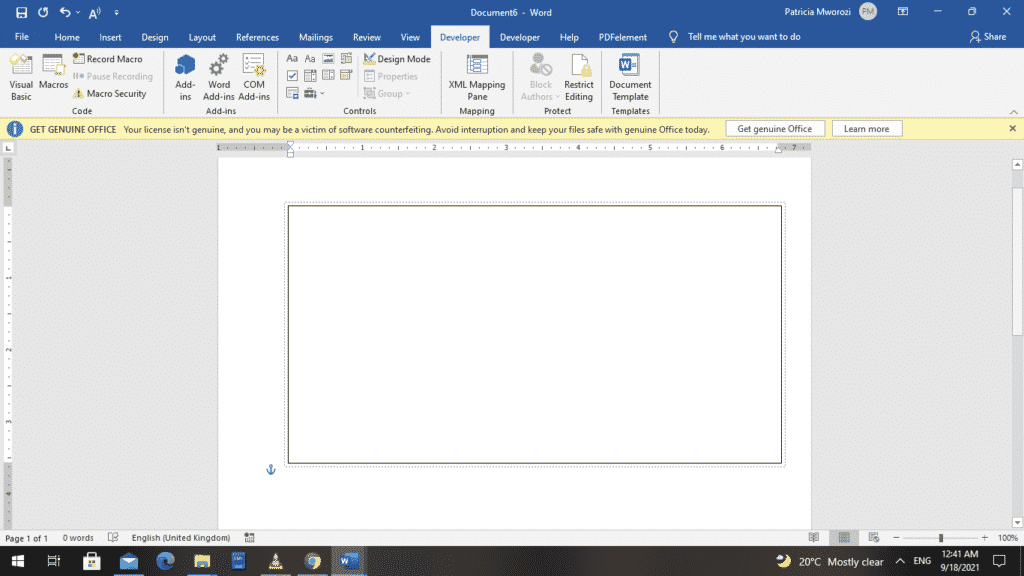
- By design, the frame has a border and is filled. You can adjust the appearance of your frame by right-clicking it and making changes from the contextual menu.
Do you ever have to work on written projects with colleagues but cannot find an organised and structured way to do it?
Group projects are already hectic, but we cannot run away from them. They are either mandatory for work or school.
You do not know who should write the first draft, who should edit or how long it will take, which word processor to use. Besides, many things always go wrong because of the many people involved.
Fortunately for you, Simul Docs can solve all these problems.
Download Simul Docs and get started. After writing your first draft in Microsoft Word, upload it to Simul Docs. This will automatically make it the first version. Now, another colleague can open it and make their edits. This will create another version different from the first. Every time another person opens a version and makes edits, a new version is created, with the latest changes. The best part is, even if you forget to turn on tracked changes, they are automatically documented!
Since it is a collaboration, a bonus feature is the ability to add comments to the document. If you want a colleague to review the changes by a specific time, or any other instructions, you can let them know in the comment section.
Let us say another co-worker is supposed to include their input, but they do not have Simul Docs. All you have to do is download the document or forward it by email. Alternatively, you can upload it to any storage software like one drive, and once their changes have been made, they can forward it to you once again, and you can open it in Simul Docs.
Once all the necessary edits have been made, you can save the final version containing all the modifications with one click.
Simul is the most convenient collaborative tool yet. Centralising your written project avoids mishaps like losing your work or losing its original format.
Visit simuldocs.com and simplify group edits today.
The use of images to decorate the texts in a Word sheet is very common. Just by using a combination of keys to copy and paste the image or text, the presentation of the document changes completely. This customization allows you to make and put frames in Word for those photos that you want to add or insert in the document
The results that can be obtained when putting personalized frames in Word are elegant. Well, to be able to frame texts in Word, it is essential to manage the borders. You can do this from a computer or mobile phone, without the need for third-party applications or the Internet.
Put Borders or Frames in Word: How are they done and how are they used?
Index( )
- How to put a frame in Word?
- What are borders in Word and how to use it?
- What kind of borders can be used in Word?
- Borders for text or images
- Page borders
- How to see the pre-designed margins of Word?
- Access Word frames from Android or iPhone mobile
- Set the margins from PC Word
- How to use borders from Word online?
- How to create a custom frame for Word sheets?
- How to add a shadow to my Word frame?
- How to set a different margin for each page of my document?
- What to do to set a default border for my Word files?
How to put a frame in Word?
In case you want to add a frame to a Word page , you will have to follow the following steps if you are from a PC or Android phone.
- Go to the toolbar and locate the Design tab .
- Go to the last option on the right hand side and select Page Borders.
- Here you can choose to insert a pre-designed style or modify it to your liking, and then add it to the Word page.
If you want to opt for the personalization of the sheet from the PC , you can take advantage of the additional functions that this technology offers you. It might be a bit different when doing it from Android. So it doesn’t hurt to look for alternative apps that have this feature.
What are borders in Word and how to use it?
They are the lines that are created around the sheet with content, which is used to highlight the information in the same Word sheet. This program for both computer and mobile phone offers different types of borders and adjustments. Which will make you more put frames in Word with a better level of customization .
It is worth mentioning that on any Word page you can add custom borders. Not to mention that you will be able to put frames in Word with shading and give it a margin in particles. All this without forgetting that you can download borders for a Word sheet from the Internet.
What kind of borders can be used in Word?
Many people have the belief that these elements are only for one Word sheet. However, they can be inserted into images, paragraphs, or charts. So it will be much easier for you to use this technology to put frames in Word and highlight a text, an image or a predetermined design.
Borders for text or images
- Select the paragraph or segment you want to customize.
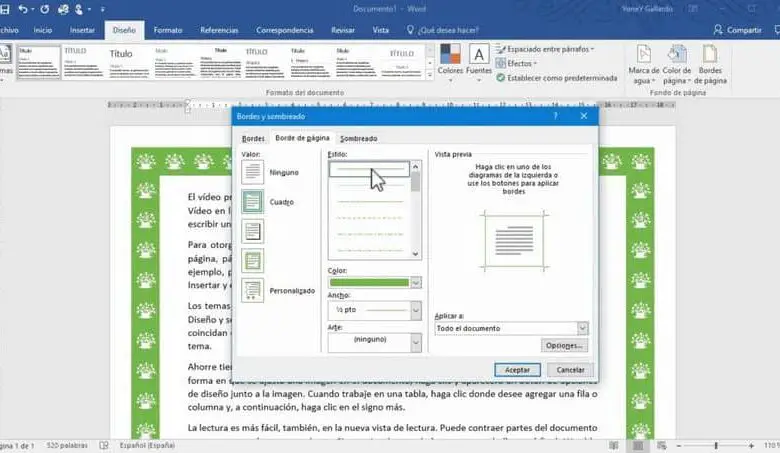
- Head over to the Word menu and locate ‘ Borders’.
- Within the option above, choose ‘Borders and Shading’.
- A dialog box will appear on the screen. On top of it, he clicks on the ‘Borders’ tab.
- Select the format you prefer.
- Click OKto add the border to the paragraph.
It is important that when making the selection, you choose the specifications when putting frames in Word. For example, it has options such as: value, style, color, width, preview, among others. Keep in mind that these same settings can be copied and pasted on any other Word page.
In the case of images, you just have to click on it, select ‘Page background’ and then ‘Page borders’. Through this section you can shade, add 3D effects or different border designs to your images. This process will be easier for you from the PC or computer, it may be that from the mobile telephony the simple fact of putting frames in Word will be a bit complicated.
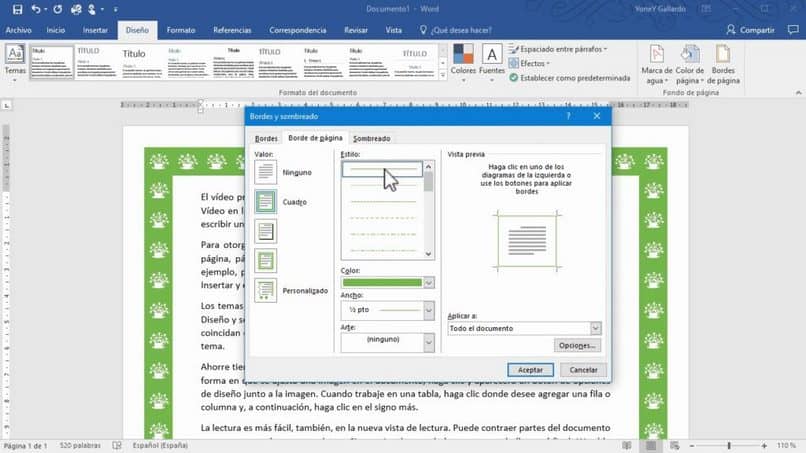
Page borders
The process is very similar to the previous one. But, within the ‘Borders and Shading ‘ tab, you will need to choose ‘Page Border’. There you will be shown several alternatives. Just make the selection you want to add and insert. For practical purposes, proceed to copy and paste this in different parts of the document.
It should be noted that in this segment you can find the same options as when applying the border or margin on a paragraph. But, in addition, the ‘Art’ section is added, which allows you to add borders decorated with different drawings . You can find this in the Word version for mobile telephony. So it is compatible with almost any cell phone.
On the other hand, if you want to insert in the shading tab, you will be able to visualize the possibility of filling the background of the border that has been decided to insert with color.
How to see the pre-designed margins of Word?
To improve the presence and aesthetics of your documents, you can implement the borders included in Word. These are found in the design section. To apply them to any part of your documents, you just have to click on the tab that indicates ‘Borders’.
When acquiring and downloading Word , we can realize the wide variety of options to personalize the texts that it offers us. Most applications similar to Microsoft Word allow you to modify a margin, without neglecting the customization of a Word page. Therefore, we will shortly mention how to access the corresponding menu.
Access Word frames from Android or iPhone mobile
In case you find yourself using Microsoft Word from a cell phone , it is still possible to apply borders or modify the margin of your documents. The first thing you should do is open the file you want or create a new one.
In the options bar, locate the ‘Design’ tab, there you must select ‘Borders’ . A box will appear on the screen where you can customize the border you choose.
Keep in mind that you can add a template with pre-designed borders or configure the margin of the document itself. Without forgetting that you can add and insert more elements , since this technology allows it. In fact, you can make frames from scratch if you have a basic idea.
Set the margins from PC Word
Very similar to the steps that we explained above, you have to go to the Design tab in the toolbar. From there, you can set standard settings for your Word sheet or customize one from scratch. If you choose the second option, you must do the following:
- Go to Layout and then select Margins.
- You will now choose the option that allows you to make a customization.
- You can use the arrows shown in the new perk or change the values manually.
- Finish by accepting the new settings and that’s it, shortly the new changes will be inserted and added.
How to use borders from Word online?
If you are not satisfied with the alternatives offered by Microsoft Word, you always have the option of downloading the borders you want online. On the web you can search for images similar to those that exist within the program.
You just have to write in any internet search engine alternative : ‘Word Borders’. There you can choose the one that best suits your needs. When you find the border you want, do the following:
- Click on the image to see it in full.
- Right click on the image and select ‘ Save Image As’.
- Open Word and look for the Insert option (in the Menu).
- Click on Illustrations, and then on Images.
- When the file explorer opens, select the image you have previously chosen.
To be able to write a text inside the image on any Word page, you must click the right button. Now select ‘Text Wrap’ and finally ‘Behind Text’. This will allow you to see the letters in front of the image. If you wish, you can make frames and add an image inside it.
How to create a custom frame for Word sheets?
To do this, once you’ve selected the border you want, go to the ‘Borders’ tab. Depending on what you have chosen, below the preview there is a series of boxes that allow you to apply the border to the entire document or just to one page. You can do this with each Word sheet that you have created on the computer or cell phone.
How to add a shadow to my Word frame?
You have the great advantage that you can insert or add shading to almost any element on a Word page. The same thing happens when you want to make frames. In this case, the easiest option is to add a rectangular figure. After this, you go to the format tab and there you choose the option without padding.
Where it says, shape effect, there you can go to any of the alternatives and choose any of the options that allows you to shade the figure. This is an easy way to make custom frames. Of course, on the cell phone it will be a little more complicated, but it is still possible.
How to set a different margin for each page of my document?
In some versions of Microsoft Word, the option to set the margin of a Word page is found under Layout. While in other versions it is in Format. In any case, you have to go to Márgenes.
After it is selected, a window will appear in which you can modify the margins of the Word sheet . You could say that this is the basic way of making frames and if you go to the option that allows you more customization, there you will find everything you need for your adjustments.
What to do to set a default border for my Word files?
Adding or inserting a new setting in Word will allow you to work better for future files. This is how you can make custom frames for any Word page you want. You just have to follow the same steps mentioned a moment ago and in one of the tabs, you will find an option that will allow you to set a configuration as default.
Note that you have two options for this: set the settings for the file you are working on, or for Word pages in future documents. If you opt for the second, your configuration will be among the alternatives to choose, since you have made one, which, in a certain way, allows you to make custom frames.
In this article we will find one more step for Word, where you will learn put frames in Word or add borders to Word pages very quickly and easily. We invite you to continue reading to learn all these functions that are necessary in office automation.
Fullerenes frames in Word are used to give a different detail to your text documents in Word, for example; Decorating a personal letter is important to achieve a different look, you can vary the decorations and they are very useful. Making presentations with frame details in your project would be ideal with a custom frame. If you also want to give your document a personal touch, you may be able to write with Chinese letters or characters in your Word document.
How to place a frame in Word?
- We open a new text document in the Microsoft Word program . If you haven’t installed it, you can download Word from its official website.
- Inside we have to start with the option «Design» and inside of it we will look for the option « Borders page».
- A new window will appear in which we will configure the frames we want to add to our project.
- Different design options will appear from dashed lines to more elaborate borders with design and all we have to do is select the one you like so that when you click accept the frame is placed on our page.

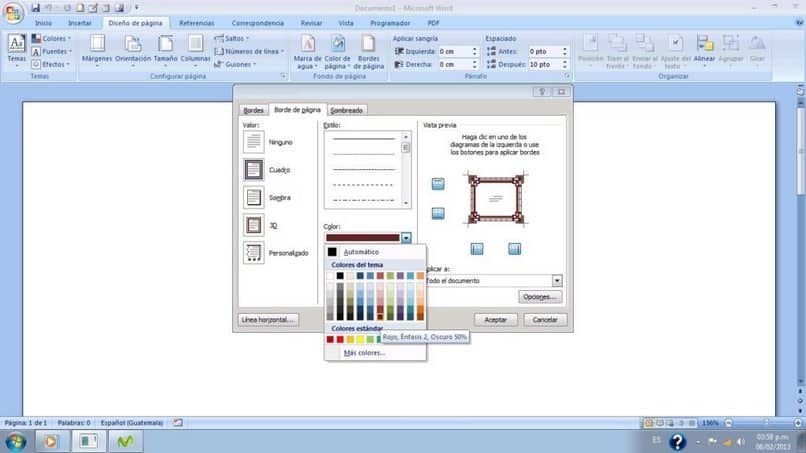
Can I choose colors and sizes for Word frames?
If you can choose colors and change the sizes as many times as you want in your text sheet in Word.
- We enter «Page Borders» .
- We select the border design that is of our preference for the project.
- Below are the colors and by default it determines «Automatic colors» this way he will take the color we use in text , in this case, black.
- Clicking here will bring up the window where we will see the variety of colors we can choose for the frame.
- The size of the frames can be determined just below the color option, we can change from the thinnest to the thickest size of all, it will depend on your project.
- With these changes, just press «Accept» and the modification will be in our text sheet.
How do we put art in our frame in Word?
- We can just place characters in our frame like «Art» and the appearance will change, depending on your project, it can be a more fun option.
- In the option «Page Borders» , we will see that after the colors and sizes of the borders, the option «Art» is present and when we click on it a new selection of frames is displayed, in this case it will be figures, stars, fruits, food, doodles and more.
- We select the one we like and click OK.
- Important: Our art will be affected by the color we set previously, i.e. if we previously selected a frame in blue, our art will also be affected in the background with a blue color.
- If you want this color not affect the art, we can put the color back on «Automatic» and then we will only see the art without color modifications.
- The size of our art can also be changed from the option «Width» where as we go forward we can preview the changes in the same window.
How to frame only text in Word?
- We write the words we want to include in a new text document.
- When we are done, we click on the tab «Design» then on the option «Page Borders» .
- Inside we will find «Borders» and inside other borders linked to the text of our project, in which we can generate borders of different styles but we no longer have the option «Art» .
- Clicking on «OK», we can see the changes in the text sheet.
If you don’t have a computer handy and need to edit a Word file, you can make changes to your Word documents from your android cell phone.
You can read more step by step on how to set background color for table cells in Word on our website. Look no further for guides, this is the most comprehensive on how to put frames in Word, add borders to Word page !.

Button back to top
Фреймы в Microsoft Word
Введение
Пожалуй, данная страница относится к одной из самых сложных тем, но не благодаря сути, а из-за бездумья программистов.
Слово «frame», изначально использовавшееся в программе, переводится как кадр или рамка.
Оно активно использовалось в разнообразном ПО 1990-х для определения того, что такой объект получает определенную самостоятельность внутри программы.
Он может перемещаться вопреки общим правилам и обладает набором собственных свойств.
Дальнейшее развитие дало ему еще одно определение — контейнер, но оно не прижилось в области текстовых редакторов.
Термин фактически прекратил свое существование, вы не найдете этот бывший пункт меню ни в программе, ни в Справке.
Ещё одним синонимом из полиграфии будет «врезка» — вспомогательный текст, заверстанный отдельным блоком, часто с использованием другой гарнитуры и размещаемый на плашке (фоне).
Но суть сущности от бездумья программистов и руководителей соответствующих проектов никак не изменилась.
«Слова нет, а суть осталась».
Множество объектов в Word помещаются во фрейм и обретают дополнительные свойства, во многом абсолютно идентичные.
Рисование в программе, так активно используемое, в том числе оправданное, также невозможно без понимания.
Именно из-за этого и стоит обсудить обозначенную тему.
Итак, любой объект, не являющийся элементом последовательного текста, включая колонтитулы, заключается во фрейм.
Следует сразу сказать, что такая модель по определению чужеродна для текстового редактора.
Зато она является основой работы издательских систем, где, условно, является апогеем их развития.
Одновременно, проникновение подобных технологий «на чужую территорию» прекрасно иллюстрирует пересечение функций программ разных классов и назначения.
Текстовый редактор без фреймов откатится на десятилетия назад.
Попробуем перечислить такие объекты.
Доступ к этим материалам предоставляется только зарегистрированным пользователям!
Общие свойства объекта во фрейме.
Доступ к этим материалам предоставляется только зарегистрированным пользователям!
….
Создание фреймов
Фрейм может быть сформирован автоматически (вне воли пользователя) или по прямому указанию.
Ручное создание фрейма стандартно предполагает некую цель, обычно упирающуюся в единственный вариант: свободное перемещение фрейма с обтеканием его текстом.
Первичным и универсальным вариантом будет создание текстового блока, куда можно поместить всё, что угодно.
Получается своего рода документ в документе.
Но даже здесь есть свои особенности.
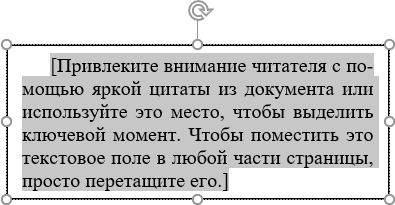
Так, использование кнопки ленты Вставка⇒Текстовое поле приведет к появлению блока с выделенным поясняющим текстом, обтеканием вокруг него и черной рамкой, толщиной 0,75 пт.
Доступ к этим материалам предоставляется только зарегистрированным пользователям!
Автоматическое создание будет описано позже….
Присвоение объекту обтекания также создаст для него фрейм.
….
Обтекание (Flow)
В подавляющем большинстве случаев использование обтекания объектов текстом характерно при работе с многостраничными документами.
Для одной страницы правила размещения объектов гораздо разумнее формировать с помощью таблиц, хотя и это неоднозначно.
Парадигма развития текстовых редакторов потребовала появления возможностей, присущим более профессиональным программам для верстки.
Именно обсуждаемая функция стала наиболее востребованной у рядовых пользователей.
С некоторых точек зрения она получила больший функционал, так как для большинства случаев текст мог активно редактироваться, а на вёрстку он обычно поступает в окончательной редакции.
Варианты обтекания
Прежде чем говорить о способах управления, стоит разобраться с теоретической частью смысла и назначения различных вариантов.
Для упрощения будем считать, что в качестве объекта рассматривается рисунок.
Доступ к этим материалам предоставляется только зарегистрированным пользователям!
Способы задания параметра обтекания
На протяжении всего моего взаимодействия с Word и его пользователями, я постоянно сталкиваюсь с позицией, что данное действие примитивно и «все это знают и умеют».
Попробуем разобраться, так ли это на самом деле.
Исходное состояние: в текст вставлен графический объект без указания обтекания (в тексте).
Доступ к этим материалам предоставляется только зарегистрированным пользователям!
Положение объекта
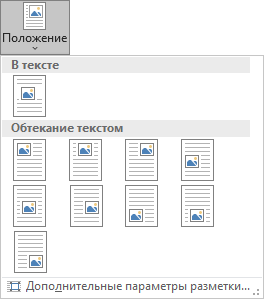
С точки зрения логики, положение можно присвоить только объекту, которому назначено обтекание, что наглядно подтверждается содержанием кнопки ленты Макет⇒Положение (Position).
Однако, внимательное рассмотрение позволит увидеть принципиальные отличия.
На самом деле задается обтекание вокруг рамки с одновременным присвоением положения, показанного на пиктограмме.
Разберем их по порядку.
Доступ к этим материалам предоставляется только зарегистрированным пользователям!
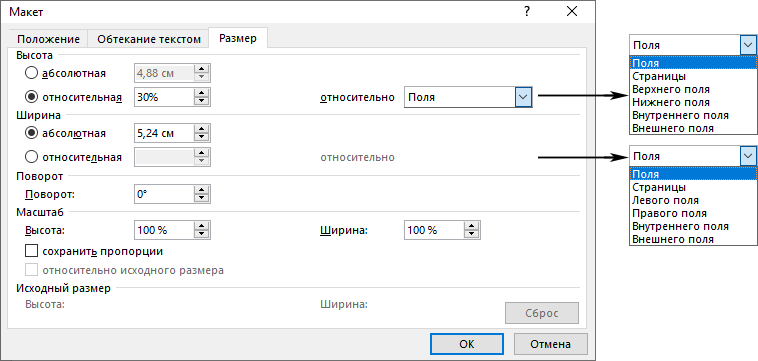
Размер объекта
Чрезвычайно важная вкладка диалога «Макет».
Она позволяет не только создать удобную автоматизацию и тонкие настройки, но и изрядно «напортачить».
Доступ к этим материалам предоставляется только зарегистрированным пользователям!
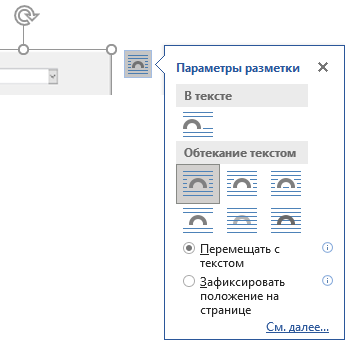
Закрепление объектов
Чрезвычайно важная настройка с точки зрения последствий при редактировании.
Фрейм либо всегда стоит на месте, либо двигается с относящимся к нему описанием.
Доступ к этим материалам предоставляется только зарегистрированным пользователям!
Практическое применение
С чисто прагматической точки зрения можно выделить две типовых ситуации, служащие экономии места на странице и повышению аккуратности документа.
Обе они активно применяются при профессиональной верстке.
Доступ к этим материалам предоставляется только зарегистрированным пользователям!
….