
To create a form in Word that others can fill out, start with a template or document and add content controls. Content controls include things like check boxes, text boxes, date pickers, and drop-down lists. If you’re familiar with databases, these content controls can even be linked to data.
Show the Developer tab
If the developer tab isn’t displayed in the ribbon, see Show the Developer tab.
Open a template or a blank document on which to base the form
To save time, start with a form template or start from scratch with a blank template.
-
Go to File > New.
-
In Search online templates, type Forms or the type of form you want and press ENTER.
-
Choose a form template, and then select Create or Download.
-
Go to File > New.
-
Select Blank document.
Add content to the form
Go to Developer, and then choose the controls that you want to add to the document or form. To remove a content control, select the control and press Delete. You can set properties on controls once inserted.
Note: You can print a form that was created using content controls, but the boxes around the content controls will not print.
In a rich text content control, users can format text as bold or italic, and they can type multiple paragraphs. If you want to limit what users add, insert the plain text content control.
-
Click or tap where you want to insert the control.
-
Select Developer > Rich Text Content Control
 or Plain Text Content Control .
 or Plain Text Content Control
  .
.To set specific properties on the control, see Set or change properties for content controls.
A picture control is often used for templates, but you can also add a picture control to a form.
-
Click or tap where you want to insert the control.
-
Select Developer > Picture Content Control
.
 .
.To set specific properties on the control, see Set or change properties for content controls.
Use building block controls when you want people to choose a specific block of text. For example, building block controls are helpful when you need to add different boilerplate text depending on the contract’s specific requirements. You can create rich text content controls for each version of the boilerplate text, and then you can use a building block control as the container for the rich text content controls.
-
Click or tap where you want to insert the control.
-
Go to DeveloperBuilding Block Gallery Content Control
(or Building Block Content Control). -
Select Developer and content controls for the building block.
 (or Building Block Content Control).
-
Click or tap where you want to insert the control.
To set specific properties on the control, see Set or change properties for content controls.
In a combo box, users can select from a list of choices that you provide or they can type in their own information. In a drop-down list, users can only select from the list of choices.
-
Go to Developer > Combo Box Content Control
or Drop-Down List Content Control . -
Select the content control, and then select Properties.
-
To create a list of choices, select Add under Drop-Down List Properties.
-
Type a choice in Display Name, such as Yes, No, or Maybe.
Repeat this step until all of the choices are in the drop-down list.
-
Fill in any other properties that you want.
Note: If you select the Contents cannot be edited check box, users won’t be able to click a choice.
 or Drop-Down List Content Control
  .
.-
Click or tap where you want to insert the date picker control.
-
Select Developer > Date Picker Content Control
.
 .
.To set specific properties on the control, see Set or change properties for content controls.
-
Click or tap where you want to insert the check box control.
-
Select Developer > Check Box Content Control
.
 .
.To set specific properties on the control, see Set or change properties for content controls.
Legacy form controls are for compatibility with older versions of Word and consist of legacy form and Active X controls.
-
Click or tap where you want to insert a legacy control.
-
Go to Developer > Legacy Forms
drop-down. -
Select the Legacy Form control or Active X Control that you want to include.
 drop-down.
Set or change properties for content controls
Each content control has properties that you can set or change. For example, the Date Picker control offers options for the format you want to use to display the date.
-
Select the content control that you want to change.
-
Go to Developer > Properties.
-
Change the properties that you want.

Add protection to a form
If you want to limit how much others can edit or format a form, use the Restrict Editing command:
-
Open the form that you want to lock or protect.
-
Select Developer > Restrict Editing.
-
After selecting restrictions, select Yes, Start Enforcing Protection.


Advanced Tip:
If you want to protect only parts of the document, separate the document into sections and only protect the sections you want.
To do this, choose Select Sections in the Restrict Editing panel. For more info on sections, see Insert a section break.

Show the Developer tab
If the developer tab isn’t displayed in the ribbon, see Show the Developer tab.
Open a template or use a blank document
To create a form in Word that others can fill out, start with a template or document and add content controls. Content controls include things like check boxes, text boxes, and drop-down lists. If you’re familiar with databases, these content controls can even be linked to data.
-
Go to File > New from Template.
-
In Search, type form.
-
Double-click the template you want to use.
-
Select File > Save As, and pick a location to save the form.
-
In Save As, type a file name and then select Save.

-
Go to File > New Document.
-
Go to File > Save As.
-
In Save As, type a file name and then select Save.

Add content to the form
Go to Developer, and then choose the controls that you want to add to the document or form. To remove a content control, select the control and press Delete. You can set Options on controls once inserted. From Options, you can add entry and exit macros to run when users interact with the controls, as well as list items for combo boxes, .
-
In the document, click or tap where you want to add a content control.
-
On Developer, select Text Box, Check Box, or Combo Box.
-
To set specific properties for the control, select Options, and set .
-
Repeat steps 1 through 3 for each control that you want to add.

Options let you set common settings, as well as control specific settings. Select a control and then select Options to set up or make changes.
-
Set common properties.
-
Select Macro to Run on lets you choose a recorded or custom macro to run on Entry or Exit from the field.
-
Bookmark Set a unique name or bookmark for each control.
-
Calculate on exit This forces Word to run or refresh any calculations, such as total price when the user exits the field.
-
Add Help Text Give hints or instructions for each field.
-
OK Saves settings and exits the panel.
-
Cancel Forgets changes and exits the panel.
-
-
Set specific properties for a Text box
-
Type Select form Regular text, Number, Date, Current Date, Current Time, or Calculation.
-
Default text sets optional instructional text that’s displayed in the text box before the user types in the field. Set Text box enabled to allow the user to enter text into the field.
-
Maximum length sets the length of text that a user can enter. The default is Unlimited.
-
Text format can set whether text automatically formats to Uppercase, Lowercase, First capital, or Title case.
-
Text box enabled Lets the user enter text into a field. If there is default text, user text replaces it.
-
-
Set specific properties for a Check box.
-
Default Value Choose between Not checked or checked as default.
-
Checkbox size Set a size Exactly or Auto to change size as needed.
-
Check box enabled Lets the user check or clear the text box.
-
-
Set specific properties for a Combo box
-
Drop-down item Type in strings for the list box items. Press + or Enter to add an item to the list.
-
Items in drop-down list Shows your current list. Select an item and use the up or down arrows to change the order, Press — to remove a selected item.
-
Drop-down enabled Lets the user open the combo box and make selections.
-
-
Go to Developer > Protect Form.
Note: To unprotect the form and continue editing, select Protect Form again.
-
Save and close the form.

If you want, you can test the form before you distribute it.
-
Protect the form.
-
Reopen the form, fill it out as the user would, and then save a copy.
Show the Developer tab
-
On the right side of the ribbon, select
, and then select Ribbon Preferences. -
Under Customize, select Developer .
 , and then select Ribbon Preferences.
Open a template or a document on which to base the form
You can start with a blank document and create your own form. Or, to save time, you can start with a form template.
-
Go to File > New from Template.
-
In the left pane, expand Online Templates, and then select Forms.
-
Double-click the form template that you want to use.
Add content controls to the form
-
In the document, click where you want to add the control.
-
On the Developer tab, under Form Controls, select Text Box, Check Box, or Combo Box.
-
To set specific properties for the control, select Options, and then configure the properties that you want.
Note: To create a list of drop-down items in a combo box, select the combo box placeholder, click Options, and then add the items that you want to appear in the drop-down list.
-
Repeat steps 1 through 3 for each control that you want to add.
Add instructional text (optional)
Instructional text (for example, «Type First Name») in a text box can make your form easier to use. By default, no text appears in a text box, but you can add it.
-
Select the text box control that you want to add instructional text to.
-
On the Developer tab, under Form Controls, select Options.
-
In Default Text, type the instructional text.
-
Make sure that Fill-in enabled is selected, and then select OK.
Protect the form
-
On the Developer tab, under Form Controls, select Protect Form.
Note: To unprotect the form and continue editing, click Protect Form again.
-
Save and close the form.
Test the form (optional)
If you want, you can test the form before you distribute it.
-
Protect the form.
-
Reopen the form, fill it out as the user would, and then save a copy.
Creating fillable forms isn’t available in Word for the web.
You can create the form with the desktop version of Word with the instructions in Create a fillable form.
When you save the document and reopen it in Word for the web, you’ll see the changes you made.
Create User Entry Form in Word 2013
- Go to the “File Tab” and choose “Options”.
- Choose “Customize Ribbon Tab”.
- Choose “Developer” from “Customize the Ribbon column”.
- Now write a simple user entry form in Word 2013.
- Add the Content Control that satisfies the user entry form reuirements.
Contents
- 1 How do I create a fillable form in Word 2013?
- 2 How do I insert a form field in Word 2013?
- 3 How do you create forms in Word?
- 4 How do I make an editable form?
- 5 How do I create a fillable form in Word with lines?
- 6 How do I create a form line in Word?
- 7 Where is the Forms toolbar in Word?
- 8 How do I insert a text form field in Word?
- 9 How do you insert a custom field in Word?
- 10 How do I get Microsoft Forms?
- 11 What is the best program to create a form?
- 12 How do I create a form in Word 2016?
- 13 How do I create a fillable PDF form in Word?
- 14 How do I save a Word document as a fillable template?
- 15 How do I make a fillable form in word and not editable?
- 16 How do I create a fillable form in Word for Mac?
- 17 Where is tools on Word 2013?
- 18 How do I pin a form to the taskbar?
- 19 How do I turn on the Developer tab in Word?
- 20 What are form fields in Word?
How do I create a fillable form in Word 2013?
Tech Tip: How to Create Fillable Forms in Microsoft Word
- Enable Developer Tab. Open Microsoft Word, then go to the File Tab > Options > Customize Ribbon > check the Developer Tab in the right column > Click OK.
- Insert a Control.
- Edit Filler Text.
- Design Mode button again to exit the mode.
- Customize Content Controls.
How do I insert a form field in Word 2013?
To insert a field, follow these steps:
- Position the insertion point where you want the field to be inserted.
- On the Insert tab, click Quick Parts and then click Field.
- (Optional) On the Categories list, select a category to narrow the list of field names.
- On the Field Names list, click the desired field name.
How do you create forms in Word?
To create a form in Word that others can fill out, start with a template or document and add content controls.
Start with a form template
- Go to File > New.
- In Search online templates, type Forms or the type of form you want and press ENTER.
- Choose a form template, and then select Create or Download.
How do I make an editable form?
How to create fillable PDF files:
- Open Acrobat: Click on the “Tools” tab and select “Prepare Form.”
- Select a file or scan a document: Acrobat will automatically analyze your document and add form fields.
- Add new form fields: Use the top toolbar and adjust the layout using tools in the right pane.
- Save your fillable PDF:
How do I create a fillable form in Word with lines?
Firstly, click “Underline” under “Home” tab and choose one line style. Then press “Shift+ Underscore” to get a line. Then place cursor above the line and type the content. As you type, you will find the line gets longer and longer.
How do I create a form line in Word?
Click the “Insert” tab, then click the “Shapes” button. Click the basic Line shape. When the cursor changes to a plus sign, hold down the “Ctrl” key to give you a straight drawing line, and drag the cursor to the right of the text you just typed, giving your form recipients a place to write.
Where is the Forms toolbar in Word?
Go to the Developer tab; Move to the Control group; Click the Legacy drop down button, then you will view the Legacy Forms buttons. These buttons are Form Toolbar buttons.
How do I insert a text form field in Word?
Working with Form Fields
- Position the insertion point where you want the field to appear.
- Display the Developer tab of the ribbon.
- In the Controls group click Legacy Tools and then click the Text Form Field tool.
- Right-click the form field just entered and choose Properties from the resulting Context menu.
How do you insert a custom field in Word?
Inserting built-in fields
- Navigate to the location in the Word document where you want to insert a field.
- Click the Insert tab in the Ribbon and then click Quick Parts in the Text group.
- Select Field.
- In the list of Field names, select a field.
- Under Field properties, select any properties or options you want.
How do I get Microsoft Forms?
Start a new form
- Sign in to Microsoft 365 with your school or work credentials.
- Select. New > Forms for Excel.
- Enter a name for your form, and then select Create. A new tab for Microsoft Forms will open in your web browser.
What is the best program to create a form?
Best online form builders of 2021
- Hubspot Free Online Form Builder.
- Gravity Forms.
- Typeform.
- Wufoo.
- Microsoft Forms.
- Formstack.
- Paperform.
- Formsite.
How do I create a form in Word 2016?
Creating a computerized form
- Press Ctrl+N to create a new document.
- On the File tab, choose Save As. You see the Save As window.
- Click the Browse button. The Save As dialog box opens.
- Open the Save As Type menu and choose Word Template.
- Enter a descriptive name for your template and click the Save button.
How do I create a fillable PDF form in Word?
Create a Word document and save it in Word, then open Acrobat. Click the “Tools” menu and click “Prepare Form.” Select the Word file to import. Acrobat will detect potential form fields and add them automatically, but you can use the tools in the right editing pane to adjust them, delete them or add new form fields.
How do I save a Word document as a fillable template?
Saving and Using a Form
- Press F12. Word displays the Save As dialog box.
- Using the Save As Type drop-down list, select Word Template.
- If necessary, change to the directory where the template is to be stored.
- In the File Name field, enter the name under which you want this template saved.
- Click on Save.
How do I make a fillable form in word and not editable?
To make a document un-editable, first, select all the text in the document by pressing Ctrl+A. Once all of the text is highlighted, click “Restrict Editing” in the “Protect” group on the “Developer” tab.
How do I create a fillable form in Word for Mac?
To do this, click on “File” tab > “Options” > “Customize Ribbon”. Then under the “Customize Ribbon”, select the “Developer” checkbox and click “OK”. Step 2: Open a Word document and you will be able to make the Word document fillable.
Where is tools on Word 2013?
MS Word 2013 as a Quick Access Toolbar that is by default placed just next to the Microsoft orb that is available at the top left corner of the interface. The Quick Access Toolbar, as the name suggests, provides tools to quickly access a few commands that are frequently used by most users.
How do I pin a form to the taskbar?
In the first place please open Microsoft forms in Edge. Then click on Apps> install this site as an app. Finally, the app will appear in the start menu. Now, to pin it to the taskbar, do a right-click under the app and then proceed to pin it to the taskbar.
How do I turn on the Developer tab in Word?
The Developer tab isn’t displayed by default, but you can add it to the ribbon.
- On the File tab, go to Options > Customize Ribbon.
- Under Customize the Ribbon and under Main Tabs, select the Developer check box.
What are form fields in Word?
You can use a text form field to collect basic text information such as a name or address. Alternatively you can also use text form fields to request other types of data such as numbers, dates, times, phone numbers, zip codes, percentages etc. Text form fields can also be used to perform calculations.
Step Wise Guide to Creating a Form in Microsoft Word 2013
Whether you’re handling a large-scale survey and user response, or just collecting some user information, at one point or another you will have to deal with digital forms. Now you have a lot of options to go about this – from creating web forms or installing plugins, to more simple methods such as using Google Docs. But there’s an even easier method sitting right there in your favorite text editor! Today, we’ll take a look at how to create a form in MS Word 2013.

In addition to text boxes, a typical form requires you to have other input controls such as check boxes, radio buttons, drop-down lists, and so on. More importantly, you need the data fields to be locked down so that they’re not editable, because the whole point of creating a form is to control user input and make it easy for the users to understand and fill out the required information.
With MS Word 2013, you can create a form with text fields, check boxes, date pickers, radio buttons, drop-down list, and so on – pretty much everything you’d need on a digital form. MS Word also allows you to connect your forms with a database where all user responses will be stored. We’ll show you how to do that, and how to further control input with VB scripts later.
To create a form in MS Word, follow the steps given below.
Create a Form in MS Word 2013
Please note that the form designer elements are not visible by default. You have to enable them by going into the developer mode. Now before you freak out, let us show you exactly how to do that with just a few clicks.
Step 1: Unlock the Developer Tab
- Go to File >> Options
- Go into the Customize Ribbon Tab
- Under the Main Tabs list, find and check the Developer option as shown below.

- You should now see a Developer tab appear in the ribbon.

Step 2: Create a Document
The next step is to create a document to base your form on. You can start creating a form based off a blank Word document, or you can search for an online template from File >> New >> Search Online Templates. You can search from among thousands of different form templates online, appropriate for every situation.
Step 3: Adding Content
Now you’re ready to start creating your form. The options can be accessed from the Developer tab at the top. Toggle the Design Mode to start inserting form controls.

Adding Text Content
You can see a collection of icons next to the Design Mode button in the ribbon. To add a text control to your form, click on either the  (rich text) or the
  (plain text) icon. Rich text is more versatile and allows users to add formatting to the text, such as bolding text, italicizing etc. Rich text also lets you create multiple paragraphs, whereas plain text is limited to a set number of characters.

Adding a Drop-Down Menu
Drop-down or combo box controls allow users to select an option from a list. Additionally, combo box controls allow users to type in their own information as well. Click on either the Combo box control  or the drop-down list control
  to add it to your form. Now, select it and click on Properties from the developer tab. Under the drop-down list properties, click Add to create a list of choices.
You can add and edit many controls this way. Each content control has properties that you can set or change. For example, the Date Picker control offers options for the format you want to use to display the date. Click the content control that you want to change, and from the Developer tab, click Properties, and change the properties that you want.
Step 4: Add Instructions
Instructional text can enhance the usability of the form you create and distribute. You can change the default instructional text in content controls. To do that, follow the steps given below;
- On the Developer tab, click Design Mode.
- Click the content control where you want to revise the placeholder instructional text.
- Edit the placeholder text and format it any way you want.
- On the Developer tab, click Design Mode to turn off the design feature and save the instructional text.
Step 5: Adding protection
Adding protection to a form is important as it will restrict users from editing your form. In order to protect your form against editing, open the form you want to protect, select all form elements, and the click on Developer >> Restrict Editing. You can then change the restrict settings from the sidebar on the right.
Hope this guide helps. If you have any questions, please feel free to ask in the comments section below!
Со времени написания последней статьи про формы в Word, у меня накопилось несколько вопросов (с решениями), которые появлялись у меня или моих коллег, в процессе работы с формами.
 Со времени публикации последней статьи про формы в Word, у меня
накопились вопросы (с решениями), которые появлялись у меня, моих коллег или
читателей, в процессе работы с формами. Представлю подборку материалов,
продолжающих серию и отвечающих на эти вопросы.
Таблицы
Ни о таблицах, ни о списках (даже такой, простой с виду
вещи, как переменный список подписантов/согласующих) в электронных формах на
базе Word 2007 речь идти не могла. Такой востребованный механизм появился-таки
в Office 2013. Более того, теперь в Word есть собственный инструмент привязки
Content Controls к узлам XML, чтобы потом извлекать/загружать данные в
документ. Давайте посмотрим, как работают эти 2 механизма.
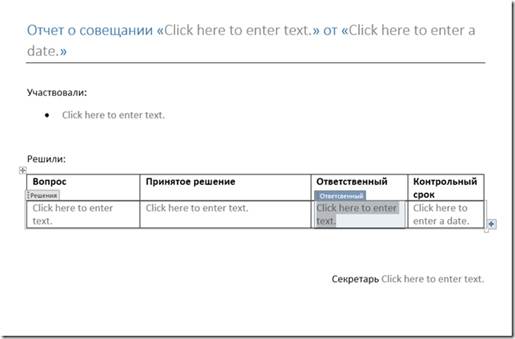
В качестве примера рассмотрим шаблон отчета о совещании, а в
качестве данных для формы возьмем:
●
Одиночные поля: тема совещания, дата, ФИО секретаря
●
Список: список участников
●
Таблица: таблица принятых решений (столбцы: Вопрос, Принятое решение и
Ответственный, Контрольный срок)
Читать
далее

Программная генерация документов-форм в Word
В предыдущих статьях мы смотрели на формы только с точки
зрения “продвинутого пользователя”, т.е. мы создавали документы, удобные для
ручного заполнения. Сегодня же я хочу предложить расширить эту задачу и
попробовать использовать механизм Content controls для генерации документов.
Прежде, чем мы приступим к нашей непосредственной задаче,
хочу сказать пару слов по поводу того, как хранятся в документах Word данные
для Content controls.
Читать
далее
Форматирование и защита ячеек таблиц
Вопрос 1. Как установить форматирование в ячейках таблиц в формах.
Например, мы хотим, чтобы данные в одной из колонок были
выровнены вправо. Пусть, это будет колонка с контрольной датой из предыдущей
статьи.
Читать
далее
Вопрос 2. Как сделать так, чтобы внутри Repeating Section нельзя было
изменять текст нигде, кроме полей ввода.
Чуть подробнее суть проблемы в следующем, когда вы создали
Repeating Section (для того, чтобы размножать строки таблицы или целые разделы
документа), вся область внутри этой Repeating Section считается полем формы. А
это значит, что когда вы делаете защиту документа и разрешаете только ввод в
поля формы, вы разрешаете вводить данные где угодно внутри Repeating Section!
Т.е. несмотря на защиту можно будет промахнуться.
Читать
далее
Формы вода с форматированием
Вопрос 1. Как использовать Rich Text Control в защищенных формах?
Вопрос возник из комментария: «Мне нужно подготовить в Word
2007 такую форму, чтобы те, кто ее будет заполнять, могли в нее вносить
достаточно объемный текст, причем с возможностью форматирования, напр.
выделение жирным, курсивом, маркированный список и т.д. Использую для этого
элемент формы “Формат RTF”. Но проблема в том, что как только я включаю защиту
формы, форматирование внутри этого элемента становится недоступным – можно
только вводить текст так же как в обычный текстовый элемент. Элемент работает
как надо только если форма не защищена.»
Читать
далее
Вопрос 2. Чем в Word 2007+ заменить Check Box (“Флажок”, “Галочка”) и
Option Button (Radio Button, “Выбор”)?
Для начала я бы убедился, что Word – в принципе подходящий
инструмент для той задачи, которую вы решаете. Например, если делается что-то
на манер опросника/анкеты для голосования, то я бы сказал, что это не совсем
функция Word.
Вообще, мое мнение – формы в Word, это не полноценные
электронные формы. Это всего лишь способ создавать документы с динамическими
элементами.
Читать
далее
Перевод чисел в словарную форму
Вернемся к разбору вопросов, связанных с созданием
электронных форм в Word.
Вопрос читателя «А можно сделать так чтобы цифры введенные в
одном поле, прописывались текстом еще в одном месте? Т.е. я цифрами вбил 3600
руб., и ниже нужно чтобы написалось “Три тысячи шестьсот” руб. и тд.»
Читать
далее
Раздел 2: Откройте шаблон или пустой документ для основы формы
Поддерживается преобразование существующего текстового документа в заполняемую форму. Вы также можете создать новый документ и сохранить его в качестве шаблона для дальнейшего использования.
Если у вас уже есть шаблон формы в Word:
Шаг 1. Найдите в шаблоне формы
Выберите Файл и нажмите Новинки для начала с шаблона формы. Позже вы можете искать формы в Шаблоны поле поиска.
Шаг 2: Выберите форму, которая соответствует вашему типу
Выберите форму, затем нажмите Скачать (Word 2010) или Создавай (Ворд 2013, Ворд 2016).
Шаг 3. Задайте имя для нового шаблона формы
Нажмите Сохранить как в Файл левая панель. Переименуйте новый шаблон, если вам это нужно. Затем нажмите Сохраните чтобы применить ваше изменение.

Если вы хотите создать свой персональный шаблон формы в Word:
Шаг 1. Перейдите в список файлов Microsoft Word.
После создания документа формы выберите Файл Вкладка. Затем нажмите Сохранить как по его списку.
Шаг 2. Сохраните новый документ как шаблон
Выберите Шаблон Word из раскрывающегося списка Сохранить как. Позже переименуйте его, чтобы отличить от других. И нажмите Сохраните в конце.

Раздел 3. Вставьте в форму любое необходимое содержимое
В этом разделе вы можете добавить много содержимого и элементов для создания заполняемой формы в Word 2010/2013/2016. Конечно, нет необходимости применять все содержимое.
Шаг 1. Подготовьтесь к установке необходимых вам элементов управления
Щелкните место, куда вы хотите вставить элемент управления. Направляйтесь к Застройщик раздел и найти Настройки группа. Затем вы можете нажать кнопку Режим проектирования вариант к тому же.
Шаг 2. Вставьте содержимое для создания заполняемой формы с помощью Microsoft Word
Вставьте текстовый элемент управления в заполняемую форму в слово:
Выберите Управление форматированным текстовым содержимым or Элемент управления содержимым обычного текста опции. У обоих есть похожие Aa иконки.
Добавьте элемент управления Picture в заполняемой форме одним словом:
Найдите и нажмите на Контроль содержимого изображения Кроме Режим проектирования, который выглядит как значок изображения.
Добавьте элемент управления «Стандартный блок» в заполняемой форме одним словом:
Выберите Стандартный блок управления содержимым or Управление содержимым галереи стандартных блоков во второй строке девять разных иконок.
Вставьте поле со списком или выпадающий список в заполняемой форме в слове:
Нажмите Элемент управления содержимым поля со списком or Выпадающий список управления содержимым. Выберите Застройщик в контроле контента. Позже нажмите Предложения в Настройки группа сверху. Если вы хотите создать список вариантов, вы можете выбрать Добавить под Свойства раскрывающегося списка. Затем заполните необходимую информацию в Display Name и другие варианты.
Вставьте выбор даты в заполняемую форму в слове:
Нажмите Элемент управления содержимым средства выбора даты это похоже на календарь. Затем вы можете выбрать дату так же, как просматривая сайт бронирования авиабилетов.
Добавить флажок в заполняемой форме в слове:
Найдите и щелкните квадратный значок со вставленным чеком Контроль содержимого коробки. Например, вы можете добавить флажок перед текстом, чтобы упростить выбор.

Внимание: Вы можете установить или изменить Предложения после выбора любого элемента управления содержимым. Так же, как шаги по вставке раскрывающегося списка для создания заполняемой формы в слове, упомянутом выше.
Люди также читают:
- Как вставить PDF в Word
- Как конвертировать страницы в Word
- Как преобразовать PDF в Word
Раздел 5: Защитите свою заполняемую форму от чужой настройки (необязательно)
К настоящему времени вы можете успешно создать заполняемую форму в Word. Так что можно сохранить заполняемую форму напрямую на жесткий диск. А еще вы можете добавить еще одно ограничение для защиты документа.
Шаг 1. Запрос на ограниченное редактирование
Просто нажмите Ограничить редактирование or Защитить документ под Застройщик. После этого вы можете свободно устанавливать ограничения форматирования/редактирования/применения из этого всплывающего диалогового окна.
Шаг 2. Установите пароль, чтобы заблокировать заполняемую словоформу
Выберите Заполнение форм , потом поставьте галочку напротив Разрешить в документе только этот тип редактирования коробка. Затем выберите Да, начать усиление защиты вариант. Теперь вы можете установить пароль, чтобы предотвратить любое изменение заполняемой формы без вашего разрешения.

Поэтому, если другие люди хотят настроить вашу заполняемую форму, им нужно сначала ввести правильный пароль, который вы установили. Вот и все, как создать заполняемую форму в Word 2016, Word 2013 или Word 2007. Пожалуйста, поделитесь этим постом с друзьями, если эта статья работает.
Win Скачать
Mac Скачать

Цель: Word 2010-2013. Формирование навыков создания электронных форм, работы с шаблонами и полями. Закрепление навыков по использованию процедуры слияния.
Теория. В повседневной жизни мы встречаемся с ситуацией, когда нам выдают некий бланк документа, в котором мы должны заполнить вручную определённые области. Это может быть бланк заявления, квитанции, заявки. После заполнения информация с бланков документов будет повторно вводиться в компьютер и обрабатываться по заданному алгоритму. Современные приложения позволяют обойти необходимость ручного заполнения бланков документов и повторный ввод заполненной информации.
В MS WORD есть возможность создания электронной формы. Электронная форма — это структурированный документ, содержащий заполненные графы (области, поля) с постоянной информацией и некоторые области (поля формы), в которые пользователь будет вводить переменную информацию.
Таким образом, форма состоит из постоянных областей и полей, подлежащих заполнению. В постоянных областях, при необходимости, можно разместить данные в графическом, текстовом, табличном виде. Обычно сама форма имеет вид таблицы. Форму можно создавать на основе ранее разработанного шаблона. В шаблоне можно разместить поля для ввода информации, указать их тип, выбрать элемент управления, который будет использоваться при вводе. Переменные области (поля) могут быть определены как текстовые поля, поля с раскрывающимися списками, флажки.
После создания формы: введения постоянной информации и выбора расположения и типа полей, необходимо установить защиту документа для устранения возможности изменения постоянной информации электронного документа. Только после установки защиты можно заполнять поля формы.
Задание: Создайте электронную форму заявки на участие в студенческой научной конференции согласно образцу заявки.
Образец заявки на участие в студенческой научной конференции

Для создания формы выполните следующую последовательность действий:
- Создайте на Рабочем столе папку Эл_ФормаФамилия_студента.
- Запустите Microsoft Word.
- Создайте шаблон с именем Форма, разместите его в папке Эл_ФормаФамилия_студента. Для этого:
4. Далее создаём макет формы в файле Форма: вводим заголовок формы — Заявка на участие в конференции.
5. Создаем таблицу, состоящую из 16 строк и 5 столбцов: переходим на вкладку Вставка, щёлкаем по кнопке Таблица, выбираем Вставить таблицу и указываем соответствующее количество строк и столбцов.
6. Согласно приведённому образцу объединяем и разбиваем ячейки, устанавливаем требуемую высоту строк, удаляем обрамление границ, вводим текст (наименование полей-постоянная информация), устанавливаем параметры шрифта (по своему усмотрению).
Обратите внимание: затенённые области — это поля формы, куда будут вводиться конкретные значения полей — переменная информация (они должны быть размещены напротив наименования полей)!
7. Для того, чтобы ячейка таблицы воспринималась, как поле формы необходимо вставить элементы управления полем. При этом, поля могут быть разных типов. В нашем примере большинство полей предназначены для ввода текста (текстовые поля). Для ввода элемента управления текстовым полем:
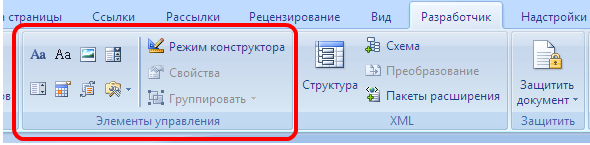
- устанавливаем курсор в место вставки текстового поля Фамилия,
- переходим на вкладку Разработчик в группе Элементы управления находим кнопку Инструменты из предыдущих версий,
Внимание! Если на ленте нет вкладки Разработчик, нажимаем кнопку ![]() OFFICE (или вкладку File), выбираем Параметры WORD, в окне Параметры Word выбираем группу Основные, устанавливаем флажок Показать вкладку «Разработчик» на ленте.
OFFICE (или вкладку File), выбираем Параметры WORD, в окне Параметры Word выбираем группу Основные, устанавливаем флажок Показать вкладку «Разработчик» на ленте.
- нажимаем кнопку и выбираем элемент Поле,
- вставленное текстовое поле отобразится в виде затенённого серого прямоугольника.
8. Устанавливаем или изменяем параметры элементов управления содержимым текстового поля. Для этого:
- щёлкаем правой кнопкой мыши по полю и контекстном меню выбираем Свойства или два раза щёлкаем по полю,
- в окне Параметры текстового поля устанавливаем требуемые параметры (в раскрывающемся списке Тип выбираем тип Обычный текст).
9. Вставляем аналогичным образом поле Имя, Отчество, Город, Факультет, группа, Тема доклада, Секция № (наименование).
10. Щёлкаем два раза по полю Город. Появится окно Параметры текстового поля. Вводим в поле Текст по умолчанию – Хабаровск.
11. Вставляем поле со списком ВУЗ. В окне Параметры поля со списком вводим — ДВИ филиал РАНХиГС в поле Элемент списка и нажимаем кнопку Добавить, вводим Пед.университет — нажимаем кнопку Добавить, вводим ТОГУ— нажимаем кнопку Добавить, перечисляем ещё ряд вузов города Хабаровска.
12. Вставляем текстовое поле Год рождения. Свойства поля: Тип — число, Максимальная длина -4, Формат числа – 0.
13. Вставляем текстовое поле Дата приезда (в случае иногороднего участника конференции). Открываем окно Параметры текстового поля (двойным щелчком мыши по полю) и устанавливаем Тип – Дата, Формат даты – dd.MM.yyyy. Для ввода поясняющего текста нажимаем кнопку Текст справки, открываем вкладку Клавиша F1, щёлкаем по флажку Текст справки и вводим текст: Укажите предполагаемую дату приезда (теперь, по нажатию клавиши F1, будет появляться введённый поясняющий текст.
14. Вставляем поле Дата оформления заявки. В окне Параметры текстового поля выбираем в поле Тип – Текущая дата, в поле Формат даты – dd.MM.yyyy.
15. Вставляем поле со списком Требуется ли гостиница. В окне Параметры поля со списком в поле Элемент списка вводим Да и нажимаем кнопку Добавить, вводим Нет в поле Элемент списка и нажимаем кнопку Добавить.
16. Поля вставлены, свойства определены. Следующий шаг – устанавливаем защиту на различные части формы для предотвращения удаления или редактирования определенного элемента управления или группы элементов управления, или защиты всей форму паролем.
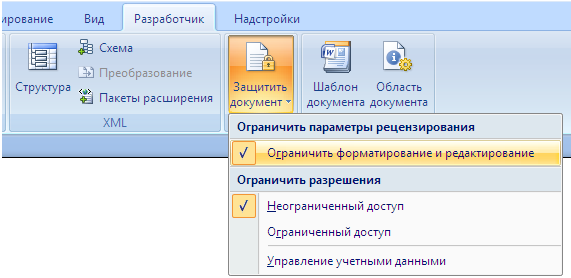
17. Для защиты постоянной информации от редактирования необходимо защитить электронную форму. Для этого:
- во вкладке Разработчик в группе Защитить нажимаем кнопку Защитить документ и выбираем команду Ограничить форматирование и редактирование
- в области задач Ограничить форматирование и редактирование в разделе Ограничения на редактирование выбираем параметр Ввод данных в поля форм и нажимаем кнопку Да, включить защиту
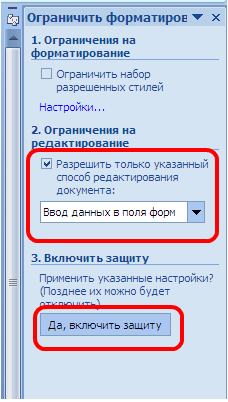
Внимание! Если кнопка Да, включить защиту будет неактивна, значит у вас включён Режим Конструктора. Нажмите на кнопку Режим Конструктора для выхода из указанного режима.
18. Теперь документ позволяет вводить информацию в поля формы, но запрещает напрямую менять остальной текст.
19. В окне Включить защиту можно ввести пароль для защиты формы (в учебных целях вводить пароль не обязательно). Для ввода пароля заполните поле Новый пароль, а затем повторите его в поле Подтверждение пароля. Только пользователи, знающие пароль, смогут снять защиту и изменить форму.
20. Сохраняем шаблон Форма, в котором размещена структура формы в папке Эл_ФормаФамилия_студента и закрываем шаблон Форма. Обращаем внимание на то, что значок шаблона отличен от значка документа.
21. Следующим этапом является заполнение формы. Так как шаблон предназначен для многократного использования, необходимо открыть Документ на основе созданного шаблона Форма. Двойным щелчком по шаблону открываем Документ.
22. Снимаем защиту с Документа. При включённой защите последующие действия по заполнению полей выполнить будет невозможно. Заполняем поля формы произвольным содержанием.
При заполнении переход между полями защищенной формы осуществляется с помощью клавиш перемещения курсора, клавишей Tab, щелчком мыши, клавишами PageDown и PageUp. При вводе данных в поля формы проверка правописания не производится, автотекст не работает, автозамена возможна. При заполнении поля со списком в правой его части отображается значок раскрывающегося списка. Щелкните мышью по стрелке списка и выберите нужное значение.
23. Сохраняем заполненную форму с именем Моя_Форма в папке Эл_ФормаФамилия_студента.
Это вариант индивидуального (единичного) заполнения формы, но можно автоматизировать процесс заполнения формы для получения группы документов путём использования процедуры Слияния.
24. Для этого создаём таблицу в текстовом процессоре WORD следующего вида:
|
Фамилия |
Имя |
Отчество |
Год рождения |
ВУЗ |
Факультет, группа |
25. Заполняем таблицу информацией о 4-х участниках студенческой научной конференции из разных вузов города.
26. Сохраняем файл с именем Список_Уч_Студ_Конф в папке Эл_ФормаФамилия_студента.
27. Открываем Документ на основе шаблона Форма (двойным щелчком по шаблону).
28. Снимаем защиту с Документа.
29. Выполняем слияние файла Документ с файлом Список_Уч_Студ_Конф.
30. Вставляем поля слияния Фамилия, Имя, Отчество Год рождения, Вуз, Факультет, группа.
31. Выполняем слияние в новый документ Форма1, который помещаем в папку Эл_ФормаФамилия_студента.
32. Заполняем в форме пустующие поля.
33. Сохраняем произведённые изменения в файле Форма1 в папке Эл_ФормаФамилия_студента.
34. Отвечаем на Контрольные вопросы к Практической работе №4. Ответы размещаем файле Форма1.docx.
35. Сохраняем папку Эл_ФормаФамилия_студента на Яндекс.Диск → MS Word.
36. Удаляем папку Эл_ФормаФамилия_студента с Рабочего стола.
Приглашайте друзей на мой сайт
В случае, если вам необходимо создать документ Word для заполнения другими людьми, например, создать анкету участника конференции, чтобы упростить процесс, вы можете создать форму для заполнения в Microsoft Word. Форма в ворде позволяет создавать заполнители для различных типов информации, таких как текст, дата, да-нет вопросы и т. д.
Включение вкладки «Разработчик»
Прежде чем перейти к созданию формы в ворде, вам нужно активировать вкладку «Разработчик» на ленте. Для этого нажмите «Файл» —> «Параметры», чтобы открыть диалоговое окно «Параметры Word». Выберите «Настроить ленту», затем установите флажок для вкладки «Разработчик».

Создание формы в Word – Параметры Word
Теперь на ленте появится вкладка «Разработчик».

Создание формы в Word – Вкладка Разработчик
Добавление полей формы в ворде
Теперь мы готовы перейти к созданию формы в ворде. Для этого мы будем использовать разнообразные поля, которые будут являться составляющими нашей будущей формы для заполнения в ворде.
Чтобы добавить поле формы для заполнения, поместите курсор в нужное место, затем выберите необходимый элемент из группы «Элементы управления» на вкладке «Разработчик». Вы можете навести указатель мыши на поля, чтобы увидеть различные параметры. В этом примере мы добавляем текстовое поле, чтобы пользователи могли вводить свои имена.

Создание формы в Word – Элементы управления для создания формы в ворде
В документе появится тестовое поле:

Создание формы в Word – Текстовое поле
Вы можете добавить несколько типов полей для создания формы в ворде. Например, вы можете добавить флажок для выбора:

Создание формы в Word – Поле «флажок»
Или даже поле выбора даты:

Создание формы в Word – Поле для выбора даты
После того, как вы добавили все поля в документ, ваша форма в ворде готова, и вы можете отправлять ее другим пользователям!
Настройка полей формы в ворде
Если вы хотите еще больше контролировать способ отображения полей своей формы в ворде, вы можете включить «Режим конструктора» в группе «Элементы управления» на вкладке «Разработчик».

Создание формы в Word – Режим конструктора
Затем вы можете изменить свойства для каждого поля вашей формы в ворде, включая текст, который будет отображаться в каждом поле. Если вы готовы потратить немного времени на настройку каждого поля, вы можете создать довольно прочную форму. Например, вы можете создать в своей форме заполнения собственный выпадающий список, как в приведенном ниже примере:

Создание формы в Word – Использование выпадающего списка в форме
В итоге в нашем примере, мы получили следующую форму для заполнения в ворде:

Создание формы в Word – Пример формы для заполнения в ворде
В этой статье мы рассмотрели основы создания формы в ворде. Теперь вы можете с легкостью создать собственную форму для заполнения в Microsoft Word.
Create User Entry Form in Word 2013
- Go to the «File Tab» and choose «Options».
- Choose «Customize Ribbon Tab».
- Choose «Developer» from «Customize the Ribbon column».
- Now write a simple user entry form in Word 2013.
- Add the Content Control that satisfies the user entry form reuirements.
- How do I create a user entry form in Word?
- How do I create a fillable form?
- How do I create forms in Word?
- What are the different ways to create a form?
- How do I create a fillable form for free?
- How do I create a fillable PDF in Word for free?
- How do you create a fillable form in Google Docs?
- How do I create a fillable form in Word for Mac 2020?
How do I create a user entry form in Word?
Part 1. How to Create a Form in Word
- Step 1: Display the «Developer» Section. Go into the «File» tab; then click «Options.» …
- Step 2: Create a Form Template. …
- Step 3: Add Content to This Form. …
- Step 4: Set Properties for Content Controls. …
- Step 5: Include Instructional Text to Your Form. …
- Step 6: Include Protection to Your Form.
How do I create a fillable form?
How to create fillable PDF files:
- Open Acrobat: Click on the “Tools” tab and select “Prepare Form.”
- Select a file or scan a document: Acrobat will automatically analyze your document and add form fields.
- Add new form fields: Use the top toolbar and adjust the layout using tools in the right pane.
- Save your fillable PDF:
How do I create forms in Word?
Create a Form
- Place the text cursor where you want to insert the form field.
- Click the Developer tab on the ribbon. …
- Click the Design Mode button in the controls group. …
- Click a Content Control buttons to insert the selected type of control. …
- When you’re done, click the Design Mode button again to exit Design Mode.
What are the different ways to create a form?
However, there are several easy ways to make filling out your form a quick, easy, and intuitive experience.
- Break up long forms with pages. …
- Show fields only when necessary. …
- Only collect the information you really need. …
- Give users options to choose from. …
- Use clear language. …
- Choose the right type of input fields.
How do I create a fillable form for free?
How to Create a Fillable PDF Form Free
- Select an existing PDF document. Click on ‘Upload’ to choose a file.No existing document? Start with a blank template.
- Add fillable form fields to your PDF form. Go over your document’s existing content and add fillable form fields where necessary. …
- Save your document. Click on ‘Apply changes’.
How do I create a fillable PDF in Word for free?
Create a Fillable PDF Form from a Word Document
- Go to File -> Print, make sure «Adobe PDF» is selected as your printer, and then click the Print button.
- Word will ask you where to save the PDF file you’re creating. …
- Acrobat will ask you a couple of questions. …
- On the next screen, make sure «Use the current document» is selected, then click Next.
How do you create a fillable form in Google Docs?
Just open docs.google.com, click the Template Gallery button in the top right, and select your company’s name. Then, click the Submit Template button. Select the document you just made, add a title and category for it, then click Submit.
How do I create a fillable form in Word for Mac 2020?
Click “Text Box”, “Check Box”, or “Combo Box” in the Developer tab. This will insert a blank fillable field into your document. The Combo Box option creates something like a drop-down menu. Click the Options icon next to the Combo Box icon to access options to turn your combo box into a drop-down menu.