
Microsoft Excel makes it easy to import Extensible Markup Language (XML) data that is created from other databases and applications, to map XML elements from an XML schema to worksheet cells, and to export revised XML data for interaction with other databases and applications. Think of these XML features as turning Office Excel into an XML data file generator with a familiar user interface.
In this article
-
Why use XML in Excel?
-
XML data and schema files
-
Key XML and Excel scenarios
-
-
The basic process of using XML data in Excel
-
Working with XML maps
-
Using the XML Source task pane
-
Element types and their icons
-
Working with single-mapped cells
-
Working with repeating cells in XML tables
-
XML map security considerations
-
Importing XML data
-
Working with an inferred schema
-
Exporting XML data
-
Using the Excel macro-enabled Office Open XML Format file
-
Why use XML in Excel?
XML is a technology that is designed for managing and sharing structured data in a human-readable text file. XML follows industry-standard guidelines and can be processed by a variety of databases and applications. Using XML, application designers can create their own customized tags, data structures, and schemas. In short, XML greatly eases the definition, transmission, validation, and interpretation of data between databases, applications, and organizations.
XML data and schema files
Excel works primarily with two types of XML files:
-
XML data files (.xml), which contain the custom tags and structured data.
-
Schema files (.xsd), which contain schema tags that enforce rules, such as data type and validation.
The XML standard also defines Extensible Stylesheet Language Transformation (XSLT) (.xslt) files, which are used to apply styles and transform XML data into different presentation formats. You can apply these transforms before you import XML files into Excel and after you export XML files from Excel. If XSLT files are linked to XML data files that you import into Excel, you do have the option to apply or not apply the formatting before the data is added to the worksheet, but only when you open an XML file by using the Open command from within Excel. Choose the XML Files (*.xml) file type before you click the Open button to see the XML files in the folder.
Key XML and Excel scenarios
By using XML and Excel, you can manage workbooks and data in ways that were previously impossible or very difficult. By using XML maps, you can easily add, identify, and extract specific pieces of business data from Excel documents. For example, an invoice that contains the name and address of a customer or a report that contains last quarter’s financial results are no longer just static reports. You can easily import this information from databases and applications, revise it, and export it to the same or other databases and applications.
The following are key scenarios that the XML features are designed to address:
-
Extend the functionality of existing Excel templates by mapping XML elements onto existing cells. This makes it easier to get XML data into and out of your templates without having to redesign them.
-
Use XML data as input to your existing calculation models by mapping XML elements onto existing worksheets.
-
Import XML data files into a new workbook.
-
Import XML data from a Web service into your Excel worksheet.
-
Export data in mapped cells to XML data files independent from other data in the workbook.
Top of Page
The basic process of using XML data in Excel
The following diagram shows how the different files and operations work together when you use XML with Excel. Essentially, there are five phases to the process:
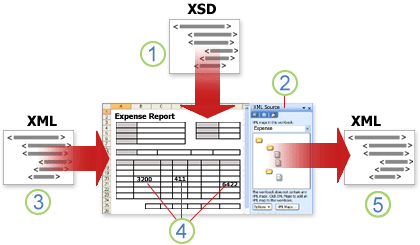
 Adding an XML schema file (.xsd) to a workbook
 Mapping XML schema elements to individual cells or XML tables
 Importing an XML data file (.xml) and binding the XML elements to mapped cells
 Entering data, moving mapped cells, and leveraging Excel functionality, while preserving XML structure and definitions
 Exporting revised data from mapped cells to an XML data file
Working with XML maps
You can create or open a workbook in Excel, attach an XML schema file (.xsd) to the workbook, and then use the XML Source task pane to map XML elements of the schema to individual cells or tables. After you map the XML elements to your worksheet, you can import and export XML data into and out of the mapped cells.
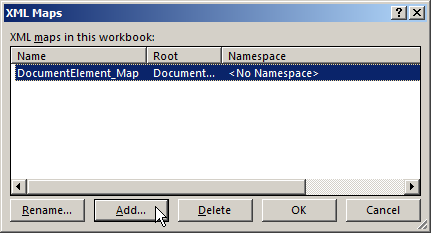
When you add an XML schema file (.xsd) to your workbook, you create an XML map. In general, XML maps are used to create mapped cells and to manage the relationship between mapped cells and individual elements in the XML schema. In addition, these XML maps are used to bind the contents of mapped cells to elements in the schema when you import or export XML data files (.xml).
There are two kinds of mapped cells that you can create: single-mapped cells and repeating cells (which appear as XML tables). To make designing your worksheet more flexible, you can drag the mapped cells anywhere on a worksheet and into any order — even one different from the XML schema. You can also choose which elements to map and not map.
The following rules about using XML maps are important to know:
-
A workbook can contain one or more XML maps.
-
You can only map one element to one location in a workbook at a time.
-
Each XML map is an independent entity, even if multiple XML maps in the same workbook refer to the same schema.
-
An XML map can only contain one root element. If you add a schema that defines more than one root element, you are prompted to choose the root element to use for the new XML map.
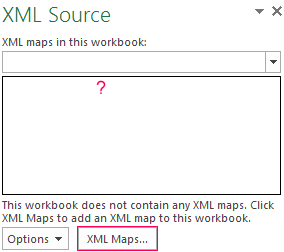
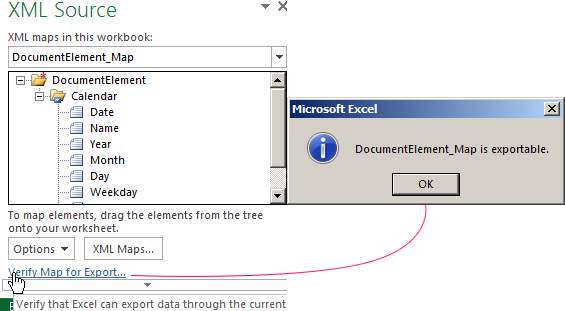
Using the XML Source task pane
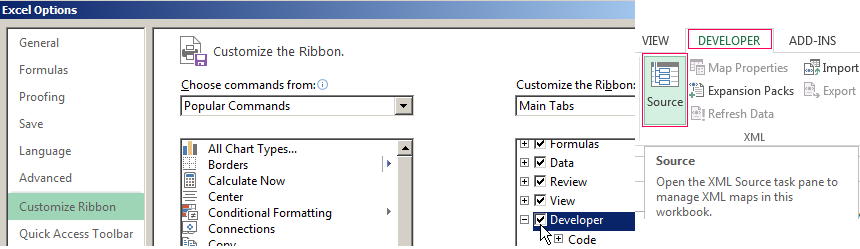
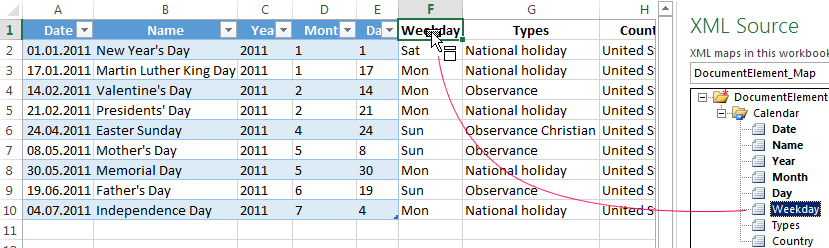
You use the XML Source task pane to manage XML maps. To open it, on the Developer tab, in the XML group, click Source. The following diagram shows the main features of this task pane.
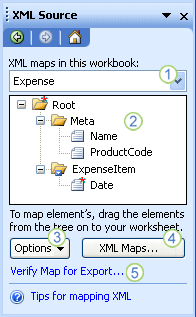
1. Lists XML maps that were added to the workbook
2. Displays a hierarchical list of XML elements in the currently listed XML map
3. Sets options when working with the XML Source task pane and the XML data, such as how to preview the data and control headings
4. Opens the XML Maps dialog box, which you can use to add, delete, or rename XML maps
5. Verifies whether you can export XML data through the current XML map
Top of Page
Element types and their icons
The following table summarizes each type of XML element that Excel can work with and the icon that is used to represent each type of element.
|
Element type |
Icon |
|---|---|
|
Parent element |
|
|
Required parent element |
|
|
Repeating parent element |
|
|
Required repeating parent element |
|
|
Child element |
|
|
Required child element |
|
|
Repeating child element |
|
|
Required repeating child element |
|
|
Attribute |
|
|
Required attribute |
|
|
Simple content in a complex structure |
|
|
Required simple content in a complex structure |
|
Top of Page
Working with single-mapped cells
A single-mapped cell is a cell that has been mapped to a nonrepeating XML element. You create a single-mapped cell by dragging a nonrepeating XML element from the XML Source task pane onto a single cell in your worksheet.
When you drag a nonrepeating XML element onto the worksheet, you can use a smart tag to choose to include the XML element name as a heading above or just to the left of the single-mapped cell, or you can use an existing cell value as a heading.
You can also use a formula in a single-mapped cell, if the cell is mapped to an XML element with an XML Schema Definition (XSD) data type that Excel interprets as a number, date, or time.
Top of Page
Working with repeating cells in XML tables
XML tables are similar in appearance and functionality to Excel tables. An XML table is an Excel table that has been mapped to one or more XML repeating elements. Each column in the XML table represents an XML element.
An XML table is created when you:
-
Use the Import command (in the XML group on the Developer tab) to import an XML data file.
-
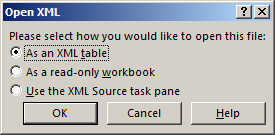
Use the Open command from within Excel to open an XML data file — and then select As an XML table in the Open XML dialog box.
-
Use the From XML Data Import command (from the From Other Sources command button, in the Get External Data group, on the Data tab) to import an XML data file — and then select XML table in existing worksheet or New worksheet in the Import Data dialog box.
-
Drag one or more repeating elements from the XML Source task pane to a worksheet.
When you create an XML table, the XML element names are automatically used as column headings. You can change these to any column headings that you want. However, the original XML element names are always used when you export data from the mapped cells.
Two options under the Options button in the XML Source task pane are useful when you work with XML tables:
-
Automatically Merge Elements When Mapping
When selected, Excel creates one XML table from multiple fields as they are dropped onto the worksheet. This option works as long as the multiple fields are dropped on the same row, one adjacent to the other. When this option is cleared, each element appears as its own XML table. -
My Data Has Headings
When selected, existing heading data is used as column headings for repeating elements that you map to your worksheet. When this option is cleared, the XML element names are used as column headings.
Using XML tables, you can easily import, export, sort, filter, and print data based on an XML data source. However, XML tables do have some limitations regarding how they can be arranged on the worksheet.
-
XML tables are row-based, meaning that they grow from the header row down. You cannot add new entries above existing rows.
-
You cannot transpose an XML table so that new entries will be added to the right.
You can use formulas in columns that are mapped to XML elements with an XML Schema Definition (XSD) data type that Excel interprets as a number, date, or time. Just as in an Excel table, formulas in an XML table are filled down the column when new rows are added to the table.
XML map security considerations
An XML map and its data source information are saved with the Excel workbook, not a specific worksheet. A malicious user can view this map information by using a Microsoft Visual Basic for Applications (VBA) macro. Furthermore, if you save your workbook as a macro-enabled Excel Office Open XML Format File, this map information can be viewed through Microsoft Notepad or through another text-editing program.
If you want to keep using the map information but remove the potentially sensitive data source information, you can delete the data source definition of the XML schema from the workbook, but still export the XML data, by clearing the Save data source definition in workbook check box in the XML Map Properties dialog box, which is available from the Map Properties command in the XML group on the Developer tab.
If you delete a worksheet before you delete a map, the map information about the data sources, and possibly other sensitive information, is still saved in the workbook. If you are updating the workbook to remove sensitive information, make sure that you delete the XML map before you delete the worksheet, so that the map information is permanently removed from the workbook.
Top of Page
Importing XML data
You can import XML data into an existing XML map in your workbook. When you import data, you bind the data from the file to an XML map that is stored in your workbook. This means that each data element in the XML data file has a corresponding element, in the XML schema, that you mapped from an XML Schema file or inferred schema. Each XML map can only have one XML data binding, and an XML data binding is bound to all of the mappings that were created from a single XML map.
You can display the XML Map Properties dialog box (Click Map Properties in the XML group on the Developer tab.), which has three options, all selected by default, that you can set or clear to control the behavior of an XML data binding:
-
Validate data against schema for import and export Specifies whether Excel validates data against the XML map when importing data. Click this option when you want to ensure that the XML data that you import conforms to the XML schema.
-
Overwrite existing data with new data Specifies whether data is overwritten when you import data. Click this option when you want to replace the current data with new data, for example, when up-to-date data is contained in the new XML data file.
-
Append new data to existing XML tables Specifies whether the contents of the data source are appended to the existing data on the worksheet. Click this option, for example, when you are consolidating data from several similar XML data files into an XML table, or you do not want to overwrite the contents of a cell that contains a function.
When you import XML data, you may want to overwrite some mapped cells but not others. For example, some mapped cells may contain formulas and you don’t want to overwrite the formula when you import an XML file. There are two approaches that you can take:
-
Unmap the elements that you don’t want overwritten, before you import the XML data. After you import the XML data, you can remap the XML element to the cells containing the formulas, so that you can export the results of the formulas to the XML data file.
-
Create two XML maps from the same XML schema. Use one XML map for importing the XML data. In this «Import» XML map, don’t map elements to the cells that contain formulas or other data that you don’t want overwritten. Use another XML map for exporting the data. In this «Export» XML map, map the elements that you want to export to an XML file.
Note: The ability to import XML data from a Web service by using a Data Retrieval Service Connection (.uxdc) file to connect to a data source is no longer supported in versions later than Excel 2003 through the user interface. If you open a workbook that was created in Excel 2003, you can still view the data, but you cannot edit or refresh the source data.
Working with an inferred schema
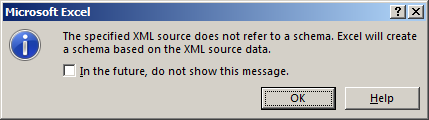
If you import XML data without first adding a corresponding XML schema to create an XML map, Excel tries to infer a schema for you based on the tags that are defined in the XML data file. The inferred schema is stored with the workbook, and the inferred schema allows you to work with XML data if an XML schema file isn’t associated with the workbook.
When you work with imported XML data that has an inferred schema, you can also customize the XML Source task pane. Select the Preview Data in Task Pane option from the Options button to display the first row of data as sample data in the element list, if you imported XML data associated with the XML map in the current session of Excel.
You cannot export the Excel inferred schema as a separate XML schema data file (.xsd). Although there are XML schema editors and other methods for creating an XML schema file, you may not have convenient access to them or know how to use them. As an alternative, you can use the Excel 2003 XML Tools Add-in Version 1.1, which can create a schema file from an XML map. For more information, see Using the Excel 2003 XML Tools Add-in Version 1.1.
Exporting XML data
You export XML data by exporting the contents of mapped cells on the worksheet. When you export data, Excel applies the following rules to determine what data to save and how to save it:
-
Empty items are not created when blank cells exist for an optional element, but empty items are created when blank cells exist for a required element.
-
Unicode Transformation Format-8 (UTF-8) encoding is used to write the data.
-
All namespaces are defined in the Root XML element.
-
Excel overwrites existing namespace prefixes. The default namespace is assigned a prefix of ns0. Successive namespaces are designated ns1, ns2 to ns<count> where <count> is the number of namespaces written to the XML file.
-
Comment nodes are not preserved.
You can display the XML Map Properties dialog box (Click Map Properties in the XML group on the Developer tab.) and then use the Validate data against schema for import and export option (active by default) to specify whether Excel validates data against the XML map when exporting data. Click this option when you want to ensure that the XML data you export conforms to the XML schema.
Using the Excel Macro-enabled Office Open XML Format File
You can save an Excel workbook in a variety of file formats, including the Excel macro-enabled Office Open XML Format File (.xlsm). Excel has a defined XML schema that defines the contents of an Excel workbook, including XML tags that store all workbook information, such as data and properties, and define the overall structure of the workbook. Custom applications can use this Excel macro-enabled Office XML Format File. For example, developers may want to create a custom application to search for data in multiple workbooks that are saved in the this format and create a reporting system based on the data found.
Top of Page
Need more help?
You can always ask an expert in the Excel Tech Community or get support in the Answers community.
See Also
Import XML data
Map XML elements to cells in an XML Map
Export XML data
Append or overwrite mapped XML data
Содержание
- Overview of XML in Excel
- In this article
- Why use XML in Excel?
- XML data and schema files
- Key XML and Excel scenarios
- The basic process of using XML data in Excel
- Working with XML maps
- Using the XML Source task pane
- Element types and their icons
- Working with single-mapped cells
- Working with repeating cells in XML tables
- XML map security considerations
- Importing XML data
- Working with an inferred schema
- Exporting XML data
- Using the Excel Macro-enabled Office Open XML Format File
- Need more help?
Overview of XML in Excel
Microsoft Excel makes it easy to import Extensible Markup Language (XML) data that is created from other databases and applications, to map XML elements from an XML schema to worksheet cells, and to export revised XML data for interaction with other databases and applications. Think of these XML features as turning Office Excel into an XML data file generator with a familiar user interface.
In this article
Why use XML in Excel?
XML is a technology that is designed for managing and sharing structured data in a human-readable text file. XML follows industry-standard guidelines and can be processed by a variety of databases and applications. Using XML, application designers can create their own customized tags, data structures, and schemas. In short, XML greatly eases the definition, transmission, validation, and interpretation of data between databases, applications, and organizations.
XML data and schema files
Excel works primarily with two types of XML files:
XML data files (.xml), which contain the custom tags and structured data.
Schema files (.xsd), which contain schema tags that enforce rules, such as data type and validation.
The XML standard also defines Extensible Stylesheet Language Transformation (XSLT) (.xslt) files, which are used to apply styles and transform XML data into different presentation formats. You can apply these transforms before you import XML files into Excel and after you export XML files from Excel. If XSLT files are linked to XML data files that you import into Excel, you do have the option to apply or not apply the formatting before the data is added to the worksheet, but only when you open an XML file by using the Open command from within Excel. Choose the XML Files (*.xml) file type before you click the Open button to see the XML files in the folder.
Key XML and Excel scenarios
By using XML and Excel, you can manage workbooks and data in ways that were previously impossible or very difficult. By using XML maps, you can easily add, identify, and extract specific pieces of business data from Excel documents. For example, an invoice that contains the name and address of a customer or a report that contains last quarter’s financial results are no longer just static reports. You can easily import this information from databases and applications, revise it, and export it to the same or other databases and applications.
The following are key scenarios that the XML features are designed to address:
Extend the functionality of existing Excel templates by mapping XML elements onto existing cells. This makes it easier to get XML data into and out of your templates without having to redesign them.
Use XML data as input to your existing calculation models by mapping XML elements onto existing worksheets.
Import XML data files into a new workbook.
Import XML data from a Web service into your Excel worksheet.
Export data in mapped cells to XML data files independent from other data in the workbook.
The basic process of using XML data in Excel
The following diagram shows how the different files and operations work together when you use XML with Excel. Essentially, there are five phases to the process:
Adding an XML schema file (.xsd) to a workbook
Mapping XML schema elements to individual cells or XML tables
Importing an XML data file (.xml) and binding the XML elements to mapped cells
Entering data, moving mapped cells, and leveraging Excel functionality, while preserving XML structure and definitions
Exporting revised data from mapped cells to an XML data file
Working with XML maps
You can create or open a workbook in Excel, attach an XML schema file (.xsd) to the workbook, and then use the XML Source task pane to map XML elements of the schema to individual cells or tables. After you map the XML elements to your worksheet, you can import and export XML data into and out of the mapped cells.
When you add an XML schema file (.xsd) to your workbook, you create an XML map. In general, XML maps are used to create mapped cells and to manage the relationship between mapped cells and individual elements in the XML schema. In addition, these XML maps are used to bind the contents of mapped cells to elements in the schema when you import or export XML data files (.xml).
There are two kinds of mapped cells that you can create: single-mapped cells and repeating cells (which appear as XML tables). To make designing your worksheet more flexible, you can drag the mapped cells anywhere on a worksheet and into any order — even one different from the XML schema. You can also choose which elements to map and not map.
The following rules about using XML maps are important to know:
A workbook can contain one or more XML maps.
You can only map one element to one location in a workbook at a time.
Each XML map is an independent entity, even if multiple XML maps in the same workbook refer to the same schema.
An XML map can only contain one root element. If you add a schema that defines more than one root element, you are prompted to choose the root element to use for the new XML map.
Using the XML Source task pane
You use the XML Source task pane to manage XML maps. To open it, on the Developer tab, in the XML group, click Source. The following diagram shows the main features of this task pane.
1. Lists XML maps that were added to the workbook
2. Displays a hierarchical list of XML elements in the currently listed XML map
3. Sets options when working with the XML Source task pane and the XML data, such as how to preview the data and control headings
4. Opens the XML Maps dialog box, which you can use to add, delete, or rename XML maps
5. Verifies whether you can export XML data through the current XML map
Element types and their icons
The following table summarizes each type of XML element that Excel can work with and the icon that is used to represent each type of element.

Required parent element

Repeating parent element

Required repeating parent element


Required child element

Repeating child element

Required repeating child element


Simple content in a complex structure

Required simple content in a complex structure

Working with single-mapped cells
A single-mapped cell is a cell that has been mapped to a nonrepeating XML element. You create a single-mapped cell by dragging a nonrepeating XML element from the XML Source task pane onto a single cell in your worksheet.
When you drag a nonrepeating XML element onto the worksheet, you can use a smart tag to choose to include the XML element name as a heading above or just to the left of the single-mapped cell, or you can use an existing cell value as a heading.
You can also use a formula in a single-mapped cell, if the cell is mapped to an XML element with an XML Schema Definition (XSD) data type that Excel interprets as a number, date, or time.
Working with repeating cells in XML tables
XML tables are similar in appearance and functionality to Excel tables. An XML table is an Excel table that has been mapped to one or more XML repeating elements. Each column in the XML table represents an XML element.
An XML table is created when you:
Use the Import command (in the XML group on the Developer tab) to import an XML data file.
Use the Open command from within Excel to open an XML data file — and then select As an XML table in the Open XML dialog box.
Use the From XML Data Import command (from the From Other Sources command button, in the Get External Data group, on the Data tab) to import an XML data file — and then select XML table in existing worksheet or New worksheet in the Import Data dialog box.
Drag one or more repeating elements from the XML Source task pane to a worksheet.
When you create an XML table, the XML element names are automatically used as column headings. You can change these to any column headings that you want. However, the original XML element names are always used when you export data from the mapped cells.
Two options under the Options button in the XML Source task pane are useful when you work with XML tables:
Automatically Merge Elements When Mapping When selected, Excel creates one XML table from multiple fields as they are dropped onto the worksheet. This option works as long as the multiple fields are dropped on the same row, one adjacent to the other. When this option is cleared, each element appears as its own XML table.
My Data Has Headings When selected, existing heading data is used as column headings for repeating elements that you map to your worksheet. When this option is cleared, the XML element names are used as column headings.
Using XML tables, you can easily import, export, sort, filter, and print data based on an XML data source. However, XML tables do have some limitations regarding how they can be arranged on the worksheet.
XML tables are row-based, meaning that they grow from the header row down. You cannot add new entries above existing rows.
You cannot transpose an XML table so that new entries will be added to the right.
You can use formulas in columns that are mapped to XML elements with an XML Schema Definition (XSD) data type that Excel interprets as a number, date, or time. Just as in an Excel table, formulas in an XML table are filled down the column when new rows are added to the table.
XML map security considerations
An XML map and its data source information are saved with the Excel workbook, not a specific worksheet. A malicious user can view this map information by using a Microsoft Visual Basic for Applications (VBA) macro. Furthermore, if you save your workbook as a macro-enabled Excel Office Open XML Format File, this map information can be viewed through Microsoft Notepad or through another text-editing program.
If you want to keep using the map information but remove the potentially sensitive data source information, you can delete the data source definition of the XML schema from the workbook, but still export the XML data, by clearing the Save data source definition in workbook check box in the XML Map Properties dialog box, which is available from the Map Properties command in the XML group on the Developer tab.
If you delete a worksheet before you delete a map, the map information about the data sources, and possibly other sensitive information, is still saved in the workbook. If you are updating the workbook to remove sensitive information, make sure that you delete the XML map before you delete the worksheet, so that the map information is permanently removed from the workbook.
Importing XML data
You can import XML data into an existing XML map in your workbook. When you import data, you bind the data from the file to an XML map that is stored in your workbook. This means that each data element in the XML data file has a corresponding element, in the XML schema, that you mapped from an XML Schema file or inferred schema. Each XML map can only have one XML data binding, and an XML data binding is bound to all of the mappings that were created from a single XML map.
You can display the XML Map Properties dialog box (Click Map Properties in the XML group on the Developer tab.), which has three options, all selected by default, that you can set or clear to control the behavior of an XML data binding:
Validate data against schema for import and export Specifies whether Excel validates data against the XML map when importing data. Click this option when you want to ensure that the XML data that you import conforms to the XML schema.
Overwrite existing data with new data Specifies whether data is overwritten when you import data. Click this option when you want to replace the current data with new data, for example, when up-to-date data is contained in the new XML data file.
Append new data to existing XML tables Specifies whether the contents of the data source are appended to the existing data on the worksheet. Click this option, for example, when you are consolidating data from several similar XML data files into an XML table, or you do not want to overwrite the contents of a cell that contains a function.
When you import XML data, you may want to overwrite some mapped cells but not others. For example, some mapped cells may contain formulas and you don’t want to overwrite the formula when you import an XML file. There are two approaches that you can take:
Unmap the elements that you don’t want overwritten, before you import the XML data. After you import the XML data, you can remap the XML element to the cells containing the formulas, so that you can export the results of the formulas to the XML data file.
Create two XML maps from the same XML schema. Use one XML map for importing the XML data. In this «Import» XML map, don’t map elements to the cells that contain formulas or other data that you don’t want overwritten. Use another XML map for exporting the data. In this «Export» XML map, map the elements that you want to export to an XML file.
Note: The ability to import XML data from a Web service by using a Data Retrieval Service Connection (.uxdc) file to connect to a data source is no longer supported in versions later than Excel 2003 through the user interface. If you open a workbook that was created in Excel 2003, you can still view the data, but you cannot edit or refresh the source data.
Working with an inferred schema
If you import XML data without first adding a corresponding XML schema to create an XML map, Excel tries to infer a schema for you based on the tags that are defined in the XML data file. The inferred schema is stored with the workbook, and the inferred schema allows you to work with XML data if an XML schema file isn’t associated with the workbook.
When you work with imported XML data that has an inferred schema, you can also customize the XML Source task pane. Select the Preview Data in Task Pane option from the Options button to display the first row of data as sample data in the element list, if you imported XML data associated with the XML map in the current session of Excel.
You cannot export the Excel inferred schema as a separate XML schema data file (.xsd). Although there are XML schema editors and other methods for creating an XML schema file, you may not have convenient access to them or know how to use them. As an alternative, you can use the Excel 2003 XML Tools Add-in Version 1.1, which can create a schema file from an XML map. For more information, see Using the Excel 2003 XML Tools Add-in Version 1.1.
Exporting XML data
You export XML data by exporting the contents of mapped cells on the worksheet. When you export data, Excel applies the following rules to determine what data to save and how to save it:
Empty items are not created when blank cells exist for an optional element, but empty items are created when blank cells exist for a required element.
Unicode Transformation Format-8 (UTF-8) encoding is used to write the data.
All namespaces are defined in the Root XML element.
Excel overwrites existing namespace prefixes. The default namespace is assigned a prefix of ns0. Successive namespaces are designated ns1, ns2 to ns where is the number of namespaces written to the XML file.
Comment nodes are not preserved.
You can display the XML Map Properties dialog box (Click Map Properties in the XML group on the Developer tab.) and then use the Validate data against schema for import and export option (active by default) to specify whether Excel validates data against the XML map when exporting data. Click this option when you want to ensure that the XML data you export conforms to the XML schema.
Using the Excel Macro-enabled Office Open XML Format File
You can save an Excel workbook in a variety of file formats, including the Excel macro-enabled Office Open XML Format File (.xlsm). Excel has a defined XML schema that defines the contents of an Excel workbook, including XML tags that store all workbook information, such as data and properties, and define the overall structure of the workbook. Custom applications can use this Excel macro-enabled Office XML Format File. For example, developers may want to create a custom application to search for data in multiple workbooks that are saved in the this format and create a reporting system based on the data found.
Need more help?
You can always ask an expert in the Excel Tech Community or get support in the Answers community.
Источник
- Remove From My Forums
-
Question
-
I have some data in XML format. For example:
<CompanyList>
    <Company>
        <Id>1</Id>
        <Name>Name1</Name>
    </Company>
    <Company>
        <Id>2</Id>
        <Name>Name2</Name>
        <AddressList>
            <Address>
                <City>City1</City>
                <Street>Street1</Street>
            </Address>
            <Address>
                <City>City2</City>
                <Street>Street2</Street>
            </Address>
        </AddressList>
    </Company>
</CompanyList>
Is it possible to format it in Excel in such a way, that the list of addresses is below the corresponding company and little indented? Something like
this:
Moreover I would like to do this programmatically from VB.Net, but yet I don’t manage to do this even directly in Excel (by means of the associated XML Map).
One solution would be to write the xml for excel workbook:
<?xml version="1.0"?>
<Workbook xmlns="urn:schemas-microsoft-com:office:spreadsheet"
xmlns:o="urn:schemas-microsoft-com:office:office"
xmlns:x="urn:schemas-microsoft-com:office:excel"
xmlns:ss="urn:schemas-microsoft-com:office:spreadsheet">
<Worksheet ss:Name="Data Export">
 <Table>
 <Row>
 <Cell>
 <Data ss:Type="String">1</Data>
 </Cell>
 <Cell>
 <Data ss:Type="String">Name1</Data>
 </Cell>
 </Row>
 <Row>
 <Cell>
 <Data ss:Type="String">2</Data>
 </Cell>
 <Cell>
 <Data ss:Type="String">Name2</Data>
 </Cell>
 </Row>
 <Row>
 <Cell/>
 <Cell>
 <Data ss:Type="String">Address1</Data>
 </Cell>
 </Row>
 <Row>
 <Cell/>
 <Cell>
 <Data ss:Type="String">Address2</Data>
 </Cell>
 </Row>
 </Table>
</Worksheet>
</Workbook>
but I get my data in the format I listed very first, so I must rewrite the XML and it is not the best option. Thank you for any hints.
Answers
-
Hi Kzub,
Sorry for later response. I hope following snippet can help you.
using System;
using System.Collections.Generic;
using System.Linq;
using System.Text;
using System.Xml;
using System.Windows.Forms;
using DocumentFormat.OpenXml.Packaging;
using DocumentFormat.OpenXml.Spreadsheet;
using com.mksword.net.SSpreadsheetDocumentCreator;
using DocumentFormat.OpenXml;

namespace ConsoleApplication14
{
    class Program
    {
        [STAThread]
        static void Main(string[] args)
        {
            SaveFileDialog sfd = new SaveFileDialog();
            sfd.Filter = "Excel Document|*.xlsx";
            sfd.ShowDialog();
            OpenFileDialog ofd = new OpenFileDialog();
            ofd.Filter = "xml Data|*.xml";
            ofd.Multiselect = false;
            ofd.ShowDialog();
            List<Company> data = ReadDataXml(ofd.FileName);
            string xpath = ofd.FileName;
            string path = sfd.FileName;
            ICreator creator = new Creator();
            using (SpreadsheetDocument ssd = creator.Create(path))
            {
                WorkbookPart wp = ssd.WorkbookPart;
                Workbook wb = wp.Workbook;
                Sheet sheet = wb.Descendants<Sheet>().FirstOrDefault();
                WorksheetPart wsp = ssd.GetPartById(sheet.Id) as WorksheetPart;
                SheetData sd = wsp.Worksheet.Descendants<SheetData>().FirstOrDefault();
                SharedStringTablePart sstp = wsp.AddNewPart<SharedStringTablePart>();
                SharedStringTable sst = new SharedStringTable();
                sstp.SharedStringTable = sst;
                int st = 0;
                Row hr = new Row() { RowIndex = (UInt32Value)1 };
                Cell hc1 = new Cell() { CellReference="A1", DataType = CellValues.SharedString };
                CellValue cv1 = new CellValue();
                cv1.Text = "0";
                AddSharedString(ref sst, "Id", ref st);
                hc1.Append(cv1);
                hr.Append(hc1);
                Cell hc2 = new Cell() { CellReference = "B1", DataType = CellValues.SharedString };
                CellValue cv2 = new CellValue();
                cv2.Text = "1";
                AddSharedString(ref sst, "Name", ref st);
                hc2.Append(cv2);
                hr.Append(hc2);
                AddSharedString(ref sst, "City", ref st);
                AddSharedString(ref sst, "Street", ref st);
                int row = 2;
                foreach (Company company in data)
                {
                    Row cr = new Row() { RowIndex = UInt32Value.FromUInt32((UInt32)row) };
                    Cell idc = new Cell() { CellReference = "A" + row.ToString() };
                    idc.CellValue = new CellValue();
                    idc.CellValue.Text = company.Id.ToString();
                    Cell nmc = new Cell() { CellReference = "B" + row.ToString(),
                        DataType = CellValues.SharedString };
                    AddSharedString(ref sst,company.Name,ref st);
                    nmc.CellValue = new CellValue();
                    nmc.CellValue.Text = (st - 1).ToString();
                    cr.Append(idc);
                    cr.Append(nmc);
                    sd.Append(cr);
                    row++;
                    if (company.AddressList != null)
                    {
                        Row sur = new Row() { RowIndex = UInt32Value.FromUInt32((UInt32)row) };
                        Cell cl = new Cell() { CellReference = "B" + row.ToString(),
                            DataType = CellValues.SharedString };
                        cl.CellValue = new CellValue();
                        cl.CellValue.Text = "2";
                        Cell cs = new Cell() { CellReference = "C" + row.ToString(),
                            DataType = CellValues.SharedString };
                        cs.CellValue = new CellValue();
                        cs.CellValue.Text = "3";
                        sur.Append(cl);
                        sur.Append(cs);
                        sd.Append(sur);
                        row++;
                        foreach (Address address in company.AddressList)
                        {
                            Row ar = new Row() { RowIndex = UInt32Value.FromUInt32((UInt32)row) };
                            Cell acc = new Cell() { CellReference = "B" + row.ToString(),
                                DataType = CellValues.SharedString };
                            AddSharedString(ref sst, address.City, ref st);
                            acc.CellValue = new CellValue();
                            acc.CellValue.Text = (st - 1).ToString();
                            Cell acs = new Cell() { CellReference = "C" + row.ToString(),
                                DataType = CellValues.SharedString };
                            AddSharedString(ref sst, address.Stree, ref st);
                            acs.CellValue = new CellValue();
                            acs.CellValue.Text = (st - 1).ToString();
                            ar.Append(acc);
                            ar.Append(acs);
                            sd.Append(ar);
                        }
                    }
                }
            }
        }

        private static void AddSharedString(ref SharedStringTable sharedStringTable, string p, ref int st)
        {
            SharedStringItem ssi = new SharedStringItem();
            ssi.Text = new Text();
            ssi.Text.Text = p;
            sharedStringTable.Append(ssi);
            st++;
        }

        private static List<Company> ReadDataXml(string p)
        {
            List<Company> result = null;
            try
            {
                XmlDocument doc = new XmlDocument();
                doc.Load(p);
                result = new List<Company>();
                XmlElement root = doc.DocumentElement;
                XmlNodeList collection = root.SelectNodes("Company");
                foreach (XmlNode node in collection)
                {
                    Company item = new Company();
                    XmlElement IdNode = node.SelectSingleNode("Id") as XmlElement;
                    item.Id = int.Parse(IdNode.FirstChild.Value);
                    XmlElement NameNode = node.SelectSingleNode("Name") as XmlElement;
                    item.Name = NameNode.FirstChild.Value;
                    XmlElement Addresses = node.SelectSingleNode("AddressList") as XmlElement;
                    if (Addresses != null)
                    {
                        List<Address>al = new List<Address>();
                        XmlNodeList als = node.SelectNodes("AddressList/Address");
                        foreach (XmlNode aitem in als)
                        {
                            Address address = new Address();
                            XmlElement CityNode = aitem.SelectSingleNode("City") as XmlElement;
                            address.City = CityNode.FirstChild.Value;
                            XmlElement StreetNode = aitem.SelectSingleNode("Street") as XmlElement;
                            address.Stree = StreetNode.FirstChild.Value;
                            al.Add(address);
                        }
                        item.AddressList = al;
                    }
                }
            }
            catch
            {

            }
            return result;
        }
    }

    internal class Company
    {
        public int Id { set; get; }
        public string Name { set; get; }
        public IEnumerable<Address> AddressList { set; get; }
    }

    internal class Address
    {
        public string City { set; get; }
        public string Stree { set; get; }
    }
}
Have a good day,
Tom
Tom Xu [MSFT]
MSDN Community Support | Feedback to us
-
Edited by
Friday, May 18, 2012 6:22 AM
-
Marked as answer by
许阳(无锡)
Tuesday, May 22, 2012 6:16 AM
-
Edited by
Microsoft Excel is a useful instrument for organizing and structuring very different data. It can be used to process information by various methods and edit data arrays.
Let us see its tools for generation and processing web applications files. Using a particular example, we will learn the basics of work with XML in Excel.
How to create XML-file in Excel
XML is a file standard for transferring files over the Internet. Excel supports its export and import.
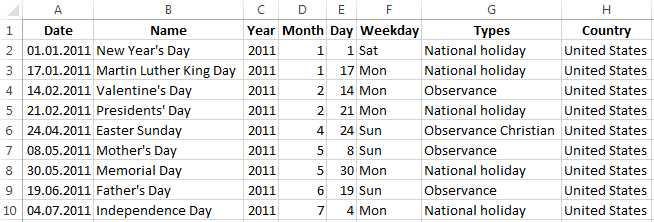
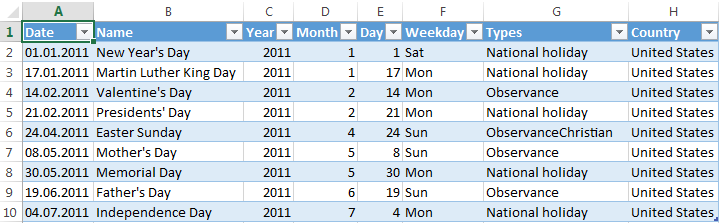
We are going to look through the process of creation an XML-file using factory calendar as a particular example.
- Create a table on which you want to create an XML file in Excel and fill it with data.
- Create and insert a map with the required XML document structure.
- Export the table data in XML format.
Altogether.
- Our table is a Holiday calendar.
- Create any text editor (such as «Notepad») the desired XML structure to generate a map file is saved. In this example, use the map structure:
- Open the tool «DEVELOPER». Choose the dialog box «Source» in the XML tab.
- If Excel cannot see XML maps, they have to be added. Press «XML Maps» button.
- Press «Add». Find your XML file – press ОК.
- Elements of the schema will appear in the right column. They have to be dragged to the corresponding column names of the table.
- Check whether the export is possible.
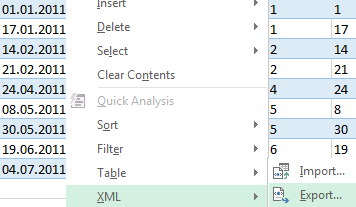
- When all of the elements will be associated, right click any cell on the table and choose XML – Export.
Save the file.
How to save an Excel file in XML format
One of the options:
- Press CTRL+S, choose «Save as» — «Other formats».
- Set the name. Choose the file destination and type – XML.
Press «Save» button.
If you get any errors, try to save the workbook as XML 2003 table or web page. Usually, there are no problems with these formats.
Other options:
- Download XLC to XML converter, or find a service, which exports files online.
- Download XML Tools Add-in from the official Microsoft web site. It is available free of charge.
- Open a new workbook. Press CTRL+O «Open».
How to open an XML file in Excel
- Change the format to XML file. Choose the desired file. Press CTRL+O.
- Open it as an XML-table. Press OK.
- Similar notification will appear.
- Press OK. You can work with this table the same way as with any Excel file.
How to convert XML file to Excel
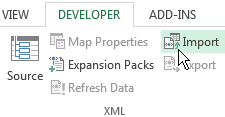
- Open the tool «DEVELOPER». Choose the dialog box «Import».
- Choose a file in the dialog box, that you want to convert.
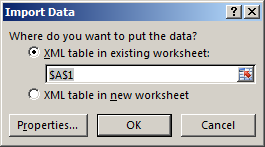
- Press «Import». Excel will offer to create a scheme automatically based on the data received. Press OK. A window will open, where you will need to choose a destination for the importing file.
- Set the range for import. It is better to add extra cells for future entries. Press «OK».
From now on, the created table is being edited and saved in Excel format.
How to collect data from XML-files to Excel
The principle of collecting data from several XML-files is the same as the principle of conversion. When we import data to Excel, the XML map transfers at the same time. You can also transfer other data in this schema.
Each new file will be linked to the existing map. Every element of the table structure binds to an element from XML map. Only one data link is allowed.
In order to configure binding settings, in the «DEVELOPER» menu choose the «Map Proparties» instrument.
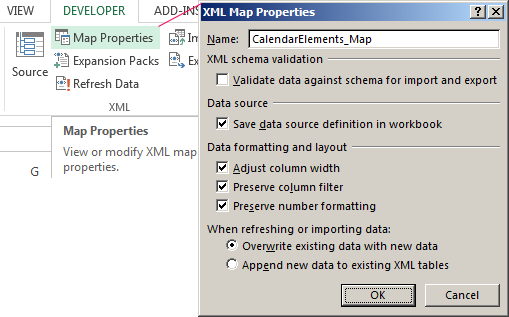
Features:
- Excel will check every new file for compliance with the existing map (if you check the box next to this line).
- The data can be update. Also, new information can be added to the existing table (it makes sense, if you need to collect data from similar files).
Other ways to get structure data (schema):
- Download it from a database of a specialized business application. Commercial sites and services may provide schemas. Simple options are in the public domain.
- Use prepared examples in order to validate the maps. Examples contain the basic elements and structure data. Copy and paste it into the program «Notepad» – and save it with the desired extension.
These are all manual methods of import and export files structure data.
Зачастую некоторым пользователям приходится иметь дело с файлами XML, представляющими собой данные на основе ввода описания с тегами или настроек программ. Открыть их для редактирования обычным двойным кликом не получается. Связано это с тем, что для ассоциации с расширением не установлено нужное приложение, которое применяется по умолчанию. Но если нужно получить удобочитаемый файл в виде таблицы с возможностью редактирования, можно открыть файл XML в Excel. При этом не нужны никакие конверторы, способные преобразовывать форматы между собой. Единственное замечание: такая возможность имеется только в версиях Office версии 2003 и выше.
Как открыть XML в Excel: способ первый
Рассмотрим импорт данных на основе Excel версии 2016 года. Первый и самый простой способ состоит в том, чтобы изначально запустить программу Excel. При старте приложение вместо приветствия и логотипа выдаст специальное окно входа, в котором слева в меню присутствует строка «Открыть другие книги».
Если кто не помнит или не знает, приложение MS Excel является одним из самых мощных средств работы…

После этого используется пункт обзора, а в новом окне в качестве открываемого формата выбирается XML. После этого привычным методом находим нужный файл и жмем кнопку открытия. В этом случае XML-файл Excel распознает не как текстовый документ, содержащий описания и теги, а как самую обычную таблицу. Естественно, данные можно редактировать по своему усмотрению, но об этом позже.
Как открыть формат XML в Excel: способ второй
Практически ничем не отличается от первого еще один предлагаемый метод. Файл XML в Excel можно открыть из файлового меню или использовать для этого быстрое сочетание Ctrl + O.

Опять же, сначала выбирается тип формата, подлежащего открытию, после этого находится нужный файл и нажимается соответствующая кнопка.
Открытие XML: способ третий
Есть еще несколько методов открытия файлов формата XML в Excel. Так, в версии программы 2016 года можно использовать меню верхней панели, где выбирается раздел «Данные», а затем нажимается кнопка получения внешних данных.
Сегодня формат PDF стал настолько универсальным в плане просмотра, редактирования, для пересылки и…

В выпадающем меню нужно просто выбрать раздел «Из других источников» и в новом меню использовать строку «Из импорта XML». После этого следует стандартная процедура поиска нужного файла с последующим открытием.
Редактирование, сохранение и экспорт
При использовании любого из этих методов пользователь получает структуру таблицы. Редактирование производится точно так же, как это делается со стандартными файлами XLS. Иногда для удобства редактирования и сохранения данных целесообразно использовать меню для разработчиков.

В этом случае можно импортировать не все содержимое XML-файла, а только то, что действительно необходимо, вставляя информацию в соответствующие столбцы и строки, указав в качестве источника данных именно XML-объект. Но для этого необходимо в самой программе выполнить вход в аккаунт, используя свою регистрацию в Microsoft.
Сохранить измененный файл можно сразу же в оригинальном формате, выбрав соответствующий тип из списка. Из файлового меню, если объект был сохранен в «родном» формате Excel, можно выбрать функцию экспорта, нажать на изменение типа файла и установить в качестве конечного формата именно XML.
Нередко по завершении работы с документами Excel требуется зафиксировать результат, чтобы исключить…
Если пользователю лень заниматься подобными преобразованиями, или в работе он использует версию Office ниже версии 2003, для открытия данного формата в виде таблицы придется использовать специальный конвертор. Таких программ сейчас предлагается достаточно много. В крайнем случае, если и это не подходит, без проблем можно обратиться к специализированным онлайн-сервисам, на которых формат будет изменен в течение пары десятков секунд. По окончании таких действий останется только загрузить готовый результат в формате XLS на жесткий диск, а потом открыть его в Excel. Впрочем, в большинстве случаев такие действия не требуются, поскольку в том же Office 2003 возможность прямого открытия (импорта) формата XML уже предусмотрена изначально. И думается, мало кто сегодня использует устаревшие офисные продукты Microsoft.