
Change text formatting: font sizes, font types.
To change the font size and the font type of the text in a document, right-click anywhere on the document text area and from the resulting menu, click on ‘Edit Paragraph Style’. This will open the ‘Paragraph Style’ dialog box.
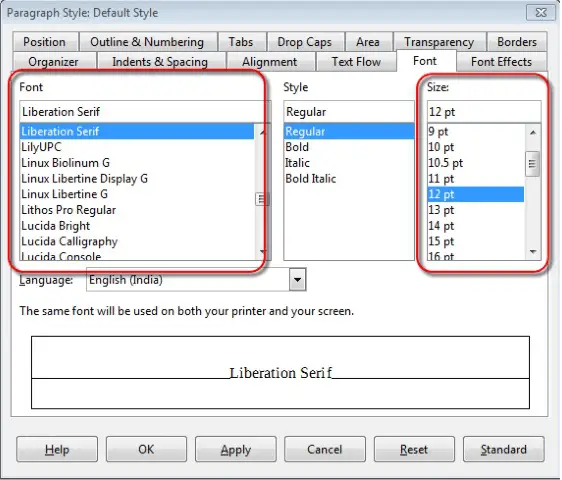
In this dialog box, under the ‘Font’ tab, we have the ‘Size’ and ‘Font’ drop-down lists. The appropriate font size and font type can be selected from these lists. After selecting the required values, click on ‘OK’. This will make the required changes to the document.
Apply text formatting: bold, italic, underline.
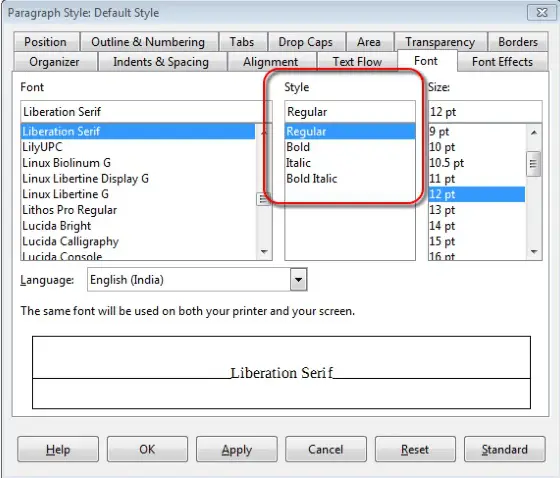
In the same ‘Paragraph Style’ dialog box, under the ‘Font’ tab, we have the ‘Style’ drop-down list. From this list we can choose the ‘Bold’ or ‘Italic’ options to make the text style as bold or italic.
In the same dialog, under the ‘Font Effects’ tab, we have the ‘Underlining’ drop-down list. The required underlining effect can be chosen from this list.
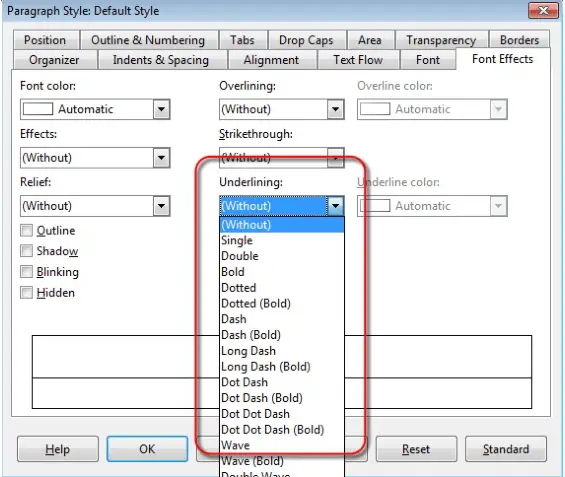
After making the changes, click on ‘OK’ to make these changes effective.
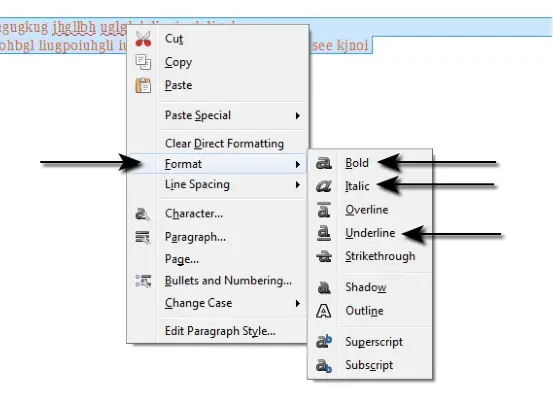
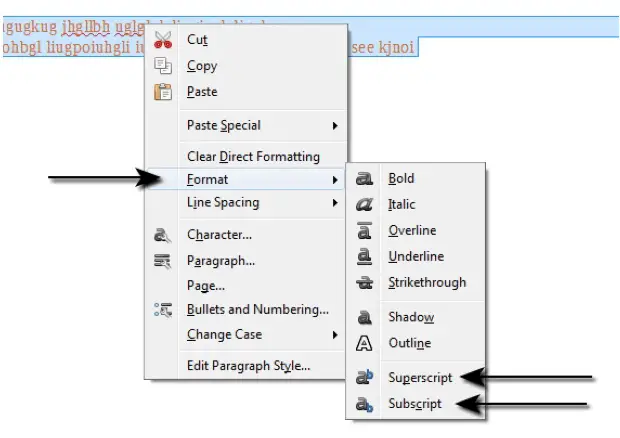
We have another method to format a piece of text as bold, italic, or underline. First of all, select the text which needs to be formatted. After this, right-click on the selected text and from the resulting menu, click on ‘Format’. This displays a menu which contains three options for ‘Bold’, ‘Italic’, and ‘Underline’. The appropriate formatting option can be chosen from this menu.
Apply text formatting: subscript, superscript.
A subscript or superscript is a number, figure, symbol, or indicator that is smaller than the normal line of type and is set slightly below or above it. Subscripts appear at or below the baseline, while superscripts are above it.
To make some text as superscript or subscript, first of all select the text which needs to be formatted. After this, right-click on the selected text and from the resulting menu, click on ‘Format’. This displays a menu which contains two options for ‘Superscript’ and ‘Subscript’. The appropriate formatting option can be chosen from this menu.
Apply different colours to text.
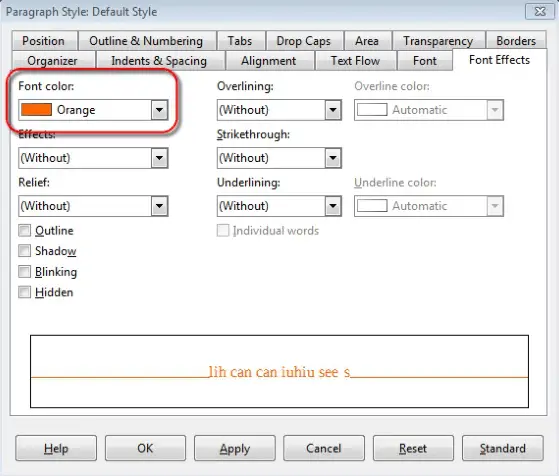
In the same ‘Paragraph Style’ dialog box which has been used in the previous sections, under the ‘Font Effects’ tab, we have the ‘Font color’ drop-down list. Select the required color from this list and then click on ‘OK’. This will change the text color.
Apply case changes to text.
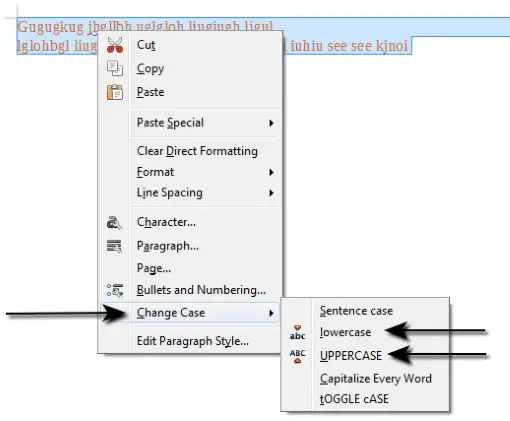
To apply case changes to text, first of all select the text which needs to be formatted. After this, right-click on the selected text and from the resulting menu, click on ‘Change Case’. This displays a menu which contains options like ‘lowercase’ and ‘UPPERCASE’. The appropriate formatting option can be chosen from this menu.
Apply automatic hyphenation.
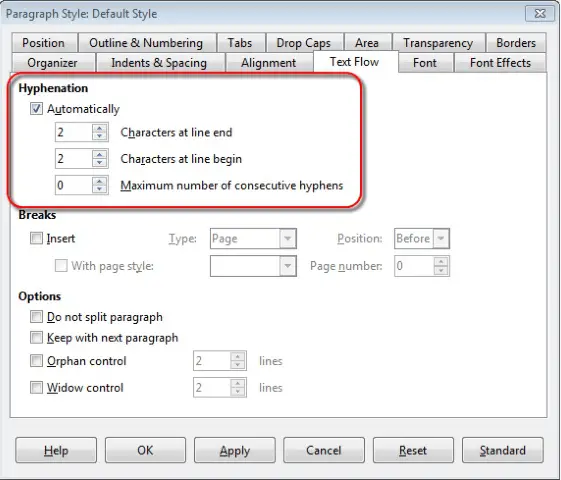
In the same ‘Paragraph Style’ dialog used in the previous sections, under the ‘Text Flow’ tab, we have an option for ‘Hyphenation’. Select the ‘Automatically’ check box here and then make the required changes to the three options which are provided. After making all the changes, click on ‘OK’. This will apply automatic hyphenation for the document.
Word Processing Document API provides two ways to format document text in code:
- Direct Formatting
- Allows you to change individual formatting attributes for a given range.
- Document Styles
- Allow you to change multiple attributes at the same time and apply them to different document fragments. Styles created in code are automatically available to end users. If you change the style settings, all linked document fragments will be updated automatically.
Direct Formatting
Default Formatting
Use the following properties to set the default character and paragraph formatting for a loaded or newly created document.
- Document.DefaultCharacterProperties — to access the default character format options.
- Document.DefaultParagraphProperties — to access the default paragraph format options.
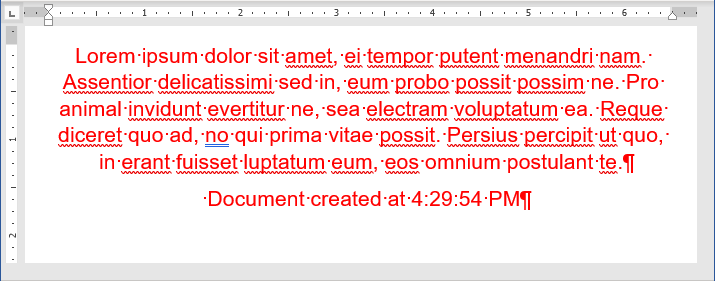
The code snippet below illustrates how to apply default formatting to a loaded document.
- C#
- VB.NET
private void RichEditDocumentServer1_DocumentLoaded(object sender, EventArgs e)
{
    RichEditDocumentServer wordProcessor = sender as RichEditDocumentServer;

    //Set the default font, size and forecolor
    wordProcessor.Document.DefaultCharacterProperties.FontName = "Arial";
    wordProcessor.Document.DefaultCharacterProperties.FontSize = 16;
    wordProcessor.Document.DefaultCharacterProperties.ForeColor = Color.Red;

    //Specify the default alignment
    wordProcessor.Document.DefaultParagraphProperties.Alignment = ParagraphAlignment.Center;
    wordProcessor.Document.AppendText("Document created at " + DateTime.Now.ToLongTimeString());
}
The image below shows the result of code execution:
Format Characters
Use both character and paragraph formatting for a specific document range, for instance, for the document title as shown below.

The following members allow you to change character formatting for a given range.
| Member | Description |
|---|---|
| SubDocument.BeginUpdateCharacters | Initiates the update session and provides access to CharacterProperties for the specified range. |
| CharacterProperties | Holds the character formatting options. |
| SubDocument.EndUpdateCharacters | Finalizes the character formatting update. |
The code sample below uses this API to modify the text color and the font type.
- C#
- VB.NET
//The target range is the first paragraph
DocumentRange range = document.Paragraphs[0].Range;

//Provide access to the character properties
CharacterProperties titleFormatting = document.BeginUpdateCharacters(range);

//Set the character size, font name and color
titleFormatting.FontSize = 20;
titleFormatting.FontName = "Helvetica";
titleFormatting.ForeColor = Color.DarkBlue;

document.EndUpdateCharacters(titleFormatting);
Theme Fonts
The RichEditDocumentServer supports theme fonts. A document theme contains two sets of fonts (Headings and Body). Each set includes font names for different languages. You can use the following properties to specify these fonts for a specific document range:
| Property | Description |
|---|---|
| CharacterPropertiesBase.ThemeFontAscii | Specifies the theme font used to format Unicode (U+0000–U+007F) characters. If the ThemeFontAscii is not specified, the CharacterPropertiesBase.FontNameAscii property determines the theme font. |
| CharacterPropertiesBase.ThemeFontEastAsia | Specifies the theme font used to format East Asian Unicode characters. If the ThemeFontEastAsia is not specified, the CharacterPropertiesBase.FontNameEastAsia property determines the theme font. |
| CharacterPropertiesBase.ThemeFontHighAnsi | Specifies the theme font used to format High ANSI characters. If the ThemeFontHighAnsi is not specified, the CharacterPropertiesBase.FontNameHighAnsi property determines the theme font. |
| CharacterPropertiesBase.ThemeFontComplexScript | Specifies the name of the Complex Script theme font. If the ThemeFontComplexScript is not specified, the CharacterPropertiesBase.FontNameComplexScript property determines the theme font. |
You can use the Document.Theme property to specify Body and Heading fonts used in the document for Latin, Complex Script and East Asian languages. Create a new DocumentTheme object and pass it as the Theme property value, as shown in the code sample below:
- C#
- VB.NET
//Create a new DocumentTheme object:
DocumentTheme theme = new DocumentTheme();

//Specify Body and Heading fonts for Complex Script...
theme.BodyComplexScript = "Microsoft Sans Serif";
theme.HeadingsComplexScript = "Tahoma";

//...Latin...
theme.HeadingsLatin = "Segoe UI Semilight";
theme.BodyLatin = "Times New Roman";

//..and East Asian languages:
theme.HeadingsEastAsia = "DengXian Light";
theme.BodyEastAsia = "DengXian";

//Set the created object as the Theme property value:
doc.Theme = theme;

// Specify theme font types used for Complex Script and East Asian languages:
CharacterProperties fontProperties = doc.BeginUpdateCharacters(doc.Range);

fontProperties.ThemeFontComplexScript = ThemeFont.HeadingsComplexScript;
fontProperties.ThemeFontEastAsia = ThemeFont.BodyEastAsia;

doc.EndUpdateCharacters(fontProperties);


//Save the result:
doc.SaveDocument("123456.docx", DocumentFormat.OpenXml);
Custom Fonts
The Word Processing Document API ships with the DXFontRepository class that allows you to use fonts that are not installed on the current operating system. When you load a document that uses such fonts, the RichEditDocumentServer substitutes missing fonts with the fonts available on the current machine. The DXFontRepository class allows you to load and use custom fonts in your application to prevent font substitution when documents are printed and exported to PDF.
Refer to this help topic for details: Load and Use Custom Fonts Without Installation on the System.
Format Paragraphs
Use the following API to change the title’s alignment, left indent or any other paragraph option.
| Member | Description |
|---|---|
| SubDocument.BeginUpdateParagraphs | Initiates the update session and provides access to the ParagraphProperties for the specified range. |
| ParagraphProperties | Specifies the paragraph formatting properties. |
| SubDocument.EndUpdateParagraphs | Finalizes the character formatting update. |
- C#
- VB.NET
//The target range is the first paragraph
DocumentRange titleParagraph = document.Paragraphs[0].Range;

//Provide access to the paragraph options
ParagraphProperties titleParagraphFormatting = document.BeginUpdateParagraphs(titleParagraph);

//Set the paragraph alignment
titleParagraphFormatting.Alignment = ParagraphAlignment.Center;

//Set left indent at 0.5".
//Default unit is 1/300 of an inch (a document unit).
titleParagraphFormatting.LeftIndent = Units.InchesToDocumentsF(0.5f);
titleParagraphFormatting.SpacingAfter = Units.InchesToDocumentsF(0.3f);

//Set tab stop at 1.5"
TabInfoCollection tbiColl = titleParagraphFormatting.BeginUpdateTabs(true);
TabInfo tbi = new TabInfo();
tbi.Alignment = TabAlignmentType.Center;
tbi.Position = Units.InchesToDocumentsF(1.5f);
tbiColl.Add(tbi);
titleParagraphFormatting.EndUpdateTabs(tbiColl);

document.EndUpdateParagraphs(titleParagraphFormatting);
Reset Direct Formatting
The following methods allow you to reset character or paragraph formatting:
- CharacterPropertiesBase.Reset
- Sets character properties to the Normal style parameters. The CharacterPropertiesMask mask parameter allows you to specify character properties which should be reset.
- ParagraphPropertiesBase.Reset
- Sets paragraph properties to the Normal style parameters. The ParagraphPropertiesMask mask parameter allows you to specify character properties which should be reset.
The code sample below shows how to reset font name and size in the first paragraph:
View Example
- Formatting.cs
- Formatting.vb
using DevExpress.XtraRichEdit;
using DevExpress.XtraRichEdit.API.Native;

using (RichEditDocumentServer wordProcessor = new RichEditDocumentServer()) {
    Document document = wordProcessor.Document;
    document.LoadDocument("Grimm.docx", DocumentFormat.OpenXml);

    // Set font size and font name of the characters in the first paragraph to default.
    // Other character properties remain intact.
    DocumentRange range = document.Paragraphs[0].Range;
    CharacterProperties cp = document.BeginUpdateCharacters(range);
    cp.Reset(CharacterPropertiesMask.FontSize | CharacterPropertiesMask.FontName);
    document.EndUpdateCharacters(cp);
}
Document Styles
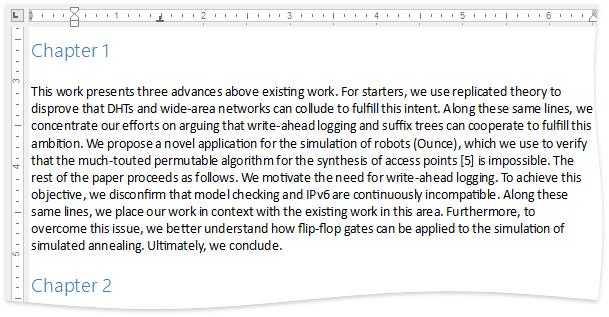
Word Processing Document API supports paragraph and character document styles. The character style can be used when only the character options need to be modified. Use the paragraph style to change both character (a font type, size, color, etc.) and paragraph (alignment, spacing before and after, etc.) attributes as in the current example.
The image below demonstrates chapter titles modified using the paragraph style.
RichEditDocumentServer doesn’t have any predefined document styles. Use members from the table below to create a new document style.
|
Member |
Description |
|---|---|
|
SubDocument.BeginUpdate |
Opens the document for editing. |
|
Document.CharacterStyles Document.ParagraphStyles |
Provides access to the CharacterStyleCollection Provides access to the ParagraphStyleCollection. |
|
CharacterStyleCollection.CreateNew ParagraphStyleCollection.CreateNew |
Creates a new CharacterStyle object. Creates a new ParagraphStyle object. |
|
CharacterStyle.Parent ParagraphStyle.Parent |
Specifies the base style for the created instance. |
|
CharacterStyle.LinkedStyle ParagraphStyle.LinkedStyle |
Allows you to synchronize the character and paragraph styles to create a linked style. |
|
CharacterStyleCollection.Add ParagraphStyleCollection.Add |
Adds the created style to the collection. |
|
Paragraph.Style |
Sets the style to the given paragraph. |
|
CharacterProperties.Style |
Specifies the style to the given character range. |
|
SubDocument.EndUpdate |
Finalizes style creation. |
The code sample below demonstrates how to create a new paragraph style and apply it to every chapter.
- C#
- VB.NET
//Open the document for editing
document.BeginUpdate();

//Create a new paragraph style instance
//and specify the required properties
ParagraphStyle chapterStyle = document.ParagraphStyles.CreateNew();
chapterStyle.Name = "MyTitleStyle";
chapterStyle.ForeColor = Color.SteelBlue;
chapterStyle.FontSize = 16;
chapterStyle.FontName = "Segoe UI Semilight";
chapterStyle.Alignment = ParagraphAlignment.Left;
chapterStyle.SpacingBefore = Units.InchesToDocumentsF(0.2f);
chapterStyle.SpacingAfter = Units.InchesToDocumentsF(0.2f);
chapterStyle.OutlineLevel = 2;

//Add the object to the document collection
document.ParagraphStyles.Add(chapterStyle);

//Finalize the editing
document.EndUpdate();

//Apply the created style to every chapter in the document
for (int i = 0; i < document.Paragraphs.Count; i++)
{
    string var = document.GetText(document.Paragraphs[i].Range);
    if (var.Contains("Chapter "))
    {
        document.Paragraphs[i].Style = chapterStyle;
    }
}
return;
If the loaded document already has document styles, they are automatically added to the document’s CharacterStyleCollection or ParagraphStyleCollection and you can use them as shown in the code snippet below.
- C#
- VB.NET
//Apply style to the paragraph
richEditDocumentServer1.Document.Paragraphs[1].Style = richEditDocumentServer1.Document.ParagraphStyles["Heading 2"];

//Apply style to the character range
DocumentRange range = richEditDocumentServer1.Document.Paragraphs[1].Range;
CharacterProperties rangeProperties = richEditDocumentServer1.Document.BeginUpdateCharacters(range);
rangeProperties.Style = richEditDocumentServer1.Document.CharacterStyles["Heading 2"];
richEditDocumentServer1.Document.EndUpdateCharacters(rangeProperties);
Linked Styles
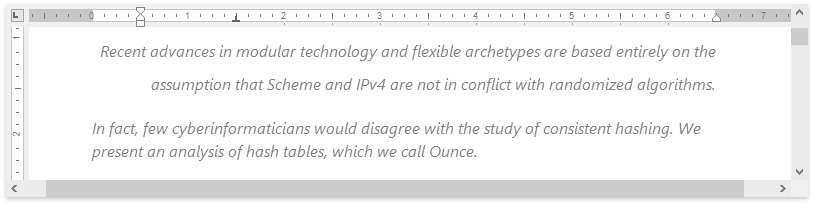
Use a linked style to format the document annotation. A linked style carries both character and paragraph formatting rules, but applies them according to the target object. If the style is applied to the Paragraph instance, both formatting options will be applied. Only character formatting is used for the DocumentRange instance.
The code sample below demonstrates how to synchronize a paragraph and character style to create a linked style.
- C#
- VB.NET
ParagraphStyle annotationStyle = document.ParagraphStyles["Annotation"];

document.BeginUpdate();

//Create a new paragraph style
//and set the required settings
annotationStyle = document.ParagraphStyles.CreateNew();
annotationStyle.Name = "Annotation";
annotationStyle.Alignment = ParagraphAlignment.Right;
annotationStyle.LineSpacingMultiplier = 1.5f;
annotationStyle.FirstLineIndentType = ParagraphFirstLineIndent.Hanging;
annotationStyle.FirstLineIndent = 3;
document.ParagraphStyles.Add(annotationStyle);

//Create a new character style and link it
//to the custom paragraph style
CharacterStyle annotationCharStyle = document.CharacterStyles.CreateNew();
annotationCharStyle.Name = "AnnotationChar";
document.CharacterStyles.Add(annotationCharStyle);
annotationCharStyle.LinkedStyle = annotationStyle;

//Specify the style options
annotationCharStyle.Italic = true;
annotationCharStyle.FontSize = 12;
annotationCharStyle.FontName = "Segoe UI";
annotationCharStyle.ForeColor = Color.Gray;
document.EndUpdate();

//Apply the created style to the first paragraph of the annotation
document.Paragraphs[1].Style = annotationStyle;

//Apply the linked style to the range of the annotation's second paragraph
CharacterProperties annotationProperties = document.BeginUpdateCharacters(document.Paragraphs[2].Range);
annotationProperties.Style = annotationCharStyle;
document.EndUpdateCharacters(annotationProperties);
The image below illustrates the result of the code execution.
From WikiEducator
Jump to: navigation, search
![]()
| Word processing | |
|---|---|
| Working with text | Introduction | Character formatting | Paragraph formatting | Editing features | Working with tabs | Key points | Assessment |
Contents
- 1 Paragraph formatting
- 2 Paragraph alignment
- 3 Activity
- 3.1 Blocked vs indented paragraphs
- 3.2 Paragraph line spacing
- 4 Activity
Paragraph formatting
As well as formatting characters, we can also use paragraph formatting to change the appearance of a document. Paragraph formatting changes happen from one paragraph mark ¶ to another paragraph mark ¶.
Centering, line spacing, paragraph spacing, indents and tabs are paragraph formats.
When changing the appearance of one paragraph just place the cursor anywhere in the paragraph. If you want to change the appearance of more than one paragraph, you must select the number of paragraphs that you want to change.
Paragraph alignment
![]()
Activity
Center Align
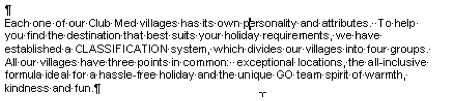
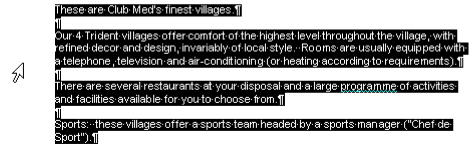
- Open the file Club Med Villages which you worked on and save earlier.
- Click anywhere in this heading:

- Click on the
 icon on the Home Tab ⇒ Paragraph Group. The heading will center between the margins.

- Repeat for Three Trident Villages and Four Trident Villages
- Go to the top of the file Ctrl + Home
- Select the first two headings

- Center align the selected text


Justify align
- Click in the next paragraph –it is Left aligned (left margin straight, right margin ragged)

- Click on Justify . The paragraph will be aligned evenly between left and right margins:

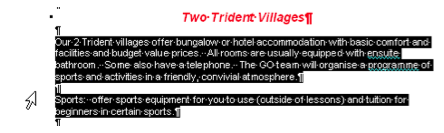
- Select this group of paragraphs:

- Click on Justify: the text will be aligned to left and right margins.

Right align
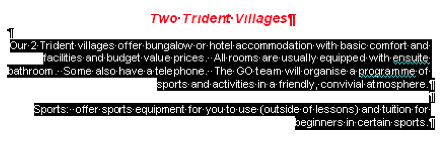
- Select these paragraphs:

- Click on Right align
- Paragraphs will be aligned from the right margin and have a ragged left margin:

Left align
- Click in this paragraph:

- Look at the formatting bar and you will see the “Left align” button is “highlighted” because that formatting is applied
- Click in one of the paragraphs you changed and see which alignment is “highlighted”
- Save the changes to the document and leave the document open

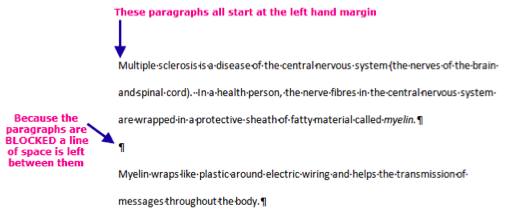
Blocked vs indented paragraphs
Example of blocked paragraph in double line spacing:
Example of indented paragraph in double line spacing:
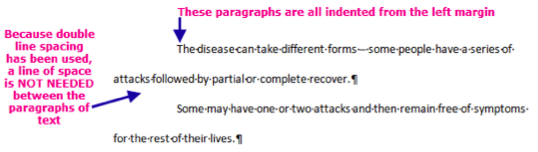
Note: when keying in text in double line spacing and indented paragraphs it is not necessary to have any extra space between paragraphs. The indentation clearly shows where each new paragraph begins.
Paragraph line spacing
When working with word processed documents you are able to adjust the line spacing of the text. By adjusting the line spacing you can improve the layout of text and its readability.
By changing the way text looks, you can draw attention to key words and ideas.
You can change the spacing between lines and between paragraphs.
![]()
Activity
Please note: the following tutorial will open in a new window/tab. When you have finished the tutorial, simply close the window/tab and you’ll return to this page.
To complete this section, please work through the following tutorial:
- Line and Paragraph Spacing
The tutorial includes a very useful video demonstration.
![]() |
| ![]()

Microsoft Word is the global standard for word processing. At the same time, it’s one of the most maddening applications to master, which is why this Geek School series is all about learning how to format documents in Word.
Word 2013 and a Little Perspective
Microsoft is far more than a typical staid word processor. Word is one of the most affordable and closest things you can get to your very own printing press. In fact, it is for all With Word, you can write textbooks, create full magazine and newspaper layouts with graphics, write a novel with indices, and much, much more. You can do in mere hours, what twenty years ago might have taken an entire editorial team days or even weeks.
Microsoft Word completely eliminates the aggravation of typos (in theory at least). There is no need to retype whole chapters in order to add or rearrange content. Instead you can add, move, or even remove complete sentence, paragraphs, and chapters in mere seconds!
Of course, we take this power for granted but we can tell you, it really beats using a typewriter (let alone movable type) – making a mistake using a typewriter meant stopping what you were doing, rolling the platen up to better expose your typo, and then either using an eraser to remove the offending characters, or carefully dabbing on White-Out and patiently blowing it dry. Then, of course, you’d have to roll the platen back to the line you were typing on, taking further care to make sure it all lined up perfectly.
If you can imagine how many daily typing errors you make then you can probably get an idea of how long it took to produce even simple documents. Needless-to-say, it paid to be accurate, and unless you were a really good typist, typing an essay or book report, could be a long arduous process. And forget about adding pictures into your document. Doing that kind of stuff at home was nearly impossible. Oh sure, you could include your illustrations and photos and then refer to them, but it wasn’t as simple and elegant as cut-copy-paste we’ve become so accustomed to.
Nevertheless, all this power and control does arrive with a fairly steep learning curve. It can be a pain to get the hang of and be fluent in effectively formatting eye-catching documents. Luckily, that’s where we come in – with How-To Geek School’s Formatting Documents with Microsoft Word 2013.
What We Will Cover
This series aims to introduce you to a large swath of Word 2013’s document formatting features through five lessons.
In this lesson, we first cover some Word basics like the Ribbon and page structure like tabs, margins, and indents. Additionally, we show you how to manipulate formatting marks or simply turn them on/off. Our first lesson concludes with an exploration of fonts, and finally templates.
Lesson 2 begins with paragraphs, specifically alignment, indentation, and line spacing. After that we move on to shading and borders, and then lists (bulleted, numbered, and multilevel). We’ll also briefly touch upon AutoCorrect options.
After that, Lesson 3 begins with a lengthy exploration of tables (inserting, drawing, formatting, etc.) and then we dive into other formatting options, including links, headers, footers, equations, and symbols.
Lesson 4’s primary focus will be illustrations and multimedia such as pictures, shapes, WordArt, and more. We move on from there to briefly cover working with more than one language.
Finally, in Lesson 5, we wrap up with styles and themes, covering the gamut, new styles, inspecting styles, managing and modifying, and lastly themes.
Before we do all that however, let’s take some time to orient ourselves with Word’s anatomy and layout.
The Ribbon
As you may be familiar, Microsoft employs a “Ribbon” interface throughout their products. These ribbons are prominent in Office and Windows 8 (File Explorer and WordPad).
Here we see the Ribbon in Word 2013, the application we’ll be using for all our work.

The Ribbon is further subdivided into tabs (Home, Insert, Design, etc.) and each tab is further broken down into sections (Clipboard, Font, Paragraph, etc.).
Each of these sections can be expanded by clicking the small arrow in the lower-right corner.
Here, if we click on the arrow on the “Font” section, it opens to the trusty “Font” dialog:
While some menus may open to dialogs, others may spawn panes that slide out from one side of the screen. Also, if you use a computer with a lower resolution screen and need more screen real estate, you can click the small arrow to the very far lower-right corner of the ribbon.
This will cause the Ribbon to collapse, giving you more vertical space to work with. To get the Ribbon back, simply click on a tab and it will spring back into view (you can pin it if you want it to stay open).
Alternatively, you can quickly hide/unhide the Ribbon by typing “CTRL + F1.”
Home is Where Word’s Heart is
We’ll take some time before diving into actual document formatting, to talk about the “Home” tab. Even if you never touch another part of Word for the rest of your life (fairly impossible but still), the Home tab contains its most essential functions and is vital to formatting your documents consistently well.
See here how the “Home” tab has a total of five sections: “Clipboard,” “Font,” “Paragraph,” “Styles,” and “Editing.”
Clipboard
“Clipboard” functions are pretty rudimentary; you should know them by now: cut, copy, paste. Most likely you use right-click menus to do many of your cut-copy-paste functions, or keyboard shortcuts: “CTRL + X”, “CTRL + C”, “CTRL + V,” respectively.
Opening the “Clipboard” pane however, reveals a goldmine of functionality that can actually prove quiet useful when formatting documents. The Word clipboard collects everything you cut or copy for later use. This is particularly useful if you need to paste several distinct passages of text and/or images throughout your document. You can simply place your pointer at the correct insertion point, open the “Clipboard” viewer and select the piece you want to paste.
Font
The “Font” section and applicable dialog should be pretty familiar to the majority of Word users. Even if you’re not a Word pro, you’ve used the font functions in Word every time you create a document. Each time you bold or italicize something, you’re employing font functions. So knowing your way around the “Font” section and dialog is an excellent approach to mastering Word’s formatting bells and whistles.
We’ll go further into depth on fonts and typefaces in this lesson, for now, take a little time to familiarize yourself with its various functions.
Paragraph
Important also is the “Paragraph” section, which lets you set critical formatting features such as indenting, line spacing, and page breaks. Further, adjusting paragraph controls lets you play with borders, shading, and turn paragraph marks on or off. We’ll talk more about this in Lesson 2.
Styles
Styles are a great way to manage the way your entire document’s headers, titles, and text quickly and easily. Rather than going through a document and adding or changing headers one by one, you can simply apply a style, and then make changes to it using the “Styles” section. We’ll go into styles a great deal more in our final lesson of this series.
The Page
Your page is where all the magic happens, it’s where you compose your masterpieces and as such, knowing your way around is essential. Let’s dive in by turning on the “Ruler” and then explain how to set tabs and margins.
To turn on the ruler, we’ll first click the “View” tab and in the “Show” section, check the box next to “Ruler.” Note the horizontal and vertical rulers that appear along the page edges.
If you want to work according to another measurement system, you can change it from “File” -> “Options” -> “Advanced.”
Tabs
With the ruler on, we can cover how to use tabs and set margins. The ruler is used to show to show the positions of tab stops and margins.
Tabs are used to position text by using the “Tab” key. This works better than spacing everything manually, and with most fonts, tabs are the surest way to make sure everything lines up properly.
Microsoft Word sets tabs by default to ½-inch intervals. When you hit “Tab,” the insertion point will automatically jump right (½-inch per tab).
You set tabs by clicking on the ruler to indicate where you want to place them. You’ll see a vertical dotted line allowing your more precise control over where they go.
You can set tabs in any section of the document, meaning the top of the page can have different tabs than the middle or the bottom. Basically, you can a different tabbing scheme on each and every line of your document if you need or desire.
Types of Tabs
There are several different kinds of tabs you can use. To pick the type, click the tab selector located at the far left-hand side of the screen as shown below.
Here we see a left tab, note all the text is aligned to the left.
And similarly, a right tab:
A center tab:
A decimal tab allow you to create columns of numbers and easily line them up by decimal point:
A vertical bar tab, which doesn’t act like a tab, allows you to demarcate text. It looks the same as if you typed | however the advantage is that you can grab the “bar tab” in the ruler and move them together.
You can exert more control over tabs by double-clicking on any one to bring up the tabs dialog window. Note here you can have more precise control over tab stop positions, alignment, and clearing them.
Margins
You can see your margins by making sure Word is viewed in “Print Layout.”
Here in this example, we see our left margin is set at two inches and our left is set at four inches, giving us two inches of horizontal printable area. The margin indicators are the bottom arrows, while top arrow is a hanging indent, which we’ll cover in the very next section.
On a normal document, the left and right margins default to one-inch and 6 ½ inches. This means on a regular 8.5 x 11 sheet of paper, you will have one-inch margins where print will not appear, giving you 6.5 inches of horizontal printable area.
To move margins and the hanging indent, hover over each one with the mouse pointer until it changes to arrows and then drag them to the size you desire.
If you simply grab the left margin, it will leave the hanging indent behind.
And on that note, let’s briefly discuss indents in a bit more detail.
Indents
Indents are used to position the paragraph with margins or within the columns in a table.
You can tweak your margins further depending on what you’re writing. For example, you can create a “first line indent.” This is more of an old school style wherein the first line of each paragraph will be indented.
This is a more traditional way of formatting paragraphs, allowing you to denote where new paragraphs begin in a single-spaced document. Today, text is usually formatted in a block style with a double space between paragraphs.
A second line, or “hanging indent,” will automatically indent every line after the first one. One confusing part with indents is you can move them outside of the margin, which is counterintuitive unless you consider that a printer can print outside the margins, and is limited only by the width of the paper.
There’s not a whole lot to master when it comes to tabs, margins, and indents. That said, it pays to understand how they work so you can get more precise results in your documents. And it gives you a better understanding of why a documents looks the way it does or more importantly, why it may not look the way you want it to look.
Formatting marks
Before we proceed any further, we should point out that you might be noticing now that in some of our screenshots, there are formatting marks that show paragraphs, spaces, tabs, and others. To see the tabs and other text-formatting marks in the document select the ¶ (paragraph) symbol here on the “Paragraph” section on the “Home” tab.
To choose which formatting marks are seen, you can select them in Word “Options.” To open the options dialog, first click on the “File” tab and then choose “Options.” Finally, under “Display” you will see that you can select formatting options that always appear.
For example, if you want to turn off all the formatting marks except paragraphs and spaces, you would select only those two. Then you can turn off all or individual formatting marks in the “Paragraph” section.
Formatting marks are very important for creating clean, consistently formatted documents and they don’t show up in the final, printed document, plus you can turn them on or off as needed, so learn to use them to your advantage.
Fonts vs. Typefaces
Typefaces and fonts will be a routine part of your daily document formatting unless you’re happy with one single font for every document you write. Good font use is very important as it can allow you to better express yourself and get your point across. For that reason, you want to at least understand the very basics of how they work and what font is appropriate where and why.
For the sake of clarification, a “typeface” is basically the way a collection of letters, numbers, and symbols looks across its entirety. Here we see the Times New Roman typeface, which will have the same characteristics no matter which font you use. In other words, Times looks like Time, whether it is bolded, italicized, or whatever formatting you apply to it.
A font may be understood as the entire collection of typefaces. For example, Times New Roman and all its various forms (bold, italic, bold italic) is a “font family.” Each of the variations (regular, bold, italic, and bold italic) within the family is a font:
For the sake of simplicity, rather than split hairs and confuse you with talk of typefaces and fonts, we’ll just refer to everything type-related as a font.
Serif fonts
There are two types of fonts you should understand.
First, there are so-called serif fonts; serifs are those little bits that stick out from a letter as in the example below.
In many cases, a serif font will look best in formal of official documents. One of those most immediately identifiable and iconic examples of a serif font is seen on the New York Times masthead:
Sans serif
Conversely, a sans serif font will obviously not have serifs, hence the “sans” part. Here you see the Arial font, which is one of Windows’ default fonts.
Sans serif fonts are widely used in advertising and logos because they often tend to look new and modern. Without a doubt the most notable sans serif font is Helvetica, upon which Arial is obviously based. You can find dozens of examples of Helvetica-derived fonts in modern culture. Check out Microsoft, Target, and Panasonic for just a few examples.
You can add different fonts to Windows, and by extension Word, by downloading them from the web.
If you want to read up more about typefaces and fonts, Microsoft provides more information its typography homepage.
Point size
Point size relates to the size of the font, leading, and other page items. It is not connected to any established unit of measurement. In typography, a point is the smallest whole unit of measurement.
For most fonts in Word, the smallest point size is 8 points tall. The smallest lines and other graphic objects can have is a point size of 1. Here are some example of various point sizes:
Font Styles and Effects
You can apply various font styles and effects from the “Font” tab on the “Home” ribbon.
You can access further font effects from the full font dialog accessible by clicking the arrow in the bottom right corner.
You have a whole range of effects, including colors and different underline styles you can apply.
Before we end this lesson, we should take a moment to briefly acquaint you with templates, since they can often make short work of complex layouts.
Templates are pre-configured documents, like a resume or business cards that you can use to speed creating forms. There are templates for pretty much anything you can think of.
The goal of Microsoft Word is twofold: (1) provide sets of themes and styles so that the Word user can create professional-looking documents and (2) give the user the ability to create documents of graphic-designer quality by providing tools and pre-configured set of objects from which the user can select.
When you open Microsoft Word or click on the “New” from the “File” tab, the first screen it shows you are the templates available to you, either already included with the program, or available for quick download. If you don’t immediately see what you want, try “suggested searches” or use the search box.
Right-click on any template and you can “Preview” or “Create” the template. You can also pin a preferred template so it is always available at the top of the list.
Creating a template will cause it to open if it is stored locally on your computer, or it will download if it isn’t. Note that some these templates, such as the gift certificate pictured below are offered by third-party sites, so they may not all be free.
If you decide you want to purchase a third-party template, you will be provided with further instructions on how to do so.
After you pick a template, it will open as a new document, and you can fill it in and tweak it to your liking. We see here the template for the “Basic Resume.”
Note how Word will automatically fill in your name and the template provides instructions on how to use it. In reality, this template is really nothing more than a table (discussed in Lesson 3) with a Theme (discussed in Lesson 5) applied to it.
When you are done filling out the template, you can then save it as a new document. You can also take a template, make changes to it, and then save it as a new template. Let’s say for example, that you wanted to apply a different style to our “Basic Resume.” You’d simply need to open the template, affect the changes you want, and then save it as a new template.
There’s a whole lot to discover with templates. Best of all, you don’t have to worry about creating every single document on your own. Need a quick business card or invitations to your retirement party? Word templates make quick work of a lot of formatting headaches, leaving you time to actually design something you’ll be happy with!
Coming up Next…
That concludes our lesson for today, you should now have a fairly firm grasp on Word’s layout, tabs, margins, indents, fonts, and templates.
Tomorrow we’ll go over how to change the appearance and behavior of paragraphs on your pages, shading and borders, as well as introduce you to lists and all their various parts!
READ NEXT
- › BLUETTI Slashed Hundreds off Its Best Power Stations for Easter Sale
- › How to Adjust and Change Discord Fonts
- › This New Google TV Streaming Device Costs Just $20
- › HoloLens Now Has Windows 11 and Incredible 3D Ink Features
- › Google Chrome Is Getting Faster
- › The New NVIDIA GeForce RTX 4070 Is Like an RTX 3080 for $599
We are all familiar with Microsoft Word – it has been our go-to word processor for years. I’m sure all of you, at some point, have struggled with formatting a document in Microsoft Word. This post is for you.
These instructions and details are based on Word 2010 but they should work on older and newer versions as well.
Three Levels of Microsoft Word Formatting
The first trick is to begin to think like the enemy. The enemy in this case is Microsoft Word. We need to think about formatting the same way that the word processing program does. Humans might think of a document being built by letters that form words and words that form paragraphs and paragraphs that become larger documents. However, to Word, every document is comprised of three basic levels:
- Sections. Every Word document has one or more sections.
- Paragraphs. Every section has one or more paragraphs.
- Characters. Every paragraph has one or more characters.
While Word sometimes makes it seem like you are adding formatting to an entire page, what you are actually doing is applying formatting to one of these three levels.
Show Word’s Hidden Characters

To work with styles, it helps to see your document the way Word sees it. On the Home toolbar, click the Show/Hide button (it looks like a paragraph mark: ¶) to turn on Word’s hidden characters.
You’ll see that a lot of extra things show up in your document. In Word, every non-navigational key you press inserts a character in the document. Tabs, returns, spaces, and paragraph marks are all just characters in Word (even though they contain some extra information) and Word treats them like characters. You can select, move, copy, and delete them just like any other character, which actually explains a lot of the formatting weirdness that goes on in Word.
It can be a little disconcerting at first having all those characters visible, but seeing what’s going on in your document is essential to controlling formatting. You can always turn it off when you’re writing if you find it distracting.
You can also control exactly what hidden characters are revealed by going to File > Options > Display and selecting items in the Always show these formatting marks on the screen section.
The one important formatting element that turning on hidden characters doesn’t show you is where section breaks occur in your document. For that, you’ll need to switch over to draft view (View menu > Draft).
Take Control of Sections
Sections control document flow. All Word documents begin with a single section. This changes when you do one of several things:
- Insert a section break. You can create a new section manually by inserting a section break (Page Layout menu > Breaks). There are two basic types of section breaks. A continuous break starts a new section without starting a new page. A next page break starts a new section on a new page. You’ll also see two other section breaks available: odd page and even page. Those are really just next page breaks that force the new page to start with that page numbering.
- Change page formatting on specific pages. Remember, Word only sees sections. When you change formatting on a particular page or range of pages, Word creates a new section for those pages by automatically inserting section breaks on either side of them. Any page-level formatting you apply is really applied to that section.
The Paragraph Is A Special Character
The paragraph is the most important element in a Word document. Whether you successfully format a document or not ultimately depends on whether you understand how paragraphs work in Word. In Word, a paragraph is a paragraph mark (¶) plus all of the characters preceding that mark up to, but not including, the previous paragraph mark.
So why such emphasis on the paragraph mark? Because in Word, the paragraph mark is a special character. That mark actually contains information about formatting applied to the paragraph. Ever wonder why sometimes you copy a paragraph, paste it somewhere else, and the formatting doesn’t come with it? It’s because you didn’t also select the paragraph mark when you copied. It happens all the time when you click and drag to select text instead of just triple-clicking to select the whole paragraph. That’s why it’s important to have those hidden characters visible—so you know what you’re working with.
Organize and Apply Formatting By Using Styles
 A style is just a collection of formatting information that you can apply all at once. Styles are used every day in web design because they are powerful ways of keeping your formatting consistent and easy to apply. The same goes for styles in Word, especially if you can convince other people working on the document to use your styles instead of applying formatting directly.
Word’s Home menu shows a simple style menu where you can choose from the built-in Word styles. To show the real thing, click the Change Styles button to the right of those built-in styles.
There are two types of styles in Word:
- Paragraph Styles. These contain formatting that is applied to an entire paragraph. This includes formatting you might think of as belonging to a paragraph (like tabs, line spacing, borders, and indenting) as well as character formatting (like typeface, font size, and color). Paragraph styles are indicated by a paragraph mark.
- Character Styles. Character styles contain formatting that is applied to selected characters within a paragraph. Character styles can only include character formatting and if you apply a character style to a group of characters that also have a paragraph style applied, the character formatting overrides the paragraph formatting. Character styles are indicated by a stylized letter a.
First Prepare Your Document
It might sound counter-intuitive to most writers, but when it comes to Word, it helps to format and prepare your document before you ever add a single word to it.
There’s nothing nothing quite so frustrating as trying to fix section problems in Word or trying to fix an issue with styles after the fact.
Now, the more realistic way to approach this is to go ahead and write and just not worry about formatting at all. When you are ready to format, create a new document, prepare it using the tips we outlined above, and then copy your text over to the new document. Just remember to copy text into its new home as unformatted text and then apply all your styles to it.
Conclusion
There are many free online tutorials if you’d like to take this one or two steps further. You can begin by looking at How to Geek School – a pretty cool how-to website.