
Word automatically generates a bibliography from the sources you used to write your paper. Each time you add a new citation to your document, Word adds that source so that it appears in the bibliography in the proper format, such as MLA, APA, and Chicago-style.
Add a citation after a quote
-
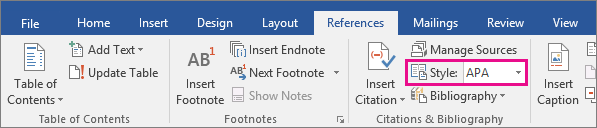
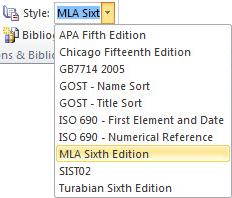
On the References tab , in the Citations & Bibliography group, click the arrow next to Style.

-
Click the style that you want to use for the citation and source.
-
Click at the end of the sentence or phrase that you want to cite.
-
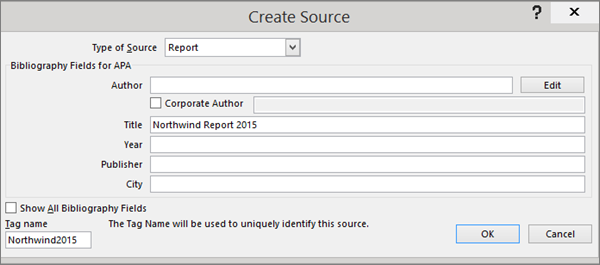
Click Insert Citation and then select Add New Source.
-
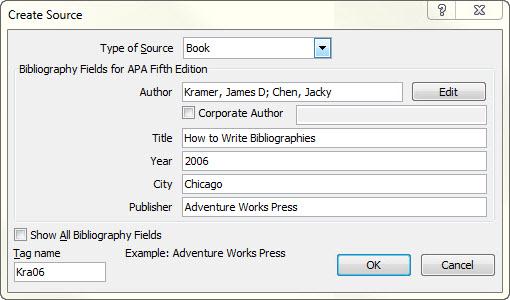
In the Create Source box, type in the citation details, and then click OK.
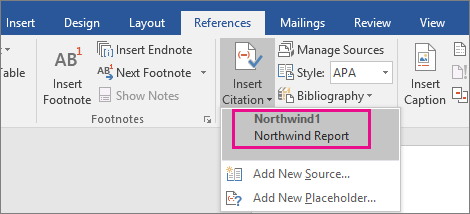
When you’ve completed these steps, the citation is added to the list of available citations. The next time you quote this reference, you don’t have to type it all out again, just click Insert Citation and select the citation you want to use.
Important: APA and MLA can change their formats, so you’ll want to ensure that these format versions meet your requirements. You can create your own updated version of a style or build custom styles. For more information see Bibliography & Citations 102 – Building Custom styles.
Create a bibliography from your sources
If you want to create a bibliography from your sources, do the following:
-
Click where you want to insert a bibliography. Typically, they are at the end of a document.
-
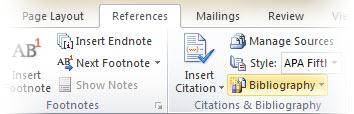
On the References tab, in the Citations & Bibliography group, click Bibliography.
Similar to the Table of Contents builder in Word, you can select a predesigned bibliography format that includes a title, or you can just click Insert Bibliography to add the citation without a title.
If you want to learn more about using citation placeholders and editing sources, take a look at Create a bibliography. Or, if you want to export your bibliography sources to another computer, check out this post on the Microsoft Word blog.
APA 6th Edition citation style fix procedure.
APA style uses the author’s name and publication date. If you have multiple citations from the same author, there is a known Word bug where the citation generator fills in the publication title when it’s not supposed to. If this happens to you, here’s how to fix the problem:
-
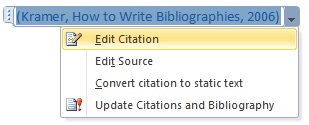
In the Word document, click the citation.
-
Click the down-arrow, and then click Edit Citation.
-
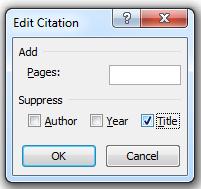
Click the Title checkbox, and then click OK.

APA and MLA can change their formats, so you’ll want to ensure that these format versions meet your requirements. You can create your own updated version of a style or build custom styles. For more information see Bibliography & Citations 102 – Building Custom styles.
If you are using the APA 5th Edition citation style, there’s one issue you should be aware of. APA style uses the author’s name and publication date. If you have multiple citations from the same author, there is a known Word 2010 bug where the citation generator fills in the publication title when it’s not supposed to. If this happens to you, see the section entitled, ‘APA 5th Edition citation style fix procedure below.
Add a citation after a quote
-
In your Word document, click on the References tab in the Ribbon.
-
In the Citations & Bibliography group, click the arrow next to Style.
-
Click the style that you want to use for the citation and source.
-
Click at the end of the sentence or phrase that you want to cite.
-
Click Insert Citation and then select Add New Source.
-
Type in the citation details and then click OK.
When you’ve completed these steps, the citation is added to the Insert Citation button, so the next time you quote this reference, you don’t have to type it all out again.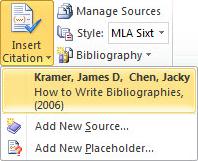
Create a bibliography from your sources
If you want to create a bibliography from your sources, do the following:
-
Click where you want to insert a bibliography. Typically they are at the end of a document.
-
On the References tab, in the Citations & Bibliography group, click Bibliography.
Much like the Table of Contents builder in Word, you can select a predesigned bibliography format that includes a title or you can just click Insert Bibliography to add the citation without a title.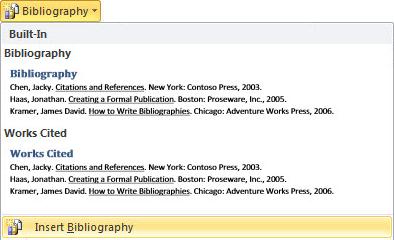
If you want to learn more about using citation placeholders and editing sources, take a look at Creating a bibliography in Word 2010. Or if you want to export your bibliography sources to another computer, check out this post on the Microsoft Word blog.
APA 5th Edition citation style fix procedure
APA style uses the author’s name and publication date. If you have multiple citations from the same author, there is a known Word 2010 bug where the citation generator fills in the publication title when it’s not supposed to. If this happens to you, here’s how to fix the problem:
-
In the Word document, click the citation.
-
Click the down-arrow and then click Edit Citation.
-
Click the Title checkbox and then click OK.
You can’t automatically generate citations in Word Online. Word Online preserves the bibliography in your document, but it doesn’t provide a way to create one.
Instead, if you have the desktop version of Word, select Open in Word to open the document.

Then follow the steps for Word desktop.
When you’re done and you save the document in Word, you’ll see the table of contents when you reopen the doc in Word Online.
Introduction: Formatting APA Style in Microsoft Word 2013
Formatting a paper in APA style can be tricky, so I have created this step-by-step guide on how to format APA correctly, from the title page to the reference section, using Microsoft Word 2013.
Step 1: Font, Spacing, and Margins
To begin with, the entire paper should be double-spaced and written in a highly readable 12-point font, preferably Times New Roman. There should also be 1-inch margins on all sides of the document.
To create 1-inch margins, you will:
- Click the Page Layout tab.
- In the Page Setup section, click on «Margins.» Choose the first option, which is to create 1-inch margins on all sides of the paper.
To double-space the paper, you will:
- Highlight any text that you have typed thus far (skip this step if you have not begun yet).
- Click the Home tab or the Page Layout tab.
- In the Paragraph section of either of those tabs, click the tiny arrow in the bottom right corner. A paragraph page will pop up. Click the arrow under «Line Spacing,» and Choose «double.»
To correct the font, you will:
- Highlight any text that you have typed thus far (skip this step if you have not begun yet).
- Click the Home tab.
- In the Font section of this tab, click the arrow next to the name of the font you are currently using, and then scroll down to choose Times New Roman (or another easily readable font).
- In the same section, click the arrow next to the size of the font, and choose 12.
Step 2: Running Head for the Title Page
At this point, you may want to add the header and page number (although you can perform this step at any point). This might be the most intimidating portion in the process, but it is simple once you become familiar with a few basic steps.
To add a header to the first page:
- Begin on the first page, which will be the title page.
- Click the Insert tab.
- In the Header and Footer section, click on «Header,» and choose the first option.
- A special Header and Footer Toolbar will then appear. Within this Toolbar, go to the Options section, and check the box next to «Different First Page.» This needs to be done because the header for the title page will be different than the header for the rest of the document.
- Click inside of the brackets in the upper left-hand corner, and type the words «Running head» (without quotations), followed by a colon and a shortened or full version of the title of your paper (up to 50 characters in length). This abbreviated title should be written in all caps. The following is an example: Running head: OPENING UP SCIENCE
- Remain in the the Header and Footer Toolbar for the next set of steps.
Step 3: Page Number for the Title Page
To add a page number to the first page:
- Be sure that you are in the Header and Footer Toolbar (double-click on the running head you just made to return to it if you are not).
- Begin with your cursor at the end of the running head you just typed.
- Click the tab button on your keyboard twice.
- In the Header and Footer section at the far left of the Header and Footer Toolbar, click on «Page Number,» and scroll to the fourth option, «Current Position.» Choose the first option, «Plain Number,» in the list that appears. The number 1 will then appear in the top left corner of your title page.
Step 4: Header and Page Number for the Rest of the Pages
To add a header and page number to the rest of the pages:
- Go the the second page of your paper.
- Be sure that you are in the Header and Footer Toolbar. If you have left this toolbar, then there should still be a set of brackets in the upper left-hand corner of the second page with the words «Type Here» between them. Double click on these brackets, and then you will be back in the Header and Footer Toolbar.
- Type the header that will be added to the rest of the paper. It will be the same abbreviated, all-caps title from the title page, except this time, you will not include «Running head:» before it. The following is an example: OPENING UP SCIENCE
- To add the rest of the page numbers, start with your cursor at the end of the header you just typed.
- Click the tab button on your keyboard twice.
- In the Header and Footer section at the far left of the Header and Footer Toolbar, click on «Page Number,» and scroll to the fourth option, «Current Position.» Choose the first option, «Plain Number,» in the list that appears. The number 2 will appear in the top left corner of the page, and the numbering will continue consecutively throughout the paper.
- On the far right of the Header and Footer Toolbar, there is a button to click so that you can exit the Header and Footer Toolbar and continue writing your paper.
Step 5: Title Page
The first step to creating your title page is to add the running head and the page number, which is discussed in the previous step.
There are still a few other components to the title, which include:
- The full title
- The author(s)’s name(s)
- The institution the author(s) are from (usually a college or university)
- An optional author note
To format the title, name(s), and institution name, there are a few easy steps to follow:
- If it is easiest for you, start typing the text in left alignment (the default). List the full title of your paper, which should be no more than twelve words, should have no abbreviations, and should not include any words that are not completely necessary. On the very next line, list the names of all the authors involved with the writing of the paper. On the third line, list the name of the institution.
- Place the cursor before the very first letter in this group of text, and press the enter key approximately 2-4 times (the exact placement is up to you). It is only important that the text remain in the top half of the page.
- Highlight all of this text. Click the Home tab. In the Paragraph section of this tab, click the icon which is a picture of lines that represent centered text (it will be the second one from the left). This will center the text.
Optionally, you can include an author note in the bottom half of the page. Most professors do not require this, however. The 6th edition of the APA manual specifies that the author note should include four paragraphs (each with its own indent) under the centered title «Author Note.» Each of the four paragraphs should correspond to the following information in the following order:
- Complete departmental information
- Changes in affiliation
- Acknowledgements and special circumstances
- Person to contact with mailing address, e-mail
Step 6: Abstract
Some professors do not require an abstract page, especially for papers that do not describe an actual study. If they do require it, however, the abstract will be on its own separate page immediately after the title page. The title «Abstract» will be centered at the top and will be followed by a non-indented paragraph of 150-250 words. This paragraph will fully summarize your study or research paper, including any findings. Optionally, you can add a list of keywords immediately under the abstract. To do this, you will begin a new line under the abstract; press the tab key on your keyboard once; click the crooked «I,» the italics icon, between the «B» and the «U» in the Font section of the Home tab; type the word «Keywords«;click the italics icon again to undo the italics; type a colon; and list any key words from your abstract, separated by commas, on the same line.
Step 7: Body of Paper
The first page of the main body of the paper will begin with the full title of the paper centered at the top of the page. The title will not be in bold, and it will serve as the head of the introduction of the paper.
You may include subsequent subheadings that will usually be centered and in bold throughout the paper. To bold text, you will highlight the text that needs to be in bold, click the Home tab, and click the thick «B» in the Font section.
One of the more complicated tasks in writing the paper is doing in-text citations correctly. Here are a few rules to consider as far as this is concerned:
- General rules
- You generally want to include three pieces of information: the author(s)’s last name(s), the date, and the page numbers, if applicable.
- If the author’s name is mentioned in the sentence, their name does not have to also appear in the citation at the end of the sentence (the same goes for the date).
- An in-text citation with all three pieces of information looks like this: (Schmidt, 2012, p. 30)
- Specific rules
- Author(s)’s name(s)
- If the author is unknown, then an abbreviated version of the article title can be substituted, in quotation marks. Example: («Welcome,» 2014)
- If there are two authors, the in-text citation will look like this: (Wilbanks & Boyle, 2006).
- If there are three to five authors, then, in the first in-text citation, all of their names must be spelled out, like this: (Shere, Zhao, & Koren, 2014). You may then write subsequent in-text citations from the same source like this: (Shere et al., 2014).
- If there are more than five authors, you can omit the previous rule about spelling all of the names out the first time and write all in-text citations like this: (Khatib et al., 2011).
- Date
- If the date is not available, as is the case with many webpages, then the initials n.d. will be substituted for the year in the in-text citation, as such: («Crowdsourcing,» n.d.)
- Page numbers
- All quotations must be cited using page numbers if possible, but page numbers are optional, though encouraged, for citing paraphrased material.
- If there are no page numbers, and you are citing a direct quotation, you should find an alternative way to direct the reader to the specific spot in the text, such as by counting the paragraphs. Example: (Khatib et al., 2011, para. 1)
- If multiple pages are being cited, then it will look like this: (Schmidt, 2012, pp. 30-33).
- Author(s)’s name(s)
Step 8: References
The reference section for you paper will begin on an entirely new page. It will begin with the word «Reference» (no quotation marks), which will be centered at the top.
The entries will be in alphabetical order, with a hanging indent. The procedure for doing a hanging indent is as follows:
- Begin each entry on a separate line.
- Once you have written all of the entries, highlight the text.
- Click either the Home tab or the Page Layout tab.
- In the Paragraph section of either of these tabs, click the tiny arrow in the bottom left corner; this will bring up a small Paragraph page.
- In this page, go to the indentation section, and click the arrow under the word «Special.» Choose the option «hanging indent.» This will automatically add a 0.5-inch hanging indent to every highlighted entry in the reference section.
To conclude, here are examples of how to format some of the most common reference entries:
- Books in print
- Fish, S. (2011). How to write a sentence and how to read one. New York, NY: HarperCollins.
- Journal articles
- Fox, J. (2012). Can blogging change how ecologists share ideas? In economics, it already has. Ideas in Ecology and Evolution, 5, 74-77. doi: 10.4033/iee.2012.5b.15.f
- Articles in online periodicals
- Bryce, E. (2012, October 24). Insights into the koala’s genetic challenge. The New York Times. Retrieved from http://nytimes.com
- Short works from websites
- Bert, A. (2014, Feb 25). How to use social media for science. Retrieved from http://www.elsevier.com/connect/how-to-use-social-media-for-science
Step 9: Take a Break!
Eat a cookie.
Be the First to Share
Recommendations
Proper formatting is an essential part of any manuscript. This article will show you a detailed approach in formatting a manuscript using the American Psychological Association (APA) system. It will cover the general rules and specific guidelines for the APA body format.
Table of Content
- 1 What is the APA style?
- 2 General Rules
- 3 Sections of the APA Format Paper
- 3.1 Title page
- 3.2 Abstract
- 3.3 Body
- 3.4 Reference List
- 3.5 Footnotes
- 3.6 Appendices
- 3.7 Additional Insights
What is the APA style?
This formatting style, developed in 1929 by the American Psychological Association (APA), is most widely used in writing academic papers in different fields, especially the social sciences. If you are already accustomed to other formatting and referencing styles such as Chicago or MLA, that’s great. However, it is strongly recommended that you also get a good grip of APA formatting rules for some professors will surely require you to use these.
If you’re preparing to enter the university or getting ready for a social science subject and want to know more about APA formatting, you can read on for more substantial information that might come in handy.
General Rules
Basics:
In writing an academic paper in APA format, you have to use an 8.5 x 11 inch paper and make sure that it has a 1 inch margin on all sides. Also, the contents of your paper must be typed using Times New Roman with a font size of 12 and should always be double-spaced.
In every page, the title of your paper must be included in the left part of the header and the page number in Arabic numeral on the right. If your title has more than 50 characters, make a shorter version of it and use that shorter title for your header.
Margins and Font
- Use one inch margin on all sides of every page, and Times New Roman with 12-point font size.
Spacing
- All parts of the paper should be double spaced. Leave one space after a comma, colon, or semi-colon and two spaces after a period.
Alignment and Indention
- Align the text to the left and indent the first line of every paragraph by 5-7 spaces.
Running head and pagination
- The running head or the short version of the title appears on the first line of every page, flushed left and written in uppercase letters. It should be less than 50 characters in length including punctuations and spacing.
- In line with the running head is page number, which is located one inch from the right edge of the paper.
- The title page, abstract, body, references, footnotes, and appendices begin on a new page.
Headings
- The heading for each part (e.g. Title Page, Abstract, References, Footnotes, Appendix or Appendices) is aligned at the center in the first line below the running head.
Sequence
- The paper starts with the title page followed by the abstract, body of the paper, references, footnotes, and appendices (abstract, footnotes, and appendices are not always required in a document).
Sections of the APA Format Paper
Sections required for every APA paper: title page, abstract, body, reference list, footnotes and appendices
Title page
The first part of your paper is obviously the title page. On this page, you must type the title of your paper, your name, ID number, course title, school, and name of the professor. Don’t forget to have them centered on the page. For a detail explanation visit our guide on the APA title page.
As previously mentioned, every page must have a shorter version of the title and a page number. The only difference with the other pages is that for the title page, you would need to type “Running head: ” before the short title.
Elements: Running head, Title, Author byline, Institutional affiliation, Author note
Format:
- The title page begins at page one.
- Ideally, the title should not exceed 12 words.
- All elements are written in lowercase and uppercase letters, and are aligned at the center of the page.
- The title comes first and next lines contain the author byline, institutional affiliation and author note.
Abstract
After making the title page, the next page should contain the Abstract. Simply put, this is a summary of your whole paper and must only be composed of 150-250 words. Have the word “Abstract” centered on the page and the write-up itself should not be indented.
Content: One paragraph summary of the paper with 150 to 250 words
Format:
- The body of the abstract is in block format (no indention).
- Numbers are generally written in digits except those at the beginning of a sentence.
Body
The body of a paper is usually composed of an Introduction, Review of Related Literature, Method, Results, Discussion, and Conclusion and Recommendations. However, these may vary depending on the requirement of your professor. For example, some professors won’t require a separate chapter for the Review of Related Literature and would instead ask you to incorporate that into the Introduction and Discussion.
Just remember that all headings must be in bold and the first letter of each word should be capitalized except for the articles, conjunctions and prepositions. Also, you should have all first-level headings centered on the page and all second-level headings aligned to the left.
Content: Main part of the paper
Format:
- The heading of each subsection (e.g. Method, Results, Discussion) of the body is written in bold, aligned at the center, and with uppercase and lowercase letters.
- Subsequent headings and subheadings follow specific formatting rules for each level.
Reference List
Proper referencing is one of the most important parts of the APA paper format. As you write the main content of your paper, you will notice the need for citing sources. You can’t just make a statement and then tell people that it’s based on your common sense. No matter how simple it is the right way to do it is either to get some data from your results that might explain your claim or just support your statement with previous findings of experts.
There are several citation guidelines that need to be followed but normally, you just have to type the last name of the author, insert a comma, type the year of publication, and then enclose these in a parenthesis. This should be located at the end of the sentence before the period.
Whenever you write an in-text citation as mentioned above, make sure that you take note of these citations and include them in the reference list. So for instance, if you have 10 different in-text citations in the body of your paper, your reference list must have 10 entries as well.
Again, certain rules must be followed for each type of reference. In general, the sources listed in the reference list are composed of the last name of the author/s with the first letter of their first name, year of publication, title that is italicized, and place of publication. They should be alphabetized and presented with the first line of the reference aligned to the left and the next lines indented.
Content: Reference list
Elements: The main elements and specific format depend on the nature of the reference (e.g. books, non-print materials, online sources)
Format:
- All entries are listed in alphabetical order based on the last name of the author or title of the reference
- After the first line, indent the next lines by 5-7 spaces (hanging indention)
Footnotes
Content: Additional information to support the some parts of the manuscript.
Format:
- Each footnote is identified by a number in superscript that appears in the text.
- The first line of each footnote is indented by 5-7 spaces.
Appendices
Content: Complex data or information that is too cumbersome to include in the body of the paper.
Format:
- For more than one appendix, the heading “Appendix” should be accompanied by capital letters A, B, C and so forth (e.g. Appendix A, Appendix B, Appendix C).
- Indent the first line by 5-7 spaces.
Additional Insights
Aside from the fact that APA formatting can standardize the presentation of academic papers, APA paper format can also prevent you from being accused of plagiarism. Institutions consider plagiarism as a major offense and you could get penalized because of this. In order to avoid this, make sure that you give proper credit to the authors by strictly following the citation rules.
There are some cases wherein some students do not intentionally plagiarize but because of their negligence, they get into this kind of trouble. You probably have heard this a thousand times from your mom, but please try to be responsible and organized.
Another good thing about APA formatting is that it can add credibility to your study by presenting findings of experts that support your ideas and allow you to present the key points in a comprehensible manner.
Although Wikipedia is the most convenient way to get some information, it is really not a great idea to cite this in your paper. Exert some effort and make use of your school library to get scholarly books or peer-reviewed journals. Another winning tip, there are also online databases where you can get access to valid sources from the comfort of your own home. Using APA as a formatting style may be confusing at first but with constant practice and exposure, you will surely be able to master this in no time.
You can format Word to the requirements for American Psychological Association (APA) format. The Publication Manual of the American Psychological Association specifies the format for typeface, line spacing, margins, line length and alignment and order of manuscript pages. These formatting specifications can be set in Word. It is easier to type your manuscript in APA format from the beginning, however, you can convert the manuscript from Word formatting to APA formatting.
Formatting Type Face
Format type face. Click on «Format» at the top of the Word document. Click «Font» on the drop-down list.
Place «Times New Roman» under Font, «Regular» under font style, and 12 under size.
Make sure the font color is set at «Automatic» and the underline style is set to «None.»
Click on «Character Spacing» and make sure that scale is 100 percent, spacing is «Normal» and position is «Normal.»
Click on «Text Effects» and make sure it is set at «None.»
Alignment, Spacing and Margins
Set alignment. Click on «Format,» then click on «Paragraph» on the drop-down list. Set alignment for «Left.»
Set line spacing for «Double.» Double space everything in the text, title, headings, references and quotations.
Format margins. Click on «File,» then click on «Page Setup.» Set margins at top, bottom, left and right for one inch and orientation to «Portrait.»
Compose a running head (an abbreviated title) for your manuscript.
Insert running head. Click on «View» and then on «Header and Footers.»
Type the running head in the header space, then click on page number. The header will be automatically left-justified. Type the running head in all uppercase letters with a maximum of 50 characters.
Paragraphs and Indentation
The default setting in Word will indent the first line of every paragraph five to seven spaces or a half inch.
Center the title, author and institution on the title page with the running head at the top. Highlight title, author and institution, then click «Format,» click «Paragraph» from the drop-down list and set alignment to «Centered.»
Put the abstract on a separate page (page 2) and do not indent it.
Things You’ll Need
- Publication Manual of the American Psychological Association, Sixth edition
- Manuscript
There are pricey software programs available that will do this type of formatting for you, but with a little effort on your part you can bypass the price tag and do it on your own for free! This tutorial will cover how to set MS Word to check for grammar and style that is specific to APA (such as the oxford comma, checking for passive voice, etc). I did this in MS 2010 but the 2003 and 2007 versions can do this as well. You can also download the free APA template I created.
Page Layout
- First you need to set your margins, font etc. Since there are many tutorials that teach this I skipped that part. I recommend Zane State College’s APA Guide. It will teach you how to:
Change font face and size
Set 1″ margins
Double-space
Indent
Add a running head & page numbers
Format a title page
Format an abstract
Format a reference list (hanging indent)
Grammar and Style
- From the “File” menu click on “Options:”

- Next click on “proofing.” Under the “When correcting spelling and grammar in Word” menu on the proofing page select “grammar and style.” Then click on “settings:”

- In the Grammar Settings dialog box select “always” for “Comma required before last list item” (otherwise known as the serial or oxford comma), “inside” for “Punctuation required with quotes,” and 2 for “spaces required between sentences” (this is an APA suggestion you can choose 1 if you’d like):

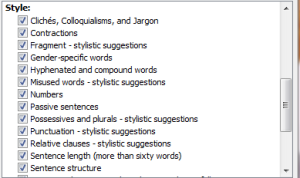
- On the Grammar and style portions check every box in the list:

Heading Styles
- Word has built in heading styles that you can modify according to APA. From the Home menu select the little arrow in the bottom right of the “Styles” box:

- You should see a floating box that says “Styles,” at the bottom of that box click “Options:”

- From the “Select styles to show” select “All styles:”

- Now you should see all the heading style options in the “Styles” menu. Click on the drop down menu on “Heading 1” and click on “Modify:”

- You will now see a “Modify Style” window. Change it to Times New Roman, size 12, black, centered, and boldface:
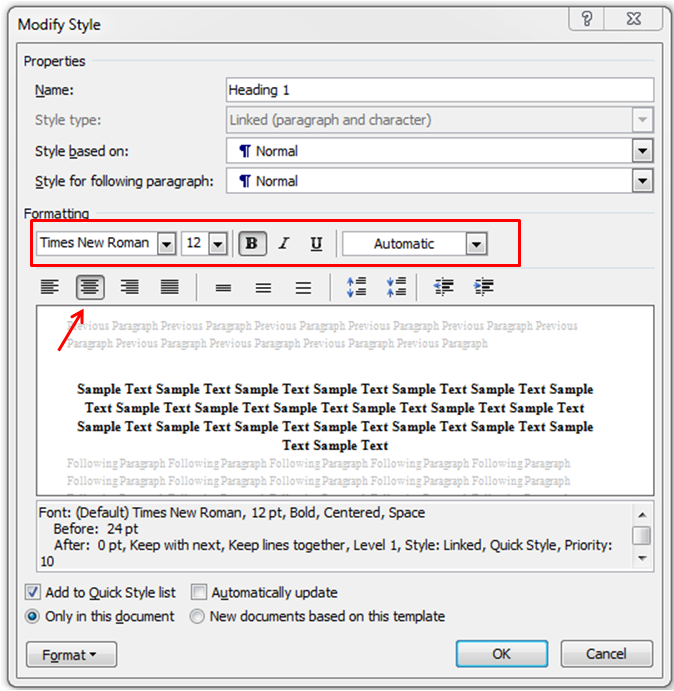
- Do this for headings 1-5 according to APA guidelines
Save Your Template:
- Title your paper something you’ll remember (I titled mine APA). From the drop down menu select “Word Template:”

And you’re done! Any time you need to write a paper in APA open your saved template and get to writing! When you save your new paper make sure to select “save as” rather than “save” so you don’t overwrite your template.
Published
April 4, 2013April 20, 2018