
Word for Microsoft 365 Word for Microsoft 365 for Mac Word 2021 Word 2021 for Mac Word 2019 Word 2019 for Mac Word 2016 Word 2016 for Mac Word 2013 Word 2010 Word 2007 More…Less
After you have created a table of contents in Word, you can customize the way it appears. Customizing your table of contents applies your preferences to your existing table. Like what you see, select OK. If you’re not happy with the look, just select Cancel and all changes are forgotten. Your table of contents will still be there.
To customize your existing table of contents:
-
Go to References > Table of Contents.
-
Select Custom table of contents.
-
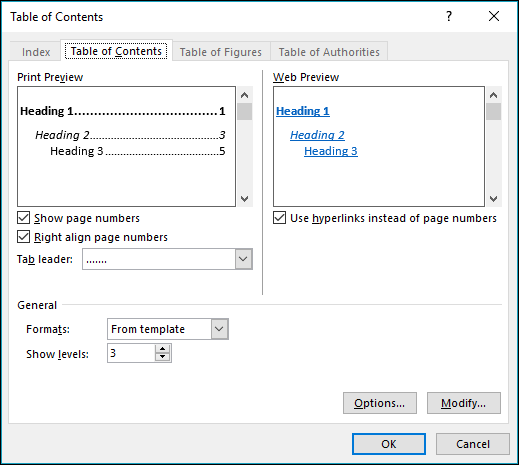
Use the settings to show, hide, and align page numbers, add or change the tab leader, set formats, and specify how many levels of headings to show. For more info, see Custom table of contents .
-
Go to References > Table of Contents > Custom Table of Contents.
-
Select Modify. If Modify is grayed out, change Formats to From template.

-
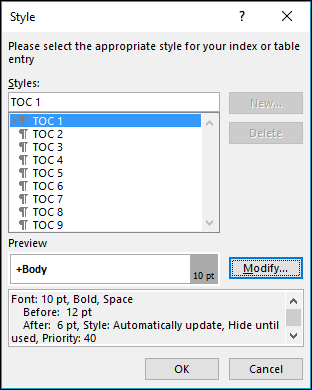
In the Styles list, click the level that you want to change and then click Modify.
-
In the Modify Style pane make your changes.
-
Select OK to save changes. Repeat steps 3 and 4 for all the levels that you want to display in your table of contents.
To customize your existing table of contents:
-
Go to References > Table of Contents.
-
Select Custom table of contents.
-
Use the settings to show, hide, and align page numbers, add or change the tab leader, set formats, and specify how many levels of headings to show.
-
Go to References > Table of Contents > Custom Table of Contents.
-
Select Modify. If Modify is grayed out, change Formats to From template.
-
In the Styles list, click the level that you want to change and then click Modify.
-
In the Modify Style pane, make your changes.
-
Select OK to save changes. Repeat steps 3 and 4 for all the levels that you want to display in your table of contents.
To customize your existing table of contents, or create a new table:
-
Go to References>Table of Contents>Insert Table of Contents.
-
If you’ve already got a table of contents, customizations will be applied. If not, this will insert a new customized table.
-
Use the settings to show, hide, and align page numbers, add or change the tab leader, set formats, and specify how many levels of headings to show. For more info, see Custom table of contents .
-
Go to References > Table of Contents > Insert Table of Contents.
-
Select Modify. If Modify is grayed out, change Formats to From template.
-
In the Styles list, click the level that you want to change and then click Modify.
-
In the Modify Style pane make your changes.
-
Select OK to save changes. Repeat steps 3 and 4 for all the levels that you want to display in your table of contents.
Do you have a question about Word that we didn’t answer here?
Post a question on the Word Answers forum.
Need more help?
Want more options?
Explore subscription benefits, browse training courses, learn how to secure your device, and more.
Communities help you ask and answer questions, give feedback, and hear from experts with rich knowledge.
Для того чтобы отформатировать текст в ячейке таблицы, его необходимо выделить, поместив текстовый курсор в конец строки, нажав левую кнопку мыши и переместив ее указатель в начало строки. После этого можно изменять расположение текста относительно границ ячейки нажатием кнопок По левому краю, По правому краю, По центру или По ширине в панели форматирования Word, изменять размер, цвет или начертание шрифта, выделять его полужирным начертанием или наклонным теми же способами, что и обычный текст (см. предыдущую главу).
Если у вас намечается конференция, семинар или презентация в которых будут участвовать иностранные граждане, то вам понадобится синхронный перевод. Агентство переводов «Прима Виста» осуществляет синхронный перевод в Москве. Синхронный перевод — один из наиболее сложных переводов, который требует специального оборудования, с помощью которого переводчик-синхронист переводит речь, затем уже переведенную речь можно записать в текстовый файл и отредактировать.
Можно выполнять операции форматирования с целыми строками или столбцами таблицы, для чего их предварительно следует выделить. Например, если вы хотите, чтобы в первой строке таблицы, где располагаются заголовки колонок, текст располагался в центре ячеек и был отформатирован полужирным шрифтом, выделите строку таблицы (для этого поместите текстовый курсор в первую ячейку строки, нажмите клавишу Shift и щелкните мышью по последней ячейке строки), после чего нажмите кнопки Полужирный и По центру в панели форматирования Word.
Как отформатировать текст в таблице? Если у вас возникла необходимость настроить форматирование текста в ячейке более точно, например выровнять текст по нижней границы ячейку, щелкните внутри ячейки правой клавишей мыши, в появившемся меню выберите пункт Выравнивание в ячейке, после чего щелкните мышью на одном из пунктов предложенного списка.
Как добавить столбцы или ячейки в таблицу? << >> Как изменить направление текста в таблице?
Форматирование текста в таблице
Перед
тем как форматировать текст в ячейках
таблицы, их надо предварительно выделить.
-
Для
выделения всей таблицы необходимо
нажать на перекрестие, расположенное
у верхнего левого угла таблицы. -
Для
выделения строки необходимо сделать
щелчок в поле документа, расположенного
левее выделяемой строки. -
Для
выделения столбца необходимо щелкнуть
у верхней границы выделяемого столбца
(при этом курсор приобретает вид жирного
указателя). -
Выделить
несколько соседних ячеек можно протяжкой
мыши при нажатой клавише Shift. -
Выделять
ячейки в произвольном порядке можно
протяжкой мыши при нажатой клавише
Ctrl.

Кроме
того, можно воспользоваться кнопкой
«Выделить», расположенной на ленте
«Макет» контекстного инструмента
«Работа с таблицами».

Само
же форматирование текста в выделенных
ячейках таблицы ничем не отличается от
форматирования обычного текста документа.
Тонкие
настройки таблицы (параметры строк,
столбцов, ячеек) можно произвести в окне
«Свойства таблицы», которое
открывается кнопкой «Свойства» на
панели «Таблица».

Word
2007 представляет большой выбор уже
готовых вариантов форматирования
таблиц. Все они расположены на панели
«Стили таблиц».
Панель
«Параметры таблиц» позволяет
устанавливать дополнительные параметры
форматирования в дополнение к уже
готовым стилям.

Три
нижних пункта меню в окне списка таблиц
позволяют очищать, изменять и создавать
форматирование таблиц

При
создании нового (изменении существующего)
стиля таблицы, как правило, указываются
следующие параметры:
-
имя
стиля; -
стиль;
-
стиль,
на основе которого создается новый; -
указывается
часть таблицы, к которой будут применены
параметры форматирования.

Для
доступа к дополнительным параметрам
настройки служит кнопка «Формат».
Для
настроек границ таблицы служит кнопка
«Границы». Из ее контекстного меню
можно выбрать различные типы границ.

При
помощи кнопки «Заливка» можно
изменить цвет заливки ячеек таблицы.
Инструменты,
расположенные на панели «Нарисовать
границы», позволяют добавлять/убирать
границы ячеек таблицы (объединять,
разъединять ячейки), а также позволяют
произвести гибкие настройки границ.

Для
вставки и удаления элементов таблицы
предназначены инструменты панели
«Строки и столбцы» контекстной
ленты «Макет».

Ранее
был рассмотрен вопрос построения сложных
таблиц , где рассматривался вариант
«рисования» таблицы. Существует
еще один способ достичь того же результата
— воспользоваться инструментами панели
«Объединить».

Инструменты
панели «Размер ячейки» позволяют
произвести точные настройки размеров
для любой ячейки таблицы.

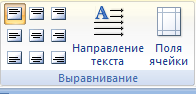
Инструменты
панели «Выравнивание» предназначены
для выравнивания текста в ячейках,
задания его направления и установки
полей в ячейках.
Иногда
таблица может не умещаться целиком на
одну страницу. В этом случае принято на
каждой новой странице повторять «шапку»
таблицы. Для этого надо выделить строку
(строки) таблицы, которые будут выступать
в качестве заголовка. Затем нажать
кнопку «Повторить строки заголовков»
на панели «Данные».

Соседние файлы в предмете [НЕСОРТИРОВАННОЕ]
- #
- #
- #
- #
- #
- #
- #
- #
19.02.201623.55 Кб23Вычисления.docx
- #
- #
- #
Create, Modify and Apply Table Styles in Word Documents
by Avantix Learning Team | Updated August 21, 2022
Applies to: Microsoft® Word® 2013, 2016, 2019, 2021 or 365 (Windows)
You can apply table styles to your Word tables to format them quickly and consistently. Word is shipped with several built-in table styles or you can create your own. You can edit table styles by modifying borders, shading, character formatting, paragraph formatting and table properties. If your document includes multiple tables, table styles can save a lot of time.
Note: Buttons and Ribbon tabs may display in a different way (with or without text) depending on your version of Word, the size of your screen and your Control Panel settings. For newer versionns of Word, Ribbon tabs may appear with different names. For example, the Table Tools Design tab may appear as Table Design.
Recommended article: How to Keep a Microsoft Word Table Together on One Page
Do you want to learn more about Microsoft Word? Check out our virtual classroom or live classroom Word courses >
Table styles and themes
Every Word document uses a document theme which includes a font theme and color theme. The colors used in table styles are based on the color theme.
You can select document themes, color themes and font themes using the Themes, Colors or Fonts drop-down menus on the Design tab in the Ribbon:

You can also create your own custom color themes so your tables can be formatted using your organization’s colors.
Display gridlines
When you are working with tables, it’s a good idea to turn gridlines on. Borders, which are a format, will print. Gridlines do not print.
To display gridlines:
- Click in a table.
- Click the Table Tools Layout or Table Layout tab.
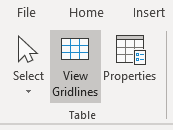
- Click View Gridlines. Gridlines will stay on for all Word documents.
View Gridlines appears on the Table Tools Layout or Table Layout tab when you click in a table:
Apply a table style
If your Word document contains multiple tables that you want to format in a consistent way, it’s best to use table styles rather than applying manual or direct formatting to each table.
To apply a table style to a table:
- Click in the table.
- Click the Table Tools Design or Table Design tab in the Ribbon.
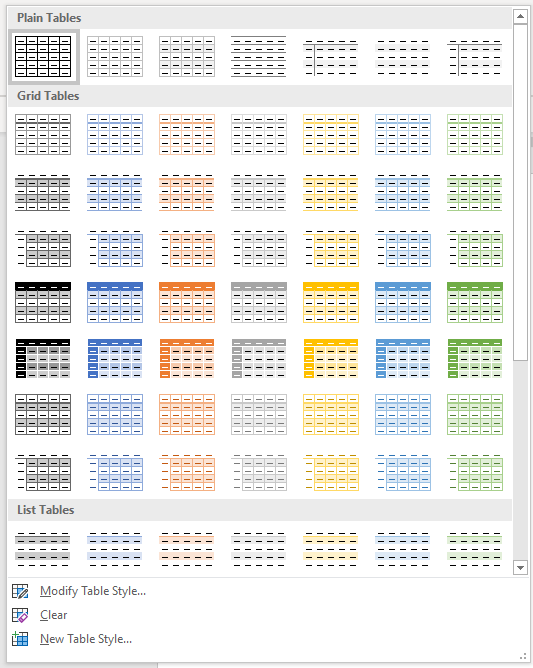
- Click the More down arrow on the bottom right in the Table Styles gallery. A drop-down menu appears.
- Hover over the various table styles. The table formatting will change as you move over different table styles in the gallery.
- Click the table style you want to apply.
Below is the Table Styles gallery (the current theme is the Office theme):
Note: Table styles do not include row height, column width or custom cell formatting for individual cells. If a user applies manual or direct formatting to a table (such as fills and borders) on the Table Tools Design or Table Design tab, this formatting will override the table style.
Apply Table Style Options
Once you have selected a table style, you can select or check different Table Style Options (which are affected by the formats in the selected table style).
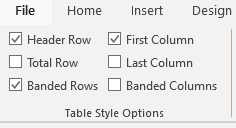
The six Table Style Options that you can apply are: Header Row, Total Row, Banded Rows, First Column, Last Column and Banded Columns. If you have selected a plain table style, you may not notice any changes in the table formatting if you select different Table Style Options.
Table Style Options appear on the Table Tools Design or Table Design tab as follows when you click in a table:
To select Table Style Options:
- Click in the table.
- Click the Table Tools Design or Table Design tab in the Ribbon.
- In Table Style Options, check or uncheck Header Row. If this option is checked, the header row will be formatted differently from the body rows.
- In Table Style Options, check or uncheck Total Row. If this option is checked, the last row will be formatted differently from the body rows.
- In Table Style Options, check or uncheck Banded Rows or Banded Columns for alternate row or column shading.
- In Table Style Options, check First Column or Last Column if you want the first or last column formatted differently from the other columns.
In the following table, Header Row and Banded Rows are checked in Table Style Options:

Modify a table style
You can modify a table style in a Word document and all tables using that table style will change.
To modify a table style:
- Click in the table.
- Click the Table Tools Design or Table Design tab in the Ribbon.
- Click the More down arrow on the bottom right in the Table Styles gallery. A drop-down menu appears.
- Click Modify Table Style. A dialog box appears. You can also right-click a table style and select Modify.
- From the Apply Formatting to drop-down menu, select the element that you want to modify (such as Header row).
- Select the desired formatting such as font, font size, font color, fill and border.
- From the Apply Formatting to drop-down menu, select the next element that you want to modify.
- Select the desired formatting such as font, font size, font color, fill and border.
- Repeat for other elements.
- Select Only in this document or New documents based on this template. If you select Only in this document, the modified style will only be available for the current document. If you select New documents based on this template, then the table style will be modified for future documents based on the current template (usually the Normal template).
- Click OK.
Below is the Modify Style dialog box:
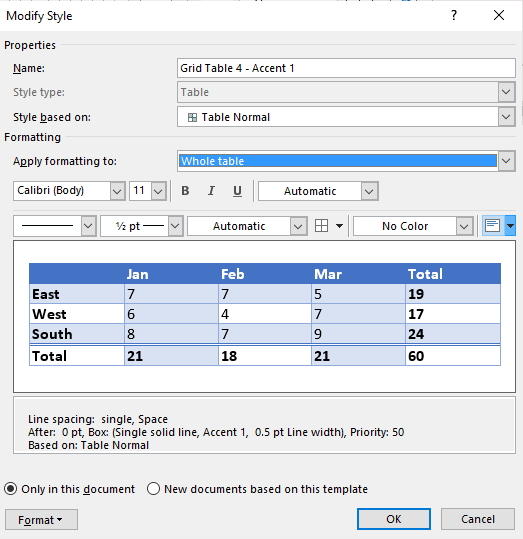
You can also click Format at the bottom of the dialog box and choose other options such as Font or Paragraph.
If you modify a table style and the tables using that style do not change, it’s likely that direct or manual formatting has been applied to the table which then overrides the table style. You may need to clear formatting in the table by selecting the table and clicking Clear Formatting on the Home tab in the Font group.
You can also modify Table Properties in a table style. Table properties include table alignment, row settings and cell margins.
To modify Table Properties in a table style:
- Click in the table.
- Click the Table Tools Design or Table Design tab in the Ribbon.
- Click the More down arrow on the bottom right in the Table Styles gallery. A drop-down menu appears.
- Click Modify Table Style. A dialog box appears. You can also right-click a table style and select Modify.
- Click Format on the bottom left of the dialog box. A drop-down menu appears.
- Click Table Properties. A dialog box appears.
- Click the Table tab and select an Alignment.
- Click the Row tab and select the desired options. For example, turn off Allow row to break across pages.
- Select any other formatting options you want to apply to the entire table.
- Click OK.
- Select Only in this document or New documents based on this template.
- Click OK.
Below is the Table Properties dialog box with the Table tab selected:

Create a new table style
You can also create a new or custom table style.
To create a custom table style:
- Click in the table.
- Click the Table Tools Design or Table Design tab in the Ribbon.
- Click the More down arrow on the bottom right in the Table Styles gallery. A drop-down menu appears.
- Click a table style to apply it as a base style.
- Click the More down arrow on the bottom right in the Table Styles gallery. A drop-down menu appears.
- Click New Table Style. A dialog box appears.
- Enter a name for the new table style in the Name box.
- Select the desired formatting.
- Select Only in this document or New documents based on this template.
- Click OK.
New Table Style appears at the bottom of the Table Styles gallery:
The new table style will appear in the Table Styles gallery under Custom (at the top of the gallery). If you want to delete it, right-click it in the gallery and select Delete Table Style.
Clear a table style
To clear a table style and remove formatting:
- Click in the table.
- Click the Table Tools Design or Table Design tab in the Ribbon.
- Click the More down arrow on the bottom right in the Table Styles gallery. A drop-down menu appears.
- Click Clear.
Clear appears at the bottom of the Table Styles gallery:
Set a default table style
You can also set a default table style for new tables in the current document or all new documents.
To set a default table style:
- Click in the table.
- Click the Table Tools Design or Table Design tab in the Ribbon.
- Click the More down arrow on the bottom right in the Table Styles gallery. A drop-down menu appears.
- Right-click the table style you want to use as the default style and select Set as Default from the drop-down menu. A dialog box appears.
- Select This document only or All documents based on the Normal.dotm template (the default template in Word is the Normal template).
- Click OK.
If you are working with documents with multiple tables, formatting with table styles can ensure that your tables are formatted consistently and save a lot of time.
Subscribe to get more articles like this one
Did you find this article helpful? If you would like to receive new articles, JOIN our email list.
More resources
4 Ways to Create a Table in Word
14 Shortcuts to Quickly Select Text in Microsoft Word
How to Create Headings in Word (Using Heading Styles)
How to Quickly Remove Hard Returns in Word Documents
10 Microsoft Word Tips, Tricks and Shortcuts for Selecting in Tables
Related courses
Microsoft Word: Intermediate / Advanced
Microsoft Excel: Intermediate / Advanced
Microsoft PowerPoint: Intermediate / Advanced
Microsoft Word: Long Documents Master Class
Microsoft Word: Styles, Templates and Tables of Contents
Microsoft Word: Designing Dynamic Word Documents Using Fields
VIEW MORE COURSES >
Our instructor-led courses are delivered in virtual classroom format or at our downtown Toronto location at 18 King Street East, Suite 1400, Toronto, Ontario, Canada (some in-person classroom courses may also be delivered at an alternate downtown Toronto location). Contact us at info@avantixlearning.ca if you’d like to arrange custom instructor-led virtual classroom or onsite training on a date that’s convenient for you.
Copyright 2023 Avantix® Learning
Microsoft, the Microsoft logo, Microsoft Office and related Microsoft applications and logos are registered trademarks of Microsoft Corporation in Canada, US and other countries. All other trademarks are the property of the registered owners.
Avantix Learning |18 King Street East, Suite 1400, Toronto, Ontario, Canada M5C 1C4 | Contact us at info@avantixlearning.ca
On Microsoft Word, tables are essential formatting tools. Microsoft Office has made it easier to create and format basic tables in Microsoft Word for Office 365, Word 2019, Word 2016, and Word 2013.
We haven’t covered tables as much as we would have liked to. It’s time to correct that, as the number of people asking questions on how to format tables properly is piling up. Maybe these eight table tips can be an appetizer. You just cannot create beautiful Microsoft Word documents by cutting corners on tables—here’s how to format tables in Word.
By the way, it’s possible to get a free copy of Microsoft Word, should you need one.
1. How to Make a Table in Microsoft Word
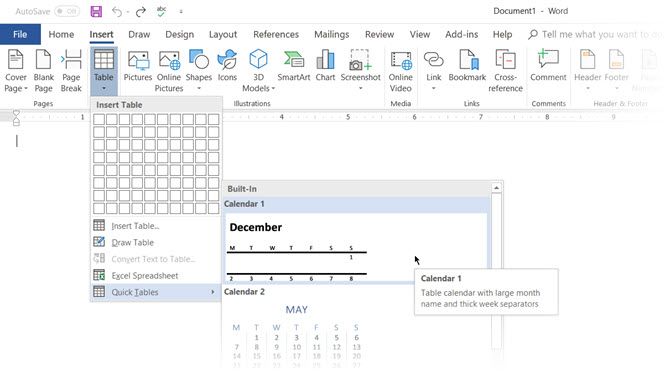
Using tables, and even changing them on the fly according to the data, has become far easier in the newer versions of Word such as Microsoft Word 2019 and Office 365. Intuitive Microsoft Word table formatting features give you finer (and quicker) control over how a table looks. But first head to the Ribbon > Insert > Table > Insert Table for making your first table.
It gives you five options for creating your first table.
The quickest way to start is with Quick Tables. The built-in designs save you from the lack of design skills. You can modify the designs by adding your own rows and columns or deleting the ones you don’t need.
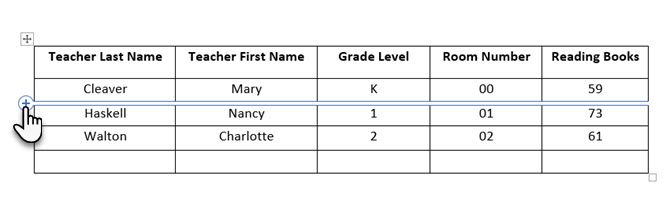
Another quick way to create a table in Word is the Insert Control feature. You can create a new column or row with one click. Hover the mouse over a table. A bar appears right outside your table between two existing columns or rows. Click on it when it appears, and a new column or row will be inserted at that position.
When you want to move or order a row around, use the combination of Alt+Shift+Up Arrow and Alt+Shift+Down Arrow to order the row up or down. Move contiguous rows by selecting them all first.
How to Use Table Properties to Position Your Table on the Page
If your tables are overlapping in Word, or you want to stop them from overlaying your text, then you need to learn how to position your tables on the page using the Table Properties feature.
Right-click on the table and select Table Properties from the context menu. The Table Properties dialog box is for precise control over the data and its display. Control the size, alignment, and indentation of the table.
By default, Word aligns a table on the left. If you want to center a table on the page, select the Table tab. Click on Alignment > Center.
The Indent from left figure controls the distance of the table from the left margin.
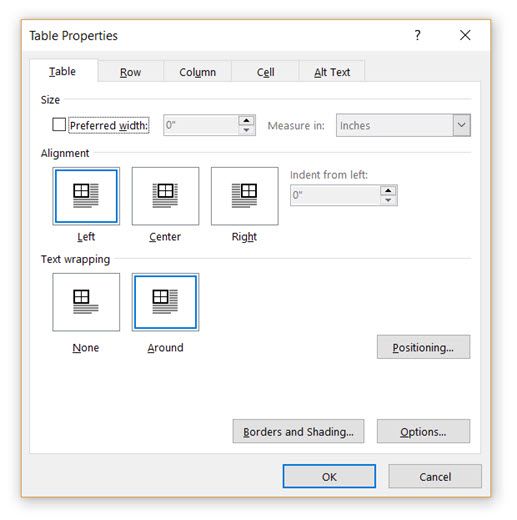
Position the table according to the text around it for a visually aesthetic look. Wrap text around tables by dragging it by the handle. The text wrapping changes automatically from None to Around. From the Table Positioning dialog box, you can set the Distance from surrounding text for each side of the table.
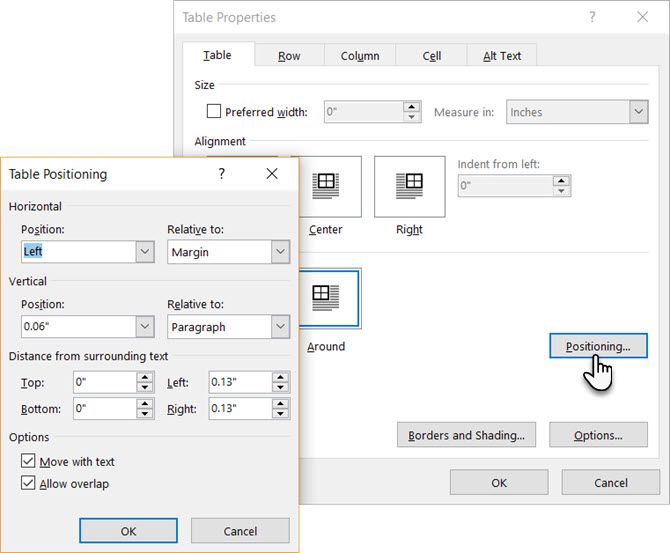
Select Move with Text if the text is directly related to the table data. The table is vertically aligned to the related paragraph around it. If the table data applies to the whole document, you can keep the option unchecked.
You can also control the tables with Microsoft Word keyboard shortcuts.
2. Use the Ruler
If you’re looking for an easy way to make tables look good in Word, then sizing tables and positioning them accurately is an art in itself. If you need precise measurements to size your rows and columns—use the ruler.
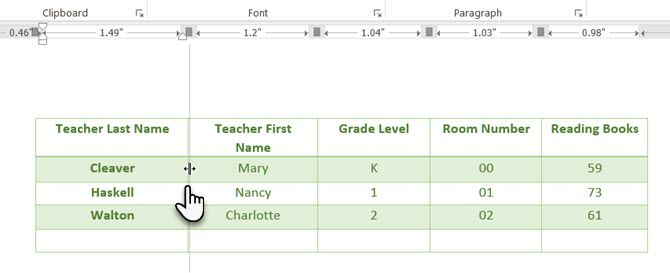
Hover the mouse over a border. When the double-arrow pointer appears, click the border and hold down the ALT key. Move the rows and columns to fit your measurements.
3. Convert Text to Table (and Vice Versa)
Tabular data gives information in its structure. It would have been frustrating if Word didn’t have something to handle non-tabular data. You can convert data to tables instantly from the Insert Table command.
Select the text. Go to Ribbon > Insert > Table > Insert Table.
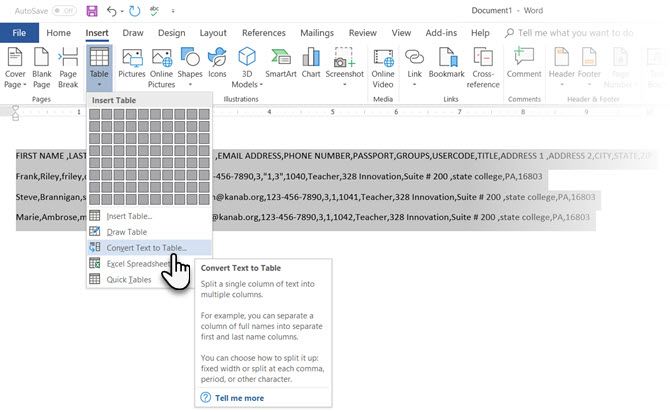
Microsoft Word determines the required number of rows and columns by considering the text separators and then auto-fits the contents. The Convert Text to Table dialog box allows you more control if the previous operation doesn’t work out right. You can also choose how to fit the contents of the table on the page.
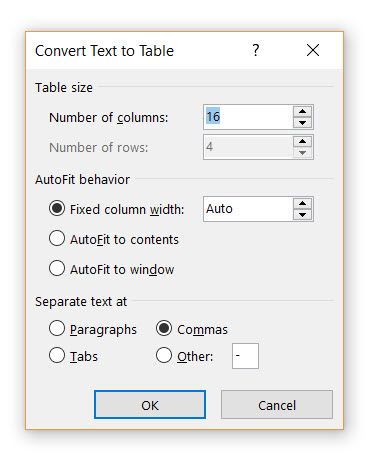
You can specify how Microsoft Word should separate the data into rows and columns. Paragraph, tabs, commas, or any other delimiting character. This allows you to easily import non-tabular data from CSV files or plain TXT files and convert them into formatted tables. Remember, you can also import data from Microsoft Word into an Excel spreadsheet.
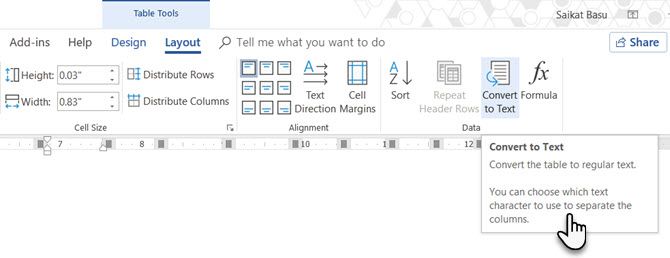
Convert Table to Text
Engineer the reverse process if someone asks you to send them files with comma-separated values or any other delineator. Select the entire table by clicking the “move” handle above the table.
Go to Ribbon > Table Tools > Layout > In the Data Group, click Convert to Text.
Simple text can be boring. When you have the chance, convert your table of data to a more visual chart instead with one of the underused features in Microsoft Word.
4. Auto-Fill Column Numbers
Microsoft Excel makes auto-filling a sequence of numbers very easy. Microsoft Word does not, and you may have to resort to a manual job. There is a simpler way.
Create a new column for the serial numbers if it does not exist. Select this column by positioning the mouse over the column.
With the column selected, go to Home > Paragraph > Click the Numbering button for inserting a numbered list.
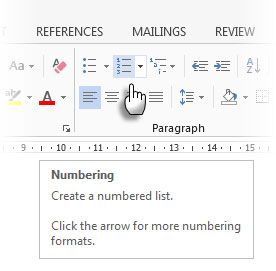
A number sequence is inserted in the column automatically.
5. Freeze Those Tables!
Microsoft Word tables change their dimension to accommodate new data. There may be times when you do not want the table to change size at all, even when new data is inserted. That is—“freeze” the size of cells.
The first step is to specify a fixed size for the cells. Go to Table Properties > Row > Enter a value in the Specify height box. For Row height is select Exactly from the dropdown.
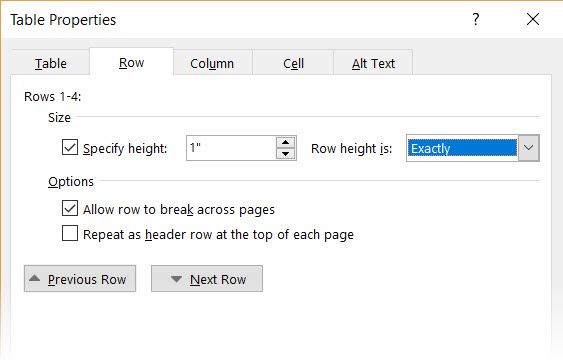
Now, select the Table tab > click the Options button > uncheck the Automatically Resize to Fit Contents check box.
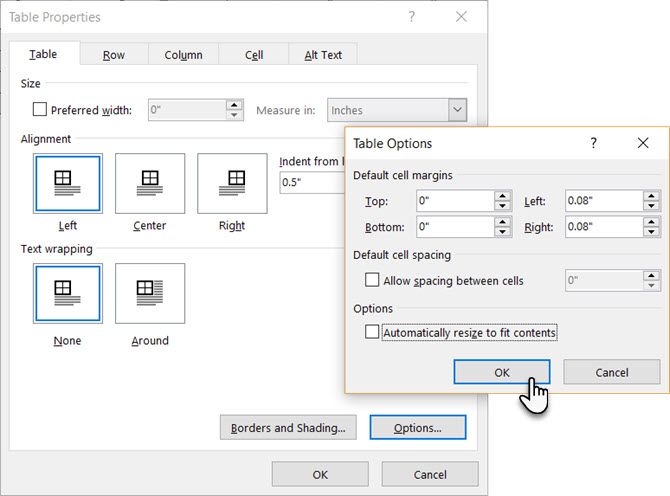
Click OK twice to exit the Table Properties dialog box.
This also solves the problem of inserting an image into a cell without the cell expanding to accommodate the image. If the image is bigger than the available space in the cell, it gets cropped to fit within the cell.
6. Change Rows Into Columns in a Table
There are situations where you have to change rows into columns and columns into rows. One possible scenario is where the number of columns exceeds the page margin. Switching columns around to rows and vice-versa is called transposition.
The bad news is that Word does not have an inbuilt method for handling this yet. Microsoft suggests that you copy-paste your table into Microsoft Excel and use its Transpose command. The transposed table can now be copy-pasted back into Microsoft Word.
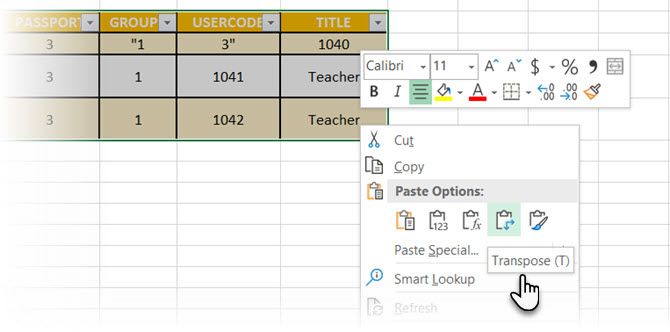
Data shows how easy it is in Excel with this short tutorial on switching rows into columns. Also, take the help of Microsoft’s Support Page if you run into a problem using the Transpose command.
7. Paste Perfect Excel Tables Into Gmail
You will find a use for this simple workaround. By default, Gmail does not retain the spreadsheet format when you paste from Microsoft Excel. To email tabular data without sending it as a separate attachment, use Microsoft Word as a bridge.
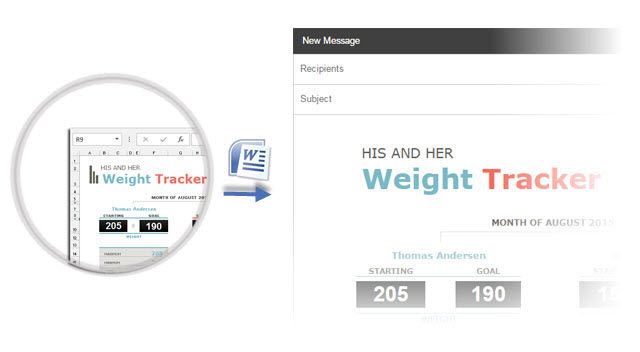
Select and copy-paste the Microsoft Excel table to a Microsoft Word document with the source formatting. Now, copy-paste from Microsoft Word to Gmail. As you can see from the screenshot, the problem is solved. You might have to tweak the more heavily formatted tables slightly, but most of the formatting is retained.
8. Reuse Your Tables to Save Time
You can save a lot of time by re-using tables in your professional Microsoft Word documents. Save empty table formats and insert new data when required. With this quick save, you won’t have to recreate the layout from scratch for new data.
Select a table. Go to Ribbon > Insert > Text group > click Quick Parts > Save Selection to Quick Part Gallery.
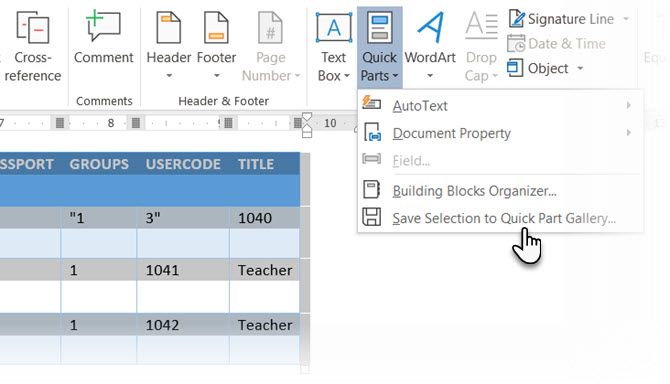
After you save a selection to the Quick Part Gallery, you can reuse the selection by clicking Quick Parts and choosing the selection from the gallery.
Use the Building Blocks Organizer to preview any table you created. You can also edit properties and delete the tables from here.
Do Microsoft Word Tables Confuse You?
These tips aren’t enough to cover the scope of formatting tables in Word. I haven’t talked about the role of the Design tab in creating eye-catching tables. That is a topic in itself. But it is one of the lesser areas to get confused over thanks to the visual help in that tab.
Working with tables in Word can be extremely rewarding. While tables are one common area between Microsoft Word and Excel, Microsoft Excel is more for power managing tabular data. Nonetheless, learning how to format tables well in both applications is an essential Microsoft Office skill. Use them at every opportunity.