If you’ve already used MS Word before, you may already know the basics of formatting a document, and it may just be a matter of learning to do is using MS Word 2007. Either way, this article will cover the subject of formatting an MS Word document using MS Word 2007, making it an easy task for you to accomplish.
Selecting Text
The first step in formatting any amount of text or an entire document is selecting the portion of text that needs formatting.
You may want to:
- Boldface a section
- Add italics
- Underline
- Change the color
- Change the font
- Highlight
- Cut/copy and paste
- Add bullets
To do any of this, you must first select the text that the formatting will be applied to within the document. Selecting text is easy and done in three easy steps.
1. Move the cursor to the beginning of the text that you want to select.
2. Click and hold in the left button on your mouse.
3. Drag it over the text you want to select. It will highlight the selected text in blue. Simply release the mouse button when you are finished selecting text.
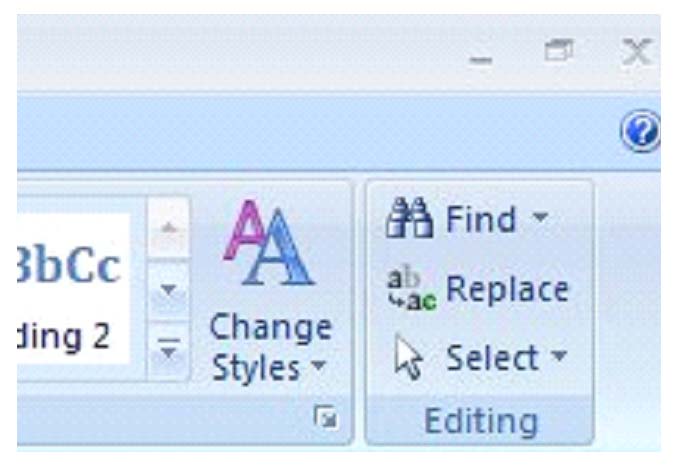
If you want to select the entire document, simply click on the ‘Home‘ tab and click ‘Select’ on the far right (located below ‘find’ and ‘replace) as seen in the picture below. You will then select ‘select all’. This will highlight all your text for formatting. Also note that you can select objects or text with similar formatting as your selected text when clicking on ‘Select.’
To be more exact, here’s a zoom in to help you find ‘Select.’
Applying a Font
You can apply a font to either an entire document or to certain portions of a document. The choice is yours. To apply a font, click on the Home tab. You’ll see the toolbars, or groups, as pictured below.
The type of font you’re currently using will appear. In the picture above, the current type of font is Calibri. The notation of (body) after Calibri lets the user know that it’s the font used in the body of text, not in headers, footnotes, etc. You can click on the arrow in that window to display other types of font available to use.
To change the type of font within a document or for the entire document, simply select the text to be formatted, then select your new font. It’s really that easy.
Note: You can also do all font formatting by selecting the arrow key beside the word Font, located directly above the document body. By clicking on this arrow, you can also alter character spacing.
Changing Font Size
Next to the type of font under the ‘Home‘ tab is a box that states the size of font currently being used. Using the picture above, the font size is 11. Once again, you can use the down arrow key to either enlarge or reduce the font size. To change the size of the font, simply select the text that you want to change, then select the new font size. You can change an entire document or just a portion. The choice is yours.
You can also use the two uppercase A’s beside the font size box to change the size of fonts you’re currently using. Pushing the larger A will increase your font size by one for each time it’s clicked. On the other hand, clicking the smaller A will decrease the font size by one for each time it’s clicked.
Font Attributes
As we discussed earlier, you may want to select text to either boldface, italicize, or underline a section of text. The boldface command in MS Word is represented by an uppercase, boldfaced B. Italics are represented by an uppercase, italicized ‘I’, and underline by an uppercase U with a line under it. These button’s are located directly below the font type window. Locate them in the picture below.
To add italics, boldfaced, or underlining to any portion of a text within a document, select the desired text, then click the appropriate button (B for boldfaced, I for italic, or U for underline.)
Next to the commands for boldfaced, italics, and underline, you’ll see an ‘abc’ with a line through it. (abc) This is for strikethrough. When clicking on this button, it will put a line through any text you have selected.
Next to the strikethrough command, you’ll see ‘X2‘. This simply puts smaller text below the text line of the normal text. This command was used when typing X2 into this course. X2 is just the opposite, putting smaller text above the text line. This makes creating footnotes easier than it had been with previous versions of Word.
The uppercase A and lowercase A that are situated side by side allow you to change the case of selected text. You can change from lowercase to uppercase or vice versa , toggle tHe CaSe, or select other common capitalizations.
Font Color
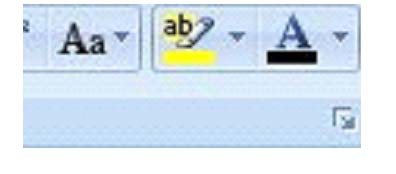
Changing the font color is as simple as changing the font. Look for the uppercase A with a black bar under it as pictured below. It’s just to the right of the Aa that allows you to capitalize portions of text.
Select your text, then click on the button to choose the color you want to apply to the selected text.
You can also highlight selected text. To the left of the font color button, you’ll see a lowercase ‘ab‘ with a marker near it. It is highlighted in yellow. Simply select the portion of text you want to highlight, click the button, and select the color of highlight that you want to apply.
Clear Formatting
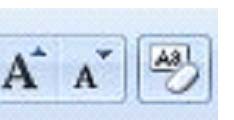
To clear formatting within a document or a specified portion of text, simply select the text, then click on the ‘As‘ with the eraser beside it. It’s located to the right of the two uppercase A’s that allow you to increase or decrease font size. (see the picture below.) By selecting the text and clicking on this button, it will remove all formatting done to the text and leave you with the default font and font size for the document.
Text Alignment
As with all word processing programs, you can either left, right, center or justify your text. You can either do one of these things to a portion of text or to the entire document.
This is an example of text that is aligned to the left.
This is text that is aligned to the right.
This text is centered.
The following text, selected from this lesson, is justified so that it is aligned between the left and right margins, adding space between letters if necessary. It gives the document a clean look.
Next to the strikethrough command, you’ll see ‘X2‘. This simply puts smaller text below the text line of the normal text. This command was used when typing X2 into this course. X2 is just the opposite, putting smaller text above the text line. This makes creating footnotes easier than it had been with previous versions of Word.
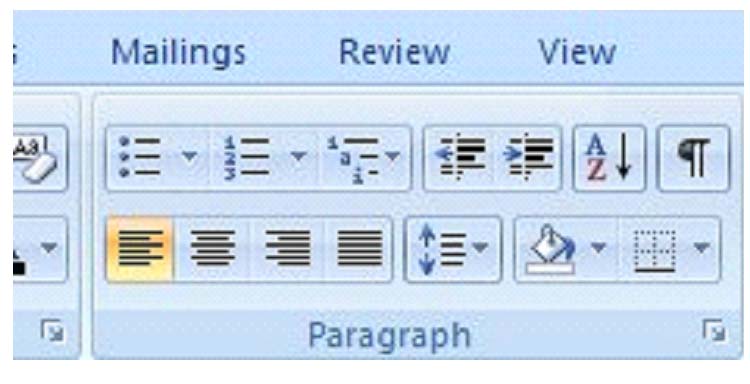
The buttons or commands for aligning text are located under the ‘Home‘ tab above the ‘Paragraph’ label, as shown below.
In the above picture, the left alignment button is highlighted. Beside it is the center, then right, and then justify. To use these, simply select the text you want to align, and click on the appropriate button.
Conclusion
Although this article may seem very basic to some of you, learning where everything is located and reviewing simple tasks is what it takes to become an advanced MS Word user.
Copying and Moving Text and Objects
The Clipboard
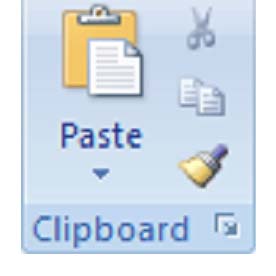
Whenever you copy anything in MS Word (or any other MS Office 2007 program, for that matter), it is automatically sent to the Clipboard. The Clipboard and its associated tools can be found on the Home tab at the far left end of the ribbon. The Clipboard group looks like this:
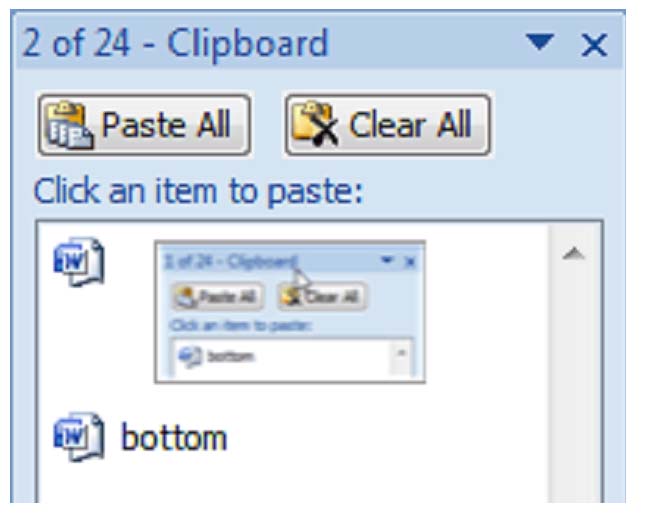
Click the arrow at the bottom of the Clipboard group to see its contents. The clipboard will open as a long window to the left of your document. It can only hold 24 objects. When a 25th object is added, the first copied item is removed. To empty the Clipboard, click the Clear All button at the top of the Clipboard menu.
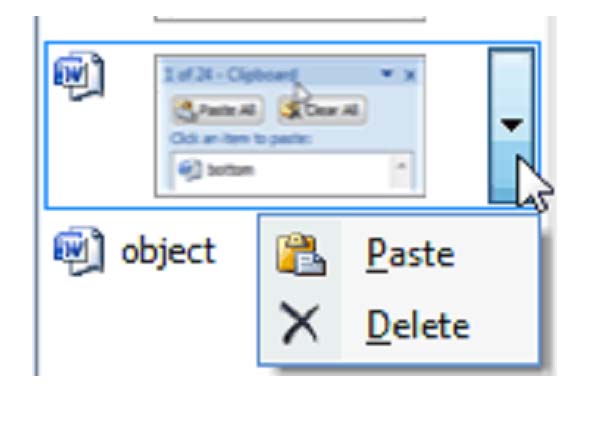
You can remove individual items from the clipboard by moving the mouse pointer over the item and clicking the arrow button that appears to the right of the object. In the drop down menu, select Delete.
There are three ways to copy text and objects to the clipboard.
1. Select the text or object to be copied and click the copy icon
2. Select the text or object to be copied, position the mouse pointer over it and right click. Then select Copy from the menu.
3. Select text or object to be copied and hit CTRL + C.
If you’d like to delete text or objects from one position in the document to Paste into another position, use the Cut command:
1. Select the text or object to be cut and copied and click theCut icon 
2. Select the text or object to be cut and copied, move the mouse pointer over it and click the right mouse button. SelectCut from the menu.
3. Select text or object to be cut and copied and use CTRL + X.
Delete and Cut should not be used interchangeably. When you Cut an object, it is copied to the Clipboard. When you Delete an object, it is simply removed from the document and the only way to restore it is by clicking the Undo Typing button.
Paste
The Paste command allows you to copy an object from one location in the document to another, or from another MS Office Program into MS Word 2007. Once an object is copied to the clipboard, you can Paste it anywhere in your document.
There are three ways to Paste text or an object into a document:
1. Move the cursor to the point in your document where you want to place the item and click the Pasteicon 
2. Move the mouse pointer to the place you wish to insert the item and click the right mouse button. Select Paste from the menu.
3. Move the cursor to the point in your document where you wish to place the item and press CTRL + V.
Ordinarily, MS Word pastes the most recently copied item. To paste an object that was copied earlier, position the cursor at the point in your document you wish to paste the item, then open the clipboard and click the item you wish to paste. You can also move the mouse pointer over the item to be pasted, and click the arrow that appears to the right of that item. Then select Paste.
The text that you cut from one place in your document to another may be formatted in a style drastically different from that of the text at its destination. In the same way, text copied from another document or MS Office application may also be very different. Word 2007 gives you the option of preserving this source formatting or discarding it.
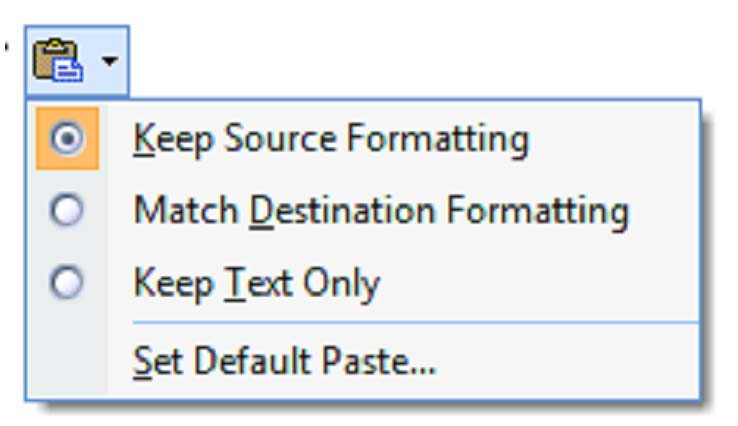
Whenever you paste an item into word, a formatting icon appears to the right and slightly below it. 
Keep Source Formatting: This option preserves the original character formatting of the copied text. If the original font was 14pt Times New Roman in italics with red lettering, that is exactly the way it will be pasted into your document.
Match Destination Formatting: If, however, the text at the destination is 12pt Calibri in black lettering, and you’d like the copied text to match, select this option. Formatting used for emphasis, such as the italics in the example above or bold will be saved. The copied text will also take on any attributes of the text to the immediate left of the cursor.
Keep Text Only: This button is pretty much the same as the option above, except all source formatting is discarded, including pictures. Tables will be turned into a series of paragraphs.
Changing Defaults
If you’re always selecting another option, you can change the default by clicking the Microsoft Office button
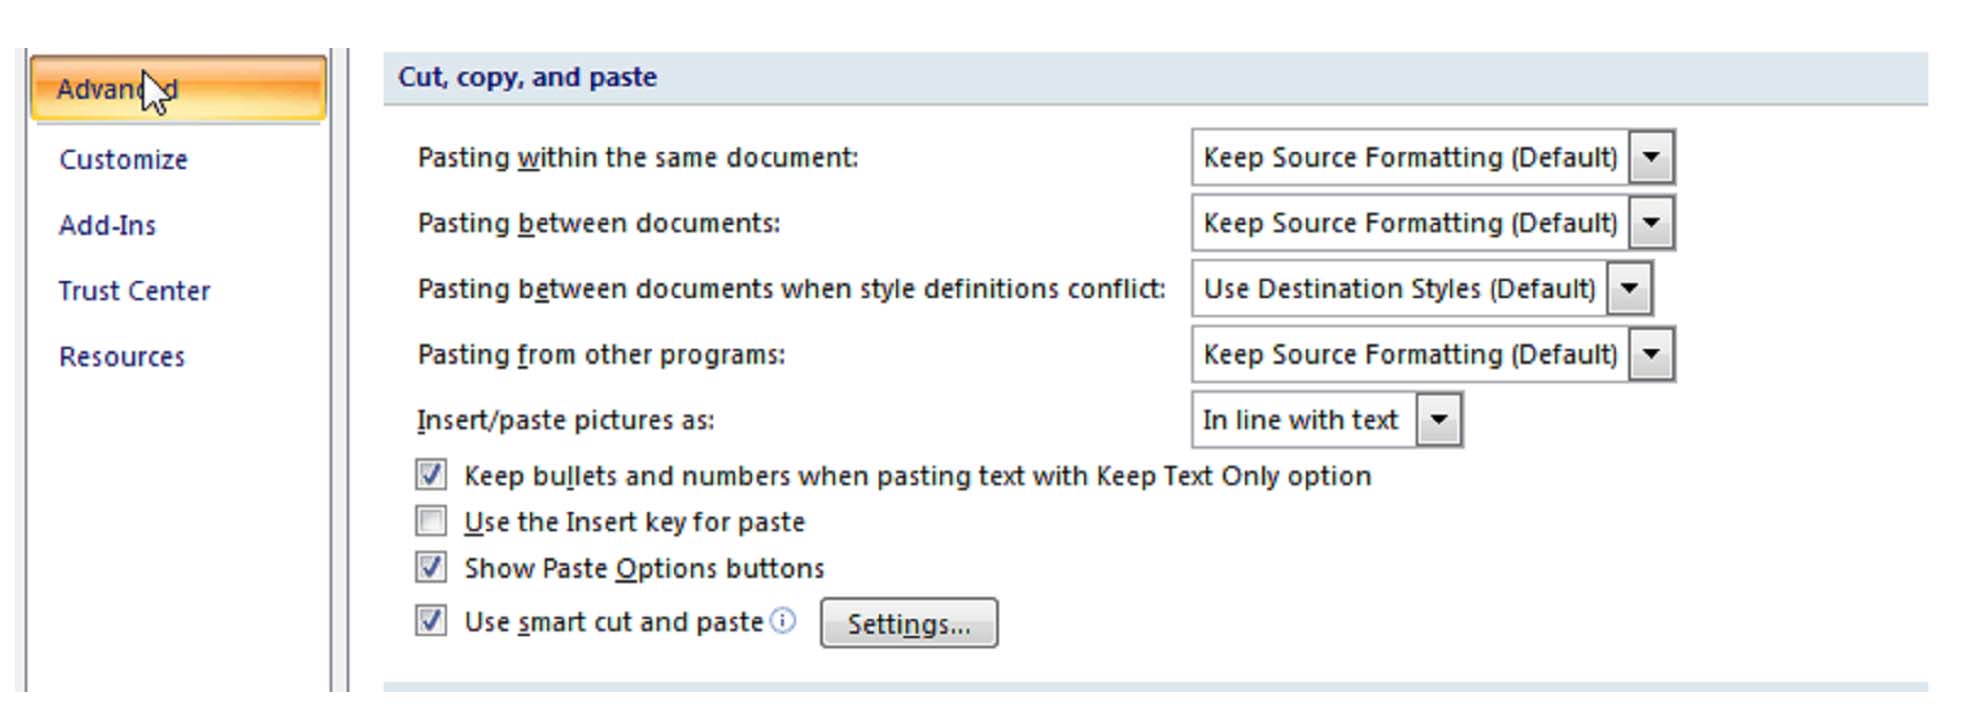
From the Word Options menu, select Advanced. Scroll down to the section labeled Cut, copy, and paste. It looks like this:
Simply select the options you use most frequently, and click Okay.
Drag and Drop Text
You can quickly and easily move text from one location to another within a document using the Drag and Drop feature. To do this, select the text you’d like to move, be it a single character or the contents of an entire page. Move the mouse pointer over the selected text and click and hold the right mouse button. A small box will appear next to the mouse pointer, letting you know that the pointer is «loaded», and the cursor will become a ragged line. Position the pointer over the place in your document where you’d like to move the text. The cursor moves with the mouse pointer to let you know exactly where the words will appear.
You can also drag and drop text and objects from another Word document or another application.
The drag and drop feature is activated in Word 2007 by default, but you can turn it off or on by clicking the Microsoft Office button
Check the box to activate it.

Оформление текста в документе может включать в себя выделение текста посредством изменения размера, гарнитуры и начертания шрифта, вставку списков, выравнивание по центру страницы и т. д. Все эти и другие параметры
оформления текста принято называть форматированием. Word содержит большое количество средств форматирования, с помощью которых можно существенно улучшить внешний вид документов на экране и при печати.
Задание параметров шрифта
С помощью инструментов группы Шрифт вкладки Главная можно изменять размер, тип и начертание шрифта. Здесь же находятся кнопки, позволяющие сделать текст жирным, курсивным , подчеркнутым , зачеркнутым, увеличить/уменьшить размер шрифта ; применить эффект надстрочного/подстрочного начертания ; изменить регистр текста – сделать буквы прописными или строчными ; его цвет; цвет выделенного фрагмента . Кнопка Очистить формат позволяет удалять
измененные параметры форматирования. Если указанных кнопок форматирования недостаточно для выполнения задачи, при помощи окна
Рис. 3.1. Диалоговое окно Шрифт
Шрифт можно настроить дополнительные параметры форматирования шрифта: на вкладке Шрифт – различные параметры начертания, на вкладке Интервал – расстояние между символами, смещение их по вертикали, применение кернинга (рис. 3.1).
Замечания
—Если вы хотите вставить специальный символ, которого нет на клавиатуре (π, γ, √, ∞, €, ® и т. п.), нужно выбрать пункт Символ вкладки Вставка –Символы. Перед вами откроется окно, в котором можно выбрать необходимые символы и нажать кнопку Вставить.
—Если в документ требуется вставить формулу, нужно выбрать пункт Формула вкладки Вставка – Символы. В появившемся окне можно выбрать имеющуюся формулу, либо составить новую, нажав на кнопку Вставить новую формулу и использовав средства контекстной ленты Работа с формулами – Конструктор.
Word 2007 предоставляет удобную возможность быстрого форматирования текста. Когда выделяется какой-либо фрагмент текста, рядом появляется прозрачное окно, содержащее наиболее часто встречающиеся команды форматирования. При наведении курсора на это окно оно приобретает нормальный цвет и доступно для использования.
Задание параметров абзаца
Для абзацного форматирования предназначены: группа кнопок панели Абзац вкладки Главная и диалоговое окно Абзац, вызываемое с панели группы Абзац (рис. 3.2).
12
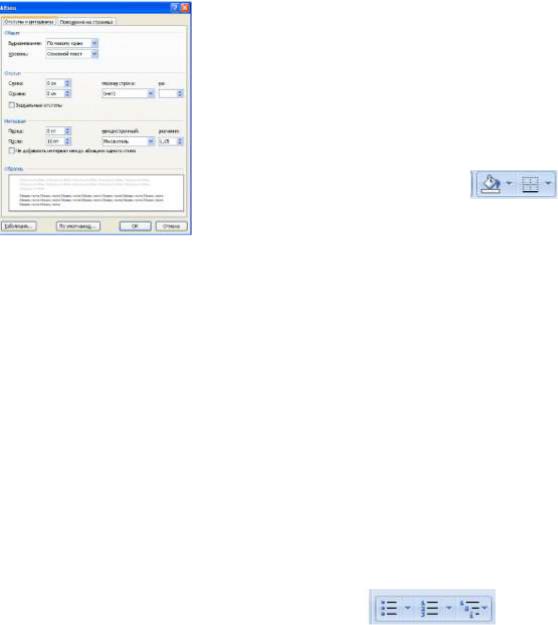
Рис. 3.2. Диалоговое окно Абзац
На вкладке Отступы и интервалы данного окна можно задать:
—выравнивание текста в абзаце (по левому краю, по центру, по правому краю, по ширине), для этого также можно использовать кнопки панели Абзац;
—выступы и отступы текста от краев страницы, отступ первой строки абзаца (так называемая «красная строка»), для этого также можно применять кнопки ;
—междустрочный интервал в абзаце (можно использовать выпадающий список установки междустрочного интервала на панели), интервал до и после форматируемого абзаца.
На вкладке Положение на странице можно задать:
—запрет висячих строк (обеспечивает перенос всего абзаца на следующую страницу без оставления одной строки на предыдущей);
—неразрывность абзаца, запрет отрыва от предыдущего;
—положение абзаца с новой страницы;
—запрет расстановки переносов в абзаце и нумерации его строк.
Для абзаца может быть задана заливка цветом и обрамление границами, для этого применяются кнопки , которые позволяют задать нужный цвет и вид границ для выделенных частей абзаца.
ля выделения первой буквы абзаца в виде Буквицы (большой заглавной буквы в начале абзаца высотой в днесколько строк), выберите вкладку Вставка – панель Текст – Буквица. По нажатию правой кнопки мыши
на значке буквицы, вызвав команду Буквица, можно настроить ее параметры.
|
На панели Абзац присутствуют кнопки |
, предназначенные для работы с |
|
маркированными, нумерованными многоуровневыми списками. |
Кнопка 
Кнопка 
Формат по образцу
Полезной при форматировании текста в документе является кнопка 
—установить курсор в любом месте абзаца, параметры форматирования которого мы хотим использовать;
—нажать кнопку Формат по образцу на вкладке Главная – Буфер обмена (если необходимо форматировать за один раз несколько разных фрагментов, следует сделать двойной щелчок на кнопке);
—выделить текст, на который надо перенести форматирование (если был сделан двойной щелчок на кнопке Формат по образцу, то можно выделять последовательно нужные фрагменты текста; по завершении всей операции форматирования надо один раз щелкнуть на кнопке Формат по образцу, чтобы «отжать» ее).
13
Работа со списками
Списки – это фрагменты текста, пункты которого отмечены специальными знаками. Списки могут быть маркированными, нумерованными и многоуровневыми.
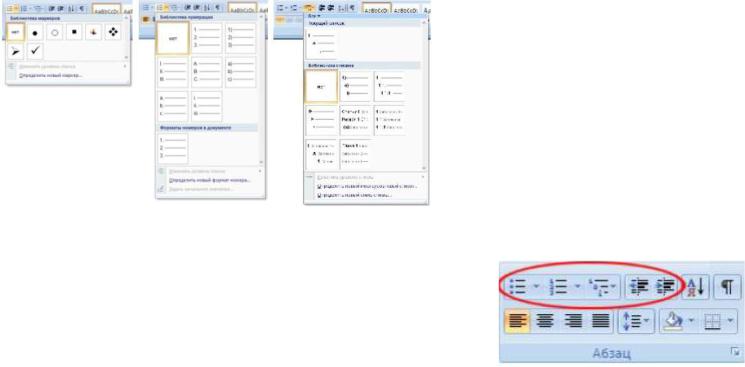
Для работы со списками служат пять верхних кнопок панели Абзац вкладки Главная. Список можно создавать изначально, а можно из уже существующего текста. Если необходимо сделать список из уже существующего текста, то надо выделить фрагмент, который подлежит форматированию и выбрать тип списка (рис. 3.3). При этом выделенный текст будет разбит по пунктам списка согласно абзацам (каждый абзац – это новый пункт списка). Во время выбора типа списка при наведении курсора на соответствующий вариант выделенный текст будет сразу предварительно форматироваться, давая пользователю быстро оценить пригодность того или иного варианта.
Нумерованный и маркированный список также могут быть созданы с использованием команд Маркеры, Нумерация по нажатию на тексте правой кнопки мыши.
При работе с маркированными и нумерованными списками можно создавать свой стиль оформления списка. Для этого нужно в соответствующих диалоговых окнах выбрать пункт Определить новый маркер или Определить новый формат номера. Чтобы в нумерованном списке начать список не с первого номера, нужно использовать пункт Задать начальное значение окна задания параметров списка. В появившемся окне в зависимости от поставленной задачи надо установить переключатель в одно из двух положений: Начать новый список или Продолжить предыдущий список и в поле Начальное значение задать номер первого пункта списка (рис. 3.4)
Рис. 3.3. Диалоговые окна создания маркированных, нумерованных и многоуровневых списков

При формировании многоуровневого списка, чтобы задать создание маркеров очередного уровня, можно использовать клавишу Tab (либо кнопку Увеличить отступ на панели Абзац).
Вернуться к вводу данных предыдущего уровня можно, нажав сочетание Shift+Tab (либо кнопку Уменьшить отступ на панели Абзац).
При необходимости редактирования многоуровневого списка, щелкните кнопкой мыши на кнопке Многоуровневый список – Определить новый многоуровневый список. Здесь можно настроить формат номера, расстояние, тип шрифта и другие параметры списка.
14
Если необходимо сформировать новый стиль списка, то нужно воспользоваться пунктом Определить новый стиль списка. В появившемся окне можно настроить все необходимые параметры стиля, а также задать область действия нового формата.
Замечание. Word автоматически создает новый нумерованный список, когда абзац начинается с цифры «один» с точкой.
Многоколончатый текст
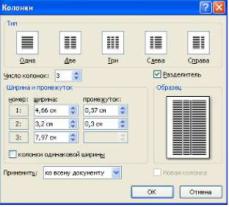
Кнопка Колонки панели Параметры страницы вкладки Разметка страницы служит для разбивки текста страницы на несколько колонок (подобно газетной верстке). Пользователю предлагается пять вариантов расположения выделенного текста в колонки.
Опция Другие колонки.. вызывает окно Колонки (рис. 3.5) и служит для более гибкой настройки колонок. Все функции настройки интуитивно понятны, к тому же, в окне Образец сразу показано как будет выглядеть страница.
Рис. 3.5. Окно настройки колонок
Работа со стилями
Стили представляют собой наборы атрибутов форматирования. При создании стиля указывается значения отдельных параметров форматирования, которые должны быть включены в создаваемый стиль, для последующего применения всех этих параметров совместно посредством выбора имени этого стиля. Стили определяют форматирование символов, текстовых фрагментов, абзацев, строк таблиц или уровней структуры документа. Основные типы стилей:
—стиль символа (знака) – содержит параметры форматирования символов, включая шрифт, размер, начертание, положение и интервалы;
—стиль абзаца – содержит параметры форматирования абзацев, такие как междустрочные интервалы, отступы, выравнивание и позиции табуляции
Стили абзацев также могут содержать стили или параметры форматирования символов. Большинство стилей, используемых в Word, являются стилями абзацев. Также существуют стили таблиц и списков.
Вкаждом шаблоне документа имеется заранее созданный набор стилей, или библиотека стилей, но можно самостоятельно создавать новые и изменять имеющиеся в шаблонах стили. Кроме того, стили могут сохранятьсянепосредственно в документах.
Применение имеющихся стилей
В Word есть большое количество заготовленных стилей, к которым наиболее часто обращаются пользователи программы. На вкладке Главная – Стили отображаются так называемые экспресс-стили (рис.
3.6).
Для применения стиля из списка экспресс-стилей необходимо:
—выделить фрагмент текста;
—на панели Стили нажать справа нижнюю кнопку в строке с графическим представлением стилей (можно нажать кнопку в самой строке Стили);
—в появившейся галерее надо выбрать нужный стиль, при этом выделенный
15
Соседние файлы в предмете [НЕСОРТИРОВАННОЕ]
- #
- #
- #
- #
- #
- #
- #
- #
- #
- #
- #
После того, как пользователь завершил набор текста, пришел черед его редактирования, или другими словами, оформления. Оформляется текст в соответствии с определенными правилами или же по желанию самого пользователя. Под форматированием текста обычно подразумевают придание абзацам и символам необходимого вида, используя специальный набор инструментов.
Форматирование символов. Есть три наиважнейших свойств символов, которые Вы полностью можете изменять в Microsoft word 2007. Это начертание, шрифт и размер. Для того чтобы начать работу с этими параметрами шрифта необходимо зайти на вкладке Главной ленты в Шрифт.
Перед тем, как приступить к форматированию текста, необходимо выделить тот фрагмент, который Вы желаете придать изменениям. Стоит помнить, что в том случае, когда текст не выделен, а курсор находится в конце последнего предложения, то все изменения не коснуться ранее написанного текста, а будут применены лишь к вновь набираемым символам.
Работа с абзацами. Выравнивание по левому краю – этот способ в программе Microsoft word 2007 установлен по умолчанию и может быть использован при создании абсолютно любых документов.
Выравнивание по центру. Этот инструмент используется с целью расположения текста (строки) в центр документа. Именно этот способ удобно использовать при создании заголовков.
Выравнивание по правому краю. Текст смещается к правому краю документа. Этот тип форматирования может стать очень полезен для использования шапки документа, подобного заявлению.
По ширине. Этот инструмент поможет выровнять текст одновременно по левому и по правому краям. Этот эффект Microsoft word достигает с помощью установки пробелов разной величины.
Междустрочный интервал. В Microsoft word есть возможность изменять расстояния между строками. Увеличивать или уменьшать их можно используя функцию Междустрочный интервал.
Между абзацами так же предусмотрены определенные интервалы. Ими так же можно варьировать
Chapter 4. Formatting Text, Paragraphs, and Headings
Formatting is the fine art of making your documents effective and attractive. Good formatting distinguishes different parts of your text and helps your readers take in your message. You can apply formatting to just about every element of your document, from a single character to entire paragraphs. Body text needs to be readable and easy on the eyes. Headings should be big and bold, and they should also be consistent throughout your document. Important words need to resonate with emphasis. Quotes and references should be set off from the other text.
This chapter starts with the basics: how to format individual characters and wordsâselecting fonts and making characters bold, italicized, underlined, or capitalized. You learn how to format paragraphs with indents and spacing, and how to control the way Word breaks up the words in a line and the lines in a paragraph. Finally, you find out how to copy and reuse formatting with tools like the Format Painter and style sets.
Formatting Basics
Word deals with formatting on three levels encompassing small and specific on up to big and broadâthrough characters, paragraphs, and sections. You apply different types of formatting to each of these parts. Character formatting includes selecting a font, a font size, bold or italics, and so on. At the paragraph level, you apply indents, bullets, and line spacing. For each section of your document (even if thereâs only one), you set the page size, orientation, and margins, as described in the previous chapter. Sometimes it helps to think of the parts of a document as Russian nesting dolls: Characters go inside paragraphs, which go inside sections, which fit inside your document.
Each type of formatting has its own dialog box, giving you access to all possible settings. You can also apply most types of formatting via the ribbon, the mini-toolbar, or the keyboard shortcut.
-
Characters. Use the Font dialog box (Alt+H, FN) to format characters. Letters, numbers, and punctuation marks are all printable characters and, as such, you can format them. Once you select a character or a group of characters, you can apply any of the formatting commands on the Home tabâs Font group (Alt+H). You can choose a font and a size for any character in your document. You can make characters bold, underlined, superscript, or change them to just about any color of the rainbow.
Note
Prior to the use of computers, groups of letters, numbers, and punctuation of a certain style, such as Helvetica or Bodoni, were called
typefaces. The term font was more specific, referring to variations within a typeface such as bold, narrow, or italic. Today, the terms are interchangeable. Word uses the term font, probably because itâs shorter and therefore easier to fit into a dialog box. -
Paragraphs. Use the Paragraph dialog box (Alt+H, PG) to format paragraphs. You can set formatting for text alignment, indents, line spacing, line breaks, and paragraph breaks. You donât have to select a paragraph to format it; just click to place the insertion point within a paragraph. Because characters are part of paragraphs (remember those Russian nesting dolls), every paragraph includes a basic font description. When you select characters within a paragraph and change the font settings, you override the basic font description in the paragraphâs style. -
Sections. Use the Page Setup dialog box (Alt+P, SP) to format sections. When you change margins, page orientation, page size, and the number of columns per page (all described in Chapter 3), youâre formatting the section. Many documents have only one section, so when you make formatting changes to a section, youâre actually formatting the entire document.
Note
This chapter explains how to format characters and paragraphs. Section formatting is covered in Chapter 9, beginning in Section 9.2.
Formatting Characters
Every character in your document is formatted. The formatting describes the typeface, the size of the character, the color, and whether or not the character is underlined, bold, or capitalized. Itâs easy to change the formatting, and Word gives you quite a few different ways to do it. The easiest and most visual way is with the ribbon (Home â Font). You can further fine-tune the font formatting using the Font dialog box (Alt+H, FN).
For quick formatting, you may not need to go any further than the mini-toolbar that pops up when you select text for formatting. And when you get really good, you can do most of your formatting with keyboard shortcuts, never even slowing down long enough to reach for the mouse.
Whichever method you use, formatting is a two-step process. First, tell Word which text you want to format by selecting it. Then format away. Or, you can set up your formatting options first, and then begin to type. Your letters and words will be beautifully formatted from the get-go.
Formatting with the Ribbon or the Font Dialog Box
Since character formatting is one of the most often used Word features, Microsoft put the most popular settings right on the Home tab. If you donât see what youâre looking for there, then you must open the Font dialog box. The good thing about the dialog box is that it puts all your character formatting options in one place so you can quickly make multiple changes. Itâs one-stop shopping if you want to change the typeface and the size, and add that pink double-underline.
Here are the steps:
-
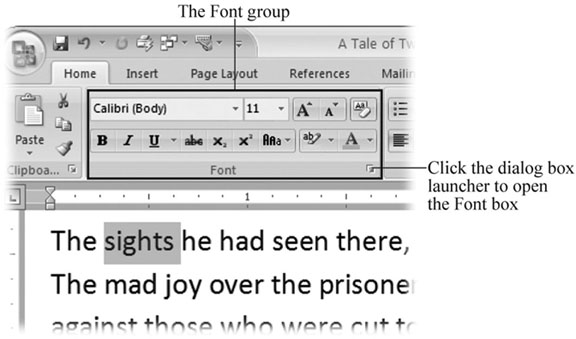
Select a group of characters, as shown in Figure 4-1
.You can use any of the selection methods described in Chapter 2. You can drag to select a single character. You can double-click to select a word. Or you can move the mouse cursor to the left side of a paragraph, and then double-click to select the whole paragraph.
Of course, if you havenât typed anything yet, you can always go right to the ribbon and make your formatting choices first. Then type away.
Figure 4-1. The Font group on the Home tab holds most of the common character formatting commands. Choices you make here apply to text youâve selected (like the word âsightsâ in this example). If you donât see the command you need, in the lower-right corner, click the dialog box launcher to open the Font dialog box (Figure 4-2).
-
Go to Home â Font or the Font dialog box (click the little launcher button shown in Figure 4-1 or press Alt+H, FN) and make your formatting choices.
Many of the buttons in the Font group act like toggles. So, when you select text and click the underline button, Word underlines all the characters in the selection. When you click the underline button again, the underline goes away.
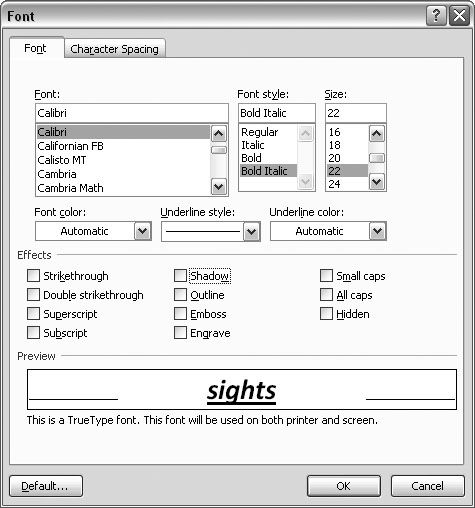
If you canât find the command you want on the ribbon, or if you want to make several character formatting changes at once, then open the Font box (Figure 4-2).
Figure 4-2. Open the Font box (Alt+H+FN) to change the typeface, style, size, color, and other effects. Like many dialog boxes, the Font box gives you access to more commands than you find on the ribbon.
Formatting with the Mini Toolbar
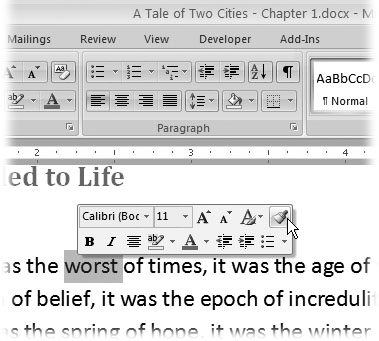
Wordâs Mini Toolbar isnât quite as much fun as your hotel roomâs mini-bar, but there are times when youâll be glad itâs there. A new feature in Word 2007, the Mini Toolbar pops up after youâve selected text (Figure 4-3). Itâs faint at first, but if you move your mouse toward it, the Mini Toolbar comes into focus showing commands, most of which are character formatting commands. Just click one of the buttons to format your selection (or move your mouse away from the toolbar if you want it to go away).
Formatting with Keyboard Shortcuts
When youâre typing away and the muses are moving you, itâs a lot easier to hit Ctrl+I to italicize a word than it is to take your hands off the keyboard and grab a mouse. Because most formatting commands work like toggles, formatting options like bold, underline, and italics become second nature. For example, to italicize a word, just press Ctrl+I at the beginning, type the word, and then press Ctrl+I at the end. Table 4-1 is your cheat sheet to every character formatting shortcut known to Word.
Figure 4-3. The mini-toolbar gives you access to the most commonly used commands. It just so happens that most of these commands are character formatting commands.
Table 4-1. As a result of Wordâs evolution, most formatting commands have more than one keyboard shortcut. A new set of keyboard shortcuts is part of the reorganization that came up with Word 2007âs new ribbon feature. But if commands like Ctrl+B for bold and Ctrl+U for underline are permanently burned into your brain, donât worry: Those commands from previous versions still work just fine.
|
Command |
Keyboard Shortcut |
Old Keyboard Shortcut |
Description |
|---|---|---|---|
|
Font |
Alt+H, FF; arrow keys; Enter |
Ctrl+D; arrow keys; Enter |
Alt+H, FF selects the font drop-down menu; use the arrow keys to highlight the font; press Enter to finish the selection. |
|
Font Size |
Alt+H, FS; arrow keys; Enter |
Ctrl+Shift+P; arrow keys; Enter |
Alt+H, FS selects the font size drop-down menu; use the arrow keys to highlight the size; press Enter to finish the selection. |
|
Increase Font Size |
Alt+H, FG |
Ctrl+> |
Increases font size. |
|
Decrease Font Size |
Alt+H, FK |
Ctrl+< |
Decreases font size. |
|
Bold |
Alt+H,1 |
Ctrl+B |
Toggles bold on and off. |
|
Italic |
Alt+H,2 |
Ctrl+I |
Toggles italics on and off. |
|
Underline |
Alt+H, 3; Enter |
Ctrl+U |
Toggles underline on and off. |
|
Double underline |
Alt+H, 3; down arrow; Enter |
Ctrl+Shift+D |
Toggles double underline on and off. |
|
Underline style |
Alt+H, 3; arrow keys |
 |
Alt+H, 3 selects the underline style drop-down menu; use the arrow keys to highlight the style; press Enter to finish the selection. |
|
Strikethrough |
Alt+H, 4 |
 |
Toggles strikethrough on and off. |
|
Subscript |
Alt+H, 5 |
Ctrl+= |
Toggles subscript on and off. |
|
Superscript |
Alt+H, 6 |
Ctrl++ |
Toggles superscript on and off. |
|
Change Case |
Alt+H, 7; arrow keys |
Shift+F3 |
Toggles through five case options: sentence case, lowercase, uppercase, capitalize each word, toggle case. |
|
Color |
Alt+H, FC; arrow keys; Enter |
 |
Alt+H, FS FC selects the font color drop-down menu; use the arrow keys to highlight the color; press Enter to finish the selection. |
|
Highlight Text |
Alt+H, I; Enter |
 |
Alt+H, I selects the highlight drop-down menu; Enter highlights the selection. |
|
Clear formatting |
Alt+H, E |
Ctrl+Spacebar |
Removes text formatting from the selection. |
Changing Capitalization
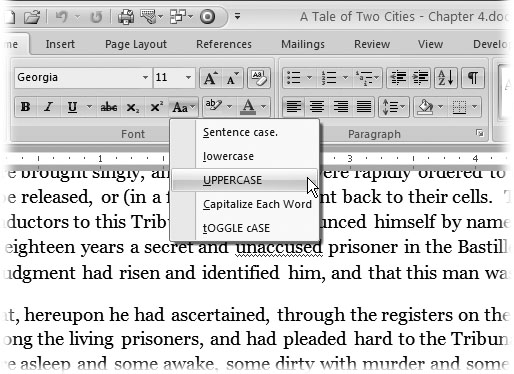
Any letter can be uppercase or lowercase, but when you get to words and sentences, you find some variations on the theme. Itâs not unusual to have a heading or a company name where all the letters are capitalized. Sentences start with an initial cap on the first word only, and titles usually have the major words capped. In an effort to automate anything that can possibly be automated, Microsoft provides the Change Case menu (Alt+H, 7) on the ribbon (Figure 4-4).
The Change Case command defies the usual rules about selecting before you apply character formatting. If you donât select anything, Word assumes you want to apply the Change Case command to an entire word, so the program selects the word at the insertion point. If youâve selected text, the command works, as youâd expect, only on the selection.
Figure 4-4. The Change Case menu gives you five ways to change the case of a selection. To open it, click the button that looks like two letter As.
Small caps for headers
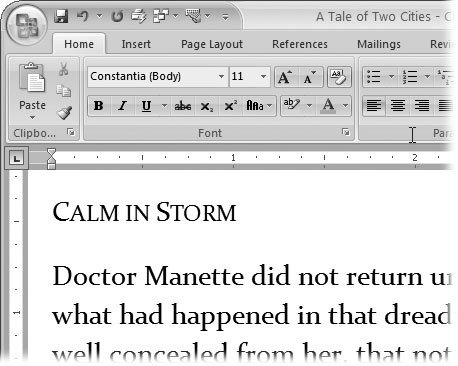
Small caps (Figure 4-5) are another variation on the capitalization theme. You wonât find this option on the Change Case button; for small caps you have to use the Font dialog box, which you find on the right side under Effects (where underline or strikethrough are). Small caps are great for headings and letterhead (especially if youâre a lawyer or an accountant), but you wouldnât want to use them for body text. Itâs difficult to read all capitalized text for an entire paragraph.
Figure 4-5. Small caps are a great way to distinguish a heading or subheading from body text, like the words âCalm in Storm.â Initial letters get full-sized capitals while the letters that would normally be lowercase get small capitals.
Formatting Paragraphs
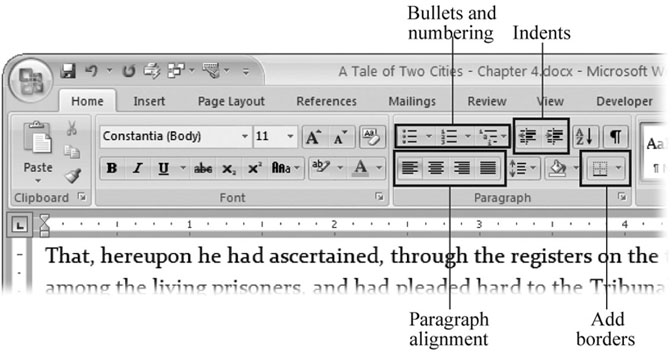
Formatting a paragraph usually entails changing its shape. You may be squeezing it in with indents or stretching it out with additional line spacing. Other kinds of formatting change a paragraphâs very nature, like adding a border or making it part of a numbered or bulleted list. The Paragraph formatting group (Home â Paragraph) is right next door to the Font group (Figure 4-6). You donât need to select text to format a paragraph; just make sure the insertion point is in the paragraph you want to format. However, if you want to format several paragraphs at once, select them all before you apply a command.
Figure 4-6. Paragraph formatting commands are in the Home â Paragraph group. Left to right, from the top, you find buttons to add bullets and numbers, apply indents, sort paragraphs, show the paragraph mark, align paragraphs, adjust line spacing, change the background color, and add borders.
Aligning Text
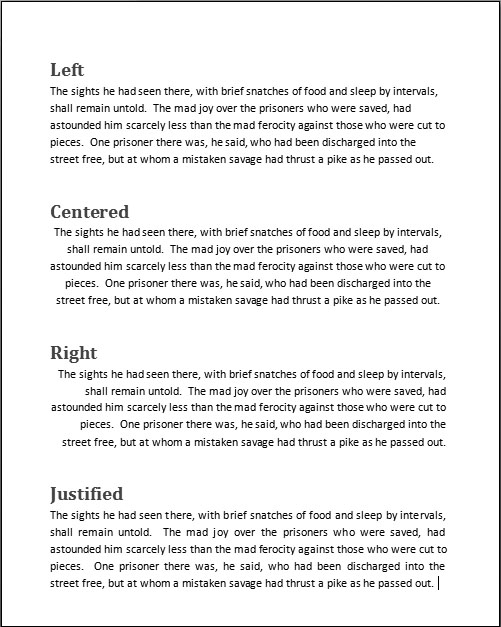
Itâs easy to apply alignment to text. With your insertion point in the paragraph you want to change, click one of the alignment buttons in the Paragraph group on the Home Tab. For example, Home â Paragraph â Left sets the current paragraphâs alignment. As shown in Figure 4-7, you have four choices when it comes to aligning your paragraphs:
-
Left (Alt+H, AL). Aligns the lines in the paragraph flush on the left side and ragged on the right. Left alignment is standard for letters, reports, and many business documents.
-
Centered (Alt+H, AC). Centers each line in the paragraph, leaving both left and right margins ragged. This setting is appropriate for headings and short chunks of text, as in invitations and advertisements. Avoid using centered text for long paragraphs, since itâs hard for readersâ eyes to track from the end of one line to the beginning of the next when the left margin is uneven.
-
Right (Alt+H, AR). Aligns the lines in the paragraph flush on the right side and ragged on the left. This unusual alignment is most often used for setting captions or quotations apart from the main text.
-
Justified (Alt+H, AJ). Adds space between letters and words so that both the left and right sides of the paragraph are straight and flush with the margins. Justified margins give text a more formal look suitable for textbooks or scholarly documents. If your justified text looks odd because big gaps appear between the letters or words, try using a long lineâthat is, putting more characters per line. You can do this by extending the margins (Alt+P, M) or by changing the size of your font (Alt+H, FS).
Figure 4-7. Set the alignment of your paragraphs using the buttons on the ribbon. Four settings are available: Left, Centered, Right, and Justified.
Indenting Paragraphs
One of the most common reasons for indenting a paragraph is to set off quoted text from the rest of the document. Usually, you move the paragraphâs left edge in about a half inch from the left margin. Word makes it easy to indent text in this way. Just use the Increase Indent button on the ribbon (shown back in Figure 4-6) or the shortcut Alt+H, AI. If you change your mind and want to remove the indent, use the companion command Decrease Indent (Alt+H, AO).
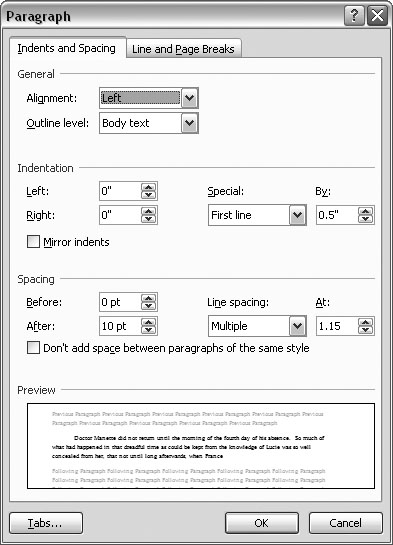
The ribbon buttons handle most everyday indentation chores, but what if you need to customize your indents? To do that, open the Paragraph dialog box to the Indents and Spacing tab (Alt+H, PG), and you see the Indentation tools in the middle of the tab (Figure 4-8).
Figure 4-8. The Paragraph box is divided into four sections. From the top you see: General, Indentation, Spacing, and Preview. As you adjust your paragraph formatting using tools from the first three groups, you see the changes take place in an example paragraph in the Preview window.
The indentation tools in the Paragraph box let you set indents with much more precision than the simple Increase and Decrease buttons. For one thing, you can indent your paragraph from both margins using the Left and Right text boxes. Type a number in the box or use the arrow buttons to make an adjustment. Look in the Preview window at bottom to get a sense of the changes youâre making.
Novels, short stories, and other manuscripts often indent the first line of each paragraph. To set up this format, click the Special drop-down menu, and then choose âFirst line.â Type a number, in inches, in the By box on the right. A quarter inch (.25â) is usually an attractive first-line indent.
Tip
By the way, donât hit Tab to create a first-line indent. For one thing, it creates an amateurish, type-writer-like half-inch indent. And you lose all the benefits of paragraph formatting. For example, when you press Enter to start a new paragraph, Word automatically carries your settings forward, with a perfect first-line indent just like the paragraph above. If you use the Tab key, you have to remember to hit it at the beginning of every paragraph, and thereâs the danger of messing up your indents if you change the tab settings (Section 4.5).
For the reverse of the âFirst lineâ indent, choose the hanging indent where the first line extends to the left margin, while the rest of the paragraph is indented the amount shown in the By box. This kind of indentation makes great looking glossaries, bibliographies, and such.
Spacing Between Paragraphs
For documents like business letters or reports that use block-style paragraphs, thereâs usually a little space between each. You can adjust this spacing between paragraphs to set off some blocks of text from the rest.
Use the Paragraph dialog box (Figure 4-8) to adjust the distance between paragraphs. On the left, you can enter numbers to set the space before the paragraph and the space after. With body text paragraphs, itâs good to set the same, relatively small distance before and afterâsay, three points. For headers, you may want to put a little extra space before the header to distance it from the preceding text. That space makes it clear that the header is related to the text beneath it. Generally speaking, the more significant the header, the larger the type and the greater the spacing around it.
Spacing Between Lines
In the Paragraph box, to the right of the paragraph spacing controls, you find the âLine spacingâ tools. Use these controls to set the distance between lines within paragraphs. You have three presets and three custom settings:
-
Single keeps the lines close together, with a minimum amount of space between. Single spacing is usually easy to read, and it sure saves paper.
-
1.5 lines gives your text a little more breathing room, and still offers a nice professional look.
-
Double is the option preferred by teachers and editors, so thereâs plenty of room for their helpful comments.
-
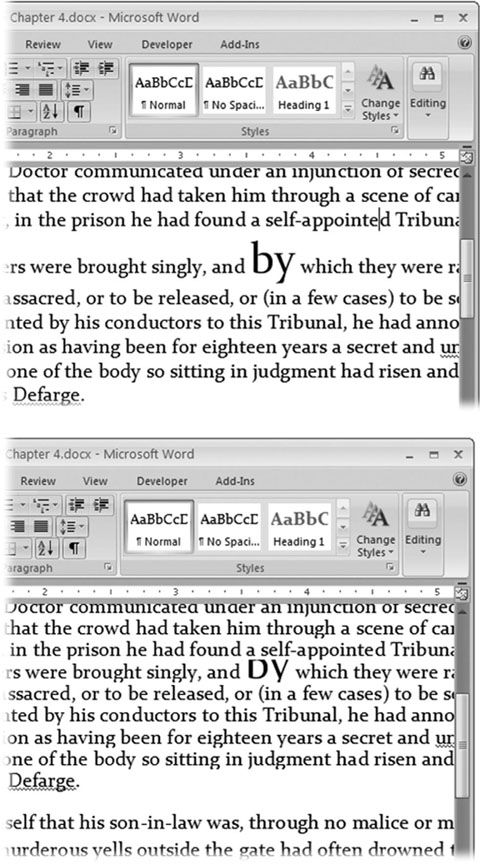
At least is a good option if you have a mix of font sizes or include inline graphics with your text. This option ensures that everything fits, as Figure 4-9 illustrates. -
Exactly puts you in control. Type a number in the At box, and Word wonât mess with that setting. -
Multiple is the oddball of the bunch. Think of Multiple as a percentage of a single line space: 1=100 percent; .8=80 percent; 1.2=120 percent; and so on.
Figure 4-9. Line spacing controls the space between lines within a paragraph. These examples show the same paragraph, with two different settings. All the type is set to 11 points except for the word âby,â which is 24-point type. Top: Using the âAt leastâ option with 12 points entered in the At box, this setting adjusts so that the oversized word fits. Bottom: Using the Exactly option with 12 points in the At box, the b and y get clipped off.
Inserting Page Breaks and Line Breaks
Some things just look wrong, such as a heading at the bottom of a page with no text beneath it. That heading should be at the top of the next page. Sure, you could force it over there with a page break (Ctrl+Enter), but that can cause trouble if you edit your text and things move around. You could end up with a page break in some weird spot. The solution is to adjust your Line and Page Break settings so that headings and paragraphs behave the way you want them to.
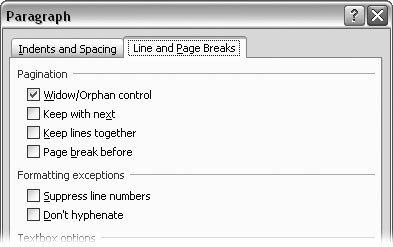
On the Paragraph boxâs Line and Page Breaks tab (Figure 4-10), you can adjust how paragraphs handle these breaks. The behavior becomes part of the paragraphâs formatting and travels with the text no matter where you move the text or breaks. The keyboard shortcut to get there is Alt+H, PG, Alt+P. You can use four settings:
-
Widow/Orphan control. Single lines abandoned at the top (widows) or bottom (orphans) of the page look out of place. Turn on this checkbox, and Word keeps the whole family, er, paragraph together.
-
Keep with next. Certain paragraphs, like headings, need to stay attached to the paragraph that comes immediately after them. Choose the âKeep with nextâ option for your headings, and they always appear above following paragraph. -
Keep lines together. Sometimes you have a paragraph that shouldnât be split between two pages, like a one-paragraph quote or disclaimer. Use this option to keep the paragraph as one unit. -
Page break before. Use this command with major headings to make sure new sections of your document start on a new page.
Figure 4-10. Use the Line and Page Break settings to control the appearance of your text and to avoid awkward transitions between pages.
Creating Bulleted and Numbered Lists
Bullets and numbers add impact and help organize information. The bullets in the previous section call attention to the Line and Page Breaks commands and show that the commands are related to each other. Numbered paragraphs send a different signal, implying that the items listed are sequential or have a hierarchy. This book uses numbered paragraphs for step-by-step instructions. Meeting minutes are usually numbered, both as a point of reference and to indicate the order of the meetingâs events.
Like the other paragraph formatting options, you donât have to select a paragraph to format it. Itâs enough just to have the insertion point in the paragraph. When using bullets or numbers, you usually want to format more than one paragraph. To do that, make a selection, and then click the bullet or number button.
Bulleted paragraphs
Itâs easy to turn an ordinary paragraph into a bulleted paragraphâWord does all the heavy lifting for you. You may spend more time choosing a bullet style than applying it.
Hereâs how to create a bulleted list:
-
Go to Home â Paragraph, and then click the triangle next to the Bullet button to open the Bullets menu (or press Alt+H, U).
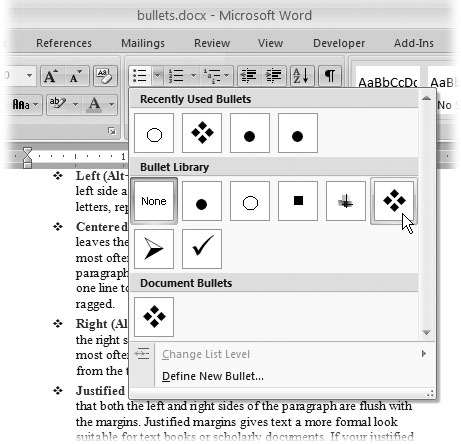
At the top of the menu (Figure 4-11), you see bullet styles that you used recently. In the middle, you see your Bullet Library. The bottom section shows bullet styles that have already been used in the document. At the very bottom are two commands for customizing bullets.
Figure 4-11. The Bullet menu provides choices from the traditional filled circle to more contemporary options. If you have your own ideas for bullet design, at the bottom of the menu click Define New Bullet.
-
On the Bullets menu, click to choose a bullet style.
When you click a bullet to apply that style to the paragraph, a couple of things happen. Word adds the bullet and automatically formats the paragraph with a hanging indent (Section 4.3.2), so that the first line of the paragraph extends farther to the left than the other lines. The bullet appears in this overhang, calling attention to the bullet and setting off the paragraph from the other body text.
-
Type some text, and then press Enter to start a new paragraph.
When you hit Enter to create a new paragraph, Word assumes that youâre continuing with your bulleted list, so it adds the same bullet and indent automatically. You donât have to do anything; just keep on writing.
-
When youâre through with your bulleted list, press Enter, and then click the Home â Paragraph â Bullet button again to turn off bullet formatting.
The paragraph with the insertion point changes from a bulleted paragraph to a normal paragraph.
If you have a few paragraphs that youâve already written, and you want to change them to bulleted paragraphs, just select all the paragraphs, and then click the Bullet button.
Customizing bullets
You donât have to settle for the bullets shown on the menuâWord has more choices tucked away. You can even use your own graphics for bullets, like a miniaturized version of your company logo. To explore the Bullet options available to you, open the Bullet menu (Alt+H, U), and then, at the bottom of the menu, click Define New Bullet. The Define New Bullet Box opens, showing you three buttons at the top: Symbol, Picture, and Font. Use the Symbol to browse through additional bullet options that are built into Wordâs type libraries. Use the Font button to apply character styles to your choice such as font size, shadow, or bold formatting.
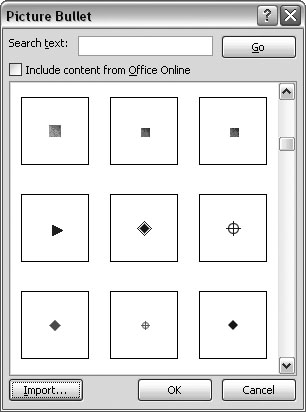
The middle button is the most interestingâit opens the Picture Bullet box (Figure 4-12) where you see a whole slew of bullets based on picture files. These files are the same sort used for drawings and photographs, with filename extensions like .jpg, .gif, .pct, and .emf. In addition to these dozens of bullet options, you can use your own picture or graphic files as bullets. Just click the Import button at the bottom-left corner to open the Add Clips to Organizer box. Use this Windows file box to select any picture on your computer and add it to your bullet library.
Numbered paragraphs
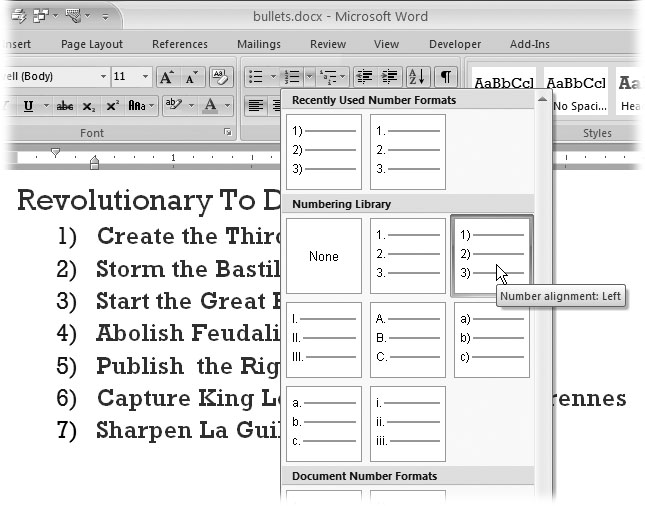
In most cases, numbered paragraphs work just like bulleted paragraphs. You can follow the step-by-step instructions in the previous section for making bulleted paragraphs to make numbered paragraphs. Just click the Numbering button, and then choose a number style (Figure 4-13).
The main distinction between the numbered paragraphs and the bulleted paragraphs is in the options. For numbered paragraphs, you can choose from Arabic numbers, Roman numerals, numbers set off by parentheses, and alphabetic sequences. You can even use words such as One, Two, Three, or First, Second, Third.
Multilevel lists
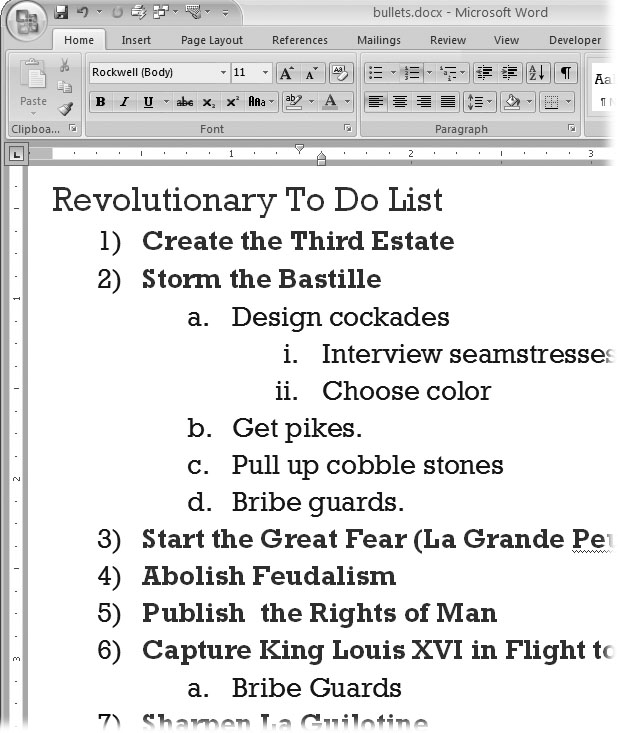
Multilevel lists are a more advanced numbering format. They help you create project and document outlines, as well as legal documents divided into articles and sections. In a multilevel list, each new level is indented (nudged to the right), and usually each new level has a new number format (Figure 4-14). In addition to outline and legal numbering, multilevel lists can use bullets instead of numbers. So for example, you can create a bulleted list that uses squares for level one, triangles for level two, and circles for level three. If you choose a bulleted multilevel list, the lines within the levels arenât sequenced; theyâre just bulleted.
Figure 4-12. Open the Picture Bullet box to see bullets based on picture files like JPEG and GIF. If you have pictures or drawings on your computer that you want to use as bullets, then click the Import button in the lower-left corner.
Figure 4-13. Word provides several styles for numbered paragraphs. In fact, a better term would be sequenced paragraphs, because not all of the styles use numbers. You find recently used styles at the top of the list. To customize your numbered lists, click Define New Number Format (not shown) at the bottom of the list.
Figure 4-14. Multilevel lists add an extra twist to the numbered format. Theyâre like outlines and provide a new sequence of characters for each new outline level.
Setting Tabs
The lowly Tab key contains more power than you may think. Sure, you can use the Tab key to scoot the insertion point across the page in half-inch increments. But Wordâs tab tool is capable of much loftier feats: You can use it to design a dinner menu, create a playbill, or develop a series of consistently formatted reports.
Tab stops are all about precision alignment, giving you control over the way you present text and numbers to your readers. For example, on your dinner menu you can use tab leaders (dotted lines like the ones in this bookâs table of contents) so that your readerâs eye tracks from Wild Salmon to the exceptionally reasonable price youâre asking. Once you have settings you like, you can save and reuse them. (Howâs that for efficiency?)
Before you start working with tabs, you need to know a few basic terms:
-
Tabs. Technically considered tab characters, tabs are hidden formatting characters, similar to space characters. Tabs are embedded in your documentâs text. -
Tab stops. These paragraph settings define the position and characteristics of tabs in your document. Think of tab stops as definitions, describing your tabs. To define them, you use Word tools, like the Ruler or the Tabs dialog box. -
Tab key. The key on your computer keyboard that inserts tabs into your text.
Press the Tab key, and Word inserts a tab in the text at that point. The tab character makes the insertion point jump left to right and stop at the first tab stop it reaches. If you havenât set any new tab stops, Word uses the built-in set of tab stopsâone every half inch across the widthâthat every new, blank document starts out with.
How Tab Stops Work
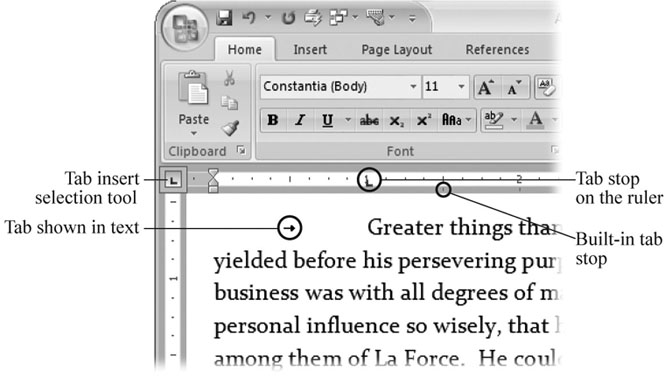
Tab stop settings apply to paragraphs. If a paragraph has several lines, the tab stops are the same for all the lines within that paragraph. If you havenât deliberately set tab stops, Word provides built-in tab stops at half-inch intervals. These stops are left tab stops, meaning the text aligns on the left side. You can see all tab stops on the horizontal rulerâthey show as small vertical tick marks in the gray area below the number scale (Figure 4-15).
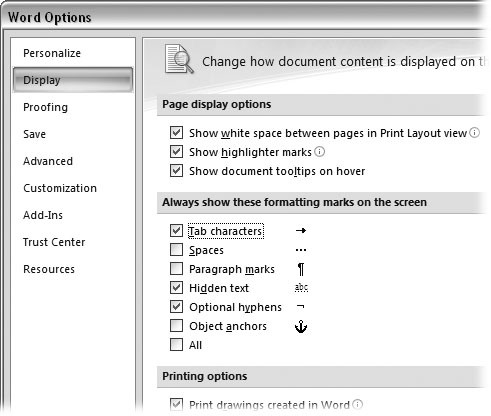
Figure 4-15. Tabs are just white space in your text, but for Word, theyâre these little arrow characters that position your text on the line. You can change your Word Options (Office button â Word Options â Display) to show tabs on your screen.
Tip
If you donât see tab stops in the ruler, click within a paragraph. Remember, tab stops are paragraph settings, so your insertion point must be in a paragraph to see them.
Viewing Tab Marks in Your Text
Tabs are invisible on the printed page, like spaces or paragraph marks. Sometimes, when your document behaves unexpectedly, it helps to reveal the hidden characters so you can see if tabs are the culprit. After all, when theyâre hidden, all you see is white space on the page, however, spaces, tabs, and indents each behave quite differently.
To view tabs within your text:
-
Choose Office button â Word Options to open the Word Options dialog box (Figure 4-16).
The Word Options button is at the bottom of the Office menu.
Figure 4-16. Use the Word Options box to reveal formatting characters like tabs, spaces, and paragraph marks. When you turn on the checkbox next to the mark, you see these nonprinting characters on your screen.
-
On the left side of the Word Options box, choose the Display option.
The panel on the right is divided into three parts. The top section shows page display options, the middle section shows formatting marks, and the bottom section holds printing options.
-
In the middle group, turn on the âTab charactersâ checkbox to make your tabs visible.
An icon next to this checkbox shows you the symbol for tab characters. This mark shows up on your computer screen but not in printed text.
-
Click OK to save the settings and close the dialog box.
The box closes and you see the tabs as small arrows in your text.
Deleting and Editing Tabs
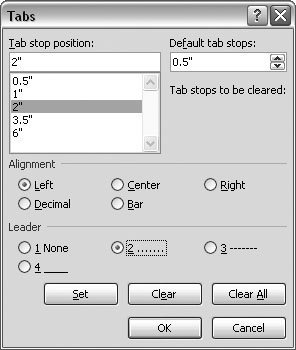
Because tabs are characters within your document, you can delete, copy, and paste them, just as you would any other character or text fragment. Maybe you want to delete a tab just click immediately after a tab character, and then press the Backspace key. You can also use the Tabs box (Figure 4-17) for to control tabs.
With tabs, you can use almost any editing trick that youâd use on other characters. You can select and drag a tab to a different place in your text. You can use shortcut keys, such as Ctrl+X to cut a tab and Ctrl+V to paste it someplace else. (All of these activities are much, much easier when youâve set your Word Options to view tab marks as described previously.)
Figure 4-17. The Tabs box puts you in complete control of all things tabular. When you select a specific tab in the upper-left box, you can customize its alignment and leader characters.
Types of Tabs
Five types of tabs are available in Wordâone of which isnât a true tab but works well with the others:
-
Left tab. The most common type of tab, it aligns text at the left side; text flows from the tab stop to the right. When you start a new, blank document, Word provides left tabs every half inch.
-
Center tab. Keeps text centered at the tab stop. Text extends evenly left and right with the tab stop in the middle.
-
Right tab. Aligns text to the right. Text flows backwards from the tab stop, from right to left.
-
Decimal tab. Used to align numbers, whether or not they have decimals. Numbers align with the decimal point centered on the tab stop. Numbers without decimal points align similar to a right tab. -
Bar tab. The Bar tab is the oddball of the group and, no, it has nothing to do with your local watering hole. It also has nothing to do with aligning text. It inserts a vertical bar in your text as a divider. The bar appears in every line in the paragraph. This tab stop ignores tabs inserted in your text and behaves in the same manner whether or not tab characters are present.
Note
There may be a certain Microsoftian logic in grouping the bar tab with the tab feature, but Word provides other ways to place vertical lines on your pages that you may find more intuitive. You can use Insert â Insert Shapes â More and choose the line for free-form lines. Or you can use borders for paragraphs or tables.
Tab Leaders
Tab leaders help readers connect the dots by providing a trail from one tabbed item to the next. Theyâre ideal for creating professional-looking menus, playbills, and more.
Here are some examples:
	Hamlet, Prince of Denmark...........Sir Laurence Olivier
	Ophelia, daughter to Polonius.......Roseanne Barr
Four Leader options can be used with each type of tab stop except the bar tab:
	None                                No leader here
	Dotted..............................You've seen this before
	Dashed_ _ _ _ _ _ _ _ _ _ _ _ _ _ _ For a different, intermittent look
	Underline__________________________ When only a solid line will do
As visual aids, leaders are quite helpful, and they work equally well for text and numbers.
Using Wordâs Rulers
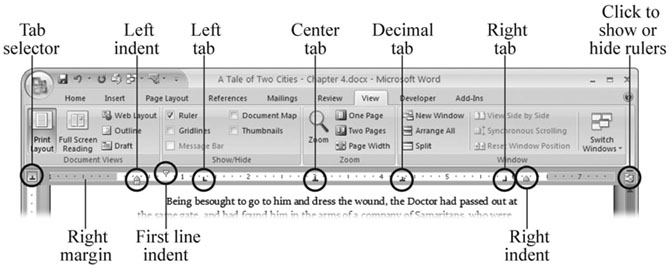
If youâre visually oriented, you may prefer the ruler for futzing with tab stops, page margins, and indents. Two rulers are availableâhorizontal and vertical. The horizontal ruler appears at the top of the page, giving you quick access to your tab, indent, and margin settings. To make the rulers visible, press Alt+W, R, or click the View Ruler button at the top of the right-hand scroll bar (Figure 4-18).
Tip
The ruler marks off your page in the measuring units of your choice. The factory setting uses inches, but if you want to make changes, you can do that in Word Options. Go to Office button â Word Options â Advanced. Scroll down to the group under Display, and then change the drop-down menu labeled âShow measurements in units ofâ to your preferred units of measurement.
Figure 4-18. Wordâs ruler provides lots of information about the formatting of the current paragraph, that is, the paragraph that contains the insertion point. Use the button just above the scroll bar for a quick way to show and hide your ruler.
Managing Tab Settings with the Ruler
In Figure 4-18, the ruler measures the page in inches. The grayed areas at both ends of the ruler indicate the page margins. The numbers on the ruler mark the distance from the left margin in both directions, left and right. Note the number 1, at the left edge of the ruler in Figure 4-18.
Setting tab stops
Wordâs every-half-inch tab stops can work for many of your documents, but sooner or later, you may need to put a tab stop in a different place or change its style. No problemâitâs easy enough to do with the ruler.
Setting a new tab stop is a two-step process:
-
Using the selection box to the left of the ruler, choose the type of tab you want.
The icon in this box shows what kind of tab youâre about to applyâLeft, Center, Right, Decimal, or Bar. When you hold your cursor over the box for a second or two, a little screen tip appears describing the formatting option. Click the box to cycle through the tab stop and indent options.
-
Once youâve selected the tab type you want, click the ruler to position the tab.
Click the point on the ruler where you want to place the tab stop. An icon appears on the ruler showing the position and the type of tab stop.
Tip
If you find the tab icons a little confusing, hereâs some help: Think of the vertical line as the tab stop and the horizontal line at the bottom as the direction your text flows. For example, the Left tab icon is L shaped, indicating that text flows to the right, away from the tab stop. The Center tab icon has the vertical line in the middle.
You can add an almost limitless number of tab stopsâone for every tick mark on the ruler. If you need greater precision, use the Tab dialog box described in Section 4.5. Setting a tab stop removes all the built-in tab stops to its left, but the ones to the right remain.
Adjusting and removing tab stops with the ruler
If a tab stop isnât exactly where you want it, you donât have to delete itâjust drag it to a new position on the ruler. If you wish to remove a tab stop, drag it up or down off the ruler, and it disappears. When you make these changes, your document shows the consequences. Any tabs in your text shift over to the next readily available tab stop, which can be a built-in tab stop or one that youâve set.
Setting Margins with the Ruler
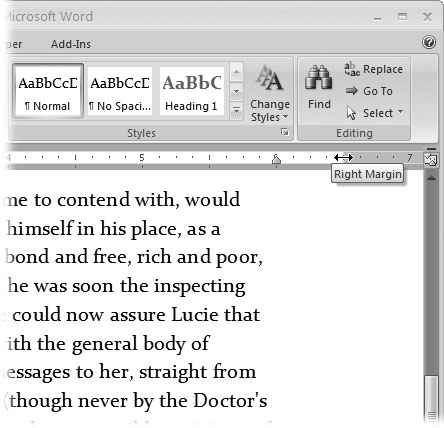
You can always use the Page Layout tools (Page Layout â Page Setup â Margins or Alt+P, M) to set your margins with a click of the mouse, but for visual control, nothing beats the ruler (Figure 4-19). The lighter part of the ruler shows the text area, and the darker part shows your margins. Making adjustments is simply a matter of clicking and dragging the margin to a new location. Keep in mind that changing your margin affects the entire document section; more often than not, that means it affects the entire document because many documents are a single section. (For more details on working with sections, see Section 9.2.)
Figure 4-19. Hold your cursor over the margin boundary on the ruler, and it changes to a double arrow, as shown here. The screen tip shows what youâre pointing toâthe right margin, in this case. Drag the boundary to a new location to change your document margins.
Tip
To avoid confusion, remember that indents are used to change the width of a single paragraph, while margins are used to change the paragraph width for an entire section or document.
Adjusting Paragraph Indents with the Ruler
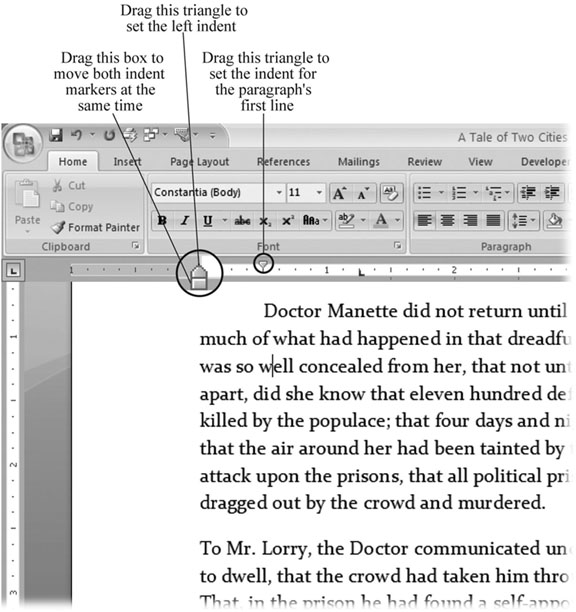
Using the ruler to adjust indentation is similar to changing margins. Itâs just a matter of clicking and dragging. Indents are bit more complicated because you have a few more options, and that means more tools and widgets (Figure 4-20).
It can take awhile to get used to adjusting paragraph indents with the ruler. For one thing, you need a steady hand and accurate clicking to zero in on those little triangle buttons. The top triangle sets the first line indent and moves independently. The bottom triangle creates a hanging indent, and you can move it independently too, as long as you grab only that triangle. That little box below the triangle is your left indent, and if you drag it, both it and the top (first line) indent marker move together.
Figure 4-20. To adjust paragraph indents, slide the little triangles along the ruler. The changes you make affect the paragraph with the insertion point. If you want to make changes to more than one paragraph, make a multiple selection before you start.
Fast Formatting with Format Painter
Whether itâs a special heading or a paragraph of text, formatting a paragraph just the way you want it is a lot of work. Once you have the margins, indents, and tabs in place, and youâve got the font style and size set, youâve invested a chunk of time in the project. Fortunately, you can capitalize on that investment. The Format Painter works like magic. You can use it to copy the formatting of a word, heading, or paragraph onto something else. You donât have to worry about any of the formatting details. You donât even need to know how something is formatted, so long as you like the way it looks.
Hereâs how it works:
-
Select the character or paragraph with the formatting that you want to copy.
You can copy and paint either the character or the paragraph formatting. If you want to copy just text formatting (font, size, text color, and so on), select a few letters or a word with that formatting, not the whole paragraph. Selecting an entire paragraph, complete with the paragraph mark at the end, copies both the character formatting and the paragraph formatting. If you donât select anything, the Format Painter uses the formatting from the current paragraph, so to copy paragraph formatting alone (for example, tabs and indents), just click anywhere in the paragraph.
-
Go to Home â Clipboard and click the Format Painter button, or just press Alt+H, FP.
Your cursor acquires a tiny paintbrush icon. If you have only one quick change to make, just click the Format Painter once. However, if you want to copy the same formatting to several different locations, double-click the Format Painter. When you double-click, the button stays locked down, indicating that it will stay on and let you paint multiple times until youâre ready to stop.
-
Drag the Format Painter over the text or paragraph that you want to change.
Hereâs the fun part. Like magic, your selection takes on all the formatting that you copied. If you double-clicked for multiple format painting, you can keep on dragging over text or clicking paragraphs. When youâre through, hit Esc. The Format Painter button pops back up, and your cursor changes back to its normal I-beam appearance.
Formatting with Styles
Like the Format Painter, Wordâs styles are great time-savers because they let you apply a whole bunch of formatting commands in one fell swoop. Unlike Format Painter, Wordâs styles are permanent repositories of formatting information that you can always apply with one click. So, if youâve discovered or created the perfect style (formatting) for a heading, you can apply that same style to headings today, tomorrow, or a week from tomorrow.
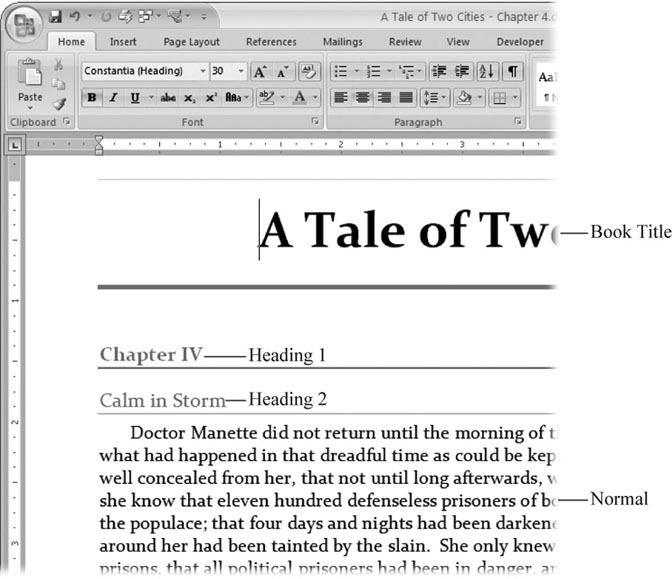
Microsoft provides sets of predesigned Quick Styles. These sets include a Normal style for body text and a number of Heading styles. You can also find a variety of styles for lists, quotes, references, and for paragraphs or text that deserve special emphasis. With a click of your mouse, you can apply any one of these styles and make dramatic changes to your document (Figure 4-21).
Some styles define character formatting, such as font, font size, font style, and special effects such as underlining or strikethrough. Other styles define both character formatting and paragraph formatting. Paragraph formatting includes things like paragraph alignment, line spacing, bullets, numbering, indents, and tab settings.
Figure 4-21. This attractive page uses four Quick Styles: Book Title style centers the text and sets the font to 30-point Constantia with colored borders above and below. Heading 1 for the chapter heading uses a different color and generous paragraph spacing. The Heading 2 spec uses a complementary color and closer paragraph spacing. Finally, the body text uses the Normal style, which provides, among other things, an indent for the first line of each paragraph.
Applying Quick Styles
Itâs easy to preview and apply a style to your text. The action takes place in the Styles group on the Home tab. Follow these steps:
-
Select the text or paragraph that you want to format.
When you want to apply a style to an entire paragraph, just click to put the insertion point in that paragraph. When you want to apply a style to text, you need to select the text first.
-
Go to Home â Styles and hold your cursor over a style to see a live preview in your document.
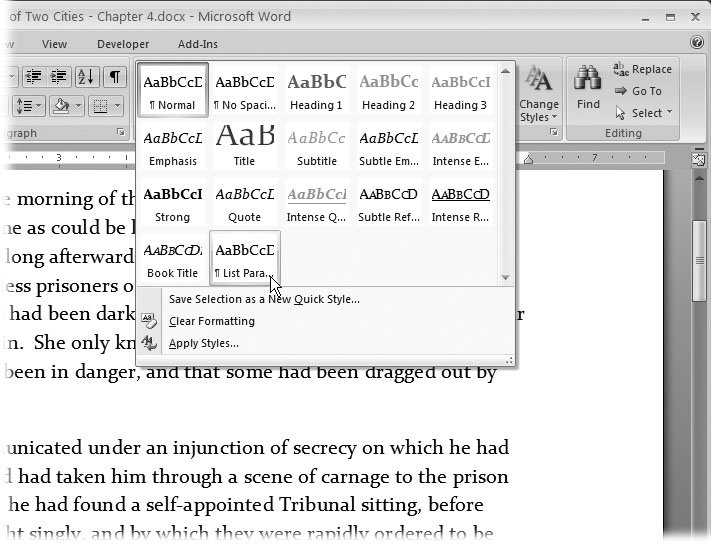
The Styles group shows a few styles right on the ribbon. To see more styles, use the arrows on the right to scroll through the list, or click the button at bottom to open the entire menu (Figure 4-22).
When you hold the mouse cursor over a style, the text in your document changes, showing you the effect of applying that style.
-
Click to apply the style.
When you click a style on the ribbon or in the menu, Word applies that style to your paragraph or text selection.
Figure 4-22. Each style is a collection of formatting commands that you can apply with a mouse click. To browse the available styles, go to Home â Styles. When you hold your mouse over a style, the text in your document changes, giving you a live preview of the style. Word offers dozens of predesigned Quick Styles, or you can create your own.
Modifying Styles
When you apply a style to a paragraph of text, you do more than just change its formatting. In essence, youâve attached that style to the paragraph. If you make changes to that style later, the paragraph reflects those changes. Imagine that you have a style called Heading 1 that centers the headings on the page. Youâve used this style repeatedly throughout your 400-page novel about the French Revolution. Say, you decide your novel would look better with that heading aligned on the left margin rather than centered. Instead of making the change to each individual heading, you edit the Heading 1 style. When you change the style definition, all your headings that are based on the Heading 1 style change to match.
Here are the steps to modifying a style. In this example, you give the Heading 1 style left alignment:
-
Go to Home â Styles and click the Styles dialog box launcher (Figure 4-23).
In the Styles box, you can click to apply any one of the styles to your current selection or paragraph. Even when the Styles box is open, you can click within your text to move the insertion point to a different paragraph. And you can use the scroll bar, the PageUP and PageDN keys, or any other method to navigate through your document.
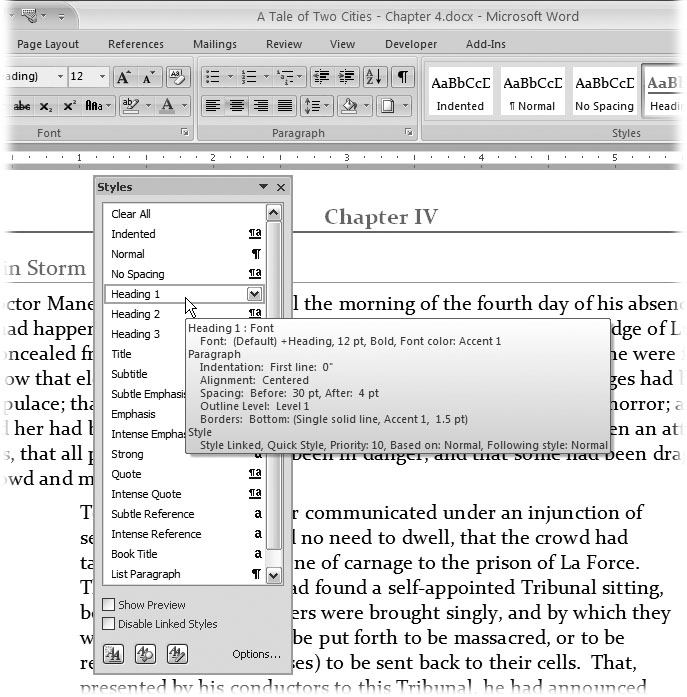
When you hold your cursor over a style, a screen tip pops up showing you details. Turn on the Show Preview checkbox at bottom to see a more visual representation of each of the styles.
Figure 4-23. Open the Style dialog box to see a complete list of all available styles. On the right side, a paragraph mark shows that a style includes paragraph formatting. The lowercase âaâ shows that the style includes character formatting. Click the down arrow button to open a menu where you can modify the style definition.
-
Right-click Heading 1 (or whatever style you want to change), and then choose Modify from the shortcut menu.
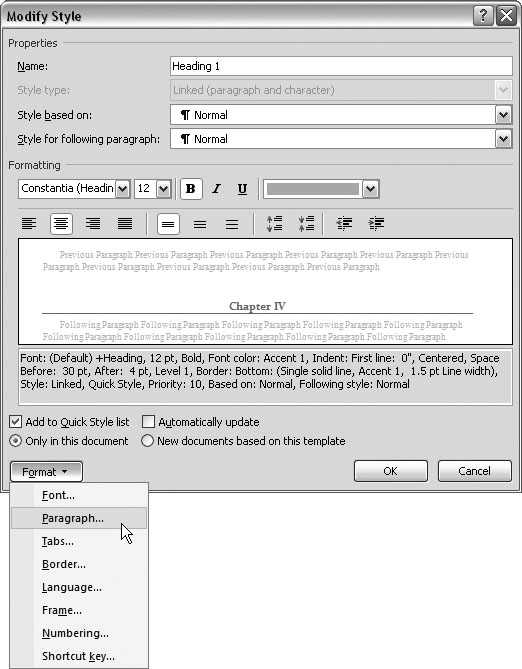
The Modify Style dialog box opens (Figure 4-24). Here you can get under the hood and tinker with all the formatting options.
Tip
When you right-click anywhere on the style name, or click the V button in the Styles dialog box, a context menu shows you several choices for changing and working with the selected style. At the top of the list is âUpdate Heading 1 to Match Selection.â This option changes all the formatting in the selected style so that itâs identical to the current paragraph or selection.
-
In the lower-left corner of the Modify Style box, click the Format button, and then choose Paragraph.
The Paragraph dialog box opens. Yep, itâs exactly the same box you open when you click the Paragraph dialog box launcher on the ribbon or press Alt+H, PG (see Figure 4-8). In fact, the Format button leads you to many familiar dialog boxes, from Fonts to Borders to Tabs. The difference, of course, is that youâre now changing a style format, not just a few paragraphs.
Figure 4-24. The Modify Style box is command central for tinkering with your style definitions. The properties at the top determine the behavior of the styles when youâre working with text. The preview window in the center shows an example of the style in action. Use the format button in the lower-left corner to open dialog boxes to make changes in the character and paragraph formatting.
-
At the top of the Paragraph box, in the General group, click the Alignment drop-down menu, and then choose Left.
In this example, youâre just making a single change, but you can also make changes to any of the other formatting options in this box.
-
Close the Paragraph box, the Modify Style box, and the Styles box.
Everythingâs done except the cleanup. Close each of the boxes youâve opened to go back to your text and continue editing.
Managing Style Sets
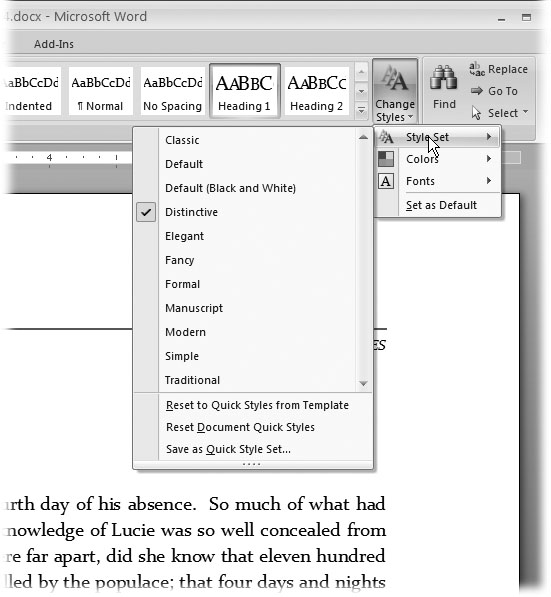
A style set is a collection of styles. Microsoft includes several predesigned style sets with Word, with names like Classic, Distinctive, Elegant, Formal, and Modern. Go to Home â Styles â Change Styles (or press Alt+H, FQ) to see them listed under the Change Styles button (Figure 4-25). Each of Wordâs predesigned style sets includes a Normal style, several heading styles (Heading 1, Heading 2, and so on), and other paragraph and character styles (like Title, Subtitle, Intense, Strong, and Reference). Even though a style has the same name in different setsâlike Heading 1âthe formatting is likely to be quite different. So when you change your documentâs style set, you can get a radically different look.
Figure 4-25. Click the Change Styles button, and then click Style Set to see the different style sets available. Using the Colors and Fonts options, you can make quick changes to the look of your document. Second thoughts? Click âReset to Quick Style from Templateâ to undo any changes made in haste. At the very bottom, you can use the âSave as Quick Style Setâ command to immortalize your current styles as a brand-new style set.
The style set thatâs in use has a checkmark next to the name. If you move your cursor over the name of a different style set, Live Preview shows you your text formatted with that new style set. To make the change permanent, just click the name. The menu closes, and your text has a whole new look.
Creating Your Own Style Set
The best way to create your own style set is to start with one of Microsoftâs predesigned sets, and then modify it. Hereâs a basic procedure for customize an existing style set to meet your needs.
-
Use live preview to browse the existing style sets and choose one thatâs a reasonably close match to what you have in mind.
For example, open a document to a place where you can see a few different types of styles, like body text, some headings, and maybe a numbered or bulleted list.
-
Go to Home â Styles â Change Styles â Style Set (Alt+H, GY). Work your way down the list of style sets, and click one that has a look thatâs similar to the one you want.
The Style Sets submenu lists the style sets available. Hold your mouse cursor over the name of a style set, and live preview shows you how that style set changes your document. In the next steps, youâll modify the style set to be exactly what you want.
-
If necessary, modify the colors and fonts using the options on the Change Styles menu.
The first and most obvious changes you can make are to the colors and fonts. The commands to make those changes are right there on the Change Styles menu (Home â Styles â Change Styles). The previewing procedure is the same: Just hold your mouse cursor over a Font or Color style, and you see your document change. Click to choose a color or font style.
Start with the Normal paragraph style. Consider the font, font size, color, and any other character formatting that you may want to change. (But donât get crazy; after all, this is the Normal paragraph style.) After the Normal paragraph style, move on to the Heading styles. The font size and color you choose for your headings set the tone for your entire document.
-
Examine the existing paragraph styles, and if necessary, make changes.
Consider the line spacing and indents for normal paragraph. Do you want more or less space around them on the page? Choose the paragraph spacing for each heading style. Think about bordersâperhaps youâd like a nice line above or below a heading.
Work your way through any of the existing paragraph or character styles that you know youâll use.
-
Consider the paragraph styles you need, and add new ones if theyâre missing.
After youâve modified the existing styles, think about styles that youâd like to have but arenât part of the set. Maybe you need a numbered list, or a special sidebar paragraph with a border running all the way around it. Create whatever styles you need, and then add them to your style set.
Donât worry if you canât think of everything just now. You can always add new styles later when youâre using the style set.
-
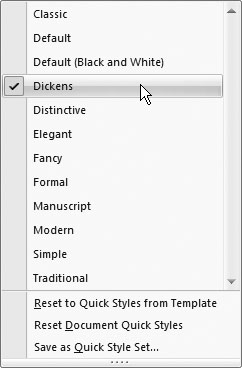
When youâre done customizing your style set, go to Home â Styles â More â Save Selection as Quick Style Set (or Atl+H, L), and then save it with a new name.
The Save command is at the very bottom of the submenu. As a last step, save your style with a name, and it becomes one of the available style sets (Figure 4-26).
A standard Windows Save dialog box opens. Type a name for your style set in the âFile nameâ text box, and then click Save. After youâve saved it, your customized style shows on the Change Styles menu with all the rest.
Figure 4-26. You can create a custom style set thatâs fine-tuned to your own specs. Once saved,
your style set shows up on the Change Styles menu.
Get Word 2007: The Missing Manual now with the O’Reilly learning platform.
O’Reilly members experience books, live events, courses curated by job role, and more from O’Reilly and nearly 200 top publishers.


