
Format numbers as dates or times
Excel for Microsoft 365 Excel for Microsoft 365 for Mac Excel for the web Excel 2021 Excel 2021 for Mac Excel 2019 Excel 2019 for Mac Excel 2016 Excel 2016 for Mac Excel 2013 Excel 2010 Excel 2007 Excel for Mac 2011 More…Less
When you type a date or time in a cell, it appears in a default date and time format. This default format is based on the regional date and time settings that are specified in Control Panel, and changes when you adjust those settings in Control Panel. You can display numbers in several other date and time formats, most of which are not affected by Control Panel settings.
In this article
-
Display numbers as dates or times
-
Create a custom date or time format
-
Tips for displaying dates or times
Display numbers as dates or times
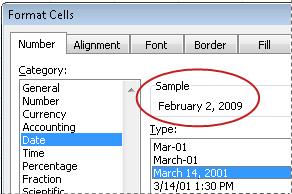
You can format dates and times as you type. For example, if you type 2/2 in a cell, Excel automatically interprets this as a date and displays 2-Feb in the cell. If this isn’t what you want—for example, if you would rather show February 2, 2009 or 2/2/09 in the cell—you can choose a different date format in the Format Cells dialog box, as explained in the following procedure. Similarly, if you type 9:30 a or 9:30 p in a cell, Excel will interpret this as a time and display 9:30 AM or 9:30 PM. Again, you can customize the way the time appears in the Format Cells dialog box.
-
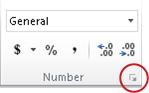
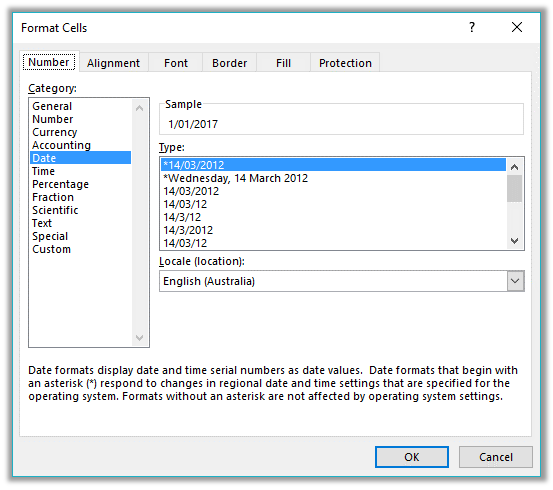
On the Home tab, in the Number group, click the Dialog Box Launcher next to Number.

You can also press CTRL+1 to open the Format Cells dialog box.
-
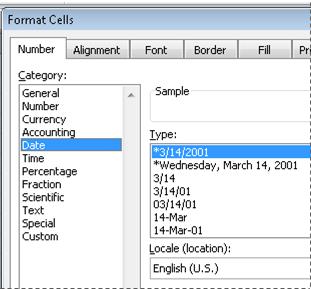
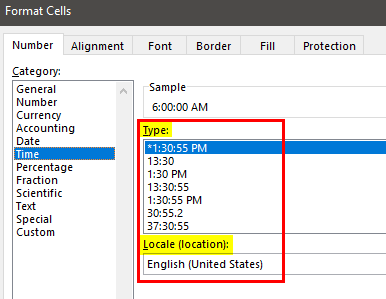
In the Category list, click Date or Time.
-
In the Type list, click the date or time format that you want to use.
Note: Date and time formats that begin with an asterisk (*) respond to changes in regional date and time settings that are specified in Control Panel. Formats without an asterisk are not affected by Control Panel settings.
-
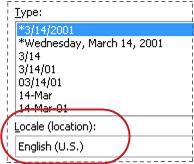
To display dates and times in the format of other languages, click the language setting that you want in the Locale (location) box.
The number in the active cell of the selection on the worksheet appears in the Sample box so that you can preview the number formatting options that you selected.
Top of Page
Create a custom date or time format
-
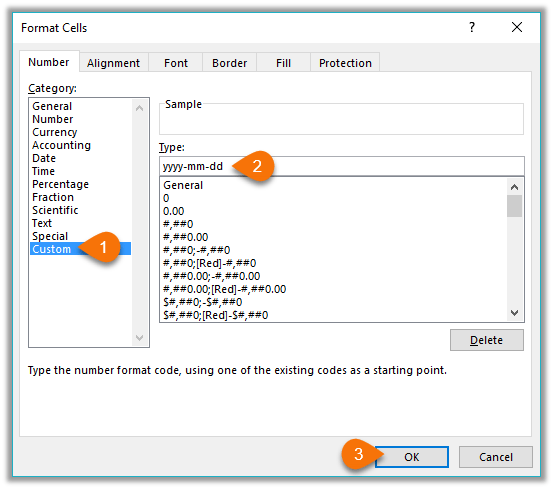
On the Home tab, click the Dialog Box Launcher next to Number.
You can also press CTRL+1 to open the Format Cells dialog box.
-
In the Category box, click Date or Time, and then choose the number format that is closest in style to the one you want to create. (When creating custom number formats, it’s easier to start from an existing format than it is to start from scratch.)
-
In the Category box, click Custom. In the Type box, you should see the format code matching the date or time format you selected in the step 3. The built-in date or time format can’t be changed or deleted, so don’t worry about overwriting it.
-
In the Type box, make the necessary changes to the format. You can use any of the codes in the following tables:
Days, months, and years
|
To display |
Use this code |
|---|---|
|
Months as 1–12 |
m |
|
Months as 01–12 |
mm |
|
Months as Jan–Dec |
mmm |
|
Months as January–December |
mmmm |
|
Months as the first letter of the month |
mmmmm |
|
Days as 1–31 |
d |
|
Days as 01–31 |
dd |
|
Days as Sun–Sat |
ddd |
|
Days as Sunday–Saturday |
dddd |
|
Years as 00–99 |
yy |
|
Years as 1900–9999 |
yyyy |
If you use «m» immediately after the «h» or «hh» code or immediately before the «ss» code, Excel displays minutes instead of the month.
Hours, minutes, and seconds
|
To display |
Use this code |
|---|---|
|
Hours as 0–23 |
h |
|
Hours as 00–23 |
hh |
|
Minutes as 0–59 |
m |
|
Minutes as 00–59 |
mm |
|
Seconds as 0–59 |
s |
|
Seconds as 00–59 |
ss |
|
Hours as 4 AM |
h AM/PM |
|
Time as 4:36 PM |
h:mm AM/PM |
|
Time as 4:36:03 P |
h:mm:ss A/P |
|
Elapsed time in hours; for example, 25.02 |
[h]:mm |
|
Elapsed time in minutes; for example, 63:46 |
[mm]:ss |
|
Elapsed time in seconds |
[ss] |
|
Fractions of a second |
h:mm:ss.00 |
AM and PM If the format contains an AM or PM, the hour is based on the 12-hour clock, where «AM» or «A» indicates times from midnight until noon and «PM» or «P» indicates times from noon until midnight. Otherwise, the hour is based on the 24-hour clock. The «m» or «mm» code must appear immediately after the «h» or «hh» code or immediately before the «ss» code; otherwise, Excel displays the month instead of minutes.
Creating custom number formats can be tricky if you haven’t done it before. For more information about how to create custom number formats, see Create or delete a custom number format.
Top of Page
Tips for displaying dates or times
-
To quickly use the default date or time format, click the cell that contains the date or time, and then press CTRL+SHIFT+# or CTRL+SHIFT+@.
-
If a cell displays ##### after you apply date or time formatting to it, the cell probably isn’t wide enough to display the data. To expand the column width, double-click the right boundary of the column containing the cells. This automatically resizes the column to fit the number. You can also drag the right boundary until the columns are the size you want.
-
When you try to undo a date or time format by selecting General in the Category list, Excel displays a number code. When you enter a date or time again, Excel displays the default date or time format. To enter a specific date or time format, such as January 2010, you can format it as text by selecting Text in the Category list.
-
To quickly enter the current date in your worksheet, select any empty cell, and then press CTRL+; (semicolon), and then press ENTER, if necessary. To insert a date that will update to the current date each time you reopen a worksheet or recalculate a formula, type =TODAY() in an empty cell, and then press ENTER.
Need more help?
You can always ask an expert in the Excel Tech Community or get support in the Answers community.
Need more help?
Want more options?
Explore subscription benefits, browse training courses, learn how to secure your device, and more.
Communities help you ask and answer questions, give feedback, and hear from experts with rich knowledge.
How to Format Time in Excel? (Step by Step)
Table of contents
- How to Format Time in Excel? (Step by Step)
- Understanding the Time Format Code
- Different Formatting Technique for More than 24 Hours’ Time
- Things to Remember
- Recommended Articles
As we know, we can apply the time format for any decimal or fractional value.

Now, let us learn how to use the time format in Excel for the 0.25 value.
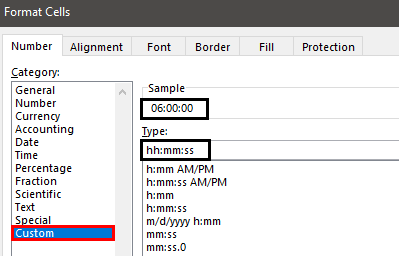
- We must first select the cell. Then, right-click and choose FORMAT Cell excel.

- Now, we can see below the Format Cells window. From there, choose the Time category.

- Now, we can see all the time types available for this value as per the location setting.

- We can see the preview of the selected cell time format. Choose any of the ones to see a similar time in the cell.

- Using the Time format category, we can also use the Custom category to modify the time format.

- We have applied the formatting code as hh:mm:ss, so our time shows the preview as 06:00:00. This time format code will show the time in 24-hour format. So if we do not want to see the 24-hour time format, we must enter the AM / PM separator.


So, this will differentiate the “AM” and “PM” times.
Understanding the Time Format Code
As we learned, the Excel time format code is hh:mm:ss. Let me explain this code in detail now.
- hh: This time code represents the hour part of the time in double-digit value. For example, in the above example, our time value showed as “06.” If we mention a single “h,” the hour part will be only “6,” not “06.”
- mm: This code represents a minute part of the time in a double-digit value.
- ss: This will represent the second part of the time.
If we do not want to see the “seconds” part from the time, then apply only the “time and minute” part of the code.

We can also customize the time. For example, “0.689” equals the time of “04:32:10 PM.”

So, instead of showing like the below, we can modify it as “04 Hours, 32 Minutes, 10 Seconds”.

We get the following result.

For this, we must enter the below custom time code.
hh “hours”, mm “Minutes”, ss “Seconds” AM/PM
So, this will display the time as we have shown above.
Different Formatting Techniques for More than 24 Hours
Working with time could be tricky if we do not know the full formatting technique because if we want to enter the time more than 24 hours, we need to employ a different formatting code.
For example, Mr. A was a sales manager. Below are his call records for the past five days.
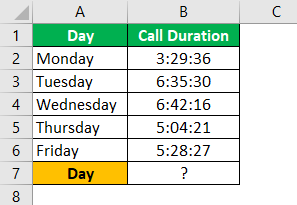
Now, he wants to calculate his total call duration for the week.

So, let us sum all the days in the time format of cell B7.

We got the total as “03:20:10,” which is wrong.
It is a real-time experience. Looking at the data, we can easily say the total duration is more than “03:20:10,” so what is its issue?
The issue is when the summation or time value exceeds 24 hours, we need to give slightly different time formatting codes.
For example, let us select the call duration time and see the status barAs the name implies, the status bar displays the current status in the bottom right corner of Excel; it is a customizable bar that can be customized to meet the needs of the user.read more to see the sum of the values chosen.

So, the total in the status bar is “27:20:10,” but our SUM functionThe SUM function in excel adds the numerical values in a range of cells. Being categorized under the Math and Trigonometry function, it is entered by typing “=SUM” followed by the values to be summed. The values supplied to the function can be numbers, cell references or ranges.read more has returned “03:20:10.”
To understand this better, we must copy the result cell and use paste specialPaste special in Excel allows you to paste partial aspects of the data copied. There are several ways to paste special in Excel, including right-clicking on the target cell and selecting paste special, or using a shortcut such as CTRL+ALT+V or ALT+E+S.read more as values in another cell.

We get the value as 1.13900463. i.e., 1 Day, 20 minutes, 10 seconds.
As we told you, the time value is stored as serial numbers from 0 to 0.9999; we are getting this error sum since this total is crossing the fraction mark.
So for this, we need to apply the time formatting code as “[hh]:mm:ss.”

We get the following result.

Same formula, we have changed the time format to [hh]:mm:ss.
Things to Remember
- Time is stored as decimal values in Excel.
- The date and time are combined in Excel.
- When the time value exceeds 24 hours, we must enclose the time format code of the hour part inside the parenthesis, “[hh]:mm:ss.”
Recommended Articles
This article is a guide to formatting time in Excel. We discuss formatting time in Excel with practical examples and downloadable Excel templates. You can learn more from the following articles: –
- Format Text in Excel
- Add Time in Excel
- TimeValue in VBA
- Subtract Time in Excel
In Excel, working with the time is not difficult but you need to know a few rules to avoid big mistakes. In this article you will learn these rules and how to manage time formats.
Difference between date and time in Excel
In Excel, hours are always a fraction of a day. So it is necessarily decimal numbers.
This rule is fundamental to avoid mistakes in calculation and display.
- Dates are whole numbers (like 1, 2, 3, ….)
- Hours are decimal numbers (like 0.5, 0.33333, …)
A whole number will never be understood as hours or minutes in a worksheet ❗❗❗
A very good example of used is the technique to split date and time to 2 different cells.

Why I can’t convert to Time format
For instance, in this situation, you have whole number in column A. But when you apply the Time format, all the cells returned 00:00:00 🤔

But this is absolutely normal. In Excel, a whole number is a day (and not a time). Now, if you convert to Date & Time format you have this result

How to Convert a whole number in Time
If you have to convert a whole number to Time, you must divide that number by 24 (the number of hours in a day 😉).
=8/24 = 0,333333

Then, you apply the Time format, you have the correct result 😍😎

If the content of your cell is a seconde and not hour, then the formula is
=8/(24*60*60)
Technique with Paste Special — Divide
DON’T waste your time. There is a technique to divide all your numbers by 24 in 2 steps.
The secret is to use paste special (option divide) 😍😍😍
Time format hours, minutes and seconds

In the article Date Format, we saw how to customize the date and time using the dialog box Number Format.
To customize a time, you use the following parameters.
- h for the hour
- m for the minute
- s for the second
Hours over 24 hours
By default in Excel, Time values is between 00:00:00:and 23:59:59
But there is a trick to display times over 24 hours 😉

Tenth, hundredth, thousandth
You can also display the tenth, hundredth and thousandth. But for that, you have to add 0.

Even though dates and time are actually stored as a regular number known as the date serial number, we can make use of extensive Excel date and time formatting options to display them just the way we want.
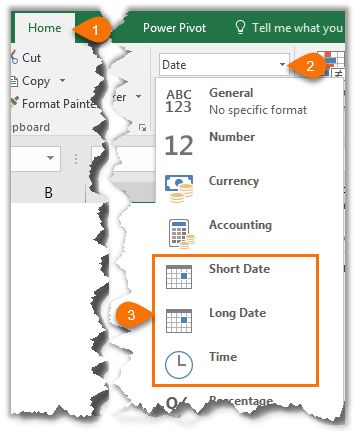
We can access some quick date and time formats from the Home tab > in the Number group:
We can also create our own custom date and time formats to suit our needs. Let’s take a look.
- Select the cell(s) containing the dates you want to format.
- Press CTRL+1, or right-click > Format Cells to open the Format Cells dialog box.
- On the Number tab select ‘Date’ in the Categories list. This brings up a list of default date formats you can select from in the ‘Type’ list. Likewise for the Time category.
We aren’t limited to the defaults though. You can create your own Custom date or time formats in the ‘Custom’ category. These custom formats are saved for you to re-use in the current file.
Custom Date Formatting Characters
Excel recognises the following characters and sets of characters for date formatting.
| Character | Explanation | Date | Formatted | |
| d | Displays the day as a number without a leading zero. | 3/09/2016 | 3 | |
| dd | Displays the day as a number with a leading zero when appropriate. | 3/09/2016 | 03 | |
| ddd | Displays the day as an abbreviation (Sun to Sat). | 3/09/2016 | Sat | |
| dddd | Displays the day as a full name (Sunday to Saturday). | 3/09/2016 | Saturday | |
| m | Displays the month as a number without a leading zero. | 3/09/2016 | 9 | |
| mm | Displays the month as a number with a leading zero when appropriate. | 3/09/2016 | 09 | |
| mmm | Displays the month as an abbreviation (Jan to Dec). | 3/09/2016 | Sep | |
| mmmm | Displays the month as a full name (January to December). | 3/09/2016 | September | |
| mmmmm | Displays the month as a single letter (J to D). | 3/09/2016 | S | |
| yy | Displays the year as a two-digit number. | 3/09/2016 | 16 | |
| yyyy | Displays the year as a four-digit number. | 3/09/2016 | 2016 |
Custom Date Formatting Examples
We can bring the characters together to create our own custom formats. Some examples below:
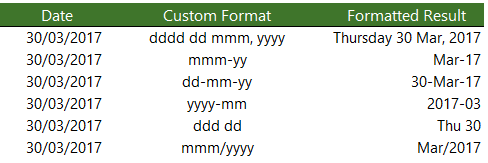
Remember; the custom format doesn’t alter the underlying date serial number, it is still the same.
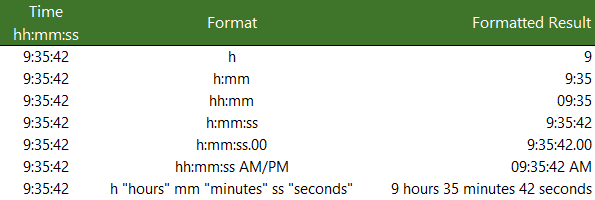
Custom Time Formatting Characters
Like dates, time also has its own set of custom formatting characters, as listed below:
| Character | Explanation | ||
| h | Displays the hour as a number without a leading zero. | ||
| [h] | Displays elapsed time in hours. If you are working with a formula that returns a time in which the number of hours exceeds 24, use a number format that resembles [h]:mm:ss or [h]:mm | ||
| hh | Displays the hour as a number with a leading zero when appropriate. If the format contains AM or PM, the hour is based on the 12-hour clock. Otherwise, the hour is based on the 24-hour clock. | ||
| m | Displays the minute as a number without a leading zero.* | ||
| [m] | Displays elapsed time in minutes. If you are working with a formula that returns a time in which the number of minutes exceeds 60, use a number format that resembles [mm]:ss. | ||
| mm | Displays the minute as a number with a leading zero when appropriate.* | ||
| s | Displays the second as a number without a leading zero. | ||
| [s] | Displays elapsed time in seconds. If you are working with a formula that returns a time in which the number of seconds exceeds 60, use a number format that resembles [ss]. | ||
| ss | Displays the second as a number with a leading zero when appropriate. If you want to display fractions of a second, use a number format that resembles h:mm:ss.00. | ||
| AM/PM, am/pm, A/P, a/p | Displays the hour using a 12-hour clock. Excel displays AM, am, A, or a for times from midnight until noon and PM, pm, P, or p for times from noon until midnight. |
*Note: The m or mm code must appear immediately after the h or hh code or immediately before the ss code; otherwise, Excel displays the month instead of minutes.
Custom Time Formatting Examples
Note: if your PC region settings have the Date & Time formats set to show the Short Time as hh:mm tt or the Long Time as hh:mm:ss tt then this may override any single ‘h’ formats and display them as ‘hh’.
The screenshot above is what I see with my PC region settings for the Short Time as h:mm tt. If you see something different when using a single ‘h’ format, then it will be down to your PC region settings.
More Excel Formatting
Custom cell formatting isn’t limited to dates and times. There is a plethora of formatting options for all types of numbers that we can use to get our reports looking just the way we want. Click here for our comprehensive guide to Excel custom number formatting.
Free eBook — Working with Date & Time in Excel
Everything you need to know about Date and Time in Excel — Download the free eBook and Excel file with detailed instructions.
Enter your email address below to download the comprehensive Excel workbook and PDF.
By submitting your email address you agree that we can email you our Excel newsletter.
Transcript
In this lesson we’ll look at the Time format. Like the Date format, the Time format includes a number of built-in options for displaying time.
Let’s take a look.
Here we have a set of times in column B of our table. Let’s start off by copying these times to all columns, then adjust formats to match those shown in the table header.
Let’s look first at the default time format in column C. This is the format you get when you apply the Time format using the menu in the ribbon.
If we check this format in the Format Cells dialog, we see it listed first, with an asterisk.
The asterisk means that this time format is controlled by the regional settings on the computer.
If we change the time format in Windows, in the Region and Language control panel, we’ll see the change in Excel for cells that use this time format.
This means that this time format may look different on different computers, depending on regional settings. If you need to ensure that the display of time is always the same, it’s better to use another format option.
To set the time format indicated in columns D through H, we need to use the Format Cells dialog.
We can set time to display in military format—without the AM or PM—with and without seconds.
We can also use Format Cells to show a standard AM/PM time with and without seconds.
Finally, we have the option to select a time format that includes a date. Because these times don’t contain a date component, Excel will display the first date in its date system. As a result, time formats that include a date only make sense when the cell contains both a date and a time.