
![]()
Download Article
Learn the basics of formatting a Microsoft Word document
![]()
Download Article
- Formatting the Layout
- Formatting Text
- Adding Pictures, Graphs, & Tables
- Using a Formatted Template
- Saving in Other Formats
- Q&A
|
|
|
|
|
Microsoft Word is the world’s most popular word processing app. Depending on what kind of legal, formal, or personal paper you’re writing, each has its own formatting guidelines. Fortunately, Microsoft Word makes it easy to format the layout, text, and other objects in your document. If you’re new to using Microsoft Word, don’t worry. You can be formatting your document like a pro in no time. This wikiHow guide will teach you simple ways to format a Word document on your PC or Mac computer.
Things You Should Know
- You can find most of the formatting tools you’ll need in the Ribbon menu at the top of your document.
- If you don’t want to do all the formatting from scratch, try using one of Word’s premade templates.
- Save your document in different file formats using the Save a Copy or Save As menu.
-

1
Explore the Word user interface. You can access most of Word’s formatting tools from the Menu Bar or the Ribbon at the top of the window. You can modify which tools are visible using the View menu.
- The Menu Bar is the area at the top of the screen where you will find File, Edit, View, and other important menu commands.
- The Ribbon is at the top of your workspace and contains icons, menus, and shortcuts to common tasks.
-
2
Align your document. Different types of documents call for different text alignments. You can choose whether to align your entire document to the left, right, or at the center on the Home tab by clicking the Alignment buttons in the «Paragraph» section.
- These are the buttons that look like a small version of a document, with small black lines arranged according to their button’s alignment function.
- You can also adjust alignment by selecting the text and objects you want to align, right-clicking the selection, and choosing Paragraph. Select your preferred alignment from the Alignment menu under the General header.
- You can either set the alignment for the whole document or just a selected piece of text.
Advertisement
-
3
Set the line spacing of your document. Need to change your document to single or double-space? You can adjust the spacing of your entire document, or for selected text.
- If you haven’t begun typing or adding content to your Word document, click the Home tab, click the «Line and Paragraph Spacing» icon (a row of lines with vertical arrows to the left of the lines pointing up and down, and select an option.
- If your document already has text or other content, press Ctrl + A (PC) or Cmd + A (Mac) to select everything in the document, right-click the selection, and choose Paragraph. You can then choose your desired spacing from the «Line Spacing» menu.
- For a single-spaced document, choose 1.0. For double-spacing, choose 2.0.
- Many professional documents, like college essays and cover letters, should be double-spaced.
-
4
Adjust the page orientation. If you need to write the document in a different orientation, click the Layout tab at the top of Word, select Orientation, and choose either Portrait or Landscape.
-
5
Change the size of the paper. If you need to print the document on a specific paper size, click the Layout tab, click Size, and then select your desired size from the drop-down list.
- This will change the virtual size of the document you’re writing as well as the actual size of the printout.
-
6
Adjust the headers and footers. A header contains details that will appear on every page of the paper, such as page numbers, your name, or the document title.
- To set the header of your document, double-click on the topmost part of the page, and the header field will appear. You can also click the Insert tab and select Header.
- Footers are just like headers. All text in the footer will appear at the bottom of each page of your document. To set the footer, double-click on the bottommost part of the page, and the footer field will appear. You can also use the Footer button on the Insert tab.
- You can also format your headers and footers by selecting the View tab and clicking Header and Footer on the list. This action will open the headers and footers on your page and allow you to edit them.
-
7
Insert page or section breaks with the Breaks menu. Go to the Layout tab in the and click Breaks if you want to start a new page or section in your document. You can choose from a variety of types of breaks, including Page, Column, and Section. This is a very useful tool if you need to format different sections of your document in different ways.[1]
- For example, you can use section or page breaks to help you format your page numbers so that the numbering restarts with each new section.
-
8
Adjust the margin size with the Margins tool. Click the Margins button in the Layout tab and select a margin from the pre-defined margin settings listed on the drop-down list.
- If you want to use your own margin measurements, click Custom Margins at the very bottom of the drop-down list to set your own.
-
9
Add columns to split your text vertically on the page. If you need to create a newspaper-like document, you can do so by adjusting the format of the document to columns. Click the Layout tab, select the Columns option, and choose the number and alignment of columns from the drop-down list.
- The Columns button looks like a rectangle with two vertical columns of blue lines on it.
- If you want to create one, two, or three columns, you can do so from the preset options. If you’d like to create more, you’ll need to choose More Columns from the bottom of the dropdown menu.
- Note that this column option is different from the columns you get when you insert items like tables on your document.
-
10
Add bullets and numbers to make lists. Highlight the text that you would like to be numbered or bulleted and click the Numbering or Bullets button on the Home tab of the Ribbon.
- These buttons can be found side by side on the Ribbon, near the alignment buttons. The Numbering button displays three small lines with numbers to the left of the lines and the Bullets button displays three small lines with bullet points to the left of the lines.
- There’s also a third button that allows you to create more elaborate multi-level list styles, which is useful for formatting outlines.
-
11
Experiment with document styles. All documents have standard built-in styles (for example, Normal, Title, Heading 1). The default style for text is Normal. The template that a document is based on (for example, Normal.dotx) determines which styles appear on the Ribbon and on the Styles tab. You can see the current style presets for your document in the Home tab of the Ribbon.
- Before you apply a style, you can see all of the available styles and preview how they will appear when applied.
- On the Home tab, click a style to apply it to selected text.
- Click the Styles Pane button (the arrow pointing down and to the right) to view and select from advanced Style options.
- By default, Word applies a paragraph style (for example, Heading 1) to the entire paragraph. To apply a paragraph style to part of a paragraph, select only the specific part that you wish to modify.
-
12
Reveal hidden formatting symbols if you’re having trouble. Word documents often contain hidden code that can cause frustrating problems when you’re trying to modify your formatting. For instance, an invisible extra paragraph mark or section break can create unwanted spaces between paragraphs or lines of text. To see formatting symbols that are normally hidden so you can delete or modify them, you can click the ¶ button in the Home tab, or try one of the following:[2]
- On Windows, open File, select Options, and click Display. Tick the box next to Show all formatting marks.
- In Word for Mac, open the Word menu, then Preferences, then View. Check the box next to All in the Show Non-Printing Characters section of the View menu.
-
13
Use the View menu to change your view of the document. The View menu can let you change how your document looks in Word without actually making changes to the format. For example, Print Layout will show approximately what your document will look like when it’s printed out, while Web Layout will display the whole document in one long chunk without any page breaks.
- The View menu also lets you zoom in and out on your document.
- You can also change your view with the buttons and zoom slider at the bottom right side of the document pane, or with the View tab in the Ribbon.


Advertisement
-
1
Change the font face. On the Home tab, you will a drop-down menu containing a list of fonts to choose from. Use your mouse to select the text you want to change, then choose a font from the list.
-
2
Change font size and color. Also on the Home tab, you can change the size, color, and highlighting for your font. Select the text you want to format, then choose your options.
- By default, they will be set to the size and font associated with your document’s current Style settings. For example, if you’re using Word’s default template, the Normal style will use Calibri as the default font and 12 pt. as the default text size.
- Always consider the formatting guidelines of the document you are writing when choosing the font style and size.
- The standard font for most college and professional papers is Times New Roman font, text size 12.
-
3
Make text bold, underlined, or italicized. Besides setting the font style and size, you can also adjust the emphasis of words and lines in your document. Near the font and text size menus, you will see the Bold, Italics, and Underline buttons.
- Just click the buttons to make your text bold, underlined, or italicized.
- In this section, you can also find special text formatting options such as Strikethrough, Subscript, and Superscript.
-
4
Highlight text on the page. If you would like to change the background color behind selected text, similar to using a highlighter on a printed page, click the Text Highlight icon, which is a pen above a colored line.
- You can also add special text effects with the Text Effects button, which looks like a capital A with a glowing blue border.


Advertisement
-
1
Drag an image into your document. This is a quick way to add a picture to your Word document. Simply select an image on your desktop and drag and drop it into the document window. Make sure your image is placed exactly where you want it before you drop it.
- You can also insert an image by going to the Insert tab, then clicking Pictures. Select one of the options to browse for images on your computer, the web, or Word’s gallery of stock photos.
- You can also insert graphics or other media (such as video or audio clips) using the Shapes, Icons, or 3D Models, and Media buttons.
-
2
Enable text wrapping. Text wrapping changes the layout of your document, allowing the text to flow around the image no matter where it is placed. To turn on text wrapping:
- Right-click (or ctrl-click, on a Mac) on the image and hover over Wrap Text. Select the alignment that best suits your document. You will see a preview as you hover over each option.
- To change the location of the image in the document, select the image and then hold the Ctrl key. While holding the key, use the arrow keys to move the picture around the document.
- When you right-click or ctrl-click your image, you’ll also see an option in the context menu to add a caption under your image.
-
3
Edit your image in the Picture Format tab. Once you insert your image, you can select it to open a new Picture Format tab in the ribbon. From there, you can choose from a variety of tools, such as:
- Making corrections or adding artistic filters to the image
- Adding style effects, such as a drop shadow or frame, to the picture
- Entering alt text
- Tweaking the position of your image or changing the text-wrap settings
-
4
Add a graph or chart in the Insert tab. Click the Insert tab on the Ribbon, and then click the Chart option. Choose your preferred type of graph, such as a pie or bar chart, from the dropdown menu.
- Depending on the type of chart or graph you choose, Word may automatically launch Excel and create a new spreadsheet, where you can enter data for your chart.
-
5
Modify your graph. When you choose a graph type, a new tab will appear in the Ribbon menu called Chart Design. Navigate to that tab with the chart selected to make changes to the look of your graph or chart, or choose the Edit in Excel button to make changes to the data in your chart.
-
6
Use the Table tool to insert a table. If you want to add a table to your document, head over to the Insert tab and click the Table button. A menu will pop open where you can either scroll over a grid of squares to select your number of rows and columns, or select an option like Insert Table or Draw Table.
- Insert Table opens a pop-up menu where you can specify parameters like the number of rows and columns and whether or not the contents of the table autofit your document window.
- The Draw Table tool allows you to draw the table with your mouse directly in the document.
- Once you start creating a table, you’ll see several new table editing tools in the Layout tab.


Advertisement
-
1
Choose a template from the New Documents pane. Templates are a great way to create a nice-looking document without having to do all the formatting from scratch. To use one, open Word and select New from the side menu to create a new document, or select New from Template from the File menu. Click one of the templates on the screen to select it.[3]
- If you don’t see a template you like, use the Search bar at the top of the window to find one that fits your needs. For instance, use keywords like “flyer,” “resume,” or “research paper” to find different styles of templates.
-
2
Click Create to open the template. The template will open as a new document.
-
3
Select text within the template to modify it. Word templates are simply preformatted documents with text, graphics, and other elements already in place. To add your own text, select text anywhere on the document and type in your own. The new text will have the same format as whatever text you selected and replaced. You can also click on a blank area of the document and start typing to add new text.
- To select a single word, double-click it. You can select longer pieces of text by clicking and dragging your mouse, or positioning your cursor at the start of the selection and holding down Shift while pressing the Right Arrow key.
- You can also select and move, delete, or replace other elements in the template, such as images, graphs, or tables.
-
4
Modify your template with the Styles pane. Templates use styles to create their distinctive looks. If you want to change the look of the template, click the Styles button in the Home tab of the ribbon toolbar. Click the down arrow next to any of the style elements and select Modify Style… to make changes.
- You can also make any other types of changes you like using the rest of the tools in the ribbon menu or Format menu.
-
5
Save your modified template as a document. When you’ve made the changes you want to the template, save it the same way you would any other Microsoft Word document.


Advertisement
-
1
Click the file menu and select Save a Copy…. If you want to save a document as a file type other than .DOCX, you can do so with the Save a Copy function.
- If it’s a brand-new document that you haven’t already saved, select Save As… instead.
-
2
Open the File Format dropdown menu. You’ll see this menu at the bottom of the Save a Copy or Save As window.
-
3
Select the format you want from the menu. In addition to common formats like .DOC, .DOCX, .TXT and .RTF, you can also save your document as a PDF, an XML file, or a macro-enabled Word file.
- Check out the list of file formats that are supported in word here.


Advertisement
Add New Question
-
Question
What is Microsoft publishing?

UK_Gamer05
Community Answer
Publisher is a tool for making posters, leaflets, booklet,s etc. It’s for when you need to create something that isn’t a standard document.
-
Question
How do I move from page one to page two of a Word document?
UK_Gamer05
Community Answer
In Word 2016, on the insert tab, either select insert new page or page break.
Ask a Question
200 characters left
Include your email address to get a message when this question is answered.
Submit
Advertisement
Thanks for submitting a tip for review!
Tip
- Unless free-handedly writing your paper, consult the guidelines of your document first before adjusting its format.
- Besides the header, footer, and page layout formats (which affect the entire document), all the other formatting tools can be applied only on specific parts of the document.
About This Article
Thanks to all authors for creating a page that has been read 309,741 times.
Is this article up to date?
Add and format text
To add text, place the cursor where you want and start typing.

Format text
-
Select the text you want to format.
To select a single word, double-click it. To select a line of text, click to the left of it.
-
Select an option to change the font, font size, font color, or make the text bold, italic, or underline.
Copy formatting
-
Select the text with the formatting you want to copy.
-
Click Format Painter
, and then select the text you want to copy the formatting to.Tip: Double-click Format Painter if you want to copy the formatting in more than one place.
 , and then select the text you want to copy the formatting to.
See Also
Create a bulleted or numbered list
Change the line spacing in Word
Apply styles
Apply themes
Select text
Need more help?
Has this ever happened to you? You’re plugging along on a Microsoft Word document only to freeze because you can’t recall how to do a relatively simple formatting function. I think it’s happened to all of us at one point or another and I hope the following will be your go-to resource whenever an instance like that takes place. (Bookmark the link so you can easily find it whenever a brain freeze occurs!)
My goal is not to cover all Microsoft Word formatting capabilities, just the basic ones that can increase your efficiency greatly. If you need more information or other guidance, look to the ‘HELP’ feature within the software itself.
How do I capitalize (or uncapitalize) text in microsoft Word?
You can change the capitalization, or case, of selected text in a document by clicking a single button on the Home tab called Change Case.
To change capitalization (or case) in Word, follow these steps:
- Select the text for which you want to change the case.
- On the Home tab, in the Font group, click the Change Case button.

- Then choose one of the following:
- To capitalize the first letter of a sentence and leave all other letters as lowercase, click Sentence case.
- To exclude capital letters from your text, click lowercase.
- To capitalize all of the letters, click UPPERCASE.
- To capitalize the first letter of each word and leave the other letters lowercase, click Capitalize Each Word.
- To shift between two case views (for example, to shift between Capitalize Each Word and the opposite, cAPITALIZE eACH wORD), click tOGGLE cASE.

To apply small capital (Small Caps) to your text:
- Select the text, and then on the Home tab, in the Font group, click the Font Dialog Box Launcher (the arrow in the lower-right corner). In the Font dialog box, under Effects, select the Small Caps checkbox.


To use a keyboard shortcut to change between lowercase, UPPERCASE, and Capitalize Each Word:
- Select the text and press SHIFT + F3 until the case you want is applied.
How do I add text effects in a Word document?
Besides WordArt and color fills and outlines, you can change the look of your text by adding effects, such as shadows, reflections, or glows.
To add text effects in Word, do the following:
- Select the text to which you want to add an effect.
- On the Home tab, in the Font group, click the Text Effect button.

- Point to the effect that you want (Shadow, Reflection, or Glow) and then when more choices appear click the effect that you want to add.

NOTE: To remove an effect, click the Clear Formatting button (eraser) on the Home tab in the Font group.
How do I change or set the default font in microsoft word?
The default font for new documents in Word 2016 is Calibri, 11 point but you can change/set it to your preference.
NOTE: When you set a default font, every new document you open will use the font settings that you selected and set as the default. The default font applies to new documents based on the active template, usually Normal.dotm.
To change/set the default in Word, follow these steps:
- Start with a blank document, or if your document already contains text formatted with the properties that you want to use, select that text.
- On the Home tab, click the Font Dialog Box Launcher, and then click the Font tab.

- Select the options that you want to apply to the default font, such as font style and font size. NOTE: If you selected text in step 1, the properties of the selected text are already set in the dialog box.

- Click Set As Default, and set the scope of your changes:
- This document only: (if you want your changes to apply to only the current document)
- Select all documents based on the Normal template: (if you want your changes to apply to any document based on the Normal template)

- Click OK to apply your changes.


How do I format paragraphs in word?
To change spacing between paragraphs in Word, do this:
- Click Design, then Paragraph Spacing.

- Pick which spacing you want (the default is Open) and notice your whole document will preview as you mouse over the different settings.
- If you do not like those options, click Custom Paragraph Spacing and change the numbers under Paragraph Spacing.


To change the spacing in only part of a document:
- Click anywhere in the paragraph you want to change.
- Go to Page Layout and under Spacing, click the up or down arrows to adjust the distance before or after the paragraph. You can also type a number directly.


To format a Word document with columns, follow these steps:
- Select the text you want formatted in columns.
- On the Layout tab, click Columns.
- Click More Columns.

- Click the number of columns that you want.
- Optional: To add a vertical line between the columns, select the Line Between checkbox. You can also adjust the column width and spacing.
- In the Apply to list, click Whole Document, Selected Text or This Point Forward.


To control how text flows between columns:
- Insert a column break. For example, to end a paragraph in one column and start a new paragraph at the top of the next column.


To Stop Using Columns:
- On the Layout tab, click Columns and then click One to return to one-column format. NOTE: You may need to insert a section break if you want two-columns in one section of your document and one-column formatting in another section of the document.
To add leaders between tab stops in Word, do this:
Leaders are those special characters—dots, dashes, underlines—that create a visual link between tab stops. Most often, you see leaders in a table of contents or an index.
NOTE: If you want to use tab stops and leaders to format a Table of Contents, consider using Word to create one automatically.
- Type the text that you want to appear before the leader.
- On the horizontal ruler, set the tab stop where you want (just click on the ruler), and then double-click it.
- In the Tabs dialog box under Leader, choose none, dots, dashes, or underline to set a series of characters.

- Click OK, and then press Tab on your keyboard.
- Type the text that you want to appear after the leader.

If you’d like to dive deeper into the formatting tools of Microsoft Word, and other applications within the Microsoft Office Suite, sign up for a one-day training class at Centriq.
View Centriq’s Microsoft Office Training Classes
Get specific information by speaking with a Training Advisor by email, by phone at 913.322.7062 and 314.644.6400, or by completing the following form.
Содержание
- Выбор шрифта и типа написания текста
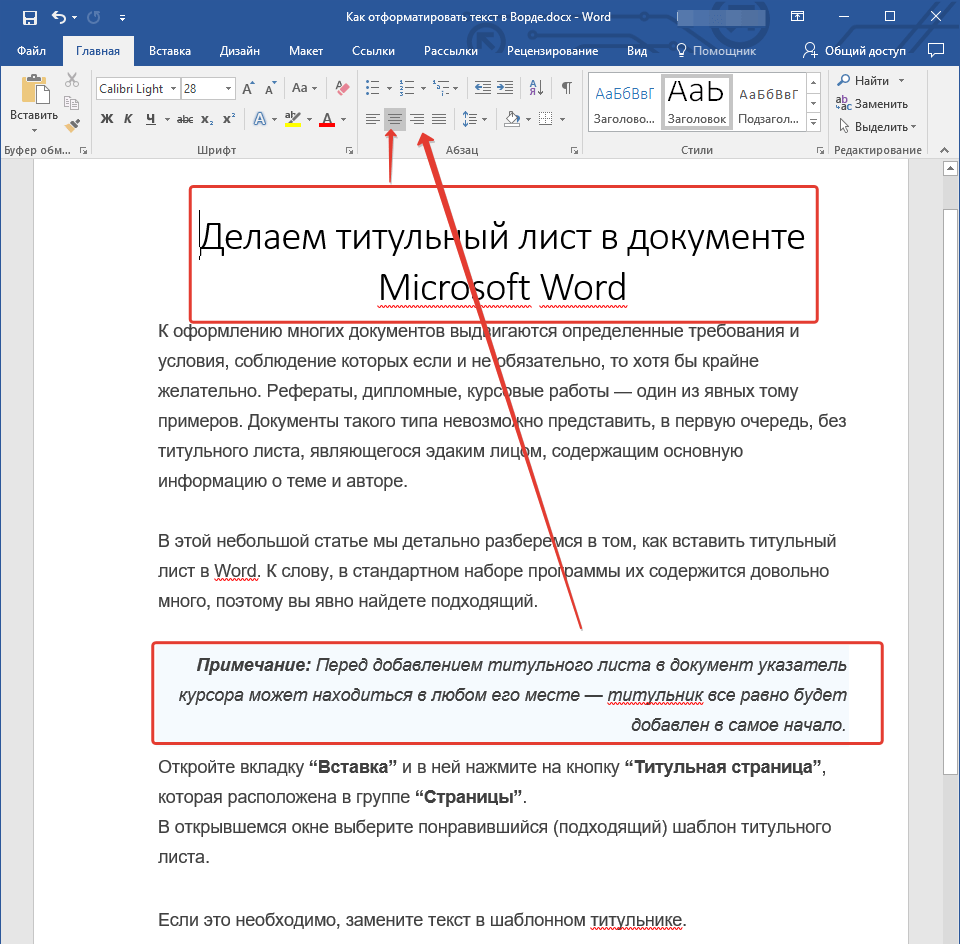
- Выделение заголовка
- Выравнивание текста
- Изменение интервалов
- Добавление маркированных и нумерованных списков
- Дополнительные операции
- Вопросы и ответы
![]()
Мы уже неоднократно писали об инструментах для работы с текстом в MS Word, о тонкостях его оформления, изменения и редактирования. О каждой из этих функций мы рассказывали в отдельных статьях, вот только для того, чтобы сделать текст более привлекательным, удобным для чтения, понадобится большинство из них, причем, выполненных в правильном порядке.
Урок: Как добавить новый шрифт в Ворд
Именно о том, как правильно выполнить форматирование текста в документе Microsoft Word и пойдет речь в данной статье.
Выбор шрифта и типа написания текста
О том, как изменять шрифты в Ворде мы уже писали. Вероятнее всего, вы изначально набирали текст в понравившемся шрифте, выбрав подходящий размер. Более подробно о том, как работать со шрифтами, вы можете узнать в нашей статье.
Урок: Как изменить шрифт в Word

Выбрав подходящий шрифт для основного текста (заголовки и подзаголовки пока что не торопитесь изменять), пройдитесь по всему тексту. Возможно, некоторые есть фрагменты нужно выделить курсивом или полужирным шрифтом, что-то нужно подчеркнуть. Вот пример того, как может выглядеть статья на нашем сайте.
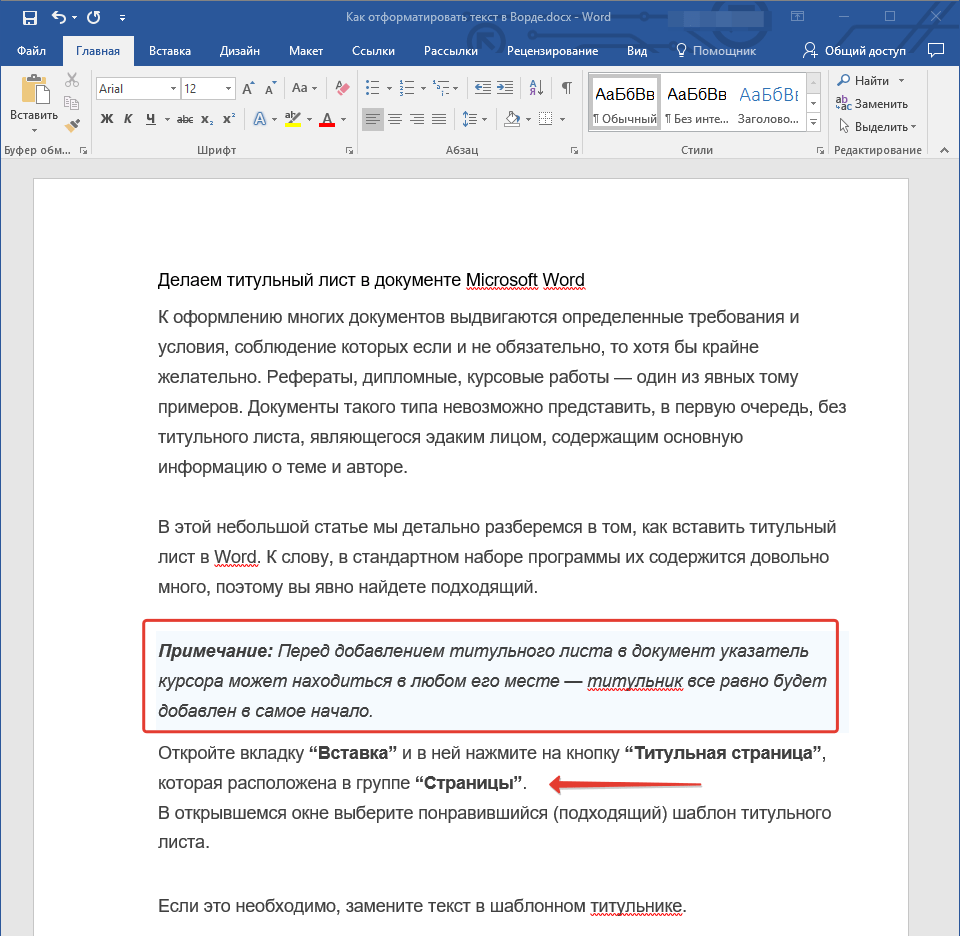
Урок: Как подчеркнуть текст в Ворде
Выделение заголовка
С вероятностью в 99,9% у статьи, которую вы хотите отформатировать, есть заголовок, и, скорее всего, подзаголовки в ней тоже имеются. Конечно же, их нужно отделить от основного текста. Сделать это можно с помощью встроенных стилей Word, а более подробно с тем, как работать с этими инструментами, вы можете ознакомиться в нашей статье.
Урок: Как сделать заголовок в Ворде
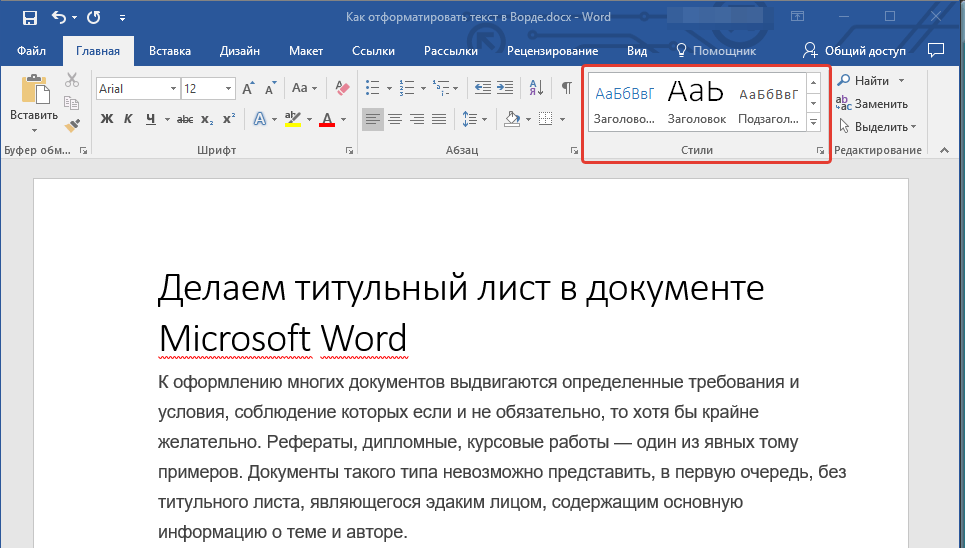
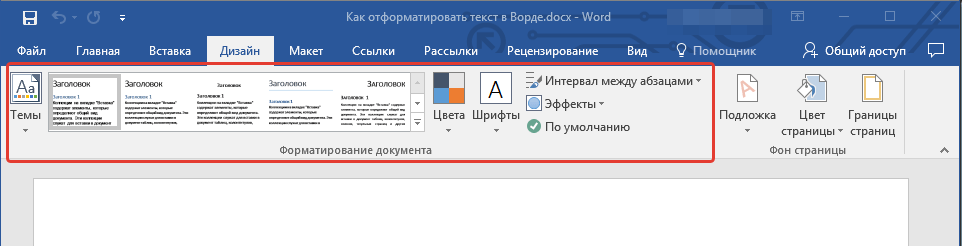
Если вы используете последнюю версию MS Word, дополнительные стили для оформления документа вы можете найти во вкладке “Дизайн” в группе с говорящим названием “Форматирование текста”.

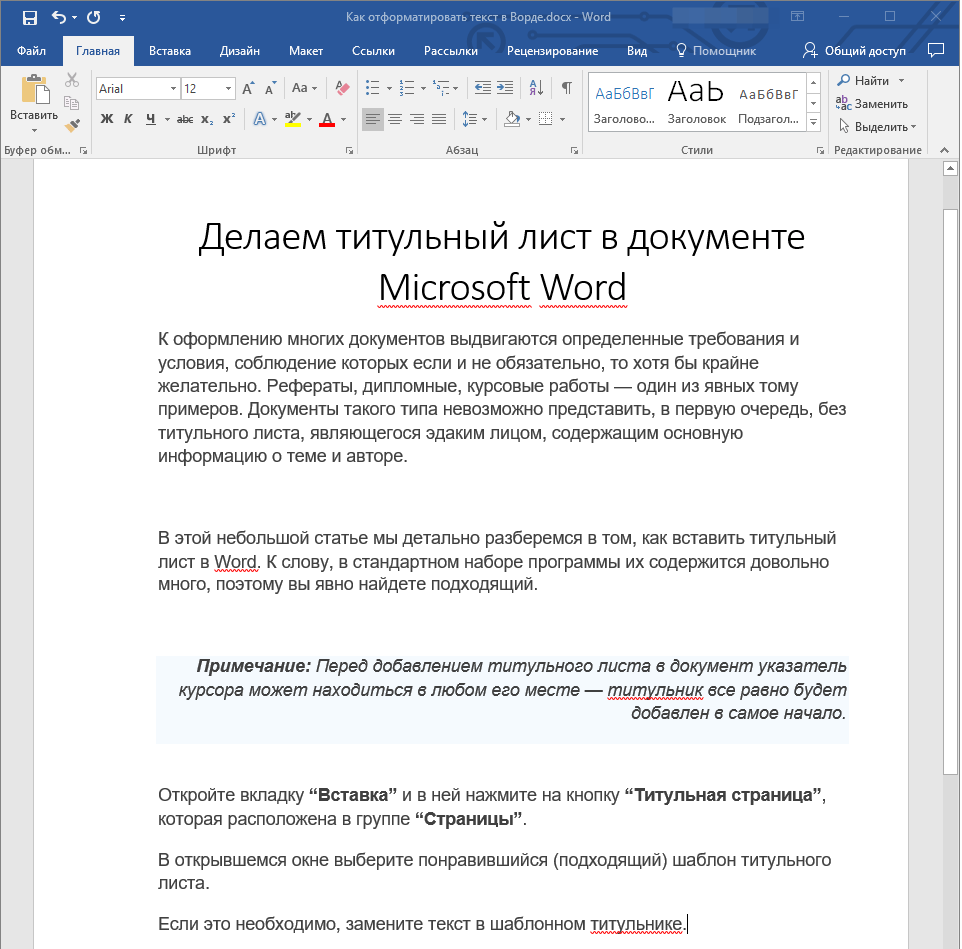
Выравнивание текста
По умолчанию текст в документе выравнивается по левому краю. Однако, если это необходимо, вы можете изменить выравнивание всего текста или отдельно выделенного фрагмента так, как вам это необходимо, выбрав один из подходящих вариантов:
Урок: Как выровнять текст в Ворде
Инструкция, представленная на нашем сайте, поможет вам правильно расположить текст на страницах документа. Выделенные красным прямоугольником фрагменты текста на скриншоте и связанные с ними стрелки показывают, какой стиль выравнивания выбран для данных частей документа. Остальное содержимое файла выровнено по стандарту, то есть, по левому краю.
Изменение интервалов
Расстояние между строчками в MS Word по умолчанию составляет 1,15, однако, его всегда можно изменить на большее или меньшее (шаблонное), а также вручную задать любое подходящее значение. Более подробную инструкцию касательно того, как работать с интервалами, изменять и настраивать их вы найдете в нашей статье.
Урок: Как изменить межстрочный интервал в Ворде

Помимо интервала между строками, в Word также можно изменить и расстояние между абзацами, причем, как до них, так и после. Опять-таки, вы можете выбрать шаблонное значение, которое вас устраивает, или задать собственное вручную.
Урок: Как изменить интервал между абзацами в Ворде
Примечание: Если заголовок и подзаголовки, которые имеются в вашем текстовом документе, оформлены с помощью одного из встроенных стилей, интервал определенного размера между ними и следующими абзацами задается автоматически, а зависит он от выбранного стиля оформления.
Добавление маркированных и нумерованных списков
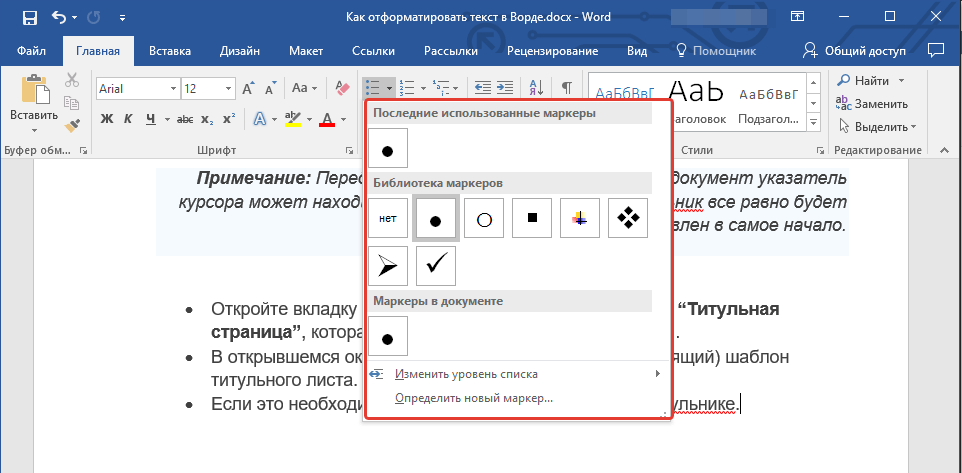
Если в вашем документе содержатся списки, незачем нумеровать или уж тем более маркировать их вручную. В Microsoft Word для этих целей предусмотрены специальных инструменты. Они, как и средства для работы с интервалами, расположены в группе “Абзац”, вкладка “Главная”.

1. Выделите фрагмент текста, который необходимо преобразовать в маркированный или нумерованный список.

2. Нажмите одну из кнопок (“Маркеры” или “Нумерация”) на панели управления в группе “Абзац”.
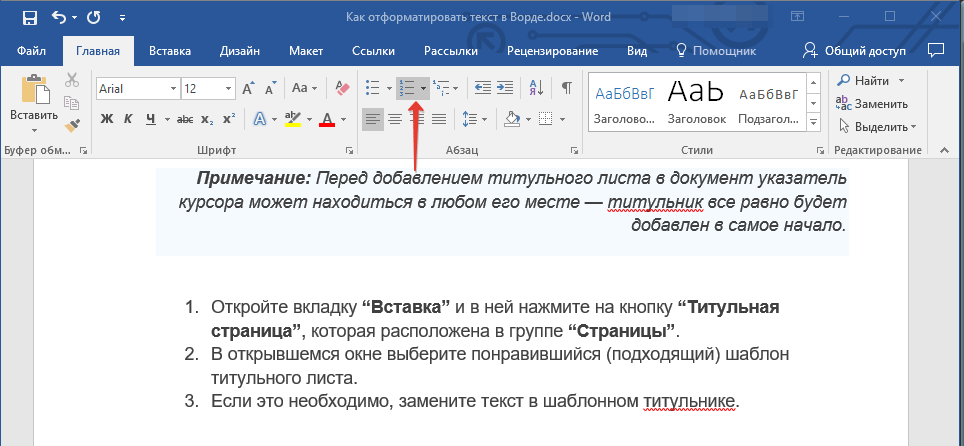
3. Выделенный фрагмент текста преобразуется в красивый маркированный или нумерованный список, в зависимости от того, какой из инструментов вы выбрали.
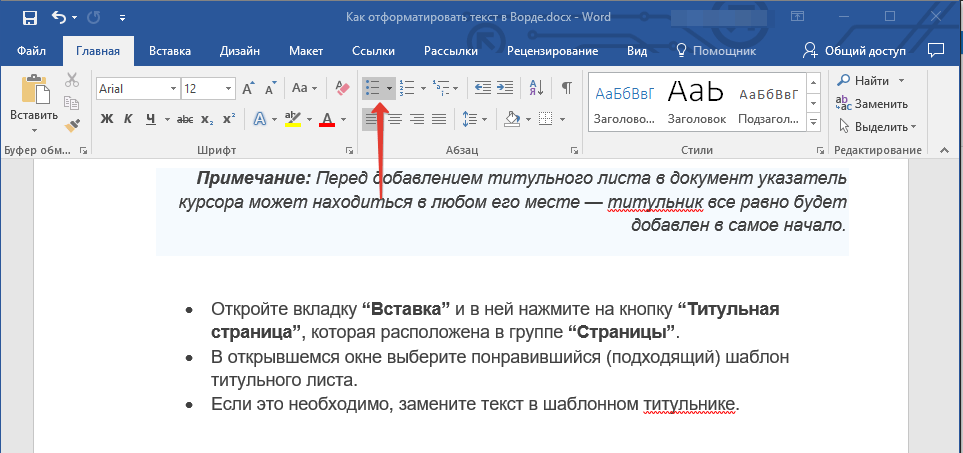
- Совет: Если развернуть меню кнопок, отвечающих за списки (для этого нужно нажать на небольшую стрелочку справа от значка), вы можете увидеть дополнительные стили оформления списков.
Урок: Как в Ворде сделать список в алфавитном порядке
Дополнительные операции
В большинстве случаев того, что мы уже описали в данной статье и остальном материале по теме форматирования текста более, чем достаточно для оформления документов на должном уровне. Если же вам этого будет мало, либо же вы просто пожелаете внести какие-то дополнительные изменения, коррективы и т. д. в документ, с большой вероятность, вам будут очень полезны следующие статьи:
Уроки по работе с Microsoft Word:
Как сделать отступы
Как сделать титульный лист
Как пронумеровать страницы
Как сделать красную строку
Как сделать автоматическое содержание
Табуляция
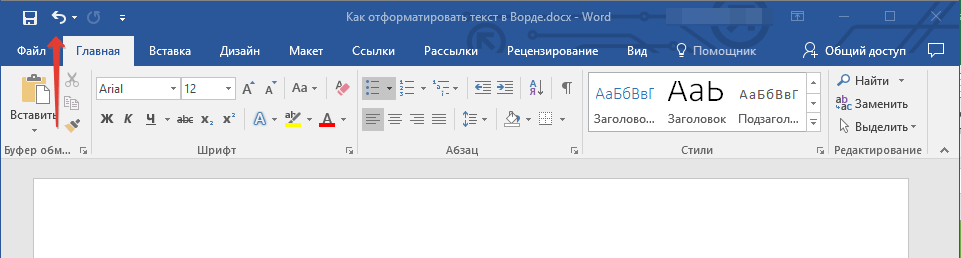
- Совет: Если во время оформления документа, при выполнении той или иной операции по его форматированию, вы допустили ошибку, ее всегда можно исправить, то есть, отменить. Для этого просто нажмите на закругленную стрелку (направленную влево), расположенную возле кнопки “Сохранить”. Также, для отмены любого действия в Ворде, будь то форматирование текста или любая другая операция, можно использовать комбинацию клавиш “CTRL+Z”.
Урок: Горячие клавиши в Word
На этом мы смело можем закончить. Теперь вы точно знаете, как отформатировать текст в Ворде, сделав его не просто привлекательным, а хорошо читабельным, оформленным в соответствии с выдвигаемыми требованиями.
Whether you’re a one-person business operating out of your kitchen, or a billion-dollar company on Wall Street, the expectation is the same. Your business documents must be the paragon of professionalism and competence.


This expectation shouldn’t be a cause for worry. With applications like Microsoft Word you can create professional-looking documents with your own computer. Through the years, Word has become more powerful, yet more intuitive. Anyone with basic computer skills can use Word to create well-designed documents.
In this article, you’ll learn how to format text in Word to make your business documents easier to read and understand. You’ll also pick up tips on how to make sure your formatting doesn’t look amateurish—even if you’re getting started with Word.
Formatting Text in Word
Formatting text in Microsoft Word refers to controlling how text appears in your document. This includes the size, color, and font of the text. It also covers text alignment, spacing, and letter case.
Microsoft Word styles make it easy to change and apply styles throughout a document. A “style” is a set of formatting settings applied to a specific kind of text.
For example, you can set up a style for headings that’s bold, 14 points, aligned left, and uses the Tahoma font. This means all text in your document with the heading style will be formatted the same way. You don’t have to manually format each heading in your document.
In this post, you’ll see how to use MS Word styles.
How to Format Text in Word
To show you how to format text in Word, we’ll walk through formatting a completely unformatted business document file.
This is what my marketing report looks like without any formatting in Word:


As you can see, it’s plain and boring. Nobody would be inspired to read it, let alone act on the findings of the report!
Some basic Word text formatting can fix that.
1. How to Apply Typographic Emphasis
1. For starters, let’s use typographic emphasis (bold, italic, underline) to make the report title stand out.
To do this, select the text you want to emphasize. Click on the bold button on the Microsoft Word ribbon.


Note that the ribbon also has the buttons to apply italic, underline, strikethrough, and other formatting effects for text. Follow the same steps to apply those effects.
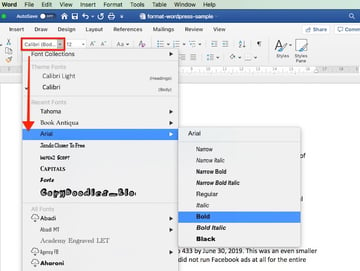
2. Now, let’s change the font, font size, and color of the title.
Again, select the text. Click the drop-down arrow on the font section of the ribbon, then select the font you want to apply. In this case, I’m using Arial bold.


3. To change the font size, highlight the text. Click the drop-down arrow on the font size indicator on the ribbon. Click on the font size of your choice.


Or, after highlighting the text, you can type the font size into the font size indicator on the ribbon. This is especially useful when the font size you want isn’t available in the font size selector.


4. You can also use the Increase Font Size or Decrease Font Size buttons on the ribbon to quickly change the font size.


5. We can easily change the font color as well.
Highlight the text, then click the down arrow beside the Font Color selector. Click on the color of your choice.


Choose More Colors… if you wish to apply a custom color.
2. How to Change Capitalization in Word
Microsoft Word also allows you to easily and quickly change the capitalization of your text. For example, if we want to make the title all uppercase, we don’t have to retype it.
Highlight the title, then click the Change Case button on the ribbon.


Or, highlight the text, go to Format > Change Case…


… then click on the radio button for the case you want to apply. Click OK.


Now the title is looking much better. It’s the most prominent part of the document and commands the reader’s attention. However, we can still improve its readability.
3. How to Format Paragraphs
One way to make your document easier to read is by increasing white space around lines and paragraphs.
1. To adjust the line spacing, select the text. Click on the arrow on the Line and Paragraph Spacing button. Select the line spacing you wish to apply.


2. To change the spacing around a paragraph, select the paragraph. Click on the arrow on the Line and Paragraph Spacing button > Line Spacing Options…. Then, type the amount of spacing before and after the paragraph. (Tip: You can adjust other settings from this dialog box as well.)
For the title, I’ll add a generous amount of space after the paragraph, to set it apart from the rest of the document.


3. Finally, let’s change the alignment of the title. Select the text, click on either the Align Left, Center Text, Align Right, or Justify button on the ribbon. Since this is a title, let’s use Center Text.


These simple formatting effects make the title stand out from the rest of the document.
4. How to Work With MS Word Styles
As much as Word makes it easy to format text, if you need to apply formatting effects on the entire document, the process becomes tedious.
Word solves that through styles. MS Word Styles allow you to define a set of formatting commands and apply them automatically to every item in the document with that style.
Let’s look at a specific example:
1. How to Modify a Paragraph Style
Let’s follow the steps above to define a style for the main headings of the report with the following characteristics:
- Font: Arial
- Size: 14 points
- Color: Blue-grey
- Typographic Emphasis: Bold
- Case: Capitalize each word
- Alignment: Left
- Line spacing: Single
- Paragraph spacing: 6 pts before paragraph, 0 pts after paragraph
It would look like this:


One way to apply this exact formatting on every main heading is to modify the existing Heading 1 style in our document. Place your cursor anywhere in the main heading. Go to Styles, right-click on Heading 1, then choose Update Heading 1 to Match Selection.


You can also modify any style by going to Format > Style…. The Style dialog box opens.


Select the style you want to modify from the Style list. This gives you a preview of the paragraph and character, as well as a description of the current style settings of the selected style.
Click Modify…. The Modify Style dialog box pops up.


Change the text and paragraph format settings. You can control the font, font size, font color, typographic emphasis, alignment, and spacing. When you’re done, click OK.
2. How to Apply a Paragraph Style
Now, go to each main heading in the document and apply the Heading 1 style to it. Place the cursor on a heading, go to Styles > Heading 1.


The selected text instantly takes on the formatting of Heading 1.


3. How to Create a List Paragraph Style
You can also create a new paragraph style from scratch, instead of modifying an existing one. To demonstrate, let’s create a list-type paragraph style.
1. Go to Format > Style…. Fill in the Properties section of the dialog box that opens. For Style based on, you may wish to use one of the pre-existing list styles as a starting point.


2. Next, change the formatting options. The box below gives you a preview of what the list paragraph would look like with those settings. There’s also a summary of the formatting properties you’ve specified.


You also have the option to do the following for this style:
- Add to template. Adds the style you’re creating to the document template.
- Add to Quick Style list. Shows the new style to the Quick Style list, making it quickly accessible from the ribbon.
- Automatically update. Automatically updates the style when you manually format a paragraph with that style.
When you’re happy with the settings you’ve made, click OK. Notice how the new Bullet style you created is now included in the Quick Style popup.


Once the bullet style is applied, our list now looks like this:


4. How to Use Character Styles in Microsoft Word
You can also define a style to an individual word or a block of text, rather than a paragraph. In the next example, I’d like to apply a character style for every URL in the document.
1. Select the text. Then, go to Format > Styles…. From the Style dialog, click New…. The Create New Style from Formatting dialog opens.


2. Give the new character style a name. For Style type, choose Character. Then, make the formatting settings you want to apply to this character. Note that you can’t change alignment and spacing for a character style. The preview box shows you a sneak peek of the text based on the settings you specified.


3. When you’re done, click OK.


To apply the character style, place your cursor in a word or select a set of words. Go to Format > Style…. Find the character style you wish to apply. Click Apply.


Tip: To quickly find the MS Word styles you’ve created, for List, choose User-defined styles.
5. How to Use Table Styles in Word
We can also define a table style to provide a consistent look to the tables in our document.
1. Create the table. Go to Insert > Table…, then indicate the number of columns and rows you need in your table (you can always add or remove these later). Click OK.


2. Add your text to the table. If necessary, click and drag any of the borderlines to adjust the width or a column, or the height of a row.
3. To apply a table style, click anywhere on the table, then go to Table Design. The Table Design ribbon appears.


4. Click on the down-arrow for table styles to display the table styles gallery.


5. Click on any style to apply it to your table.


Expand the table styles gallery again to change the existing style, clear the style you applied, or create your own table style.
Discover Great Microsoft Word Templates for 2020
Some experts say it’s a good idea to set up your formatting styles in Word first before typing or copying the text into the document. One quick way to do this is by starting with a Microsoft Word template. Templates come pre-formatted by professional designers to look current and impressive.
You can find thousands of Word templates for all kinds of business documents in Envato Elements.


For a small monthly subscription fee, you get unlimited downloads of all the templates at Elements. You also have unlimited access to everything else in the Elements catalog:
- presentation templates
- web templates
- fonts
- photos
- graphics
- other digital assets
Use as many of these assets as you want, as often as you want, without paying more. This makes Elements a terrific source for all the creative assets you need to create remarkable marketing and communication materials.
You can also pay as you go at GraphicRiver. This marketplace also offers a huge library of templates for Microsoft Word and other digital assets for all your marketing and communication needs. The difference is, you only pay each time you use an item. This can be a very economical option.
Below are some of the best print templates for Word available on Envato Elements and GraphicRiver:
After downloading any of these Microsoft Word templates, you can apply what you’ve learned about formatting text in Word. This way, you can personalize the template so that it aligns with your visual branding and preferences. You now know how to take any Word template and make it your own!
5 Top FAQs on Formatting Text in Microsoft Word
Below are some of the questions that come up as people format text in Word.
1. How Do You Make a Word Document Easier for the Reader to Scan?
Your primary goal when formatting text in Word is to make it easy for people to scan, read, and understand the content of the document. The different formatting options in Word help you achieve this:
- Use typographic emphasis like bold, italics, and underline to emphasize specific text and add variety to your document.
- Break up the document into sections with headings and sub-headings to help the reader scan and navigate their way through it.
- Use either bulleted or numbered lists where appropriate to shorten paragraphs and make lists easier to comprehend.
- Set up line and paragraph spacing so that there’s plenty of white spaces throughout the document.
2. How Many Fonts Should I Use in a Word Document?
It’s easy—and fun—to apply different fonts in Word. Too easy, in fact, that you could end up overwhelming your reader and making your document look like someone played with the formatting.
Avoid this by sticking to a maximum of two different fonts in a single document. For instance, you could choose a sans serif font for your title and headings, and a serif font for all other text. You could even use one font for the entire document, relying on typographical emphasis and color to distinguish different types of text from each other.
3. Why Should I Use Microsoft Word Text Styles?
Use Microsoft Word text styles because they let you apply formatting settings globally throughout your document. This is important in long documents, where formatting each line or paragraph is too onerous. With text styles, you only need to determine what style you want for each piece of text. Word will do the rest.
4. How Can I Make My Document Formatting Consistent?
Using MS Word styles, as you’ve learned in this article, is an easy way to make your document formatting consistent. You decide and set how you want each type of text to be formatted. Then you can apply those styles consistently through your entire document.
Beyond Microsoft Word styles, also make sure that the recurring parts of your document are consistent as well. These include your headers and footers, for example. You must also be consistent with the placement of images: Do they have borders? Are they always within the document’s margins or do they bleed to the edge of the page?
When you use a Word template, these design decisions are already made for you. So, if you want a consistent design without all the hard work, then starting with a template for Word is the way to go.
5. How do You Copy text into Word without also copying junk code?
When you copy text from one application and paste it into Word, you run the risk of also copying the underlying formatting code for it. This code or set of formatting commands is invisible so you won’t know you’re copying it inadvertently. This can mess up your formatting in Word. Soon, you’ll be pulling your hair wondering why Word won’t “follow” your commands.
To avoid this grief, make sure you strip all formatting when you copy and paste the text into Word. Here’s how: Copy the text. In Word, click Edit > Paste and Match Style.


That’s all there is to it!
Using Microsoft Word, Style Your Business Document for Maximum Impact
You’ve learned how to format a document in Word to make it easier to scan and read. Good formatting is also essential to make sure the final document represents you and your business in a favorable light.
You’ve seen how doable formatting is, even if you’re starting from scratch with completely unformatted text. You’ve also discovered that you can rely on professional designers to make the formatting decisions for you by starting with a template for Word.
For unlimited downloads of print templates for Word at a fixed subscription fee, look to Envato Elements. Here, you can also have your fill of fonts, icons, photos, and other design assets you’ll need without having to pay more. Or, get your premium Word templates from GraphicRiver on a pay-per-use basis. You also get a wide range of choices without having to commit to a subscription.
With Microsoft Word styles and formatting tools, there’s no more excuse to have poorly designed business documents. Make your next business document one you’ll be proud of.