
Время на прочтение
5 мин
Количество просмотров 197K

Продукты HFLabs в промышленных объемах обрабатывают данные: адреса, ФИО, реквизиты компаний и еще вагон всего. Естественно, тестировщики ежедневно с этими данными имеют дело: обновляют тест-кейсы, изучают результаты очистки. Часто заказчики дают «живую» базу, чтобы тестировщик настроил сервис под нее.
Первое, чему мы учим новых QA — сохранять данные в первозданном виде. Все по заветам: «Не навреди». В статье я расскажу, как аккуратно работать с CSV-файлами в Excel и Open Office. Советы помогут ничего не испортить, сохранить информацию после редактирования и в целом чувствовать себя увереннее.
Материал базовый, профессионалы совершенно точно заскучают.
Что такое CSV-файлы
Формат CSV используют, чтобы хранить таблицы в текстовых файлах. Данные очень часто упаковывают именно в таблицы, поэтому CSV-файлы очень популярны.
CSV-файл состоит из строк с данными и разделителей, которые обозначают границы столбцов
CSV расшифровывается как comma-separated values — «значения, разделенные запятыми». Но пусть название вас не обманет: разделителями столбцов в CSV-файле могут служить и точки с запятой, и знаки табуляции. Это все равно будет CSV-файл.
У CSV куча плюсов перед тем же форматом Excel: текстовые файлы просты как пуговица, открываются быстро, читаются на любом устройстве и в любой среде без дополнительных инструментов.
Из-за своих преимуществ CSV — сверхпопулярный формат обмена данными, хотя ему уже лет 40. CSV используют прикладные промышленные программы, в него выгружают данные из баз.
Одна беда — текстового редактора для работы с CSV мало. Еще ничего, если таблица простая: в первом поле ID одной длины, во втором дата одного формата, а в третьем какой-нибудь адрес. Но когда поля разной длины и их больше трех, начинаются мучения.

Следить за разделителями и столбцами — глаза сломаешь
Еще хуже с анализом данных — попробуй «Блокнотом» хотя бы сложить все числа в столбце. Я уж не говорю о красивых графиках.
Поэтому CSV-файлы анализируют и редактируют в Excel и аналогах: Open Office, LibreOffice и прочих.
Ветеранам, которые все же дочитали: ребята, мы знаем об анализе непосредственно в БД c помощью SQL, знаем о Tableau и Talend Open Studio. Это статья для начинающих, а на базовом уровне и небольшом объеме данных Excel с аналогами хватает.
Как Excel портит данные: из классики
Все бы ничего, но Excel, едва открыв CSV-файл, начинает свои лукавые выкрутасы. Он без спроса меняет данные так, что те приходят в негодность. Причем делает это совершенно незаметно. Из-за этого в свое время мы схватили ворох проблем.
Большинство казусов связано с тем, что программа без спроса преобразует строки с набором цифр в числа.
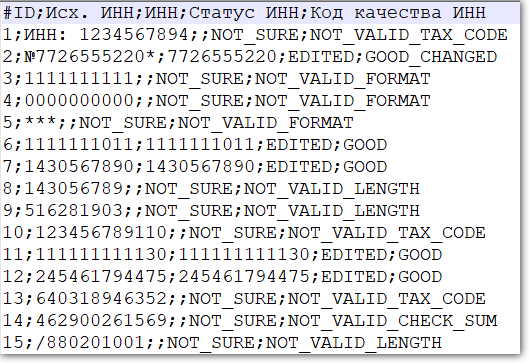
Округляет. Например, в исходной ячейке два телефона хранятся через запятую без пробелов: «5235834,5235835». Что сделает Excel? Лихо превратит номера́ в одно число и округлит до двух цифр после запятой: «5235834,52». Так мы потеряем второй телефон.
Приводит к экспоненциальной форме. Excel заботливо преобразует «123456789012345» в число «1,2E+15». Исходное значение потеряем напрочь.
Проблема актуальна для длинных, символов по пятнадцать, цифровых строк. Например, КЛАДР-кодов (это такой государственный идентификатор адресного объекта: го́рода, у́лицы, до́ма).
Удаляет лидирующие плюсы. Excel считает, что плюс в начале строки с цифрами — совершенно лишний символ. Мол, и так ясно, что число положительное, коль перед ним не стоит минус. Поэтому лидирующий плюс в номере «+74955235834» будет отброшен за ненадобностью — получится «74955235834». (В реальности номер пострадает еще сильнее, но для наглядности обойдусь плюсом).
Потеря плюса критична, например, если данные пойдут в стороннюю систему, а та при импорте жестко проверяет формат.
Разбивает по три цифры. Цифровую строку длиннее трех символов Excel, добрая душа, аккуратно разберет. Например, «8 495 5235834» превратит в «84 955 235 834».
Форматирование важно как минимум для телефонных номеров: пробелы отделяют коды страны и города от остального номера и друг от друга. Excel запросто нарушает правильное членение телефона.
Удаляет лидирующие нули. Строку «00523446» Excel превратит в «523446».
А в ИНН, например, первые две цифры — это код региона. Для Республики Алтай он начинается с нуля — «04». Без нуля смысл номера исказится, а проверку формата ИНН вообще не пройдет.
Меняет даты под локальные настройки. Excel с удовольствием исправит номер дома «1/2» на «01.фев». Потому что Windows подсказал, что в таком виде вам удобнее считывать даты.
Побеждаем порчу данных правильным импортом
Если серьезно, в бедах виноват не Excel целиком, а неочевидный способ импорта данных в программу.
По умолчанию Excel применяет к данным в загруженном CSV-файле тип «General» — общий. Из-за него программа распознает цифровые строки как числа. Такой порядок можно победить, используя встроенный инструмент импорта.
Запускаю встроенный в Excel механизм импорта. В меню это «Data → Get External Data → From Text».
Выбираю CSV-файл с данными, открывается диалог. В диалоге кликаю на тип файла Delimited (с разделителями). Кодировка — та, что в файле, обычно определяется автоматом. Если первая строка файла — шапка, отмечаю «My Data Has Headers».
Перехожу ко второму шагу диалога. Выбираю разделитель полей (обычно это точка с запятой — semicolon). Отключаю «Treat consecutive delimiters as one», а «Text qualifier» выставляю в «{none}». (Text qualifier — это символ начала и конца текста. Если разделитель в CSV — запятая, то text qualifier нужен, чтобы отличать запятые внутри текста от запятых-разделителей.)
На третьем шаге выбираю формат полей, ради него все и затевалось. Для всех столбцов выставляю тип «Text». Кстати, если кликнуть на первую колонку, зажать шифт и кликнуть на последнюю, выделятся сразу все столбцы. Удобно.
Дальше Excel спросит, куда вставлять данные из CSV — можно просто нажать «OK», и данные появятся в открытом листе.
Перед импортом придется создать в Excel новый workbook
Но! Если я планирую добавлять данные в CSV через Excel, придется сделать еще кое-что.
После импорта нужно принудительно привести все-все ячейки на листе к формату «Text». Иначе новые поля приобретут все тот же тип «General».
- Нажимаю два раза Ctrl+A, Excel выбирает все ячейки на листе;
- кликаю правой кнопкой мыши;
- выбираю в контекстном меню «Format Cells»;
- в открывшемся диалоге выбираю слева тип данных «Text».
Чтобы выделить все ячейки, нужно нажать Ctrl+A два раза. Именно два, это не шутка, попробуйте
После этого, если повезет, Excel оставит исходные данные в покое. Но это не самая твердая гарантия, поэтому мы после сохранения обязательно проверяем файл через текстовый просмотрщик.
Альтернатива: Open Office Calc
Для работы с CSV-файлами я использую именно Calc. Он не то чтобы совсем не считает цифровые данные строками, но хотя бы не применяет к ним переформатирование в соответствии с региональными настройками Windows. Да и импорт попроще.
Конечно, понадобится пакет Open Office (OO). При установке он предложит переназначить на себя файлы MS Office. Не рекомендую: хоть OO достаточно функционален, он не до конца понимает хитрое микрософтовское форматирование документов.
А вот назначить OO программой по умолчанию для CSV-файлов — вполне разумно. Сделать это можно после установки пакета.
Итак, запускаем импорт данных из CSV. После двойного клика на файле Open Office показывает диалог.

Заметьте, в OO не нужно создавать новый воркбук и принудительно запускать импорт, все само
- Кодировка — как в файле.
- «Разделитель» — точка с запятой. Естественно, если в файле разделителем выступает именно она.
- «Разделитель текста» — пустой (все то же, что в Excel).
- В разделе «Поля» кликаю в левый-верхний квадрат таблицы, подсвечиваются все колонки. Указываю тип «Текст».
Штука, которая испортила немало крови: если по ошибке выбрать несколько разделителей полей или не тот разделитесь текста, файл может правильно открыться, но неправильно сохраниться.
Помимо Calc у нас в HFLabs популярен libreOffice, особенно под «Линуксом». И то, и другое для CSV применяют активнее, чем Excel.
Бонус-трек: проблемы при сохранении из Calc в .xlsx
Если сохраняете данные из Calc в экселевский формат .xlsx, имейте в виду — OO порой необъяснимо и масштабно теряет данные.

Белая пустошь, раскинувшаяся посередине, в оригинальном CSV-файле богато заполнена данными
Поэтому после сохранения я еще раз открываю файл и убеждаюсь, что данные на месте.
Если что-то потерялись, лечение — пересохранить из CSV в .xlsx. Или, если установлен Windows, импортнуть из CSV в Excel и сохранить оттуда.
После пересохранения обязательно еще раз проверяю, что все данные на месте и нет лишних пустых строк.
Если интересно работать с данными, посмотрите на наши вакансии. HFLabs почти всегда нужны аналитики, тестировщики, инженеры по внедрению, разработчики. Данными обеспечим так, что мало не покажется 
Содержание
- Import or export text (.txt or .csv) files
- Import a text file by opening it in Excel
- Import a text file by connecting to it (Power Query)
- Export data to a text file by saving it
- Import a text file by connecting to it
- Export data to a text file by saving it
- Need more help?
- How to change Excel CSV delimiter to comma or semicolon
- What delimiter Excel uses for CSV files
- Change separator when saving Excel file as CSV
- Change delimiter when importing CSV to Excel
- Indicate separator directly in CSV file
- Choose delimiter in Text Import Wizard
- Specify delimiter when creating a Power Query connection
- Change default CSV separator globally
- Changing List separator: background and consequences
- You may also be interested in
Import or export text (.txt or .csv) files
There are two ways to import data from a text file with Excel: you can open it in Excel, or you can import it as an external data range. To export data from Excel to a text file, use the Save As command and change the file type from the drop-down menu.
There are two commonly used text file formats:
Delimited text files (.txt), in which the TAB character (ASCII character code 009) typically separates each field of text.
Comma separated values text files (.csv), in which the comma character (,) typically separates each field of text.
You can change the separator character that is used in both delimited and .csv text files. This may be necessary to make sure that the import or export operation works the way that you want it to.
Note: You can import or export up to 1,048,576 rows and 16,384 columns.
Import a text file by opening it in Excel
You can open a text file that you created in another program as an Excel workbook by using the Open command. Opening a text file in Excel does not change the format of the file — you can see this in the Excel title bar, where the name of the file retains the text file name extension (for example, .txt or .csv).
Go to File > Open and browse to the location that contains the text file.
Select Text Files in the file type dropdown list in the Open dialog box.
Locate and double-click the text file that you want to open.
If the file is a text file (.txt), Excel starts the Import Text Wizard. When you are done with the steps, click Finish to complete the import operation. See Text Import Wizard for more information about delimiters and advanced options.
If the file is a .csv file, Excel automatically opens the text file and displays the data in a new workbook.
Note: When Excel opens a .csv file, it uses the current default data format settings to interpret how to import each column of data. If you want more flexibility in converting columns to different data formats, you can use the Import Text Wizard. For example, the format of a data column in the .csv file may be MDY, but Excel’s default data format is YMD, or you want to convert a column of numbers that contains leading zeros to text so you can preserve the leading zeros. To force Excel to run the Import Text Wizard, you can change the file name extension from .csv to .txt before you open it, or you can import a text file by connecting to it (for more information, see the following section).
Import a text file by connecting to it (Power Query)
You can import data from a text file into an existing worksheet.
On the Data tab, in the Get & Transform Data group, click From Text/CSV.
In the Import Data dialog box, locate and double-click the text file that you want to import, and click Import.
In the preview dialog box, you have several options:
Select Load if you want to load the data directly to a new worksheet.
Alternatively, select Load to if you want to load the data to a table, PivotTable/PivotChart, an existing/new Excel worksheet, or simply create a connection. You also have the choice of adding your data to the Data Model.
Select Transform Data if you want to load the data to Power Query, and edit it before bringing it to Excel.
If Excel doesn’t convert a particular column of data to the format that you want, then you can convert the data after you import it. For more information, see Convert numbers stored as text to numbers and Convert dates stored as text to dates.
Export data to a text file by saving it
You can convert an Excel worksheet to a text file by using the Save As command.
Go to File > Save As.
In the Save As dialog box, under Save as type box, choose the text file format for the worksheet; for example, click Text (Tab delimited) or CSV (Comma delimited).
Note: The different formats support different feature sets. For more information about the feature sets that are supported by the different text file formats, see File formats that are supported in Excel.
Browse to the location where you want to save the new text file, and then click Save.
A dialog box appears, reminding you that only the current worksheet will be saved to the new file. If you are certain that the current worksheet is the one that you want to save as a text file, click OK. You can save other worksheets as separate text files by repeating this procedure for each worksheet.
You may also see an alert below the ribbon that some features might be lost if you save the workbook in a CSV format.
For more information about saving files in other formats, see Save a workbook in another file format.
Import a text file by connecting to it
You can import data from a text file into an existing worksheet.
Click the cell where you want to put the data from the text file.
On the Data tab, in the Get External Data group, click From Text.
In the Import Data dialog box, locate and double-click the text file that you want to import, and click Import.
Follow the instructions in the Text Import Wizard. Click Help  on any page of the Text Import Wizard for more information about using the wizard. When you are done with the steps in the wizard, click Finish to complete the import operation.
In the Import Data dialog box, do the following:
Under Where do you want to put the data?, do one of the following:
To return the data to the location that you selected, click Existing worksheet.
To return the data to the upper-left corner of a new worksheet, click New worksheet.
Optionally, click Properties to set refresh, formatting, and layout options for the imported data.
Excel puts the external data range in the location that you specify.
If Excel does not convert a column of data to the format that you want, you can convert the data after you import it. For more information, see Convert numbers stored as text to numbers and Convert dates stored as text to dates.
Export data to a text file by saving it
You can convert an Excel worksheet to a text file by using the Save As command.
Go to File > Save As.
The Save As dialog box appears.
In the Save as type box, choose the text file format for the worksheet.
For example, click Text (Tab delimited) or CSV (Comma delimited).
Note: The different formats support different feature sets. For more information about the feature sets that are supported by the different text file formats, see File formats that are supported in Excel.
Browse to the location where you want to save the new text file, and then click Save.
A dialog box appears, reminding you that only the current worksheet will be saved to the new file. If you are certain that the current worksheet is the one that you want to save as a text file, click OK. You can save other worksheets as separate text files by repeating this procedure for each worksheet.
A second dialog box appears, reminding you that your worksheet may contain features that are not supported by text file formats. If you are interested only in saving the worksheet data into the new text file, click Yes. If you are unsure and would like to know more about which Excel features are not supported by text file formats, click Help for more information.
For more information about saving files in other formats, see Save a workbook in another file format.
The way you change the delimiter when importing is different depending on how you import the text.
If you use Get & Transform Data > From Text/CSV, after you choose the text file and click Import, choose a character to use from the list under Delimiter. You can see the effect of your new choice immediately in the data preview, so you can be sure you make the choice you want before you proceed.
If you use the Text Import Wizard to import a text file, you can change the delimiter that is used for the import operation in Step 2 of the Text Import Wizard. In this step, you can also change the way that consecutive delimiters, such as consecutive quotation marks, are handled.
See Text Import Wizard for more information about delimiters and advanced options.
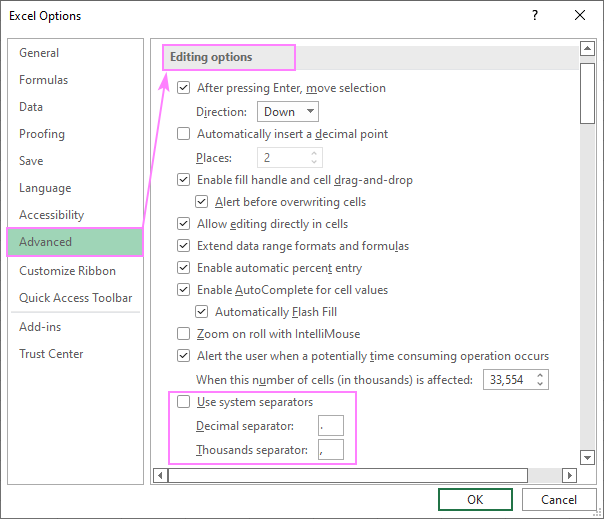
If you want to use a semi-colon as the default list separator when you Save As .csv, but need to limit the change to Excel, consider changing the default decimal separator to a comma — this forces Excel to use a semi-colon for the list separator. Obviously, this will also change the way decimal numbers are displayed, so also consider changing the Thousands separator to limit any confusion.
Clear Excel Options > Advanced > Editing options > Use system separators.
Set Decimal separator to , (a comma).
Set Thousands separator to . (a period).
When you save a workbook as a .csv file, the default list separator (delimiter) is a comma. You can change this to another separator character using Windows Region settings.
Caution: Changing the Windows setting will cause a global change on your computer, affecting all applications. To only change the delimiter for Excel, see Change the default list separator for saving files as text (.csv) in Excel.
In Microsoft Windows 10, right-click the Start button, and then click Settings.
Click Time & Language, and then click Region in the left panel.
In the main panel, under Regional settings, click Additional date, time, and regional settings.
Under Region, click Change date, time, or number formats.
In the Region dialog, on the Format tab, click Additional settings.
In the Customize Format dialog, on the Numbers tab, type a character to use as the new separator in the List separator box.
In Microsoft Windows, click the Start button, and then click Control Panel.
Under Clock, Language, and Region, click Change date, time, or number formats.
In the Region dialog, on the Format tab, click Additional settings.
In the Customize Format dialog, on the Numbers tab, type a character to use as the new separator in the List separator box.
Note: After you change the list separator character for your computer, all programs use the new character as a list separator. You can change the character back to the default character by following the same procedure.
Need more help?
You can always ask an expert in the Excel Tech Community or get support in the Answers community.
Источник
How to change Excel CSV delimiter to comma or semicolon
 by Svetlana Cheusheva, updated on March 9, 2023
The tutorial shows how to change CSV separator when importing or exporting data to/from Excel, so you can save your file in the comma-separated values or semicolon-separated values format.
Excel is diligent. Excel is smart. It thoroughly examines the system settings of the machine it’s running on and does its best to anticipate the user’s needs … quite often to disappointing results.
Imagine this: you want to export your Excel data to another application, so you go save it in the CSV format supported by many programs. Whatever CSV option you use, the result is a semicolon-delimited file instead of comma-separated you really wanted. The setting is default, and you have no idea how to change it. Don’t give up! No matter how deep the setting is hidden, we’ll show you a way to locate it and tweak for your needs.
What delimiter Excel uses for CSV files
To handle .csv files, Microsoft Excel uses the List separator defined in Windows Regional settings.
In North America and some other countries, the default list separator is a comma, so you get CSV comma delimited.
In European countries, a comma is reserved for the decimal symbol, and the list separator is generally set to semicolon. That is why the result is CSV semicolon delimited.
To get a CSV file with another field delimiter, apply one of the approaches described below.
Change separator when saving Excel file as CSV
When your save a workbook as a .csv file, Excel separates values with your default List separator. To force it to use a different delimiter, proceed with the following steps:
- Click File >Options >Advanced.
- Under Editing options, clear the Use system separators check box.
- Change the default Decimal separator. As this will change the way decimal numbers are displayed in your worksheets, choose a different Thousands separator to avoid confusion.
Depending on which separator you wish to use, configure the settings in one of the following ways.
To convert Excel file to CSV semicolon delimited, set the default decimal separator to a comma. This will get Excel to use a semicolon for the List separator (CSV delimiter):
- Set Decimal separator to comma (,)
- Set Thousands separator to period (.)


To save Excel file as CSV comma delimited, set the decimal separator to a period (dot). This will make Excel use a comma for the List separator (CSV delimiter):
- Set Decimal separator to period (.)
- Set Thousands separator to comma (,)
If you want to change a CSV separator only for a specific file, then tick the Use system settings check box again after exporting your Excel workbook to CSV.
Note. Obviously, the changes you’ve made in Excel Options are limited to Excel. Other applications will keep using the default List separator defined in your Windows Regional settings.
Change delimiter when importing CSV to Excel
There are a few different ways to import CSV file into Excel. The way of changing the delimiter depends on the importing method you opted for.
Indicate separator directly in CSV file
For Excel to be able to read a CSV file with a field separator used in a given CSV file, you can specify the separator directly in that file. For this, open your file in any text editor, say Notepad, and type the below string before any other data:
- To separate values with comma: sep=,
- To separate values with semicolon: sep=;
- To separate values with a pipe: sep=|
In a similar fashion, you can use any other character for the delimiter — just type the character after the equality sign.
Once the delimiter is defined, you can open your text file in Excel like you normally would, from Excel itself or from Windows Explorer.
For example, to correctly open a semicolon delimited CSV in Excel, we explicitly indicate that the field separator is a semicolon: 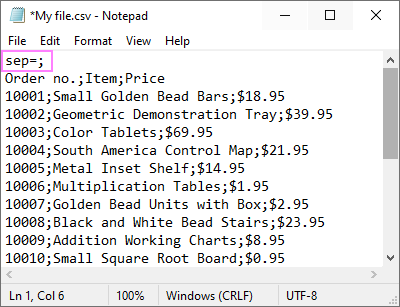
Choose delimiter in Text Import Wizard
Another way to handle a csv file with a delimiter different from the default one is to import the file rather than open. In Excel 2013 an earlier, that was quite easy to do with the Text Import Wizard residing on the Data tab, in the Get External Data group. Beginning with Excel 2016, the wizard is removed from the ribbon as a legacy feature. However, you can still make use of it:
- Enable From Text (Legacy) feature.
- Change the file extension from .csv to .txt, and then open the txt file from Excel. This will launch the Import Text Wizard automatically.
In step 2 of the wizard, you are suggested to choose from the predefined delimiters (tab, comma, semicolon, or space) or specify your custom one: 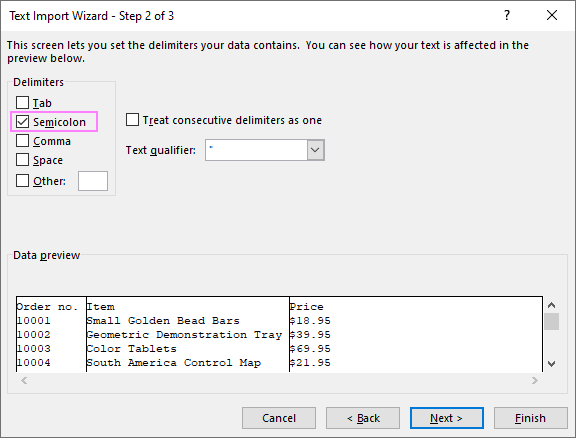
Specify delimiter when creating a Power Query connection
Microsoft Excel 2016 and higher provides one more easy way to import a csv file — by connecting to it with the help of Power Query. When creating a Power Query connection, you can choose the delimiter in the Preview dialog window: 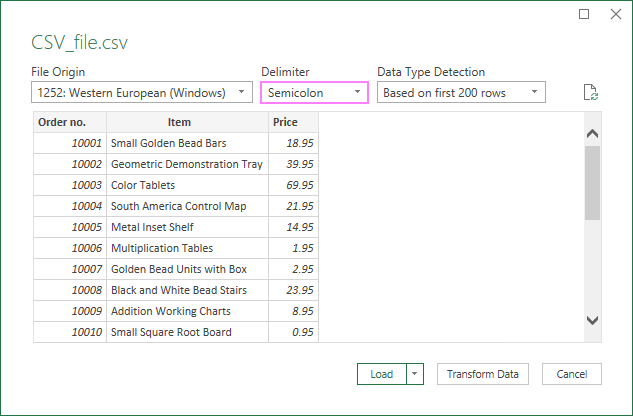
Change default CSV separator globally
To change the default List separator not only for Excel but for all programs installed on your computer, here’s what you need to do:
- On Windows, go to Control Panel >Region settings. For this, just type Region in the Windows search box, and then click Region settings.

In the Region panel, under Related settings, click Additional date, time, and regional settings. 
Under Region, click Change date, time, or number formats. 
In the Region dialog box, on the Formats tab, click Additional settings… 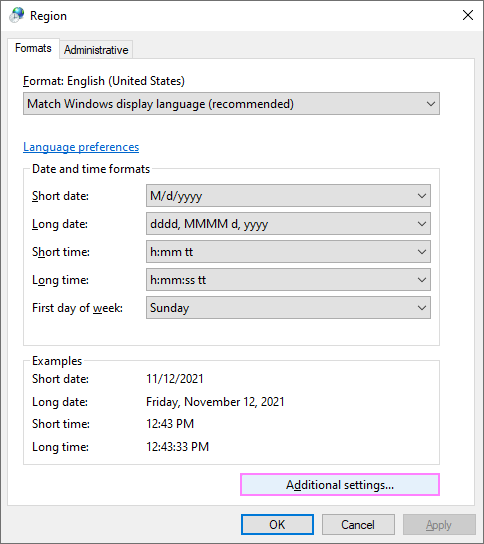
In the Customize Format dialog box, on the Numbers tab, type the character you want to use as the default CSV delimiter in the List separator box. 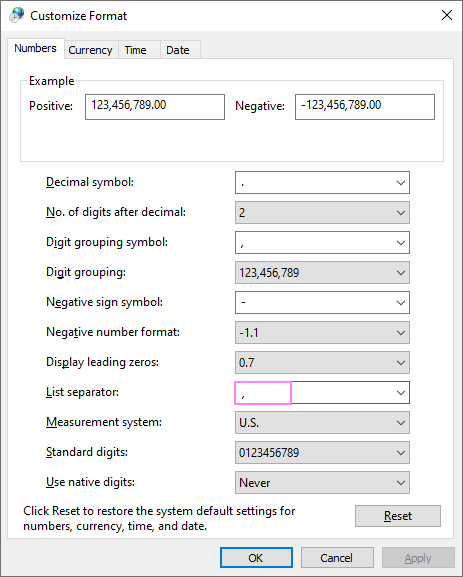
For this change to work, the List separatorshould not be the same as Decimal symbol.
When done, restart Excel, so it can pick up your changes.
- Modifying the system settings will cause a global change on your computer that will affect all applications and all output of the system. Do not do this unless you are 100% confident in the results.
- If changing the separator has adversely affected the behavior of some application or caused other troubles on your machine, undo the changes. For this, click the Reset button in the Customize Format dialog box (step 5 above). This will remove all the customizations you’ve made and restore the system default settings.
Changing List separator: background and consequences
Before changing the List separator on your machine, I encourage you to carefully read this section, so you fully understand possible outcomes.
First off, it should be noted that depending on the country Windows uses different default separators. It’s because large numbers and decimals are written in different ways across the globe.
In the USA, UK and some other English-speaking countries including Australia and New Zealand, the following separators are used:
Decimal symbol: dot (.)
Digit grouping symbol: comma (,)
List separator: comma (,) 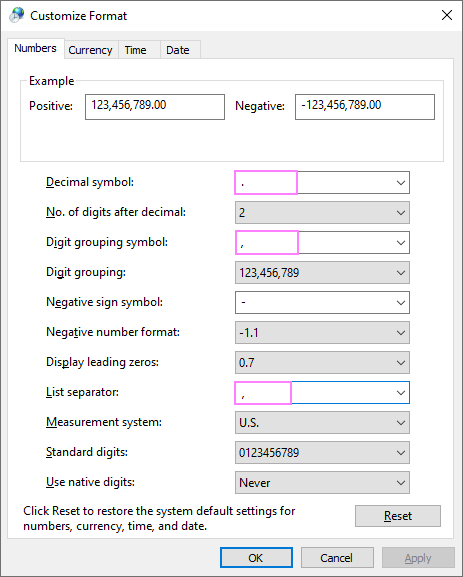
In most European countries, the default list separator is a semicolon (;) because a comma is utilized as the decimal point:
Decimal symbol: comma (,)
Digit grouping symbol: dot (.)
List separator: semicolon (;) 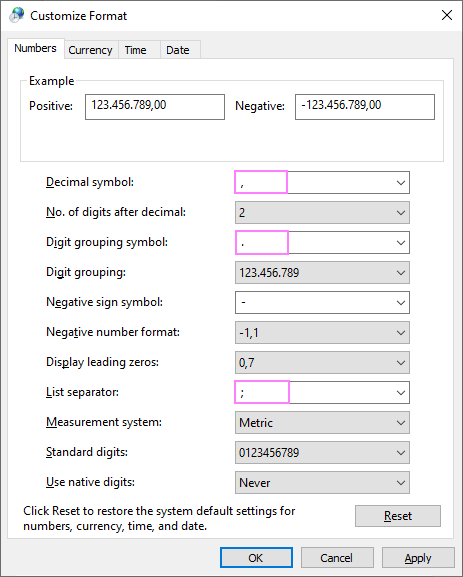
For example, here’s how two thousand dollars and fifty cents is written in different countries:
US and UK: $2,000.50
How does all this relate to the CSV delimiter? The point is that the List separator (CSV delimiter) and Decimal symbol should be two different characters. That means setting the List separator to comma will require changing the default Decimal symbol (if it’s set to comma). As the result, numbers will be displayed in a different way in all your applications.
Moreover, List separator is used for separating arguments in Excel formulas. Once you change it, say from comma to semicolon, the separators in all your formulas will also change to semicolons.
If you are not ready for such large-scale modifications, then change a separator only for a specific CSV file as described in the first part of this tutorial.
That’s how you can open or save CSV files with different delimiters in Excel. Thank you for reading and see you next week!
You may also be interested in
Table of contents
This is the most recent post on that topic I could find, which tells me, that this problem has still not been SUSTAINABLY resolved by the «software giant» (as one said here) Microsoft .
The only sustainable way to resolve it — and not the whole world is the United States of America, so we DO NEED such a resolution — would be a seamlessly added EXPORT filter, allowing to replace the the decimal and field separators of the csv saved by Excel .
Actually this could also be achieved — as a workaround — by a well-crafted VBA macro.
But we DO NEED this as a built-in function of Excel and this can only be done by Microsoft as the manufacturer of their (international . ) Office suite, right ?
Remark:
When writing such a macro (as a workaround), you would not only have to replace , and ;
Be aware that the csv specification also allows the use of of the separator WITHIN a field, when using special delimiters, like that:
. , «This is a text, aint it», 64.7, .
So you would have to take care of such «exceptions», otherwise you’d spoil the whole csv.
Anyway thanks to all, contributing ideas to this thread, including Svetlana for describing all EXISTING workarounds (which are only a crutch in my opinion; sorry Svetlana, that’s not your fault of course !)
FINALLY.
Would anyone of you know where to request such a «feature» at Microsoft directly ?
Any developers forum we could jointly add such a request and could gather others, who hopefully agree with us and demand such a priority change with their next release ?
This is rediculous. How can a BIG software giant as Microsoft think in this way!?
Let us set the separator manually.
If you look at some other software that import/export CSV they use comma as separator and put all the information within quotes. If there is a quote in the information it is escaped.
I guess there’s some old standard from 1965 stating how a CSV should be. 🙁
Hi all, Svetlana is not true at all, but only partially. I will explain.
If you use English locale and you in Excel change decimal separator from system to comma, Excel understand that he cannot use comma as a field delimiter and will use semicolon instead of it and will save csv file in non-english format, it is for example: 1,5;23,45.
But, in the case you are working with for example Czech locale (or probably with French locale) and you in Excel change a decimal separator to dot as correct for English csv and save this file. The format of file is for example: 1.5;23;45 and not expected 1.5,23.45. The reason is, I guess, that Excel has no any reason to change a field separator from semicolon to comma, because semicolon is a correct field separator for csv file and and does not contradict with the dot or comma decimal delimiter at all.
So with English locale you can save an usual non-english csv with comma decimal delimiter and semicolon field separator, but with non-english locale (Czech or French) you cannot save usual English csv, with dot decimal delimiter and comma field separator, but you can save alternative English csv, with dot decimal delimiter and semicolon field separator.
Of course another possibility is to switch locale with other possible problems, for example with other application.
Best regards,
Martin Molhanec
All works as intended. Microsoft 365 Apps for Enterprise.
Decimal and Thousands separators can be changed in my case — just mind the emtpy space character that you HAVE to delete!
[ 0. 0. 0. 1. 7. 6. 0. 0. 0. 0. 0. 2. 4. 1.
0. 0. 2. 0. 0. 0. 0. 0. 0. 0. 0. 0. 0. 0.
0. 0. 0. 0. 0. 0. 0. 34. 128. 106. 6. 0. 23. 4.
1. 95. 128. 42. 18. 7. 128. 15. 2. 18. 16. 4. 10. 23.
46. 6. 10. 73. 79. 1. 0. 1. 19. 12. 29. 128. 83. 27.
10. 5. 29. 7. 3. 23. 82. 128. 128. 25. 128. 71. 13. 15.
25. 40. 66. 51. 37. 43. 25. 81. 128. 19. 5. 12. 47. 43.
20. 73. 13. 19. 14. 8. 40. 77. 52. 23. 48. 22. 14. 6.
5. 38. 31. 37. 78. 29. 4. 1. 37. 36. 56. 81. 20. 9.
3. 6.];[ 0. 0. 0. 1. 7. 6. 0. 0. 0. 0. 0. 2. 4. 1.
0. 0. 2. 0. 0. 0. 0. 0. 0. 0. 0. 0. 0. 0.
0. 0. 0. 0. 0. 0. 0. 34. 128. 106. 6. 0. 23. 4.
1. 95. 128. 42. 18. 7. 128. 15. 2. 18. 16. 4. 10. 23.
46. 6. 10. 73. 79. 1. 0. 1. 19. 12. 29. 128. 83. 27.
10. 5. 29. 7. 3. 23. 82. 128. 128. 25. 128. 71. 13. 15.
25. 40. 66. 51. 37. 43. 25. 81. 128. 19. 5. 12. 47. 43.
20. 73. 13. 19. 14. 8. 40. 77. 52. 23. 48. 22. 14. 6.
5. 38. 31. 37. 78. 29. 4. 1. 37. 36. 56. 81. 20. 9.
3. 6.];True
Please need to make a code or tools to be three above details as a column, its mean [ ] [ ] True as a three columns
This instruction doesn’t work:
«To save Excel file as CSV comma delimited, set the decimal separator to a period (dot). This will make Excel use a comma for the List separator (CSV delimiter):»
I’ve just retested it in my Excel 365 — it does work as described. What Excel version do you use?
I had the same problem, could not change the list separator modifying it in Excel 2016 Professional. The file I was trying to convert, had to be used in another program that uses the comma as list separator (forScore).
I confirm the second option, the global change of the list separator. This has the draw-back that it interferes with other simulating programs. So, after converting the file, I had to restore the configuration for my other simulators to work properly again.
How did you test the first approach?
Here’s what I did:
— Performed the steps described in «Change separator when saving Excel file as CSV». In particular, set Decimal separator to period (.) and Thousands separator to comma (,).
— Saved the workbook as CSV file.
— Opened the CSV file in Notepad to check which separator is actually used. In my case, the result is always comma-separated values.
Same story for me.
And i am not allowed to change global setting by company policy, so no alternative there.
Hi Svetlana,
for me with Excel 365 it is not working.
Allthough doing all steps and chekcing it twice, result is still semicolon separataed.
The semicolon is still there since perhaps you have missed this part «For this change to work, the List separator should not be the same as Decimal symbol.» on the article.
If all above do not work and you want to properly read/modify csv which source file has comma as separator and dot as delimiter just open it in an editor, I used vsc for example. Mark all commas in the file, change them to semicolons after that mark all dots if you have numbers and change them to commas.
Office 365, version 2108. comma delimited doesn’t work for me as well. All done with the description from this article.
Microsoft it’s shame we cannot do it Excel :/
Copyright © 2003 – 2023 Office Data Apps sp. z o.o. All rights reserved.
Microsoft and the Office logos are trademarks or registered trademarks of Microsoft Corporation. Google Chrome is a trademark of Google LLC.
Источник
В этой статье Вы найдёте 2 простых способа преобразовать файл CSV в Excel. Кроме того, Вы узнаете, как импортировать в Excel несколько файлов CSV и как справиться с ситуациями, когда часть данных из файла CSV не отображается корректно на листе Excel.
Недавно мы начали изучать особенности формата CSV (Comma-Separated Values – значения, разделённые запятой) и различные способы преобразования файла Excel в CSV. Сегодня мы займёмся обратным процессом – импортом CSV в Excel.
Эта статья покажет Вам, как открывать CSV в Excel и как импортировать одновременно несколько файлов CSV. Мы также обозначим возможные подводные камни и предложим наиболее эффективные решения.
- Как преобразовать CSV в Excel
- Преобразование CSV в Excel: проблемы и решения
Содержание
- Как преобразовать CSV в Excel
- Как открыть файл CSV в Excel
- Как открыть файл CSV при помощи Проводника Windows
- Как импортировать CSV в Excel
- Преобразование CSV в Excel: проблемы и решения
- Файл CSV отображается в Excel неправильно
- Первые нули теряются при открытии файла CSV в Excel
- Excel преобразует некоторые значения в даты при открытии файла CSV
- Как импортировать в Excel несколько файлов CSV
Как преобразовать CSV в Excel
Если Вам нужно вытащить какую-то информацию на лист Excel из базы данных Вашей компании, то первая же идея, что приходит на ум, – экспортировать базу данных в файл CSV, а затем импортировать файл CSV в Excel.
Существует 3 способа преобразования CSV в Excel: Вы можете открыть файл с расширением .csv непосредственно в Excel, дважды кликнуть по файлу в Проводнике Windows либо импортировать CSV в Excel, как внешний источник данных. Далее я подробно расскажу об этих трёх способах и укажу преимущества и недостатки каждого из них.
- Способ 1: Открываем файл CSV в Excel
- Способ 2: Открываем файл CSV в Excel при помощи Проводника Windows
- Способ 3: Импортируем CSV в Excel
Как открыть файл CSV в Excel
Даже если файл CSV создан в другой программе, Вы всегда можете открыть его как книгу Excel при помощи команды Open (Открыть).
Замечание: Открытие файла CSV в Excel не изменяет формат файла. Другими словами, файл CSV при этом не будет преобразован в файл Excel (формат .xls или .xlsx), он сохранит свой изначальный тип (.csv или .txt).
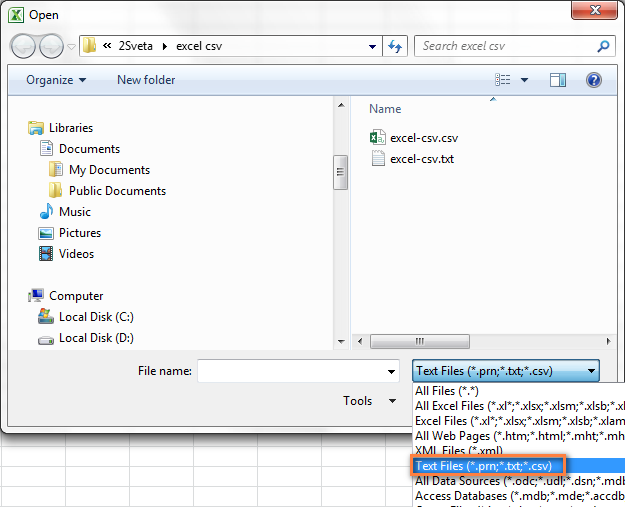
- Запустите Microsoft Excel, на вкладке Home (Главная) нажмите Open (Открыть).
- Появится диалоговое окно Open (Открытие документа), в выпадающем списке в нижнем правом углу выберите Text Files (Текстовые файлы).
- Найдите в Проводнике Windows файл CSV и откройте его, дважды кликнув по нему.
Если Вы открываете файл CSV, то Excel откроет его сразу же вставив данные в новую книгу Excel. Если Вы открываете текстовый файл (.txt), то Excel запустит Мастер импорта текстов. Подробнее об этом читайте в разделе Импортируем CSV в Excel.
Замечание: Когда Microsoft Excel открывает файл CSV, то для того, чтобы понять, как именно импортировать каждый столбец данных, он использует настройки форматирования, заданные по умолчанию.
Если данные соответствуют хотя бы одному из следующих пунктов, то воспользуйтесь Мастером импорта текстов:
- В файле CSV использованы различные разделители;
- В файле CSV использованы различные форматы даты;
- Вы преобразуете данные, среди которых есть числа с нулём в начале, и Вы хотите сохранить этот ноль;
- Вы хотите предварительно просмотреть, как будут импортированы данные из файла CSV в Excel;
- Вам хочется большей гибкости в работе.
Чтобы заставить Excel запустить Мастер импорта текстов, Вы можете либо изменить расширение фала с .csv на .txt (прежде чем открывать файл), либо импортировать CSV в Excel так, как это будет описано далее.
Как открыть файл CSV при помощи Проводника Windows
Это самый быстрый способ открыть CSV в Excel. В Проводнике Windows дважды кликните по файлу .csv, и он откроется как новая книга Excel.
Однако, этот способ сработает только в том случае, если приложение Microsoft Excel установлено как программа, заданная по умолчанию, для открытия файлов .csv. Если это так, то Вы будете видеть знакомую иконку в Проводнике Windows рядом с именем файла.
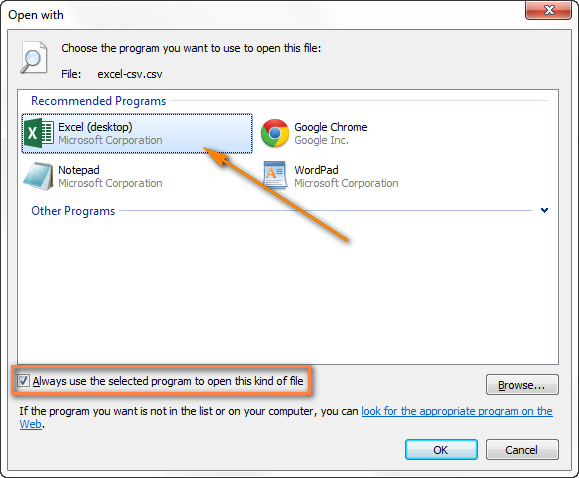
Если Excel не является программой по умолчанию, вот как Вы можете это исправить:
- Кликните правой кнопкой мыши по любому файлу .csv в Проводнике Windows и в открывшемся контекстном меню нажмите Open with (Открыть с помощью) > Choose default program (Выбрать программу).
- Выберите Excel в списке рекомендованных программ, убедитесь, что стоит галочка для параметра Always use the selected program to open this kind of file (Всегда использовать выбранное приложение для такого типа файлов) и нажмите ОК.
Как импортировать CSV в Excel
Этим способом Вы можете импортировать данные из файла .csv в существующий или в новый лист Excel. В отличие от предыдущих двух способов, он не просто открывает CSV в Excel, а именно конвертирует формат .csv в .xlsx (если Вы используете Excel 2007, 2010 или 2013) или .xls (в версиях Excel 2003 и более ранних).
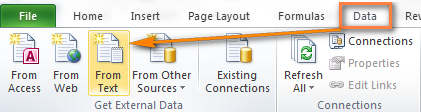
- Откройте нужный лист Excel и кликните по ячейке, куда нужно импортировать данные из файла .csv или .txt.
- На вкладке Data (Данные) в разделе Get External Data (Получение внешних данных) кликните From Text (Из текста).
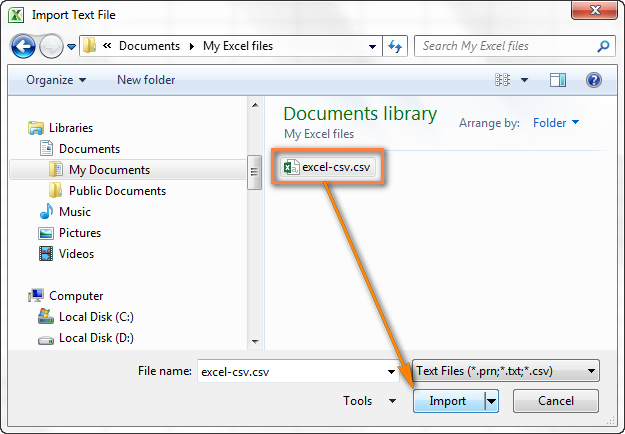
- Найдите файл .csv, который требуется импортировать, выберите его и нажмите кнопку Import (Импорт), или просто дважды кликните по нужному CSV файлу.
- Откроется Мастер импорта текстов, Вам нужно просто выполнить его шаги.
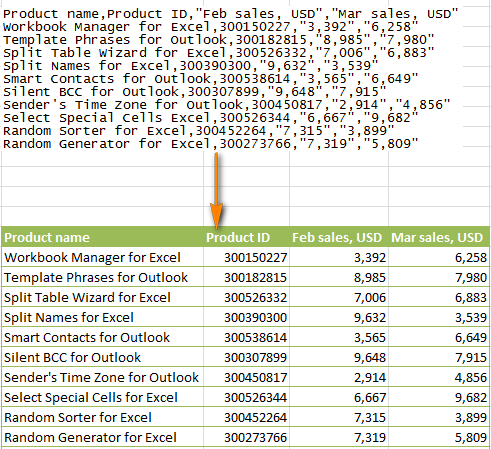
Прежде, чем мы двинемся дальше, пожалуйста, посмотрите на снимок экрана ниже, на нем показан исходный файл CSV и желаемый результат в Excel. Надеюсь, это поможет Вам лучше понять, почему мы выбираем те или иные параметры настроек в последующем примере.
-
- Шаг 1. Выберите формат данных и номер строки, с которой нужно начинать импорт. Чаще всего выбирают Delimited (С разделителями) и со строки 1. Область предварительного просмотра в нижней части диалогового окна мастера показывает первые несколько записей импортируемого файла CSV.
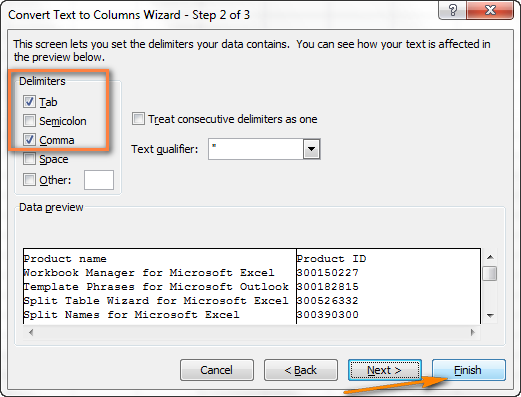
- Шаг 2. На этом шаге нужно выбрать разделители и ограничитель строк. Delimiter (Разделитель) – это символ, который разделяет значения в файле CSV. Если в Вашем файле CSV использован какой-то символ, которого нет в предложенном списке, то поставьте галочку в варианте Other (Другой) и введите нужный символ. В нашем примере мы указали Tab (Знак табуляции) и Comma (Запятая), чтобы каждый товар (они разделены табуляцией) начинался с новой строки, а информация о товаре, например, ID и данные о продажах (они разделены запятыми), были помещены в разные ячейки.Text qualifier (Ограничитель строк) – это символ, в который заключены отдельные значения. Весь текст, заключённый между такими символами, например, «текст1, текст2», будет импортирован как одно значение, даже если в этом тексте содержится символ, указанный Вами как разделитель.В этом примере мы указали запятую как разделитель, и кавычки как ограничитель строк. В результате, все числа с разделителем десятичных разрядов (которым тоже в нашем случае служит запятая!) будут импортированы в одну ячейку, как это видно в области предпросмотра на рисунке ниже. Если мы не укажем кавычки как ограничитель строк, то все числа будут импортированы в разные ячейки.
- Шаг 3. Посмотрите в область Data preview (Образец разбора данных). Если Вы довольны тем, как выглядят Ваши данные, тогда жмите кнопку Finish (Готово).
- Шаг 1. Выберите формат данных и номер строки, с которой нужно начинать импорт. Чаще всего выбирают Delimited (С разделителями) и со строки 1. Область предварительного просмотра в нижней части диалогового окна мастера показывает первые несколько записей импортируемого файла CSV.

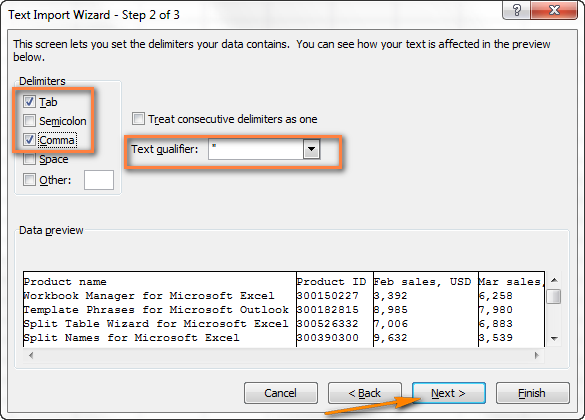
Совет: Если в Вашем файле CSV используется последовательно более одной запятой или другого символа-разделителя, то поставьте галочку для параметра Treat consecutive delimiters as one (Считать последовательные разделители одним), чтобы избежать появления пустых ячеек.
- Выберите, куда вставлять импортированные данные, на существующий или на новый лист, и нажмите ОК, чтобы завершить импорт файла CSV в Excel.
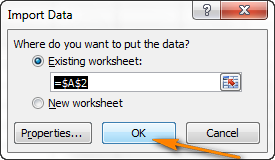
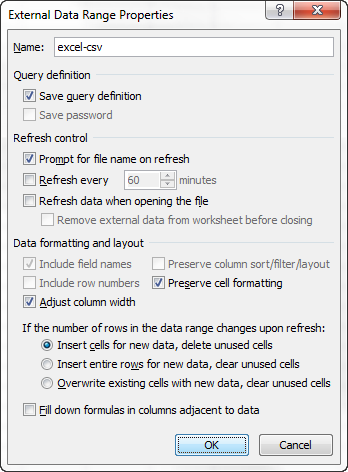
Совет: Вы можете нажать кнопку Properties (Свойства), чтобы настроить дополнительные параметры, такие как обновление, разметка и форматирование для импортированных данных.
Замечание: Если Ваш файл CSV содержит численные данные или даты, Excel может преобразовать их с ошибками. Чтобы изменить формат импортированных данных, выберите столбец (столбцы), в которых возникли ошибки, кликните по ним правой кнопкой мыши и в контекстном меню выберите Format cells (Формат ячеек).
Преобразование CSV в Excel: проблемы и решения
Формат CSV используется уже более 30 лет, но несмотря на его длительную историю, он никогда не был официально задокументирован. Название CSV (Comma-Separated Values) возникло из-за использования запятых для разделения полей данных. Но это в теории. На самом деле, множество так называемых CSV-файлов используют другие символы для разделения данных, например:
- Табуляция – TSV-файлы (tab-separated values)
- Точка с запятой – SCSV-файлы (semicolon separated values)
Некоторые вариации файлов CSV разделяют поля данных одинарными или двойными кавычками, другие требуют маркер последовательности байтов из Юникода (BOM), например, UTF-8, для корректной интерпретации Юникода.
Это отсутствие стандартов порождает разнообразные проблемы, с которыми Вы можете столкнуться, пытаясь преобразовать файл Excel в CSV, и особенно, когда импортируете файл CSV в Excel. Давайте разберёмся с известными проблемами, начиная с самой распространённой.
- Файл CSV отображается в Excel неправильно (все данные помещены в первый столбец)
- Первые нули потеряны при открытии файла CSV в Excel
- Значения преобразованы в даты при импорте файла CSV в Excel
Файл CSV отображается в Excel неправильно
Признаки: Вы пытаетесь открыть файл CSV в Excel, и все данные попадают в первый столбец.
Причина: Корень проблемы кроется в том, что в Ваших региональных и языковых настройках Windows и в Вашем файле CSV установлены различные разделители. В Северной Америке и некоторых других странах разделителем полей списка по умолчанию является запятая. В то время как в Европейских странах запятая используется как разделитель десятичных разрядов, а разделителем полей списка является точка с запятой.
Решение: Есть несколько возможных решений этой проблемы. Вы можете быстро просмотреть приведённые ниже рекомендации и выбрать наиболее подходящие для конкретно Вашей задачи.
- Укажите правильный разделитель непосредственно в файле CSV. Откройте файл CSV в любом текстовом редакторе (подойдёт даже обычный блокнот) и в первой строке вставьте следующий текст. Обратите внимание, что это должна быть отдельная строка перед любыми другими данными:
- Чтобы установить разделитель запятую: sep=,
- Чтобы установить разделитель точку с запятой: sep=;
Как Вы уже догадались, таким образом можно установить в качестве разделителя любой другой символ, просто указав его сразу после знака равенства.
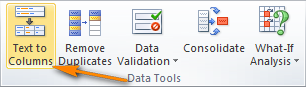
- Выберите нужный разделитель в Excel. В Excel 2013 или 2010 на вкладке Data (Данные) в разделе Data Tools (Работа с данными) нажмите Text To Columns (Текст по столбцам).Когда запустится Мастер распределения текста по столбцам, на первом шаге выберите формат данных Delimited (С разделителями) и нажмите Next (Далее). На втором шаге выберите нужный разделитель и нажмите Finish (Готово).
- Измените расширение с .csv на .txt. Открытие файла .txt в Excel приведёт к запуску Мастера импорта текстов, и Вы сможете выбрать нужный разделитель, как это было описано в разделе Как импортировать CSV в Excel.
- Откройте файл CSV с точкой с запятой в качестве разделителя при помощи VBA. Вот пример кода VBA, который открывает в Excel файл CSV, где в качестве разделителя используется точка с запятой. Код был написан несколько лет назад для более ранних версий Excel (2000 и 2003), но если Вы достаточно хорошо знакомы с VBA, то у Вас не должно возникнуть проблем с его обновлением или изменением для работы с файлами CSV с запятой в качестве разделителя.
 Когда запустится Мастер распределения текста по столбцам, на первом шаге выберите формат данных Delimited (С разделителями) и нажмите Next (Далее). На втором шаге выберите нужный разделитель и нажмите Finish (Готово).
Замечание: Все показанные решения изменяют разделитель только для данного файла CSV. Если Вы хотите раз и навсегда изменить разделитель, заданный по умолчанию, то Вам подойдёт следующее решение.
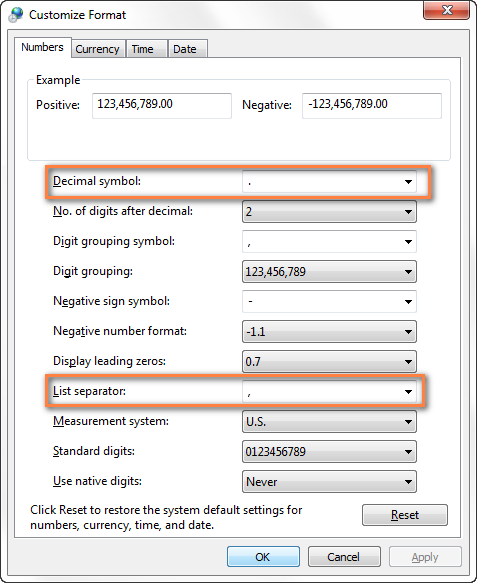
- Изменяем разделители в настройках региональных стандартов. Нажмите кнопку Start (Пуск) и запустите Control Panel (Панель управления), кликните пункт Region and Language (Региональные стандарты) > Additional Settings (Дополнительные параметры). Откроется диалоговое окно Customize Format (Настройка формата), в котором Вам нужно выбрать точку (.) для параметра Decimal symbol (Разделитель целой и дробной части), и установить запятую (,) для параметра List separator (Разделитель элементов списка).
Примечание переводчика: Данные настройки приведены для английской локализации Excel (и ряда других стран). Для русской локализации привычнее будет использовать запятую в качестве разделителя целой и дробной части и точку с запятой для разделения элементов списка.
- Дважды нажмите ОК, чтобы закрыть диалоговые окна – всё готово! С этого момента Microsoft Excel будет открывать и отображать все файлы CSV (с разделителем запятой) корректно.
 Дважды нажмите ОК, чтобы закрыть диалоговые окна – всё готово! С этого момента Microsoft Excel будет открывать и отображать все файлы CSV (с разделителем запятой) корректно.
Замечание: Установка в Панели управления Windows символов-разделителей целой и дробной части и элементов списка изменит настройки символов, заданные по умолчанию, для всех программ на Вашем компьютере, а не только в Microsoft Excel.
Первые нули теряются при открытии файла CSV в Excel
Признаки: Ваш файл CSV содержит значения с первыми нулями, и эти нули теряются при открытии файла CSV в Excel.
Причина: По умолчанию, Microsoft Excel отображает файл CSV в формате General (Общий), в котором первые нули отсекаются.
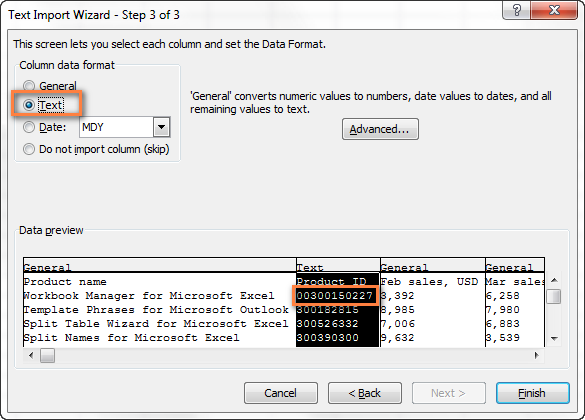
Решение: Вместо того, чтобы открывать файл .csv в Excel, запустите, как мы это делали ранее, Мастер импорта текстов, чтобы конвертировать файл CSV в Excel.
На шаге 3 мастера выберите столбцы, содержащие значения с первыми нулями и измените формат этих столбцов на текстовый. Так Вы конвертируете Ваш файл CSV в Excel, сохранив нули на своих местах.
Excel преобразует некоторые значения в даты при открытии файла CSV
Признаки: Некоторые значения в Вашем файле CSV похожи на даты, и Excel автоматически преобразует такие значения из текстового формата в формат даты.
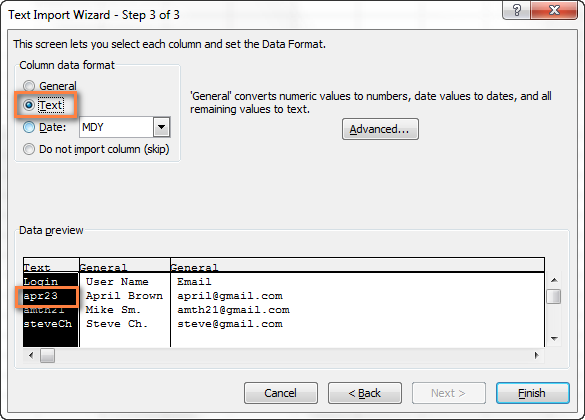
Причина: Как упоминалось выше, Excel открывает файл CSV в формате General (Общий), при этом значения, похожие на даты, преобразует из текстового формата в формат даты. Например, если Вы открываете файл CSV, содержащий логины пользователей, то запись «апр23» будет преобразована в дату.
Решение: Преобразуйте файл CSV в Excel при помощи Мастера импорта текстов. На шаге 3 мастера выберите столбцы с записями, похожими на даты, и измените формат столбца на текстовый.
Если Вам нужно достичь противоположного результата, то есть в определённом столбце преобразовать значения в даты, тогда установите формат Date (Дата) и выберите подходящий формат даты в выпадающем списке.
Как импортировать в Excel несколько файлов CSV
Думаю, Вы знаете, что Microsoft Excel позволяет открывать несколько файлов CSV при помощи команды Open (Открыть).
- На вкладке File (Файл) нажмите Open (Открыть) и в выпадающем списке в нижней правой части диалогового окна выберите Text Files (Текстовые файлы).
- Чтобы выделить несколько файлов подряд, кликните по первому файлу, затем нажав и удерживая клавишу Shift, кликните по крайнему файл. Оба эти файла, а также все, что находятся между ними, будут выделены.Чтобы выделить файлы, расположенные не подряд, удерживайте клавишу Ctrl и щелкайте по каждому файлу .csv, который хотите открыть.
- Когда выделены все нужные файлы CSV, нажмите кнопку Open (Открыть).
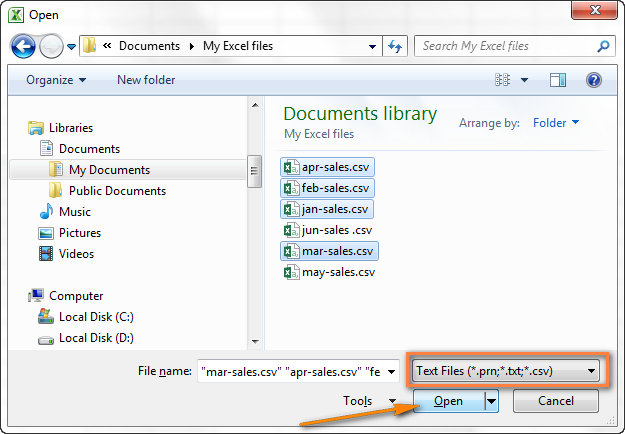
Этот способ простой и быстрый, и мы могли бы назвать его отличным, если бы не одно обстоятельство – каждый файл CSV открывается таким образом как отдельная книга Excel. На практике переключение туда-сюда между несколькими открытыми файлами Excel может быть крайне неудобным и обременительным.
Надеюсь, теперь Вы легко сможете преобразовать любой файл CSV в Excel. Если у Вас возникают какие-либо вопросы или сложности, смело пишите мне в комментариях. И благодарю за терпение каждого, кто осилил чтение этой длинной статьи до самого конца! 🙂
Оцените качество статьи. Нам важно ваше мнение:
Win XP, Excel 2007
I know there are various other posts on csv formatting but couldn’t quite find what i needed.
Some of our data is held off site by another company and they send us a csv file every morning with the previous days data.
The problem is this data has come from web input forms that may have drop-down lists.
For example there may be a drop down list of Number of Employees with options like 1-10, 11-25, 26-50 etc
When we open the csv file in Excel certain options like 1-10 has been turned into Oct-01 date format which we do not want.
Is there an easy way to change these back OR reformat the cells and do a find…replace? (This didn’t seem to work terribly well as it kept reverting back to the date)
Indeed is there a better way of opening the csv file to keep the formatting intact? and save us doing lots of find…replaces.
Ultimately we will need to open the csv in Excel though.
Grateful for any hints
asked Apr 26, 2011 at 9:33
![]()
1
Isn’t that SO annoying? Here’s how I deal with this issue:
When you open the CSV file in Excel, you should get a dialog with parsing options. First you select delimited or fixed then you get a screen that previews the data parsing.
It’s easy to miss, but in the upper right corner of the dialog box there’s an option to set a specific data format for each column. Select the column you want to protect and set the format to text. (This keeps Excel from dropping the leading zeros in ZIP codes for New England too!)
Once you get it into Excel, you can do a vlookup or replace to reset the values to your own codes.
Hope this helps. Good luck.
answered Apr 28, 2011 at 15:08
![]()
1
Import or export text (.txt or .csv) files
There are two ways to import data from a text file with Excel: you can open it in Excel, or you can import it as an external data range. To export data from Excel to a text file, use the Save As command and change the file type from the drop-down menu.
There are two commonly used text file formats:
-
Delimited text files (.txt), in which the TAB character (ASCII character code 009) typically separates each field of text.
-
Comma separated values text files (.csv), in which the comma character (,) typically separates each field of text.
You can change the separator character that is used in both delimited and .csv text files. This may be necessary to make sure that the import or export operation works the way that you want it to.
Note: You can import or export up to 1,048,576 rows and 16,384 columns.
Import a text file by opening it in Excel
You can open a text file that you created in another program as an Excel workbook by using the Open command. Opening a text file in Excel does not change the format of the file — you can see this in the Excel title bar, where the name of the file retains the text file name extension (for example, .txt or .csv).
-
Go to File > Open and browse to the location that contains the text file.
-
Select Text Files in the file type dropdown list in the Open dialog box.
-
Locate and double-click the text file that you want to open.
-
If the file is a text file (.txt), Excel starts the Import Text Wizard. When you are done with the steps, click Finish to complete the import operation. See Text Import Wizard for more information about delimiters and advanced options.
-
If the file is a .csv file, Excel automatically opens the text file and displays the data in a new workbook.
Note: When Excel opens a .csv file, it uses the current default data format settings to interpret how to import each column of data. If you want more flexibility in converting columns to different data formats, you can use the Import Text Wizard. For example, the format of a data column in the .csv file may be MDY, but Excel’s default data format is YMD, or you want to convert a column of numbers that contains leading zeros to text so you can preserve the leading zeros. To force Excel to run the Import Text Wizard, you can change the file name extension from .csv to .txt before you open it, or you can import a text file by connecting to it (for more information, see the following section).
-
Import a text file by connecting to it (Power Query)
You can import data from a text file into an existing worksheet.
-
On the Data tab, in the Get & Transform Data group, click From Text/CSV.
-
In the Import Data dialog box, locate and double-click the text file that you want to import, and click Import.
-
In the preview dialog box, you have several options:
-
Select Load if you want to load the data directly to a new worksheet.
-
Alternatively, select Load to if you want to load the data to a table, PivotTable/PivotChart, an existing/new Excel worksheet, or simply create a connection. You also have the choice of adding your data to the Data Model.
-
Select Transform Data if you want to load the data to Power Query, and edit it before bringing it to Excel.
-
If Excel doesn’t convert a particular column of data to the format that you want, then you can convert the data after you import it. For more information, see Convert numbers stored as text to numbers and Convert dates stored as text to dates.
Export data to a text file by saving it
You can convert an Excel worksheet to a text file by using the Save As command.
-
Go to File > Save As.
-
Click Browse.
-
In the Save As dialog box, under Save as type box, choose the text file format for the worksheet; for example, click Text (Tab delimited) or CSV (Comma delimited).
Note: The different formats support different feature sets. For more information about the feature sets that are supported by the different text file formats, see File formats that are supported in Excel.
-
Browse to the location where you want to save the new text file, and then click Save.
-
A dialog box appears, reminding you that only the current worksheet will be saved to the new file. If you are certain that the current worksheet is the one that you want to save as a text file, click OK. You can save other worksheets as separate text files by repeating this procedure for each worksheet.
You may also see an alert below the ribbon that some features might be lost if you save the workbook in a CSV format.
For more information about saving files in other formats, see Save a workbook in another file format.
Import a text file by connecting to it
You can import data from a text file into an existing worksheet.
-
Click the cell where you want to put the data from the text file.
-
On the Data tab, in the Get External Data group, click From Text.
-
In the Import Data dialog box, locate and double-click the text file that you want to import, and click Import.
Follow the instructions in the Text Import Wizard. Click Help
on any page of the Text Import Wizard for more information about using the wizard. When you are done with the steps in the wizard, click Finish to complete the import operation. -
In the Import Data dialog box, do the following:
-
Under Where do you want to put the data?, do one of the following:
-
To return the data to the location that you selected, click Existing worksheet.
-
To return the data to the upper-left corner of a new worksheet, click New worksheet.
-
-
Optionally, click Properties to set refresh, formatting, and layout options for the imported data.
-
Click OK.
Excel puts the external data range in the location that you specify.
-
If Excel does not convert a column of data to the format that you want, you can convert the data after you import it. For more information, see Convert numbers stored as text to numbers and Convert dates stored as text to dates.
Export data to a text file by saving it
You can convert an Excel worksheet to a text file by using the Save As command.
-
Go to File > Save As.
-
The Save As dialog box appears.
-
In the Save as type box, choose the text file format for the worksheet.
-
For example, click Text (Tab delimited) or CSV (Comma delimited).
-
Note: The different formats support different feature sets. For more information about the feature sets that are supported by the different text file formats, see File formats that are supported in Excel.
-
-
Browse to the location where you want to save the new text file, and then click Save.
-
A dialog box appears, reminding you that only the current worksheet will be saved to the new file. If you are certain that the current worksheet is the one that you want to save as a text file, click OK. You can save other worksheets as separate text files by repeating this procedure for each worksheet.
-
A second dialog box appears, reminding you that your worksheet may contain features that are not supported by text file formats. If you are interested only in saving the worksheet data into the new text file, click Yes. If you are unsure and would like to know more about which Excel features are not supported by text file formats, click Help for more information.
For more information about saving files in other formats, see Save a workbook in another file format.
The way you change the delimiter when importing is different depending on how you import the text.
-
If you use Get & Transform Data > From Text/CSV, after you choose the text file and click Import, choose a character to use from the list under Delimiter. You can see the effect of your new choice immediately in the data preview, so you can be sure you make the choice you want before you proceed.
-
If you use the Text Import Wizard to import a text file, you can change the delimiter that is used for the import operation in Step 2 of the Text Import Wizard. In this step, you can also change the way that consecutive delimiters, such as consecutive quotation marks, are handled.
See Text Import Wizard for more information about delimiters and advanced options.
If you want to use a semi-colon as the default list separator when you Save As .csv, but need to limit the change to Excel, consider changing the default decimal separator to a comma — this forces Excel to use a semi-colon for the list separator. Obviously, this will also change the way decimal numbers are displayed, so also consider changing the Thousands separator to limit any confusion.
-
Clear Excel Options > Advanced > Editing options > Use system separators.
-
Set Decimal separator to , (a comma).
-
Set Thousands separator to . (a period).
When you save a workbook as a .csv file, the default list separator (delimiter) is a comma. You can change this to another separator character using Windows Region settings.
Caution: Changing the Windows setting will cause a global change on your computer, affecting all applications. To only change the delimiter for Excel, see Change the default list separator for saving files as text (.csv) in Excel.
-
In Microsoft Windows 10, right-click the Start button, and then click Settings.
-
Click Time & Language, and then click Region in the left panel.
-
In the main panel, under Regional settings, click Additional date, time, and regional settings.
-
Under Region, click Change date, time, or number formats.
-
In the Region dialog, on the Format tab, click Additional settings.
-
In the Customize Format dialog, on the Numbers tab, type a character to use as the new separator in the List separator box.
-
Click OK twice.
-
In Microsoft Windows, click the Start button, and then click Control Panel.
-
Under Clock, Language, and Region, click Change date, time, or number formats.
-
In the Region dialog, on the Format tab, click Additional settings.
-
In the Customize Format dialog, on the Numbers tab, type a character to use as the new separator in the List separator box.
-
Click OK twice.
Note: After you change the list separator character for your computer, all programs use the new character as a list separator. You can change the character back to the default character by following the same procedure.
Need more help?
You can always ask an expert in the Excel Tech Community or get support in the Answers community.
See Also
Import data from external data sources (Power Query)
Need more help?
Want more options?
Explore subscription benefits, browse training courses, learn how to secure your device, and more.
Communities help you ask and answer questions, give feedback, and hear from experts with rich knowledge.