
Word автоматически создает bibliography из источников, использованных при написании документа. Каждый раз, когда вы добавляете в документ новую цитату, Word добавляет этот источник в нужный формат, например MLA,APAи Chicago.
Добавление ссылки после цитаты
-
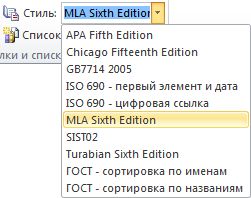
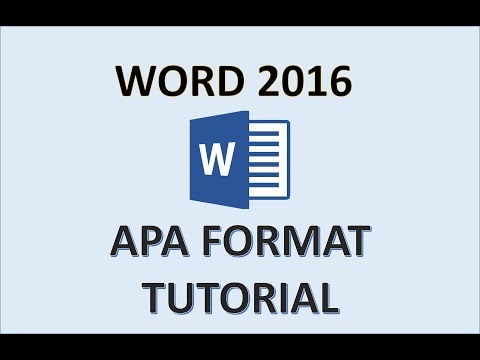
На вкладке Ссылки в группе Ссылки и списки литературы щелкните стрелку рядом со списком Стиль.

-
Выберите стиль, который следует применить к ссылке и литературному источнику.
-
Щелкните место в конце предложения или выражения, которое будет использовано в качестве ссылки.
-
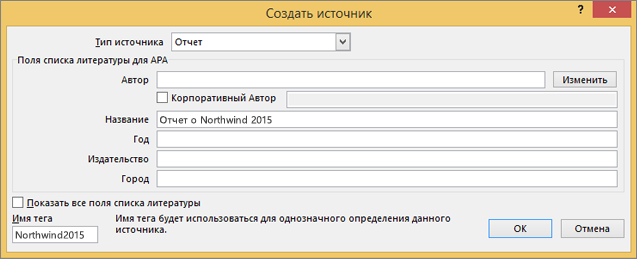
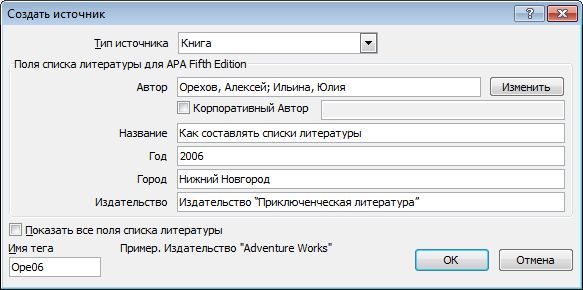
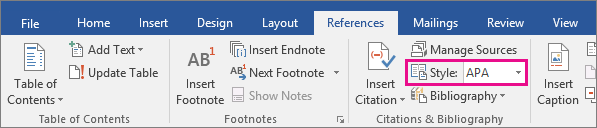
Нажмите кнопку Вставить ссылку и выберите пункт Добавить новый источник.
-
В окне Создать источник введите сведения об источнике ссылки и нажмите кнопку ОК.

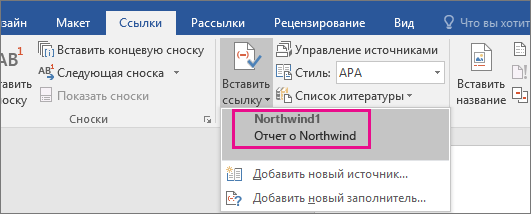
После завершения этих действий цитата будет добавлена в список доступных. При следующей цитате ссылки вам не придется вводить ее снова, просто нажмите кнопку Вставить ссылку и выберите ссылку.
Важно: Форматы APA и MLA могут меняться, поэтому нужно проверять, соответствуют ли имеющиеся версии форматов требованиям. Можно создать собственную обновленную версию стиля или пользовательские стили. Дополнительные сведения см. в статье Общие сведения о списке литературы и ссылках: создание пользовательских стилей.
Создание списка литературы на основе источников
Чтобы создать список литературы на основе источников, выполните указанные ниже действия.
-
Щелкните место, куда вы хотите вставить bibliography. Обычно они находятся в конце документа.
-
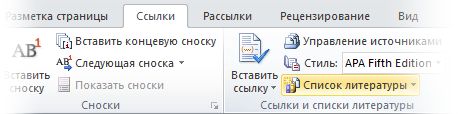
На вкладке Ссылки в группе Ссылки и списки литературы выберите Список литературы .
Так же как и в построителе оглавления в Word, здесь можно выбрать готовый формат списка литературы, содержащий название, или просто выбрать пункт Вставить список литературы, чтобы добавить ссылку без названия.
Если вы хотите узнать больше об использовании заполнителей ссылок и изменении источников, ознакомьтесь со статьей Создание списка литературы. Если вы хотите экспортировать источники bibliography на другой компьютер, ознакомьтесь с этой записью в блоге Microsoft Word.
Процедура исправления стиля сносок APA 6th Edition
В стиле APA используется имя автора и дата публикации. Если имеется несколько ссылок на одного автора, возникает известная ошибка Word 2010, связанная с заполнением названия публикации, когда этого не требуется. Чтобы исправить эту ошибку, выполните указанные ниже действия.
-
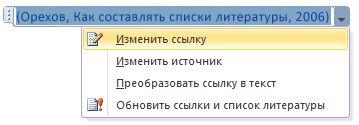
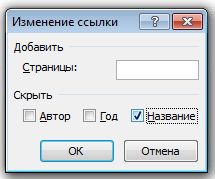
В документе Word выделите ссылку.
-
Щелкните стрелку вниз и выберите пункт Изменить ссылку.
-
Установите флажок Название и нажмите кнопку ОК.

Форматы APA и MLA могут меняться, поэтому нужно проверять, соответствуют ли имеющиеся версии форматов требованиям. Можно создать собственную обновленную версию стиля или пользовательские стили. Дополнительные сведения см. в & CITATIONS 102 — создание пользовательских стилей.
При использовании стиля ссылок APA 5th Edition нужно знать об одной проблеме. В стиле APA используется имя автора и дата публикации. Если имеется несколько ссылок на одного автора, возникает известная ошибка Word 2010, связанная с заполнением названия публикации, когда это не требуется. Если это произойдет, см. раздел‘APA 5th Edition, процедура исправления стиля ссылок ниже.
Добавление ссылки после цитаты
-
В документе Word откройте на ленте вкладку Ссылки.
-
В группе Ссылки и списки литературы щелкните стрелку в списке Стиль.
-
Выберите стиль, который следует применить к ссылке и литературному источнику.
-
Щелкните место в конце предложения или выражения, которое будет использовано в качестве ссылки.
-
Нажмите кнопку Вставить ссылку и выберите пункт Добавить новый источник.
-
Введите сведения об источнике цитаты и нажмите кнопку ОК.
После этого источник будет добавлен в список, открывающийся по нажатию кнопки Вставить ссылку, и следующий раз при добавлении ссылки на него не нужно будет вводить все заново.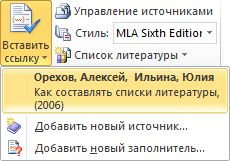
Создание списка литературы на основе источников
Чтобы создать список литературы на основе источников, выполните указанные ниже действия.
-
Щелкните место, куда вы хотите вставить bibliography. Обычно они находятся в конце документа.
-
На вкладке Ссылки в группе Ссылки и списки литературы нажмите кнопку Список литературы.
Так же как и в построителе оглавления, здесь можно выбрать готовый формат списка литературы, содержащий заголовок, или просто выбрать пункт Вставить список литературы, чтобы добавить ссылку без заголовка.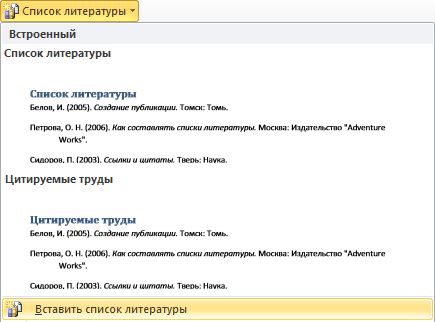
Если вы хотите узнать больше об использовании заметивов для ссылки и редактировании источников, продумайте статью Создание bibliography в Word 2010. Если вы хотите экспортировать источники bibliography на другой компьютер, ознакомьтесь с этой записью в блоге Microsoft Word.
Процедура исправления стиля сносок APA 5th Edition
В стиле APA используется имя автора и дата публикации. Если имеется несколько ссылок на одного автора, возникает известная ошибка Word 2010, связанная с заполнением названия публикации, когда это не требуется. Чтобы исправить эту ошибку, выполните указанные ниже действия.
-
В документе Word выделите ссылку.
-
Щелкните стрелку вниз и выберите пункт Изменить ссылку.
-
Щелкните флажок Название и нажмите кнопку ОК.
В Word Online нельзя автоматически создавать цитаты. Word Online сохраняет в документе bibliography, но не создает его.
Если у вас есть настольная версия Word, выберите Открыть в Word, чтобы открыть документ.

Затем выполните действия для рабочего стола Word.
Когда вы сделаете это и сохраните документ в Word, то при повторном его повторном доступе в Word Online вы увидите одержимые.

Академические документы часто должны соответствовать определенным правилам стиля, таким как MLA или APA. Если вы хотите настроить документ в стиле APA в Word, следуйте этому руководству.
Формат документа APA является официальным стилем Американской психологической ассоциации (APA). APA, как и формат MLA, представляет собой особый тип форматирования документов, используемый в определенных типах академических документов.
APA часто используется в академических документах, особенно в тех, которые относятся к психологии, образованию и другим общественным наукам. Если вы никогда не создавали документ Word в стиле APA, вам может быть трудно понять это, но это легко, если вы знаете правила.
Если вы хотите знать, как форматировать стиль APA в Microsoft Word, вот что вам нужно сделать.
APA похож на другие стили академических документов — все дело в правилах, которым должен следовать ваш документ. К счастью, Microsoft Word позволяет легко настроить документ в соответствии с форматом APA.
Чтобы написать документ в стиле APA в Microsoft Word:
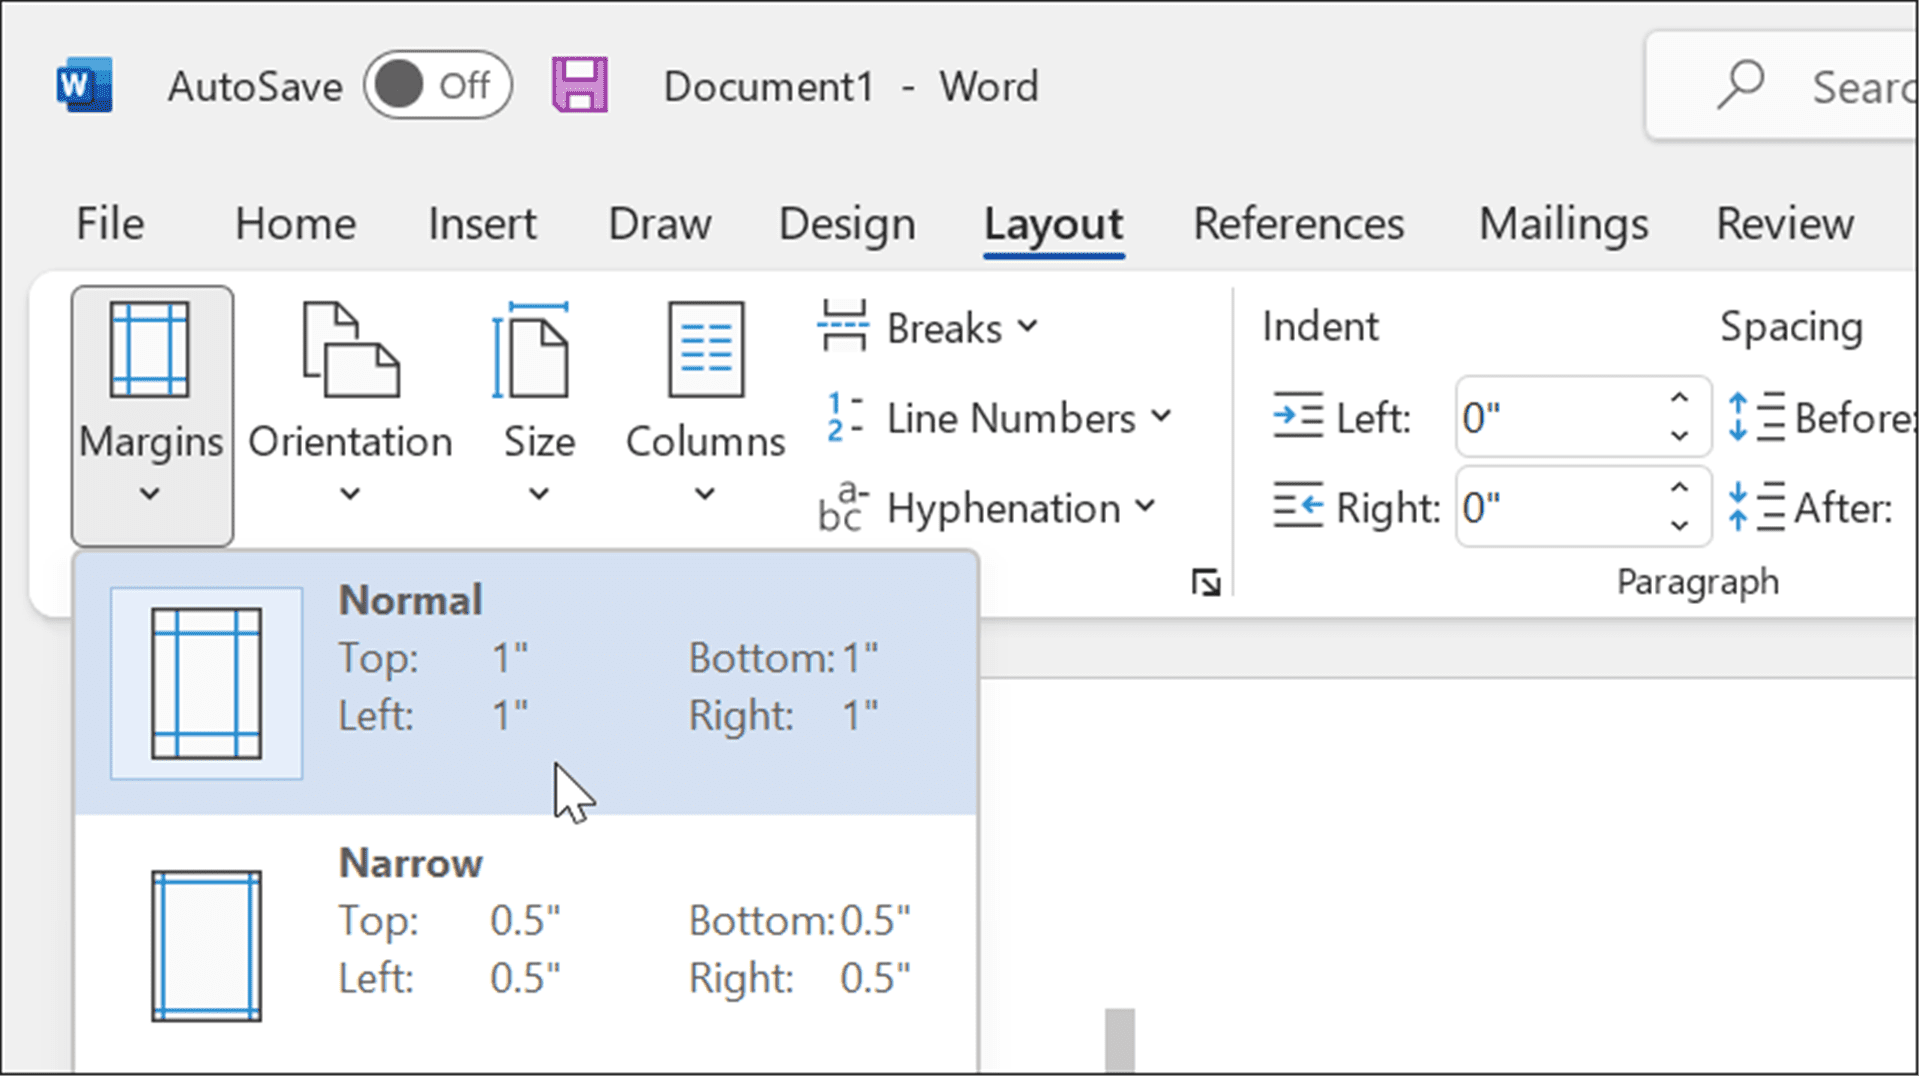
- Сначала установите поля страницы на 1 дюйм с каждой стороны, нажав вкладку «Макет», а затем нажав «Поля» > «Нормальный».

- Установите шрифт Times New Roman на вкладке «Главная».
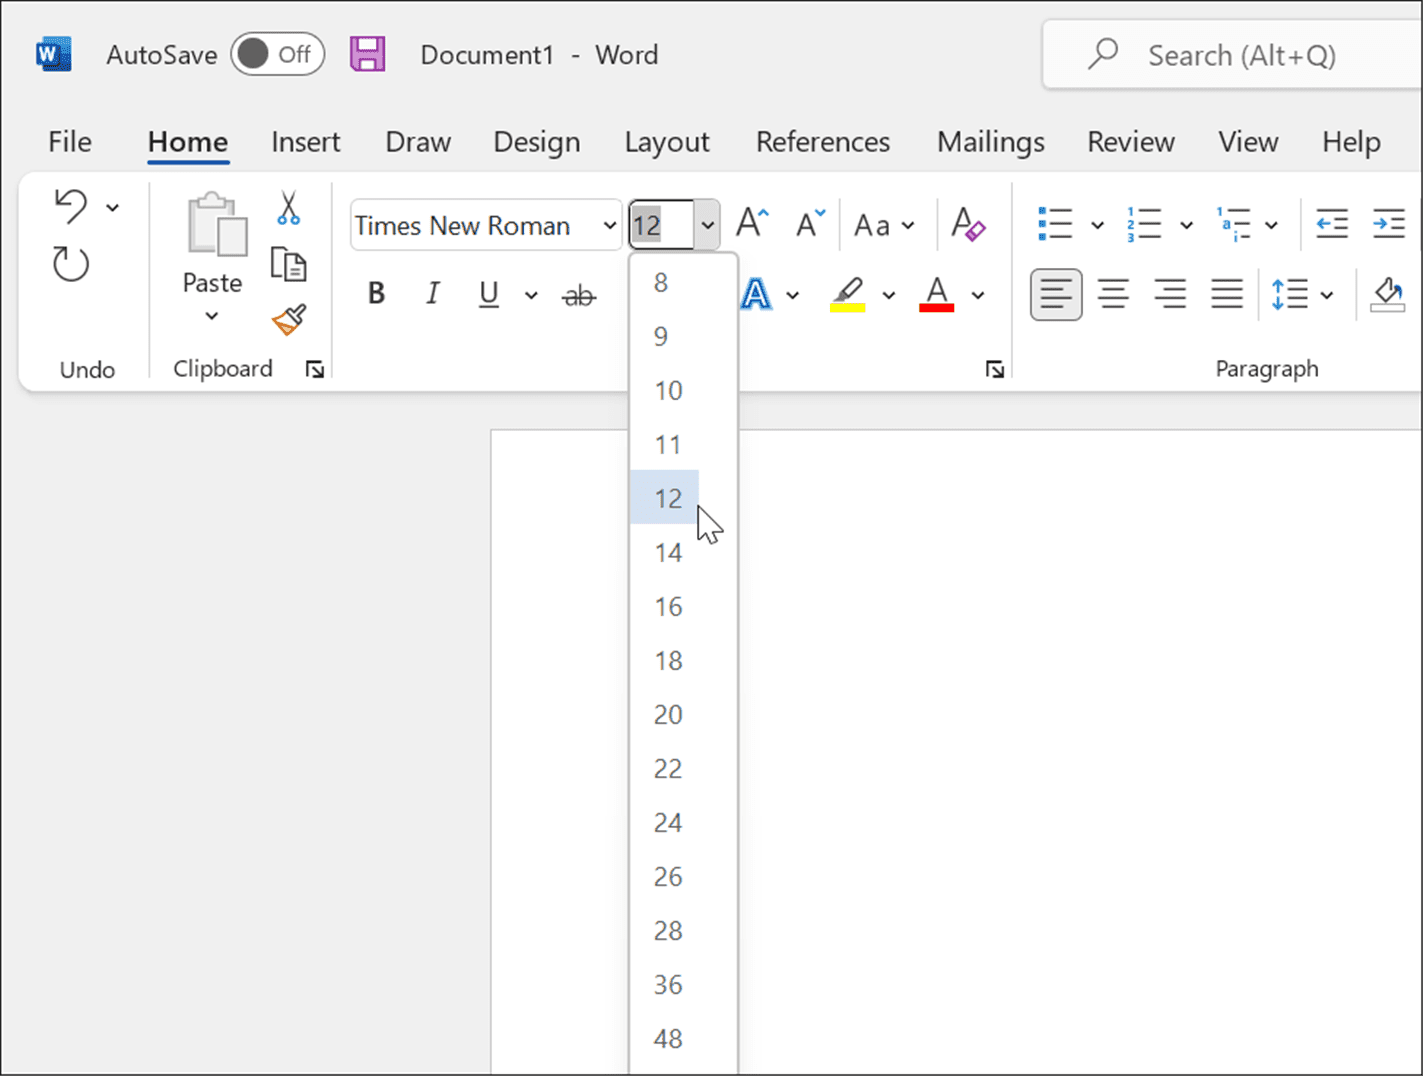
- Измените размер шрифта на 12, используя раскрывающееся меню.

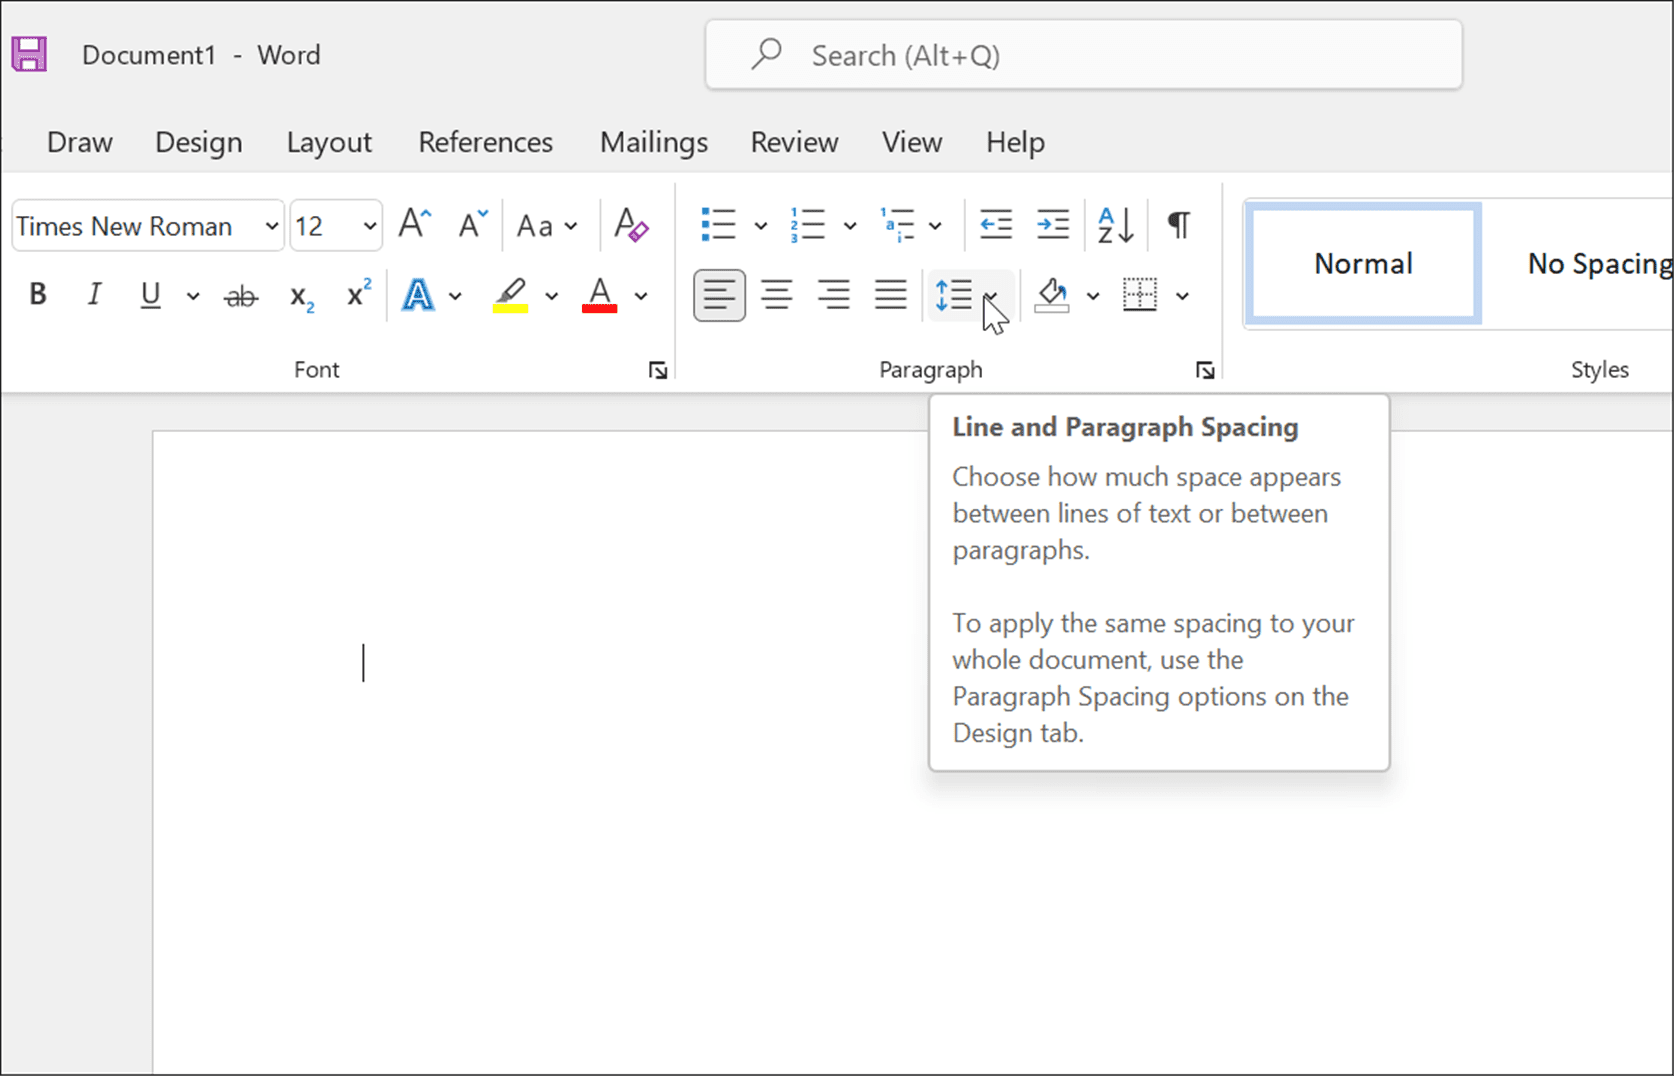
- Включите текст с двойным интервалом, выбрав «Главная», а затем нажав инструмент «Интервал между строками и абзацами» в разделе «Абзац».

- В раскрывающемся списке выберите 2.0, чтобы сделать текст двойным интервалом.

- Чтобы убедиться, что между абзацами в вашей статье нет лишних пробелов, снова нажмите кнопку «Интервал между строками и абзацами» и выберите «Удалить пробел после абзаца» в меню.


Настройте заголовок документа
На этом этапе ваш документ должен быть почти отформатирован для APA, но вам нужно будет внести некоторые дополнительные изменения в заголовок, чтобы вставить номера страниц.
Чтобы настроить заголовок документа для APA:
- Нажмите вкладку «Вставка» на ленточной панели.
- Нажмите «Номер страницы», затем наведите указатель мыши на «Верх страницы».
- Из вариантов выберите Обычный номер 3.

- Word переключится в режим редактирования заголовка, где вы увидите номер страницы справа.

- Выбрав число, нажмите «Домой», затем установите шрифт и размер шрифта на Times New Roman и 12.

- Если вы добавляете название, используйте для этого заглавные буквы — нажмите клавишу Caps Lock и введите название статьи.

- После ввода заголовка нажмите клавишу «Пробел» один раз, чтобы создать пробел между заголовком и номером страницы.
- Вы захотите переместить заголовок влево, поэтому выберите заголовок, затем нажмите «Выровнять по левому краю» на вкладке «Главная».

- Заголовок теперь выровнен по левому краю, как и номер страницы. Чтобы это исправить, убедитесь, что мигающий курсор находится прямо слева от номера страницы.
- Перейдите на вкладку Верхний и нижний колонтитулы и выберите Вставить вкладку выравнивания.
- Когда появится окно вкладки «Выравнивание», нажмите «Вправо» и «ОК».

- Если все пойдет хорошо, вы должны увидеть номер страницы справа и заголовок слева — теперь ваш заголовок настроен для APA.


Настройте титульный лист
Теперь ваш документ готов к форматированию APA с использованием шрифта Times New Roman и размером 12 пунктов по всему телу и заголовку. Следующим шагом будет создание титульного листа.
Чтобы добавить титульный лист в Word:
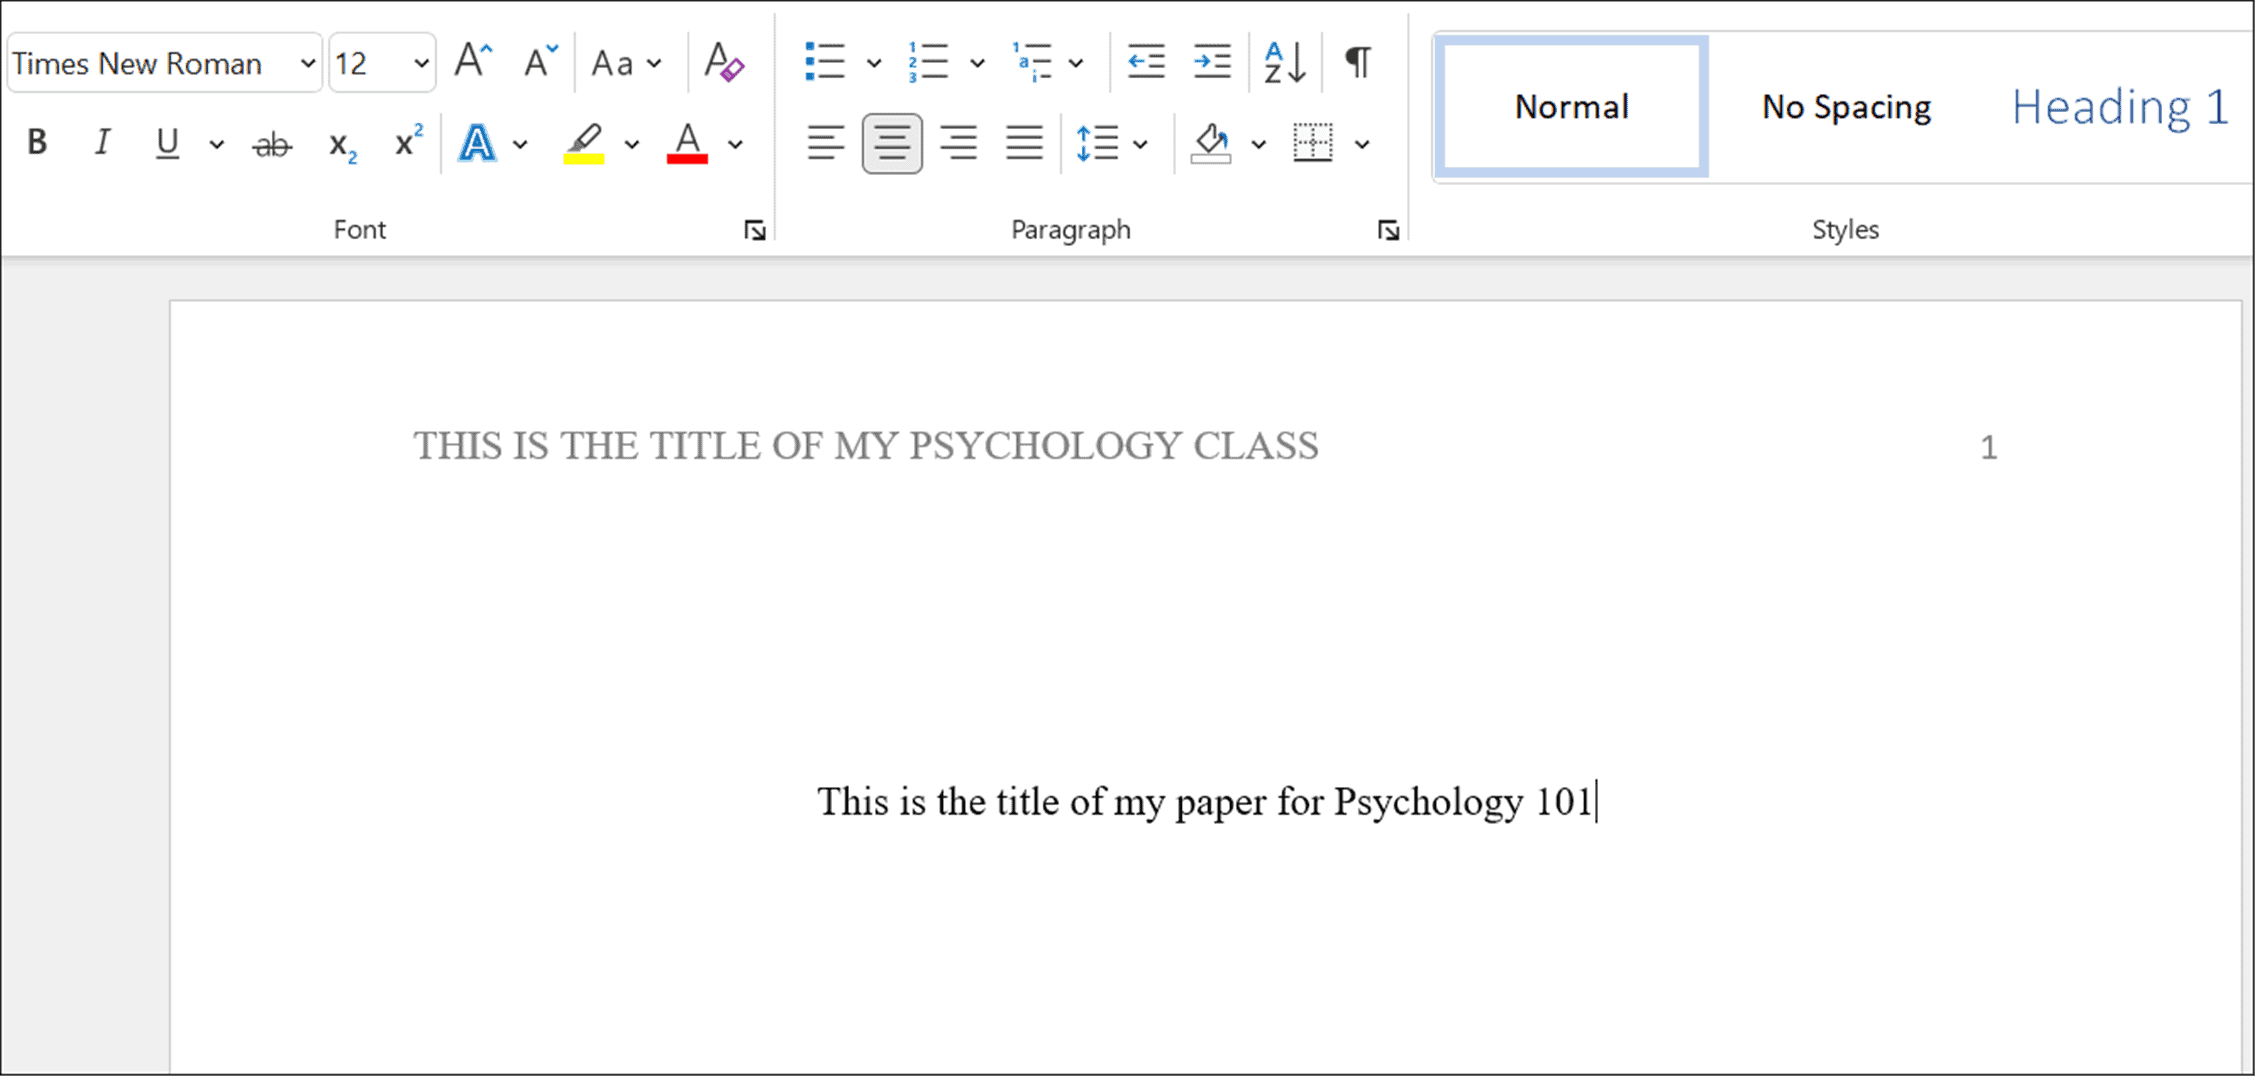
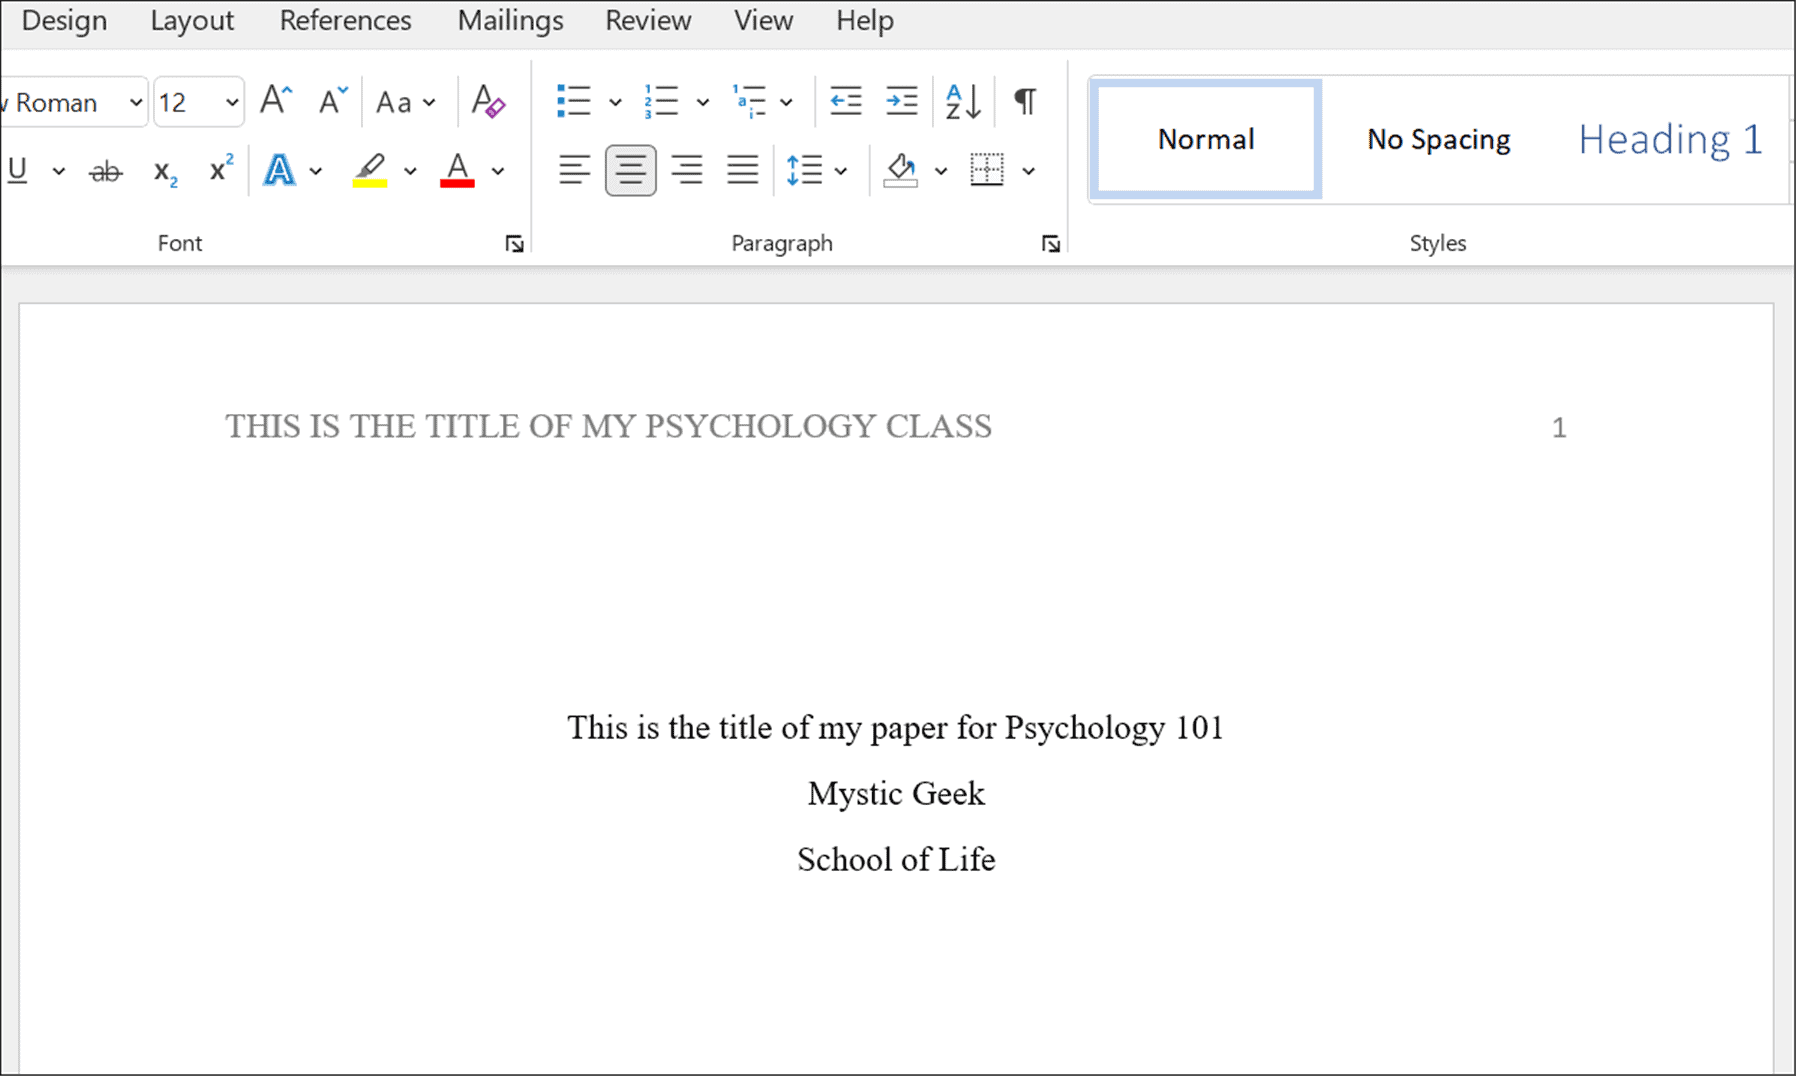
- Нажмите на свободное место на первой странице.
- Установите для текста значение «По центру» в разделе «Абзац» на вкладке «Главная».

- Введите название своей статьи, убедившись, что самые важные термины выделены заглавными буквами.
- Нажмите Enter, чтобы перейти на новую строку, и введите свое имя.
- Нажмите Enter еще раз, чтобы ввести название учреждения.

- При необходимости внесите дополнительные изменения стиля в документ, убедившись, что они соответствуют стиль АПА.
Написание академических документов в Microsoft Word
Приведенные выше шаги помогут вам настроить форматирование в стиле APA в документе Microsoft Word. Конечно, контекст и цитаты на ваше усмотрение. Вашему преподавателю может потребоваться дополнительная информация на титульном листе, например номер вашего студента и текущая дата, поэтому обязательно свяжитесь с ним, прежде чем писать свою работу.
В дополнение к стилю APA вы также можете использовать формат MLA в Word. Другие полезные вещи, которые вы можете сделать, это транскрибировать аудиоформат или посмотреть количество слов в Microsoft Word.
Помимо настройки формата APA или MLA в Word, вы можете вставлять пользовательские верхние и нижние колонтитулы, а также вставлять и форматировать текстовое поле в Word.
APA Formatting and Citation (7th Ed.) | Generator, Template, Examples
Published on
November 6, 2020
by
Raimo Streefkerk.
Revised on
August 23, 2022.
The 7th edition of the APA Publication Manual provides guidelines for clear communication, citing sources, and formatting documents. This article focuses on paper formatting.
Generate accurate APA citations with Scribbr
Throughout your paper, you need to apply the following APA format guidelines:
- Set page margins to 1 inch on all sides.
- Double-space all text, including headings.
- Indent the first line of every paragraph 0.5 inches.
- Use an accessible font (e.g., Times New Roman 12pt., Arial 11pt., or Georgia 11pt.).
- Include a page number on every page.
Let an expert format your paper
![]()


Our APA formatting experts can help you to format your paper according to APA guidelines. They can help you with:
- Margins, line spacing, and indentation
- Font and headings
- Running head and page numbering
- And more
Learn more
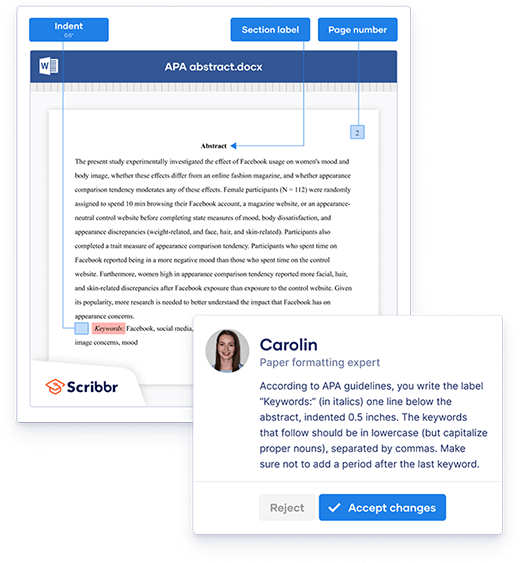
Table of contents
- How to set up APA format (with template)
- APA alphabetization guidelines
- APA format template [Free download]
- Page header
- Headings and subheadings
- Title page
- Abstract
- Table of contents
- Reference page
- Tables and figures
- Frequently asked questions about APA format
How to set up APA format (with template)
APA alphabetization guidelines
References are ordered alphabetically by the first author’s last name. If the author is unknown, order the reference entry by the first meaningful word of the title (ignoring articles: “the”, “a”, or “an”).
Let an expert format your paper
![]()
Our APA formatting experts can help you to format your paper according to APA guidelines. They can help you with:
- Margins, line spacing, and indentation
- Font and headings
- Running head and page numbering
- And more
Learn more
APA format template [Free download]
Why set up APA format from scratch if you can download Scribbr’s template for free?
Student papers and professional papers have slightly different guidelines regarding the title page, abstract, and running head. Our template is available in Word and Google Docs format for both versions.
- Student paper: Word | Google Docs
- Professional paper: Word | Google Docs
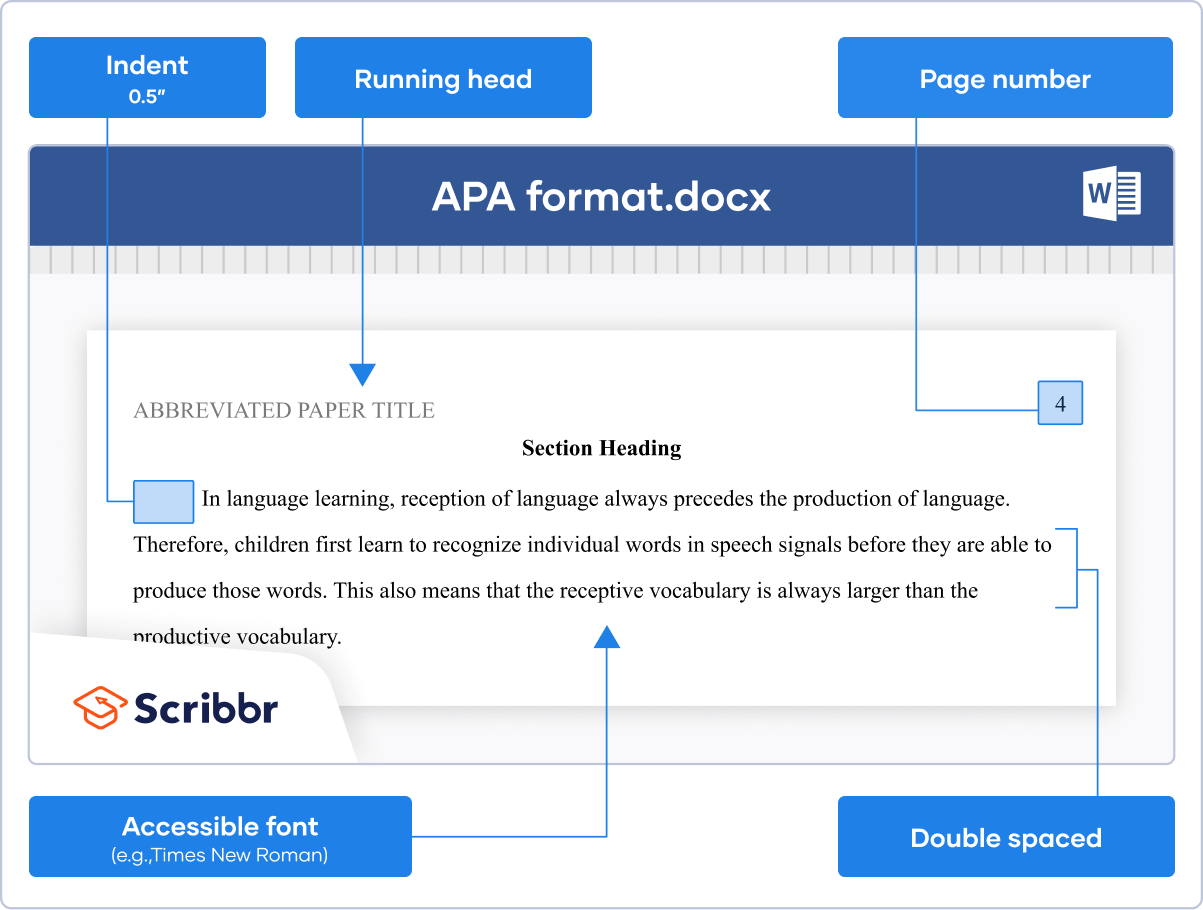
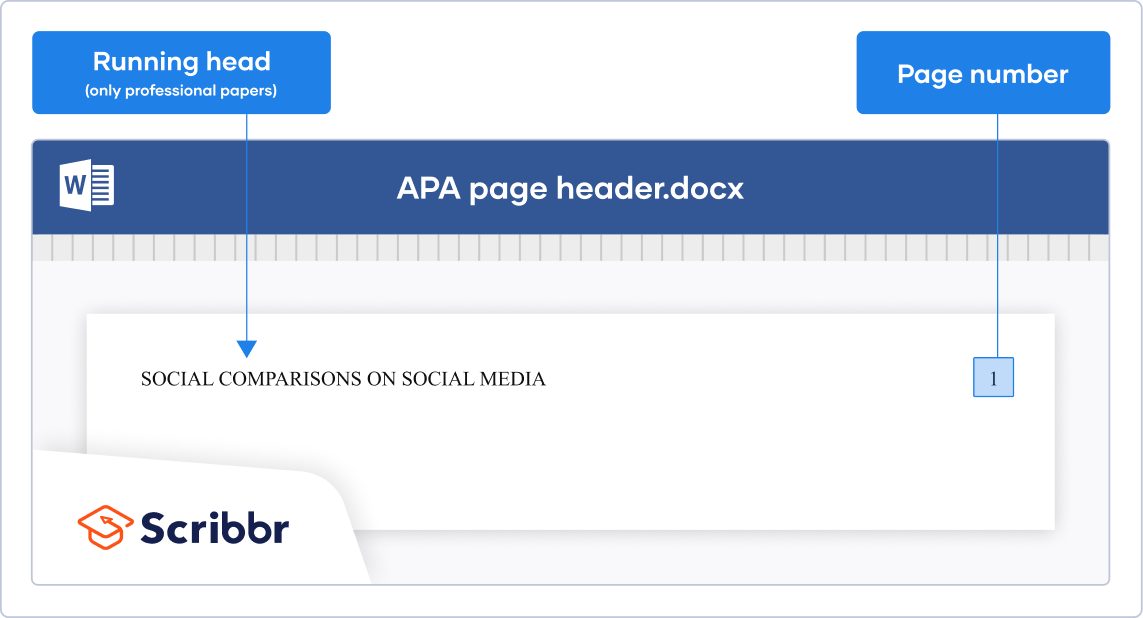
In an APA Style paper, every page has a page header. For student papers, the page header usually consists of just a page number in the page’s top-right corner. For professional papers intended for publication, it also includes a running head.
A running head is simply the paper’s title in all capital letters. It is left-aligned and can be up to 50 characters in length. Longer titles are abbreviated.
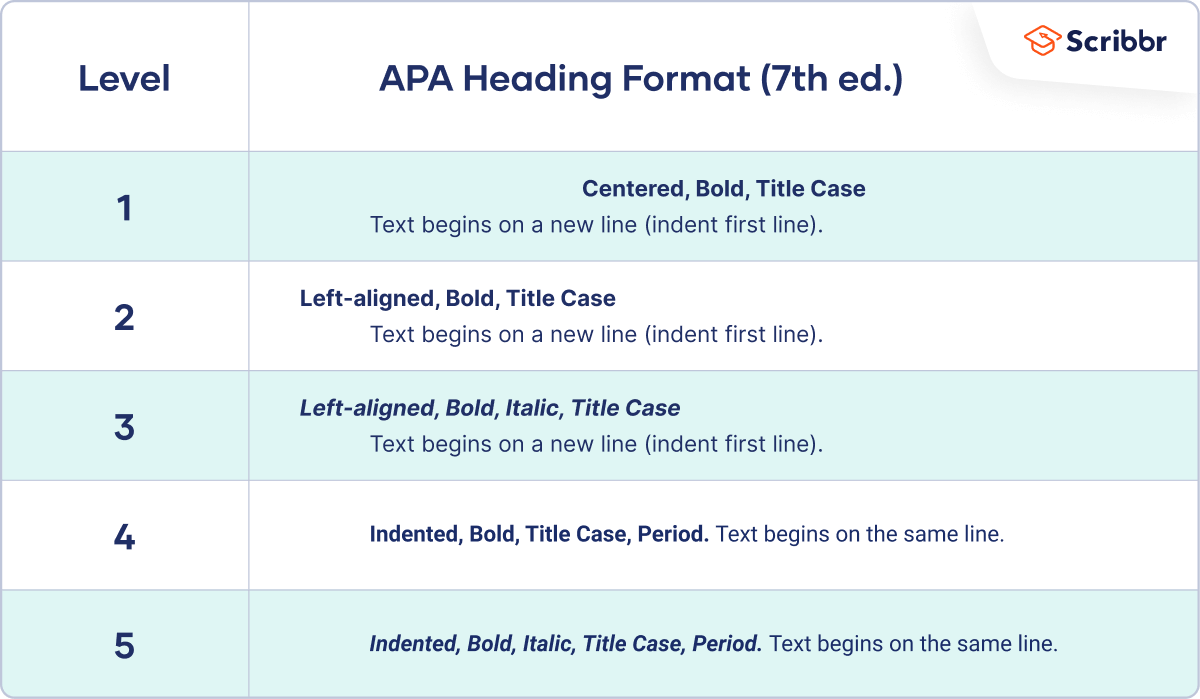
Headings and subheadings
APA headings have five possible levels. Heading level 1 is used for main sections such as “Methods” or “Results”. Heading levels 2 to 5 are used for subheadings. Each heading level is formatted differently.
Want to know how many heading levels you should use, when to use which heading level, and how to set up heading styles in Word or Google Docs? Then check out our in-depth article on APA headings.
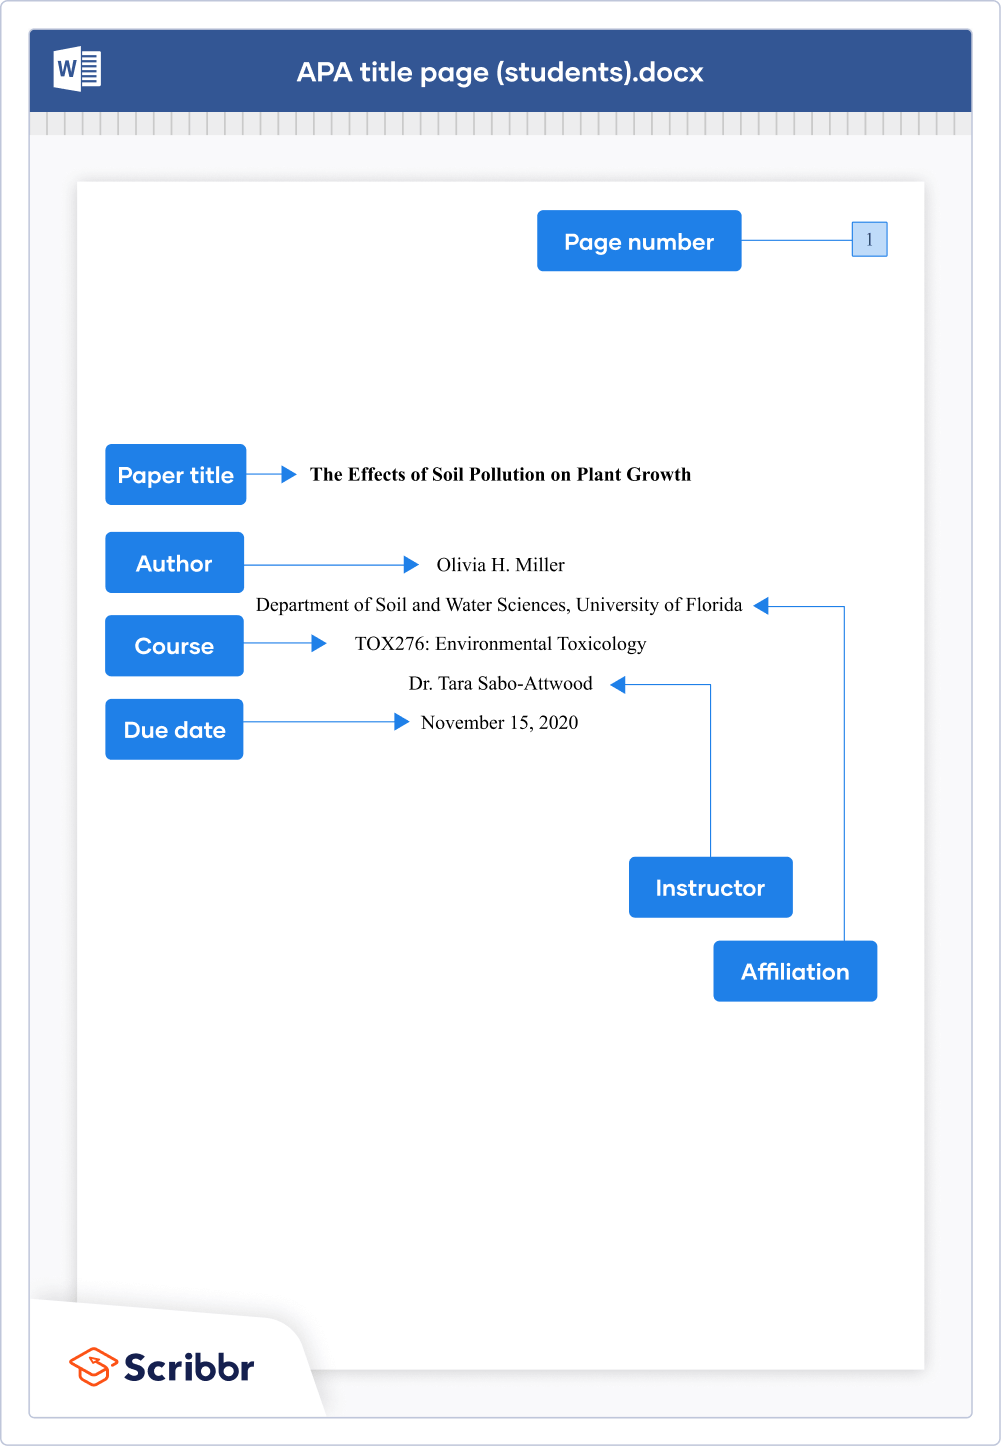
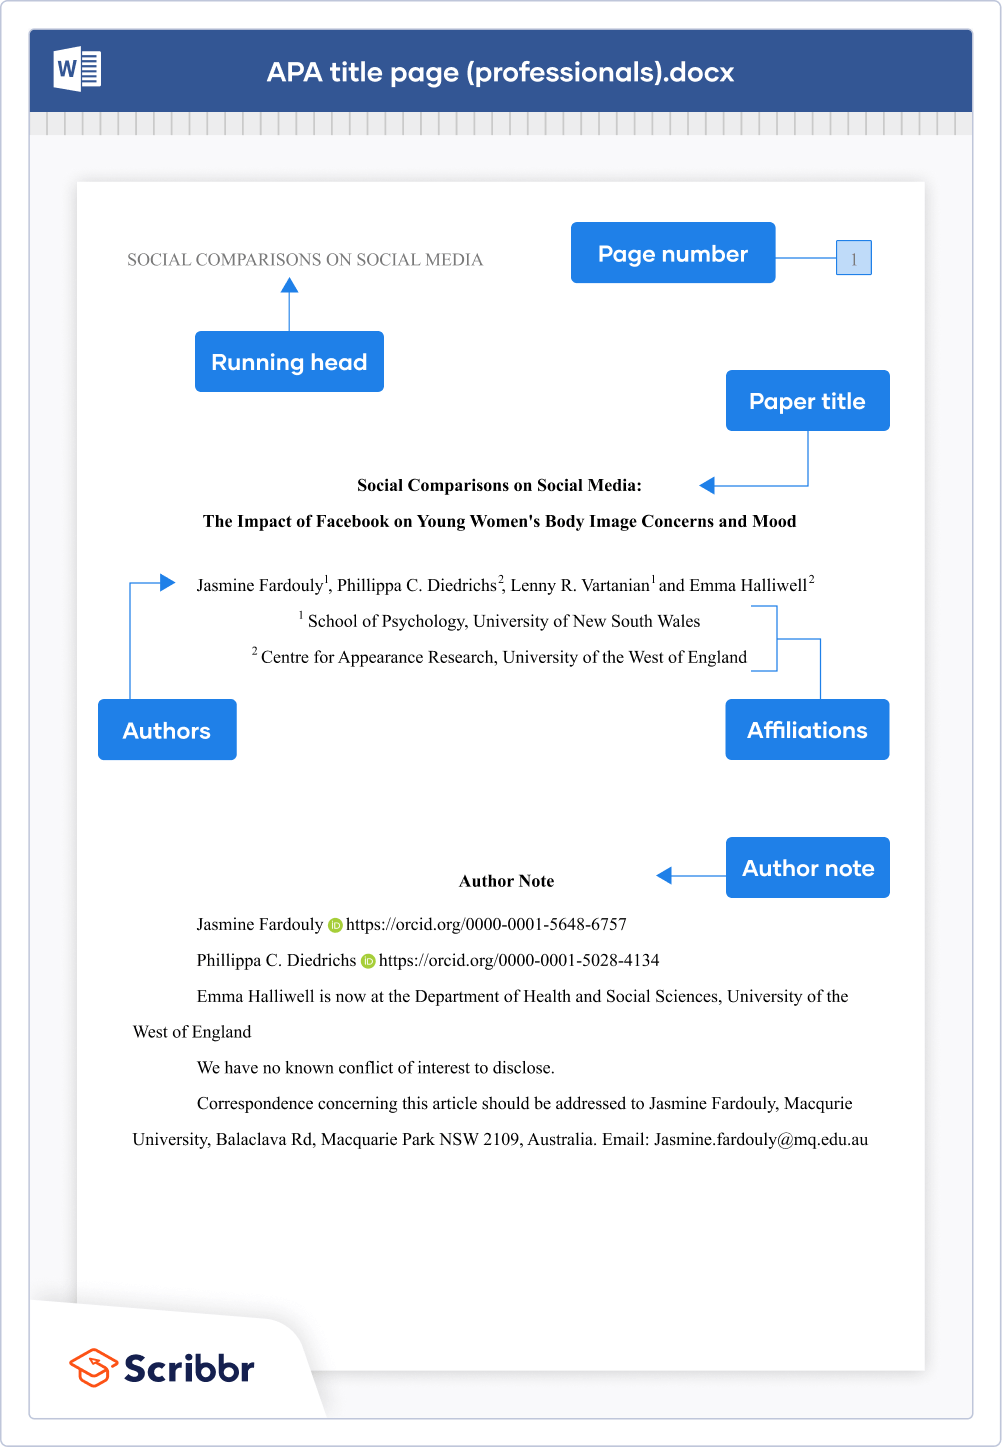
Title page
The title page is the first page of an APA Style paper. There are different guidelines for student and professional papers.
Both versions include the paper title and author’s name and affiliation. The student version includes the course number and name, instructor name, and due date of the assignment. The professional version includes an author note and running head.
For more information on writing a striking title, crediting multiple authors (with different affiliations), and writing the author note, check out our in-depth article on the APA title page.
Abstract
The abstract is a 150–250 word summary of your paper. An abstract is usually required in professional papers, but it’s rare to include one in student papers (except for longer texts like theses and dissertations).
The abstract is placed on a separate page after the title page. At the top of the page, write the section label “Abstract” (bold and centered). The contents of the abstract appear directly under the label. Unlike regular paragraphs, the first line is not indented. Abstracts are usually written as a single paragraph without headings or blank lines.
Directly below the abstract, you may list three to five relevant keywords. On a new line, write the label “Keywords:” (italicized and indented), followed by the keywords in lowercase letters, separated by commas.
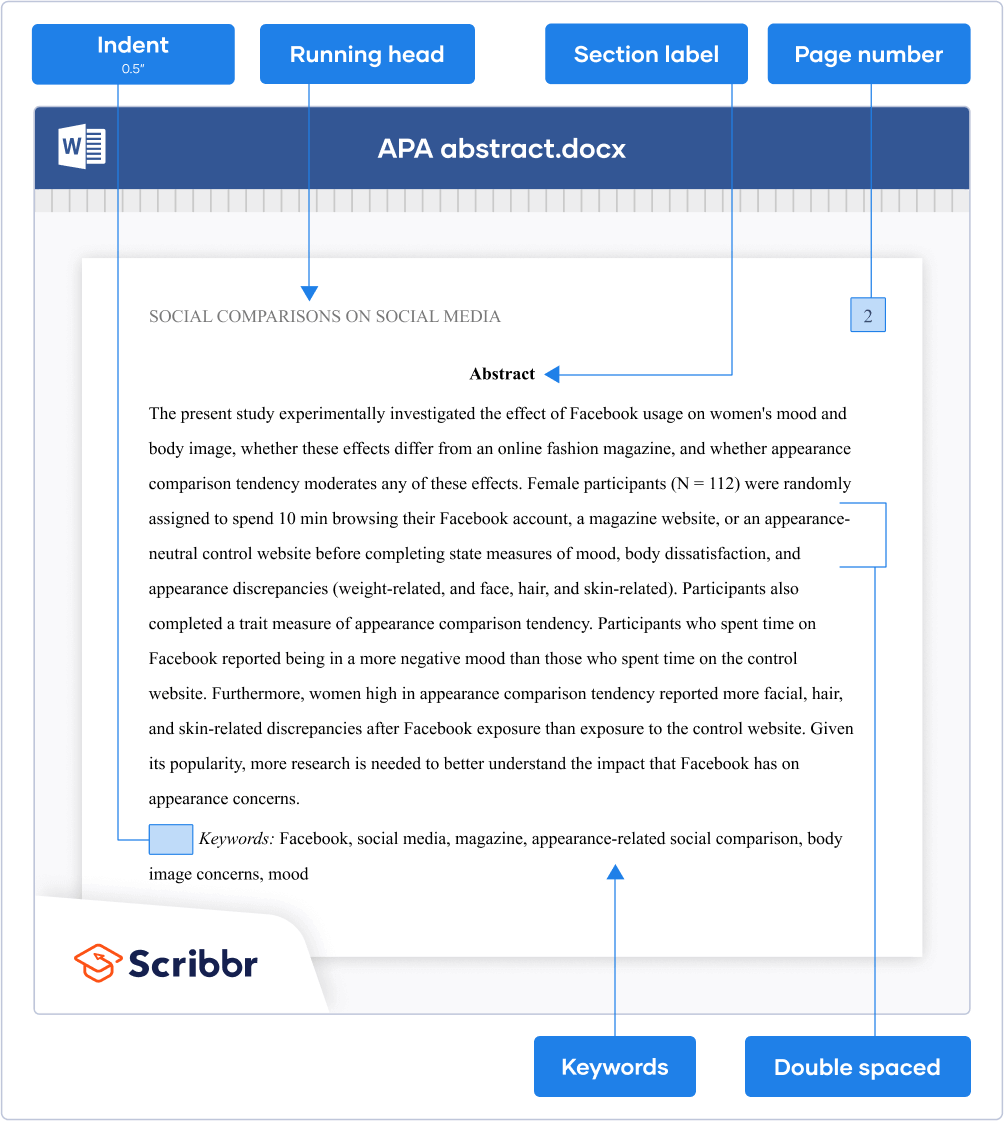
Table of contents
APA Style does not provide guidelines for formatting the table of contents. It’s also not a required paper element in either professional or student papers. If your instructor wants you to include a table of contents, it’s best to follow the general guidelines.
Place the table of contents on a separate page between the abstract and introduction. Write the section label “Contents” at the top (bold and centered), press “Enter” once, and list the important headings with corresponding page numbers.
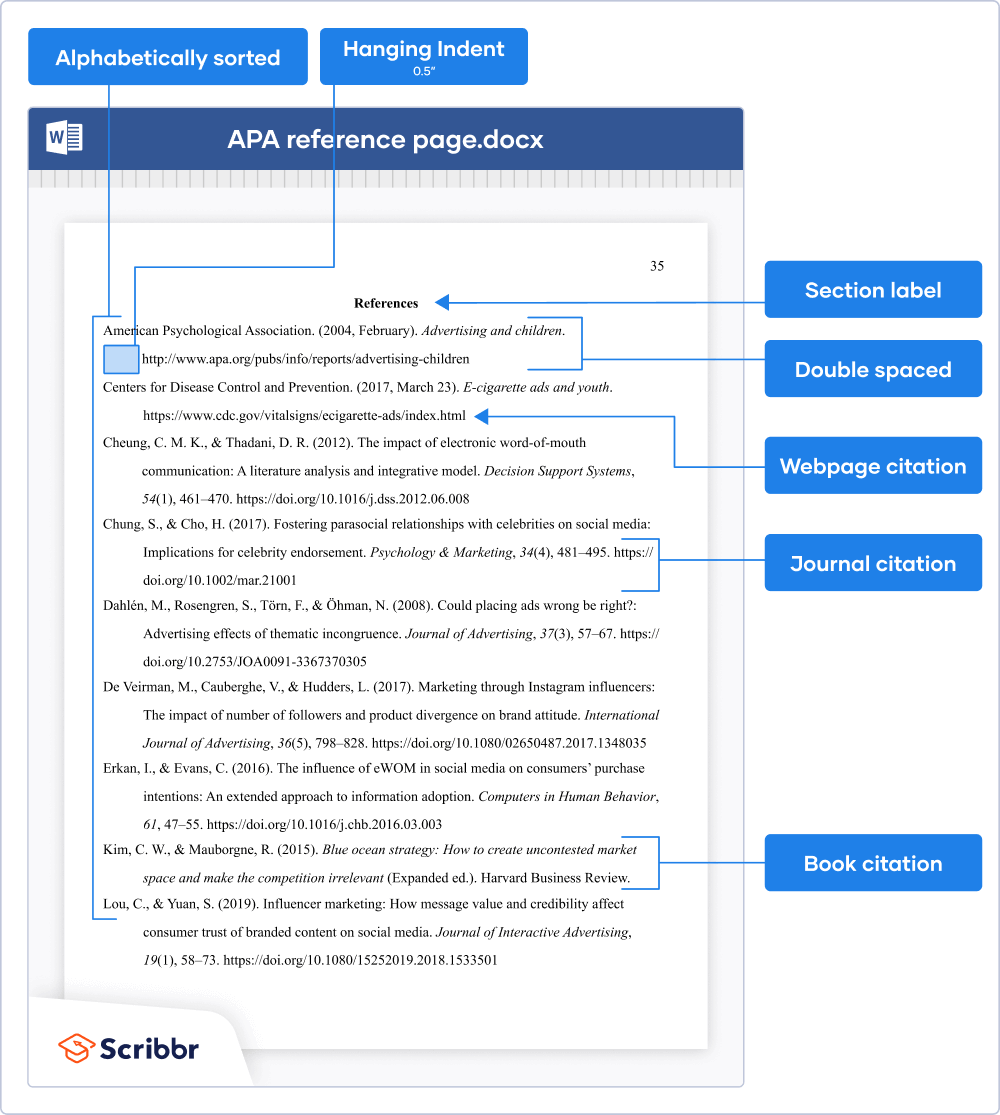
Reference page
The APA reference page is placed after the main body of your paper but before any appendices. Here you list all sources that you’ve cited in your paper (through APA in-text citations). APA provides guidelines for formatting the references as well as the page itself.
Creating APA Style references
Play around with the Scribbr Citation Example Generator below to learn about the
APA reference format of the most common source types or generate APA citations for free with Scribbr’s APA Citation Generator.
Generate accurate APA citations with Scribbr
Formatting the reference page
Write the section label “References” at the top of a new page (bold and centered). Place the reference entries directly under the label in alphabetical order.
Finally, apply a hanging indent, meaning the first line of each reference is left-aligned, and all subsequent lines are indented 0.5 inches.
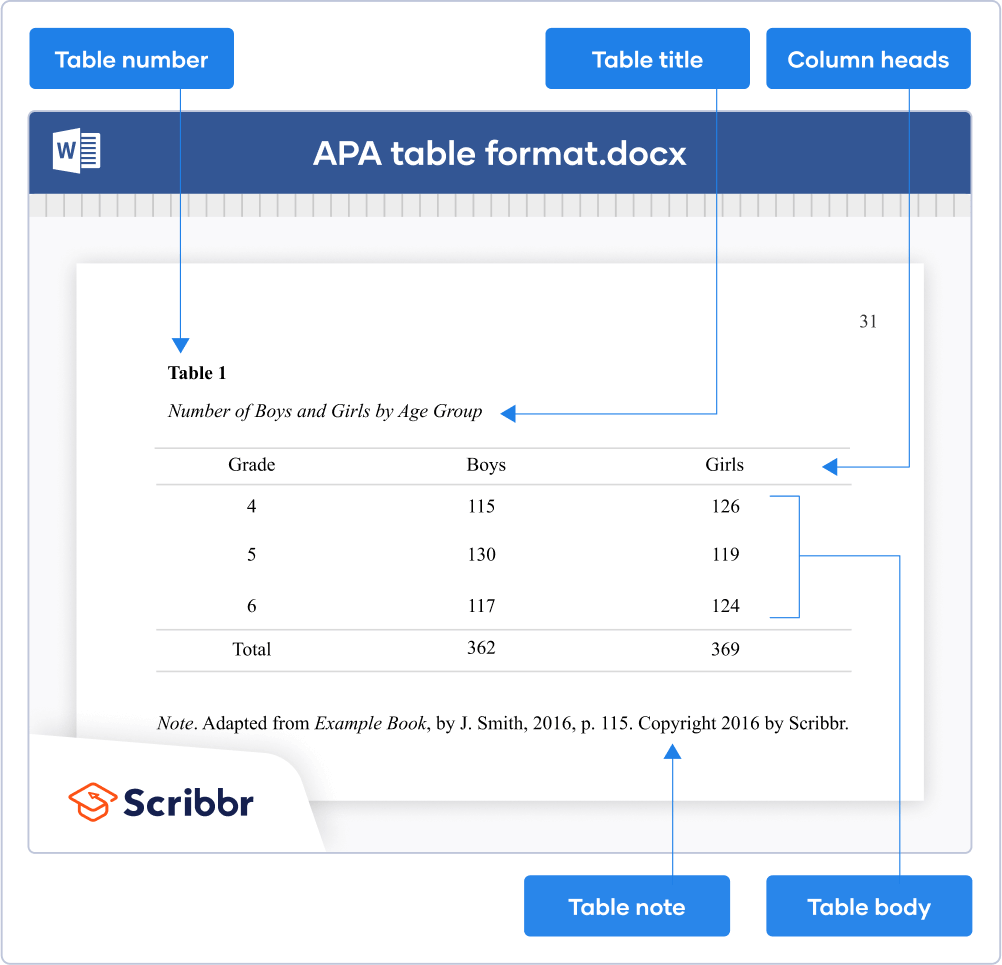
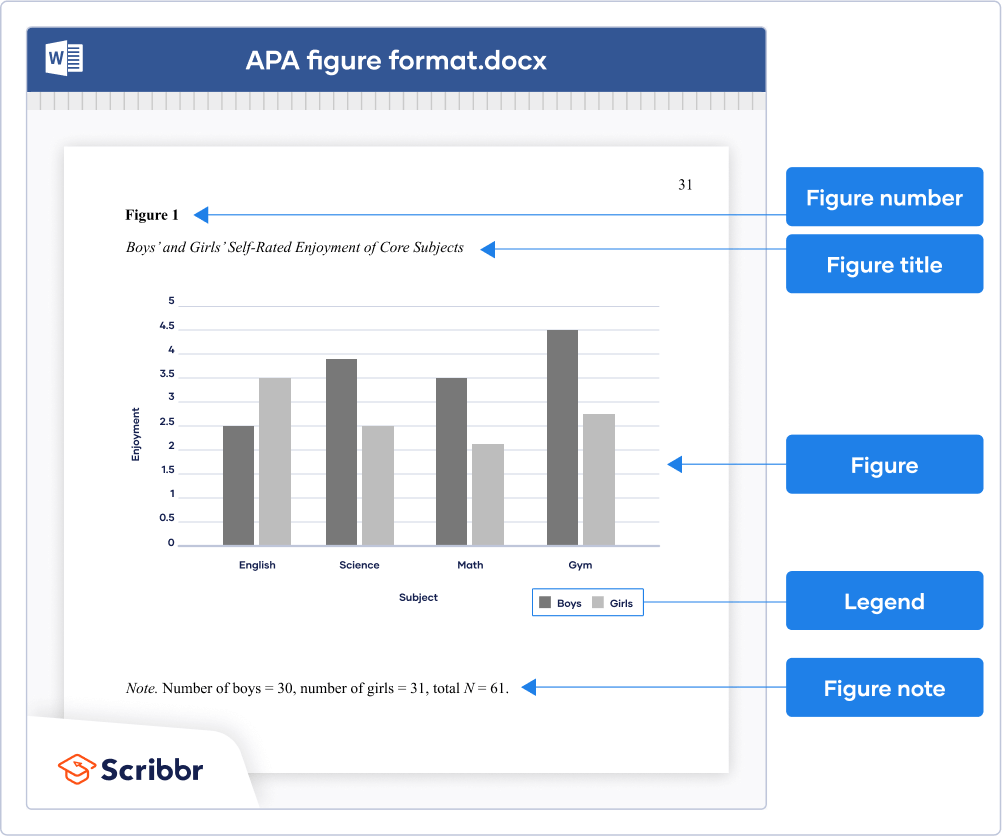
Tables and figures
Tables and figures are presented in a similar format. They’re preceded by a number and title and followed by explanatory notes (if necessary).
Use bold styling for the word “Table” or “Figure” and the number, and place the title on a separate line directly below it (in italics and title case). Try to keep tables clean; don’t use any vertical lines, use as few horizontal lines as possible, and keep row and column labels concise.
Keep the design of figures as simple as possible. Include labels and a legend if needed, and only use color when necessary (not to make it look more appealing).
Check out our in-depth article about table and figure notes to learn when to use notes and how to format them.
Frequently asked questions about APA format
-
Who uses APA Style?
-
APA format is widely used by professionals, researchers, and students in the social and behavioral sciences, including fields like education, psychology, and business.
Be sure to check the guidelines of your university or the journal you want to be published in to double-check which style you should be using.
Cite this Scribbr article
If you want to cite this source, you can copy and paste the citation or click the “Cite this Scribbr article” button to automatically add the citation to our free Citation Generator.
Streefkerk, R.
(2022, August 23). APA Formatting and Citation (7th Ed.) | Generator, Template, Examples. Scribbr.
Retrieved April 12, 2023,
from https://www.scribbr.com/apa-style/format/
Is this article helpful?
You have already voted. Thanks 
Your vote is saved
Processing your vote…
Автор:
Robert Simon
Дата создания:
20 Июнь 2021
Дата обновления:
8 Апрель 2023
Содержание
- Как настроить формат APA в Word
- Как добавить цитату в формате APA в Word
- Продолжай читать

Формат APA часто используется для создания академических текстов, а в Microsoft Word вы можете легко активировать его, чтобы иметь возможность создавать документы научного качества.
Microsoft Word — одна из наиболее часто используемых программ обработки текста, особенно в большинстве университетов и компаний, учреждения, которые обычно запрашивают документы, написанные в формате APA, разработанный Американской психологической ассоциацией (APA).
Совместите стиль APA с форматом Word это так же просто, как понять, как эти два формата гармонично сочетаются друг с другом. Стандарты APA обычно используются для создания исследовательских документов, особенно используемых профессионалами в области психологии или социальных наук.

Первое, что вам нужно сделать для настройки формата APA, — это открыть Microsoft Word на вашем компьютере и найти место для «Ссылки». Там почти в конце панели инструментов вы найдете опцию «Стиль», где есть выпадающее меню, в котором вы должны выбрать формат «APA».
Перед тем, как начать работу с документом, рекомендуется перейти в раздел «Макет страницы» и оттуда нажать на опцию «Поля». Откроется новое окно. Создайте поля в один дюйм для верхнего, нижнего, левого и правого края страницы, поскольку для документов APA требуется поле размером около одного дюйма. Нажать кнопку «ОК».
Далее важно выбрать подходящую букву, поэтому вы должны прокрутить раскрывающееся меню, чтобы найти «Times New Roman» и выберите этот вариант, так как он используется в APA. Затем найдите номер рядом со стилем шрифта, чтобы изменить размер шрифта. Щелкните стрелку и прокрутите раскрывающееся меню, найдите «12» и выберите его.
После этого оставайтесь на вкладке «Главная» и найдите там раздел под названием «Абзац». Найдите четыре линии, параллельные друг другу, и используйте выравнивание по правому краю и центру, чтобы создать обложку. Заголовок и номер страницы будут отсортированы в заголовке с выравниванием по правому краю в соответствии с форматом APA.. Для обложки будет использоваться выравнивание по центру, а вся информация на обложке будет соответствовать центру страницы, чтобы соответствовать формату APA.

Для листов, которые входят в документ, необходимо вставить заголовок на бумаге, поскольку стиль APA требуется заголовок с номерами страниц; поэтому вы должны реализовать его с заголовком и номером страницы на каждой странице.
Найдите вкладку «Верхний и нижний колонтитулы» на вкладке «Вставка» и нажмите «Верхний колонтитул». Затем выберите «Изменить заголовок» e вставьте сокращенный заголовок документа и нажмите «ОК». Снова найдите вкладку «Верхний и нижний колонтитулы» и щелкните вкладку «Номер страницы». Используйте параметры для вставки номеров страниц в заголовок каждого листа в документе.
Как добавить цитату в формате APA в Word
Чтобы добавить цитату в документ в формате APA, вы должны щелкнуть в конце фразы или предложения, которое вы хотите процитировать. Затем, Найдите опцию «Вставить цитату» и затем выберите «Добавить новый источник».

На этом этапе вы должны написать подробности встречи в поле «Создать источник» и затем нажать OK. Когда вы выполните эти шаги, встреча будет добавлена в список доступных ссылок, поэтому в следующий раз, когда вы процитируете эту ссылку, вам не придется писать ее снова. вам просто нужно нажать «Вставить цитату» и выбрать ту, которую вы хотите использовать.
Продолжай читать
Как предотвратить копирование документа Word
Как создать единый документ из нескольких документов в Word
Как поместить документ Word в электронное письмо вместо того, чтобы прикреплять его
Academic documents often need to follow certain style rules, such as MLA or APA. If you want to set up an APA style document in Word, follow this guide.
The APA document format is the official style of the American Psychological Association (APA). APA, like the MLA format, is a specific type of document formatting used in certain types of academic documents.
APA is often used in academic documents, specifically those that relate to psychology, education, and other social sciences. If you’ve never created a Word document in the APA style, you may have difficulty figuring it out, but it’s easy once you know the rules.
If you want to know how to format APA style in Microsoft Word, here’s what you’ll need to do.
APA is like other academic document styles—it’s all about the rules your document needs to follow. Thankfully, Microsoft Word makes it easy to set up a document to follow the APA format.
To write a document in APA style in Microsoft Word:
- First, set your page margins to 1 inch on each side by pressing the Layout tab, then pressing Margins > Normal.
- Set your font to Times New Roman in the Home tab.
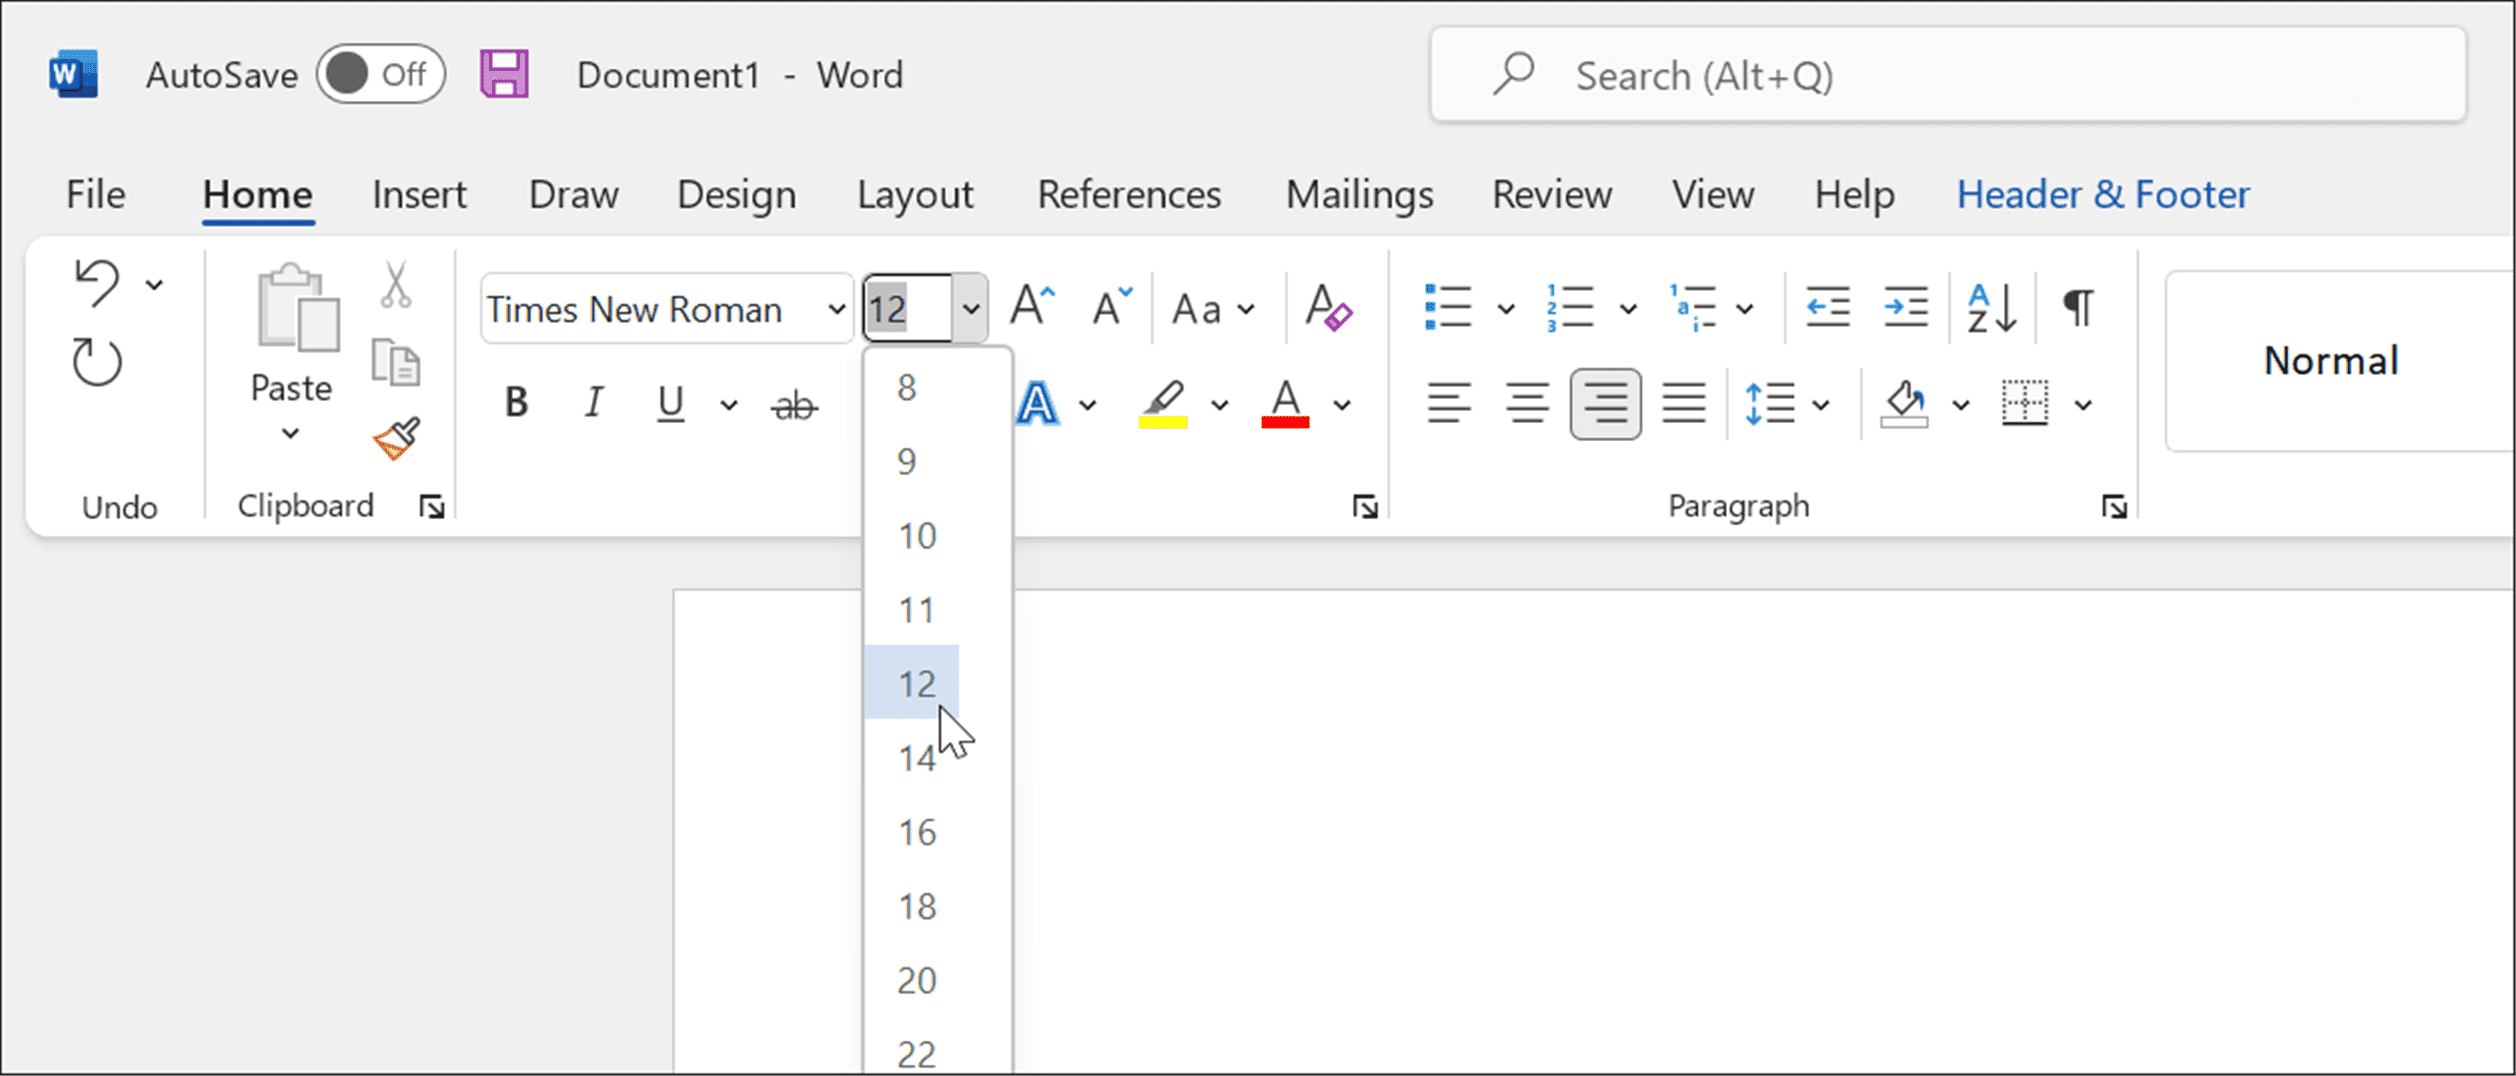
- Change your font size to 12 using the drop-down menu.
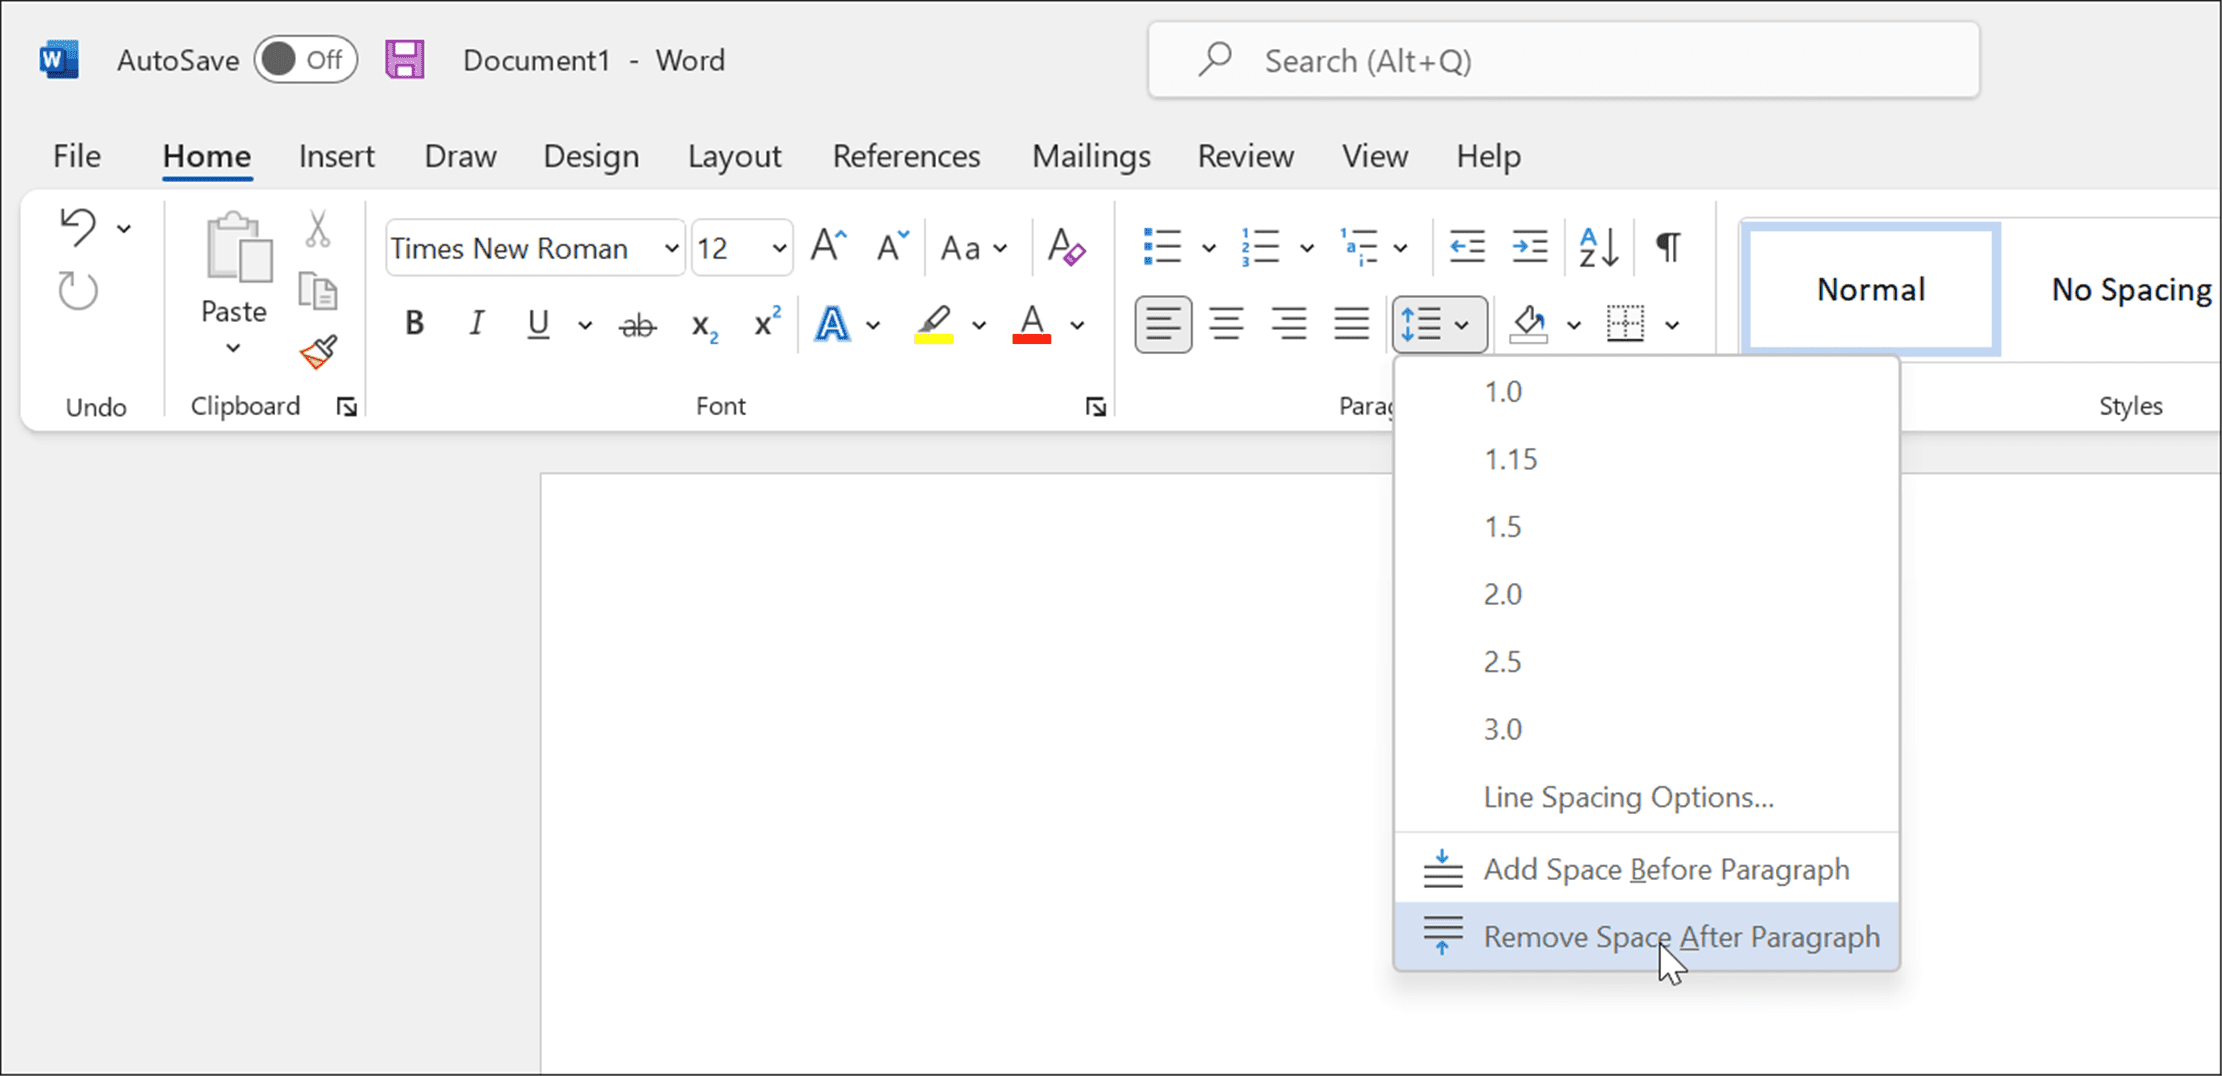
- Enable double-spaced text by choosing Home, then pressing the Line and Paragraph Spacing tool in the Paragraph section.
- In the drop-down, choose 2.0 to double-space the text.
- To verify there are no extra spaces between paragraphs in your paper, press the Line and Paragraph Spacing button again and select Remove Space After Paragraph from the menu.
Configure Your Document Header
At this point, your document should be nearly formatted for APA, but you’ll need to make some additional changes to your header to insert page numbers.
To configure your document header for APA:
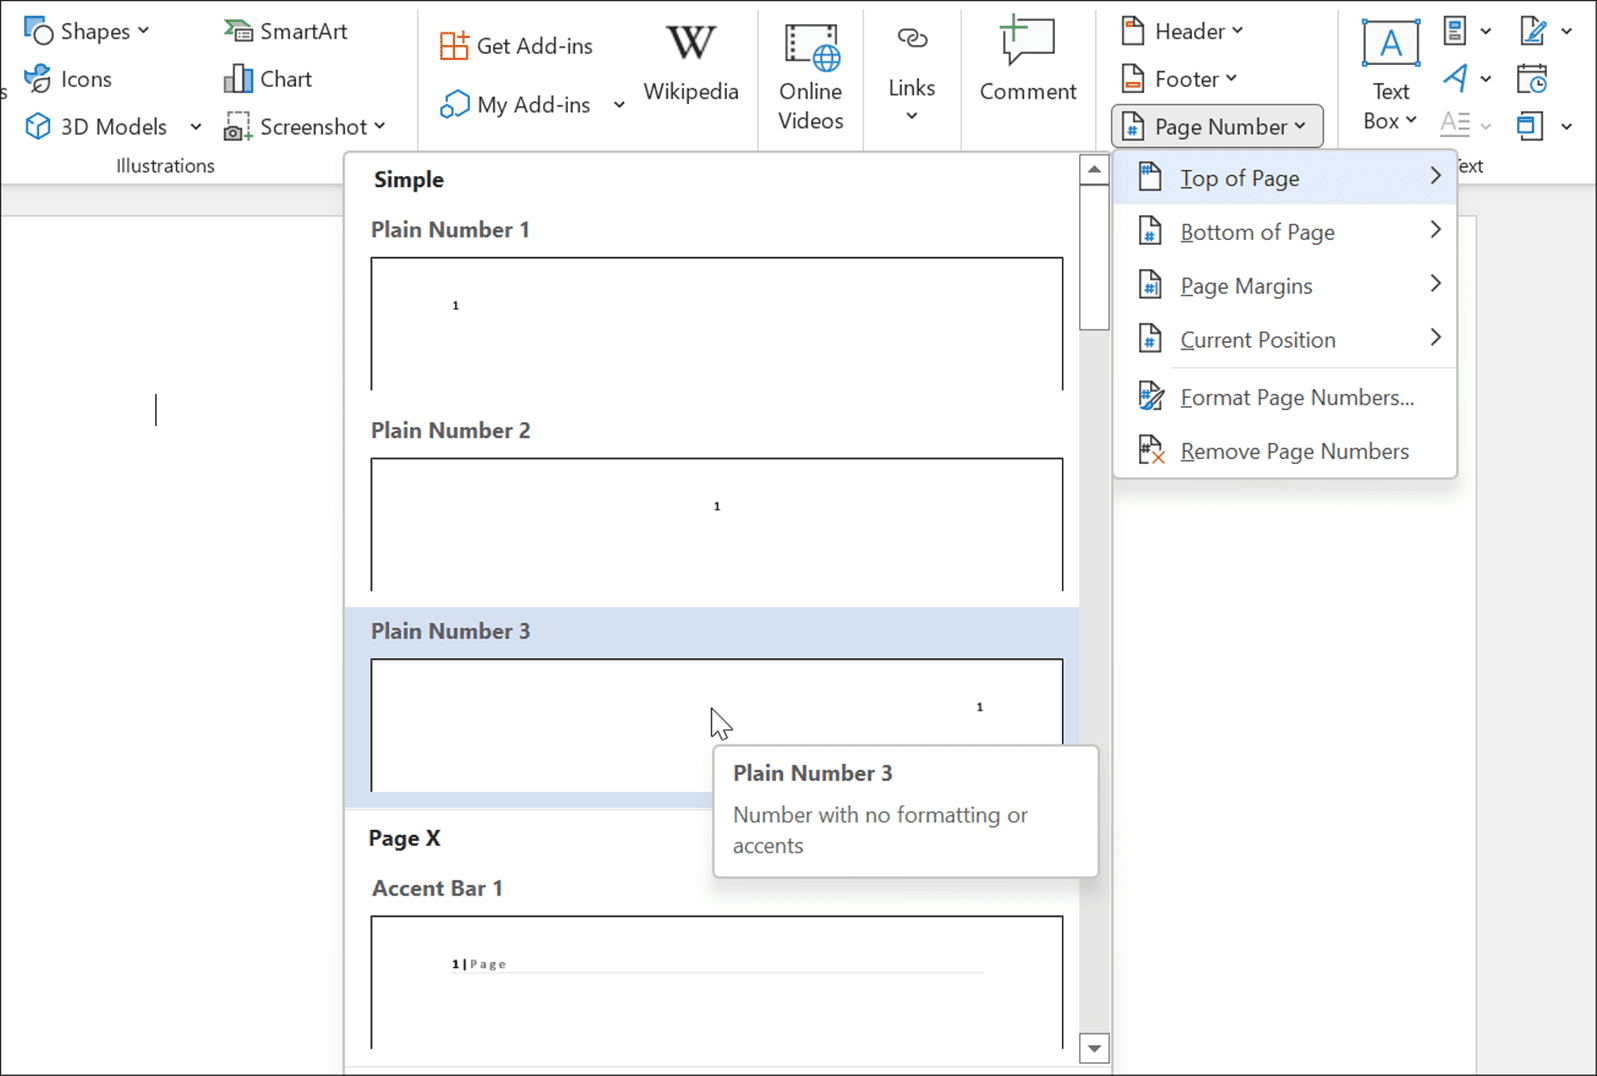
- Press the Insert tab on the ribbon bar.
- Press Page Number, then hover over Top of Page.
- From the options, select Plain Number 3.
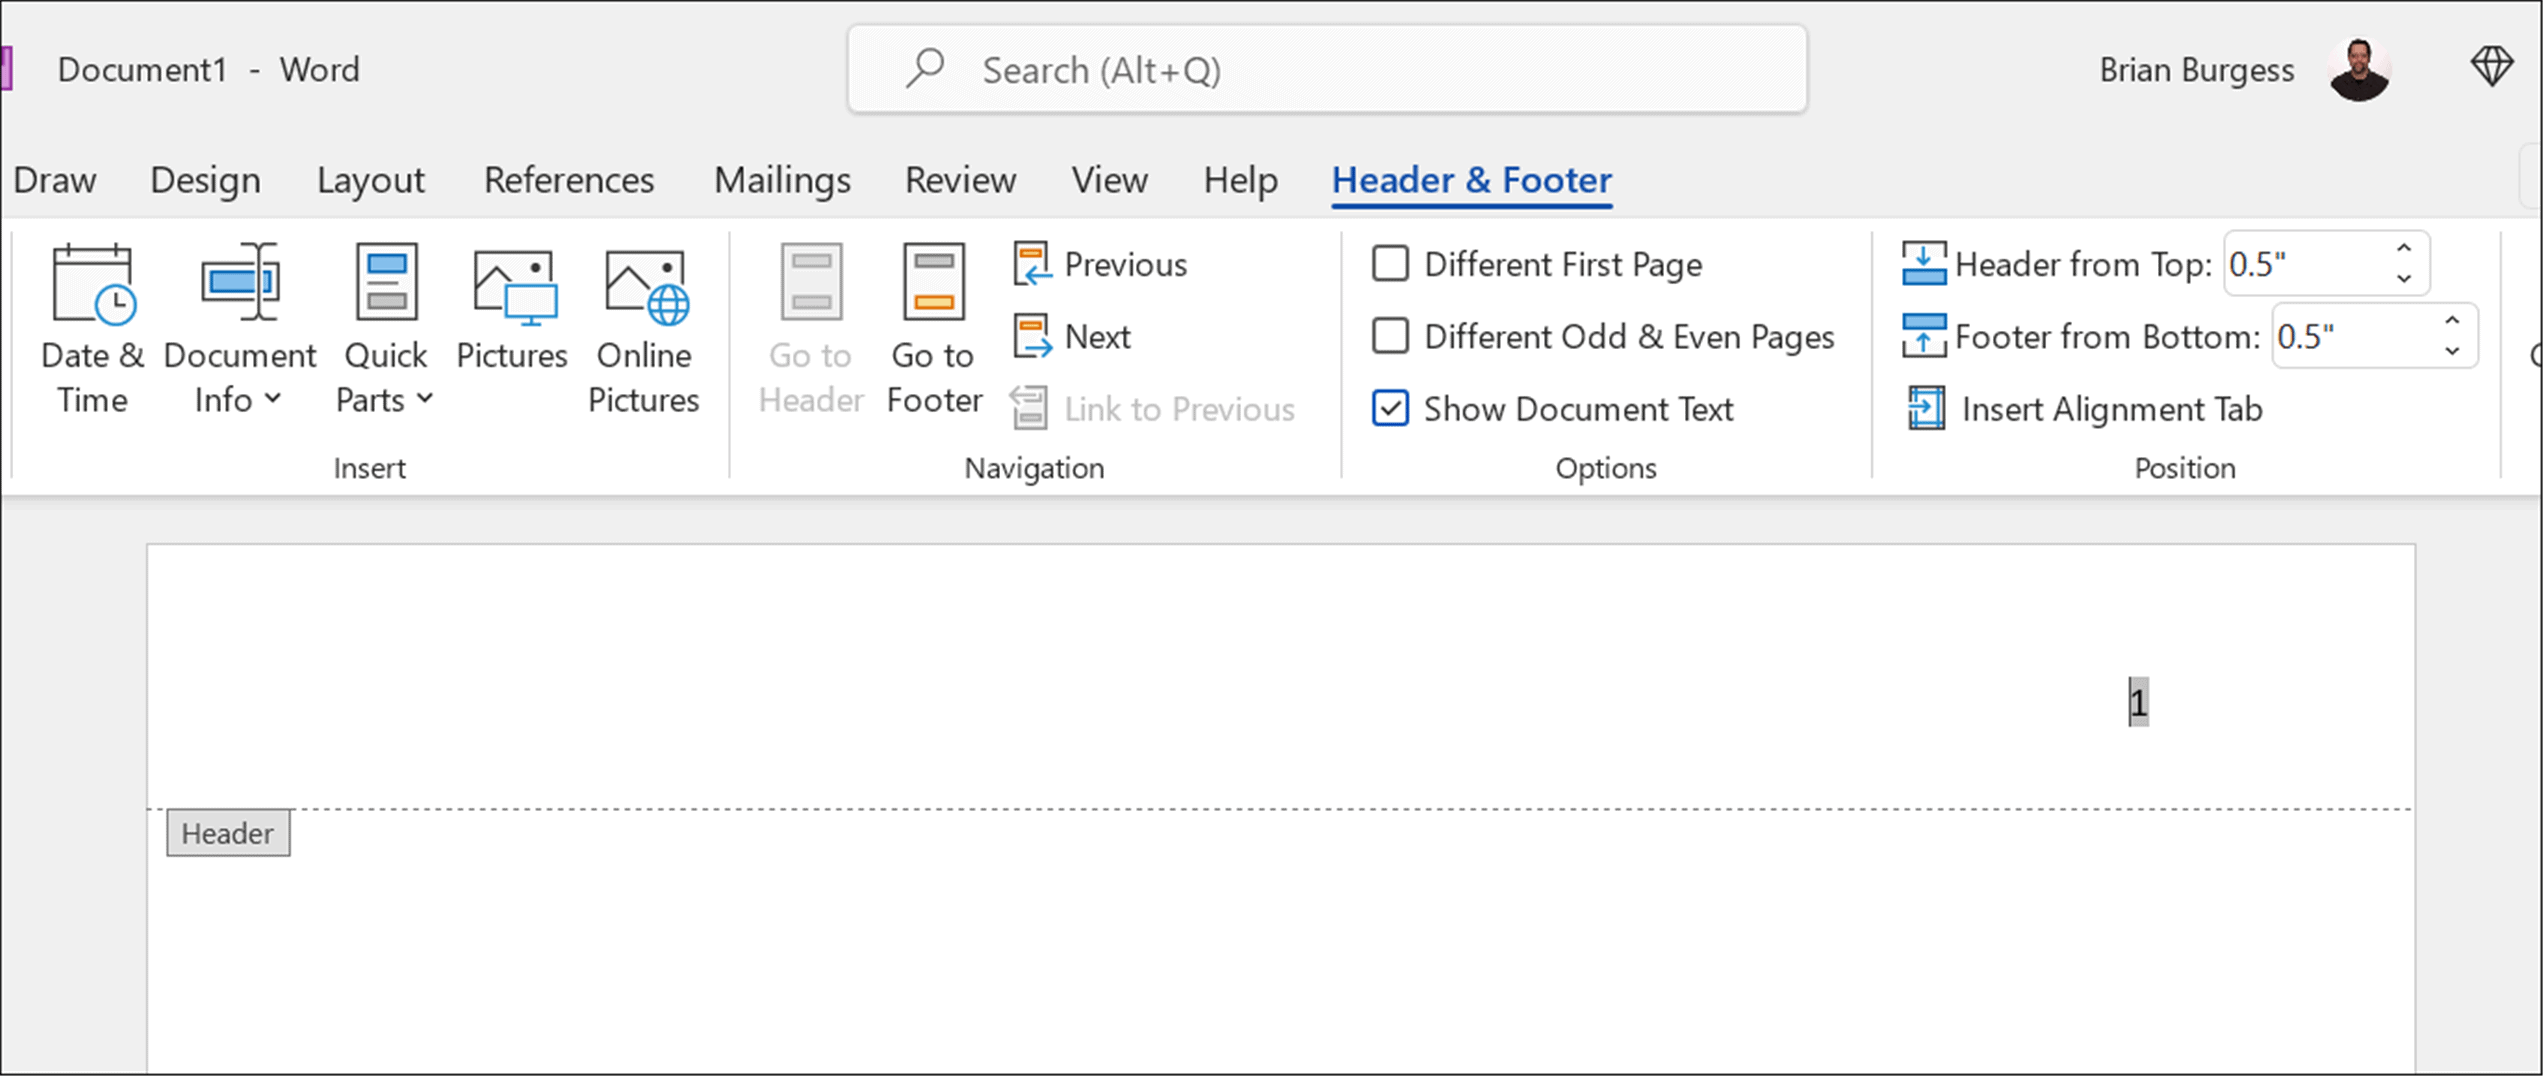
- Word will switch to the Header editing mode, where you’ll see the page number appear on the right-hand side.
- With the number selected, press Home, then set the font and font size to Times New Roman and 12.
- If you’re adding a title, use capital letters to do so—press the Caps Lock key and type in the title for your paper.
- After typing your title, hit the Space key once to create a space between the title and the page number.
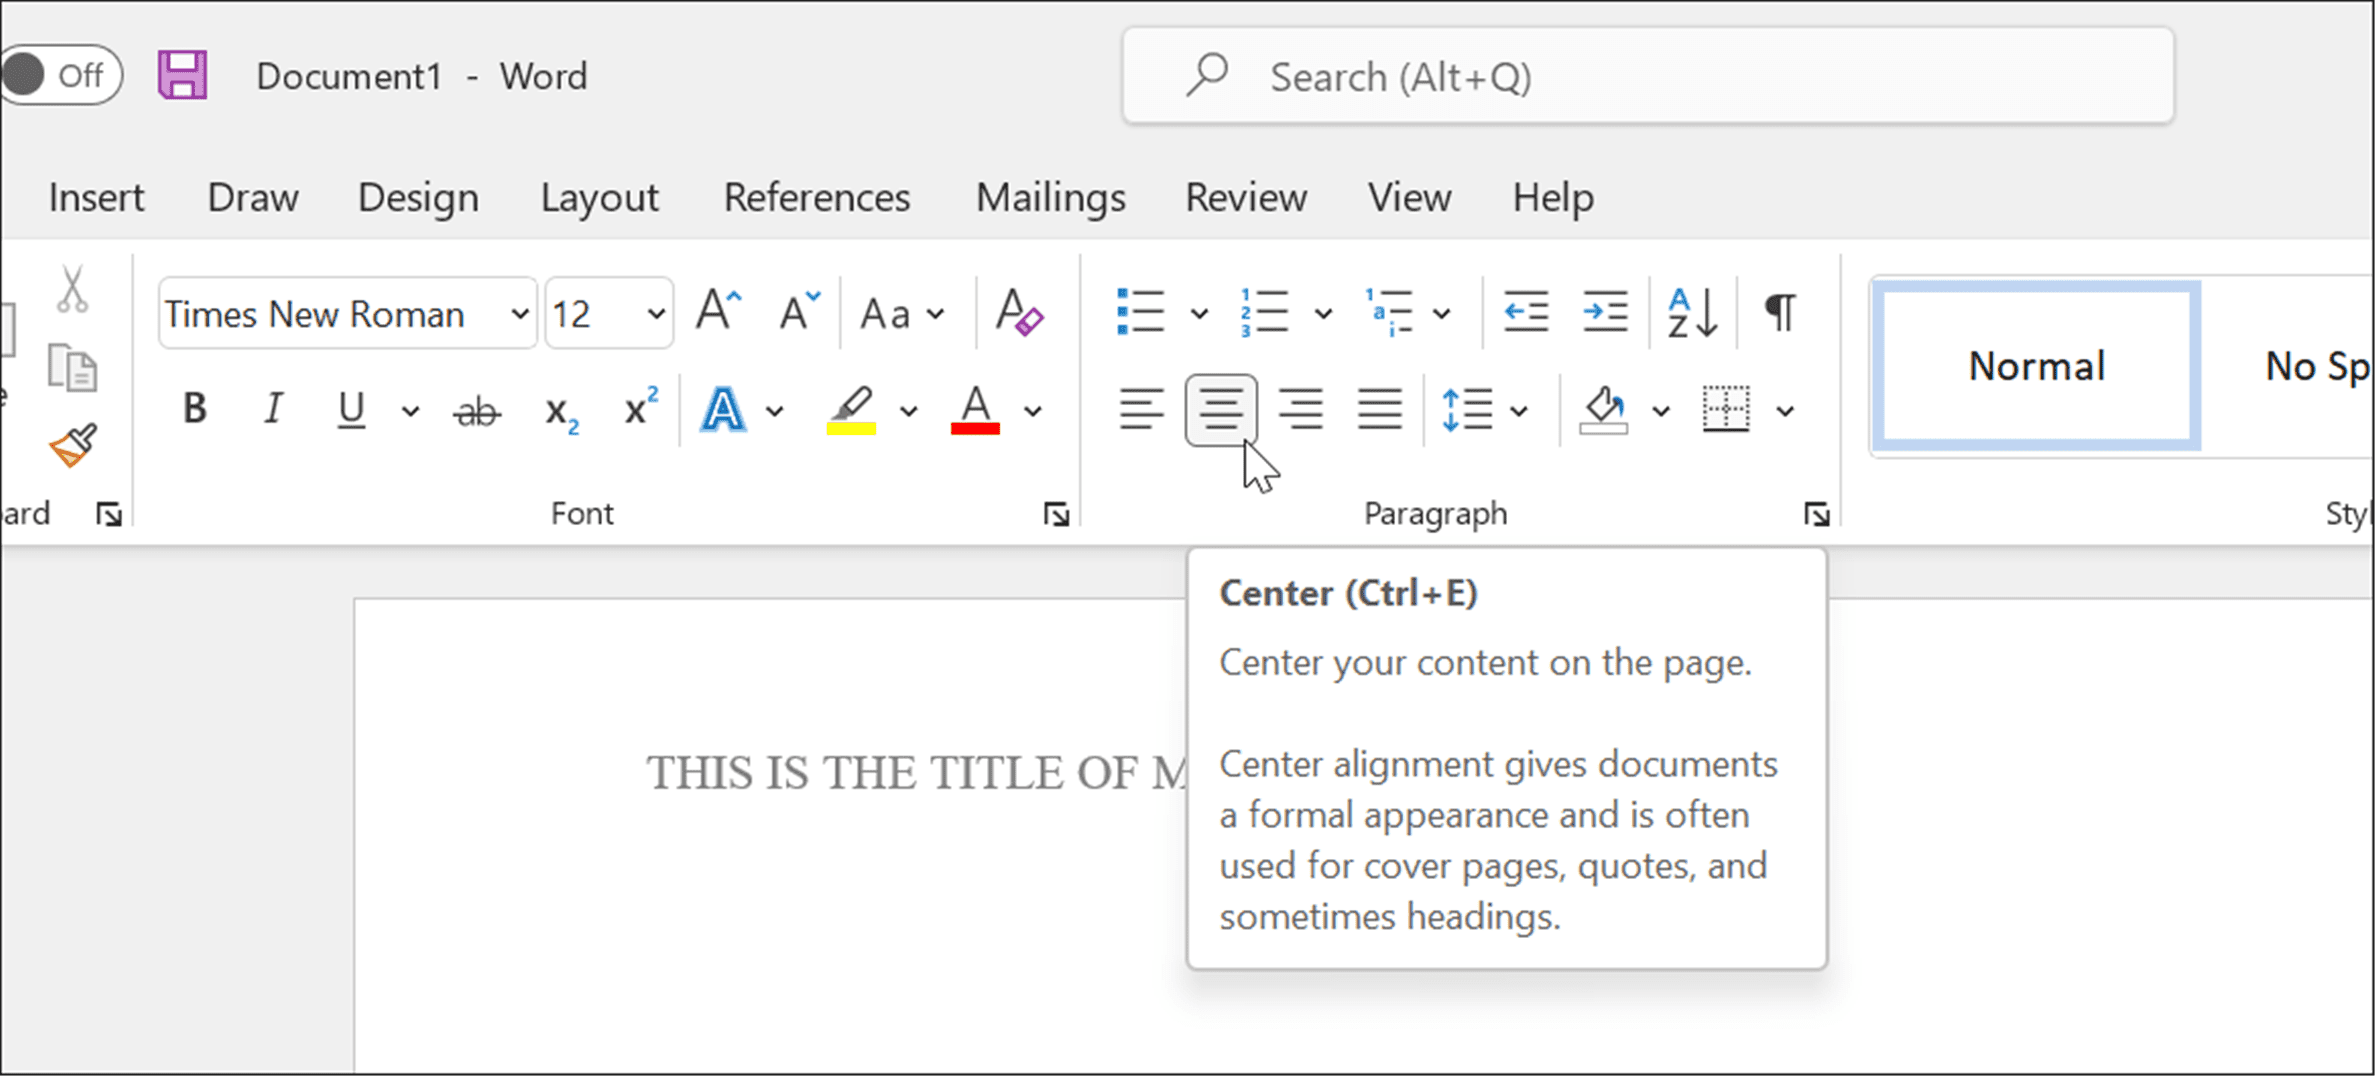
- You’ll want to move the title to the left, so select the title, then press Align Left under the Home tab.
- The title is now aligned to the left, but so is the page number. To fix that, make sure the blinking cursor is direct to the left of the page number.
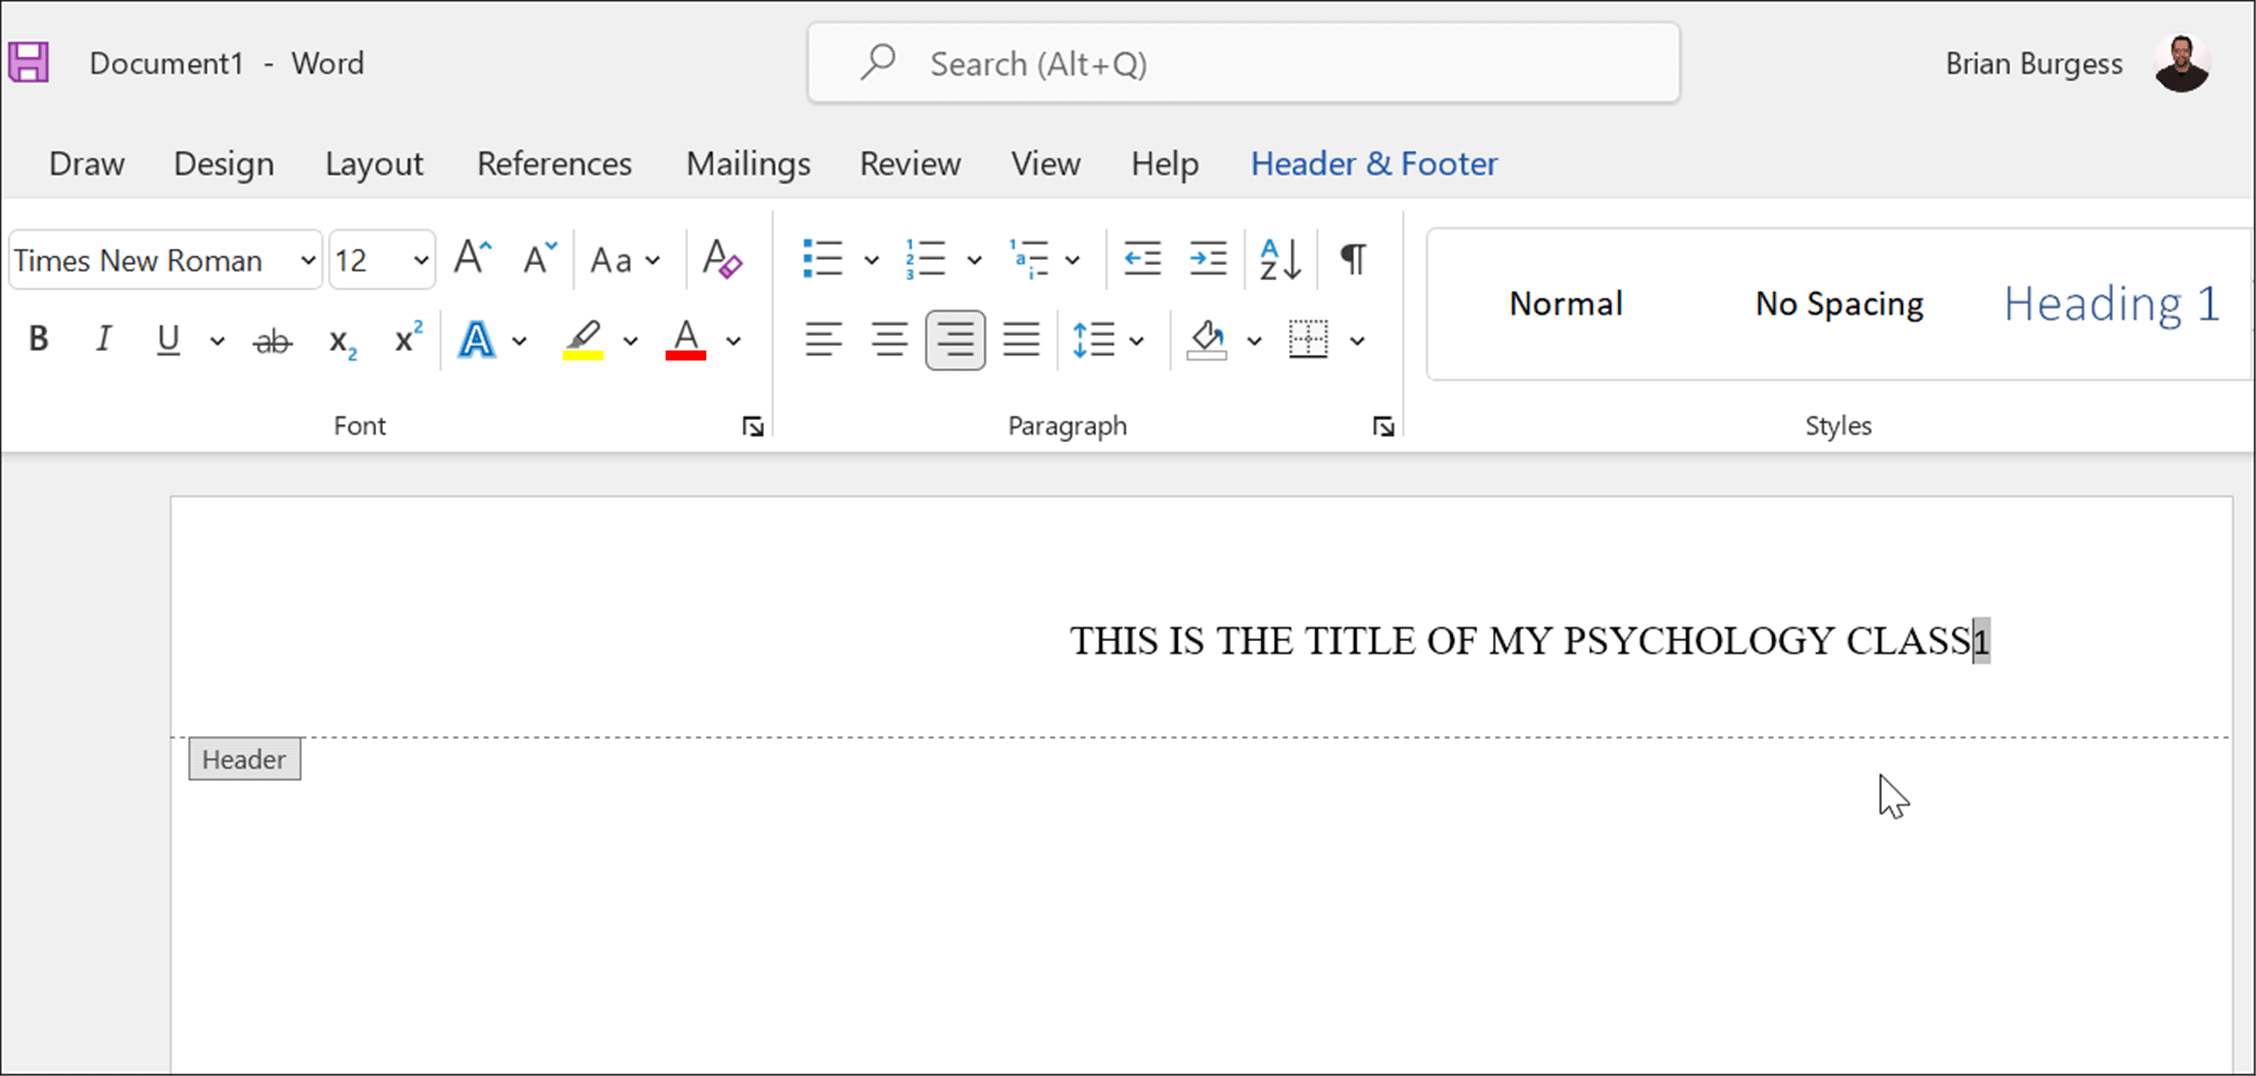
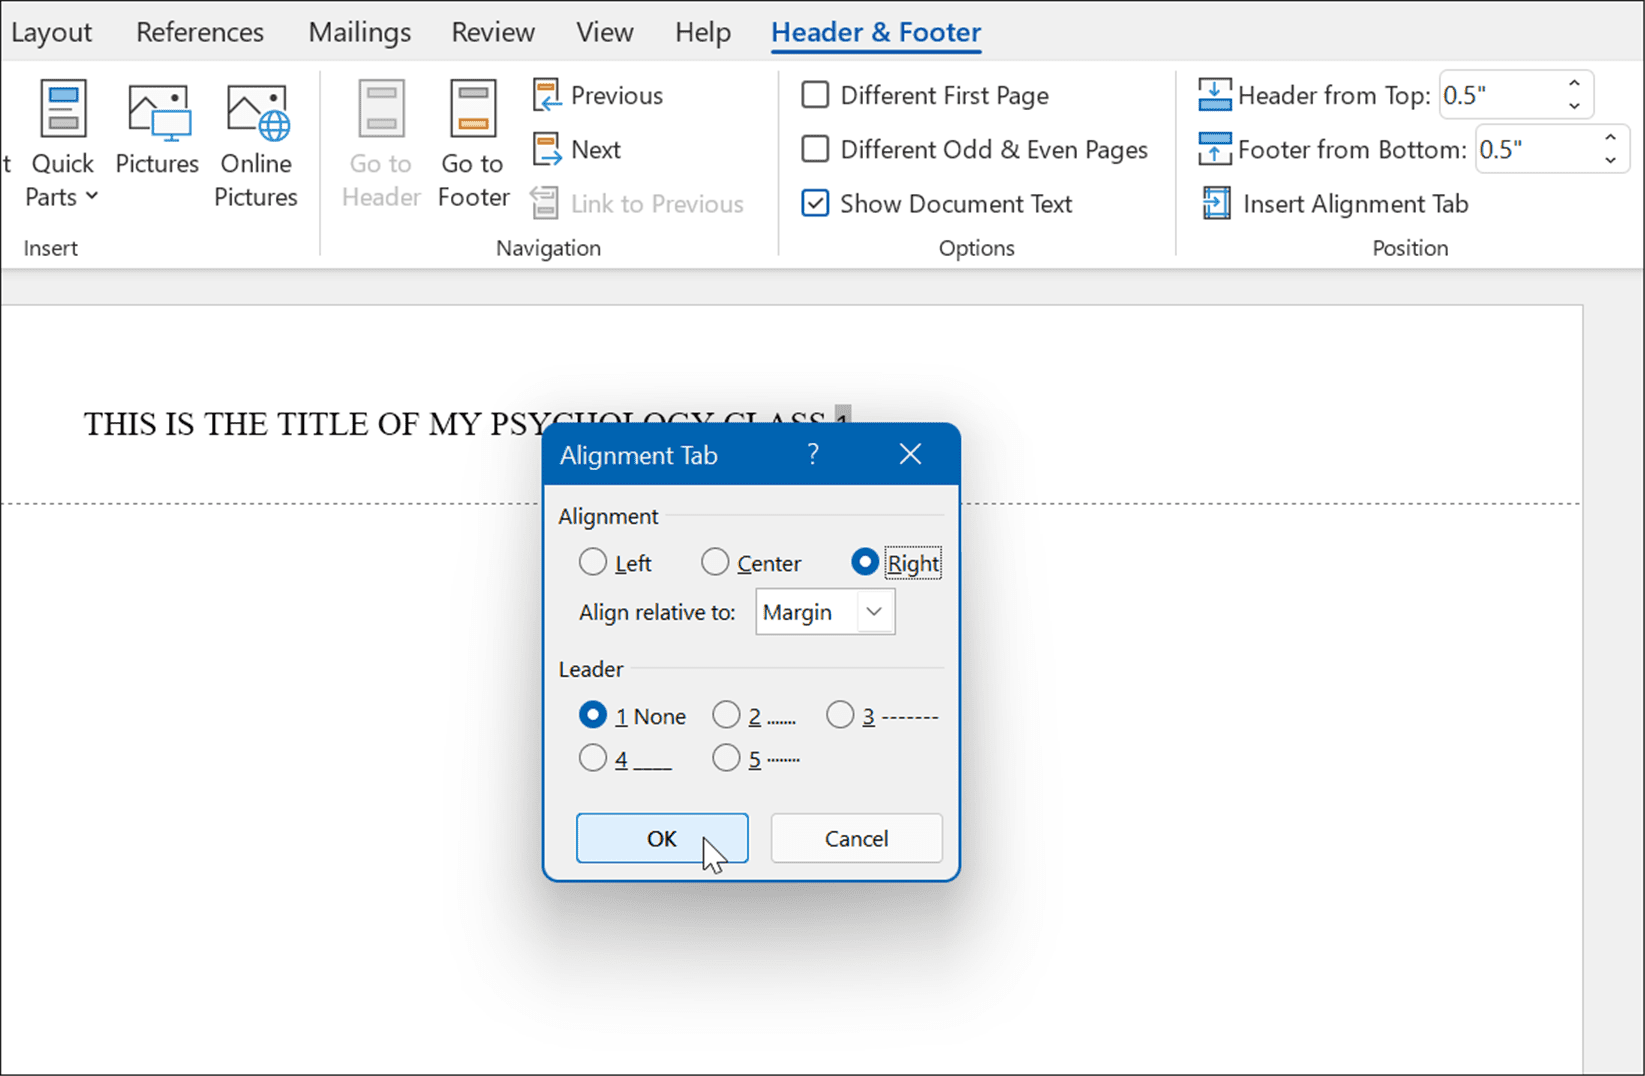
- Click the Header & Footer tab, and select Insert Alignment Tab.
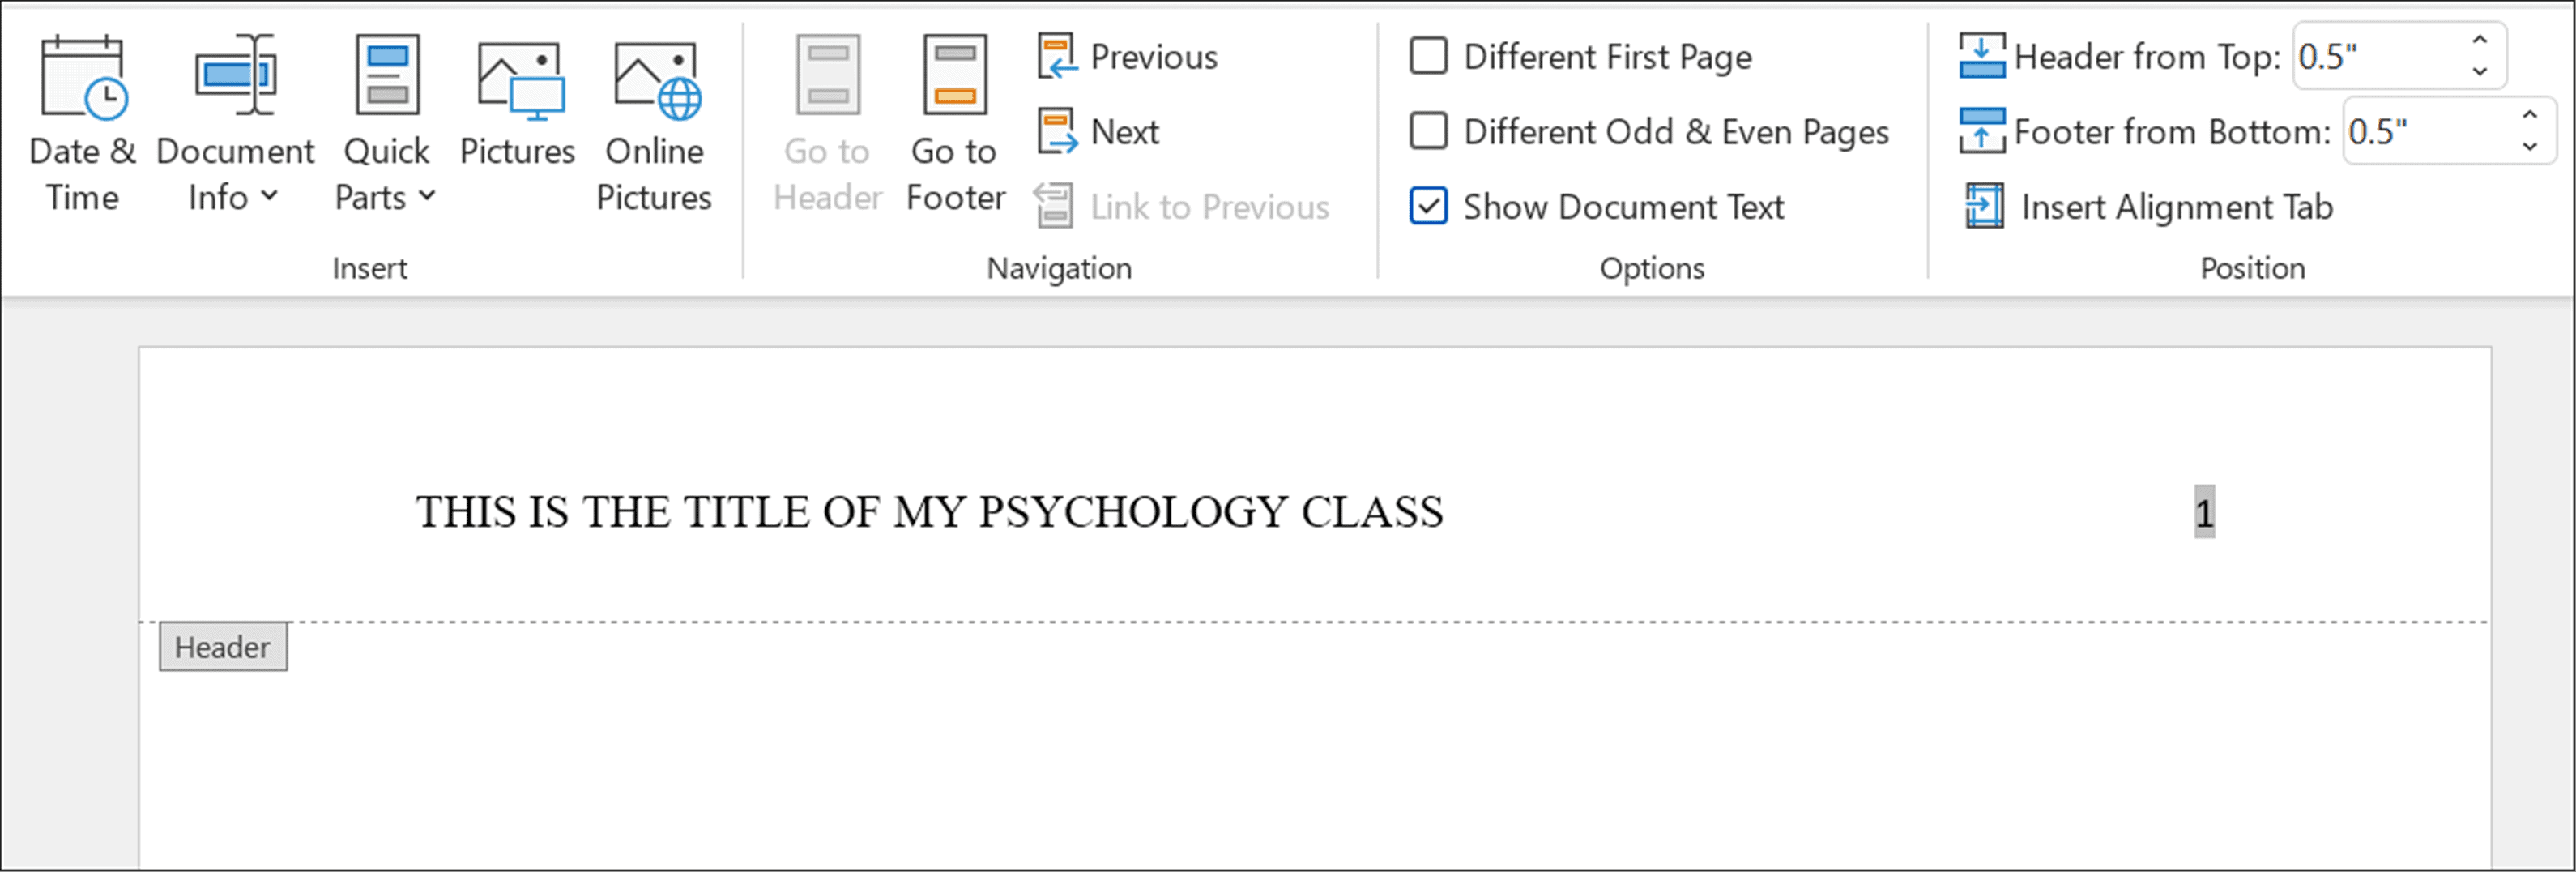
- When the Alignment Tab window appears, click Right and OK.
- If all goes well, you should see the page number on the right and the title on the left—your header is now configured for APA.
Set Up a Title Page
Your document is now ready for APA formatting with Times New Roman and 12-point font sizing across the body and header. The next step is to set up a title page.
To add a title page to Word:
- Click an open area on your first page.
- Set the text to Centered in the Paragraph section of the Home tab.
- Type in the title of your paper, making sure to capitalize the most important terms.
- Press Enter to move to a new line and type your name.
- Press Enter again to type in the institution’s name.
- Make further style changes to your document as required, making sure they follow the APA style.
Writing Academic Documents in Microsoft Word
The steps above will help you to set up APA style formatting in a Microsoft Word document. Of course, the context and citations are up to you. Your instructor may require additional information on the title page, like your student number and current date, so make sure to check in with them before writing your paper.
In addition to APA style, you can also use MLA format in Word. Other neat things you can do is transcribe an audio format or see the word count in Microsoft Word.
In addition to setting up APA or MLA format in Word, you can insert custom headers and footers and insert and format a text box in Word.
![]()
Word automatically generates a bibliography from the sources you used to write your paper. Each time you add a new citation to your document, Word adds that source so that it appears in the bibliography in the proper format, such as MLA, APA, and Chicago-style.
Add a citation after a quote
-
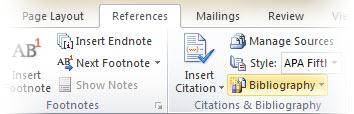
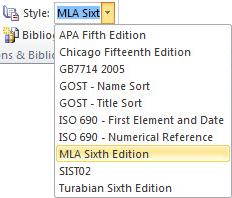
On the References tab , in the Citations & Bibliography group, click the arrow next to Style.
-
Click the style that you want to use for the citation and source.
-
Click at the end of the sentence or phrase that you want to cite.
-
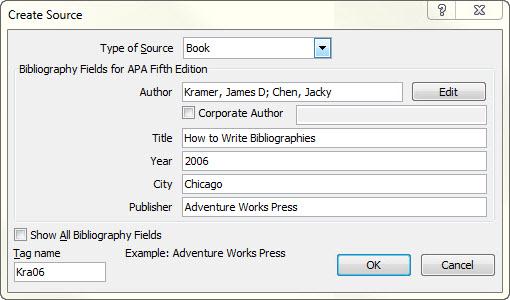
Click Insert Citation and then select Add New Source.
-
In the Create Source box, type in the citation details, and then click OK.
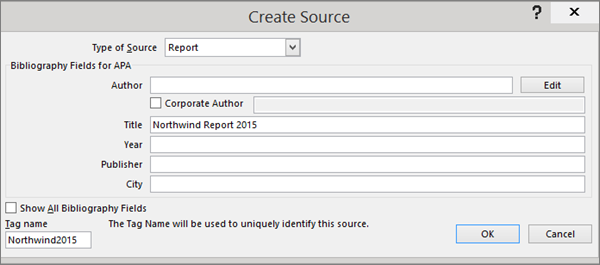
When you’ve completed these steps, the citation is added to the list of available citations. The next time you quote this reference, you don’t have to type it all out again, just click Insert Citation and select the citation you want to use.
Important: APA and MLA can change their formats, so you’ll want to ensure that these format versions meet your requirements. You can create your own updated version of a style or build custom styles. For more information see Bibliography & Citations 102 – Building Custom styles.
Create a bibliography from your sources
If you want to create a bibliography from your sources, do the following:
-
Click where you want to insert a bibliography. Typically, they are at the end of a document.
-
On the References tab, in the Citations & Bibliography group, click Bibliography.
Similar to the Table of Contents builder in Word, you can select a predesigned bibliography format that includes a title, or you can just click Insert Bibliography to add the citation without a title.
If you want to learn more about using citation placeholders and editing sources, take a look at Create a bibliography. Or, if you want to export your bibliography sources to another computer, check out this post on the Microsoft Word blog.
APA 6th Edition citation style fix procedure.
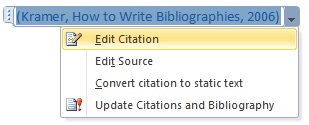
APA style uses the author’s name and publication date. If you have multiple citations from the same author, there is a known Word bug where the citation generator fills in the publication title when it’s not supposed to. If this happens to you, here’s how to fix the problem:
-
In the Word document, click the citation.
-
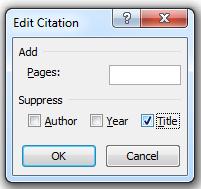
Click the down-arrow, and then click Edit Citation.
-
Click the Title checkbox, and then click OK.

APA and MLA can change their formats, so you’ll want to ensure that these format versions meet your requirements. You can create your own updated version of a style or build custom styles. For more information see Bibliography & Citations 102 – Building Custom styles.
If you are using the APA 5th Edition citation style, there’s one issue you should be aware of. APA style uses the author’s name and publication date. If you have multiple citations from the same author, there is a known Word 2010 bug where the citation generator fills in the publication title when it’s not supposed to. If this happens to you, see the section entitled, ‘APA 5th Edition citation style fix procedure below.
Add a citation after a quote
-
In your Word document, click on the References tab in the Ribbon.
-
In the Citations & Bibliography group, click the arrow next to Style.
-
Click the style that you want to use for the citation and source.
-
Click at the end of the sentence or phrase that you want to cite.
-
Click Insert Citation and then select Add New Source.
-
Type in the citation details and then click OK.
When you’ve completed these steps, the citation is added to the Insert Citation button, so the next time you quote this reference, you don’t have to type it all out again.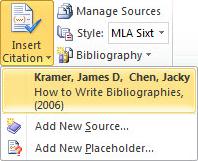
Create a bibliography from your sources
If you want to create a bibliography from your sources, do the following:
-
Click where you want to insert a bibliography. Typically they are at the end of a document.
-
On the References tab, in the Citations & Bibliography group, click Bibliography.
Much like the Table of Contents builder in Word, you can select a predesigned bibliography format that includes a title or you can just click Insert Bibliography to add the citation without a title.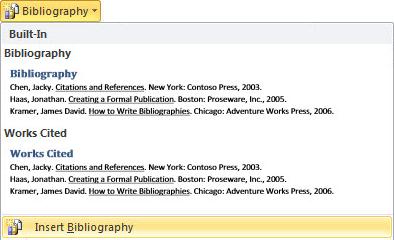
If you want to learn more about using citation placeholders and editing sources, take a look at Creating a bibliography in Word 2010. Or if you want to export your bibliography sources to another computer, check out this post on the Microsoft Word blog.
APA 5th Edition citation style fix procedure
APA style uses the author’s name and publication date. If you have multiple citations from the same author, there is a known Word 2010 bug where the citation generator fills in the publication title when it’s not supposed to. If this happens to you, here’s how to fix the problem:
-
In the Word document, click the citation.
-
Click the down-arrow and then click Edit Citation.
-
Click the Title checkbox and then click OK.
You can’t automatically generate citations in Word Online. Word Online preserves the bibliography in your document, but it doesn’t provide a way to create one.
Instead, if you have the desktop version of Word, select Open in Word to open the document.

Then follow the steps for Word desktop.
When you’re done and you save the document in Word, you’ll see the table of contents when you reopen the doc in Word Online.
You can format Word to the requirements for American Psychological Association (APA) format. The Publication Manual of the American Psychological Association specifies the format for typeface, line spacing, margins, line length and alignment and order of manuscript pages. These formatting specifications can be set in Word. It is easier to type your manuscript in APA format from the beginning, however, you can convert the manuscript from Word formatting to APA formatting.
Formatting Type Face
Format type face. Click on «Format» at the top of the Word document. Click «Font» on the drop-down list.
Place «Times New Roman» under Font, «Regular» under font style, and 12 under size.
Make sure the font color is set at «Automatic» and the underline style is set to «None.»
Click on «Character Spacing» and make sure that scale is 100 percent, spacing is «Normal» and position is «Normal.»
Click on «Text Effects» and make sure it is set at «None.»
Alignment, Spacing and Margins
Set alignment. Click on «Format,» then click on «Paragraph» on the drop-down list. Set alignment for «Left.»
Set line spacing for «Double.» Double space everything in the text, title, headings, references and quotations.
Format margins. Click on «File,» then click on «Page Setup.» Set margins at top, bottom, left and right for one inch and orientation to «Portrait.»
Compose a running head (an abbreviated title) for your manuscript.
Insert running head. Click on «View» and then on «Header and Footers.»
Type the running head in the header space, then click on page number. The header will be automatically left-justified. Type the running head in all uppercase letters with a maximum of 50 characters.
Paragraphs and Indentation
The default setting in Word will indent the first line of every paragraph five to seven spaces or a half inch.
Center the title, author and institution on the title page with the running head at the top. Highlight title, author and institution, then click «Format,» click «Paragraph» from the drop-down list and set alignment to «Centered.»
Put the abstract on a separate page (page 2) and do not indent it.
Things You’ll Need
- Publication Manual of the American Psychological Association, Sixth edition
- Manuscript