
Change the Format of a Number Field in a Microsoft Word Mail Merge Document Using Switches
by Avantix Learning Team | Updated January 16, 2021
Applies to: Microsoft® Word® 2010, 2013, 2016, 2019 and 365 (Windows)
You can change or fix the format of a number field in a Word mail merge document using switches in field codes. Number formatting issues typically occur when the source document for the mail merge is an Excel workbook or Access database. You can use switches to change the format of a number field to display currency symbols as well as commas or decimals.
A number field is typically inserted in the main document using Insert Merge Field on the Mailings tab in the Ribbon.
Related article: How to Use Mail Merge in Microsoft Word to Generate Form Letters
Do you want to learn more about Microsoft Word? Check out our virtual classroom or live classroom Word courses >
Using codes in a number field switch
The common codes used in a number switch are 0 for a required digit and # for a variable number. Codes entered in switches can contain multiple parts separated by semi-colons:
# = variable number
0 (zero) = required digit
The # code will be replaced by a digit only if it is not a leading or trailing zero. You can also enter commas (,), decimals (.) and currency signs ($). Since # specifies the minimum numeric places to display, if a place has no digit, it is replaced with a space.
Number switches start with # and the codes that follow represent the format for the number. The merge codes may appear in quotes or double quotes.
The syntax of the full mail merge number field code with the switch is:
{MERGEFIELD FieldName # number codes} or
{MERGEFIELD FieldName # «number codes»}
If you want to include negative formatting, add a semi-colon after the first part. This follows the same logic as Excel custom number formatting. The first part formats positive numbers, the second part (after the semi-colon) formats negative numbers. If you add another semi-colon, this creates a third part that formats zero (0) values.
Quotation marks are not required for simple number formats that do not include spaces such as {Salary # $#,##0.00}. For more complex number formats and those that include text or spaces, enclose the number format codes in quotation marks.
Changing the format of Word mail merge number field using a switch
To use a switch to change the format of a mail merge number field in Word, you will first need to display the field code and then type the switch starting with #:
- In the main Word mail merge document, select the number field.
- Right-click the field and choose Toggle Field Codes from the drop-down menu to display the field code. You can also press Shift + F9 to display the field code.
- If necessary, delete *MERGEFORMAT from the field code.
- Enter the switch after the field name (such as # $#,##0). Be sure to type a space after #.
- Right-click the field and choose Toggle Field Codes from the drop-down menu to hide the field code. You can also press Shift + F9 to hide the field code.
- Right-click in the field and select Update Field from the drop-down menu. You can also press F9 to update the field.
- Run the merge by selecting Edit Individual documents from the Mailings tab in the Ribbon and then click OK in the dialog box. In the merged document, the number should appear in the switch format.
Number field formatting examples
The following are examples of mail merge number fields formatted using switches. Number switches apply rounding by default.
To change the number field formatting to a format to display a dollar sign and insert a comma as a thousands separator, we used the following switch:
{MERGEFIELD Salary # $#,##0}
To change the number field formatting to display a comma as a thousands separator and two decimal places, we used the following switch:
{MERGEFIELD SalesAmount # #,##0.00}
To change the number field formatting to display a number under one thousand with two decimal places and a number of one thousand or more with a comma as a thousands separator, we used the following switch (the benefit of this switch is that Word will not include a space for missing digits):
{MERGEFIELD AmountOwing # ,#.00}
The following switch could be used with negative numbers (if the original value was 1500.57 or -1500.57, this would display $1,500.57 for a positive number and ($1,500.57) for a negative number):
{MERGEFIELD AmountOwing # «$,#.00;($,#.00)»}
The following switch is similar to the switch above but formats zeros as a dash (the dash is considered to be text so must be enclosed in single quotes):
{MERGEFIELD AmountOwing # «$,#.00;($,#.00);’-‘»}
Zero values can be suppressed by adding a final semicolon (;) in the switch but nothing after it. This suppresses zeros from empty fields and from fields containing zeros.
In the examples above, commas would be inserted only if the number was one thousand or more. The name of the number merge field in the above examples comes from the Excel source file. The curly brackets cannot be typed.
Subscribe to get more articles like this one
Did you find this article helpful? If you would like to receive new articles, join our email list.
More resources
How to Create a Table of Contents in Word
How to Insert a Watermark in Word (like DRAFT)
How to Remove Hard Returns in Word Documents
How to Find and Replace in Word (and use Wildcards)
How to Superscipt or Subscript in Word (with Shortcuts)
Related courses
Microsoft Word: Intermediate / Advanced
Microsoft Word: Designing Dynamic Word Documents Using Fields
Microsoft Word: Long Documents Master Class
Microsoft Word: Accessible Word Documents
Microsoft Excel: Intermediate / Advanced
Microsoft PowerPoint: Intermediate / Advanced
VIEW MORE COURSES >
Our instructor-led courses are delivered in virtual classroom format or at our downtown Toronto location at 18 King Street East, Suite 1400, Toronto, Ontario, Canada (some in-person classroom courses may also be delivered at an alternate downtown Toronto location). Contact us at info@avantixlearning.ca if you’d like to arrange custom instructor-led virtual classroom or onsite training on a date that’s convenient for you.
Copyright 2023 Avantix® Learning
Microsoft, the Microsoft logo, Microsoft Office and related Microsoft applications and logos are registered trademarks of Microsoft Corporation in Canada, US and other countries. All other trademarks are the property of the registered owners.
Avantix Learning |18 King Street East, Suite 1400, Toronto, Ontario, Canada M5C 1C4 | Contact us at info@avantixlearning.ca
Mail Merge is used when you want to create set of documents or a form letter that is sent to many customers. I have explain in prevous article How to Use Mail Merge in Word to send form letters in multiple customers. Very easy and very helpfull when you have hundred of customers to send a form letter. Today i will explain another feature of mail merge that it’s also very helpfull when you have to do with numbers in form letters.
So let’s create a scenario to implement the number format with mail merge.
Scenario
We use Template for Invoices from Word. We must generate invoices for 200 customers and send them with an email.
Are you ready to start?
- Open in your Word the Form Letter that you want to sent in your customers.
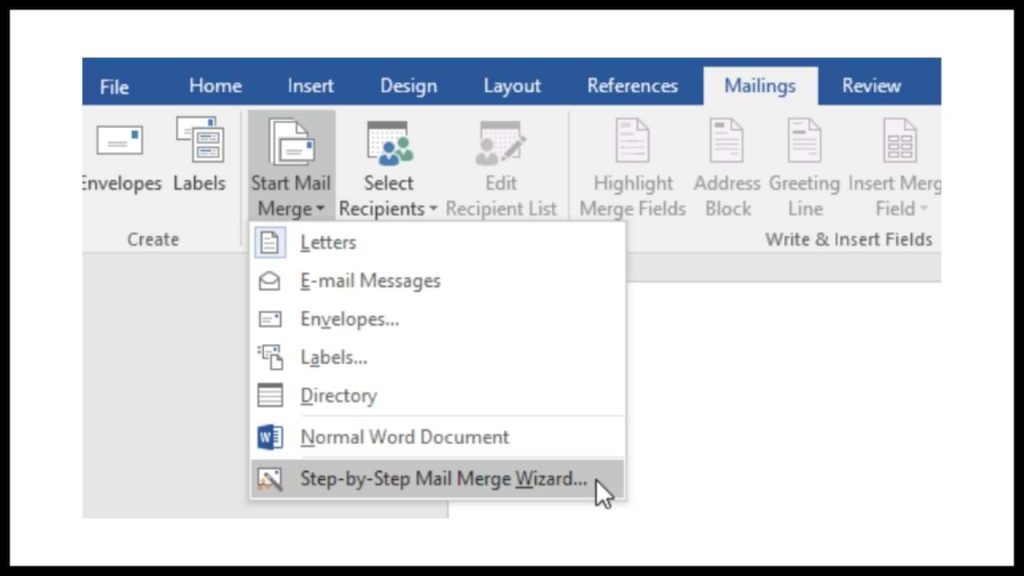
- From the Menu Bar go in Tab Mailiing and click on Start Mail Merge.
- Select Step-by-Step Mail Merge Wizard.

- It will open a new section from the left side.
- In Select Document Type kepp the default option (Letter) for the specific Example. You can use and othe options as Email messages,Labels,Evnelopes and so on.
- Go in the bottom and click Next :Starting Document.

- In Select Starting Document use the default option <Use the current document>
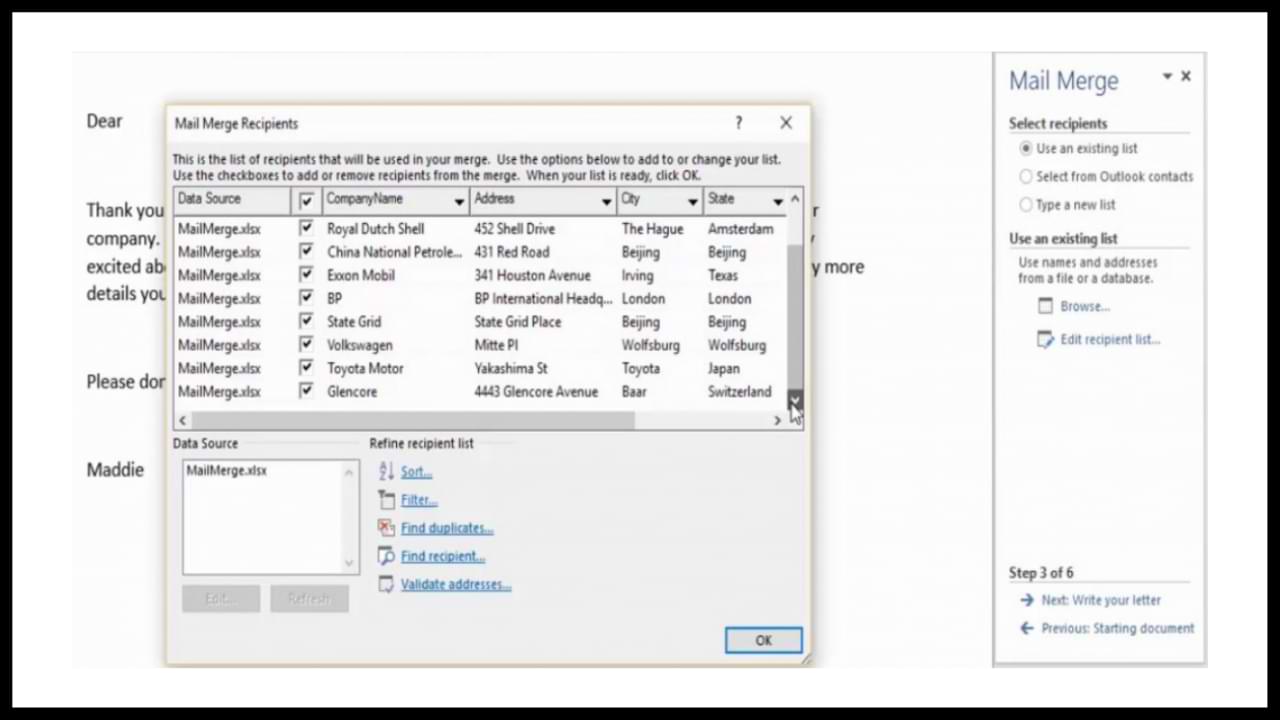
- Go again in bottom and click Next:Select Recipients.

- In Select Recipients use the default option <Use an existing list>.
- In Use an existing List click Browse.

- Find your Excel file with your customers and click Open.
- Click OK

- And again OK.

- Go in the bottom and click Next : Write Your Letter

- Select the area from your Document that you want to copy the values from your Excel file. In this example we need Custmore Name and Total Amount.

- In Write your letter click More Items.

- Select the first field Name and click Insert.

- You will see that in the selected area will be change as <<Name>>. This is the area that will copy the data from the field.
- Click Close
- Click again in More Items and Repeat the Steps for the other available fields.
- When you finish click Close, Go in the right bottom side and click Preview Your letters.

- Check that the selected Areas which insert the field preview the data from the Excel.

Format Numbers After Mail Merge
After finish the Mail Merge you can see the Page of the first Invoice with the values which inserted from Excel.
As we can see in above image the number format has change from 10,998,076 to 1099876 after mail merge.But we need the right format because we have to do with Numbers and we don’t want to have wrong values..
Before Complete the merge follow the steps.
- Right click in the Number and selec Toggle Field Codes.

- The field will change like
{ MERGEFIELD «TotalAmount»} - After TotalAmount» add the following line
# €#,##0.00 - Now the field should be like

- Right Click in the field and select Update Field.

- Now your number has the right format and you can continue to Complete the Merge.

- Base on the customers that you have in the Excel the Word will be create x Pages with the same Letter and different data in the selected area that you inserted.
- Click Save and you are Ready.
What do the Symbols Mean?
- # Begins the “switch” which tells the document to apply formatting to the number.
- € The character to display at the beginning of the number (in this case, a dollar sign).
- # The number of number signs (#) typed after the comma indicate the number of digits that should be forced to display.
- , Indicates that you want commas to designate thousands.
- .00 Indicates that you want to include a decimal point to two places with each number. Anytime a number to be merged doesn’t include decimals, it will display with zeros.
If you use Mail Merge you have the option to format Date and Time except Numbers.
You can find a usefull article in the link from Microsoft which explain all the commands that you can use.
Insert and format field codes in Word 2010.
I hope to find usefull my article!!
Write your comments or send me an email if you have any question in info@askme4tech.com
Follow me in Google+, Facebook or twitter if to keep up to date with new articles.
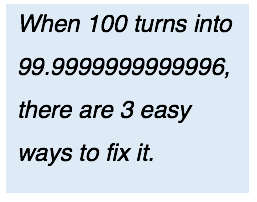
One of the perennial annoyances of Mail Merge is its inability to format numbers from an Excel spreadsheet correctly. Fortunately, there is a way to fix this. In fact, there are three ways.
[Originally posted June 2012. Last updated in June 2021. For a video on this topic, click: https://youtu.be/otPTkvnrPlc.]
 The Mail Merge feature of Microsoft Word is one of my favorite parts of the program. It is extremely powerful for creating labels and customized letters, emails, or reports. Once you learn how to use it, you can save countless hours of work. Unfortunately, the task of learning to master all of its idiosyncrasies can give you countless headaches.
One of the perennial annoyances of Mail Merge is its inability to format numbers from an Excel spreadsheet correctly. For example, a sales result in Excel appears as 100 but in Word it suddenly becomes 99.99999999996!
Fortunately, there are no less than three different ways to get Mail Merge numbers to appear the way they should.
[Note for users of various versions of Microsoft Office: The steps presented here are for Office 2016 as of August 2018, but the steps needed for older and newer versions of Word and Excel are very similar if not identical.]
1. Modify the Excel Spreadsheet
The first way is to avoid the problem: In the Excel worksheet, insert a column with a formula that converts the Excel numbers or dates into a text format that is exactly the same as what you would want to appear in your Mail Merge document.
To do this, you need to use Excel’s TEXT function, which enables you to convert a number or date into its equivalent text formatted exactly the way you desire. The downside is that you need to know certain formatting codes. Although these codes are identical to those used in the Custom Number formatting feature of Excel, they are rarely seen by most Excel users.
For example, the formulas TEXT(B3, “$#,##0.00”) and TEXT(C5, “M/dd/yy”) convert number and date data into textual data (in this case, “$12,345.67” and “12/01/10”).
(Tip: It is a good idea to format the cells containing these formulas in a different style, say, italic, or some unusual color to remind you that these numbers are simply text. In older versions of Excel, these “numbers” could not be used in calculations. In Excel 2016, they can be used in all formulas except aggregate functions, such as, SUM and AVERAGE.)
The advantage of formatting numbers and dates as text is that text is transported from Excel into a Word Mail Merge document unmolested. Well, almost unmolested. Formatting options such as font, size, and color do not make the trip.
Format Codes for Excel’s TEXT Function
 A collection of the most commonly used codes is presented at the right. A key thing to remember is that both “0” and “#” act as placeholders for digits, but “0” will force leading or trailing zeros to appear. The “#” placeholder will be replaced by a digit only if it is not a leading or trailing zero. Thus, the code “00000” will ensure that the leading zero is not truncated from New Jersey postal zip codes.
These codes for numbers, dates, and times can be used in the TEXT function or in Excel’s Custom number formats. As an extra bonus, they can also be used in the “Numeric Switches” in Word Mail-Merge Fields described in the next section.
Unfortunately, there is a slight difference between the way these codes work in Excel and Word in Microsoft Office 2013. In Excel, you can use either “M” or “m” for months or minutes. In almost all cases, Excel is smart enough to figure out which units you are talking about. But Word is not so smart, and you must use the capitalized letter to refer to months. Also, Excel has an additional code, “MMMMM”, which returns a single letter abbreviation for the month (e.g., “J, F, M, A, …”).
Supplementing a spreadsheet table with a few columns featuring TEXT functions is a simple and direct approach. Just remember that these cells may look like they contain numbers, but they cannot be used in SUM or AVERAGE functions. If you need to convert them into numbers again, just use the VALUE function.
Handle with Care: The ROUND Function
Instead of the TEXT() function, some users prefer to use the ROUND() function to trim off extra decimal places. As its name implies, Excel’s ROUND() function will permanently round a number up or down to the number of decimal places you specify. The advantage is that the rounded number is not text and can still be used for further calculations. In many cases, the ROUND() function will work well with Mail Merge, but you may want to steer clear of it because of the following reasons:
- The ROUND function will not preserve the dollar sign or the thousands separator (comma)
- The ROUND function will truncate trailing zeros
- The ROUND function sometimes causes Mail Merge to display the wrong number of decimal places. For example, a Mail Merge document occasionally shows 4 decimal places when the ROUND function had specified 2 or 3.
In rare cases, the ROUND function causes Mail Merge to show a slightly different number. For example, instead of displaying 1.0014, Mail Merge showed 1.0013.
Okay. But let’s say that you can’t or don’t want to change your Excel spreadsheet. Well, there is something we can do in Word:
2. Use a “Numeric Switch” in Word
The second way to cajole Mail Merge into displaying numbers from Excel correctly is to modify the Word document. Specifically, this means applying the desired number format code to the Merge Fields in the Word document. (The merge fields basically tell the Word document which column in the Excel table has the desired data.) To apply a format to a field, you must include a numeric switch (formerly called a picture switch) in the field’s field code.
The first thing you have to do is to see the actual field code. Open the Mail Merge document and click the Mailings tab at the top of the window. Be sure the Preview Results button is toggled off so that you can see the Mail-Merge fields. Then right-click a Mail-Merge field (such as «Donation») and choose the Toggle Field Code option. You should now see the actual field code for that field, which is designated by curly braces as in { MERGEFIELD Donation }. Now edit the field code by simply inserting a numeric switch code to the end of the field code, as in
{ MERGEFIELD Donation # $#,##0.00 }
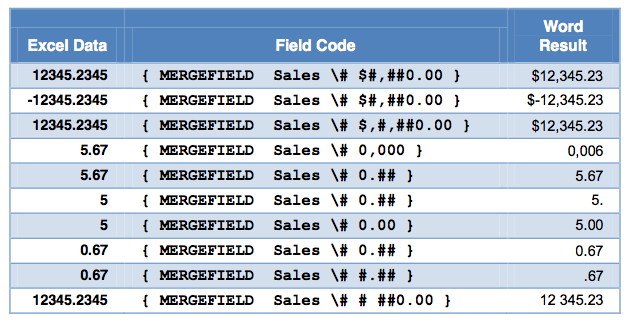
There are many picture codes available. Here are four examples with their respective results:
{ MERGEFIELD Cost # 00.00 }              01.00
{ MERGEFIELD Sales # $### }               $ 15
{ MERGEFIELD Sales # $#,##0.00 }    $ 1,500.00
{ MERGEFIELD Date @ "MMMM d" }     November 26
As you can see, the numeric switch codes are identical to the Excel formatting codes except that they are preceded by “#” for numbers and “@” for dates. (Note the use of quotation marks in the date code but not in the number codes.) To see more of the codes available, refer to the table below, or see the online help for “numeric switch” in Microsoft Word.
Here are some examples of how the numeric field codes work with data in a column labeled “Sales” in an Excel spreadsheet.
Numeric Switches for Mail-Merge MergeFields
In light of the fact that Word and Excel use the same formatting codes, we could not help wondering why they don’t use the same function format. For example, why not have the MergeField function look something like:
{ MERGEFIELD(Donation,"$#,##0.00") }
Good question. You’ll have to ask Microsoft.
Note: Before you start cursing me out, try to remember that when you add or change a numeric switch, the effect may not be shown immediately. You either have to update the field (right-click it and choose Update Field), or click the button Mailings > Preview Results. On one occasion I had to do this 2 or 3 times. If you are using the Mail-Merge Wizard, you may have to go back a step and return to see the effect of your changes. (Why? Again, you will have to ask Microsoft.)
The numeric switches in merge fields work well, but I find the process very difficult to remember. (“Is it a forward slash or a back slash?”) Also, it is very easy to make a mistake. Fortunately, for some users there is another way:
3. Use a DDE Link
The above approaches are relatively simple, but if you have more than a few fields that require formatting, they can drive you into early retirement. At the very least, they require you to remember format codes that, while similar, are used in very different ways.
A much more elegant and simple solution is to have Word link to the Excel workbook via a DDE (Dynamic Data Exchange) link rather than the usual, presumably non-dynamic, linking process. That sounds a little daunting, but if you are smart enough to do Mail Merge, then DDE can a piece of cake. It is a simple two-step process, and the first step — enabling Word to open a file via DDE — has to be done only once.
[Warning: Does DDE work in Office 2016 or 2019? Dynamic Data Exchange is an old technology, and it looks like Microsoft is in the process of pulling the plug on it. Sometimes it works for me in these fairly new versions, but lately it rarely works.
One trick you could try is to be sure that the Excel data source is open before you access it from Word. As usual for Excel data sources, the table must begin on the first row of the first worksheet in the workbook file. If you do this, and have some patience, you should be able to get it to work. But, beware: It may not work all the time.]
To set up Word for DDE links, do the following:
- Click: File > Options.
- Click the Advanced tab on the left and scroll down to the section General.
- Check the box labeled Confirm file format conversion on open.
That’s all for the first step, and you never have to do it again. From now on, your copy of Word can open up many different types of files, and can open these by different avenues, including DDE. 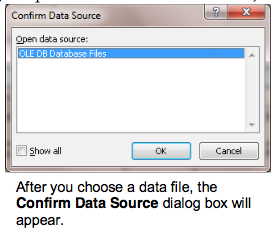 The only side effect of the above is that every time you open a non-Word file with Word, the program will give you a chance to change your mind. No problem.
The second and last step has to be done each time you select a data source for your Mail Merge operation (either in Step 3 of Word’s Mail Merge Wizard or after you press the Select Recipients button in the Mailings ribbon). Relax. It is just three additional mouse clicks:
- After you have chosen the data file you would like to use, a new “Confirm Data Source” dialog box will appear.
- The default type of link is by OLE, but that is not what you want.
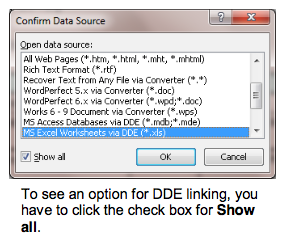
 In the Confirm Data Source dialog box, click the check box to Show all.
- In the expanded list of file types, choose MS Excel Worksheets via DDE (*.xls). (Choose this even if you are using the newer Excel file format: *.xlsx.)
- If asked, confirm that you are selecting the Entire Spreadsheet.
 In the Confirm Data Source dialog box, click the check box to Show all.
If you have already selected a spreadsheet for your Word document, you may have to select it again, this time via a DDE link. That’s it! From now on, your Excel formatting will travel over to Word Mail Merge documents fairly intact. One huge caveat here: Make sure that the data you want to merge are in the first sheet of your Excel workbook. (It took us two hours to finally figure out that DDE does not see anything but the first Excel worksheet!)
It is a shame that Microsoft has not replaced DDE with a new technology that works in a similar manner. When DDE worked, it was marvelous. Let’s hope an equally marvelous technology will appear in the near future.
Does DDE work for you in Word 2016 or 2019? If you have a comment about that or any other issue related to Mail Merge number formatting, please let me know. Click here to post an anonymous comment.
281
281 people found this article helpful
Can you round numbers in Word?
Updated on October 11, 2020
When using Excel spreadsheets in a mail merge process, many users frequently run into difficulty formatting the fields that contain decimals or other numerical values. To ensure the data contained in the fields are inserted correctly, one must format the field, not the data in the source file.
Unfortunately, Word does not provide a way for you to change how many decimal places are displayed when working with numbers. While there are ways to work around this limitation, the best solution is to include a switch in the merge field.
Instructions in this article apply to Word for Microsoft 365, Word 2019, Word 2016, Word 2013, and Word 2010.
What Is a Switch?
Field code switches allow you to modify the resulting data that you merge into a document. There are two types of switches in Word:
- General switches help you format the data. For instance, you could use a general switch to select uppercase letters.
- Field switches are field-specific, changing the behavior of the fields to which they are applied.
All switches begin with a backslash, followed by a character (or characters) that describe its function. A Numeric Picture Field Switch (#) determines the display of a numeric result.
How to Perform The Numerical Switch Function
Learn how to use the Numeric Picture Field Switch (#) to specify how many decimal places to display in your Word mail merge.
If the result of a field is not a number, this switch has no effect.
-
With the mail merge main document open, press Alt + F9 to view the field codes.
The field code will look something like {MERGEFIELD “fieldname” }.
-
Directly after the end quote around the field name type # followed by:
- 0 for rounded whole numbers
- 0.00 if you want to round the number to two decimal places (or 0.000 if you want to round the number to three decimal places and so forth)
- ,0 for rounded whole numbers with a thousands separator
-
Once you have added your field switch, press Alt + F9 to display the fields instead of the field codes.
Your number will appear rounded to the decimal place you specify. If it does not display immediately, refresh the document by minimizing it to the toolbar and reopening it. If the field value still does not display correctly, you may need to refresh the document again or close and re-open your document.
Thanks for letting us know!
Get the Latest Tech News Delivered Every Day
Subscribe
Слияние почты — полезный инструмент для создания набора документов, которые по сути одинаковы, но каждый документ содержит уникальные элементы. Однако, когда мы объединяем несколько писем, мы должны уделять больше внимания формату даты, валюты и числа. Из этого туториала Вы узнаете, как правильно форматировать дату, валюту и число в словах во время слияния почты.
Правильное форматирование даты во время слияния почты в Word
Правильное форматирование валюты и числа при слиянии писем в Word
Прежде чем мы изменим формат даты, числа и валюты при слиянии писем, нам необходимо сначала применить следующие операции.
Шаг 1: выберите поле слияния, которое вы хотите изменить. В данном случае это поле Дата.
Шаг 2: нажмите Shift + F9 чтобы сделать кодировку поля видимой. Выбранное вами поле теперь должно выглядеть так:
{MERGEFIELD DATE}, {MERGEFIELD CURRENCY} или {«Percent»}
 Правильное форматирование даты во время слияния почты в Word
Добавьте следующие данные форматирования: @ «дд ММММ гггг» в файл слияния даты. И поле слияния даты должно быть таким:
{ДАТА ОБЪЕДИНЕНИЯ @ «ММММ д, ггг»}
Формат даты будет таким:

Примечание:вы можете изменить формат даты по своему усмотрению. Другие возможные форматы: • дд / МММ / гггг, • д / МММ / гг, • д ММММ гггг.
Правильное форматирование валюты и числа при слиянии писем в Word
Добавьте следующие данные форматирования # $, 0.00 в файл слияния валюты, и поле слияния валюты должно выглядеть так:
{MERGEFIELD CURRENCY # $, 0.00}
![]()
Примечание:‘ # $, 0.00’ в поле называется числовым переключателем изображения. Другие возможности включают:
(1). # 0 для округленных целых чисел
(2). #, 0 для округленных целых чисел с разделителем тысяч
(3). #, 0.00 для чисел с точностью до двух десятичных знаков, с разделителем тысяч
(4). # $, 0 для округления всего доллара с разделителем тысяч
(5). # «$, 0.00; ($, 0.00); ‘-‘» для валюты, с квадратными скобками вокруг отрицательных чисел и дефисом для 0 значений
Кроме того, иногда число может быть процентным, может потребоваться отредактировать поле {«Percent»}, чтобы получилось {= «Percent» * 100 # 0.00%}.
Рекомендуемые инструменты для повышения производительности Word


Kutools For Word — Более 100 расширенных функций для Word, сэкономьте 50% времени
- Сложные и повторяющиеся операции можно производить разово за секунды.
- Вставляйте сразу несколько изображений из папок в документ Word.
- Объединяйте и объединяйте несколько файлов Word из папок в одну в желаемом порядке.
- Разделите текущий документ на отдельные документы в соответствии с заголовком, разрывом раздела или другими критериями.
- Преобразование файлов между Doc и Docx, Docx и PDF, набор инструментов для общих преобразований и выбора и т. Д.
Комментарии (66)
Оценок пока нет. Оцените первым!
Функция слияния почты в Microsoft Word — одна из функций, которые нравятся пользователям. Он работает при создании пользовательских этикеток, шаблонов, электронных писем или отчетов. Когда вы знаете, как им пользоваться, вы можете сэкономить много часов работы.
Однако одна из проблем слияния почты заключается в том, что он не может правильно форматировать числа из электронных таблиц Excel. Например, результат продаж в электронной таблице Excel равен 100, но он превращается в Word 99.99999999996. Чтобы исправить это, мы можем отредактировать электронную таблицу, отредактировать документ слияния почты или просто изменить способ связи двух файлов. Хотя последние несколько человек знают об этом, это может быть лучший способ, за исключением того, что он больше не работает в Word 2016.
Примечание. Следующие меры реализованы в Office 2016, но по-прежнему применяются в других версиях Word и Excel.
- 1. Используйте «Переключатель номера» в Word.
- 2. Измените таблицу Excel.
- 3. Использование ссылок DDE
1. Используйте «Переключатель номера» в Word.
Мы сделаем первый способ редактирования документа Word. Здесь вы будете использовать код желаемого числового формата для поля слияния в документе Word. Поле слияния в основном сообщает Word, какой столбец в таблице Excel содержит данные для преобразования. Чтобы применить форматирование к полю, вы должны использовать числовой переключатель (ранее называвшийся переключателем изображения) в коде поля этого поля.
Во-первых, вам нужно увидеть фактический код поля, открыв документ «Слияние» и щелкнув вкладку «Рассылки» в верхней части окна. Обязательно отключите предварительный просмотр результатов, чтобы вы могли видеть поля слияния. Затем щелкните правой кнопкой мыши поле слияния почты (например, «Пожертвование») и выберите параметр «Переключить код поля». Теперь вы должны увидеть фактический код поля (в фигурных скобках, как в {MERGEFIELD Donation}) для этого поля. Измените коды полей, просто вставив код переключателя в конец кода поля, например:
{Пожертвование MERGEFIELD # $ #, ## 0.00}
Wors предлагает множество кодов изображений, вот 4 примера с соответствующими результатами:
{MERGEFIELD Cost # 00.00} 01.00 {MERGEFIELD Sales # $ ###} 15 долларов США
{MERGEFIELD Sales # $ #, ## 0.00} 1500.00 $
{MERGEFIELD Date @ «MMMM d»} 26 ноября
Как видите, числовой код переключения совпадает с кодом формата Excel, за исключением того, что за ними следует «#» для числа и «@» для даты.
Примечание: используйте только кавычки в коде даты, не используйте для кодов.
Чтобы увидеть больше кодов, см. Таблицу ниже или выполните поиск числовых кодов переключателей в Microsoft Word в Интернете.
Вот несколько примеров числовых кодов полей для данных в столбце «Продажи» в электронных таблицах Excel.
Цифровой переключатель для поля слияния слияния писем
Фактически, Word и Excel используют один и тот же код формата, но не используют один и тот же формат функций. Например, нет функции MergeField, подобной приведенной ниже:
{MERGEFIELD (Пожертвование, «# $, ## 0,00»)}
Примечание. При добавлении или изменении числового переключателя эффект может измениться не сразу, вам необходимо обновить поле, щелкнув по нему и выбрав «Обновить поле» или нажав кнопку «Рассылки»> «Предварительный просмотр результатов». Иногда приходится делать это 2 или 3 раза. Если вы используете мастер слияния писем, вам, возможно, придется вернуться к предыдущим шагам, чтобы увидеть изменения.
2. Измените таблицу Excel.
В электронной таблице Excel вставьте столбец, используя формулу для преобразования числа или даты в Excel в текстовый формат, который будет отображаться в слиянии писем.
- Экономьте время с помощью этих функций форматирования текста в Microsoft Excel
Для этого воспользуемся функцией ТЕКСТ в Excel. Эта функция имеет функцию преобразования чисел или дат в соответствующий текстовый формат. Однако у этого метода есть недостаток в том, что вам необходимо знать определенные коды формата. Хотя эти коды идентичны коду, используемому в функции форматирования настраиваемых чисел Excel, большинство пользователей редко их видят.
Например: формулы ТЕКСТ (B3, ‘$ #, ## 0.00’) и ТЕКСТ (C5, ‘M / dd / yy’) преобразуют числа и даты в текст (в этом случае преобразование станет ’12 345,67 долларов США’ и ’12 / 01.10′.
Совет: вам следует отформатировать поле, содержащее эти формулы, в другой форме (курсив, полужирный шрифт, другие цвета), чтобы знать эти числа только в виде обычного текста. В более старых версиях Excel эти числа не используются для вычислений, но в Excel 2016 вы можете использовать их во всех формулах, кроме таких функций, как СУММ и СРЕДНЕЕ. Преимущество форматирования дат и чисел в виде текста заключается в том, что при переключении с Excel на документ Word Mail Merge не возникает беспорядка.
Код формата для функции ТЕКСТ
Ниже приведена таблица кодов, обычно используемых в текстовой функции.
Примечание: «0» и «#» действуют как заполнители для чисел, но «0» заставляет 0 в начале или в конце, «#» будет заменен числом, если оно не является верхним или нижним 0. Следовательно, код «00000» ‘гарантирует, что ноль в начале не будет удален из почтовых индексов Нью-Джерси.
Коды чисел, дат и времени можно использовать в текстовом или произвольном числовом формате Excel. Однако есть разница между тем, как эти коды работают в Excel и Word в Microsoft Office 2013. В Excel вы можете использовать M или m в течение месяцев или минут. В большинстве случаев Excel достаточно умен, чтобы определить, какую единицу вы используете, но Word не так умен, вам нужно использовать заглавные буквы для месяца и часто писать в течение минут. Кроме того, Excel добавил код MMMMM к результату единственного сокращения месяца (например, J, F, M, A и т. Д.)
Примечание: при преобразовании этих чисел в текст они не используются в функциях СУММ или СРЕДНЕЕ, если вы хотите, вам нужно преобразовать их снова, используя функцию ЗНАЧЕНИЕ.
ОКРУГЛ (функция ОКРУГЛ.)
Вместо функции ТЕКСТ некоторые пользователи предпочитают использовать функцию ОКРУГЛ, чтобы удалить дополнительные десятичные числа. Функция ОКРУГЛ. Округляет числа в большую или меньшую сторону до указанного вами десятичного разряда. Преимущество в том, что числа округления не в виде текста, вы все равно можете использовать их для расчета. Функция ОКРУГЛ может хорошо работать при слиянии писем, но редко используется, потому что:
- Функция ОКРУГЛ удалит символ доллара или разделитель тысяч (запятую).
- Функция ОКРУГЛ удалит нули в конце.
- Иногда функция ОКРУГЛ отображает неправильные десятичные разряды при переключении на слияние. Например, в документе «Слияние» отображается 4 десятичных разряда, в то время как функция округления указывает 2 или 3 разряда.
В редких случаях функция ОКРУГЛ. Также отображает ошибки в слиянии писем, например, вместо 1.0014, слияния, показывающего 1.0013.
3. Использование ссылок DDE
Вышеупомянутые два метода относительно просты, но вам нужно помнить код формата и в некоторых случаях один и тот же код, но использование также отличается.
Более простой способ — связать Word с Excel с помощью ссылок DDE (динамический обмен данными). Звучит сложно, но если вы можете объединить почту, DDE не усложнит вам задачу. Вам нужно сделать всего два шага, и первый шаг — активировать Word, чтобы открыть файл через DEE (этот шаг нужно сделать только один раз).
Как упоминалось выше, DDE не работает в Office 2016. Динамический обмен данными — старый метод, и, похоже, Microsoft собирается отказаться от него. Иногда это работает в Office 2016, а иногда нет. Уловка для его работы в Office 2016 заключается в том, что источник данных Excel необходимо открыть перед доступом к нему из Word. А в Excel таблица должна начинаться с первой строки первого рабочего листа в файле.
Чтобы настроить ссылку DDE в Word 2013, выполните следующие действия:
Шаг 1 . Щелкните Файл> Параметры.
Шаг 2 . Щелкните вкладку «Дополнительно» слева и прокрутите до раздела «Общие».
Шаг 3 . Щелкните Подтвердить преобразование формата файла в открытом окне.
Это первый шаг, и вам не придется делать это снова. С этого момента копии Word будут открываться во многих различных типах файлов и открываться с другими путями, включая DDE. Недостатком этого метода является то, что каждый раз, когда вы открываете в Microsoft Word файл, отличный от документа Word, программа позволяет вам изменить свой выбор.
Второй шаг — это последний шаг, который вам нужно делать каждый раз, когда вы выбираете источник данных для слияния писем (до шага 3 в руководстве по слияниям писем или после нажатия кнопки «Выбрать получателей» на ленте «Рассылки»). Следуйте инструкциям ниже:
Шаг 1 . После выбора файла данных, который вы хотите использовать, появится диалоговое окно «Подтвердить источник данных».
Шаг 2 . Тип по умолчанию — OLE, но вы можете изменить его на другой тип. В диалоговом окне Подтверждение источника данных щелкните Показать все. В развернутом списке типов файлов выберите Листы MS Excel через DDE (* .xls). (Выберите этот параметр, если используется более новый формат файла Excel * .xlsx). Если будет предложено, подтвердите, что вы выбрали всю электронную таблицу.
Если вы выбрали электронную таблицу для документа Word, вам нужно выбрать ее снова, на этот раз через ссылку DDE. Отныне формат Excel будет перенесен в документ Word Mail Merge в неизменном виде.
Предупреждение: убедитесь, что документ, который вы хотите объединить, должен находиться на первом листе документа Excel.
Выше приведены способы исправить ошибки форматирования при использовании слияния в Word. Желаю всем успехов!
In this article, we will present you 5 different ways to address the changing of number format while apply mail merge feature in Word.
Now and then, we will use mail merge function in Word to import a batch of data from Excel files. However, things can go in a very different way sometimes. For example, when it comes to data with decimals, we are likely to get a number with multiple decimal digits, which can undermine the document outlook. Below is an example:

Therefore, we here pick up 5 effectual methods for you to address such a problem. As this article will mainly focus on deal with the decimal issue, we will skip the steps of how to use mail merge feature in Word. Just for reference, you can read one of our previous articles: How to Create Personalized Letters or Emails in Batches via Mail Merge Feature in Word
Method 1: Alter Field Codes
- Firstly, after you insert merge field, you should not rush to click “Finish& Merge”. Instead, right click on the field.
- Then choose “Toggle Field Codes” on the list-menu.

- Now input “#”0.00” just before the symbol “}”. To type “#”0.00” means you want to keep 2 decimal digits in the number you get. Similarly, if you need just 1 decimal digit, you can enter “#”0.0”.

- Next, place cursor inside field codes and press “F9” or right click and choose “Toggle Field Codes” again.
- Then you can click “Preview Results” to see if the results are right. After this, you can comfortably finish the left steps to fulfill the task.


Method 2: Convert Source Data to Text Format
- To begin with, open the Excel File which contains source data.
- Then, select the target row or column of data.
- Next go to “Number” group under “Home” tab, and choose “Text” for “Number Format”.

- Remember to save the Excel file.
- Then open Word file, and conduct the steps of mail merge.

Method 3: Insert a New Row into Table
- First thing, open the Excel file.
- Then select the row below the title.
- Next right click.
- And choose “Insert” on the menu to insert a new row into the table.

- Then enter any letter you like in the cell above that of the first number. For instance, you may type “a” there.
- Next, when you open Word to start mail merge, you will finally get a page with letter “a”. Just delete it and the rest numbers shall remain in correct format.

Method 4: Convert Excel Table to a Word One
- First and foremost, open the Excel file.
- Secondly, click “File” tab.
- Then click “Save As” option.

- In “Save As” window, first find a storage location.
- Then choose “Web Page” in “Save as type”.
- Next, on the left-down corner, select “Selection: Sheet”.
- And click “Save” button.

- Now in “Publish as Web Page” dialog box, first you choose the item to publish from the drop-down list of “Choose”.
- Next, click “Publish”.

- Now go to find the web file and right click on it.
- Next, choose “Open with”.
- And click “Microsoft Word” option to open the file in Word.

- Now ensure there is no single space before the first paragraph mark. If any, just delete them.

- And click “File” tab.
- Then click “Save As”.

- In “Save As” window, choose to save the file either with extension of “.doc” or “.docx”.
- Then click “Save”.

- Lastly, follow the steps to finish mail merge.


Method 5: Confirm File Format Conversion on Open in Word
- First, make sure the source file is saved in extension of “.xls” and the table includes source data is on the first sheet.
- Then open Word, and click “File” tab.
- Next click “Options” to open “Word Options” dialog box.

- And choose “Advanced” next.
- Then scroll down to “General” page. Check the “Confirm file format conversion on open” box.
- Click “OK” to save change.

- Next thing, after finishing editing the document, you click “Mailings” tab.
- Then click “Select Recipients”.
- And choose “Use Existing List”.

- Now in “Select Data Source” dialog box, select the right file then click “Open”.

- In “Confirm Data Source” dialog box, choose “MS Excel Worksheets via DDE”.
- Then click “OK”.

- Next the “Microsoft Excel” dialog box will pop up. Choose “Entire Spreadsheet”.
- And click “OK”.

- Take the usual way to complete mail merge.


Comparison of 5 Methods
| Methods | Advantages | Disadvantages |
| Method 1: Alter Field Codes | 1. Simple steps comparatively
2. You can choose decimal digits. 3. No need to change source file 4. This method won’t add extra document page. |
All data will have the same decimal digits. |
| Method 2: Convert Source Data to Text Format | 1. Simple steps comparatively
2. Decimal digits will be the same as that in source file. 3. This method won’t add extra document page. |
It will alter the number format in source file. |
| Method 3: Insert a New Row into Table | 1. Simple steps comparatively
2. Decimal digits will be the same as that in source file. |
1. You have to insert a new row insource file.
2. You have to delete the extra page manually. |
| Method 4: Convert Excel Table to a Word One | 1. This method won’t add extra document page.
2. Decimal digits will be the same as that in source file. 3. No need to change source file 4. You won’t be confined due to Excel file formatting. |
1. More steps comparatively
2. You can only get data form one sheet each time. |
| Method 5: Confirm File Format Conversion on Open in Word | 1. This method won’t add extra document page.
2. Decimal digits will be the same as that in source file. 3. No need to change source file |
1. More steps comparatively
2. It may require longer response time sometimes. 3. The source file must be saved in “.xls” format. 4. You can only get the data from the first worksheet. |
File Corruption Always Find its Opportunity
In the above article, we talked operations between Word documents and Excel files. And as the demand varies, different methods are employed. But doubtlessly, all these moves can largely increase the possibility of getting Word files damaged. Then, a powerful Word file error repair tool is what you will badly need.
Author Introduction:
Vera Chen is a data recovery expert in DataNumen, Inc., which is the world leader in data recovery technologies, including damaged Excel xls repair and pdf repair software products. For more information visit www.datanumen.com
As usual, We want to share tutorials on the most fun topics for all of you, Good guys! This time there is a review on how to format mail merge data in Microsoft Word.
Have you heard of this tutorial yet? If not, let’s just read the following article to the end.
HOW TO CREATE A MAIL MERGE DATA FORMAT IN WORD
How to create a mail merge data format in Microsoft Word referred to here, such as font formatting, making upper and lower case letters, and creating formats for dates, currencies, and numbers.
Let’s discuss it one by one!
Formatting Text in Mail Merge Data
The first tutorial is how to format the text in mail merge data, whether from Excel or other sources. These data are called data fields.
Next, if you want to bold the data or change the font size and type, the format is as follows:
- Select the fields you want to format in a mail merge document in Microsoft Word, including the double square brackets (« »).
- On the Home tab, in the Font group, select the desired format.
- For this method, you can give the format that is in the Font in this Word mail merge data, including:
- Change the font size and type.
- Bold (CTRL + B), italic (CTRL + I), and underline (CTRL + U).
- Cross out text.
- Giving format subscript (CTRL + =) dan superscript (CTRL + SHIFT + +).
- Highlight the text.
- Change color.
Create Uppercase and Lowercase Letters on Data Mail Merge
There is also a way to change the uppercase (capital) and lowercase letters in the mail merge data in Word. But before that, you need to add a unique ‘formatting switch’ code, as described below:
- In the MS. Word mail merge document, press the shortcut key ALT + F9 to display the field code. Example field code: { MERGEFIELD Name }.
- Next to the field name, press the space bar and type one of the following codes:
- * Caps – to capitalize the first letter of each text. Example: Lorem Ipsum Sit Amet.
- * FirstCap – to capitalize the first letter in the text. Example: Lorem ipsum dolor sit amet.
- * Upper – to capitalize all letters. Example: LOREM IPSUM DOLOR SIT AMET.
- * Lower – to make all letters lowercase. Example: lorem ipsum dolor sit amet.
- Next, press the shortcut key ALT + F9 again on the keyboard to hide the field code.
Creating Number, Currency, and Date Formats in Mail Merge
Next is a tutorial on displaying or generating number formats, currency symbols, percentage symbols, and dates in Microsoft Word mail merge.
The steps are as follows:
- In a Microsoft Word mail merge document, press the shortcut key ALT + F9 to display the field code.
- Press the ALT + F9 keys again to hide the field code.
- Next, next to the field name, press the space bar and type as follows:
- Thousands Separator – Add a switch (in bold) to the code field. Example: { MERGEFIELD Number # #.### }
- Decimal Separator – Add a switch to the code field. Example: { MERGEFIELD Number # #.###,00 }
- Stair Format – Add a switch to the code field. Example: { MERGEFIELD Date @ ” dd MMMM yyyy” } or { MERGEFIELD Date @ ” dd-MM-yyyy” }
So, that was the tutorial on how to format the mail merge data in Microsoft Word, whether it’s text formatting, uppercase, and lowercase letters, as well as number and symbol formats.

MS Word
How to Make Letterhead in Microsoft Word
![]()
Published
1 year ago
on
November 18, 2021

How to make a letterhead in Word correctly and neatly is actually easy, but surely there are still many of you who don’t know how to make it.
In an official letter, of course, there is a letterhead and there is always a line at the bottom right. Well, it turned out to be quite easy to make you know.
Apart from being the introduction to a letter, letterhead is also commonly used as a place to write the identity of the letter, such as the identity of the sender and recipient.
For those of you who want to know how to make it, here we explain in full the steps to make a letterhead in Word for you.
HOW TO MAKE LETTERHEAD IN WORD
You should know how to make a letterhead in Word this time, guys, especially when you want to send letters between agencies.
Although not all agencies use it, it doesn’t hurt you to try and find out how to make this letterhead, here are the steps!
- First, open your Word.
- Place the cursor at the back of the last word of the letterhead
- Then select the menu Borders – Borders and Shading.
- After the border menu appears, all you have to do is select the line you want on the menu with a sign like this.
Don’t rush to click Ok, because there’s one more thing you have to do to make it, guys. In the section below, remove it or set it like this to make the line only exist at the bottom, and then Ok.
Yeah, you have successfully drawn the line, Guys, it’s easy and fast, right, how to make a letterhead in Word?
You don’t need to be confused anymore about how to make it. For beginners, making letterhead or letterhead does sound quite difficult.
In fact, how to make a letterhead in Word is fairly easy as long as you already know the procedure. After all, the letterhead cannot be made casually because it is an official identity.
The letterhead contains the official identity of an institution, agency, or company. Well, you can create an official identity on the letterhead in Microsoft Word.
MS Word
How to Create a Background in Microsoft Word
![]()
Published
1 year ago
on
November 18, 2021

This way of making a background in Word aims to beautify the appearance of the document and make it more attractive Guys.
Usually, this is often found in the use of proposals, certificates, covers, and not infrequently in job applications.
With this function, how do you make it? It’s so easy. Yes, although there are several ways you can do this, you can follow this tutorial in full.
HOW TO MAKE A BACKGROUND IN WORD
This background function is very useful if you want to create a document that upholds the originality of Guys, for example, a thesis.
In addition to having to know how to create a table of contents in Microsoft Word, you may also need to know how to create a background in your thesis document, especially in showing the results of the tests you did.
How to make this background is also needed if you want to make an official letter from the agency. Besides needing to know how to make letterhead lines in Word, you also need to know how to add a background to the letter. Here’s how:
- The first thing you can do is change the color.
- Go to Design – Page Color – and immediately choose a color like this.
That is the easiest way and you can change the color according to your needs or tastes, guys. In addition to this method, you can also replace it with an image that you have.
The method is almost the same, guys, pay attention to the following rare:
- Go to the Design menu.
- Click Page Color.
- Select Fill Effects.
- Next, select the tab Picture – Select Picture – From a File.
- Then find the image you have and press Ok
- Finished! The background will change.
But, you also need to remember that both methods will not appear when you print either color or image.
To make it appear when printing, then you need to go to the File menu – Options – Display – and check the Print background colors and Image.
Well, after you go through these few steps, the background will change and also enter when you print, GRATZ!!! It’s easy to make a background in Word.
MS Word
How to Create a Signature in Word
![]()
Published
1 year ago
on
November 11, 2021

There are several ways to make a signature in Microsoft Word. And the method is really easy, just follow the steps below, guys!
Making a signature is really needed, especially in the digital era like now, right? Of course, you need a signature in your Word file, so from that our Team will provide this tutorial in detail.
Actually, you can also use a third application or additional devices such as pens that support your PC or laptop. But this is the easiest way without using other devices and applications Guys.
HOW TO CREATE A SIGNATURE IN WORD
You need to sign first, Guys on a piece of white paper. Make sure the paper is really white and the pen has colour ink that you can really see clearly.
This function is for later photos or files the resolution will be smaller Guys. Not only that, but the customized color saturation will also reduce the thickness of the pen color, you know.
So make sure you give a signature with a clear enough emphasis. Here’s how to create a signature in Word:
- Prepare a white paper with a signature on it. Photos using a smartphone or you can directly scan the signature through a scanner.

- You can reduce the resolution and crop it so that the photo focuses on the signature. For convenience, click the image file > Edit.
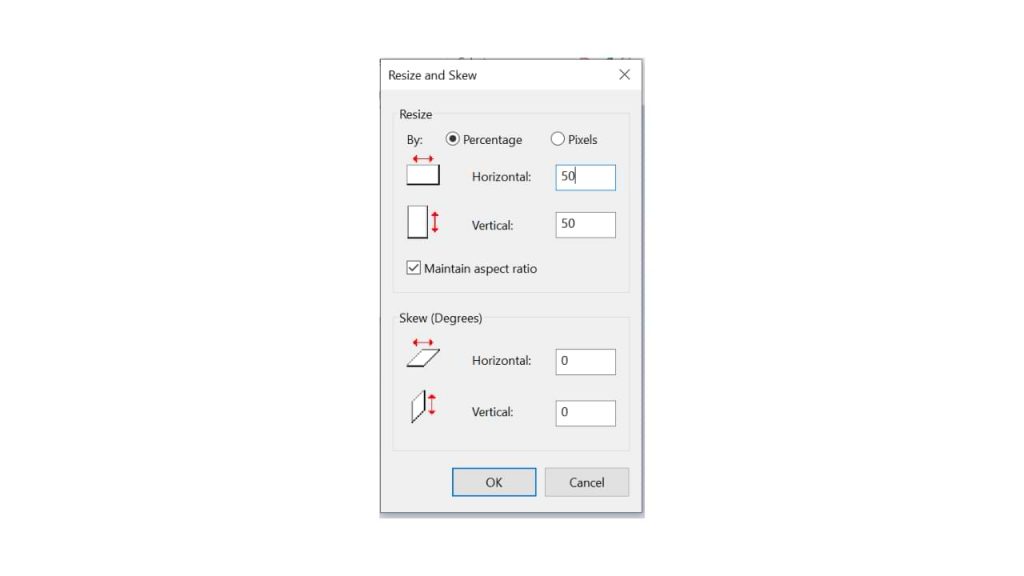
- On the Paint menu, you can resize to reduce the resolution. Choose 50 per cent resolution, fill Horizontal 50 and Vertical 50
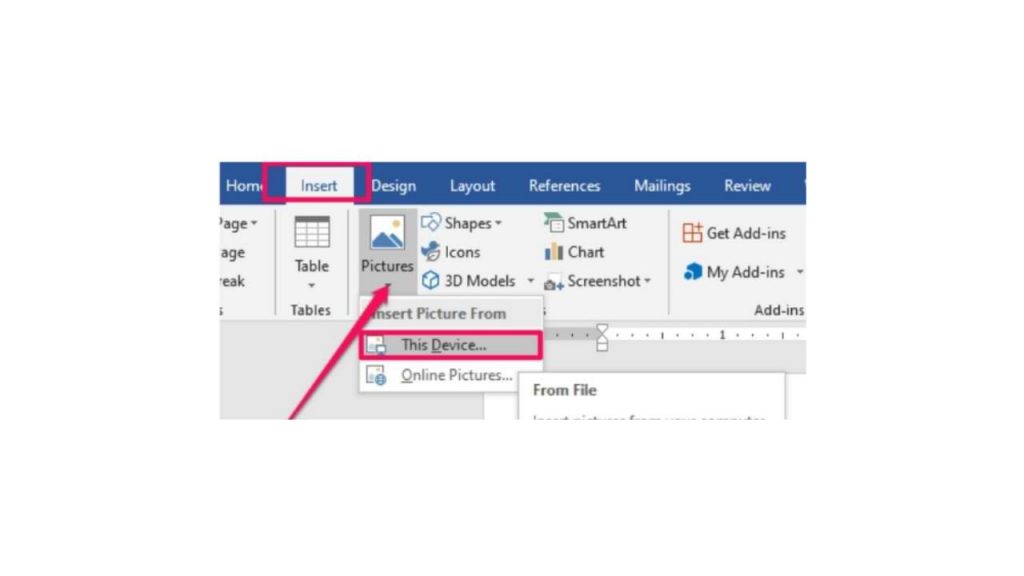
- Hover over the exact position of the word you want to add a signature to. Click Insert > Picture > insert the previous signature image file.
- After you insert the image, reduce the size again using the cursor for more precision.
- Double click on the image.
- On the Format menu, select the Color > Recolor > Black and White 50 per cent submenu.
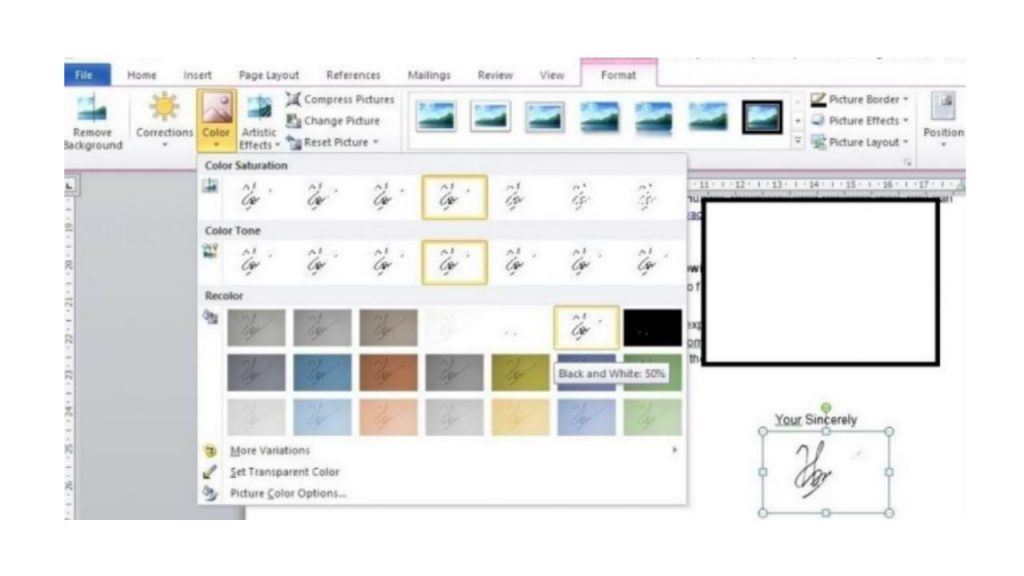
- if your signature is not clear, double click on the image, select menu Correction > Brightness 0 per cent (Normal) Contrast 40 per cent.
You can change the last two steps depending on the contrast and color saturation you want, guys. So you can at the same time adjust the thickness of your signature that has entered the word, so guys.
I also said what Guys, how easy it is to make a signature in Microsoft Word! The most important thing is to make sure your signature is clear enough, and the photos are of high enough quality. Obviously, so that later your signature looks good, it doesn’t break.