
Word for Microsoft 365 Outlook for Microsoft 365 Project Online Desktop Client Word 2021 Outlook 2021 Project Professional 2021 Project Standard 2021 Word 2019 Outlook 2019 Project Professional 2019 Project Standard 2019 Word 2016 Outlook 2016 Project Professional 2016 Project Standard 2016 Office 2016 Word 2013 Outlook 2013 Project Professional 2013 Project Standard 2013 Office 2013 Word 2010 Outlook 2010 Office 2010 Word 2007 Outlook 2007 Office 2007 InfoPath 2013 InfoPath Edit Mode 2010 InfoPath Filler 2013 Word Starter 2010 More…Less
The fastest way to create a basic hyperlink in a Microsoft 365 document is to press ENTER or the SPACEBAR after you type the address of an existing webpage, such as http://www.contoso.com. Microsoft 365 automatically converts the address into a link.
In addition to webpages, you can create links to existing or new files on your computer, to email addresses, and to specific locations in a document. You can also edit the address, display text, and font style or color of a hyperlink.
Notes:
-
If you want to remove links or stop Microsoft 365 from automatically adding hyperlinks, see Remove or turn off hyperlinks.
-
This article applies to desktop versions of Word, Excel, Outlook, and PowerPoint. A simplified set of hyperlink features is offered on Microsoft 365 Online. If you have a desktop version of Microsoft 365, you can edit your document there for more advanced hyperlink features, or you can try or buy the latest version of Microsoft 365.
-
Select the text or picture that you want to display as a hyperlink.
-
On ribbon, on the Insert tab, select Link.
You can also right-click the text or picture and click Link on the shortcut menu.
-
In the Insert Hyperlink box, type or paste your link in the Address box.
Note: If you don’t see the Address box, make sure Existing File or Web Page is selected under Link to.
Optionally, type different display text for your link in the Text to display box.
Note: If you don’t know the address for your hyperlink, click Browse the Web
 to locate the URL on the Internet and copy it.
 to locate the URL on the Internet and copy it.
Optional: To customize the ScreenTip that appears when you rest the pointer over the hyperlink, click ScreenTip in the top-right corner of the Insert Hyperlink dialog box and enter the text you want.
You can add a hyperlink to a file on your computer, or to a new file that you want to create on your computer.
-
Select the text or picture that you want to display as a hyperlink.
-
Press Ctrl+K.
-
Under Link to, do one of the following:
-
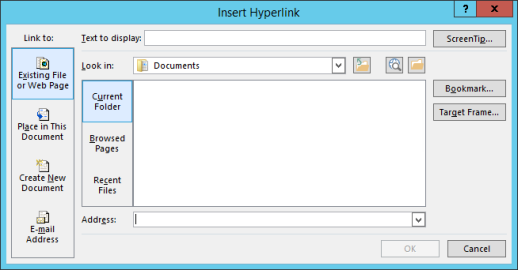
To link to an existing file, click Existing File or Web Page under Link to, and then find the file in the Look in list or the Current Folder list.
-
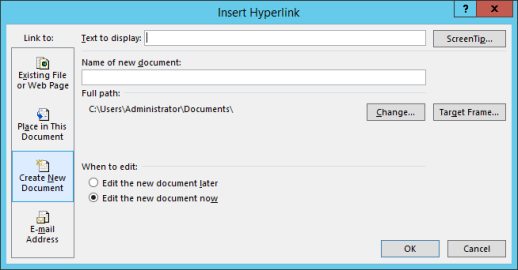
To create a new, blank file and link to it, click Create New Document under Link to, type a name for the new file, and either use the location shown under Full path or browse to a different save location by clicking Change. You can also choose whether to Edit the new document later or open and Edit the new document now.
-
Optional: To customize the ScreenTip that appears when you rest the pointer over the hyperlink, click ScreenTip in the top-right corner of the Insert Hyperlink dialog box and enter the text you want.
-
Select the text or picture that you want to display as a hyperlink.
-
Press Ctrl+K.
You can also right-click the text or picture and click Link on the shortcut menu.
-
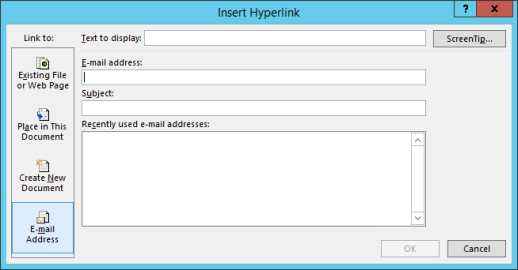
Under Link to, click E-mail Address.
-
Either type the email address that you want in the E-mail address box, or select an address in the Recently used e-mail addresses list.
-
In the Subject box, type the subject of the message.
Note: Some web browsers and email programs might not recognize the subject line.
Optional: To customize the ScreenTip that appears when you rest the pointer over the hyperlink, click ScreenTip in the top-right corner of the Insert Hyperlink dialog box and enter the text you want.
You can also create a hyperlink to a blank email message by simply typing the address in the document. For example, type someone@example.com, and Microsoft 365 creates the hyperlink for you (unless you turned off automatic formatting of hyperlinks).
You can create hyperlinks that link to a Word document or Outlook email message that includes heading styles or bookmarks. You can also link to slides or custom shows in PowerPoint presentations and specific cells and sheets in Excel spreadsheets.
Tips:
-
Learn about adding bookmarks.
-
To add a heading style, select your heading text, click the Home tab in Word or the Format Text tab in Outlook, and select a style in the Styles group.
Create a hyperlink to a location in the current document
-
Select the text or picture that you want to display as a hyperlink.
-
Press Ctrl+K.
You can also right-click the text or picture and click Link on the shortcut menu.
-
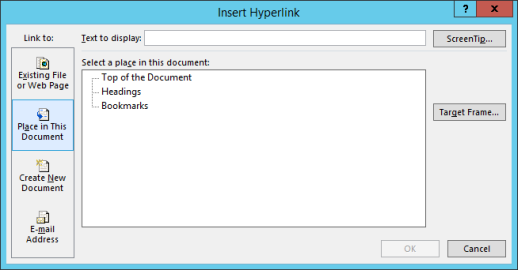
Under Link to, click Place in This Document.
-
In the list, select the heading (current document only), bookmark, slide, custom show, or cell reference that you want to link to.
Optional: To customize the ScreenTip that appears when you rest the pointer over the hyperlink, click ScreenTip in the top-right corner of the Insert Hyperlink dialog box and enter the text you want.
Create a hyperlink to a location in another document
-
Select the text or picture that you want to display as a hyperlink.
-
Press Ctrl+K.
You can also right-click the text or picture and click Link on the shortcut menu.
-
Under Link to, click Existing File or Web Page.
-
In the Look in box, click the down arrow, and find and select the file that you want to link to.
-
Click Bookmark, select the heading, bookmark, slide, custom show, or cell reference that you want, and then click OK.
Optional: To customize the ScreenTip that appears when you rest the pointer over the hyperlink, click ScreenTip in the top-right corner of the Insert Hyperlink dialog box and enter the text you want.
-
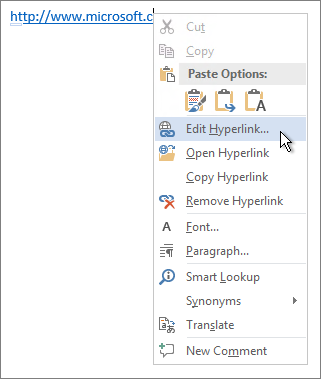
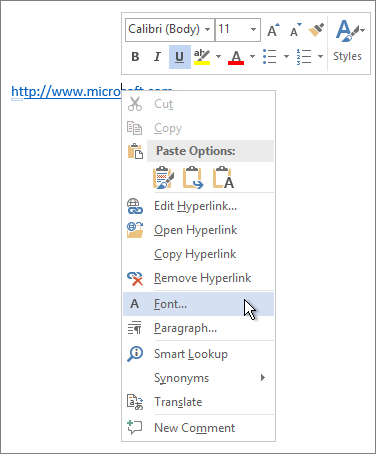
To change the address or display text of a hyperlink you added, right-click the link and click Edit Hyperlink.
-
To change the appearance of a hyperlink, such as font style, size, or color, right-click the link and click Font on the shortcut menu, or click a style option on the mini toolbar that appears.
-
To customize the ScreenTip that appears when you rest the pointer over the hyperlink, right-click the link, click Edit Hyperlink, click ScreenTip in the top-right corner of the dialog box, and enter the text you want.
See also
Remove or turn off hyperlinks
Create a hyperlink in Publisher
Create a hyperlink in OneNote
Hyperlinks in Word for the web
Need more help?
Содержание
- Создаем настраиваемую гиперссылку
- Создаем гиперссылку на пустое электронное сообщение
- Создаем гиперссылку на другое место в документе
- Как отметить место назначения ссылки?
- Добавляем закладку
- Используем стиль заголовка
- Добавляем ссылку
- Создаем гиперссылку на место в стороннем документе или созданной веб-странице
- Отмечаем место назначения гиперссылки
- Добавляем ссылку
- Быстро создаем гиперссылку на другой файл
- Создаем гиперссылку посредством перетаскивания содержимого со стороннего документа
- Создаем гиперссылку на содержимое веб-страницы посредством его перетаскивания
- Создаем гиперсслыку на содержимое листа Excel путем копирования и вставки
- Вопросы и ответы
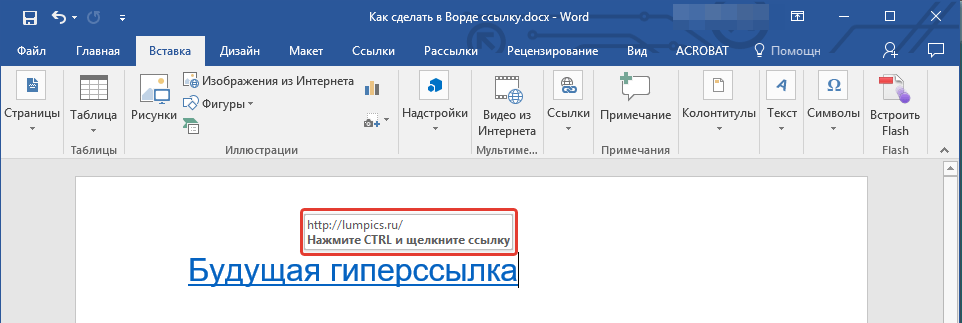
Программа MS Word автоматически создает активные ссылки (гиперссылки) после ввода или вставки URL-адреса веб-страницы и последующего нажатия клавиш “Space” (пробел) или “Enter”. Кроме того, сделать активную ссылку в Ворде можно и вручную, о чем и пойдет речь в нашей статье.
Создаем настраиваемую гиперссылку
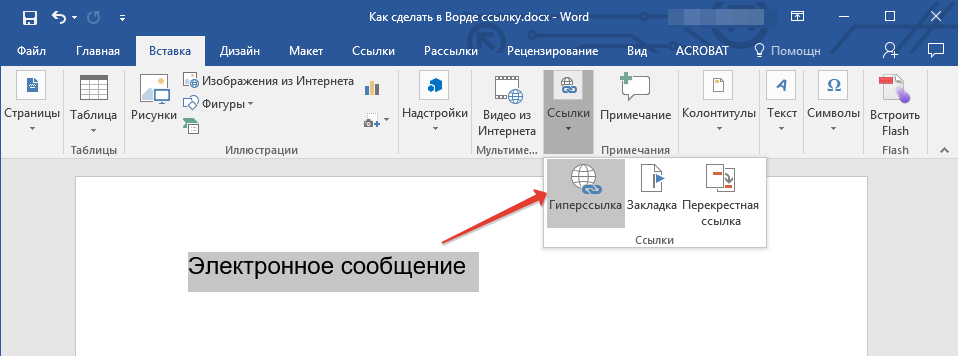
1. Выделите текст или изображение, которое должно представлять собой активную ссылку (гиперссылку).
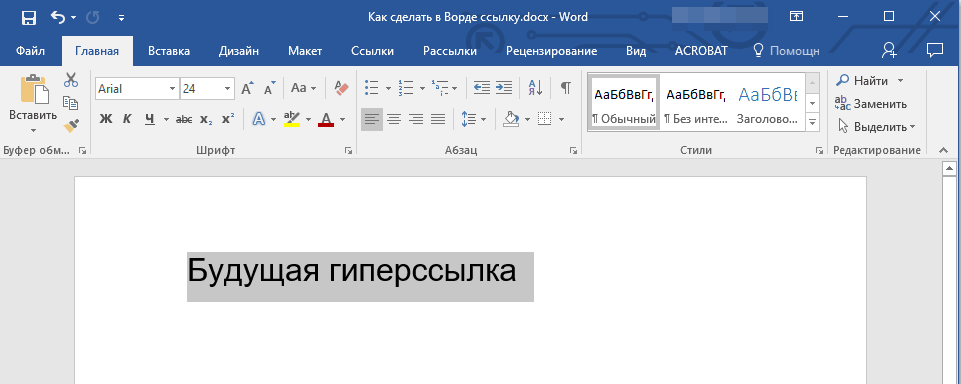
2. Перейдите ко вкладке “Вставка” и выберите там команду “Гиперссылка”, расположенную в группе “Ссылки”.
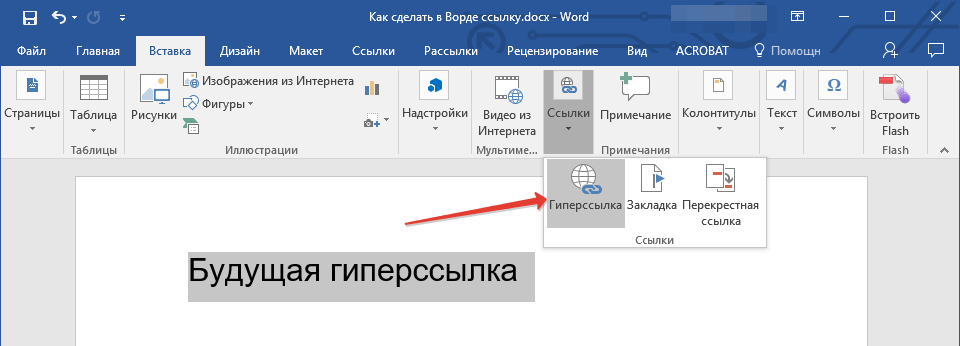
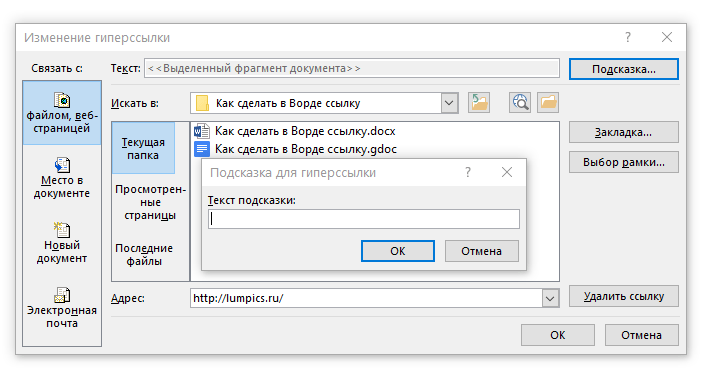
3. В диалоговом окне, которое появится перед вами, выполните необходимое действие:
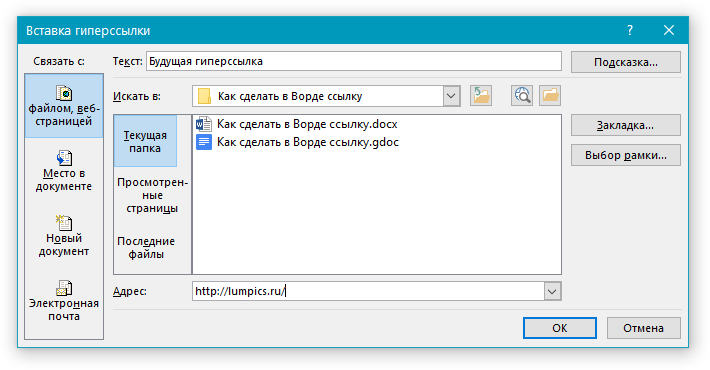
- Если вы хотите создать ссылку на какой-либо существующий файл или веб-ресурс, выберите в разделе “Связать с” пункт “файлом, веб-страницей”. В появившемся поле “Адрес” введите URL-адрес (к примеру, /).
-
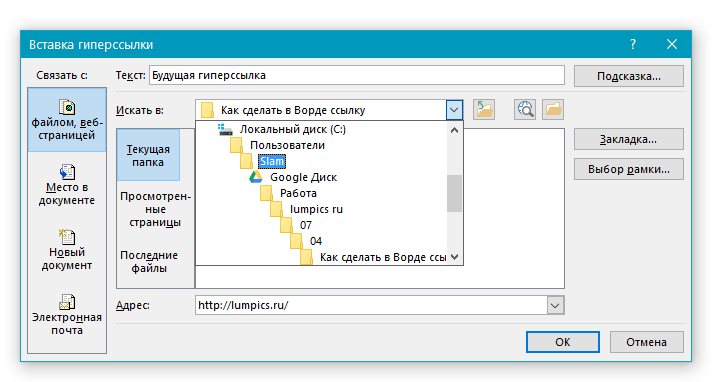
Совет: Если вы делаете ссылку на файл, адрес (путь) которого вам неизвестен, просто нажмите на стрелочку в списке “Искать в” и перейдите к файлу.
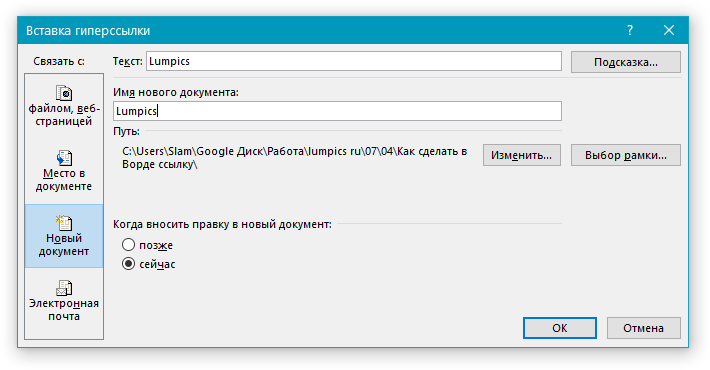
- Если вы хотите добавить ссылку на файл, который пока не был создан, выберите в разделе “Связать с” пункт “новым документом”, после чего введите имя будущего файла в соответствующее поле. В разделе “Когда вносить правку в новый документ” выберите необходимый параметр “сейчас” или “позже”.
-
Совет: Помимо создания самой гиперссылки, вы можете изменить подсказку, которая всплывает при наведении курсора на слово, фразу или графический файл, содержащий активную ссылку.
Чтобы это сделать, нажмите кнопку “Подсказка”, а затем введите необходимую информацию. Если же подсказка не задана вручную, в качестве таковой используется путь к файлу или его адрес.
Создаем гиперссылку на пустое электронное сообщение
1. Выделите изображение или текст, который вы планируете преобразовать в гиперссылку.

2. Перейдите ко вкладке “Вставка” и выберите в ней команду “Гиперссылка” (группа “Ссылки”).
3. В диалоговом окне, которое перед вами появится, в разделе “Связать с” выберите пункт “электронной почтой”.
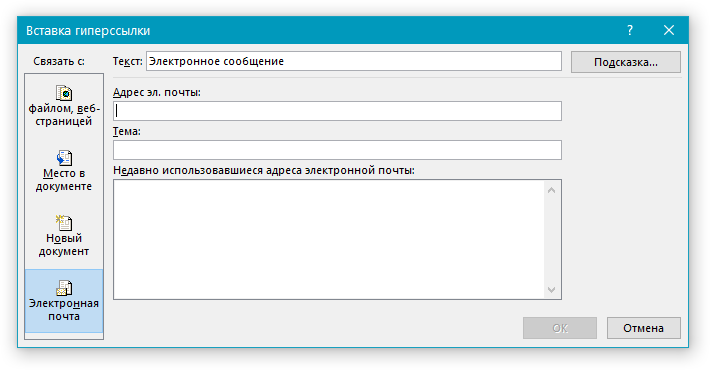
4. Введите в соответствующее поле необходимый адрес электронного ящика. Также, можно выбрать адрес из списка недавно использовавшихся.
5. Если это необходимо, введите тему сообщения в соответствующем поле.
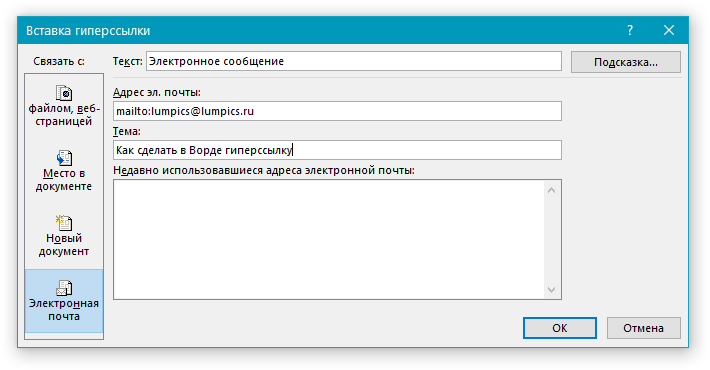
Примечание: Некоторыми браузерами и почтовыми клиентами строка темы не распознается.
-
Совет: Подобно тому, как можно настроить подсказку для обычной гиперссылки, вы также можете настроить всплывающую подсказку для активной ссылки на электронное сообщение. Для этого просто нажмите кнопку “Подсказка” и в соответствующем поле введите необходимый текст.
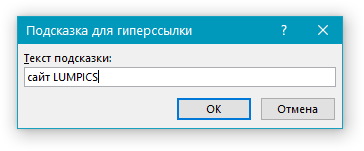
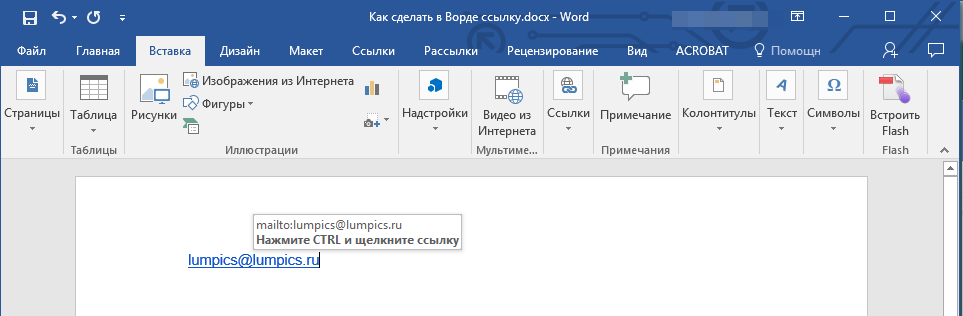
Если вы не введете текст всплывающей подсказки, MS Word автоматически будет выводить “mailto”, а вслед за этим текстом будет указан введенный вами адрес электронной почты и тема письма.
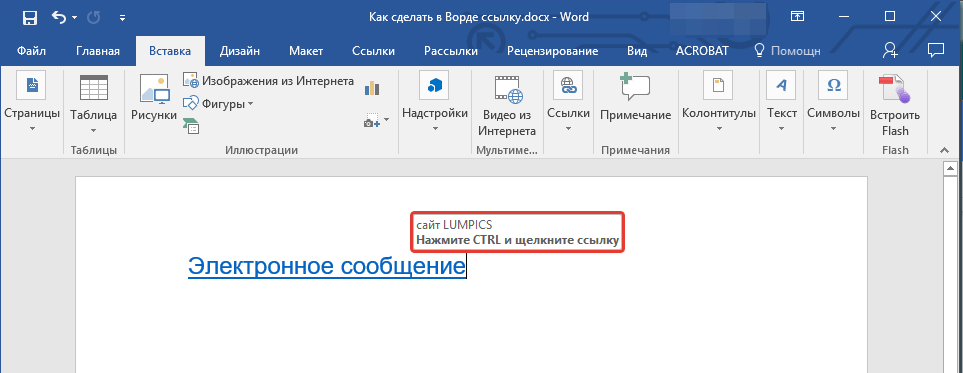
Кроме того, вы можете создать гиперссылку на пустое электронное сообщение, введя в документе адрес почты. К примеру, если ввести “lumpics@lumpics.ru” без кавычек и нажать пробел или “Enter”, автоматически создастся гиперссылка с подсказкой по умолчанию.
Создаем гиперссылку на другое место в документе
Для того, чтобы создать активную ссылку на то или иное место в документе или же на веб-странице, созданной вами в Ворде, для начала необходимо отметить точку, в которую эта ссылка будет вести.
Как отметить место назначения ссылки?
Используя закладку или заголовок, можно отметить место назначения ссылки.
Добавляем закладку
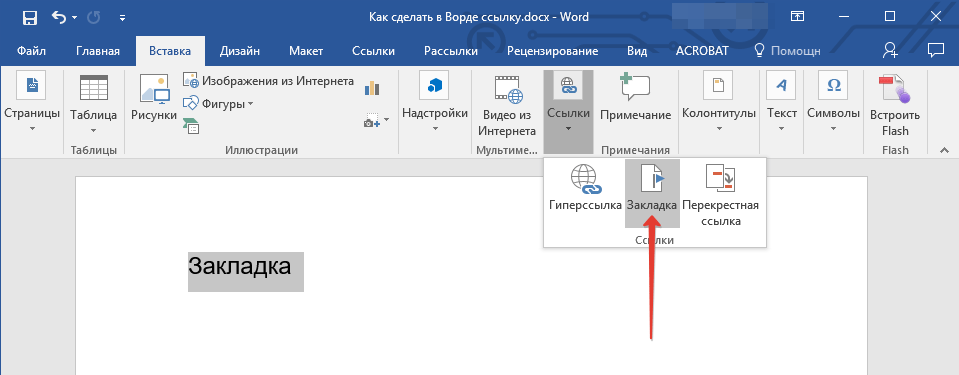
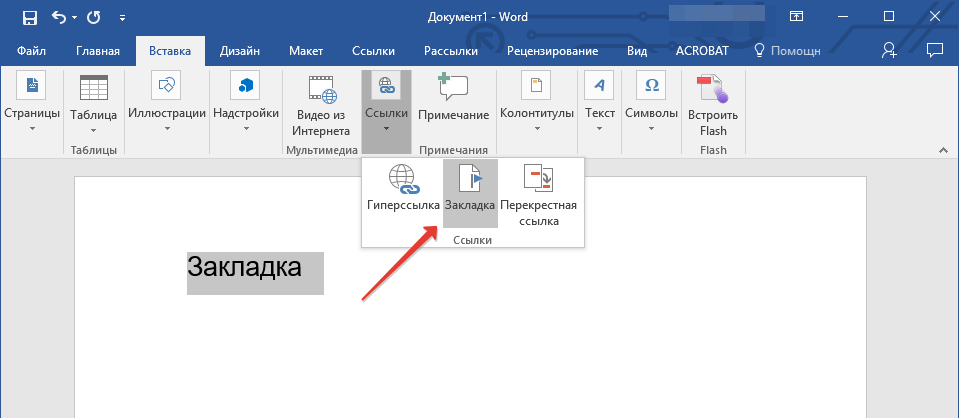
1. Выделите объект или текст, с которым требуется связать закладку, либо же кликните левой кнопкой мышки по тому месту документа, где ее требуется вставить.
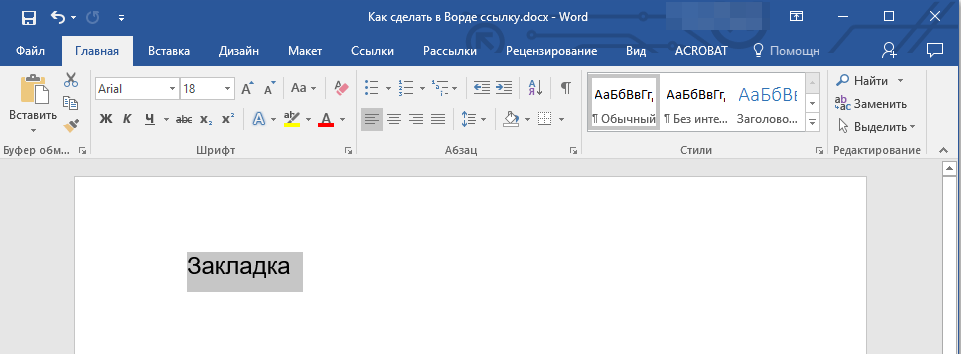
2. Перейдите ко вкладке “Вставка”, нажмите кнопку “Закладка”, расположенную в группе “Ссылки”.
3. Введите имя закладки в соответствующем поле.
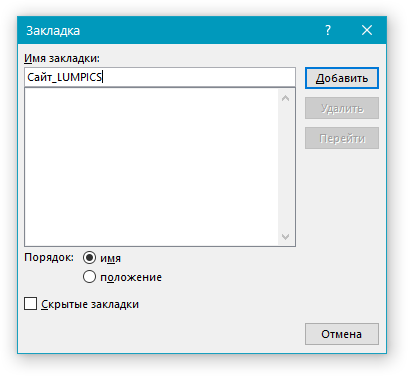
Примечание: Имя закладки обязательно должно начинаться с буквы. Однако, в имени закладки могут содержаться и цифры, а вот пробелов быть не должно.
-
Совет: Если вам необходимо разделить слова в название закладки, воспользуйтесь символом подчеркивания, к примеру, “сайт_lumpics”.
4. Выполнив вышеописанные действия, нажмите “Добавить”.
Используем стиль заголовка
К тексту, расположенному в том месте, куда должна вести гиперссылка, можно использовать один из шаблонных стилей заголовков, доступных в MS Word.
1. Выделите фрагмент текста, к которому необходимо применить конкретный стиль заголовка.
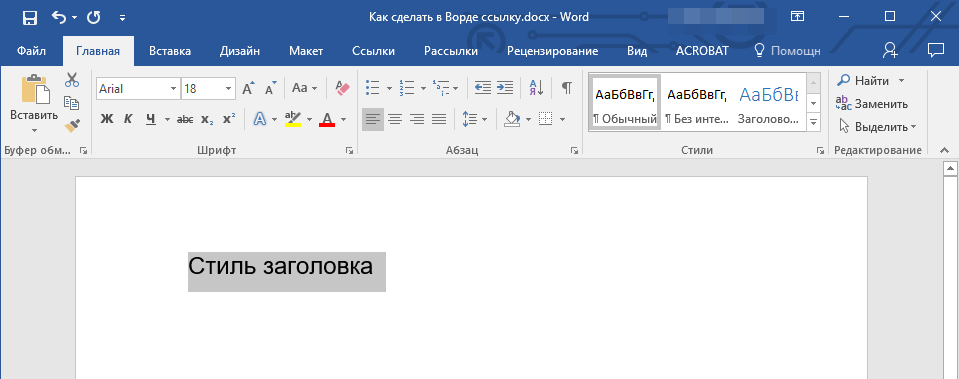
2. Во вкладке “Главная” выберите один из доступных стилей, представленных в группе “Стили”.

-
Совет: Если выделен текст, который должен выглядеть, как основной заголовок, можно выбрать для него соответствующий шаблон из доступной коллекции экспресс-стилей. Например, “Заголовок 1”.
Добавляем ссылку
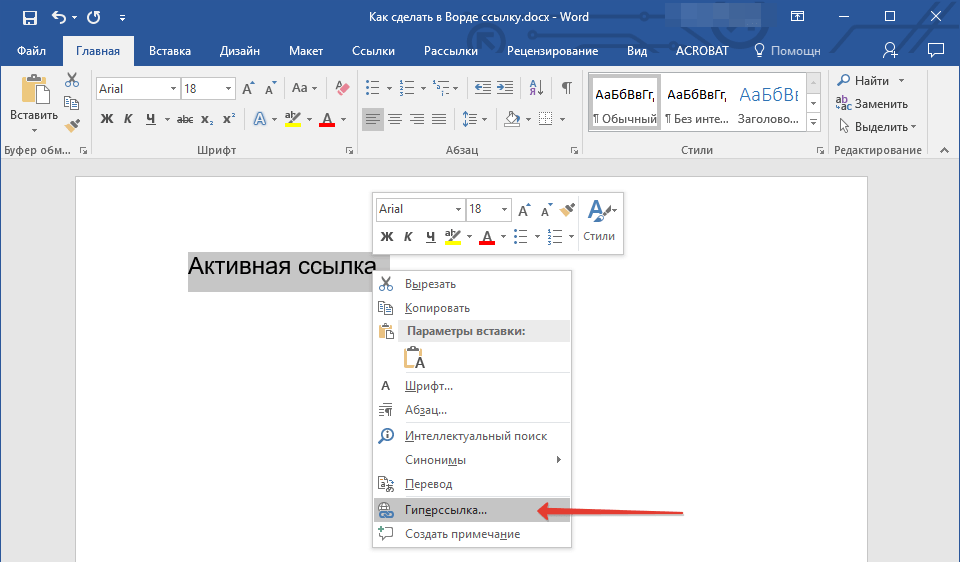
1. Выделите тот текст или объект, который в дальнейшем будет представлять собой гиперссылку.
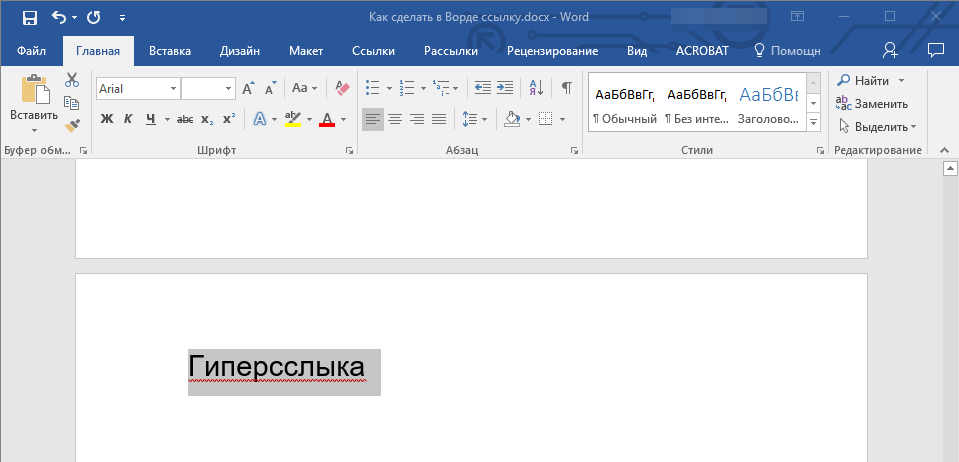
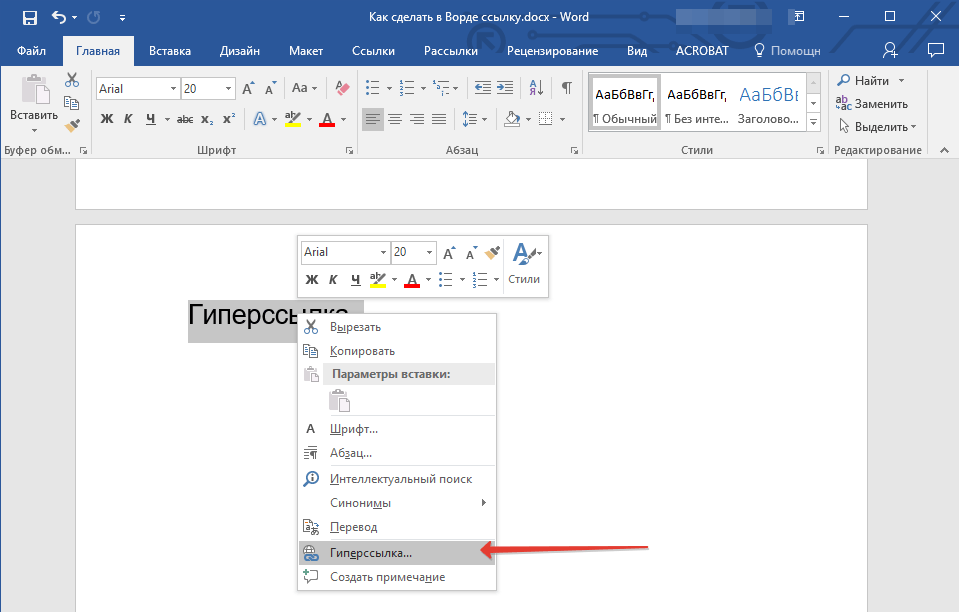
2. Кликните правой кнопкой мышки по этому элементу, и в открывшемся контекстном меню выберите пункт “Гиперссылка”.
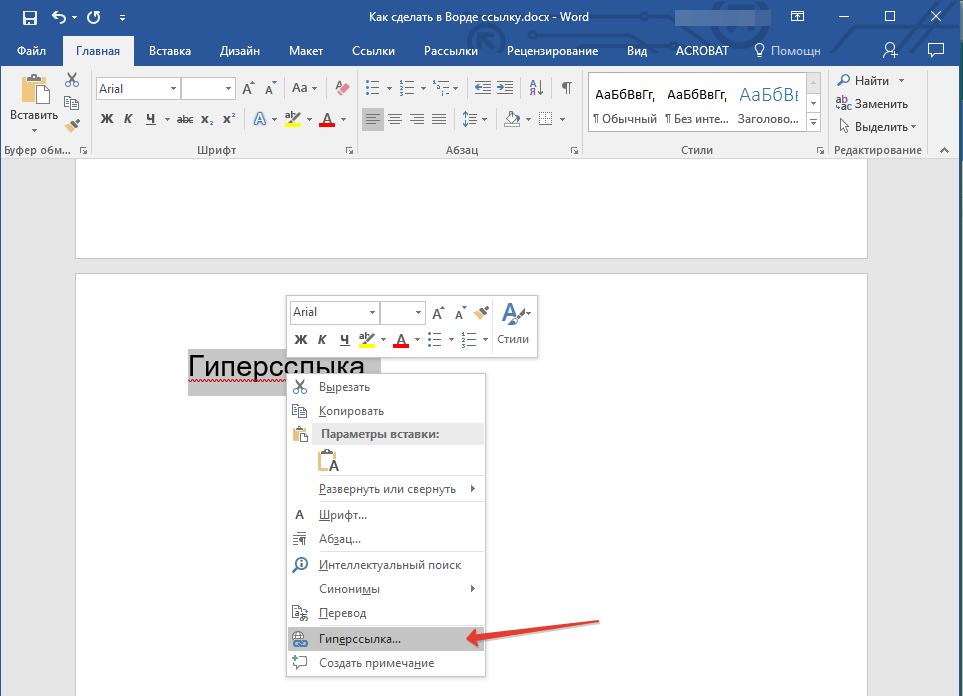
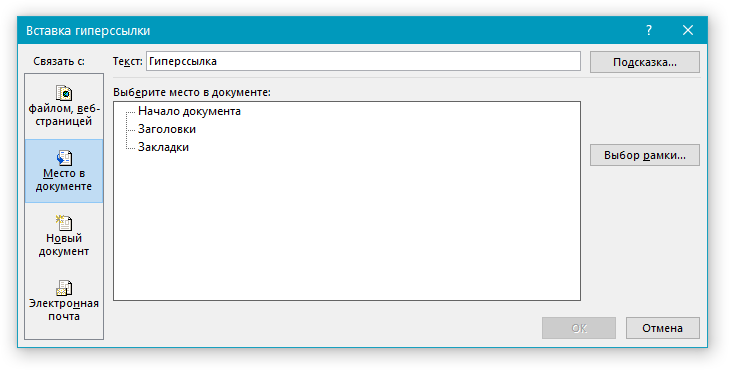
3. Выберите в разделе “Связать с” пункт “Место в документе”.
4. В появившемся списке выберите закладку или заголовок, куда будет ссылаться гиперссылка.
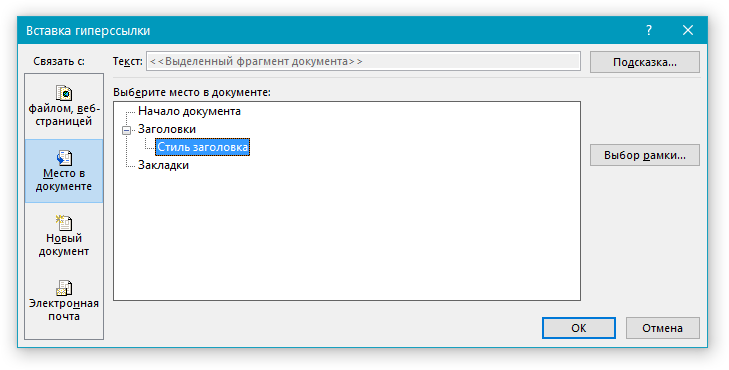
-
Совет: Если вы хотите изменить подсказку, которая будет выводиться при наведении курсора на гиперссылку, нажмите кнопку “Подсказка” и введите необходимый текст.
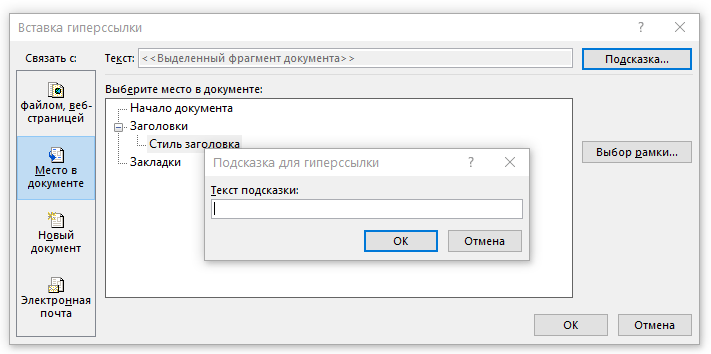
Если подсказка не будет задана вручную, то для активной ссылки на закладку будет использоваться “имя закладки”, а для ссылки на заголовок “Текущий документ”.
Создаем гиперссылку на место в стороннем документе или созданной веб-странице
Если вы желаете создать активную ссылку на то или иное место в текстовом документе или веб-странице, созданной вами в Ворде, для начала необходимо отметить точку, к которой эта ссылка будет вести.
Отмечаем место назначения гиперссылки
1. Добавьте закладку в конечный текстовый документ или созданную веб-страницу, используя метод, описанный выше. Закройте файл.
2. Откройте файл, в котором должна быть размещена активная ссылка на конкретное место ранее открытого документа.
3. Выделите объект, который эту гиперссылку должен содержать.

4. Кликните правой кнопкой мышки на выделенном объекте и выберите в контекстном меню пункт “Гиперссылка”.
5. В появившемся окне выберите в группе “Связать с” пункт “файлом, веб-страницей”.
6. В разделе “Искать в” укажите путь к файлу, в котором вы создали закладку.
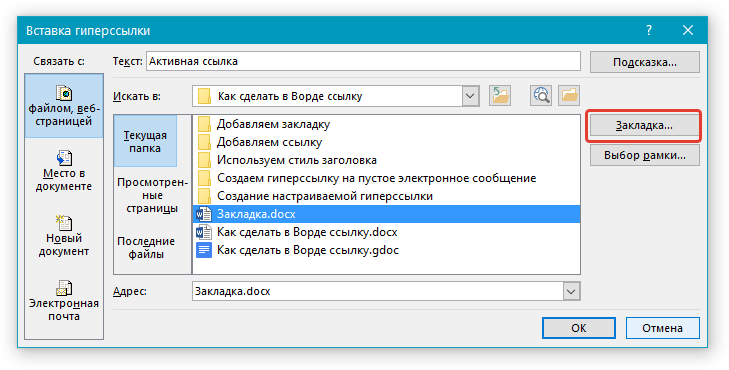
7. Кликните по кнопке “Закладка” и выберите в диалоговом окне необходимую закладку, после чего нажмите “ОК”.
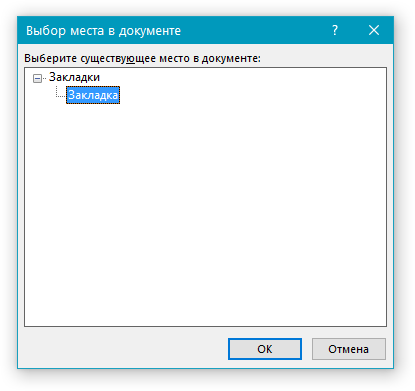
8. Нажмите “ОК” в диалоговом окне “Вставка ссылки”.
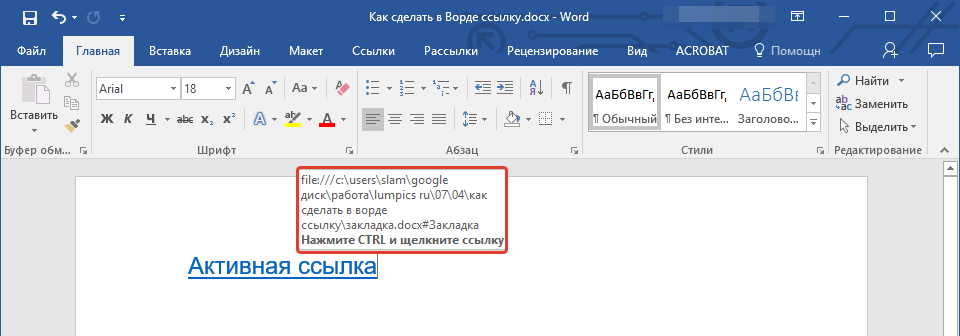
В созданном вами документе появится гиперссылка на место в другом документе либо же на веб-странице. Подсказка, которая будет отображаться по умолчанию — это путь к первому файлу, содержащему в себе закладку.
О том, как изменить подсказку для гиперссылки, мы уже писали выше.
Добавляем ссылку
1. В документе выделите текстовый фрагмент или объект, который в дальнейшем будет представлять собой гиперссылку.

2. Кликните на нем правой кнопкой мышки и в открывшемся контекстном меню выберите пункт “Гиперссылка”.
3. В открывшемся диалоговом окне, в разделе “Связать с” выберите пункт “Место в документе”.
4. В появившемся списке выберите закладку или заголовок, куда в дальнейшем должна ссылаться активная ссылка.

Если вам необходимо изменить подсказку, появляющуюся при наведении на гиперссылку указателя, воспользуйтесь инструкцией, описанной в предыдущих разделах статьи.
Совет: В документах Microsoft Office Word можно создавать активные ссылки на конкретные места в документах, созданных в других программах офисного пакета. Эти ссылки могут быть сохранены в форматах приложений Excel и PowerPoint.
Так, если вы хотите создать ссылку на место в книге MS Excel, для начала создайте в ней имя, затем в гиперссылке в конце имени файла введите “#” без кавычек, а за решеткой укажите созданное вами имя XLS-файла.
Для гиперссылки на PowerPoint проделайте ровно то же самое, только после символа “#” укажите номер конкретного слайда.
Быстро создаем гиперссылку на другой файл
Чтобы быстро создать гиперссылку, в том числе и вставить ссылку на сайт в Ворде, отнюдь не обязательно прибегать к помощи диалогового окна “Вставка гиперссылки”, которое упоминалось во всех предыдущих разделах статьи.
Сделать это можно также и с помощью функции drag-and-drop, то есть, путем банального перетаскивания выбранного текстового или графического элемента из документа MS Word, URL-адрес или активную ссылку из некоторых веб-обозревателей.
Кроме этого, можно также просто скопировать предварительно выбранную ячейку или диапазон таковых из таблицы Microsoft Office Excel.
Так, к примеру, вы можете самостоятельно создать гиперссылку на развернутое описание, которое содержится в другом документ. Также можно сослаться и на новость, размещенную на той или иной веб-странице.
Важное примечание: Текст следует копировать из файла, который был предварительно сохранен.
Примечание: Создавать активные ссылки посредством перетаскивания объектов-рисунков (например, фигур) невозможно. Чтобы сделать гиперссылку для таких графических элементов, следует выделить объект-рисунок, кликнуть по нему правой кнопкой мышки и в контекстном меню выбрать “Гиперссылка”.
Создаем гиперссылку посредством перетаскивания содержимого со стороннего документа
1. Используйте в качестве конечного документа файл, на который требуется создать активную ссылку. Предварительно выполните его сохранение.
2. Откройте документ MS Word, в который требуется добавить гиперссылку.
3. Откройте конечный документ и выделите фрагмент текста, изображение или любой другой объект, к которому и будет вести гиперссылка.
Совет: Вы можете выделить несколько первых слов раздела, на который будет создаваться активная ссылка.
4. Кликните правой кнопкой мышки по выделенному объекту, перетащите его на панель задач, а затем наведите на документ Ворд, в который и требуется добавить гиперссылку.
5. В контекстном меню, которое перед вами появится, выберите пункт “Создать гиперссылку”.
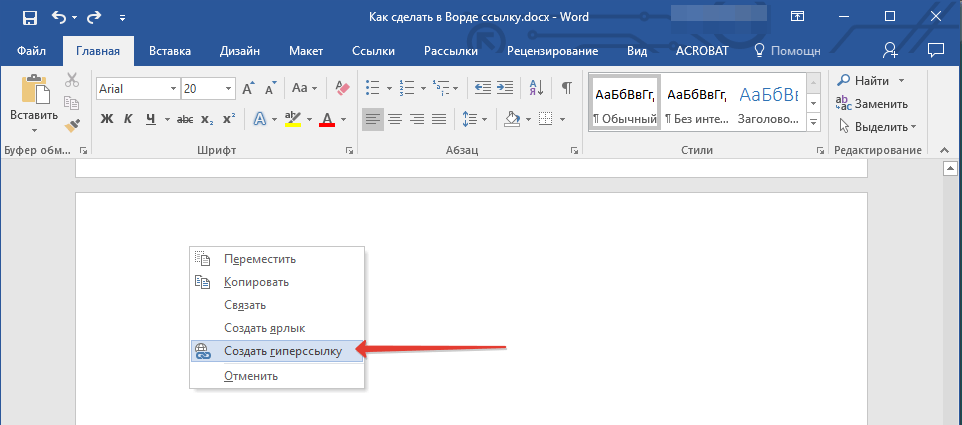
6. Выделенный вами фрагмент текста, изображение или другой объект станет гиперссылкой и будет ссылаться на созданный вами ранее конечный документ.
Совет: При наведении курсора на созданную гиперссылку, в качестве подсказки по умолчанию будет отображаться путь к конечному документу. Если же вы кликните левой кнопкой мышки по гиперсслыке, предварительно зажав клавишу “Ctrl”, вы перейдете к месту в конечном документе, на которое гиперссылка ссылается.
Создаем гиперссылку на содержимое веб-страницы посредством его перетаскивания
1. Откройте текстовый документ, в который необходимо добавить активную ссылку.
2. Откройте страницу сайта и кликните правой кнопкой мышки по предварительно выделенному объекту, к которому должна вести гиперссылка.
3. Теперь перетащите выбранный объект на панель задач, а затем наведите на документ, в который необходимо добавить ссылку на него.
4. Отпустите правую кнопку мышки, когда будете находиться внутри документа, и в открывшемся контекстном меню выберите пункт “Создать гиперсслыку”. В документе появится активная ссылка на объект с веб-страницы.
Кликнув по ссылке с предварительно зажатой клавишей “Ctrl”, вы перейдете непосредственно к выбранному вами объекту в окне браузера.
Создаем гиперсслыку на содержимое листа Excel путем копирования и вставки
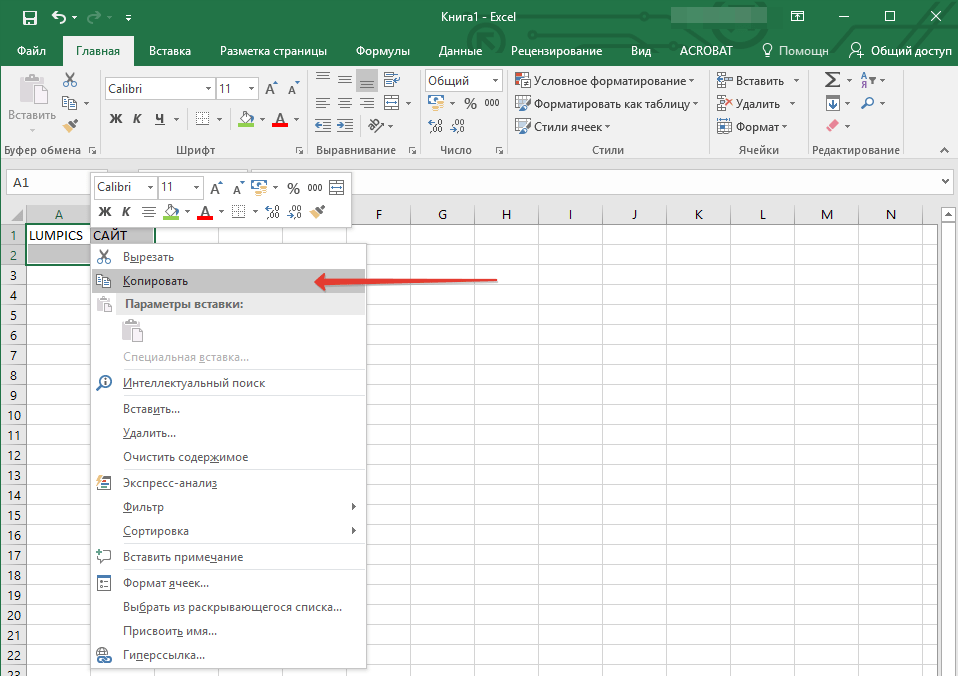
1. Откройте документ MS Excel и выделите в нем ячейку или диапазон таковых, на которые будет ссылаться гиперссылка.
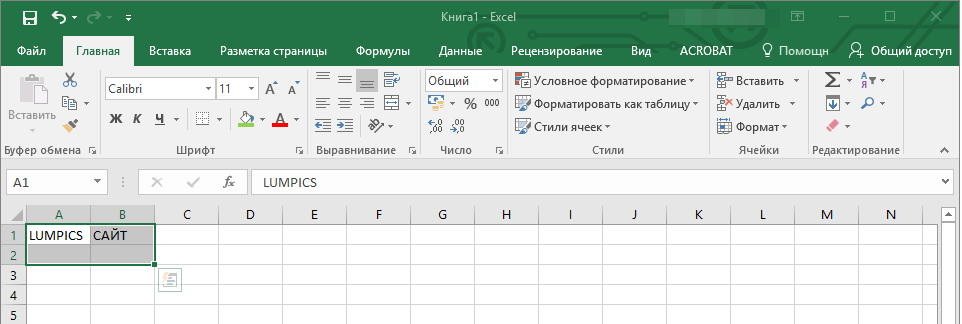
2. Кликните по выделенному фрагменту правой кнопкой мышки и выберите в контекстном меню пункт “Копировать”.
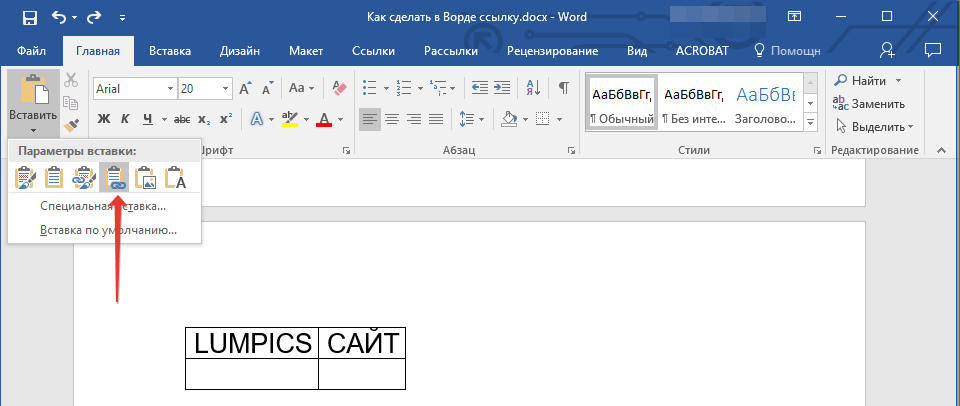
3. Откройте документ MS Word, в который требуется добавить гиперссылку.
4. Во вкладке “Главная” в группе “Буфер обмена” кликните по стрелке “Вставить”, после чего в развернувшемся меню выберите “Вставить как гиперссылку”.
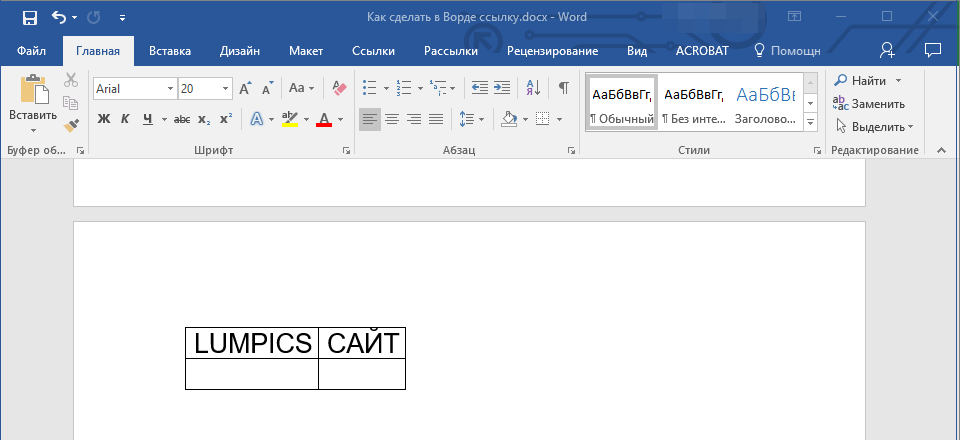
Гиперссылка на содержимое документа Microsoft Excel будет добавлена в Ворд.
На этом все, теперь вы знаете, как сделать активную ссылку в документе MS Word и знаете, как добавлять разные гиперссылки на разного рода содержимое. Желаем вам продуктивной работы и результативного обучения. Успехов в покорение Майкрософт Ворд.

We recently created hyperlinks in Microsoft Word to external files, websites, and email addresses. In today’s tutorial, we are going to change the style of hyperlinks in Microsoft Word. Style includes the font, font size, font color, and emphasis (i.e., bold font, italics, and underlining).
The style settings for followed and unfollowed hyperlinks are different, so we will cover the steps to change each separately.
Quick Links:
- How to Change the Style of Unfollowed Hyperlinks
- How to Change the Style of Followed Hyperlinks
Important Note: These steps apply to all the hyperlinks in your Word document. If you want to change the style of an individual hyperlink, select it, and then use the options in the Font group in the Home tab to change the style as you would regular text.
This tutorial is available as a YouTube video showing all the steps in real time.
Watch more than 100 other writing-related software tutorials on my YouTube channel.
The images below are from Word for Microsoft 365. The steps are the same for Word 2021, Word 2019, Word 2016, Word 2013, and Word 2010. However, your interface may look slightly different in those older versions of the software.
Unfollowed hyperlinks are links that haven’t been selected (or clicked) by the reader. Word’s default style for unfollowed hyperlinks is normally blue with underlining. The default font will match the surrounding text. Your default may be different if you are using a custom template.
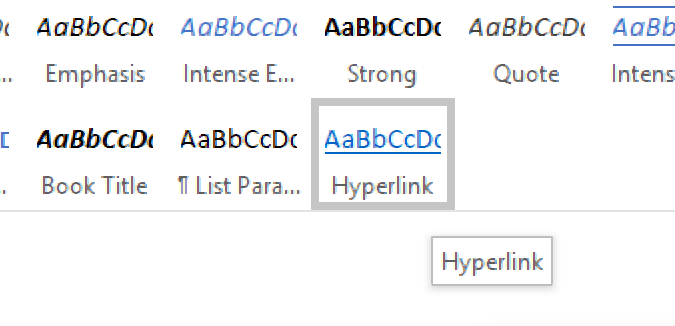
- Select the Home tab.

- Place your cursor inside an existing unfollowed hyperlink.

- Select the dialog box launcher in the Styles group.

- Select the Hyperlink menu arrow in the Styles pane.
![]()
- Select Modify from the drop-down menu.

- Select new choices from the formatting section in the Modify Style dialog box: (1) font, (2) font size, (3) emphasis (bold, italic, and underlining), and (4) font color.

- Select the OK button to close the Modify Style dialog box.

- Select the X to close the Styles pane.

Your unfollowed hyperlinks should be formatted with your new style choices.

How to Change the Style of Followed Hyperlinks in Microsoft Word
Followed hyperlinks are links that have been selected (or clicked) by the reader. Word’s default style for followed hyperlinks is normally purple with underlining. The default font will match the surrounding text. Your default may be different if you are using a custom template.
Pro Tip: To follow a hyperlink in Word, press the Ctrl key on your keyboard while selecting the hyperlink.

- Select the Home tab in the ribbon (see figure 1).
- Select the dialog box launcher in the Styles group (see figure 3).
- Select the Manage Styles button in the Styles pane.

- Select Alphabetical from the Sort order menu in the Manage Styles dialog box.

- Select FollowedHyperlink from the Select a style to edit menu.

- Select the Modify button.

- Select new choices from the formatting section in the Modify Style dialog box (see figure 6).
- Select the OK button to close the Modify Style dialog box (see figure 7).
- Select the OK button to close the Manage Styles dialog box.

- Select the X to close the Styles pane (see figure 8).
Your followed hyperlinks should be formatted with your new style choices.
Related Resources
How to Create and Update a Table of Contents in Microsoft Word
How to Create Bulleted Lists in Microsoft Word
How to Create, Change, and Delete Tabs in Microsoft Word
Updated February 19, 2022
Lesson 11: Links
/en/word/lists/content/
Introduction
Adding hyperlinks, also known as links, to text can provide access to websites and email addresses directly from your document. There are a few ways to insert a hyperlink into your document. Depending on how you want the link to appear, you can use Word’s automatic link formatting or convert text into a link.
Optional: Download our practice document.
Watch the video below to learn more about hyperlinks in Word.
Understanding hyperlinks in Word
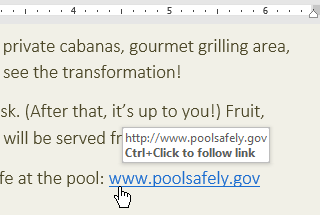
Hyperlinks have two basic parts: the address (URL) of the webpage and the display text. For example, the address could be http://www.popsci.com, and the display text could be Popular Science Magazine. When you create a hyperlink in Word, you’ll be able to choose both the address and the display text.
Word often recognizes email and web addresses as you type and will automatically format them as hyperlinks after you press Enter or the spacebar. In the image below, you can see a hyperlinked web address.
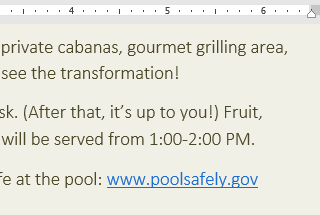
To follow a hyperlink in Word, hold the Ctrl key and click the hyperlink.
To format text with a hyperlink:
- Select the text you want to format as a hyperlink.
- Select the Insert tab, then click the Link command.
You can also open the Insert Hyperlink dialog box by right-clicking the selected text and selecting Link… from the menu that appears.
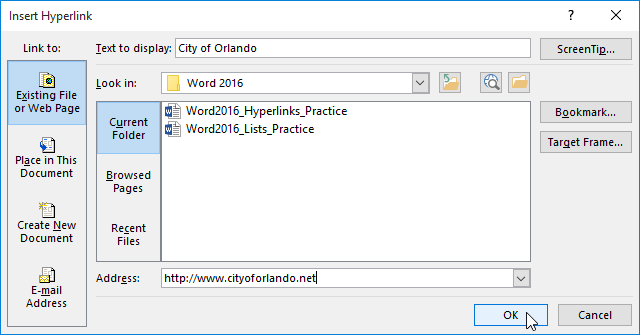
- The Insert Hyperlink dialog box will appear. Using the options on the left side, you can choose to link to a file, webpage, email address, document, or a place in the current document.
- The selected text will appear in the Text to display: field at the top. You can change this text if you want.
- In the Address: field, type the address you want to link to, then click OK.
- The text will then be formatted as a hyperlink.

After you create a hyperlink, you should test it. If you’ve linked to a website, your web browser should automatically open and display the site. If it doesn’t work, check the hyperlink address for misspellings.
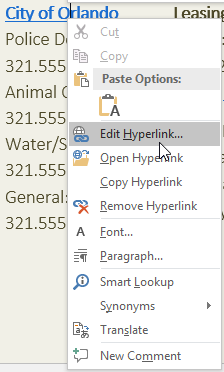
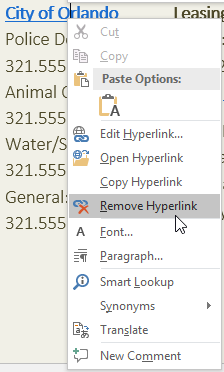
Editing and removing hyperlinks
Once you’ve inserted a hyperlink, you can right-click the hyperlink to edit, open, copy, or remove it.
To remove a hyperlink, right-click the hyperlink and select Remove Hyperlink from the menu that appears.
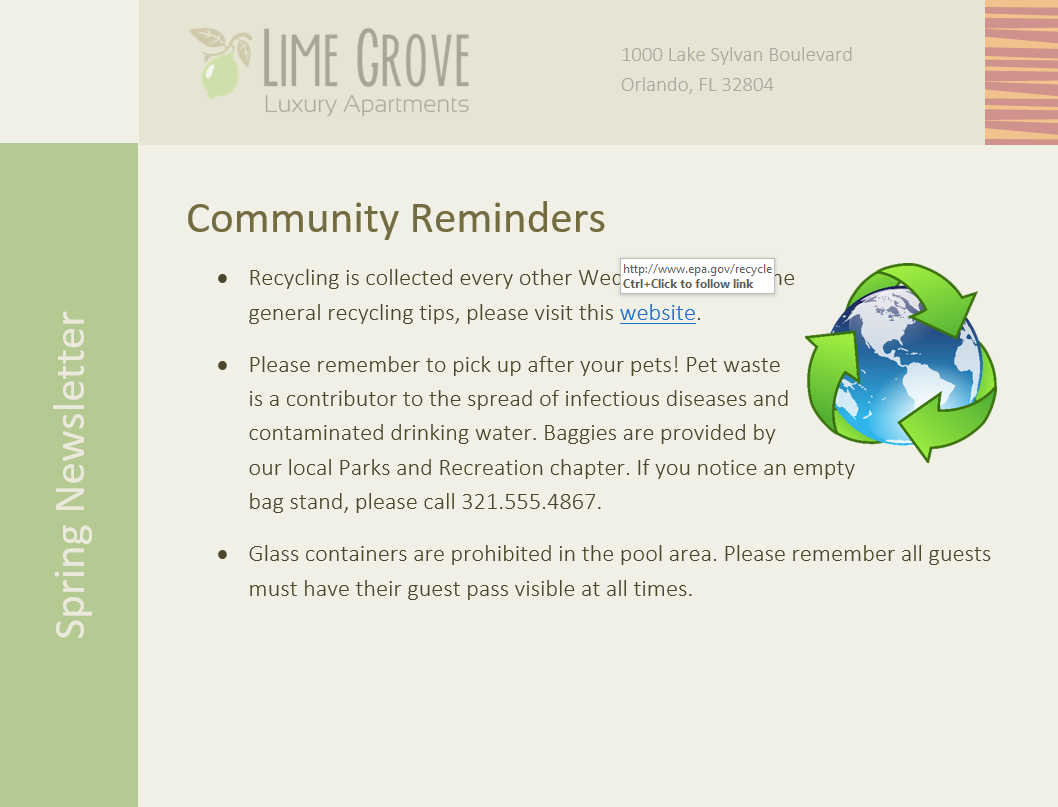
Challenge!
- Open our practice document.
- Scroll to page 4.
- In the first bullet point under Community Reminders, format the word website as a hyperlink to http://www.epa.gov/recycle.
- Test your hyperlink to make sure it works.
- In the second bullet point, remove the hyperlink from the words Parks and Recreation.
- When you’re finished, your page should look something like this:

/en/word/page-layout/content/
In our previous post, we showed you how to add web links to a Word document. In this post, we’re going to show you how to format web links in a Word document so they look exactly as you want them to.
Existing Format for Web Links in Word
When a web link has been added to Word, the standard way to display it is in a blue colour and also underlined.

This is helpful but what if the blue colour and underlined text do not match the colour scheme and formatting rules that you are using elsewhere in your document?
You can change the colour and formatting just like any other text in a document but this means that every time you add a web link, you have to manually change the formatting.
How can you change the way that Word displays any web linked text in the first place so that you don’t have to manually format each link yourself?
Formatting Web Links in Word Online
At the moment, the online version of Word does not allow you to change the default way that web links are displayed in a document. In the online version of Word, you can only format individual web links after each one has been created.
To change the default way that Word displays web links, you will have to use the desktop version of Word.
Formatting Web Links in Desktop Word
Highlight the text that contains a web link and then click on the “Home” tab.

In the styles section of the home ribbon, click on the small arrow icon in the bottom right-hand corner of the section.
![]()
This will open the Styles window.

Scroll down the list of styles until you see the line headed “Hyperlink”. Hover your mouse over the word and click on the down pointing arrow icon that appears.
![]()
When you click on the down pointing arrow, a drop-down menu will appear. In this menu, click on the line that is titled “Modify…”.

This will open the “Modify Styles” window.

In this window, you can use these fields to change how every web link is displayed by default.

When you are happy with the changes, click on the OK button to save the web link changes and close the windows.

Formatting Clicked Web Links in Desktop Word
The next setting to consider is when you have clicked on a web link in a Word document because Word will display this in a second colour.

To change the colour that is used once a web link has been clicked on, click on the “Design” tab at the top of your document.

The ribbon will change to show all the available design options. In the ribbon, click on the down arrow below the “Colors” icon and in the drop-down menu that appears, click on the line that reads “Customize Colors…”.

This will open the theme colours window.

Click on the colour icon next to “Followed Hyperlink” and this will let you choose the colour that is used by default when a web link is clicked on in your document.

When you have chosen the colour you want, click on the “Save” button and the changes will be saved.

How to Add and Edit Links in Word Documents
Insert hyperlinks quickly
Updated on February 11, 2021
What to Know
- Highlight text you want to hyperlink. Right-click it and choose Link. Alternatively, select Insert > Links > Link.
- Then, enter the URL in the Address field.
- Remove a link: Right-click the hyperlink text and choose Remove Hyperlink.
Microsoft Word is primarily used to create word processing documents, but you can also work with hyperlinks and HTML code used in websites. Learn how to insert, remove, or edit hyperlinks using Word for Microsoft 365, Word 2019, Word 2016, Word 2013, and Word 2010.
Insert Links
To link to other documents or web pages from a Word document, insert a hyperlink.
-
Select the text that you want to apply the hyperlink to. This can be the text of a URL, a single word, a phrase, a sentence, or a paragraph.
-
Right-click the text and select Link or Hyperlink to open the Insert Hyperlink dialog box. Or, go to the Insert tab and select Links > Link.
-
In the Address field, enter the URL address of the document or website you want to link to. For online assets, the URL must include the protocol (for example, http, https, or ftp).
The Text to display text box defaults to the text you selected in step 1. You can change this text here if you like.
-
Select OK.
-
The selected text appears as a hyperlink that can be clicked to open the linked document or website.
To make changes to the link, right-click the hyperlink and select Edit Hyperlink.
Remove Hyperlinks
When you type a URL into Word, it automatically inserts a hyperlink that connects to the website. This feature is handy if you distribute documents electronically, but it can be a nuisance when printing documents.
To remove a hyperlink, right-click the link and select Remove Hyperlink.
In Word for Mac, right-click then select Hyperlink. In the slide-out menu, select Edit Hyperlink, then choose Remove Link.
More About Editing Hyperlinks
When you work in the Insert Hyperlink dialog box and the Edit Hyperlink dialog box, several other features are available on the left side of the dialog box.
Existing File or Web Page
This tab is selected by default in the Insert Hyperlink and the Edit Hyperlink dialog boxes. This tab displays the text for the hyperlink and the URL of that hyperlink
In the middle of the window, there are three tabs:
- Current Folder displays files that are located in the same folder location as the current document. If you want the selected link to link to a document located in this folder, locate the file and choose it. The Address field changes to reflect the document location on your computer. The Text to display field also changes to the file address, so you may want to edit this field to change the text that displays in the Word document.
- Browsed Pages shows a list of recent documents and web pages you have accessed. Select one of these as the new link destination.
- Recent Files displays a list of recent files you’ve worked on in Word. This is handy if you’re working on a series of separate documents and want to create links to these files quickly.
Place in This Document
This tab displays sections and bookmarks contained in the current document. Use it to link to specific locations within the current document.
Create New Document
Go to this tab to create a new document to which the link will connect. This feature is useful if you’re creating a series of documents but haven’t created the document you want to link to. Define the name of the new document in the labeled field.
If you don’t want to edit the new document you create from here, select Edit the new document later.
Email Address
This section creates a link that will generate a new email when someone clicks it and populates several of the new email fields with the defaults you define. Enter the email address where you want the new email to be sent, and add the subject that will appear in the new email by filling in the appropriate fields.
If you have used this feature recently for other links, any email addresses you used in those will appear in the Recently used e-mail addresses list.
Thanks for letting us know!
Get the Latest Tech News Delivered Every Day
Subscribe
Word has special styles for hyperlinks which you can change from the standard blue, underlined look. Word link styles have some special behaviors to keep in mind.
Word links can look very different or appear no different to regular text. All these are hyperlinks, believe it or not.

Hyperlink and FollowedHyperlink
Links have two modes – visited and not visited. You’ve probably noticed on web pages that links you’ve clicked have a different color to links you’ve never used.
It’s the same in Word – links have two states, not visited or followed. That’s done with different character styles – Hyperlink and FollowedHyperlink.

Those two in-built character styles default to Blue and Purple which are the colors you often see on web sites. However, they can be changed, just like any other Word style.
Changing the link colors and other formatting
The Hyperlink style is simple. It’s based on the Default Paragraph Font with the only changes to Blue text with Underline.
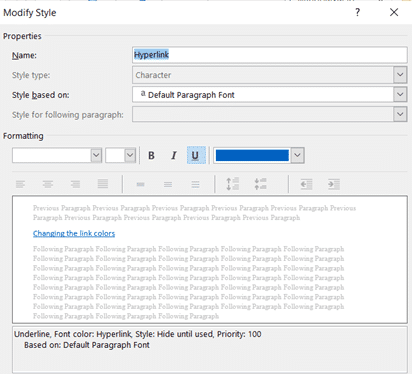
(Word Nerd note: the default color isn’t Blue, it’s ‘Hyperlink’)
Hyperlinks will change font, size and other attributes if you change the Default Paragraph Font character style.
Change hyperlink color or underline
A simple and common change to Hyperlink style is removing or changing the underlining. The solid underline can make the text harder to read. The change is the same as any other style change in one of two ways.
- Reformat a link to the way you want, then select the Hyperlink style and choose ‘Update Hyperlink to Match Selection.

OR
- Choose Modify from the Hyperlink style pull-down menu (see above) then change the style attributes. In this crazy example we’ve changed to Bold, No Underline and a different color.

Custom link formatting
Just like any other text, a hyperlink can be custom formatted to look any way you like. Just select the link text then change the font, color etc.
However, that customized link will look different to others in the document and could be confusing.
That change won’t apply to a followed hyperlink. Once clicked the custom formatting is lost and the FollowedHyperlink style is used.
No hyperlink formatting or hiding links
Would you like to hide the links so they don’t look different to the surrounding text?
As a ‘one-off’ change, select the hyperlink and just re-format it just like any other text. Change the color, underline etc. to the surrounding text. That’s quickly done by selecting the link and pressing Ctrl + Spacebar (the Clear Formatting shortcut).
For a whole document or template, go to the Hyperlink style. DEselect underline and change the Font color to Auto.

Make the same change to the FollowedHyperlink style if you want clicked links to look the same.
Links in Headings
If a link is in a Heading it will look like a link but using the matching heading font size.

If you don’t want the special link formatting, select the heading line and choose the Heading style from the Styles Gallery on the Home tab (or Styles pane). The heading shortcut (Ctrl + Alt + n ) doesn’t work for this, you have to select the style from a menu or gallery.
The link is still there and clickable but that’s only obvious if you hover a pointer over the text.

Text that looks like a link but isn’t
Because Hyperlink and FollowedHyperlink are Word character styles, you can apply it to any text whether it’s a link or not. A not-visited link can be forced to look like it’s followed, just change the style to FollowedHyperlink.

We can’t think of a practical use for this, aside from demonstrating that the two styles can be used anywhere.
Understanding the strange FollowedHyperlink style in Word
The trick to Find or Replace web links in Word
Make sure an email link is real not phishing, why does Microsoft makes it easier for criminals?
When you create a document, you may need to paste links to other documents, Excel spreadsheets, or even some websites with source information. Also, you can add hyperlinks to your profile or even e-mail address.
Word proposes several different ways to insert hyperlinks to the document:
The simplest way to insert a hyperlink in Word
Type the address starting from http:// or https://, www.; and Word automatically turns a web address into a link when you press Spacebar, Enter, or any punctuation sign.
Notes: If you don’t see the hyperlink after inserting the address, check it. If the address is correct, you probably have a problem with AutoCorrect options. See the note of the tip Insert an email hyperlink in a document.
Paste the link using the Clipboard
1. Copy the link to the Clipboard:
- Open the link that you would like to insert in the document the browser, select the link, and copy it to the Clipboard (for example, by clicking Ctrl+C),
- Type the URL in the document (or any other application such as Notepad), select the link, and copy or cut it to the Clipboard (for example, by clicking Ctrl+X).
2. Type the text for the link in your document and select it. For example, select the name of the company:

3. Right-click on the selected text, and select the copied link from the Link list in the popup menu:

Note: If you paste link copied from the Microsoft Edge, you can see the page title instead of the URL:
![]()
Instead of ![]() .
.
Pasting formatted links instead of URLs is a new feature of Microsoft Edge that is improved the copy and paste of web URLs. This feature copies and pastes a URL as a hyperlinked title instead of as a web address. Please don’t confuse the article title on the webpage and the web page title — they can be different!
To paste the URL copied from Microsoft Edge, do one of the following:
- On the Home tab, in the Clipboard group, click the Paste drop-down list and then select Keep Text Only:

- Right-click where you want to paste the link and choose the Link option in the popup menu:

- Turn this feature off in Microsoft Edge:
- In Microsoft Edge, click the Settings and More (Alt+F) button, then select Settings:

- Under Settings, select Share, Copy & Paste:
- Under Share, Copy & Paste, select the default option you want:
- Link to paste the URL as a hyperlinked title,
- Plain text to paste the URL as a web address.


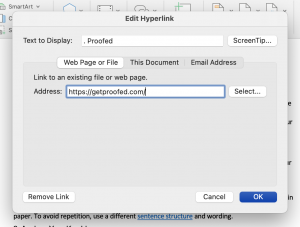
Insert the link using the Hyperlink dialog box
1. Type the text for the link in your document and select it. For example, select the name of the company.
2. On the Insert tab, in the Links group, click the Link button (or click Ctrl+K on the keyboard):

3. In the Insert Hyperlink dialog box:
3.1. Make sure that the Text to display text box contains the correct text for the link,
3.2. Type the hyperlink address in the Address field:

3.3. Click OK to insert the hyperlink in the document:

Notes:
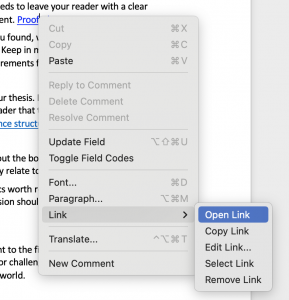
- If you want to change the link, the text of the link, or the link’s screen tip, right-click it and choose Edit Hyperlink… in the popup menu:

- If you want to delete the link, you can delete all the text of the hyperlink or right-click it and choose Remove Hyperlink in the popup menu (it removes hyperlink and leave the text).

We like books. But one thing that you can’t do on paper is link to another book. On that level at least, electronic media has a distinct advantage. And with Microsoft Word, it’s easy to add a hyperlink in a document.
But how does this work? In this post, we look at how to add a link in Microsoft Word, as well as how to edit and remove hyperlinks in a document.
How to Embed a Hyperlink in a Document
Whether you’re writing website copy, where hyperlinks enable navigation, or simply adding links to useful internet resources in a document, Microsoft Word makes it simple. For instance, if you type a web address and hit space or return, MS Word will automatically format it as a link.
However, most of the time, you’ll want to embed a link in the text. To do this:
- Highlight the text you want to use as a link
- Go to Insert > Links > Link (or right click the text and select Link)
- Type the URL for the link destination into the Address field
- Click OK to create your hyperlink
Link options in the contextual menu.
The highlighted text will then become a hyperlink.
To test the link, hold CTRL and left click (or right click and select Open Hyperlink). This will open the destination in your default web browser.
You can use this same process to link to another file on your computer.
To link to a file, simply select it via the Insert Hyperlink menu and click OK. Keep in mind, though, that this link will only work on your computer/network, since this is where the destination file is stored.
How to Edit Hyperlinks
You can edit a hyperlink in the same way as you would any text in a document: simply place the cursor in the hyperlinked text and type.
Find this useful?
Subscribe to our newsletter and get writing tips from our editors straight to your inbox.
Alternatively, if you right click the link you can select Edit Hyperlink. In the window that opens, you can then change both:
- The text that will be used for the hyperlink
- The destination of the link (i.e., file path or URL)
If you then click OK when you’re done, the link will be updated automatically.
How to Format Hyperlinks
By default, Microsoft Word formats links with blue, underlined text. However, you can edit hyperlinks with the standard formatting options, so you can use these to change the appearance of any links in a document.
And if you want to change the default hyperlink style, simply:
- Open the Styles menu
- Find the style named “Hyperlink”
- Right click the style name and select Modify…
- Apply any formatting options as required and click OK
This will update the default hyperlink formatting, including any links you had added to the document previously. And if you then add more new links while editing, they will all use your updated hyperlink formatting.
How to Remove a Hyperlink in Microsoft Word
To remove a hyperlink from document, you can simply delete it. But this will also remove the text you’d formatted as a link.
To remove a link and keep the text, though, you have two options.
- Go to Insert > Links > Link and select Remove Link in the menu
- Right click the link and select Remove Hyperlink from the menu
MS Word will then remove the link and any formatting from the selected text.
Proofreading Hyperlinks
If you have a document containing hyperlinks, why not submit it for proofreading? As well as checking your spelling, grammar and punctuation, we can make sure your links work properly, saving you from encountering any unfortunate “404 Error – Page Not Found” messages when it counts.
 Please Note:
This article is written for users of the following Microsoft Word versions: 2007, 2010, 2013, 2016, 2019, and Word in Microsoft 365. If you are using an earlier version (Word 2003 or earlier), this tip may not work for you. For a version of this tip written specifically for earlier versions of Word, click here: Hyperlink Formatting.
![]()
Written by Allen Wyatt (last updated November 7, 2020)
This tip applies to Word 2007, 2010, 2013, 2016, 2019, and Word in Microsoft 365
By default, Word recognizes network and hyperlink addresses and formats them much as you would see them appear on a Web page. Normally, this means that the text shows up as blue and underlined. Word provides the ability for you to change the way in which hyperlinks are formatted throughout your document. This is because default formatting for hyperlinks is done using a defined character style.
To change the formatting of your hyperlinks, follow these steps:
- Display the Styles task pane by displaying the Home tab of the ribbon and then clicking the small icon at the lower-right corner of the Styles group.
- Click Options at the bottom of the Styles task pane. Word displays the Style Pane Options dialog box. (See Figure 1.)
- Using the Select Styles to Show drop-down list, select All Styles.
- Click OK to close the Style Pane Options dialog box.
- In the list of styles, hover the mouse pointer over the Hyperlink style. You should see a drop-down arrow appear at the right side of the style name.
- Click on the drop-down arrow and choose Modify. Word displays the Modify Style dialog box. (See Figure 2.)
- Click on the Format button and choose Font from the resulting drop-down list. Word displays the Font dialog box. (See Figure 3.)
- Modify the font settings for your hyperlinks, as desired.
- Click on OK to close the Font dialog box. The Modify Style dialog box is still visible.
- Make sure the New Documents Based On this Template radio button is selected, at the bottom of the Modify Style dialog box.
- Click on OK.
- Close the Styles task pane.

Figure 1. The Style Pane Options dialog box.
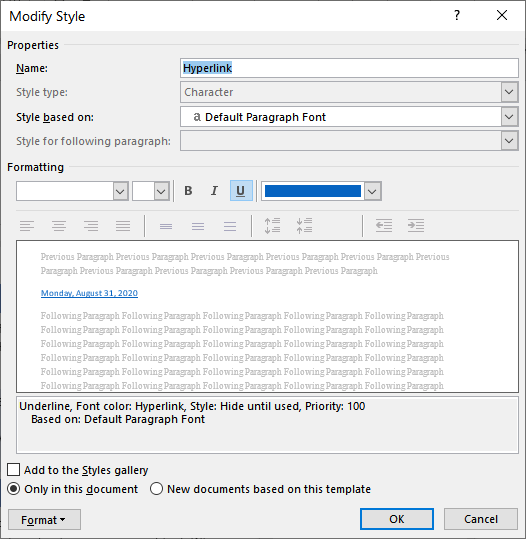
Figure 2. The Modify Style dialog box.

Figure 3. The Font dialog box.
WordTips is your source for cost-effective Microsoft Word training.
(Microsoft Word is the most popular word processing software in the world.)
This tip (10249) applies to Microsoft Word 2007, 2010, 2013, 2016, 2019, and Word in Microsoft 365. You can find a version of this tip for the older menu interface of Word here: Hyperlink Formatting.
Author Bio
With more than 50 non-fiction books and numerous magazine articles to his credit, Allen Wyatt is an internationally recognized author. He is president of Sharon Parq Associates, a computer and publishing services company. Learn more about Allen…
MORE FROM ALLEN
Quickly Selecting Cells
Need to quickly select a range of cells? Perhaps the easiest way is to use both the mouse and the keyboard together, as …
Discover More
Rounded Corners for a Text Box
Text boxes are great for positioning information the way you want it to appear in your page layout. Fortunately, you …
Discover More
Creating a Center Across Selection Button
The ability to center text across a range of cells has long been a staple of experienced Excel users. Here’s how to …
Discover More
More WordTips (ribbon)
Closing Documents after a Hyperlink
When you click a hyperlink that takes you to another document, Word dutifully opens the new document in its own window. …
Discover More
Changing How Links are Activated
Got some active links in your document? Do you want to have them activated when you click on them, or do you want to …
Discover More
Checking for Valid Hyperlinks
If you have a document containing a lot of hyperlinks, it would be cool if there was a way to check all those hyperlinks …
Discover More