

Try it!
Change your document’s layout to get it just the way you want.
Margins
-
Select Layout > Margins.
-
Choose the margins you want or select Custom Margins to define your own.
Page Orientation
-
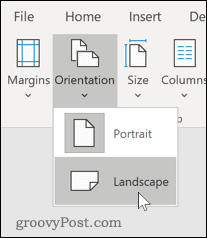
To change orientation, select Layout > Orientation.
-
Select Portrait or Landscape.
Line Spacing
-
Select Home > More Paragraph Options > Line Spacing.
-
Choose the spacing you want.
Want more?
Word for the web Quick Start
Change margins
Change page orientation to landscape or portrait
Change the line spacing in Word
Need more help?
Lesson 12: Page Layout
/en/word/links/content/
Introduction
Word offers a variety of page layout and formatting options that affect how content appears on the page. You can customize the page orientation, paper size, and page margins depending on how you want your document to appear.
Optional: Download our practice document.
Watch the video below to learn more about page layout in Word.
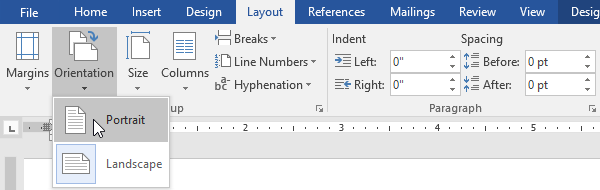
Page orientation
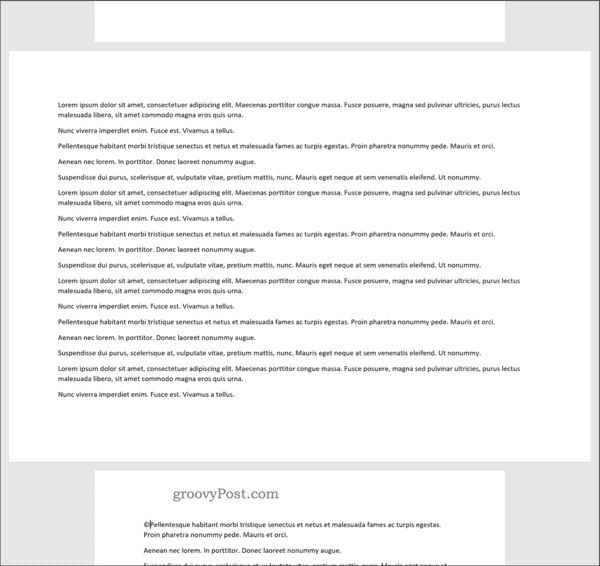
Word offers two page orientation options: landscape and portrait. Compare our example below to see how orientation can affect the appearance and spacing of text and images.
- Landscape means the page is oriented horizontally.

- Portrait means the page is oriented vertically.
To change page orientation:
- Select the Layout tab.
- Click the Orientation command in the Page Setup group.
- A drop-down menu will appear. Click either Portrait or Landscape to change the page orientation.
- The page orientation of the document will be changed.

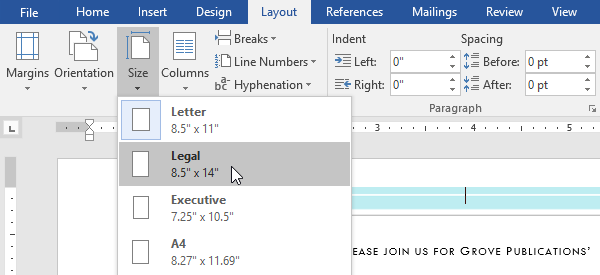
Page size
By default, the page size of a new document is 8.5 inches by 11 inches. Depending on your project, you may need to adjust your document’s page size. It’s important to note that before modifying the default page size, you should check to see which page sizes your printer can accommodate.
To change the page size:
Word has a variety of predefined page sizes to choose from.
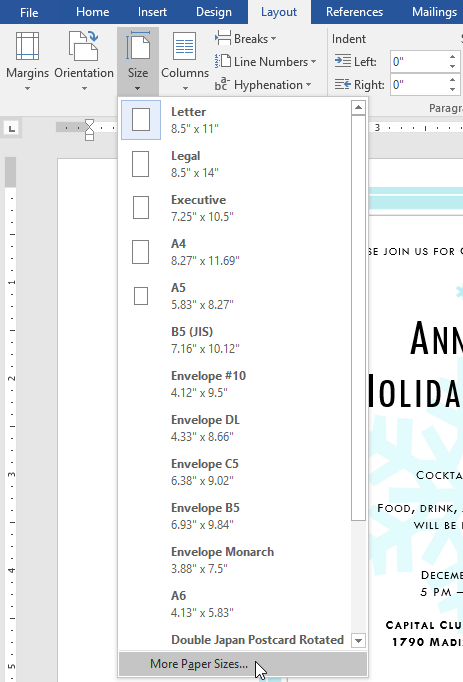
- Select the Layout tab, then click the Size command.
- A drop-down menu will appear. The current page size is highlighted. Click the desired predefined page size.
- The page size of the document will be changed.

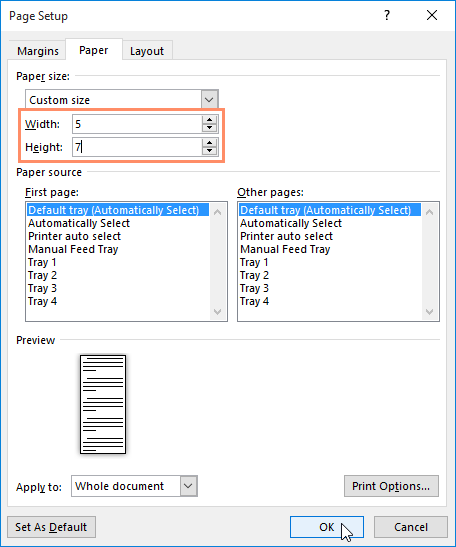
To use a custom page size:
Word also allows you to customize the page size in the Page Setup dialog box.
- From the Layout tab, click Size. Select More Paper Sizes from the drop-down menu.
- The Page Setup dialog box will appear.
- Adjust the values for Width and Height, then click OK.
- The page size of the document will be changed.
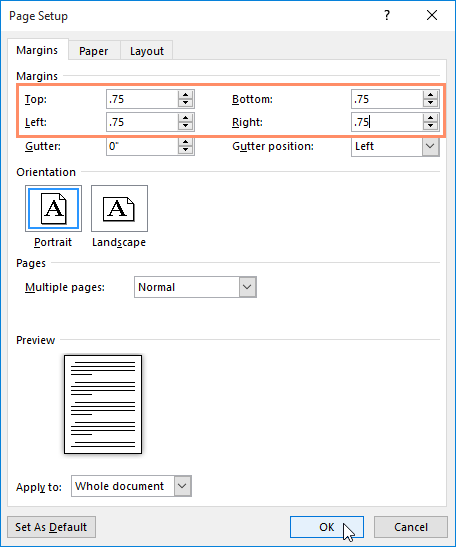
Page margins
A margin is the space between the text and the edge of your document. By default, a new document’s margins are set to Normal, which means it has a one-inch space between the text and each edge. Depending on your needs, Word allows you to change your document’s margin size.
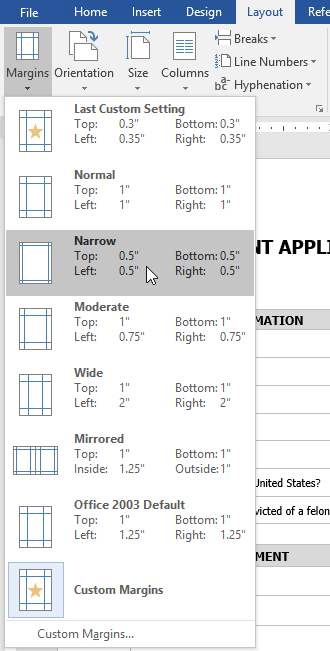
To format page margins:
Word has a variety of predefined margin sizes to choose from.
- Select the Layout tab, then click the Margins command.
- A drop-down menu will appear. Click the predefined margin size you want.
- The margins of the document will be changed.

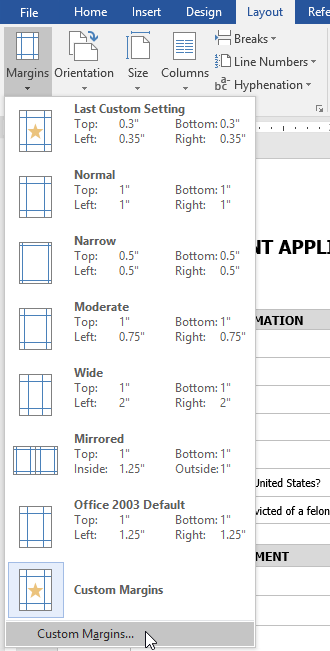
To use custom margins:
Word also allows you to customize the size of your margins in the Page Setup dialog box.
- From the Layout tab, click Margins. Select Custom Margins from the drop-down menu.
- The Page Setup dialog box will appear.
- Adjust the values for each margin, then click OK.
- The margins of the document will be changed.
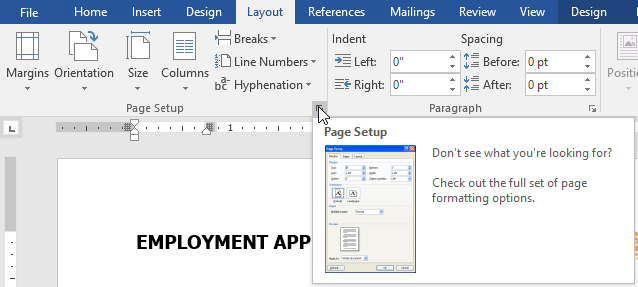
You can also open the Page Setup dialog box by navigating to the Layout tab and clicking the small arrow in the bottom-right corner of the Page Setup group.
You can use Word’s convenient Set as Default feature to save all of the formatting changes you’ve made and automatically apply them to new documents. To learn how to do this, read our lesson on Changing Your Default Settings in Word.
Challenge!
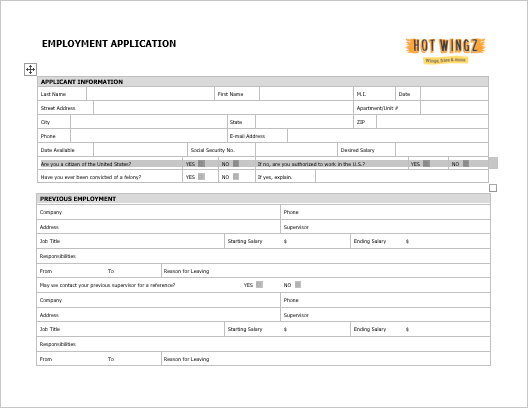
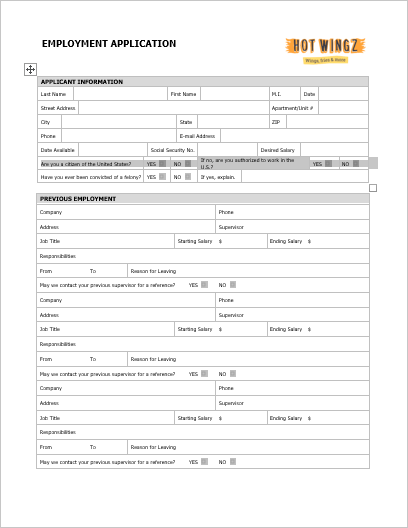
- Open our practice document.
- Change the page orientation to Portrait.
- Change the page size to Legal. If Legal size is not available, you can choose another size such as A5.
- Change the margins to the Narrow setting.
- When you’re finished, your document should be one page if using Legal size. It should look something like this:
/en/word/printing-documents/content/
![]()
Download Article
Learn the basics of formatting a Microsoft Word document
![]()
Download Article
- Formatting the Layout
- Formatting Text
- Adding Pictures, Graphs, & Tables
- Using a Formatted Template
- Saving in Other Formats
- Q&A
|
|
|
|
|
Microsoft Word is the world’s most popular word processing app. Depending on what kind of legal, formal, or personal paper you’re writing, each has its own formatting guidelines. Fortunately, Microsoft Word makes it easy to format the layout, text, and other objects in your document. If you’re new to using Microsoft Word, don’t worry. You can be formatting your document like a pro in no time. This wikiHow guide will teach you simple ways to format a Word document on your PC or Mac computer.
Things You Should Know
- You can find most of the formatting tools you’ll need in the Ribbon menu at the top of your document.
- If you don’t want to do all the formatting from scratch, try using one of Word’s premade templates.
- Save your document in different file formats using the Save a Copy or Save As menu.
-
1
Explore the Word user interface. You can access most of Word’s formatting tools from the Menu Bar or the Ribbon at the top of the window. You can modify which tools are visible using the View menu.
- The Menu Bar is the area at the top of the screen where you will find File, Edit, View, and other important menu commands.
- The Ribbon is at the top of your workspace and contains icons, menus, and shortcuts to common tasks.
-
2
Align your document. Different types of documents call for different text alignments. You can choose whether to align your entire document to the left, right, or at the center on the Home tab by clicking the Alignment buttons in the «Paragraph» section.
- These are the buttons that look like a small version of a document, with small black lines arranged according to their button’s alignment function.
- You can also adjust alignment by selecting the text and objects you want to align, right-clicking the selection, and choosing Paragraph. Select your preferred alignment from the Alignment menu under the General header.
- You can either set the alignment for the whole document or just a selected piece of text.
Advertisement
-
3
Set the line spacing of your document. Need to change your document to single or double-space? You can adjust the spacing of your entire document, or for selected text.
- If you haven’t begun typing or adding content to your Word document, click the Home tab, click the «Line and Paragraph Spacing» icon (a row of lines with vertical arrows to the left of the lines pointing up and down, and select an option.
- If your document already has text or other content, press Ctrl + A (PC) or Cmd + A (Mac) to select everything in the document, right-click the selection, and choose Paragraph. You can then choose your desired spacing from the «Line Spacing» menu.
- For a single-spaced document, choose 1.0. For double-spacing, choose 2.0.
- Many professional documents, like college essays and cover letters, should be double-spaced.
-
4
Adjust the page orientation. If you need to write the document in a different orientation, click the Layout tab at the top of Word, select Orientation, and choose either Portrait or Landscape.
-
5
Change the size of the paper. If you need to print the document on a specific paper size, click the Layout tab, click Size, and then select your desired size from the drop-down list.
- This will change the virtual size of the document you’re writing as well as the actual size of the printout.
-
6
Adjust the headers and footers. A header contains details that will appear on every page of the paper, such as page numbers, your name, or the document title.
- To set the header of your document, double-click on the topmost part of the page, and the header field will appear. You can also click the Insert tab and select Header.
- Footers are just like headers. All text in the footer will appear at the bottom of each page of your document. To set the footer, double-click on the bottommost part of the page, and the footer field will appear. You can also use the Footer button on the Insert tab.
- You can also format your headers and footers by selecting the View tab and clicking Header and Footer on the list. This action will open the headers and footers on your page and allow you to edit them.
-
7
Insert page or section breaks with the Breaks menu. Go to the Layout tab in the and click Breaks if you want to start a new page or section in your document. You can choose from a variety of types of breaks, including Page, Column, and Section. This is a very useful tool if you need to format different sections of your document in different ways.[1]
- For example, you can use section or page breaks to help you format your page numbers so that the numbering restarts with each new section.
-
8
Adjust the margin size with the Margins tool. Click the Margins button in the Layout tab and select a margin from the pre-defined margin settings listed on the drop-down list.
- If you want to use your own margin measurements, click Custom Margins at the very bottom of the drop-down list to set your own.
-
9
Add columns to split your text vertically on the page. If you need to create a newspaper-like document, you can do so by adjusting the format of the document to columns. Click the Layout tab, select the Columns option, and choose the number and alignment of columns from the drop-down list.
- The Columns button looks like a rectangle with two vertical columns of blue lines on it.
- If you want to create one, two, or three columns, you can do so from the preset options. If you’d like to create more, you’ll need to choose More Columns from the bottom of the dropdown menu.
- Note that this column option is different from the columns you get when you insert items like tables on your document.
-
10
Add bullets and numbers to make lists. Highlight the text that you would like to be numbered or bulleted and click the Numbering or Bullets button on the Home tab of the Ribbon.
- These buttons can be found side by side on the Ribbon, near the alignment buttons. The Numbering button displays three small lines with numbers to the left of the lines and the Bullets button displays three small lines with bullet points to the left of the lines.
- There’s also a third button that allows you to create more elaborate multi-level list styles, which is useful for formatting outlines.
-
11
Experiment with document styles. All documents have standard built-in styles (for example, Normal, Title, Heading 1). The default style for text is Normal. The template that a document is based on (for example, Normal.dotx) determines which styles appear on the Ribbon and on the Styles tab. You can see the current style presets for your document in the Home tab of the Ribbon.
- Before you apply a style, you can see all of the available styles and preview how they will appear when applied.
- On the Home tab, click a style to apply it to selected text.
- Click the Styles Pane button (the arrow pointing down and to the right) to view and select from advanced Style options.
- By default, Word applies a paragraph style (for example, Heading 1) to the entire paragraph. To apply a paragraph style to part of a paragraph, select only the specific part that you wish to modify.
-
12
Reveal hidden formatting symbols if you’re having trouble. Word documents often contain hidden code that can cause frustrating problems when you’re trying to modify your formatting. For instance, an invisible extra paragraph mark or section break can create unwanted spaces between paragraphs or lines of text. To see formatting symbols that are normally hidden so you can delete or modify them, you can click the ¶ button in the Home tab, or try one of the following:[2]
- On Windows, open File, select Options, and click Display. Tick the box next to Show all formatting marks.
- In Word for Mac, open the Word menu, then Preferences, then View. Check the box next to All in the Show Non-Printing Characters section of the View menu.
-
13
Use the View menu to change your view of the document. The View menu can let you change how your document looks in Word without actually making changes to the format. For example, Print Layout will show approximately what your document will look like when it’s printed out, while Web Layout will display the whole document in one long chunk without any page breaks.
- The View menu also lets you zoom in and out on your document.
- You can also change your view with the buttons and zoom slider at the bottom right side of the document pane, or with the View tab in the Ribbon.


Advertisement
-
1
Change the font face. On the Home tab, you will a drop-down menu containing a list of fonts to choose from. Use your mouse to select the text you want to change, then choose a font from the list.
-
2
Change font size and color. Also on the Home tab, you can change the size, color, and highlighting for your font. Select the text you want to format, then choose your options.
- By default, they will be set to the size and font associated with your document’s current Style settings. For example, if you’re using Word’s default template, the Normal style will use Calibri as the default font and 12 pt. as the default text size.
- Always consider the formatting guidelines of the document you are writing when choosing the font style and size.
- The standard font for most college and professional papers is Times New Roman font, text size 12.
-
3
Make text bold, underlined, or italicized. Besides setting the font style and size, you can also adjust the emphasis of words and lines in your document. Near the font and text size menus, you will see the Bold, Italics, and Underline buttons.
- Just click the buttons to make your text bold, underlined, or italicized.
- In this section, you can also find special text formatting options such as Strikethrough, Subscript, and Superscript.
-
4
Highlight text on the page. If you would like to change the background color behind selected text, similar to using a highlighter on a printed page, click the Text Highlight icon, which is a pen above a colored line.
- You can also add special text effects with the Text Effects button, which looks like a capital A with a glowing blue border.


Advertisement
-
1
Drag an image into your document. This is a quick way to add a picture to your Word document. Simply select an image on your desktop and drag and drop it into the document window. Make sure your image is placed exactly where you want it before you drop it.
- You can also insert an image by going to the Insert tab, then clicking Pictures. Select one of the options to browse for images on your computer, the web, or Word’s gallery of stock photos.
- You can also insert graphics or other media (such as video or audio clips) using the Shapes, Icons, or 3D Models, and Media buttons.
-
2
Enable text wrapping. Text wrapping changes the layout of your document, allowing the text to flow around the image no matter where it is placed. To turn on text wrapping:
- Right-click (or ctrl-click, on a Mac) on the image and hover over Wrap Text. Select the alignment that best suits your document. You will see a preview as you hover over each option.
- To change the location of the image in the document, select the image and then hold the Ctrl key. While holding the key, use the arrow keys to move the picture around the document.
- When you right-click or ctrl-click your image, you’ll also see an option in the context menu to add a caption under your image.
-
3
Edit your image in the Picture Format tab. Once you insert your image, you can select it to open a new Picture Format tab in the ribbon. From there, you can choose from a variety of tools, such as:
- Making corrections or adding artistic filters to the image
- Adding style effects, such as a drop shadow or frame, to the picture
- Entering alt text
- Tweaking the position of your image or changing the text-wrap settings
-
4
Add a graph or chart in the Insert tab. Click the Insert tab on the Ribbon, and then click the Chart option. Choose your preferred type of graph, such as a pie or bar chart, from the dropdown menu.
- Depending on the type of chart or graph you choose, Word may automatically launch Excel and create a new spreadsheet, where you can enter data for your chart.
-
5
Modify your graph. When you choose a graph type, a new tab will appear in the Ribbon menu called Chart Design. Navigate to that tab with the chart selected to make changes to the look of your graph or chart, or choose the Edit in Excel button to make changes to the data in your chart.
-
6
Use the Table tool to insert a table. If you want to add a table to your document, head over to the Insert tab and click the Table button. A menu will pop open where you can either scroll over a grid of squares to select your number of rows and columns, or select an option like Insert Table or Draw Table.
- Insert Table opens a pop-up menu where you can specify parameters like the number of rows and columns and whether or not the contents of the table autofit your document window.
- The Draw Table tool allows you to draw the table with your mouse directly in the document.
- Once you start creating a table, you’ll see several new table editing tools in the Layout tab.


Advertisement
-
1
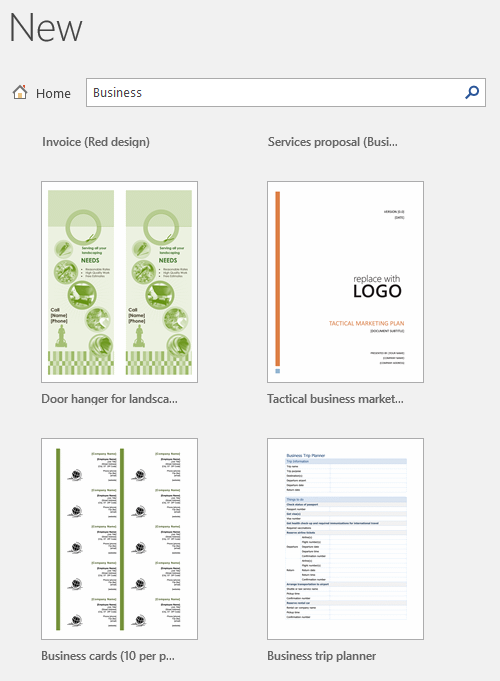
Choose a template from the New Documents pane. Templates are a great way to create a nice-looking document without having to do all the formatting from scratch. To use one, open Word and select New from the side menu to create a new document, or select New from Template from the File menu. Click one of the templates on the screen to select it.[3]
- If you don’t see a template you like, use the Search bar at the top of the window to find one that fits your needs. For instance, use keywords like “flyer,” “resume,” or “research paper” to find different styles of templates.
-
2
Click Create to open the template. The template will open as a new document.
-
3
Select text within the template to modify it. Word templates are simply preformatted documents with text, graphics, and other elements already in place. To add your own text, select text anywhere on the document and type in your own. The new text will have the same format as whatever text you selected and replaced. You can also click on a blank area of the document and start typing to add new text.
- To select a single word, double-click it. You can select longer pieces of text by clicking and dragging your mouse, or positioning your cursor at the start of the selection and holding down Shift while pressing the Right Arrow key.
- You can also select and move, delete, or replace other elements in the template, such as images, graphs, or tables.
-
4
Modify your template with the Styles pane. Templates use styles to create their distinctive looks. If you want to change the look of the template, click the Styles button in the Home tab of the ribbon toolbar. Click the down arrow next to any of the style elements and select Modify Style… to make changes.
- You can also make any other types of changes you like using the rest of the tools in the ribbon menu or Format menu.
-
5
Save your modified template as a document. When you’ve made the changes you want to the template, save it the same way you would any other Microsoft Word document.


Advertisement
-
1
Click the file menu and select Save a Copy…. If you want to save a document as a file type other than .DOCX, you can do so with the Save a Copy function.
- If it’s a brand-new document that you haven’t already saved, select Save As… instead.
-
2
Open the File Format dropdown menu. You’ll see this menu at the bottom of the Save a Copy or Save As window.
-
3
Select the format you want from the menu. In addition to common formats like .DOC, .DOCX, .TXT and .RTF, you can also save your document as a PDF, an XML file, or a macro-enabled Word file.
- Check out the list of file formats that are supported in word here.


Advertisement
Add New Question
-
Question
What is Microsoft publishing?

UK_Gamer05
Community Answer
Publisher is a tool for making posters, leaflets, booklet,s etc. It’s for when you need to create something that isn’t a standard document.
-
Question
How do I move from page one to page two of a Word document?
UK_Gamer05
Community Answer
In Word 2016, on the insert tab, either select insert new page or page break.
Ask a Question
200 characters left
Include your email address to get a message when this question is answered.
Submit
Advertisement
Thanks for submitting a tip for review!
Tip
- Unless free-handedly writing your paper, consult the guidelines of your document first before adjusting its format.
- Besides the header, footer, and page layout formats (which affect the entire document), all the other formatting tools can be applied only on specific parts of the document.
About This Article
Thanks to all authors for creating a page that has been read 309,741 times.
Is this article up to date?

If you’re creating a Word document with multiple page layouts, you may wish to make a single page landscape. Here’s how.
Photo Credit — iStockPhoto
When you’re creating Word documents, you have two-page layout options available—landscape or portrait. Portrait mode is the default option, but you can switch to landscape mode instead if you want your text sideways.
If you want to use both types of layouts in Word, you’ll need to use a few workarounds using section breaks and Word’s own page formatting options to do so. Here’s how.
If you want to quickly make one page landscape in Word, here’s what you’ll need to do:
- Open your Word document and place the blinking cursor at the start of the page you wish to change to landscape mode.
- Click on the Layout menu in the ribbon bar.
- Select Breaks > Next Page in the Section Breaks section. This will insert a section break and push your text onto a new page.

- In the Layout menu, press Orientation > Landscape. This will switch the current page and all the following pages to landscape mode.

- You’ll now need to turn the remaining pages back to portrait mode. Scroll down to the next page, then place the blinking cursor at the start of the page.
- Press Layout > Breaks > Next Page to insert a new section break.
- Click on Orientation > Portrait to switch the pages to portrait mode.


If you followed the steps correctly, you should now have one single landscape page, with all other pages remaining in portrait mode.
How to Make Specific Text Landscape in Word
If you don’t want all of the text on your page to appear on the landscape page, you can choose to make a landscape page that only contains specific text.
- To do this, start by highlighting the text that you want to appear on the landscape page.

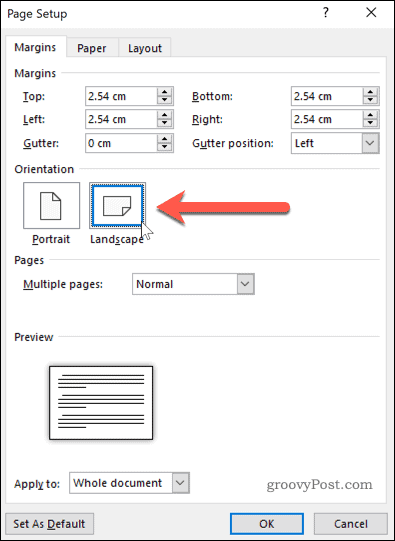
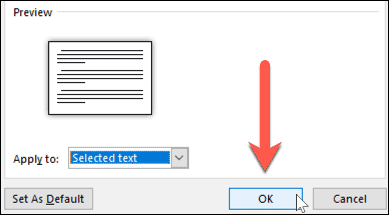
- In the Layout menu, click on Margins, then select the Custom Margins… option at the bottom of the drop-down menu.

- In the Page Setup window, click on the Landscape option in the Margins tab, under the Orientation section.

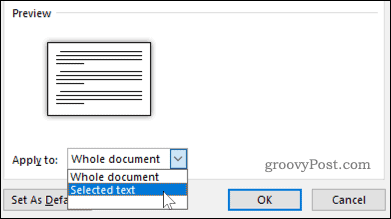
- In the Apply to box, choose Selected Text.

- Click OK to confirm the settings you’ve selected.


You should now have a landscape page that contains the text you previously highlighted, creating a section break that uses a different page layout to the rest of your Word document.
You can use this method to turn an entire page landscape—to do this, select all of the text on the page before you start and repeat the steps above to complete the change.
Formatting Microsoft Word Documents
Now that you know how to make a single page landscape in Word, you can start creating documents with as many combinations of landscape and portrait pages as you want. This is where learning how to rearrange pages in Word might just come in handy.
If you’re looking for other ways to take your Word documents further, why not learn how to insert an Excel table into Word. For academic documents, you may wish to create a table of contents in Word to keep your document organized.
![]()
When you create a new document in Microsoft Word, it looks decent right off the bat. But sometimes you want to make your page look much better than the default.
Use Microsoft Word’s page layout design tools to make easy-to-read documents that reflect positively on you and your business—even if you’re new to Word.


You can make page layout designs in Microsoft Word from scratch. Or, skip the grunt work by using Microsoft Word templates.
Envato Elements and GraphicRiver are both great sources of print templates for Word. Each template is made by professional designers. Elements makes a compelling offer. Download unlimited templates, fonts, photos, and other creative assets for one fixed subscription price.
But, if you only need the occasional template for MS Word and prefer to pay for each single use, then look to GraphicRiver.
How to Make Awesome Page Layout Designs in Microsoft Word (Video)
If you create or modify documents in Word, you may want to change the standard Microsoft Word layout. There are a number of changes you can make.
Watch this quick screencast to find out what you need to know about Word page layout options:
To learn more about changing page layouts in Microsoft Word, study the complete written tutorial below:
Why Learn About Page Layouts In Word?
Page layout settings in Word determine how your document looks when you print it out. It includes the page orientation, margins, and columns, for example.
It’s important to pay attention to the page layout of your document for several reasons:
- It ensures consistency. This gives your readers a good experience while consuming your document.
- A good page layout makes your document more readable. When your document is aesthetically pleasing and has a consistent look, your audience is more likely to read, comprehend, and remember your content.
- A well-designed document reflects well on you. It reinforces your credibility and authority in your field.
Microsoft Word has robust page settings that allow you to control your page layout design. Everything is designed to be as simple and intuitive as possible. Yet, doing page layout in Word can be daunting if you’re new to the software.
This article breaks things down for you. So, you can follow along, step-by-step, and take control of how your document looks.
Types of Documents You Can Create in MS Word
You can create all kinds of printed documents in Microsoft Word.
Make business documents like:
- resumes
- cover letters
- business letters
- reports
- proposals
- invoices
- certificates
- forms
MS Word is also very handy for creating marketing documents. Create everything from:
- flyers
- brochures
- advertising inserts
- and more
For education or training use Word to prepare:
- handouts
- workbooks
- manuals
- certificates
You can also produce postcards, invitations, newsletters, and signs. If you can print it, then you can whip it up in Word.
In this tutorial, you’ll learn how to use Microsoft Word’s page layout tools to produce the print materials you need.
How to Work With Templates to Quickly Change Your Design
The quickest way to change or apply a page layout is by using a print template for Word. For the examples below, we’ll be using the SEO Proposal template from Envato Elements.


When looking for a print template for Word, it’s a good idea to choose one that uses paragraph and character styles. The styles feature will allow you to quickly format text even in a long document.
Below are some roundups of Microsoft Word templates you can choose from:
Now that you’ve chosen a template with a good page layout in Word, it’s time to learn how to use it.
1. Download the Template
Download the template of your choice to your computer’s hard drive. Unzip the file, then copy the template. This way, you’ve got the original template file intact, if you want to revert to it.


2. Customize the Template With Your Own Content
Replace the text with your own information.


If you want to change the text formatting, change the settings for fonts and paragraphs.
To add your own image, click on an image placeholder. The Format Picture dialog box opens. Under Fill, select Picture or texture fill. Under Picture source, click Insert….


Find and select the image you want to use. Click Insert.


Now, the image is inserted.


To replace an existing logo on the template, click on the logo, then click on the Picture Format tab.


Click the Change Picture button on the ribbon. Find and select the logo file, then click Insert.
![]()
![]()
![]()
If necessary, click-and-drag one of the handles of the logo to resize it.
Next, I’d like to change the color of the rectangle on the cover page. To do that, select the shape, then click the Shape Format tab.


The Shape Format ribbon is displayed. Click on the drop-down arrow beside the Shape Fill button. Select from the color options shown or click More Fill Colors… to specify the color you want to apply.


This is what the customized proposal cover looks like now:


Repeat these steps to customize the other pages of the template.
As you can see, when you start with a template for Word most of the design and page formatting decisions are already made for you by the template creator.
But, if you prefer to start your document from scratch, follow the steps below to change the default page format settings.
Type or paste your text into the document. Apply text and paragraph formatting to modify settings for fonts, spacing, alignment, and more. Then, you can move on to the page layout.
3. How to Set the Microsoft Word Page Orientation as Portrait or Landscape
To set the Microsoft Word page orientation of your document, go to File > Page Setup….


The Page Setup dialog opens. Click on the button for either Word portrait or landscape layout orientation.


4. How to Set the Print Size of the Paper
From the Microsoft Word Page Setup dialog, you can also change the paper size when you print the document. Click on the Paper Size field to show the different paper size choices available.


Select the size you wish to use. You can also click Manage Custom Sizes… to specify your own size.


5. How to Split Your Text into Multiple Columns
Sometimes you may want to divide your text into columns. This can make the document more readable and adds variety to an otherwise monotonous layout. Columns are popular in magazines, newsletters, and similar types of materials.
Arrange the Entire Document into Columns
To change the MS Word layout to columns, follow these steps:
1. Go to Layout > Columns.


The Columns dialog box opens.


2. Select one of the Presets or manually set the:
- number of columns
- width and spacing
- apply to the whole document or from that point forward
3. When you’re happy with the settings, click OK.
Apply Columns to a Part of the Document
You can also apply columns to only a specific part of the document.
1. Select the text you wish to display in columns.


2. Go to Layout > Columns.
3. In the Columns dialog box, choose the settings you want to apply.
Notice that you now have the option to apply the column settings to Selected text. Click OK.


Now, only the selected text has been broken into two columns. The rest remains in one column.


6. How to Add Page and Section Breaks
Sections in Microsoft Word enable you to apply different layouts to different parts of your document. This is useful for making creative layouts, especially to long documents.
Insert a Page Break in Word
A page break separates text, so that anything after the break is moved to a succeeding page. It’s useful for dividing up a document into chapters and sections.
To insert a page break, place the cursor at the point where you want the break to be, then go to Insert > Break > Page Break.


In our sample document, the title page is now on a separate page from the rest of the text.


Insert a Section Break in Word
If you wish to apply varying formatting on different parts of the document, then you’ll want to break it into sections. This includes varying the columns, headers and footers, pagination, borders, and other settings.
To create a section break, place the cursor where you would like the section break to be. Go to Insert > Break > Section Break.


Select the type of section break you want to insert:
- Section Break (Next Page) creates a section break and moves the next section into a new page.
- Section Break (Continuous) keeps the two sections on the same page while allowing you to apply different formatting settings for each.
- Section Break (Odd Page) starts a new section on the next odd-numbered page.
- Section Break (Even Page) starts a new section on the next even-numbered page.
Take Control of Your Page Layouts with Microsoft Word
Use Microsoft Word’s page layout tools to give your documents a consistent, readable, and professional look. You don’t have to be an expert in Word to take better control of your document’s page layouts. With Microsoft Word’s page layout tools, you can make any document look the way you want it to.
You don’t have to start from scratch, either. You can have professional designers make most of the design and layout decisions for you by using print templates for MS Word. If you want unlimited downloads of templates as well as photos, fonts, icons, and other creative assets—all for one small, fixed fee—then Envato Elements is the best source for you.
For one-off Word templates and other desktop publishing tools, look to GraphicRiver. Here, you can access everything you need to create impressive print materials on a pay-per-use basis.
And when you use a template, the skills you learned in this post will help you customize and adapt it to your needs.
Editorial Note: Video added by Alexis (Lexi) Rodrigo.
1
Add space for underlines
This option adds extra space for underlines.
2
Adjust line height to grid height in the table
When this option is turned on, the table row height snaps to the document grid. Used in East Asian text.
3
Align table rows independently
When this option is not selected, center-aligned or right-aligned non-wrapped tables are aligned as a whole without changing the relative positions of the rows.
When this option is selected, the rows of a center-aligned or right-aligned non-wrapped table are center-aligned or right-aligned independently. For example, the right edges of the rows of a right-aligned non-wrapped table line up evenly if the right edges do not line up when the table is left-aligned.
4
Allow hyphenation between pages or columns
5
Allow space between paragraphs of the same style in a table
6
Allow table rows to lay out apart
This option determines the behavior of a non-wrapped table that is laid out on the right side of a wrapped object and extends below the wrapped object.
When this option is not selected, the remainder of the table is positioned out to the right with the first part of the table.
When the option is selected, the remainder of the table is allowed to slide back to the left.
7
Allow tables to extend into margins
This option was new in Word 2003.
This option will retain the settings of a table that is extended past the margins of a document instead of using autofit to make the table fit within the margins.
This was enabled automatically under Tools > Options > Compatibility for Word 2000 and Word 2002. In Word 2003 and newer versions, the option is built in.
8
Auto space the way Word 95 does
(Word 2003: Auto space like Word 95)
This option determines how lines of text break (word wrap) in an East Asian Word 95 document.
9
Balance SBCS characters and DBCS characters
Not used in U.S. English Word.
10
Combine table borders the way Word 5.x for the Macintosh does
If a table contains two contiguous cells whose border is formatted differently, the left-most cell is displayed with the border width of the right-most cell.
11
Convert backslash characters into yen signs
Not used in U.S. English Word.
12
Disable OpenType Font Formatting Features
13
Do full justification the way WordPerfect 6.x for Windows does
To achieve full justification, WordPerfect compresses the spaces between words while Word expands them. This often results in different line breaks and leads to different page breaks.
Turn on this option to implement the WordPerfect justification method.
14
Don’t add automatic tab stop for hanging indent
This option ignores the automatic tab stop that Word 6.0 uses when creating a hanging indent.
15
Don’t add extra space for raised/lowered characters
This option prevents Word from inserting additional space between lines to accommodate raised or lowered characters.
16
Don’t add leading (extra space) between rows of text
This option displays text without leading between the lines. This is the same functionality that exists in Word versions 5.x for the Macintosh.
17
Don’t allow hanging punctuation with character grid
This option prevents the use of punctuation marks in East Asian text when the character grid is enabled. This option was new in Word 2002.
18
Don’t autofit tables next to wrapped objects
19
Don’t balance columns at the start of Continuous sections
This option prevents Word from balancing columns at the end of a section or document.
20
Don’t blank the area behind metafile pictures
This option prevents Word from obscuring any text or graphics surrounding an inserted metafile. Selecting this option decreases editing speed.
21
Don’t break constrained tables forced onto the page
22
Don’t break wrapped tables across pages
This option was new in Word 2002. This option prevents a wrapped table from breaking across a page break.
Note: The Allow row to break across pages option has no effect in a wrapped table.
23
Don’t center «exact line height» lines
This option changes the vertical position of text between the top of the line space and the bottom of the line space.
With this option turned off, any extra space is split between the ascender and descender. With the option turned on, all the extra space goes to the descender.
24
Don’t expand character spaces on a line that ends with SHIFT+RETURN
When a «justified» line of text ends with SHIFT+ENTER, Word prevents extra spacing between words and makes the line appear as «Align Left».
25
Don’t snap text to grid inside table with inline objects
This option was new in Word 2002. This option prevents Word from allowing East Asian text in a table cell to snap to the character grid when an «inline with text» object is inserted in the table cell.
26
Don’t use Asian rules for line breaks with character grid
This option was new in Word 2002. This option allows East Asian text to line-break the same as in earlier versions of Word when the character grid is turned on.
27
Don’t use hanging indent as tab stop for bullets and numbering
28
Don’t use HTML paragraph auto spacing
This option has two functions:
- If you have Auto set for Paragraph Spacing Before/After, and you turn this option on, Word adjusts Paragraph Spacing Before/After to 5 pt.
- With this option turned off (default setting), Word sets the spacing between paragraphs to the larger of Paragraph Spacing Before/After.
With this option turned on, Word uses both values of Paragraph Spacing Before/After between paragraphs. This is the same functionality as in earlier versions of Word.
29
Don’t use proportional width for Korean characters
30
Don’t vertically align inside of textboxes
31
Don’t vertically align table cells containing shapes
32
Draw underline on trailing spaces
Not used in U.S. English Word.
33
Expand/condense by whole number of points
This option rounds the measurement of the spacing for characters with condensed or expanded spacing to the nearest whole number.
34
Forget last tab alignment
This option forces tab settings at the end of lines to behave the same as in Word 97.
35
Lay out AutoShapes the way Word 97 does
When an AutoShape with Top & Bottom wrapping style applied appears at the bottom of a page, Word forces the AutoShape behind the text.
36
Lay out footnotes the way Word 6.x/95/97 does
This option positions footnotes as they were in earlier versions of Word.
37
Lay out tables with raw width
This option allows Word to determine the width of a table (table width + table indent) and prevents a table from being laid out in an area that is too small.
This option prevents the table from being clipped (cut off on the sides) or pushed off the page when it is aligned next to a floating object.
38
Print body text before header/footer
This option prints the main text layer before the Header/Footer layer, which allows for the process of PostScript codes in the text layer, the same way that Word 5.x for the Macintosh does. (This functionality is the reverse of the default order.)
39
Print colors as black on noncolor printers
This option prints all colors as black, instead of using grayscale (different shades of gray) when you use a printer that does not print color.
40
Select entire field with first or last character
This option was new in Word 2002. This option allows you to select the entire field when you select either the first or last character of the field result. This option does not work when the field code is displayed.
41
Set the width of a space like WordPerfect 5.x
WordPerfect calculates the width of a space in a proportional font differently from Word. In the WordPerfect interface, this default word spacing is named WordPerfect Optimal. The Word 97 text converters can use the WordPerfect formula for spacing.
42
Show hard page or column breaks in frames
If a frame contains a manual, or hard, page break or column break, Word displays it.
43
Split apart page break and paragraph mark
44
Substitute fonts based on font size
This option is used by the WordPerfect 6.x converter to make a font request based on font size first and, if a match is not found, to actually map the font.
45
Suppress extra line spacing at bottom of page
WordPerfect suppresses any extra line spacing from the last line on a page. For example, if line spacing is set to double, the final line on the page does not display white space below it.
Turn on this option to implement the line-spacing feature.
46
Suppress extra line spacing at top of page
This option prevents Word from adding extra line spacing at the top of a page. If the line spacing for the line at the top of a page is set for more than single spacing, Word ignores the extra spacing, so that the top margin does not increase.
47
Suppress extra line spacing at top of page the way Word 5.x for the Macintosh does
(Word 2003: Suppress extra line spacing at top of page like Word 5.x for the Mac)
This option prevents Word from adding extra line spacing at the top of a page. If the line spacing for the line at the top of a page is set for more than single line spacing, Word ignores the extra spacing, so that the top margin does not increase.
48
Suppress extra line spacing the way WordPerfect 5.x does
(Word 2003: Suppress extra line spacing like WordPerfect 5.x)
This option ensures that the layout of a converted WordPerfect document that is formatted with Automatic line height closely matches that of the original document.
49
Suppress Space Before after a hard page or column break
This option suppresses the space in a paragraph formatted with the Space Before option that follows a hard page break or column break.
50
Swap inside and outside mirror indents and relative positioning
51
Swap left and right borders on odd facing pages
If a paragraph has a left border (not a box) and the Different Odd/Even Headers check box or Mirror Margins check box is selected, Word prints the border on the right, on odd numbered pages.
52
Treat * as ** in mail merge data sources
In a data source, this option converts a delimiter composed of a backslash and quotation mark («) to two quotation marks (» «), so that Word can recognize quotation marks.
53
Truncate font height
This option rounds the font size up or down, as in WordPerfect 6.x for Windows.
54
Underline tab character in numbered lists
55
Use cached paragraph information for column balancing
56
Use larger small caps the way Word 5.x for the Macintosh does
This option applies small caps formatting in Word version 6.0 for the Macintosh the same way as in Word version 5.x for the Macintosh, which produces slightly larger small capital letters.
57
Use line-breaking rules
This option was new in Word 2002. This option controls line breaks in a Thai language document.
58
Use Normal style for bulleted and numbered lists
59
Use printer metrics to lay out document
If this option is selected, Word uses the information from the printer driver that is installed, as in some earlier versions of Word.
If this option is turned off (default), Word use built-in metrics to lay out the document. This means your document looks the same, no matter what printer driver is installed.
60
Use Word 2002 table style rules
This option was new in Word 2003. This option will preserve layout compatibility of tables styles used in Word 2002.
61
Use Word 2002-2007 style evaluation rules for font size and paragraph justification in tables
62
Use Word 2003 hanging-punctuation rules
63
Use Word 2003 indent rules for text next to wrapped objects
64
Use Word 2003 kerning pair rules
65
Use Word 2013 rules for hyphenation between pages and columns
66
Use Word 2003 table autofit rules
67
Use Word 6.x/95 border rules
This option suppresses paragraph borders when a paragraph is intersected by frames or wrapped drawing objects.
68
Use Word 97 line-breaking rules for Asian text
This option uses Word 97 line-breaking rules for Asian text.
69
Wrap lines the way Word 6.0 does
(Word 2003: Lines wrap like Word 6.0)
Not used in U.S. English Word.
70
Wrap trailing spaces to next line
This option automatically moves any spaces that trail into the margin after a word at the end of a line to the beginning of the next line.
Microsoft Word now arrives on our systems chocked full of useful templates, styles, and themes to help shape the layout of your document. Microsoft has created a pretty good system: immensely open for an absolute novice, but with enough depth to be consistently used throughout the business world.
Customizing your document layout settings is easy, and we’ll show you how to do it in Word 2013 and Word 2016.
What Can You Change?
Many, many things. We’ll start with the Quick Access Toolbar Tabs you see immediately when opening a new Word document, with a focus on the Home, Insert, Design, and Layout tabs as they contain the bulk of the document customization tools you’ll need.
- Home: Fonts, Paragraphs, and Styles, as well as Clipboard and Editing options
- Insert: Tables, Illustrations, Media, Headers & Footers, Text Boxes, and Symbols
- Design: Themes, including colors and fonts, and Page Backgrounds
- Layout: Page Setup, Paragraphs, and Arrange
These are your manual tools. You can set up a range of formatting options before you begin editing your document to ensure the same structure and style is applied throughout, as well as using the same tools to edit your document when work is in progress. You’re probably familiar with how to change the Font, colors, sizes, and how to apply the Bold, Italicized and underlined formats to your text. These are easily applied.
Styles
But it can be much faster and usually much easier to apply pre-designed Styles to your document as you move through. The Styles are made up of individual settings, so always apply the same formatting to your document. There is a Style for «Heading 1» which will appear the same within a web-page. There is a «Title» Style which applies a 28pt font and condenses the text slightly. There is a «Quote» Style which applies an indent to the left and right of the document, italicizes your text, and grants it a different color. For instance:
This was a very quick snippet illustrating how to apply basic Styles to your document. Play around with the other styles and learn how they affect the visual presentation of your work, and what a difference that can make to your reader (and also to your own workflow!).
Create Your Own Style
You’re super stylish, right? Good, because I’m not. I have a big ginger beard and everything. Enough of that. In the video I showed you how to access the additional Styles menu. It is the tiny arrow indicating there is a pop-out menu awaiting your inspection. Alternatively, hit CTRL + SHIFT + ALT + S. At the bottom of the new Styles menu are three icons:
- New Style: Pretty self-explanatory. If you find yourself frequently tweaking a specific facet of your Word document layout, you should absolutely turn it into an easily applicable custom Style.
- Style Inspector: The Style Inspector can be pretty handy if you receive a document with lots of new and «unusual» formatting. Just open the inspector and select the area of the document you’d like to know more about. You can also reset the formatting for the selected text from within the inspector, using the red eraser icons on the right.
- Manage Styles: You can use the Manage Styles option to make any alterations to existing Styles, including your own.
When creating your own Style, you don’t have to start from scratch. The options Style type and Base style on can be handy to make slight tweaks to existing styles, suiting them for your editing needs. Just be sure to save them as something different!
Themes
Nestled in the Design tab are options for Themes and Document Formatting. Just as a Style applies a specific set of formatting instructions to a single section (or a whole document, if you like), a Theme is designed to format your entire document, altering all of the available styles.
Two of the best features of the Themes section are the interchangeable colors and fonts.

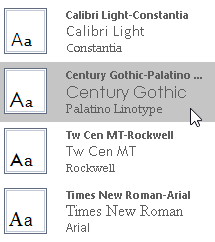
Once you’ve selected your Theme, you can alter the aesthetic of the document using one of the pre-designed color schemes, or design your own.
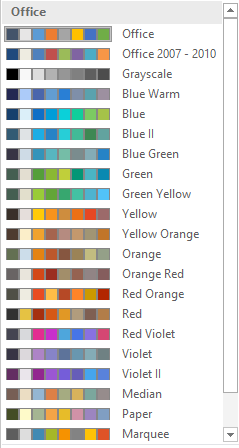
Similarly, you can select from collections of fonts that will be implemented throughout the document. It is an extremely easy way to alter the visual presentation of your document while maintaining a uniform, professional approach.
Document Formatting applies a complete «Style set» to your document. For instance, in the above video, the Heading 2 formatting Style is a standard, whereas in the next short clip, you’ll see the same Heading 2 Style (and Title Style) change as I rollover each Document Formatting option.
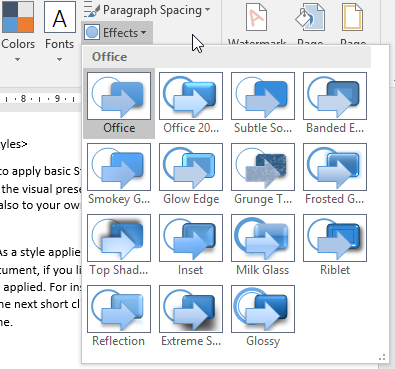
Another handy, but underused tool is Effects. Just as selecting a Theme alters the appearance of the text and formatting, selecting an Effect alters the appearance of each image throughout the document. There are options for regular Office, Glow Edge, Extreme Shadow, and plenty more, so you can select one that matches the voice of your work.
Templates
There are other extremely easy ways to apply consistent formatting throughout your entire document. Microsoft included literally thousands of free templates for you to use, covering a huge range of topics. Need a Business Report for a Graphic Design outfit? You’re covered. Need Valentine’s Day Sweetheart Supper & Pie Auction invitations (wat?!)? For some reason, you’re covered.
And although I poke fun at the latter of those examples, the templates can be tweaked to your own specifications extremely easily within Word, using the other design and layout tools available to you.
Choose any template, and open it. Look at the design of the document: where the indents are, where the text boxes are placed, if any specific styles have been applied, and then have a little play around. Move things, click things, change settings, and you’ll understand more about the composition of the template.
3 Advanced Formatting Tips
To round our Word layout settings article off, I’ll share three advanced formatting tips with you.
1. Section Breaks
Section breaks are a crazy useful formatting tool, especially if working on a document consisting of different facets of information that would benefit from an individual style. For instance, you can apply custom formatting to a single area, such as an alternative header or footer, or even a whole new page numbering system, but importantly leaving the rest of the document intact.
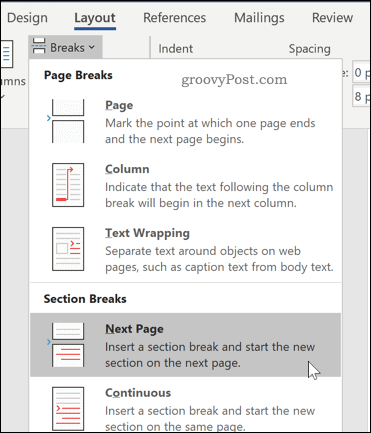
Head to the Layout tab, and select Breaks. It will open a drop-down menu containing various options:
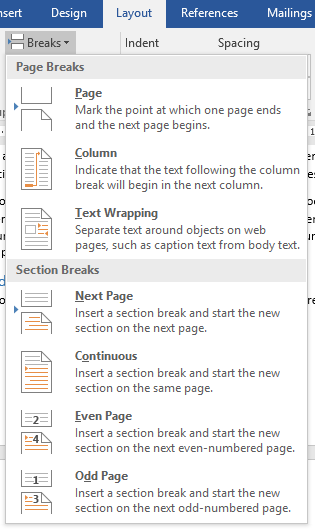
Select a section break that suits your document, but note that inserting a Next Page section break will also insert a Page Break, which can be problematic, if that isn’t what you’re after. In this case, use the Continuous Break option.
Once you implement a specific section style you like, you can always copy it to the next section break.
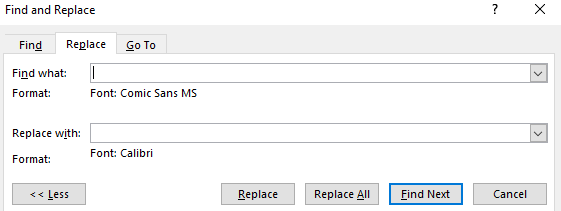
2. Using Find and Replace
This slightly overlooked formatting tool can be a lifesaver when performing editing duties, but using the Find and Replace tool can help you scour the entire document for the specific formatting issues you need to change.
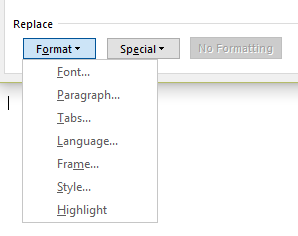
Press CTRL + H to open the Find and Replace tool. In the bottom-right you should spot Format, which opens a drop-down menu. You can now select from the range of additional replacement fields. Each options opens a new dialogue box where you can specify what you’re attempting to replace, and leaving the Find What/Replace With fields empty will change all of the matching formatting.
3. Formatting a List
You’d think altering the appearance of a numbered list would be jolly easy, but it can be surprisingly frustrating.
Head to the Home tab. In the Paragraph section, look for the paragraph symbol and select it.
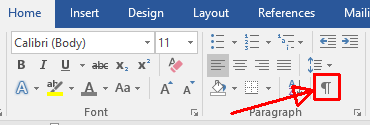
Look at the end of each entry in your numbered list.

You can now select the individual paragraph markers. When you’ve selected the list items you’d like to change (hold CTRL while making your selection to edit multiple options), head to the Home tab and select the format you’d prefer from the drop-down list options.

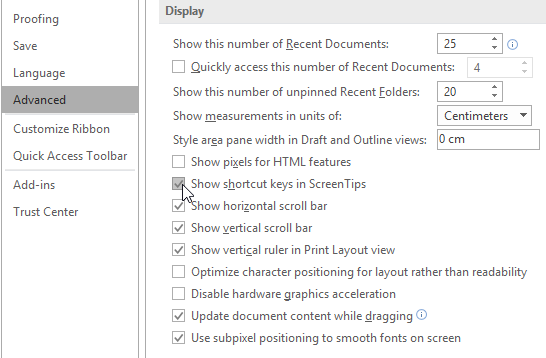
Bonus Tip: Display Shortcuts
Microsoft Word does a pretty good job of showing you ScreenTips where possible. Just hover over almost any icon and you’ll get a minute snippet of information detailing exactly what the button does. You can make these ScreenTips more interesting by adding their relevant shortcut, so each time you rollover to check, you can attempt to remember the shortcut instead.
Head to File > Options > Advanced. Under Display, ensure Show shortcut keys in ScreenTips. Then press OK.
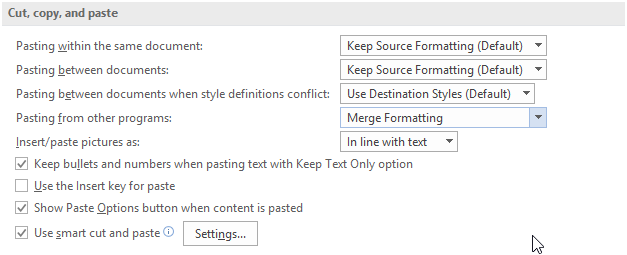
Bonus Tip 2: Configure Your Cut and Paste Settings
This is another tiny tip, but if you’re pasting snippets of text from other documents or programs, it can make a massive difference.
Head to File > Options > Advanced. Under Cut, copy, and paste you’ll see five options:
- Pasting within the same document
- Pasting between documents
- Pasting between documents when style definitions conflict
- Pasting from other programs
- Insert/paste pictures as
Select whether you’d like your pasted text to Keep Source Formatting, Merge Formatting, or Keep Text Only. There are also other options for you to consider. For instance, even after ensuring the formatting of any text copied from another program will be merged, I like to see the Show Paste Options button, just in case I need to make an alteration.
Formatting in Word Online
Word Online is part of the free online Office suite offered by Microsoft. It allows you to create and edit documents for free, provided you have a Microsoft account. Word Online offers much of the functionality of the desktop version, but there are some formatting omissions you might bump into.
The base level of formatting is all as standard, but Online doesn’t come with support for Themes or Section Breaks, as well as only allowing «Portrait» as your document orientation. Similarly, while your indents and tab settings will be imported from the desktop version of Word (or elsewhere), Word Online also restricts rulers and gridlines, so adding more can prove difficult.
However, if you are looking to make some basic edits on the move, or simply have no need for the additional formatting power of Word itself, Word Online makes a solid replacement.
Go Forth and Make Things Pretty
You now have the knowledge to make any Word document beautiful, easy to read, with oodles of visually engaging formatting. Take some time to play with the formatting settings. If you familiarize yourself with the basic formatting settings, you’ll find more advanced formatting options a synch!
Now that you know how to format Word documents like a pro, try your skills on a custom brochure or pamphlet. You can start with templates and change them to your likes.
Select the table
- Using the mouse: Move the mouse over the table until you see the table selection icons in the upper-left corner of the table and click it:

Note: You can also click on the table selection icon in the bottom-right corner (resizing handle) for the same effect.
- Using the keyboard: To select table elements, on the Table Layout tab, on the Table group, click the Select button, then select the option you prefer:

- Select Cell
- Select Column
- Select Row
- Select Table
Format the table
After positioning the cursor anywhere in a table or selecting a table element, Word shows two tabs: Table Design and Layout. E.g.:

See also Select and format table elements in Word.
Apply a predefined Table style
There are several predefined styles you can use for the table. Styles include a variety of borders, colors, and other attributes that give a table a very professional appearance.
To choose any of the predefined styles, do the following:
1. Select the table.
2. On the Table Design tab, in the Table Styles group, in the Styles Gallery, click the More arrow to see the complete list of styles:

3. Select the table style you want:

The Table Styles gallery includes three categories of styles:
- Plain Tables have minimal formatting.
- Grid Tables include vertical separators between columns.
- List Tables do not include vertical column separators:

Note: The selected style overrides any previously added style changes for the table.
Modify the table style options
To change the table or selected style, on the Table Design tab, in the Table Style group, click Modify Table Style…:

In the Modify Style dialog box, make changes you want:

Note: Click the Format button at the bottom of the dialog box to change other options such as Font or Paragraph. See also how to clear formatting.
Customize the table formatting
After applying a table style, you can turn various options on or off to change their appearance. On the Table Design tab, in the Table Style Options group, there are six options:

- Header Row is the first row of the table that contains Headers that helps identify the contents of a particular column. Usually, the Header Row is formatted differently and should be repeated at the beginning of each new page for tables that extend beyond one page.
Note: According to most requirements, data tables should have a header row to provide a contextual structure that aids navigation.
- Total Row is the last row of the table. If this option is selected, the last row will be formatted differently from the body rows, designed to summarize the rows above it (see how to insert formulas).
- First Column used special formatting to the column. Usually, the First Column contains the row headings.
- Last Column applies special formatting to the column to summarize the earlier columns (see how to insert formulas).
- Banded Rows and Banded Columns alternate the background color of rows and columns (see how to change the background color for the selected cells below).
Note: Certain Table Style Options may have a different effect depending on the Table Style you’ve chosen. You might need to experiment to get the look you want.
Apply the border styles
To apply and remove cell borders, do the following:
1. Select the cells or entire table to which you want to add a border.
2. On the Table Design tab, in the Borders group, choose the desired Border Styles, Line Style, Line Weight, and Pen Color:

- Select the predefined Line Style, Line Weight, and Line Color from the Border Styles dropdown list:

- Select the Line Style:

- Select a border thickness from the Line Weight dropdown list:

- Select the border color from the Pen Color dropdown list:

- Select the borders from the Borders dropdown list:

Note: Select No Borders from the Borders dropdown list to remove borders from the selected cells.
- Draw the border where you want:
- After selecting border style or color, the Border Painter button is automatically checked, or
- If all that you want is selected already, just click the Border Painter button by yourself:

After any of these actions, your cursor changes to the brush. Now, draw the border where you need it:

Note: Use the Eraser button in the Draw group on the Table Layout tab to remove the unnecessary border:


Apply background colors and shading
To change the background color for some table elements, select them, then on the Table Design tab, in the Table Styles group, click the Shading button, then select the background color you prefer:

Note: To use a pattern instead of a solid color, on the Table Design tab, in the Borders group, click the dialog box launcher:

In the Borders and Shading dialog box, on the Shading tab, select a pattern in the Style list:

Layout of the table
The Table Layout tab includes commands for changing the entire table format, as well as commands for changing the appearance of individual table components such as cells, columns, rows:

See Select and format table elements in Word for more details.
Resize a table
- Using the mouse: To resize a table in a Word document, move the mouse over the table until you see the table resizing icons (handle) in the bottom-right corner of the table and click it:

Drag the table to the size you need, and then release the handle.
- Using the keyboard: Select a table (see also how to resize individual cells, specific rows, or columns); the do one of the following:
- On the Layout tab, in the Cell Size group, change the values in the Height and Width fields:

- Open the Table Properties dialog box by doing one of the following:
- On the Table Layout tab, in the Table group, click the Properties button:

- Right-click the table and select Table Properties… in the popup menu:

In the Table Properties dialog box, on the Table tab, in the Size section, select the Preferred width check box, then:
- In the Preferred width field, type or select the value you need,
- In the Measure in dropdown list, select one of the items:
- Percent to specify the percentage of the table width,
- Inches to fix the column width:

- On the Table Layout tab, in the Table group, click the Properties button:
- On the Layout tab, in the Cell Size group, change the values in the Height and Width fields:


See how to resize table elements for more details.
Freeze the table
Some Word tables change the width of their columns according to the data. To stop changing the table size when new data is inserted, do the following:
1. Select the table.
2. Open the Table Properties dialog box.
3. In the Table Properties dialog box, on the Table tab, click the Options… button:

4. In the Table Options dialog box, deselect the Automatically resize to fit contents check box:

See also how to fix the height of table rows.
Move a table
To move a table to a new page or a new document, select it, then use the Cut and Paste commands. You can also use the Copy command to leave a copy of the table in the original location.
Page layout is the term used to describe how each page of your document will appear when it is printed. In Word, page layout includes elements such as the margins, the number of columns, how headers and footers appear, and a host of other considerations. As you design your pages, you can use the tools that Word puts at your disposal in this regard.
Tips, Tricks, and Answers
The following articles are available for the ‘Page Layout’ topic. Click the
article»s title (shown in bold) to see the associated article.
Adding Page Numbers
Ever want to add page numbers to your document? Word allows you to control many aspects of page numbering. Here’s how to add page numbers easily.
Adding Page Numbers in Headers or Footers
While Word has a default format for page numbers, you can design and specify how you want them to appear in your document. Headers and footers make this possible and this tip explains how.
An Exact Number of Lines Per Page
For some purposes, you may need to fit an exact number of lines on a printed page. This may be easier said than done, as it can often seem that Word is working against you. Here’s how to make sure that you get exactly what you need.
Automatic Page Numbers across Multiple Documents
Word allows you to specify the starting page number for a document, which comes in handy if you have multiple documents you need to print in sequential order. This tip discusses how you can set page numbers to automatically «flow» from one document to another.
Automatic Page Numbers in New Documents
If you want to have page numbers in your documents, by default, the easiest solution is to make your changes in templates. Then you can create new documents based on the template that contains the page numbers.
Changing Page Margins
Part of determining page layout is to specify the size of the margins that surround the text on a page. Word allows you to easily modify the margins used on your pages.
Changing the Starting Page Number
Word normally numbers pages in a document starting at one and extending as far as the number of pages you have. If you want, you can adjust a starting page number for any section in your document. It’s easy to do, as explained here.
Creating Point Pages
Want to add a page, with a different page number, in Word without affecting the entire document? The solution is a bit tricky, but worth the effort.
Creating Sideheads
A sidehead can be used as a layout element for a document. You can create sideheads in a document by using text boxes, as described in this tip.
Decreasing Space between Body Text and Footer Text
Figuring out how you want the text in your document to appear on the printed page can sometimes be a bit perplexing. Word provides many options that can affect that appearance. This tip focuses on settings that affect the distance between body text and footer text.
Default Font for Page Numbers
Page numbers are a common addition to documents, and a great aid to readers. If you want to easily format page numbers, you need to understand how Word formats them. This tip explains the best ways to get the formatting you want.
Determining Page Layout
Getting your document onto paper is the whole purpose of word processing. Here are some concepts that are important when considering how your page should be laid out.
Eliminating «Before Spacing» at the Top of a Page
When formatting paragraphs in Word, you have several options to adjust the spacing before, within, and at the end of each paragraph. Here’s how to eliminate the extra space that can sometimes appear at the top of a page.
Footnotes in Two Columns
When laying out how your printed pages will look, you might want to place your footnotes into more than one column. The best way to approach this issue depends on the version of Word you are using.
Generating a PDF that Uses CMYK Colors
Getting a Word document into a PDF format that a commercial printer can use can be challenging. This tip examines just one challenge that can be faced—getting your images to use the CMYK color model.
Getting a Proper Total Page Count
Word allows you to insert dynamic page numbers within your document. With some page number formatting, though, it is difficult to figure out how to get exactly the page numbers you want.
Leaving Even Pages Blank
Want to print your document only on odd-numbered pages in a printout? There are a couple of things you can try, as detailed in this tip.
Limiting Document Page Count
Do you need to have your document fit within a certain number of pages? This can be close to impossible to do within Word; you actually may need to consider other software to get the job done.
Margin Notes in Word
Some types of documents rely upon margin notes to the left or right of your main text. Getting these to appear in Word can be tricky, as there is no built-in function that creates them. This tip discusses one approach you can use, which involves tables.
Missing Page Break Indicator
Enter a page break in Word, and that page break may not appear on the screen as you expect it to appear. This has to do with how Word inserts the page break in the document, as described in this tip.
No Space Before at the Top of a Page
Want to make sure that Word handles space before a paragraph correctly when the paragraph is at the top of a page? Check the things discussed in this tip and you’ll get just the spacing you want.
Odd Page Numbers Disappearing
Page numbers in printed pages are often a necessary part of formatting a document. What do you do if your printed output doesn’t include some of the page numbers you expect? Here’s a short discussion on what could cause this type of problem and how to fix it.
Preventing Straggling Heads
Undoubtedly you will want to format your document so that headings stay with the paragraph that follows the heading. Here’s how to format your headings so Word takes care of this automatically.
Printing A4 on Letter Size Paper
For those around the world using the metric system, the standard size for many documents is referred to as an A4 page. If you aren’t part of the metric world, you may wonder how to get your A4 documents printed on letter-size paper without affecting pagination of the document. This tip explains how.
Quickly Displaying the Page Setup Dialog Box
The Page Setup dialog box is indispensable in setting up the overall look of your document. You can display the dialog box quickly by knowing where to click on the rulers, as described in this tip.
Selecting a Paper Size
Most of the time we print on whatever is a standard paper size for our area, such as letter size or A4 paper. However, Word allows you to select all sorts of paper sizes. Here’s how you specify the size you want to use.
Starting a New Section on an Odd Page Number
A common pagination convention used in publishing is for new chapters (and sometimes new sections) to start on an odd-numbered page. Word makes such pagination easy; just follow the steps outlined in this tip.
Two Page Numbering Schemes in the Same Document
Word is great at numbering pages if you only need a single, consistent numbering scheme through the document. If you need two separate numbering schemes, you need to apply some workarounds described in this tip.
Understanding Page Sizes
When you create a document, you need to be concerned about the final size of the page you will be creating. Word supports a wide variety of page sizes, and you can change them—«at any time—«by using the techniques in this tip.
Understanding the Gutter Margin
Most everyone knows that Word allows you to set top, bottom, left, and right margins for your document. There is another type of margin that may be helpful, as well. Known as the gutter margin, it has a very specific purpose in your page layout.
Using a Single-Column Heading in a Multi-Column Layout
Want different numbers of columns all on the same page? Word makes it easy to use, for instance, a heading that uses a single column even though the majority of the page is more than one column. Here’s how to accomplish the design.
Using Chapter Numbers with Page Numbers
Do you need to add page numbers that include, as well, a chapter number? It’s relatively easy to do, as described in this tip.
Using Continued Lines
You can create a special header and footer page numbering scheme by using nested fields. This tip shows an example of how you can use the fields to calculate the next page number and to identify the last page of the document.
Watermarks in Columns
If you are creating small flyers (two per page), you may want to include a watermark graphic in the background of each of the flyers. Here’s some ideas on how you can accomplish this task.